flat tire JEEP COMPASS 2019 Owner handbook (in English)
[x] Cancel search | Manufacturer: JEEP, Model Year: 2019, Model line: COMPASS, Model: JEEP COMPASS 2019Pages: 362, PDF Size: 6.23 MB
Page 213 of 362
CAUTION!
Do not attempt to raise the vehicle by
jacking on locations other than those indi-
cated in the Jacking Instructions for this
vehicle.
1. Remove the spare tire, jack, and wheel
bolt wrench.2. If equipped with aluminum wheels where
the center cap covers the wheel bolts, use
the wheel bolt wrench to pry the center
cap off carefully before raising the
vehicle.
3. Before raising the vehicle, use the wheel
bolt wrench to loosen, but not remove, the
wheel bolts on the wheel with the flat tire.
Turn the wheel bolts counterclockwise one
turn while the wheel is still on the ground.
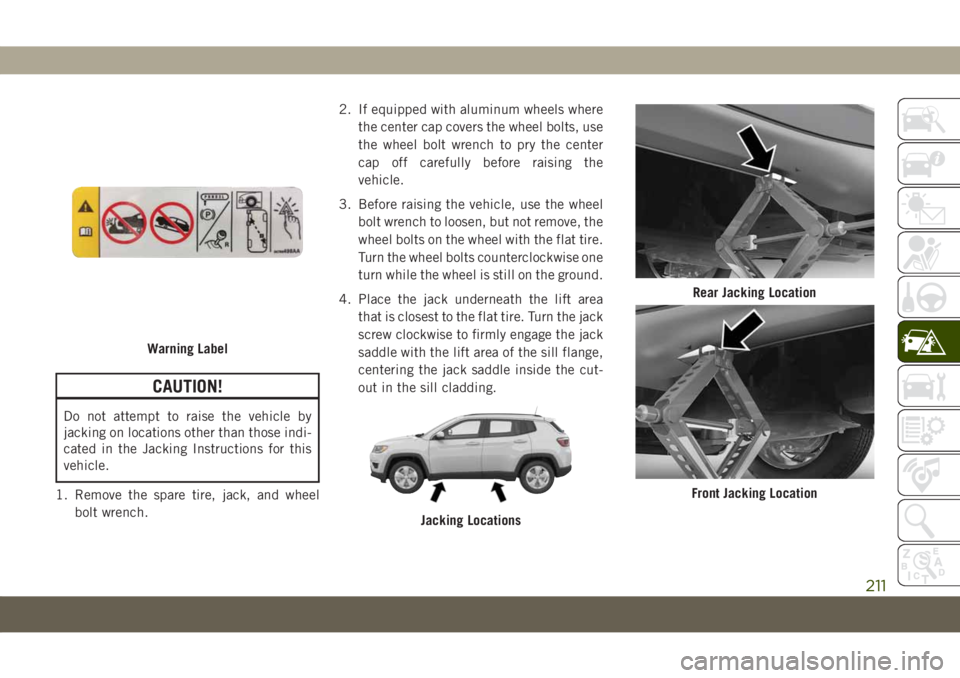
4. Place the jack underneath the lift area
that is closest to the flat tire. Turn the jack
screw clockwise to firmly engage the jack
saddle with the lift area of the sill flange,
centering the jack saddle inside the cut-
out in the sill cladding.
Warning Label
Jacking Locations
Rear Jacking Location
Front Jacking Location
211
Page 214 of 362
5. Raise the vehicle just enough to remove
the flat tire.
WARNING!
Raising the vehicle higher than necessary
can make the vehicle less stable. It could
slip off the jack and hurt someone near it.
Raise the vehicle only enough to remove
the tire.
6. Remove the wheel bolts and tire.
7. Remove the alignment pin from the jack
assembly and thread the pin into the
wheel hub to assist in mounting the spare
tire.
8. Mount the spare tire.
CAUTION!
Be sure to mount the spare tire with the
valve stem facing outward. The vehicle
could be damaged if the spare tire is
mounted incorrectly.NOTE:
• For vehicles equipped, do not attempt
to install a center cap or wheel cover on
the compact spare.
• Refer to “Compact Spare Tire” and to
“Limited-Use Spare” under “Tires—
General Information” in “Servicing And
Maintenance” in the Owner's Manual
for additional warnings, cautions, and
information about the spare tire, its
use, and operation.
9. Install and lightly tighten the wheel bolts.
WARNING!
To avoid the risk of forcing the vehicle off
the jack, do not tighten the wheel nuts
fully until the vehicle has been lowered.
Failure to follow this warning may result in
serious injury.
10. Lower the vehicle to the ground by turn-
ing the jack handle counterclockwise.11. Finish tightening the wheel bolts. Push
down on the wrench while at the end of
the handle for increased leverage.
Tighten the wheel bolts in a star pattern
until each wheel bolt has been tightened
twice. Refer to “Wheel And Tire Torque
Specifications” in “Technical Specifica-
tions” for the proper lug bolt torque. If in
doubt about the correct tightness, have
them checked with a torque wrench by
an authorized dealer or at a service
station.
12. Place the jack on the foam tray and open
it far enough so that it is secured. Once
placed in position, rotate it clockwise to
lock it in. Replace the alignment pin in
the center hole to lock the jack in place.
WARNING!
A loose tire or jack thrown forward in a
collision or hard stop could endanger the
occupants of the vehicle. Always stow the
jack parts and the spare tire in the places
provided. Have the deflated (flat) tire re-
paired or replaced immediately.
IN CASE OF EMERGENCY
212
Page 217 of 362
• On steep roads.
• In extreme weather conditions: thunder-
storms, typhoons, hurricanes, blizzards,
storms, etc.
NOTE:
• The jack requires no adjustment.
• The jack cannot be repaired, and in the
event of a fault, it must be replaced by
another genuine one.
• No tool other than its cranking device may
be fitted on the jack.
TIRE SERVICE KIT —
IF EQUIPPED
Your vehicle may be equipped with a Tire
Service Kit. Small punctures up to 1/4 inch
(6 mm) in the tire tread can be sealed with
Tire Service Kit. Foreign objects (e.g., screws
or nails) should not be removed from the tire.
Tire Service Kit can be used in outside tem-
peratures down to approximately -4°F
(-20°C). This kit will provide a temporary tire
seal, allowing you to drive your vehicle up to
100 miles (160 km) with a maximum speed
of 50 mph (80 km/h).Tire Service Kit Storage
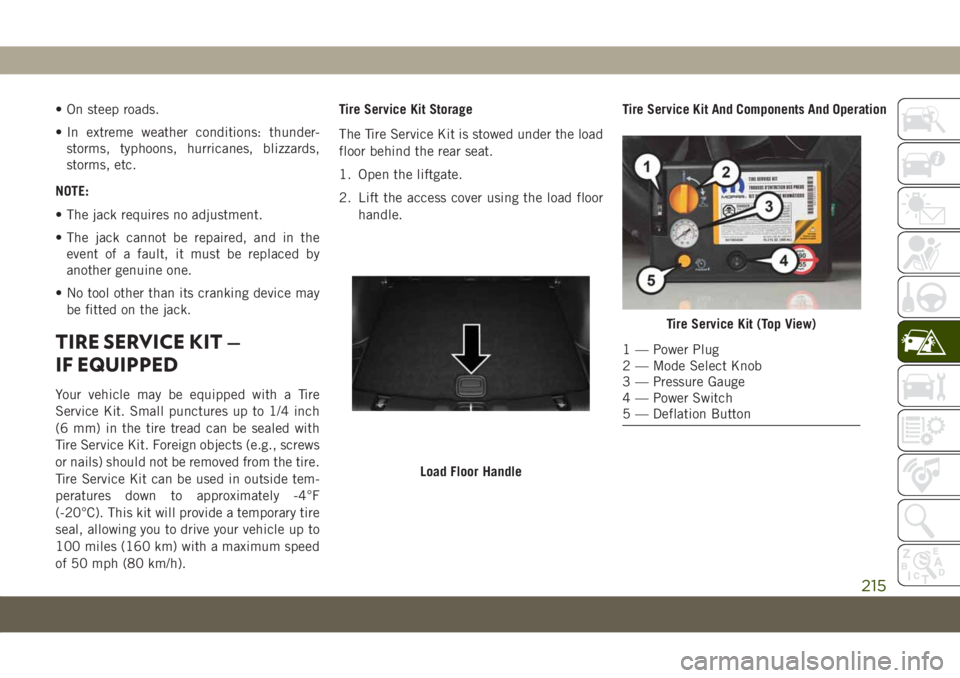
The Tire Service Kit is stowed under the load
floor behind the rear seat.
1. Open the liftgate.
2. Lift the access cover using the load floor
handle.Tire Service Kit And Components And Operation
Load Floor Handle
Tire Service Kit (Top View)
1 — Power Plug
2 — Mode Select Knob
3 — Pressure Gauge
4 — Power Switch
5 — Deflation Button
215
Page 218 of 362
Using The Mode Select Knob And Hoses
Your Tire Service Kit is equipped with the
following symbols to indicate the air or seal-
ant mode.
Selecting Air Mode
Push in the Mode Select Knob and turn to
this position for air pump operation only.
Selecting Sealant Mode
Push in the Mode Select Knob and turn to
this position to inject the Tire Service Kit
Sealant and to inflate the tire.
Using The Power Button
Push and release the Power Button once to
turn the Tire Service Kit on. Push and release
the Power Button again to turn the Tire Ser-
vice Kit off.
Using The Deflation Button
Push the Deflation Button to reduce the air
pressure in the tire if it becomes over
inflated.
Tire Service Kit Usage Precautions
• Replace the Tire Service Kit Sealant Bottle
prior to the expiration date (printed at the
lower right hand corner on the bottle label)
to assure optimum operation of the system.
Refer to “Sealant Bottle Replacement” in
this section.
• The Sealant Bottle is a one tire application
use and needs to be replaced after each
use. Always replace these components im-
mediately at your original equipment ve-
hicle dealer.• When the Tire Service Kit sealant is in a
liquid form, clean water, and a damp cloth
will remove the material from the vehicle or
tire and wheel components. Once the seal-
ant dries, it can easily be peeled off and
properly discarded.
• For optimum performance, make sure the
valve stem on the wheel is free of debris
before connecting the Tire Service Kit.
• You can use the Tire Service Kit air pump to
inflate bicycle tires. The kit also comes with
two needles, located in the Accessory Stor-
age Compartment (on the bottom of the air
pump) for inflating sport balls, rafts, or
similar inflatable items. However, use only
the Air Pump and make sure the Mode
Select Knob is in the Air Mode when inflat-
ing such items to avoid injecting sealant
into them. The Tire Service Kit Sealant is
only intended to seal punctures less than
1/4 inch (6 mm) diameter in the tread of
your vehicle.
• Do not lift or carry the Tire Service Kit by
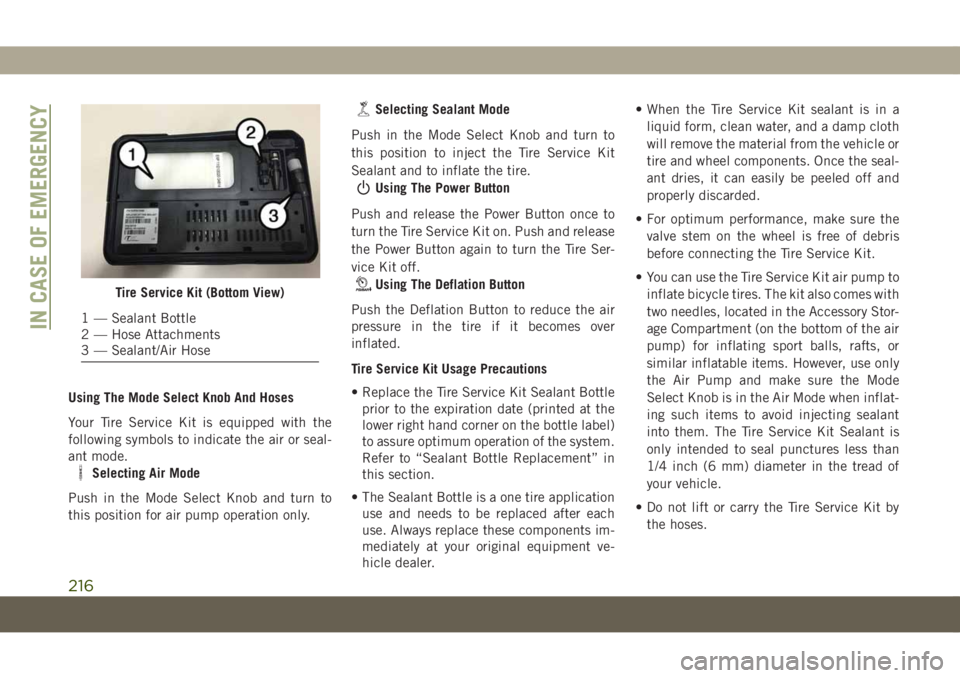
the hoses.Tire Service Kit (Bottom View)
1 — Sealant Bottle
2 — Hose Attachments
3 — Sealant/Air HoseIN CASE OF EMERGENCY
216
Page 219 of 362
WARNING!
• Do not attempt to seal a tire on the side
of the vehicle closest to traffic. Pull far
enough off the road to avoid the danger
of being hit when using the Tire Service
Kit.
• Do not use Tire Service Kit or drive the
vehicle under the following circum-
stances:
– If the puncture in the tire tread is
approximately 1/4 inch (6 mm) or
larger.
– If the tire has any sidewall damage.
– If the tire has any damage from
driving with extremely low tire pres-
sure.
– If the tire has any damage from
driving on a flat tire.
– If the wheel has any damage.
– If you are unsure of the condition of
the tire or the wheel.
• Keep Tire Service Kit away from open
flames or heat source.
• A loose Tire Service Kit thrown forward in
a collision or hard stop could endanger
the occupants of the vehicle. Always
WARNING!
stow the Tire Service Kit in the place
provided. Failure to follow these warn-
ings can result in injuries that are seri-
ous or fatal to you, your passengers, and
others around you.
• Take care not to allow the contents of
Tire Service Kit to come in contact with
hair, eyes, or clothing. Tire Service Kit
sealant is harmful if inhaled, swallowed,
or absorbed through the skin. It causes
skin, eye, and respiratory irritation.
Flush immediately with plenty of water if
there is any contact with eyes or skin.
Change clothing as soon as possible, if
there is any contact with clothing.
• Tire Service Kit Sealant solution con-
tains latex. In case of an allergic reaction
or rash, consult a physician immedi-
ately. Keep Tire Service Kit out of reach
of children. If swallowed, rinse mouth
immediately with plenty of water and
drink plenty of water. Do not induce
vomiting! Consult a physician immedi-
ately.Sealing A Tire With Tire Service Kit
Whenever You Stop To Use Tire Service
Kit:
1. Pull over to a safe location and turn on the
vehicle’s Hazard Warning flashers.
2. Verify that the valve stem (on the wheel
with the deflated tire) is in a position that
is near to the ground. This will allow the
Tire Service Kit Hose to reach the valve
stem and keep the Tire Service Kit flat on
the ground. This will provide the best
positioning of the kit when injecting the
sealant into the deflated tire and running
the air pump. Move the vehicle as neces-
sary to place the valve stem in this posi-
tion before proceeding.
3. Place the transmission in PARK and cycle
the ignition in the OFF position.
4. Apply the parking brake.
Setting Up To Use Tire Service Kit:
1. Uncoil the Sealant Hose and then remove
the cap from the fitting at the end of the
hose.
217
Page 220 of 362
2. Place the Tire Service Kit flat on the
ground next to the deflated tire.
3. Remove the cap from the valve stem and
then screw the fitting at the end of the
Sealant Hose onto the valve stem.
4. Uncoil the Power Plug and insert the plug
into the vehicle’s 12 Volt power outlet.
NOTE:
Do not remove foreign objects (e.g., screws or
nails) from the tire.
Injecting Tire Service Kit Sealant Into
The Deflated Tire:
1. Always start the vehicle before turning the
Tire Service Kit on.
2. Ensure the Mode Select Knob is to the
Sealant Mode position.
3. After pushing the Power Button, the seal-
ant (white fluid) will flow from the Sealant
Bottle through the Sealant Hose and into
the tire.
NOTE:
Sealant may leak out through the puncture in
the tire.If the sealant (white fluid) does not flow within
0 – 10 seconds through the Sealant Hose:
1. Push the Power Button to turn the Tire
Service Kit off. Disconnect the Sealant
Hose from the valve stem. Make sure the
valve stem is free of debris. Reconnect the
Sealant Hose to the valve stem. Check
that the Mode Select Knob is in the Seal-
ant Mode position and not Air Mode. Push
the Power Button to turn the Tire Service
Kit on.
2. Connect the Power Plug to a different
12 Volt power outlet in your vehicle or
another vehicle, if available. Make sure
the vehicle is running before turning the
Tire Service Kit on.
3. The Sealant Bottle may be empty due to
previous use. Call for assistance.
If the sealant (white fluid) does flow through the
Sealant Hose:
1. Continue to operate the pump until seal-
ant is no longer flowing through hose
(typically takes 30 - 70 seconds). As the
sealant flows through the Sealant Hose,
the Pressure Gauge can read as high as70 psi (4.8 Bar). The Pressure Gauge will
decrease quickly from approximately
70 psi (4.8 Bar) to the actual tire pressure
when the Sealant Bottle is empty.
2. The pump will start to inject air into the
tire immediately after the Sealant Bottle
is empty. Continue to operate the pump
and inflate the tire to the cold tire infla-
tion pressure found on the tire and load-
ing information label located in the driver-
side door opening. Check the tire pressure
by looking at the Pressure Gauge.
If the tire does not inflate to at least 26 psi
(1.8 Bar) pressure within 15 minutes:
• The tire is too badly damaged. Do not
attempt to drive the vehicle further. Call for
assistance.
If the tire inflates to the recommended pressure
or is at least 26 psi (1.8 Bar) pressure within
15 minutes:
NOTE:
If the tire becomes over-inflated, push the
Deflation Button to reduce the tire pressure
to the recommended inflation pressure be-
fore continuing.
IN CASE OF EMERGENCY
218
Page 221 of 362
1. Push the Power Button to turn off the Tire
Service Kit.
2. Remove the speed limit label from the Tire
Service Kit and place sticker on the steer-
ing wheel.
3. Immediately disconnect the Sealant Hose
from the valve stem, reinstall the cap on
the fitting at the end of the hose, and
place the Tire Service Kit in the vehicle
storage location. Proceed to “Drive
Vehicle.”
Drive Vehicle:
Immediately after injecting sealant and in-
flating the tire, drive the vehicle 5 miles
(8 km) or ten minutes to ensure distribution
of the Tire Service Kit Sealant within the tire.
Do not exceed 50 mph (80 km/h).
WARNING!
The Tire Service Kit is not a permanent flat
tire repair. Have the tire inspected and
repaired or replaced after using the Tire
Service Kit. Do not exceed 50 mph
(80 km/h) until the tire is repaired or
WARNING!
replaced. Failure to follow this warning
can result in injuries that are serious or
fatal to you, your passengers, and others
around you. Have the tire checked as soon
as possible at your authorized dealer.
After Driving:
Pull over to a safe location. Refer to “When-
ever You Stop To Use Tire Service Kit” in this
section before continuing.
1. Uncoil the Sealant Hose, and then remove
the cap from the fitting at the end of the
hose.
2. Place the Tire Service Kit flat on the
ground next to the deflated tire.
3. Remove the cap from the valve stem, and
then screw the fitting at the end of the
Sealant Hose onto the valve stem.
4. Uncoil the power plug and insert the plug
into the vehicle's 12 Volt power outlet.
5. Uncoil the Hose and screw the fitting at
the end of the hose onto the valve stem.6. Turn the Mode Select Knob and turn to the
Air Mode position.
7. Check the pressure in the tire by reading
the Pressure Gauge.
If tire pressure is less than 19 psi (1.3 Bar):
The tire is too badly damaged. Do not attempt
to drive the vehicle further. Call for assis-
tance.
If the tire pressure is 19 psi (1.3 Bar) or higher:
1. Push the Power Button to turn on Tire
Service Kit and inflate the tire to the cold
tire inflation pressure found on the tire
and loading information label located in
the driver-side door opening.
NOTE:
If the tire becomes over-inflated, push the
Deflation Button to reduce the tire pres-
sure to the recommended inflation pres-
sure before continuing.
2. Disconnect the Tire Service Kit from the
valve stem, reinstall the cap on the valve
stem and unplug from 12 Volt outlet.
3. Place the Tire Service Kit in its proper
storage area in the vehicle.
219
Page 232 of 362
WARNING!
• Failure to follow proper tow eye usage
may cause components to break result-
ing in serious injury or death.
• The brake and steering power assist sys-
tems will not function while the vehicle
is being towed. You will, therefore, need
to apply more force on the brake pedal
and steering wheel. Do not use flexible
ropes when towing, and avoid jerky
movements. Do not start the engine
while towing the car. Before tightening
the ring, clean the threaded housing
thoroughly. Make sure that the ring is
fully screwed into the housing before
towing the car.
Tow Eye Installation
Front Tow Eye
The front tow eye receptacle is located be-
hind a door on the front bumper fascia.To install the tow eye, open the door using the
vehicle key or a small screwdriver, and thread
the tow eye into the receptacle.
Insert the flat end of the jack handle through
the tow eye and tighten, refer to “Jacking And
Tire Changing” in this section for further
information. The tow eye must be fully seated
to the attaching bracket through the lower
front fascia. If the tow eye is not fully seated
to the attaching bracket, the vehicle should
not be moved.
Rear Tow Eye
The rear tow eye receptacle is located behind
a door, located on the right rear bumper
fascia.
To install the tow eye, open the door using the
vehicle key or a small screwdriver, and thread
the tow eye into the receptacle.
Insert the flat end of the jack handle through
the eye and tighten. The tow eye must be fully
seated to the attaching bracket through the
lower rear fascia. If the tow eye is not fully
seated to the attaching bracket, the vehicle
should not be moved.
ENHANCED ACCIDENT
RESPONSE SYSTEM (EARS)
This vehicle is equipped with an Enhanced
Accident Response System.
Please refer to “Occupant Restraint Sys-
tems” in “Safety” for further information on
the Enhanced Accident Response System
(EARS) function.
EVENT DATA RECORDER
(EDR)
This vehicle is equipped with an Event Data
Recorder (EDR). The main purpose of an EDR
is to record data that will assist in under-
standing how a vehicle’s systems performed
under certain crash or near crash-like situa-
tions, such as an air bag deployment or hit-
ting a road obstacle.
Please refer to “Occupant Restraint Sys-
tems” in “Safety” for further information on
the Event Data Recorder (EDR).
IN CASE OF EMERGENCY
230
Page 252 of 362
age or transmission malfunction, visit an au-
thorized dealer immediately to have the
transmission fluid level checked. Operating
the vehicle with an improper fluid level can
cause severe transmission damage.
CAUTION!
If a transmission fluid leak occurs, visit an
authorized dealer immediately. Severe
transmission damage may occur. An au-
thorized dealer has the proper tools to
adjust the fluid level accurately.
RAISING THE VEHICLE
In the case where it is necessary to raise the
vehicle, go to an authorized dealer or service
station.
TIRES
Tires — General Information
Tire Pressure
Proper tire inflation pressure is essential to
the safe and satisfactory operation of your
vehicle. Four primary areas are affected by
improper tire pressure:
• Safety and Vehicle Stability
• Economy
• Tread Wear
• Ride Comfort
Safety
WARNING!
• Improperly inflated tires are dangerous
and can cause collisions.
• Underinflation increases tire flexing and
can result in overheating and tire failure.
• Overinflation reduces a tire's ability to
cushion shock. Objects on the road and
chuckholes can cause damage that re-
sult in tire failure.
WARNING!
• Overinflated or underinflated tires can
affect vehicle handling and can fail sud-
denly, resulting in loss of vehicle con-
trol.
• Unequal tire pressures can cause steer-
ing problems. You could lose control of
your vehicle.
• Unequal tire pressures from one side of
the vehicle to the other can cause the
vehicle to drift to the right or left.
• Always drive with each tire inflated to
the recommended cold tire inflation
pressure.
Both under-inflation and over-inflation affect
the stability of the vehicle and can produce a
feeling of sluggish response or over respon-
siveness in the steering.
NOTE:
• Unequal tire pressures from side to side
may cause erratic and unpredictable steer-
ing response.
• Unequal tire pressure from side to side may
cause the vehicle to drift left or right.
SERVICING AND MAINTENANCE
250
Page 253 of 362
Fuel Economy
Underinflated tires will increase tire rolling re-
sistance resulting in higher fuel consumption.
Tread Wear
Improper cold tire inflation pressures can
cause abnormal wear patterns and reduced
tread life, resulting in the need for earlier tire
replacement.
Ride Comfort And Vehicle Stability
Proper tire inflation contributes to a comfort-
able ride. Over-inflation produces a jarring
and uncomfortable ride.
Tire Inflation Pressures
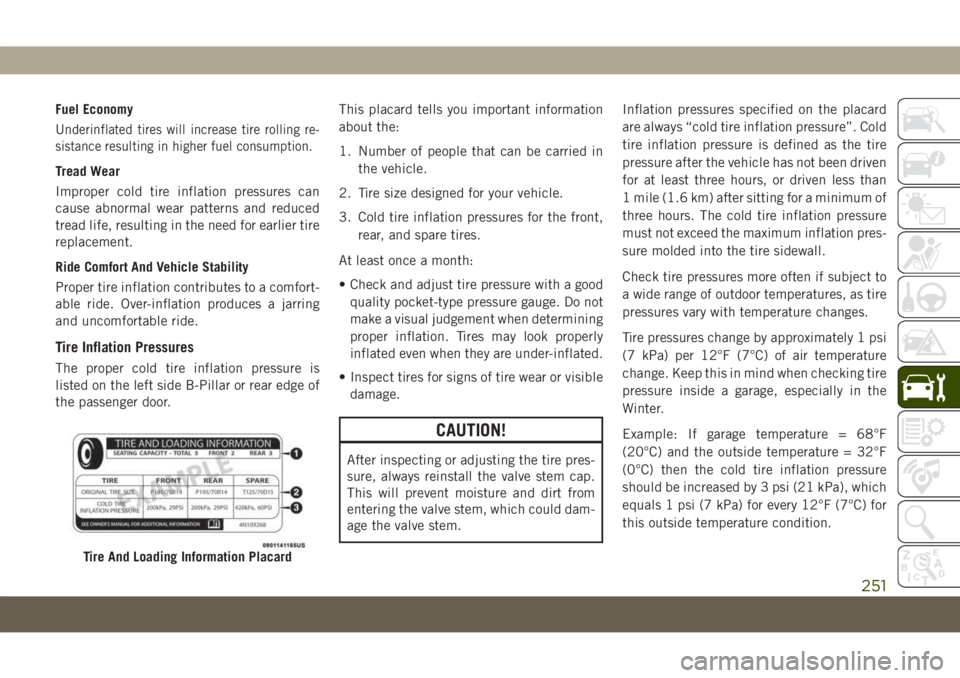
The proper cold tire inflation pressure is
listed on the left side B-Pillar or rear edge of
the passenger door.This placard tells you important information
about the:
1. Number of people that can be carried in
the vehicle.
2. Tire size designed for your vehicle.
3. Cold tire inflation pressures for the front,
rear, and spare tires.
At least once a month:
• Check and adjust tire pressure with a good
quality pocket-type pressure gauge. Do not
make a visual judgement when determining
proper inflation. Tires may look properly
inflated even when they are under-inflated.
• Inspect tires for signs of tire wear or visible
damage.
CAUTION!
After inspecting or adjusting the tire pres-
sure, always reinstall the valve stem cap.
This will prevent moisture and dirt from
entering the valve stem, which could dam-
age the valve stem.Inflation pressures specified on the placard
are always “cold tire inflation pressure”. Cold
tire inflation pressure is defined as the tire
pressure after the vehicle has not been driven
for at least three hours, or driven less than
1 mile (1.6 km) after sitting for a minimum of
three hours. The cold tire inflation pressure
must not exceed the maximum inflation pres-
sure molded into the tire sidewall.
Check tire pressures more often if subject to
a wide range of outdoor temperatures, as tire
pressures vary with temperature changes.
Tire pressures change by approximately 1 psi
(7 kPa) per 12°F (7°C) of air temperature
change. Keep this in mind when checking tire
pressure inside a garage, especially in the
Winter.
Example: If garage temperature = 68°F
(20°C) and the outside temperature = 32°F
(0°C) then the cold tire inflation pressure
should be increased by 3 psi (21 kPa), which
equals 1 psi (7 kPa) for every 12°F (7°C) for
this outside temperature condition.
Tire And Loading Information Placard
251