fluid JEEP COMPASS 2019 Owner handbook (in English)
[x] Cancel search | Manufacturer: JEEP, Model Year: 2019, Model line: COMPASS, Model: JEEP COMPASS 2019Pages: 362, PDF Size: 6.23 MB
Page 186 of 362
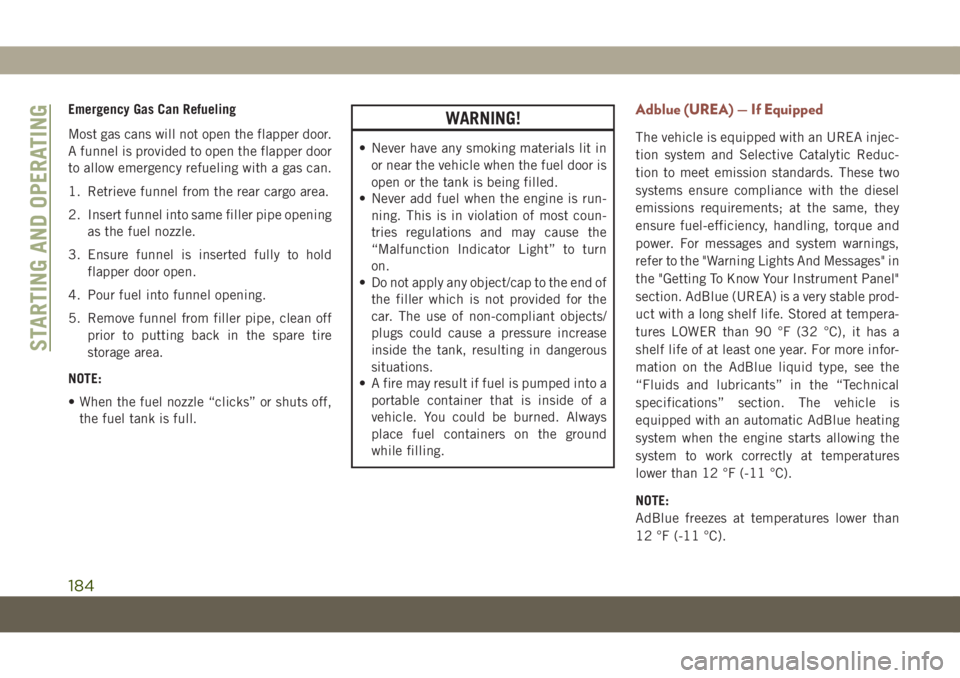
Emergency Gas Can Refueling
Most gas cans will not open the flapper door.
A funnel is provided to open the flapper door
to allow emergency refueling with a gas can.
1. Retrieve funnel from the rear cargo area.
2. Insert funnel into same filler pipe opening
as the fuel nozzle.
3. Ensure funnel is inserted fully to hold
flapper door open.
4. Pour fuel into funnel opening.
5. Remove funnel from filler pipe, clean off
prior to putting back in the spare tire
storage area.
NOTE:
• When the fuel nozzle “clicks” or shuts off,
the fuel tank is full.WARNING!
• Never have any smoking materials lit in
or near the vehicle when the fuel door is
open or the tank is being filled.
• Never add fuel when the engine is run-
ning. This is in violation of most coun-
tries regulations and may cause the
“Malfunction Indicator Light” to turn
on.
• Do not apply any object/cap to the end of
the filler which is not provided for the
car. The use of non-compliant objects/
plugs could cause a pressure increase
inside the tank, resulting in dangerous
situations.
• A fire may result if fuel is pumped into a
portable container that is inside of a
vehicle. You could be burned. Always
place fuel containers on the ground
while filling.
Adblue (UREA) — If Equipped
The vehicle is equipped with an UREA injec-
tion system and Selective Catalytic Reduc-
tion to meet emission standards. These two
systems ensure compliance with the diesel
emissions requirements; at the same, they
ensure fuel-efficiency, handling, torque and
power. For messages and system warnings,
refer to the "Warning Lights And Messages" in
the "Getting To Know Your Instrument Panel"
section. AdBlue (UREA) is a very stable prod-
uct with a long shelf life. Stored at tempera-
tures LOWER than 90 °F (32 °C), it has a
shelf life of at least one year. For more infor-
mation on the AdBlue liquid type, see the
“Fluids and lubricants” in the “Technical
specifications” section. The vehicle is
equipped with an automatic AdBlue heating
system when the engine starts allowing the
system to work correctly at temperatures
lower than 12 °F (-11 °C).
NOTE:
AdBlue freezes at temperatures lower than
12 °F (-11 °C).
STARTING AND OPERATING
184
Page 188 of 362
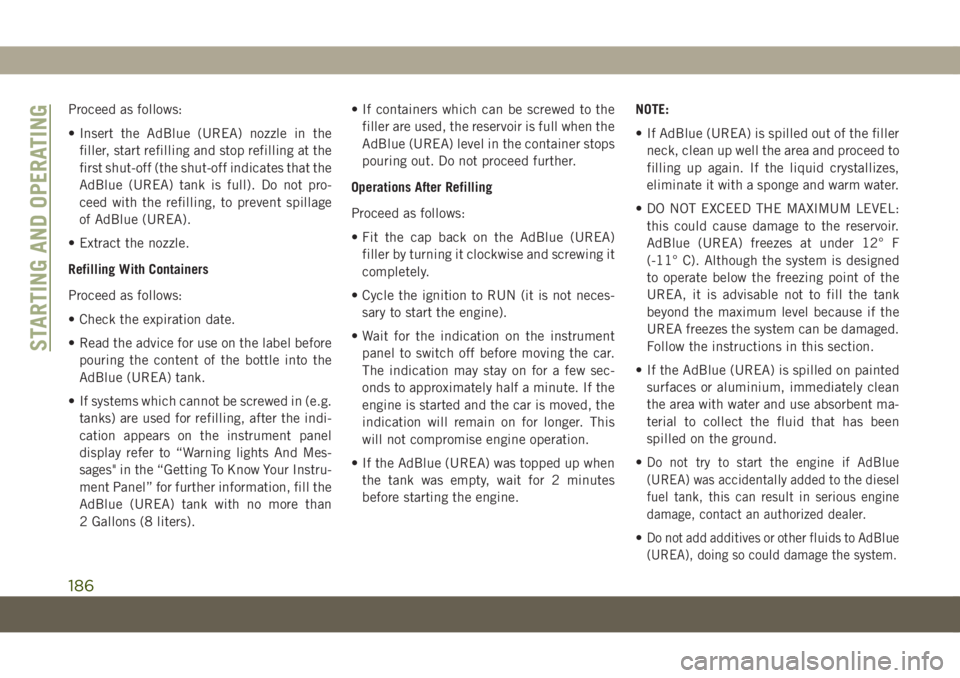
Proceed as follows:
• Insert the AdBlue (UREA) nozzle in the
filler, start refilling and stop refilling at the
first shut-off (the shut-off indicates that the
AdBlue (UREA) tank is full). Do not pro-
ceed with the refilling, to prevent spillage
of AdBlue (UREA).
• Extract the nozzle.
Refilling With Containers
Proceed as follows:
• Check the expiration date.
• Read the advice for use on the label before
pouring the content of the bottle into the
AdBlue (UREA) tank.
• If systems which cannot be screwed in (e.g.
tanks) are used for refilling, after the indi-
cation appears on the instrument panel
display refer to “Warning lights And Mes-
sages" in the “Getting To Know Your Instru-
ment Panel” for further information, fill the
AdBlue (UREA) tank with no more than
2 Gallons (8 liters).• If containers which can be screwed to the
filler are used, the reservoir is full when the
AdBlue (UREA) level in the container stops
pouring out. Do not proceed further.
Operations After Refilling
Proceed as follows:
• Fit the cap back on the AdBlue (UREA)
filler by turning it clockwise and screwing it
completely.
• Cycle the ignition to RUN (it is not neces-
sary to start the engine).
• Wait for the indication on the instrument
panel to switch off before moving the car.
The indication may stay on for a few sec-
onds to approximately half a minute. If the
engine is started and the car is moved, the
indication will remain on for longer. This
will not compromise engine operation.
• If the AdBlue (UREA) was topped up when
the tank was empty, wait for 2 minutes
before starting the engine.NOTE:
• If AdBlue (UREA) is spilled out of the filler
neck, clean up well the area and proceed to
filling up again. If the liquid crystallizes,
eliminate it with a sponge and warm water.
• DO NOT EXCEED THE MAXIMUM LEVEL:
this could cause damage to the reservoir.
AdBlue (UREA) freezes at under 12° F
(-11° C). Although the system is designed
to operate below the freezing point of the
UREA, it is advisable not to fill the tank
beyond the maximum level because if the
UREA freezes the system can be damaged.
Follow the instructions in this section.
• If the AdBlue (UREA) is spilled on painted
surfaces or aluminium, immediately clean
the area with water and use absorbent ma-
terial to collect the fluid that has been
spilled on the ground.
•
Do not try to start the engine if AdBlue
(UREA) was accidentally added to the diesel
fuel tank, this can result in serious engine
damage, contact an authorized dealer.
•Do not add additives or other fluids to AdBlue
(UREA), doing so could damage the system.
STARTING AND OPERATING
186
Page 220 of 362
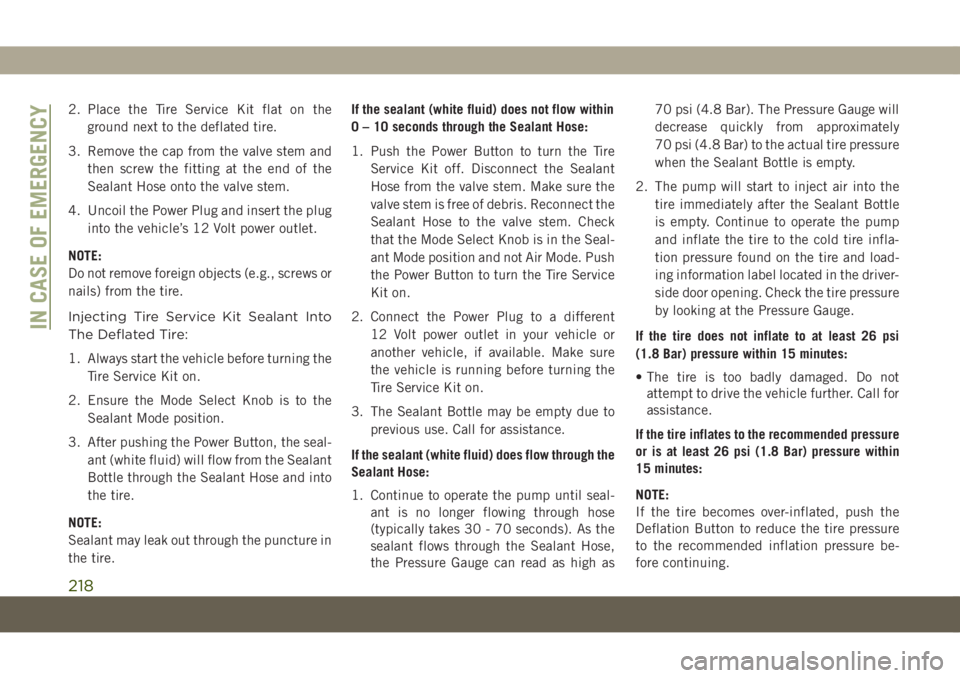
2. Place the Tire Service Kit flat on the
ground next to the deflated tire.
3. Remove the cap from the valve stem and
then screw the fitting at the end of the
Sealant Hose onto the valve stem.
4. Uncoil the Power Plug and insert the plug
into the vehicle’s 12 Volt power outlet.
NOTE:
Do not remove foreign objects (e.g., screws or
nails) from the tire.
Injecting Tire Service Kit Sealant Into
The Deflated Tire:
1. Always start the vehicle before turning the
Tire Service Kit on.
2. Ensure the Mode Select Knob is to the
Sealant Mode position.
3. After pushing the Power Button, the seal-
ant (white fluid) will flow from the Sealant
Bottle through the Sealant Hose and into
the tire.
NOTE:
Sealant may leak out through the puncture in
the tire.If the sealant (white fluid) does not flow within
0 – 10 seconds through the Sealant Hose:
1. Push the Power Button to turn the Tire
Service Kit off. Disconnect the Sealant
Hose from the valve stem. Make sure the
valve stem is free of debris. Reconnect the
Sealant Hose to the valve stem. Check
that the Mode Select Knob is in the Seal-
ant Mode position and not Air Mode. Push
the Power Button to turn the Tire Service
Kit on.
2. Connect the Power Plug to a different
12 Volt power outlet in your vehicle or
another vehicle, if available. Make sure
the vehicle is running before turning the
Tire Service Kit on.
3. The Sealant Bottle may be empty due to
previous use. Call for assistance.
If the sealant (white fluid) does flow through the
Sealant Hose:
1. Continue to operate the pump until seal-
ant is no longer flowing through hose
(typically takes 30 - 70 seconds). As the
sealant flows through the Sealant Hose,
the Pressure Gauge can read as high as70 psi (4.8 Bar). The Pressure Gauge will
decrease quickly from approximately
70 psi (4.8 Bar) to the actual tire pressure
when the Sealant Bottle is empty.
2. The pump will start to inject air into the
tire immediately after the Sealant Bottle
is empty. Continue to operate the pump
and inflate the tire to the cold tire infla-
tion pressure found on the tire and load-
ing information label located in the driver-
side door opening. Check the tire pressure
by looking at the Pressure Gauge.
If the tire does not inflate to at least 26 psi
(1.8 Bar) pressure within 15 minutes:
• The tire is too badly damaged. Do not
attempt to drive the vehicle further. Call for
assistance.
If the tire inflates to the recommended pressure
or is at least 26 psi (1.8 Bar) pressure within
15 minutes:
NOTE:
If the tire becomes over-inflated, push the
Deflation Button to reduce the tire pressure
to the recommended inflation pressure be-
fore continuing.
IN CASE OF EMERGENCY
218
Page 222 of 362
4. Have the tire inspected and repaired or
replaced at the earliest opportunity at an
authorized dealer or tire service center.
WARNING!
You must always indicate that the tire was
repaired using the Tire Service Kit. Give
the booklet to the technicians who will be
handling the tire that was treated using
the Tire Service Kit.
5. Remove the Speed Limit sticker from the
steering wheel after the tire has been
repaired.
6. Replace the Sealant Bottle at an autho-
rized dealer as soon as possible. Refer to
“Sealant Bottle Replacement”.
NOTE:
When having the tire serviced, advise the
authorized dealer or service center that the
tire has been sealed using the Tire Service
Kit.
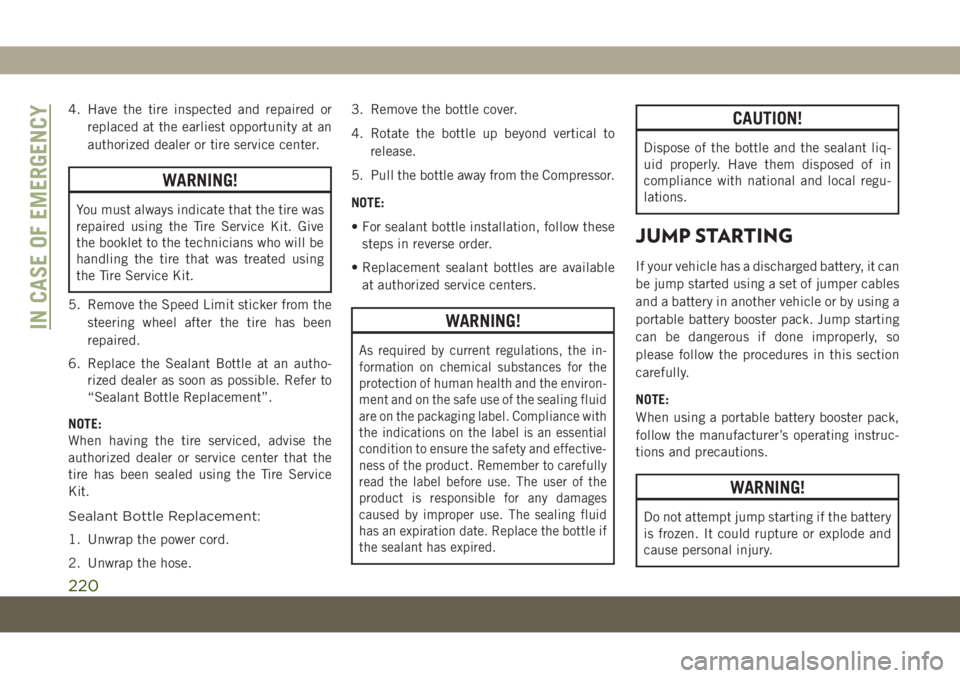
Sealant Bottle Replacement:
1. Unwrap the power cord.
2. Unwrap the hose.3. Remove the bottle cover.
4. Rotate the bottle up beyond vertical to
release.
5. Pull the bottle away from the Compressor.
NOTE:
• For sealant bottle installation, follow these
steps in reverse order.
• Replacement sealant bottles are available
at authorized service centers.
WARNING!
As required by current regulations, the in-
formation on chemical substances for the
protection of human health and the environ-
ment and on the safe use of the sealing fluid
are on the packaging label. Compliance with
the indications on the label is an essential
condition to ensure the safety and effective-
ness of the product. Remember to carefully
read the label before use. The user of the
product is responsible for any damages
caused by improper use. The sealing fluid
has an expiration date. Replace the bottle if
the sealant has expired.
CAUTION!
Dispose of the bottle and the sealant liq-
uid properly. Have them disposed of in
compliance with national and local regu-
lations.
JUMP STARTING
If your vehicle has a discharged battery, it can
be jump started using a set of jumper cables
and a battery in another vehicle or by using a
portable battery booster pack. Jump starting
can be dangerous if done improperly, so
please follow the procedures in this section
carefully.
NOTE:
When using a portable battery booster pack,
follow the manufacturer’s operating instruc-
tions and precautions.
WARNING!
Do not attempt jump starting if the battery
is frozen. It could rupture or explode and
cause personal injury.
IN CASE OF EMERGENCY
220
Page 233 of 362
SCHEDULED SERVICING
Correct servicing is crucial for guaranteeing a
long life for the car under the best conditions.
For this reason, Jeep has planned a series of
checks and services at fixed distance inter-
vals and, where provided, at fixed time inter-
vals, as described in the Scheduled Servicing
plan. To keep the car’s efficiency in tip-top
condition, in the following Scheduled Service
plan pages a few additional checks are listed
that should be carried out more frequently
with respect to the normal coupon redemp-
tion schedule. Scheduled Servicing is offered
by all authorized dealerships according to
fixed time or mileage intervals. If, during
each operation, in addition to the ones sched-
uled, the need arises for further replace-
ments or repairs, these may be carried out
with the owner's explicit agreement only.
The technicians at your dealership know your
vehicle best, and have access to factory trained
information, genuine Mopar parts, and specially
designed electronic and mechanical tools that
can help prevent future costly repairs. If your car
is used frequently for towing, the interval be-
tween one scheduled servicing operation and
the next should be reduced. More frequentmaintenance may be needed for vehicles in
severe operating conditions, such as dusty areas
and very short trip driving.
NOTE:
Scheduled Servicing interventions are set out
by the Manufacturer. Failure to have them
carried out may invalidate the warranty. It is
advised to inform an authorized dealership of
any small operating irregularities without
waiting for the next service.
1.4L Gasoline Engine
NOTE:
Under no circumstances should oil change
intervals exceed 9,000 miles (15,000 km) or
12 months, whichever comes first.
Once A Month Or Before A Long Trip
• Check engine oil level.
• Check windshield washer fluid level.
• Check tire pressure and look for unusual
wear or damage. Rotate tires at the first
sign of irregular wear, even if it occurs
before the oil indicator system turns on.
•
Check the fluid levels of the coolant reservoir
and brake master cylinder, fill as needed.
• Check function of all interior and exterior
lights.
At Each Oil Change
• Change oil and filter.
• Rotate the tires.Rotate at the first sign of
irregular wear, even if it occurs before the oil
indicator system turns on.
• Inspect battery and clean and tighten ter-
minals as required.
• Inspect brake pads, shoes, rotors, drums,
hoses and park brake.
• Inspect engine cooling system protection
and hoses.
• Inspect exhaust system.
• Inspect engine air cleaner if using in dusty
or off-road conditions.
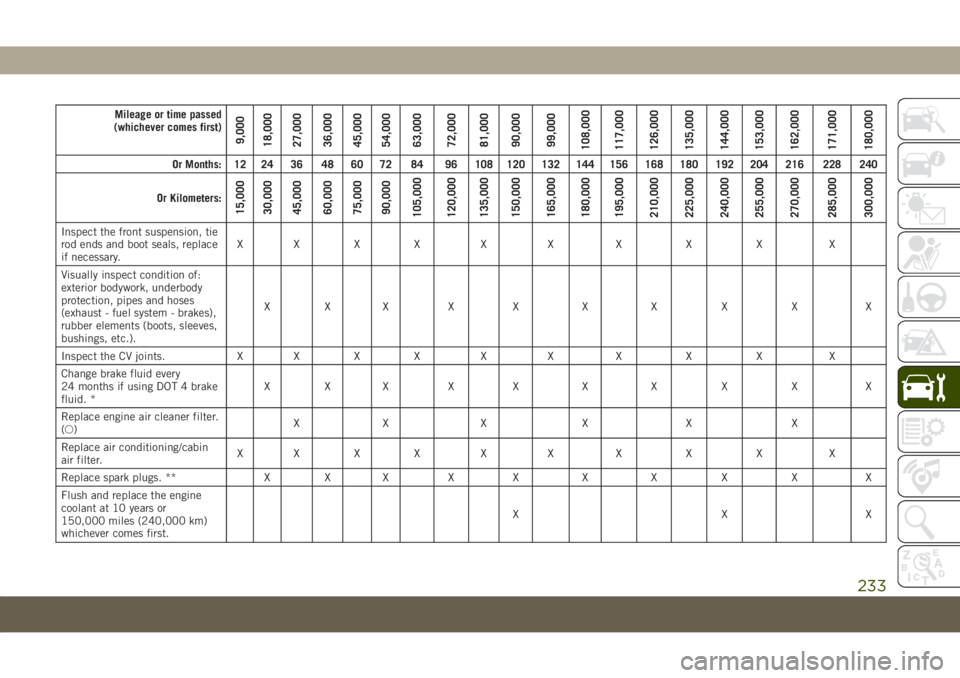
Refer to the “Maintenance Plan” on the fol-
lowing page for the required maintenance
intervals.
CAUTION!
Failure to perform the required maintenance
items may result in damage to the vehicle.
231
Page 235 of 362
Mileage or time passed
(whichever comes first)
9,000
18,000
27,000
36,000
45,000
54,000
63,000
72,000
81,000
90,000
99,000
108,000
117,000
126,000
135,000
144,000
153,000
162,000
171,000
180,000
Or Months: 12 24 36 48 60 72 84 96 108 120 132 144 156 168 180 192 204 216 228 240
Or Kilometers:
15,000
30,000
45,000
60,000
75,000
90,000
105,000
120,000
135,000
150,000
165,000
180,000
195,000
210,000
225,000
240,000
255,000
270,000
285,000
300,000
Inspect the front suspension, tie
rod ends and boot seals, replace
if necessary.XXXXXXXXX X
Visually inspect condition of:
exterior bodywork, underbody
protection, pipes and hoses
(exhaust - fuel system - brakes),
rubber elements (boots, sleeves,
bushings, etc.).XXX X X X X X X X
Inspect the CV joints. X X X X X X X X X X
Change brake fluid every
24 months if using DOT 4 brake
fluid. *XXX X X X X X X X
Replace engine air cleaner filter.
(○)XX X X X X
Replace air conditioning/cabin
air filter.XXXXXXXXX X
Replace spark plugs. ** X X X X X X X X X X
Flush and replace the engine
coolant at 10 years or
150,000 miles (240,000 km)
whichever comes first.XXX
233
Page 236 of 362
Mileage or time passed
(whichever comes first)
9,000
18,000
27,000
36,000
45,000
54,000
63,000
72,000
81,000
90,000
99,000
108,000
117,000
126,000
135,000
144,000
153,000
162,000
171,000
180,000
Or Months: 12 24 36 48 60 72 84 96 108 120 132 144 156 168 180 192 204 216 228 240
Or Kilometers:
15,000
30,000
45,000
60,000
75,000
90,000
105,000
120,000
135,000
150,000
165,000
180,000
195,000
210,000
225,000
240,000
255,000
270,000
285,000
300,000
Visually inspect conditions of the
accessory drive belt(s) (***)XX X
Check tension of accessory drive
belt (versions without automatic
tensioner) (***)XX X
Visually inspect conditions of
toothed timing drive belt (***)XX X
Replace accessory drive belt/s
(***)XX
Replace toothed timing drive
belt (***)XX
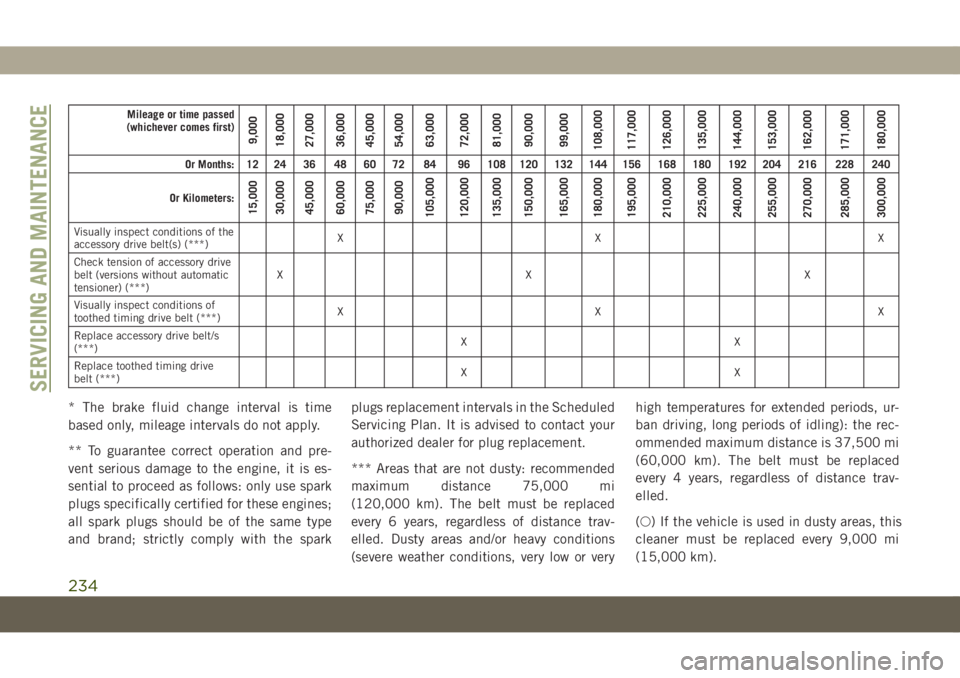
* The brake fluid change interval is time
based only, mileage intervals do not apply.
** To guarantee correct operation and pre-
vent serious damage to the engine, it is es-
sential to proceed as follows: only use spark
plugs specifically certified for these engines;
all spark plugs should be of the same type
and brand; strictly comply with the sparkplugs replacement intervals in the Scheduled
Servicing Plan. It is advised to contact your
authorized dealer for plug replacement.
*** Areas that are not dusty: recommended
maximum distance 75,000 mi
(120,000 km). The belt must be replaced
every 6 years, regardless of distance trav-
elled. Dusty areas and/or heavy conditions
(severe weather conditions, very low or veryhigh temperatures for extended periods, ur-
ban driving, long periods of idling): the rec-
ommended maximum distance is 37,500 mi
(60,000 km). The belt must be replaced
every 4 years, regardless of distance trav-
elled.
(○) If the vehicle is used in dusty areas, this
cleaner must be replaced every 9,000 mi
(15,000 km).
SERVICING AND MAINTENANCE
234
Page 238 of 362
•Areas that are not dusty: recommended maxi-
mum distance 75,000 mi (120,000 km). The
belt must be replaced every 6 years, regard-
less of distance travelled. Dusty areas and/or
heavy conditions (severe weather conditions,
very low or very high temperatures for ex-
tended periods, urban driving, long periods of
idling): the recommended maximum distance
is 37,500 mi (60,000 km). The belt must be
replaced every 4 years, regardless of dis-
tance travelled.
Once A Month Or Before A Long Trip
• Check engine oil level.
• Check windshield washer fluid level.
• Check tire pressure and look for unusual
wear or damage. Rotate tires at the first
sign of irregular wear, even if it occurs
before the oil indicator system turns on.
• Check the fluid levels of the coolant reser-
voir and brake master cylinder, fill as
needed.• Check function of all interior and exterior
lights.
• Control and recovery of additive level for
AdBlue Diesel emissions (UREA) (if
equipped).
At Each Oil Change
• Change the engine oil filter.
• Inspect the brake hoses and lines.
• Inspect for the presence of water in the fuel
filter/water separator unit.
Demanding Vehicle Use
• Restore additive level for AdBlue Diesel
emissions (UREA) (if equipped), when the
lamp is illuminated or the message on the
instrument panel.
CAUTION!
Failure to perform the required mainte-
nance items may result in damage to the
vehicle.
SERVICING AND MAINTENANCE
236
Page 240 of 362
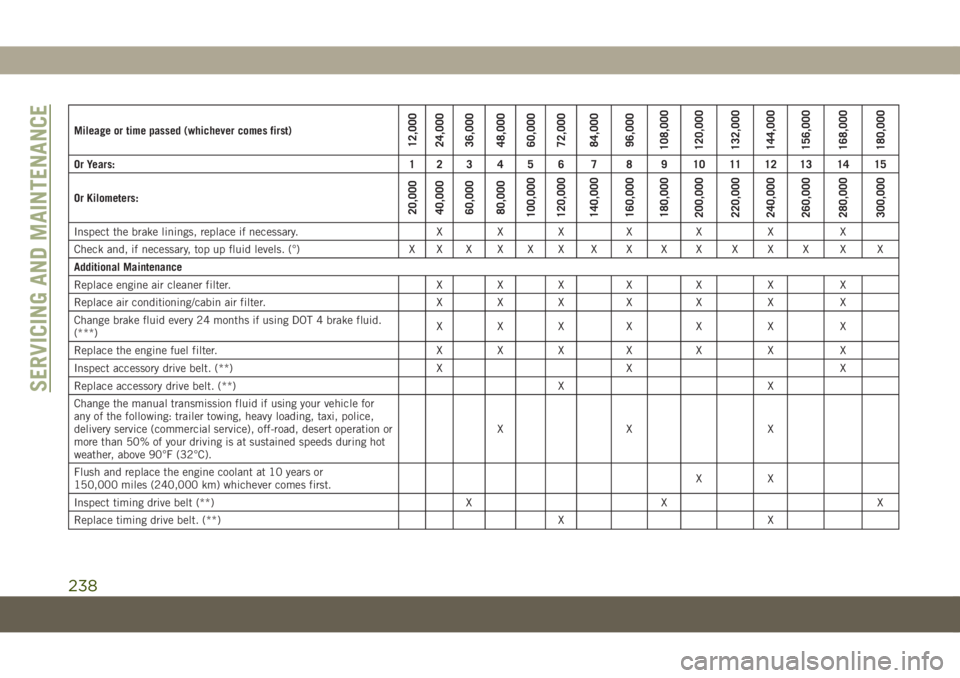
Mileage or time passed (whichever comes first)12,000
24,000
36,000
48,000
60,000
72,000
84,000
96,000
108,000
120,000
132,000
144,000
156,000
168,000
180,000
Or Years: 1 2 3 4 5 6 7 8 9 10 11 12 13 14 15
Or Kilometers:
20,000
40,000
60,000
80,000
100,000
120,000
140,000
160,000
180,000
200,000
220,000
240,000
260,000
280,000
300,000
Inspect the brake linings, replace if necessary. X X X X X X X
Check and, if necessary, top up fluid levels. (°) X X X X X X X X X X X X X X X
Additional Maintenance
Replace engine air cleaner filter. X X X X X X X
Replace air conditioning/cabin air filter. X X X X X X X
Change brake fluid every 24 months if using DOT 4 brake fluid.
(***)XXX X X X X
Replace the engine fuel filter. X X X X X X X
Inspect accessory drive belt. (**) X X X
Replace accessory drive belt. (**) X X
Change the manual transmission fluid if using your vehicle for
any of the following: trailer towing, heavy loading, taxi, police,
delivery service (commercial service), off-road, desert operation or
more than 50% of your driving is at sustained speeds during hot
weather, above 90°F (32°C).XX X
Flush and replace the engine coolant at 10 years or
150,000 miles (240,000 km) whichever comes first.XX
Inspect timing drive belt (**) X X X
Replace timing drive belt. (**) X X
SERVICING AND MAINTENANCE
238
Page 241 of 362
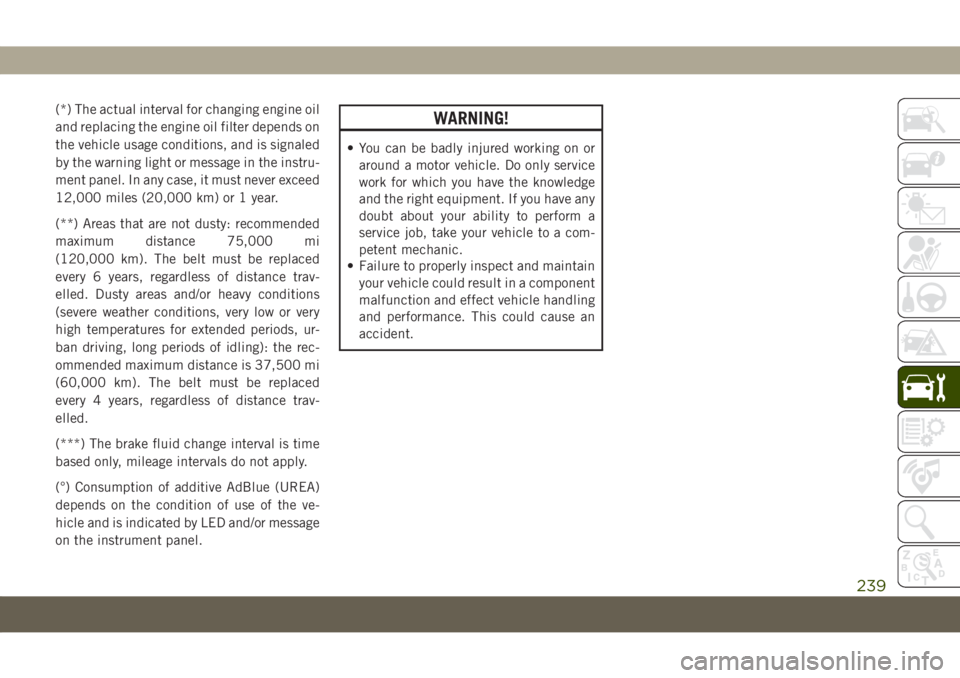
(*) The actual interval for changing engine oil
and replacing the engine oil filter depends on
the vehicle usage conditions, and is signaled
by the warning light or message in the instru-
ment panel. In any case, it must never exceed
12,000 miles (20,000 km) or 1 year.
(**) Areas that are not dusty: recommended
maximum distance 75,000 mi
(120,000 km). The belt must be replaced
every 6 years, regardless of distance trav-
elled. Dusty areas and/or heavy conditions
(severe weather conditions, very low or very
high temperatures for extended periods, ur-
ban driving, long periods of idling): the rec-
ommended maximum distance is 37,500 mi
(60,000 km). The belt must be replaced
every 4 years, regardless of distance trav-
elled.
(***) The brake fluid change interval is time
based only, mileage intervals do not apply.
(°) Consumption of additive AdBlue (UREA)
depends on the condition of use of the ve-
hicle and is indicated by LED and/or message
on the instrument panel.WARNING!
• You can be badly injured working on or
around a motor vehicle. Do only service
work for which you have the knowledge
and the right equipment. If you have any
doubt about your ability to perform a
service job, take your vehicle to a com-
petent mechanic.
• Failure to properly inspect and maintain
your vehicle could result in a component
malfunction and effect vehicle handling
and performance. This could cause an
accident.
239