warning JEEP COMPASS 2021 Owner handbook (in English)
[x] Cancel search | Manufacturer: JEEP, Model Year: 2021, Model line: COMPASS, Model: JEEP COMPASS 2021Pages: 328, PDF Size: 8.85 MB
Page 179 of 328
177
IN CASE OF EMERGENCY
HAZARD WARNING
FLASHERS
The Hazard Warning flasher switch is located
in the lower center area of the instrument
panel.Push the switch to turn on the
Hazard Warning flasher. When the
switch is activated, all directional turn signals will flash on and off to warn
oncoming traffic of an emergency. Push the
switch a second time to turn off the Hazard
Warning flashers.
This is an emergency warning system and it
should not be used when the vehicle is in
motion. Use it when your vehicle is disabled
and it is creating a safety hazard for other
motorists.
When you must leave the vehicle to seek
assistance, the Hazard Warning flashers will
continue to operate even though the ignition
is placed in the OFF position.
NOTE:
With extended use, the Hazard Warning
flashers may wear down your battery.
BULB REPLACEMENT
Replacement Bulbs
Interior Bulbs
Lamps Bulb Number
Front Courtesy Light C5W
Front Courtesy Lights (Sun Visors) C5W
Rear Dome Light (Models Without Retractable roof) C5W
Rear Interior Lights (Models With Retractable roof) C5W
Interior Lights HT-168
Dome Light (Glove Box) HT-168
2020_JEEP_M6_UG_UK.book Page 177
Page 181 of 328
179
High Intensity Discharge (HID)
Headlamps — If Equipped
The headlamps contain a type of high voltage
discharge light source. High voltage can
remain in the circuit even with the headlamp
switch off. Because of this, you should not
attempt to service a HID headlamp light
source yourself. If an HID headlamp light
source fails, take your vehicle to an autho-
rized dealer for service.
NOTE:
On vehicles equipped with HID headlamps,
when the headlamps are turned on, there is
a blue hue to the lights. This diminishes and
becomes more white after approximately 10
seconds, as the system charges.
Replacing Exterior Bulbs
Headlamps
Hi/Lo Beam Light Halogen
The bulbs can be accessed from the wheel
liner with the following procedure:
1. Turn the front wheels completely.
2. Remove the wheel liner.
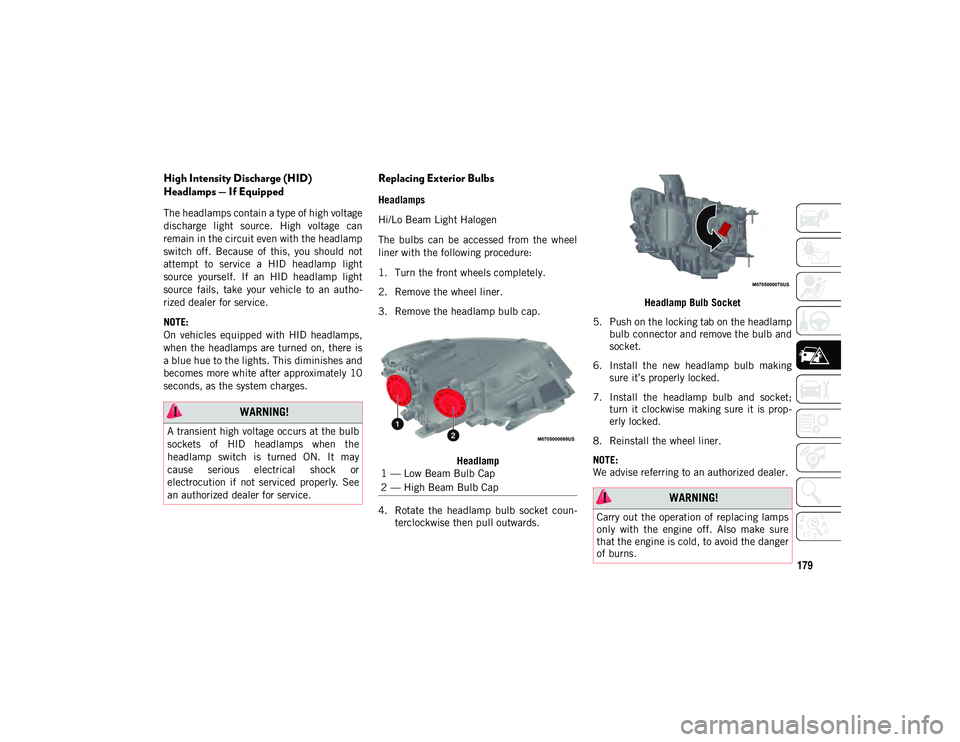
3. Remove the headlamp bulb cap.
Headlamp
4. Rotate the headlamp bulb socket coun -
terclockwise then pull outwards. Headlamp Bulb Socket
5. Push on the locking tab on the headlamp bulb connector and remove the bulb and
socket.
6. Install the new headlamp bulb making sure it’s properly locked.
7. Install the headlamp bulb and socket; turn it clockwise making sure it is prop -
erly locked.
8. Reinstall the wheel liner.
NOTE:
We advise referring to an authorized dealer.
WARNING!
A transient high voltage occurs at the bulb
sockets of HID headlamps when the
headlamp switch is turned ON. It may
cause serious electrical shock or
electrocution if not serviced properly. See
an authorized dealer for service.
1 — Low Beam Bulb Cap
2 — High Beam Bulb Cap
WARNING!
Carry out the operation of replacing lamps
only with the engine off. Also make sure
that the engine is cold, to avoid the danger
of burns.
2020_JEEP_M6_UG_UK.book Page 179
Page 183 of 328
181
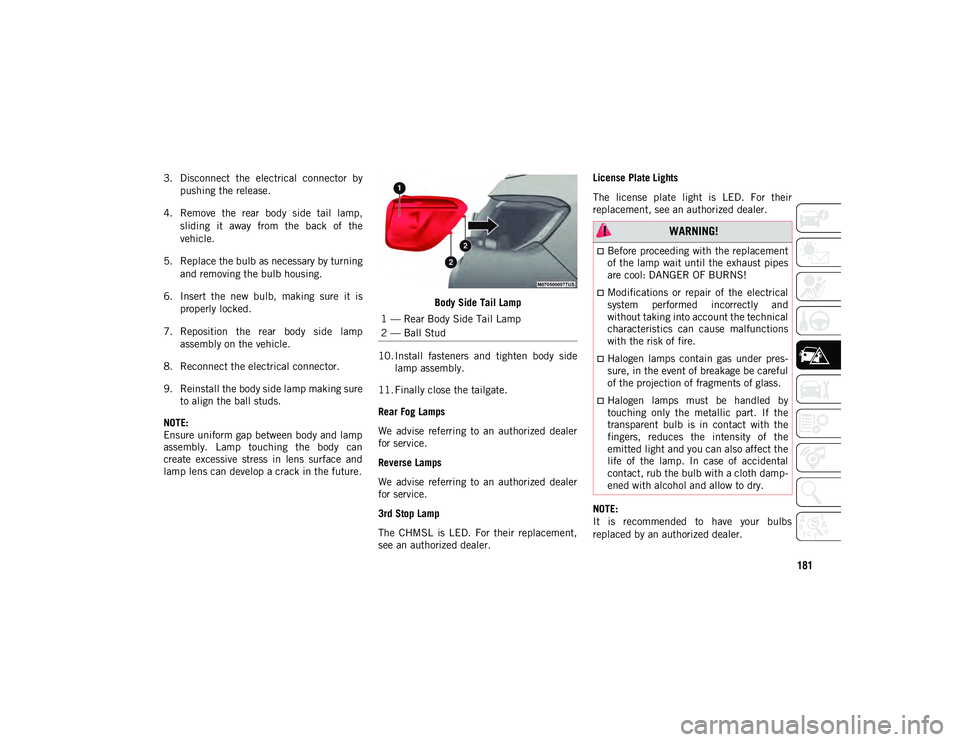
3. Disconnect the electrical connector bypushing the release.
4. Remove the rear body side tail lamp, sliding it away from the back of the
vehicle.
5. Replace the bulb as necessary by turning and removing the bulb housing.
6. Insert the new bulb, making sure it is properly locked.
7. Reposition the rear body side lamp assembly on the vehicle.
8. Reconnect the electrical connector.
9. Reinstall the body side lamp making sure to align the ball studs.
NOTE:
Ensure uniform gap between body and lamp
assembly. Lamp touching the body can
create excessive stress in lens surface and
lamp lens can develop a crack in the future. Body Side Tail Lamp
10. Install fasteners and tighten body side lamp assembly.
11. Finally close the tailgate.
Rear Fog Lamps
We advise referring to an authorized dealer
for service.
Reverse Lamps
We advise referring to an authorized dealer
for service.
3rd Stop Lamp
The CHMSL is LED. For their replacement,
see an authorized dealer. License Plate Lights
The license plate light is LED. For their
replacement, see an authorized dealer.
NOTE:
It is recommended to have your bulbs
replaced by an authorized dealer.
1 — Rear Body Side Tail Lamp
2 — Ball Stud
WARNING!
Before proceeding with the replacement
of the lamp wait until the exhaust pipes
are cool: DANGER OF BURNS!
Modifications or repair of the electrical
system performed incorrectly and
without taking into account the technical
characteristics can cause malfunctions
with the risk of fire.
Halogen lamps contain gas under pres-
sure, in the event of breakage be careful
of the projection of fragments of glass.
Halogen lamps must be handled by
touching only the metallic part. If the
transparent bulb is in contact with the
fingers, reduces the intensity of the
emitted light and you can also affect the
life of the lamp. In case of accidental
contact, rub the bulb with a cloth damp
-
ened with alcohol and allow to dry.
2020_JEEP_M6_UG_UK.book Page 181
Page 184 of 328
IN CASE OF EMERGENCY
182
FUSES
General Information
The fuses protect electrical systems against
excessive current.
When a device does not work, you must
check the fuse element inside the blade fuse
for a break/melt.
Also, please be aware that when using power
outlets for extended periods of time with the
engine off may result in vehicle battery
discharge.
Fuse Location
The fuses are grouped into controllers
located in the engine compartment.
Engine Compartment Fuses/Distribution
Unit
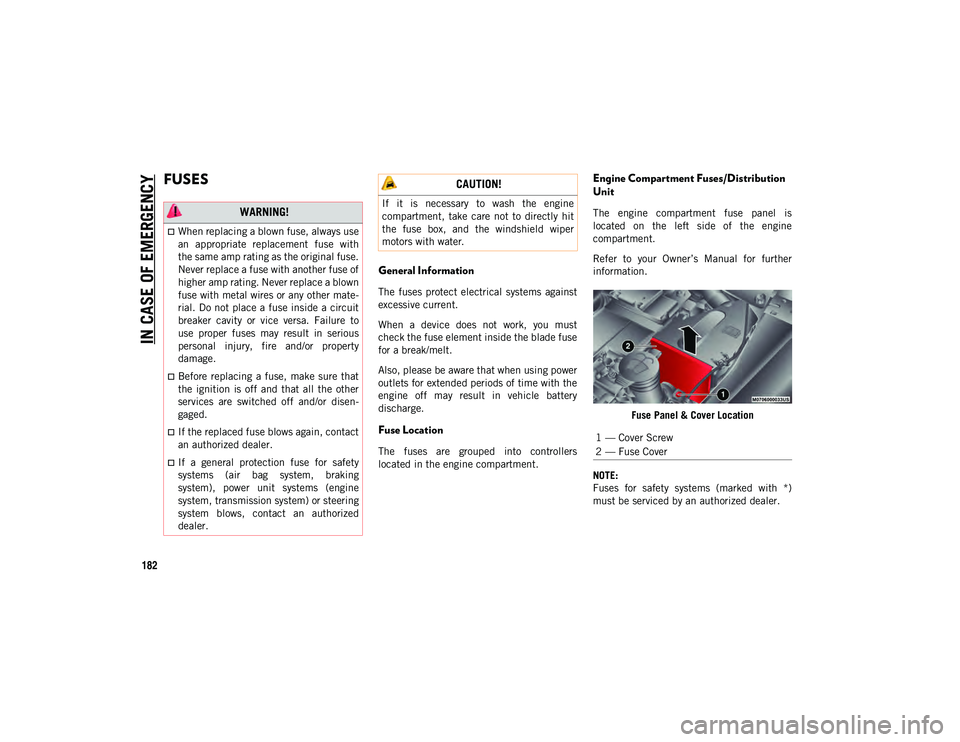
The engine compartment fuse panel is
located on the left side of the engine
compartment.
Refer to your Owner’s Manual for further
information.Fuse Panel & Cover Location
NOTE:
Fuses for safety systems (marked with *)
must be serviced by an authorized dealer. WARNING!
When replacing a blown fuse, always use
an appropriate replacement fuse with
the same amp rating as the original fuse.
Never replace a fuse with another fuse of
higher amp rating. Never replace a blown
fuse with metal wires or any other mate-
rial. Do not place a fuse inside a circuit
breaker cavity or vice versa. Failure to
use proper fuses may result in serious
personal injury, fire and/or property
damage.
Before replacing a fuse, make sure that
the ignition is off and that all the other
services are switched off and/or disen -
gaged.
If the replaced fuse blows again, contact
an authorized dealer.
If a general protection fuse for safety
systems (air bag system, braking
system), power unit systems (engine
system, transmission system) or steering
system blows, contact an authorized
dealer.
CAUTION!
If it is necessary to wash the engine
compartment, take care not to directly hit
the fuse box, and the windshield wiper
motors with water.
1 — Cover Screw
2 — Fuse Cover
2020_JEEP_M6_UG_UK.book Page 182
Page 191 of 328
189
JACKING AND TIRE
CHANGING Jack Location/Spare Tire Stowage
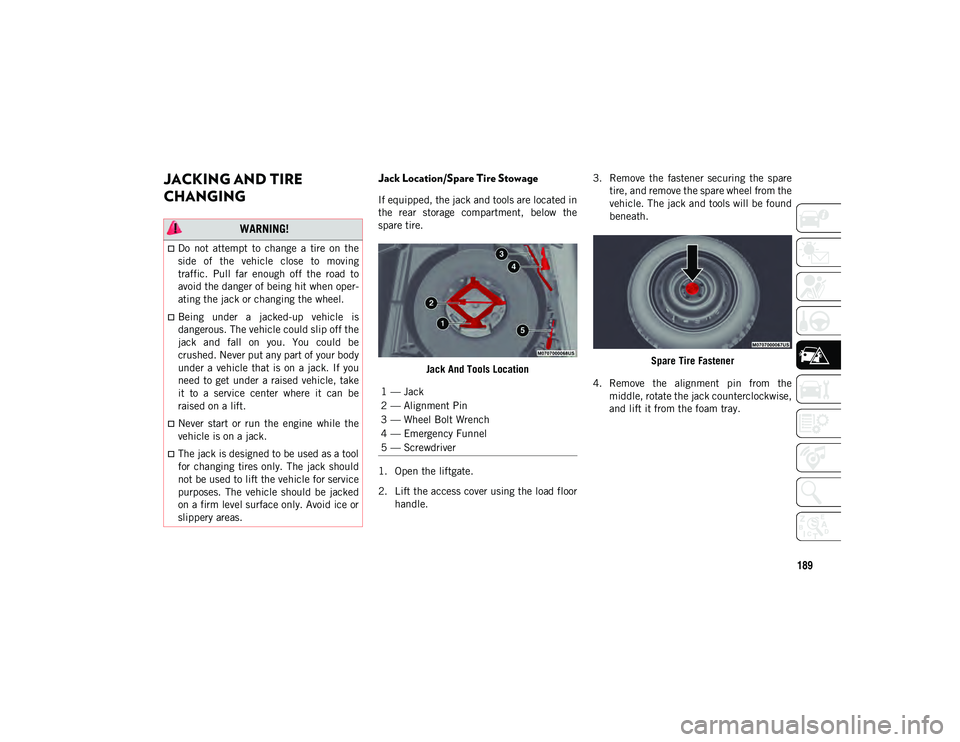
If equipped, the jack and tools are located in
the rear storage compartment, below the
spare tire.Jack And Tools Location
1. Open the liftgate.
2. Lift the access cover using the load floor handle. 3. Remove the fastener securing the spare
tire, and remove the spare wheel from the
vehicle. The jack and tools will be found
beneath.
Spare Tire Fastener
4. Remove the alignment pin from the middle, rotate the jack counterclockwise,
and lift it from the foam tray.
WARNING!
Do not attempt to change a tire on the
side of the vehicle close to moving
traffic. Pull far enough off the road to
avoid the danger of being hit when oper -
ating the jack or changing the wheel.
Being under a jacked-up vehicle is
dangerous. The vehicle could slip off the
jack and fall on you. You could be
crushed. Never put any part of your body
under a vehicle that is on a jack. If you
need to get under a raised vehicle, take
it to a service center where it can be
raised on a lift.
Never start or run the engine while the
vehicle is on a jack.
The jack is designed to be used as a tool
for changing tires only. The jack should
not be used to lift the vehicle for service
purposes. The vehicle should be jacked
on a firm level surface only. Avoid ice or
slippery areas.
1 — Jack
2 — Alignment Pin
3 — Wheel Bolt Wrench
4 — Emergency Funnel
5 — Screwdriver
2020_JEEP_M6_UG_UK.book Page 189
Page 192 of 328
IN CASE OF EMERGENCY
190(Continued)
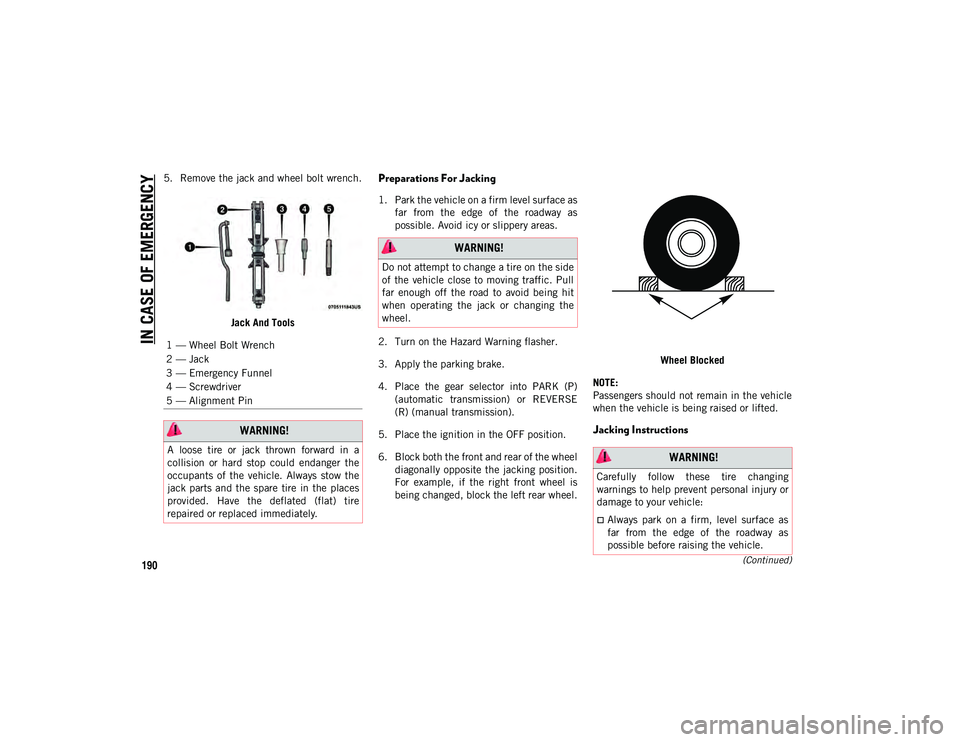
5. Remove the jack and wheel bolt wrench.Jack And ToolsPreparations For Jacking
1. Park the vehicle on a firm level surface asfar from the edge of the roadway as
possible. Avoid icy or slippery areas.
2. Turn on the Hazard Warning flasher.
3. Apply the parking brake.
4. Place the gear selector into PARK (P) (automatic transmission) or REVERSE
(R) (manual transmission).
5. Place the ignition in the OFF position.
6. Block both the front and rear of the wheel diagonally opposite the jacking position.
For example, if the right front wheel is
being changed, block the left rear wheel. Wheel Blocked
NOTE:
Passengers should not remain in the vehicle
when the vehicle is being raised or lifted.
Jacking Instructions
1 — Wheel Bolt Wrench
2 — Jack
3 — Emergency Funnel
4 — Screwdriver
5 — Alignment Pin
WARNING!
A loose tire or jack thrown forward in a
collision or hard stop could endanger the
occupants of the vehicle. Always stow the
jack parts and the spare tire in the places
provided. Have the deflated (flat) tire
repaired or replaced immediately.
WARNING!
Do not attempt to change a tire on the side
of the vehicle close to moving traffic. Pull
far enough off the road to avoid being hit
when operating the jack or changing the
wheel.
WARNING!
Carefully follow these tire changing
warnings to help prevent personal injury or
damage to your vehicle:
Always park on a firm, level surface as
far from the edge of the roadway as
possible before raising the vehicle.
2020_JEEP_M6_UG_UK.book Page 190
Page 193 of 328
191(Continued)
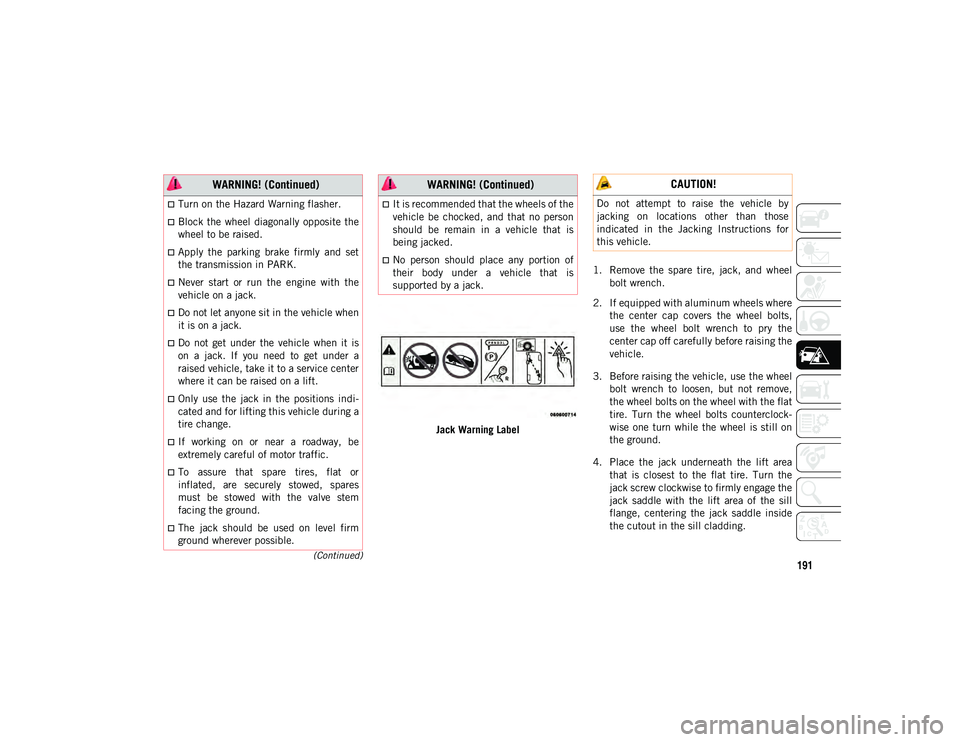
Jack Warning Label1. Remove the spare tire, jack, and wheel
bolt wrench.
2. If equipped with aluminum wheels where the center cap covers the wheel bolts,
use the wheel bolt wrench to pry the
center cap off carefully before raising the
vehicle.
3. Before raising the vehicle, use the wheel bolt wrench to loosen, but not remove,
the wheel bolts on the wheel with the flat
tire. Turn the wheel bolts counterclock -
wise one turn while the wheel is still on
the ground.
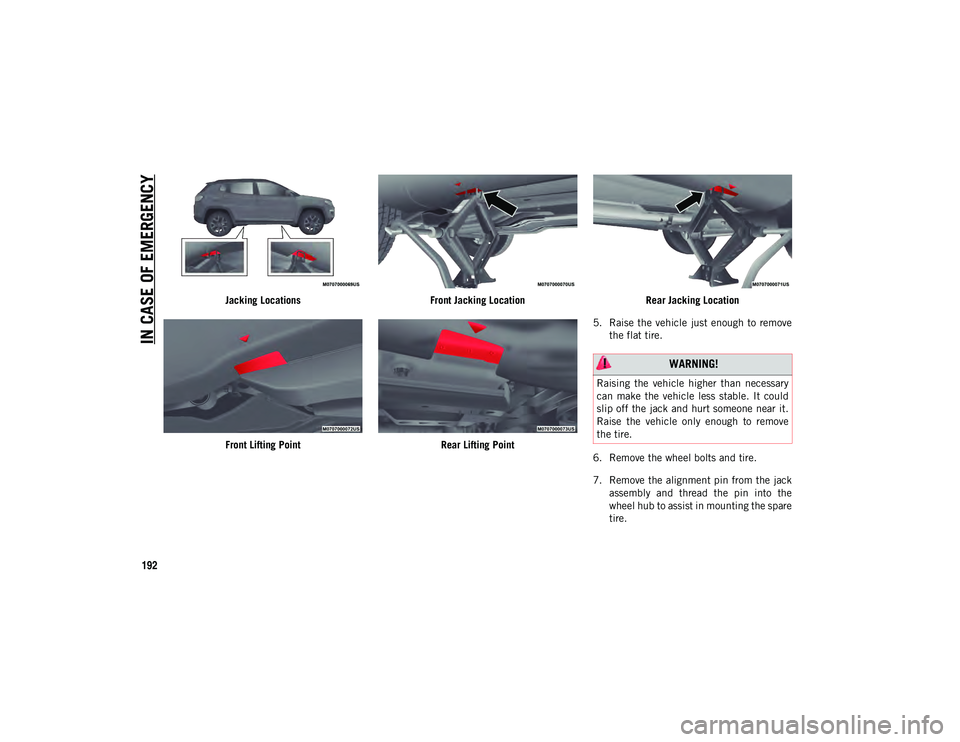
4. Place the jack underneath the lift area that is closest to the flat tire. Turn the
jack screw clockwise to firmly engage the
jack saddle with the lift area of the sill
flange, centering the jack saddle inside
the cutout in the sill cladding.
Turn on the Hazard Warning flasher.
Block the wheel diagonally opposite the
wheel to be raised.
Apply the parking brake firmly and set
the transmission in PARK.
Never start or run the engine with the
vehicle on a jack.
Do not let anyone sit in the vehicle when
it is on a jack.
Do not get under the vehicle when it is
on a jack. If you need to get under a
raised vehicle, take it to a service center
where it can be raised on a lift.
Only use the jack in the positions indi -
cated and for lifting this vehicle during a
tire change.
If working on or near a roadway, be
extremely careful of motor traffic.
To assure that spare tires, flat or
inflated, are securely stowed, spares
must be stowed with the valve stem
facing the ground.
The jack should be used on level firm
ground wherever possible.
WARNING! (Continued)
It is recommended that the wheels of the
vehicle be chocked, and that no person
should be remain in a vehicle that is
being jacked.
No person should place any portion of
their body under a vehicle that is
supported by a jack.
WARNING! (Continued) CAUTION!
Do not attempt to raise the vehicle by
jacking on locations other than those
indicated in the Jacking Instructions for
this vehicle.
2020_JEEP_M6_UG_UK.book Page 191
Page 194 of 328
IN CASE OF EMERGENCY
192
Jacking LocationsFront Lifting Point Front Jacking Location
Rear Lifting Point Rear Jacking Location
5. Raise the vehicle just enough to remove the flat tire.
6. Remove the wheel bolts and tire.
7. Remove the alignment pin from the jack assembly and thread the pin into the
wheel hub to assist in mounting the spare
tire.
WARNING!
Raising the vehicle higher than necessary
can make the vehicle less stable. It could
slip off the jack and hurt someone near it.
Raise the vehicle only enough to remove
the tire.
2020_JEEP_M6_UG_UK.book Page 192
Page 195 of 328
193
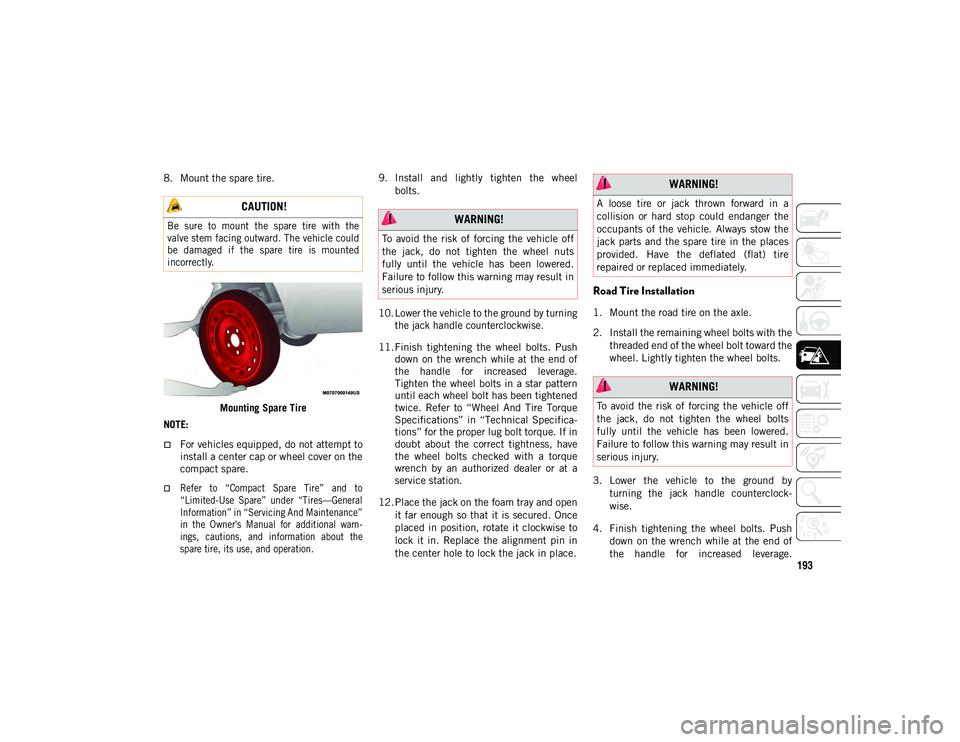
8. Mount the spare tire.Mounting Spare Tire
NOTE:
For vehicles equipped, do not attempt to install a center cap or wheel cover on the
compact spare.
Refer to “Compact Spare Tire” and to
“Limited-Use Spare” under “Tires—General
Information” in “Servicing And Maintenance”
in the Owner's Manual for additional warn- ings, cautions, and information about thespare tire, its use, and operation.
9. Install and lightly tighten the wheel
bolts.
10. Lower the vehicle to the ground by turning the jack handle counterclockwise.
11. Finish tightening the wheel bolts. Push down on the wrench while at the end of
the handle for increased leverage.
Tighten the wheel bolts in a star pattern
until each wheel bolt has been tightened
twice. Refer to “Wheel And Tire Torque
Specifications” in “Technical Specifica -
tions” for the proper lug bolt torque. If in
doubt about the correct tightness, have
the wheel bolts checked with a torque
wrench by an authorized dealer or at a
service station.
12. Place the jack on the foam tray and open it far enough so that it is secured. Once
placed in position, rotate it clockwise to
lock it in. Replace the alignment pin in
the center hole to lock the jack in place.
Road Tire Installation
1. Mount the road tire on the axle.
2. Install the remaining wheel bolts with thethreaded end of the wheel bolt toward the
wheel. Lightly tighten the wheel bolts.
3. Lower the vehicle to the ground by turning the jack handle counterclock -
wise.
4. Finish tightening the wheel bolts. Push down on the wrench while at the end of
the handle for increased leverage.
CAUTION!
Be sure to mount the spare tire with the
valve stem facing outward. The vehicle could
be damaged if the spare tire is mounted
incorrectly.
WARNING!
To avoid the risk of forcing the vehicle off
the jack, do not tighten the wheel nuts
fully until the vehicle has been lowered.
Failure to follow this warning may result in
serious injury.
WARNING!
A loose tire or jack thrown forward in a
collision or hard stop could endanger the
occupants of the vehicle. Always stow the
jack parts and the spare tire in the places
provided. Have the deflated (flat) tire
repaired or replaced immediately.
WARNING!
To avoid the risk of forcing the vehicle off
the jack, do not tighten the wheel bolts
fully until the vehicle has been lowered.
Failure to follow this warning may result in
serious injury.
2020_JEEP_M6_UG_UK.book Page 193
Page 197 of 328
195
Jack Usage Precautions
To complete the Use and Maintenance
Handbook to which this supplement is
attached, given below are some instructions
on the proper use of the jack.MaintenanceMake sure grime does not build up on the
“worm screw.”
Keep the “worm screw” lubricated.
Never modify the jack.
Conditions Of Non-Use:
Temperatures below −40°C.
On sandy or muddy ground.
On uneven ground.
On steep roads.
In extreme weather conditions: thunder -
storms, typhoons, hurricanes, blizzards,
storms, etc.
WARNING!
When using the crank, make sure it turns
freely without the risk of scraping hands
against the ground.
Even the moving parts of the jack, the
“worm screw” and joints can cause
injuries: avoid contact with them. Clean it
thoroughly if dirtied with grease.
CAUTION!
The jack is a tool designed exclusively for
changing a wheel, in case of a puncture or
damage to a tire of the vehicle on which it
is fitted or on vehicles of the same model.
Any other use, e.g. to jack up other vehicle
models or different things, is strictly
prohibited. Never use it to carry out
maintenance or repairs under the vehicle
or to change summer/winter wheels and
vice versa. Never go under the raised
vehicle. If any work under the vehicle is
necessary, contact an authorized dealer.
Incorrect placing of the jack can cause the
vehicle to drop: use it only in the positions
indicated. Do not use the jack for loads
higher than that specified on the label.
Never start the engine with vehicle raised.
If the vehicle is raised more than
necessary, everything can become more
unstable, with the risk of the vehicle
dropping violently. Therefore raise the
vehicle only as much as necessary for the
wheel/spare.
2020_JEEP_M6_UG_UK.book Page 195