rear view mirror JEEP COMPASS 2021 Owner handbook (in English)
[x] Cancel search | Manufacturer: JEEP, Model Year: 2021, Model line: COMPASS, Model: JEEP COMPASS 2021Pages: 328, PDF Size: 8.85 MB
Page 34 of 328
GETTING TO KNOW YOUR VEHICLE
32
Daytime Running Lights (DRL) — If
Equipped
The Daytime Running Lights will turn on
when the engine is started and remain on
unless the headlamps are turned on or the
ignition is in the OFF position.
NOTE:
If allowed by law in the country in which the
vehicle was purchased the Daytime Running
Lights can be turned on and off using the
Uconnect System. Refer to “Uconnect
Settings” in “Multimedia” in the Owner’s
Manual for further details.
High/Low Beam Switch
Push the multifunction lever toward the
instrument panel to switch the headlights to
high beams. Pulling the multifunction lever
back toward the steering wheel will return
the lights to low beams.
Automatic High Beam Headlamp Control
— If Equipped
The Automatic High Beam Headlamp Control
system provides increased forward lighting at
night by automating high beam control
through the use of a digital camera mounted
on the inside rearview mirror. This cameradetects vehicle specific light and automati
-
cally switches from high beams to low beams
until the approaching vehicle is out of view.
NOTE:
The Automatic High Beam Headlamp
Control can be turned on or off using the
Uconnect System. Refer to “Uconnect
Settings” in “Multimedia” in the Owner’s
Manual for further information.
Broken, muddy, or obstructed headlights
and taillights of vehicles in the field of
view will cause headlights to remain on
longer (closer to the vehicle). Also, dirt,
film, and other obstructions on the wind -
shield or camera lens will cause the
system to function improperly.
Flash-To-Pass
You can signal another vehicle with your
headlights by lightly pulling the multifunc -
tion lever toward you. This will cause the
high beam headlights to turn on, and remain
on, until the lever is released.
Automatic Headlights — If Equipped
This system automatically turns the head -
lights on or off according to ambient light
levels. To turn the system on, rotate the headlight switch clockwise to the last detent
for automatic headlight operation. When the
system is on, the headlight time delay
feature is also on. This means the headlights
will stay on for up to 90 seconds after you
place the ignition into the OFF position. To
turn the automatic system off, move the
headlight switch out of the AUTO position.
NOTE:
The engine must be running before the head
-
lights will come on in the automatic mode.
Headlight Time Delay
This feature provides the safety of headlight
illumination for up to 90 seconds (program -
mable) when leaving your vehicle in an unlit
area.
To activate the delay feature, place the igni -
tion in the OFF position while the headlights
are still on. Then, turn off the headlights
within 45 seconds. The delay interval begins
when the headlight switch is turned off.
If you turn the headlights or parking lights
on, or place the ignition in ACC or RUN, the
system will cancel the delay.
If you turn the headlights off before the igni -
tion, they will turn off in the normal manner.
2020_JEEP_M6_UG_UK.book Page 32
Page 82 of 328
SAFETY
80
Traction Control System (TCS)
The Traction Control System (TCS) monitors
the amount of wheel spin of each of the
driven wheels. If wheel spin is detected, the
TCS may apply brake pressure to the spin-
ning wheel(s) and/or reduce vehicle power to
provide enhanced acceleration and stability.
A feature of the TCS, Brake Limited Differen -
tial (BLD), functions similar to a limited slip
differential and controls the wheel spin
across a driven axle. If one wheel on a driven
axle is spinning faster than the other, the
system will apply the brake of the spinning
wheel. This will allow more vehicle torque to
be applied to the wheel that is not spinning.
BLD may remain enabled even if TCS and
ESC are in a reduced mode.
Trailer Sway Control (TSC)
Trailer Sway Control (TSC) uses sensors in
the vehicle to recognize an excessively
swaying trailer and will take the appropriate
actions to attempt to stop the sway. TSC will
become active automatically once an exces -
sively swaying trailer is recognized.
NOTE:
TSC cannot stop all trailers from swaying.
Always use caution when towing a trailer and
follow the trailer tongue weight recommen -dations. Refer to “Trailer Towing” in
“Starting And Operating” for further informa
-
tion.
When TSC is functioning, the “ESC Activa -
tion/Malfunction Indicator Light” will flash,
the engine power may be reduced and you
may feel the brakes being applied to indi -
vidual wheels to attempt to stop the trailer
from swaying. TSC is disabled when the ESC
system is in the “Partial Off” or “Full Off”
modes.
AUXILIARY DRIVING
SYSTEMS
Blind Spot Monitoring (BSM) — If
Equipped
The Blind Spot Monitoring (BSM) system
uses two radar-based sensors, located inside
the rear bumper fascia, to detect highway
licensable vehicles (automobiles, trucks,
motorcycles, etc.) that enter the blind spot
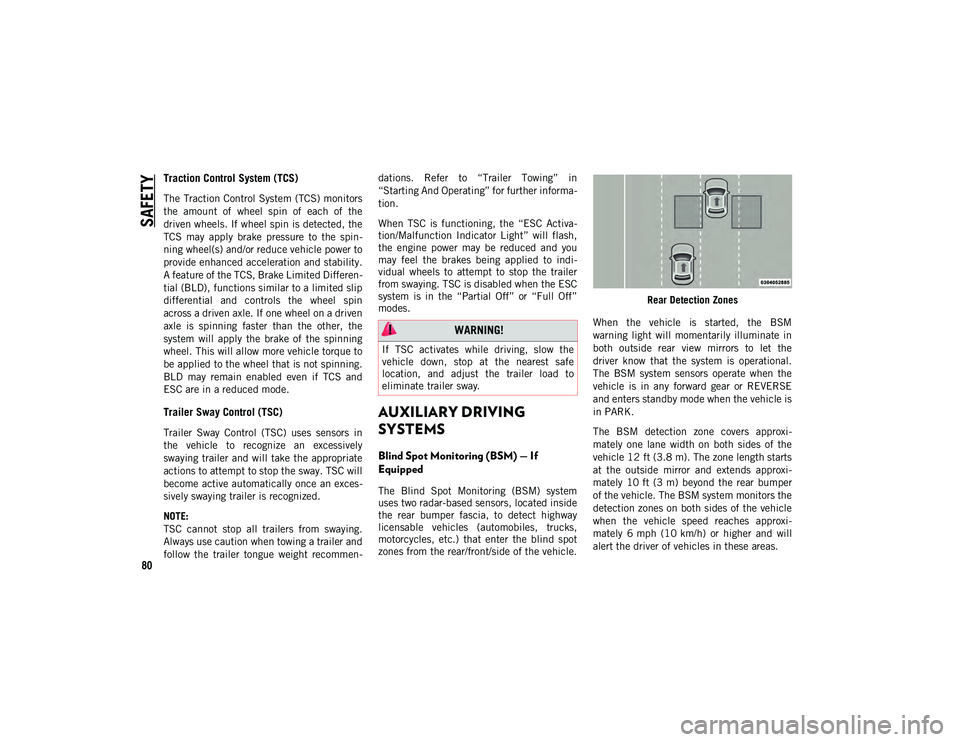
zones from the rear/front/side of the vehicle. Rear Detection Zones
When the vehicle is started, the BSM
warning light will momentarily illuminate in
both outside rear view mirrors to let the
driver know that the system is operational.
The BSM system sensors operate when the
vehicle is in any forward gear or REVERSE
and enters standby mode when the vehicle is
in PARK.
The BSM detection zone covers approxi -
mately one lane width on both sides of the
vehicle 12 ft (3.8 m). The zone length starts
at the outside mirror and extends approxi -
mately 10 ft (3 m) beyond the rear bumper
of the vehicle. The BSM system monitors the
detection zones on both sides of the vehicle
when the vehicle speed reaches approxi -
mately 6 mph (10 km/h) or higher and will
alert the driver of vehicles in these areas.
WARNING!
If TSC activates while driving, slow the
vehicle down, stop at the nearest safe
location, and adjust the trailer load to
eliminate trailer sway.
2020_JEEP_M6_UG_UK.book Page 80
Page 83 of 328
81
NOTE:
The BSM system does NOT alert the driver
about rapidly approaching vehicles that
are outside the detection zones.
The BSM system detection zone DOES
NOT change if your vehicle is towing a
trailer. Therefore, visually verify the adja-
cent lane is clear for both your vehicle and
trailer before making a lane change. If the
trailer or other object (i.e., bicycle, sports
equipment) extends beyond the side of
your vehicle, this may result in the BSM
warning light remaining illuminated the
entire time the vehicle is in a forward gear.
It may be necessary to deactivate the BSM
system manually to avoid miss-detection.
Refer to “Uconnect Settings” in “Multi-
media” in the Owner’s Manual for further
information.
The Blind Spot Monitoring (BSM) system
may experience drop outs (blinking on and
off) of the side mirror Warning Indicator
lamps when a motorcycle or any small
object remains at the side of the vehicle
for extended periods of time (more than a
couple of seconds).
The area on the rear fascia where the radar
sensors are located must remain free of
snow, ice, and dirt/road contamination so that the BSM system can function properly.
Do not block the area of the rear fascia where
the radar sensors are located with foreign
objects (bumper stickers, bicycle racks, etc.)
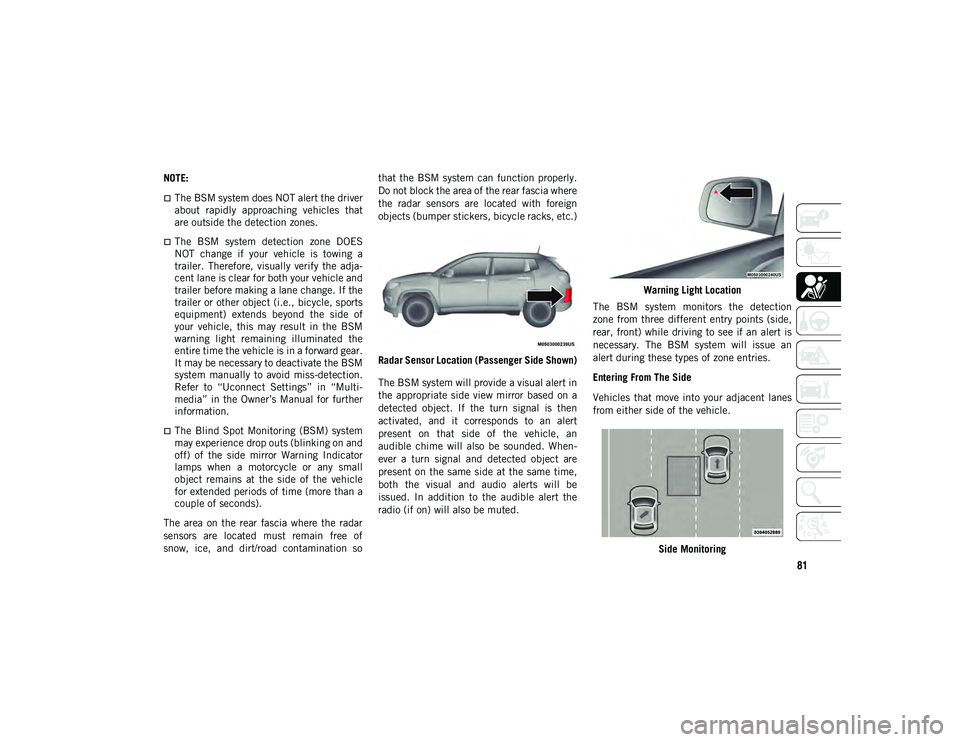
Radar Sensor Location (Passenger Side Shown)
The BSM system will provide a visual alert in
the appropriate side view mirror based on a
detected object. If the turn signal is then
activated, and it corresponds to an alert
present on that side of the vehicle, an
audible chime will also be sounded. When -
ever a turn signal and detected object are
present on the same side at the same time,
both the visual and audio alerts will be
issued. In addition to the audible alert the
radio (if on) will also be muted. Warning Light Location
The BSM system monitors the detection
zone from three different entry points (side,
rear, front) while driving to see if an alert is
necessary. The BSM system will issue an
alert during these types of zone entries.
Entering From The Side
Vehicles that move into your adjacent lanes
from either side of the vehicle.
Side Monitoring
2020_JEEP_M6_UG_UK.book Page 81
Page 85 of 328
83
Rear Cross Path (RCP)
The Rear Cross Path (RCP) feature is
intended to aid the driver when backing out
of parking spaces where their vision of
oncoming vehicles may be blocked. Proceed
slowly and cautiously out of the parking
space until the rear end of the vehicle is
exposed. The RCP system will then have a
clear view of the cross traffic and if an
oncoming vehicle is detected, alert the
driver.
RCP monitors the rear detection zones on
both sides of the vehicle, for objects that are
moving toward the side of the vehicle with a
minimum speed of approximately 3 mph(5 km/h), to objects moving a maximum of
approximately 20 mph (32 km/h), such as in
parking lot situations.
NOTE:
In a parking lot situation, oncoming vehicles
can be obscured by vehicles parked on either
side. If the sensors are blocked by other
structures or vehicles, the system will not be
able to alert the driver.
When RCP is on and the vehicle is in
REVERSE, the driver is alerted using both
the visual and audible alarms, including
reducing the radio volume.
Modes Of Operation
Three selectable modes of operation are
available in the Uconnect System. Refer to
“Uconnect Settings” in “Multimedia” in the
Owner’s Manual for further information.
Blind Spot Alert Lights Only (Default Setting)
When operating in Blind Spot Alert mode,
the BSM system will provide a visual alert in
the appropriate side view mirror based on a
detected object. However, when the system
is operating in Rear Cross Path (RCP) mode,
the system will respond with both visual and
audible alerts when a detected object is
present. Whenever an audible alert is
requested, the radio is muted.
Blind Spot Alert Lights/Chime
When operating in Blind Spot Alert Lights/
Chime mode, the BSM system will provide a
visual alert in the appropriate side view
mirror based on a detected object. If the turn
signal is then activated, and it corresponds
to an alert present on that side of the vehicle,
an audible chime will also be sounded.
Whenever a turn signal and detected object
are present on the same side at the same
WARNING!
The Blind Spot Monitoring system is only
an aid to help detect objects in the blind
spot zones. The BSM system is not
designed to detect pedestrians, bicyclists,
or animals. Even if your vehicle is
equipped with the BSM system, always
check your vehicle’s mirrors, glance over
your shoulder, and use your turn signal
before changing lanes. Failure to do so can
result in serious injury or death.
WARNING!
Rear Cross Path Detection (RCP) is not a
back up aid system. It is intended to be
used to help a driver detect an oncoming
vehicle in a parking lot situation. Drivers
must be careful when backing up, even
when using RCP. Always check carefully
behind your vehicle, look behind you, and
be sure to check for pedestrians, animals,
other vehicles, obstructions, and blind
spots before backing up. Failure to do so
can result in serious injury or death.
2020_JEEP_M6_UG_UK.book Page 83
Page 180 of 328
IN CASE OF EMERGENCY
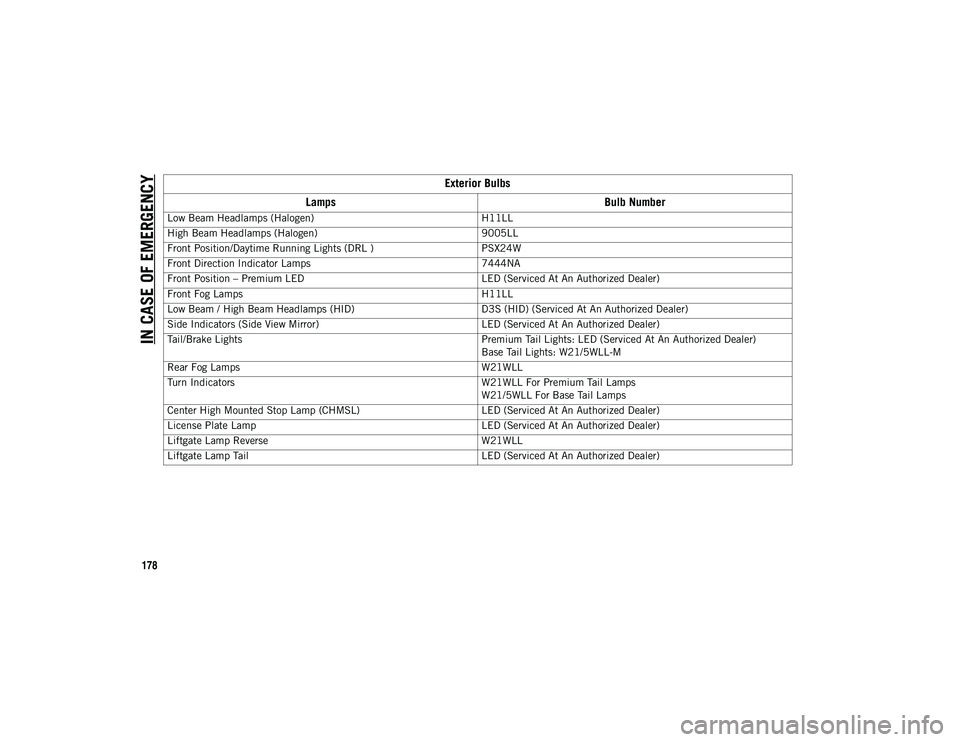
178Exterior Bulbs
Lamps Bulb Number
Low Beam Headlamps (Halogen) H11LL
High Beam Headlamps (Halogen) 9005LL
Front Position/Daytime Running Lights (DRL ) PSX24W
Front Direction Indicator Lamps 7444NA
Front Position – Premium LED LED (Serviced At An Authorized Dealer)
Front Fog Lamps H11LL
Low Beam / High Beam Headlamps (HID) D3S (HID) (Serviced At An Authorized Dealer)
Side Indicators (Side View Mirror) LED (Serviced At An Authorized Dealer)
Tail/Brake Lights Premium Tail Lights: LED (Serviced At An Authorized Dealer)
Base Tail Lights: W21/5WLL-M
Rear Fog Lamps W21WLL
Turn Indicators W21WLL For Premium Tail Lamps
W21/5WLL For Base Tail Lamps
Center High Mounted Stop Lamp (CHMSL) LED (Serviced At An Authorized Dealer)
License Plate Lamp LED (Serviced At An Authorized Dealer)
Liftgate Lamp Reverse W21WLL
Liftgate Lamp Tail LED (Serviced At An Authorized Dealer)
2020_JEEP_M6_UG_UK.book Page 178
Page 188 of 328
IN CASE OF EMERGENCY
186
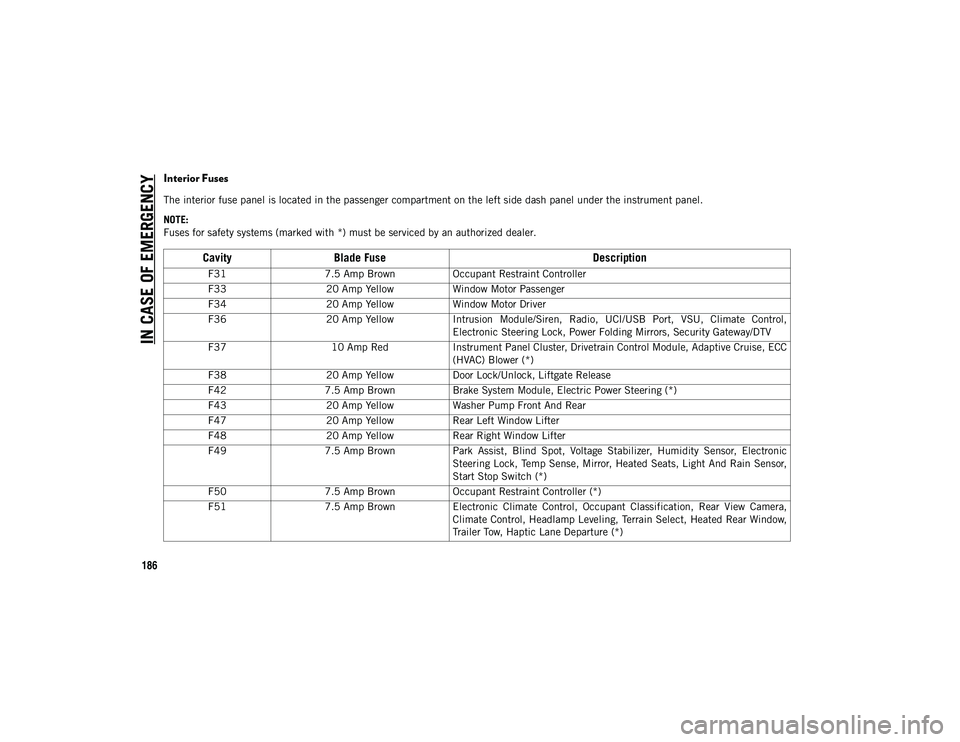
Interior Fuses
The interior fuse panel is located in the passenger compartment on the left side dash panel under the instrument panel.
NOTE:
Fuses for safety systems (marked with *) must be serviced by an authorized dealer.
CavityBlade Fuse Description
F317.5 Amp Brown Occupant Restraint Controller
F33 20 Amp Yellow Window Motor Passenger
F34 20 Amp Yellow Window Motor Driver
F36 20 Amp Yellow Intrusion Module/Siren, Radio, UCI/USB Port, VSU, Climate Control,
Electronic Steering Lock, Power Folding Mirrors, Security Gateway/DTV
F37 10 Amp RedInstrument Panel Cluster, Drivetrain Control Module, Adaptive Cruise, ECC
(HVAC) Blower (*)
F38 20 Amp Yellow Door Lock/Unlock, Liftgate Release
F42 7.5 Amp Brown Brake System Module, Electric Power Steering (*)
F43 20 Amp Yellow Washer Pump Front And Rear
F47 20 Amp Yellow Rear Left Window Lifter
F48 20 Amp Yellow Rear Right Window Lifter
F49 7.5 Amp Brown Park Assist, Blind Spot, Voltage Stabilizer, Humidity Sensor, Electronic
Steering Lock, Temp Sense, Mirror, Heated Seats, Light And Rain Sensor,
Start Stop Switch (*)
F50 7.5 Amp Brown Occupant Restraint Controller (*)
F51 7.5 Amp Brown Electronic Climate Control, Occupant Classification, Rear View Camera,
Climate Control, Headlamp Leveling, Terrain Select, Heated Rear Window,
Trailer Tow, Haptic Lane Departure (*)
2020_JEEP_M6_UG_UK.book Page 186
Page 245 of 328
243
Plastic And Coated Parts
Use a specific product to clean vinyl uphol-
stery.
Cleaning Plastic Instrument Cluster Lenses
The lenses in front of the instruments in this
vehicle are molded in clear plastic. When
cleaning the lenses, care must be taken to
avoid scratching the plastic.
1. Clean with a wet soft cloth. A mild soap solution may be used, but do not use
high alcohol content or abrasive
cleaners. If soap is used, wipe clean with
a clean damp cloth.
2. Dry with a soft cloth.
Leather Parts
Your leather upholstery can be best
preserved by regular cleaning with a damp
soft cloth. Small particles of dirt can act as
an abrasive and damage the leather uphol -
stery and should be removed promptly with a
damp cloth. Care should be taken to avoid
soaking your leather upholstery with any
liquid. Please do not use polishes, oils,
cleaning fluids, solvents, detergents, or
ammonia-based cleaners to clean your
leather upholstery. Application of a leather
conditioner is not required to maintain the
original condition.
NOTE:
If equipped with light colored leather, it
tends to show any foreign material, dirt, and
fabric dye transfer more so than darker
colors. The leather is designed for easy
cleaning.
Glass Surfaces
All glass surfaces should be cleaned on a
regular basis with any commercial house -
hold-type glass cleaner. Never use an abra -
sive type cleaner. Use caution when cleaning
the inside rear window equipped with elec -
tric defrosters or windows equipped with
radio antennas. Do not use scrapers or other
sharp instruments that may scratch the
elements.
When cleaning the rear view mirror, spray
cleaner on the towel or cloth that you are
using. Do not spray cleaner directly on the
mirror.
CAUTION!
Direct contact of air fresheners, insect
repellents, suntan lotions, or hand sani -
tizers to the plastic, painted, or deco-
rated surfaces of the interior may cause
permanent damage. Wipe away immedi -
ately.
Damage caused by these type of prod -
ucts may not be covered by your New
Vehicle Limited Warranty.
CAUTION!
Do not use Alcohol and Alcohol-based and/
or Ketone based cleaning products to
clean leather upholstery, as damage to the
upholstery may result.
2020_JEEP_M6_UG_UK.book Page 243
Page 299 of 328
297
Get Started
All you need to control your Uconnect system
with your voice are the buttons on your
steering wheel.
1. Visit DriveUconnect.eu or see an autho-
rized dealer to check mobile device and
feature compatibility and to find phone
pairing instructions.
2. Reduce background noise. Wind and passenger conversations are examples of
noise that may impact recognition.
3. Speak clearly at a normal pace and volume while facing straight ahead. The
microphone is positioned on the rearview
mirror and aimed at the driver.
4. Each time you give a Voice Command, you must first push either the Voice
Recognition (VR) or Phone button, wait
until after the beep, then say your Voice
Command.
5. You can interrupt the help message or system prompts by pushing the VR or
Phone button and saying a Voice
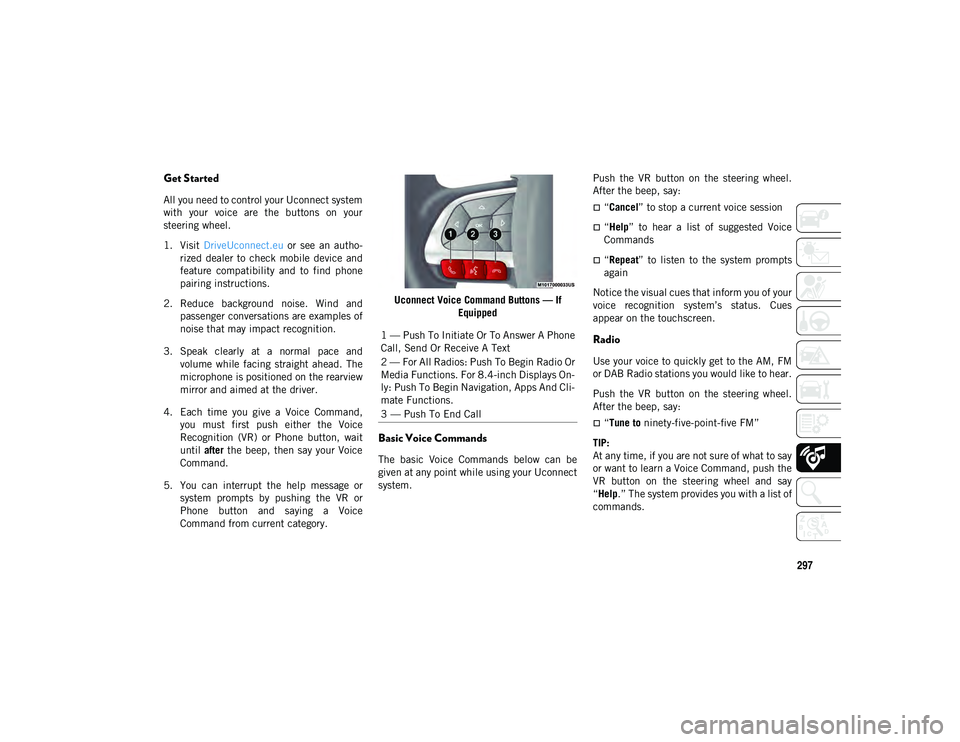
Command from current category. Uconnect Voice Command Buttons — If
Equipped
Basic Voice Commands
The basic Voice Commands below can be
given at any point while using your Uconnect
system. Push the VR button on the steering wheel.
After the beep, say:
“Cancel
” to stop a current voice session
“Help” to hear a list of suggested Voice
Commands
“Repeat ” to listen to the system prompts
again
Notice the visual cues that inform you of your
voice recognition system’s status. Cues
appear on the touchscreen.
Radio
Use your voice to quickly get to the AM, FM
or DAB Radio stations you would like to hear.
Push the VR button on the steering wheel.
After the beep, say:
“Tune to ninety-five-point-five FM”
TIP:
At any time, if you are not sure of what to say
or want to learn a Voice Command, push the
VR button on the steering wheel and say
“Help .” The system provides you with a list of
commands.
1 — Push To Initiate Or To Answer A Phone
Call, Send Or Receive A Text
2 — For All Radios: Push To Begin Radio Or
Media Functions. For 8.4-inch Displays On
-
ly: Push To Begin Navigation, Apps And Cli -
mate Functions.
3 — Push To End Call
2020_JEEP_M6_UG_UK.book Page 297