ESP JEEP COMPASS 2023 User Guide
[x] Cancel search | Manufacturer: JEEP, Model Year: 2023, Model line: COMPASS, Model: JEEP COMPASS 2023Pages: 344, PDF Size: 18.8 MB
Page 99 of 344
GETTING TO KNOW YOUR INSTRUMENT PANEL97
Turn Signal Indicator Lights
When the left or right turn signal is
activated, the turn signal indicator will
flash independently and the
corresponding exterior turn signal lamps
will flash. Turn signals can be activated when
the multifunction lever is moved down (left) or
up (right).
NOTE:
A continuous chime will sound if the vehicle is
driven more than 1 mile (1.6 km) with either
turn signal on.
Check for an inoperative outside light bulb if
either indicator flashes at a rapid rate.
Cruise Control SET Indicator Light —
If Equipped With A Premium Instrument
Cluster
This indicator light will illuminate when
the Cruise Control is set to the desired
speed Ú page 117.
Stop/Start Active Indicator Light —
If Equipped
This indicator light will illuminate when
the Stop/Start function is in “Autostop”
mode.
Automatic High Beam Indicator Light —
If Equipped
This indicator shows that the automatic
high beam headlights are on Úpage 43.
WHITE INDICATOR LIGHTS
Active Lane Management Indicator Light —
If Equipped
When the Active Lane Management
system is ON, but not armed, the Active
Lane Management indicator light
illuminates solid white. This occurs when
only left, right, or neither lane line has been
detected. If a single lane line is detected, the
system is ready to provide only visual warnings if
an unintentional lane departure occurs on the
detected lane line Ú page 145.
Hill Descent Control (HDC) Indicator
Light — If Equipped
This indicator shows when the HDC
feature is turned on. The lamp will be on
solid when HDC is armed. HDC can only
be armed when the transfer case is in the
4WD Low position and the vehicle speed is less
then 30 mph (48 km/h). If these conditions are not
met while attempting to use the HDC feature, the
HDC indicator light will flash on/off.
Cruise Control Ready Indicator Light —
If Equipped With A Premium Instrument
Cluster
This light will turn on when the Cruise
Control has been turned on, but not set
Ú page 117.
Cruise Control SET Indicator Light —
If Equipped
This indicator light will illuminate when
the Cruise Control is set Ú page 117.
BLUE INDICATOR LIGHTS
High Beam Indicator Light
This indicator light will illuminate to
indicate that the high beam headlights
are on. With the low beams activated,
push the multifunction lever forward
(toward the front of the vehicle) to turn on the high
beams. Pull the multifunction lever rearward
(toward the rear of the vehicle) to turn off the high
beams. If the high beams are off, pull the lever
toward you for a temporary high beam on, “flash to
pass” scenario.
3
22_MP_OM_EN_USC_t.book Page 97
Page 110 of 344
108STARTING AND OPERATING
NOTE:
The transmission electronics are self-cali -
brating; therefore, the first few shifts on a new
vehicle may be somewhat abrupt. This is a
normal condition, and precision shifts will
develop within a few hundred miles (kilome -
ters).
In the event of a mismatch between the gear
selector position and the actual transmission
gear (for example, driver selects REVERSE (R)
while driving forward), the position indicator will
blink continuously until the selector is returned
to the proper position, or the requested shift can
be completed.
The electronically controlled transmission adapts
its shift schedule based on driver inputs, along
with environmental and road conditions.
The 9-speed transmission has been developed to
meet the needs of current and future FWD/AWD
vehicles. Software and calibration is refined to
optimize the customer’s driving experience and
fuel economy. By design, some vehicle and
driveline combinations utilize NINTH gear only in
very specific driving situations and conditions. Only shift from DRIVE to PARK or REVERSE when
the accelerator pedal is released and the vehicle is
stopped. Be sure to keep your foot on the brake
pedal when shifting between these gears.
The transmission gear selector provides PARK,
REVERSE, NEUTRAL, DRIVE, and AutoStick (+/-)
shift positions. Manual shifts can be made using
the AutoStick shift control
Úpage 111. Moving the
gear selector into the AutoStick (+/-) position
(beside the DRIVE position) activates AutoStick
mode, providing manual shift control and
displaying the current gear in the instrument
cluster (as 1, 2, 3, etc.). Toggling the gear selector
forward (-) or rearward (+) while in the AutoStick
position will manually select the transmission gear.
NOTE:If the gear selector cannot be moved to the PARK,
REVERSE, or NEUTRAL position (when pushed
forward) it is probably in the AutoStick (+/-)
position (beside the DRIVE position). In AutoStick
mode, the transmission gear (1, 2, 3, etc.) is
displayed in the instrument cluster. Move the gear
selector to the right (into the DRIVE [D] position) for
access to PARK, REVERSE, and NEUTRAL.
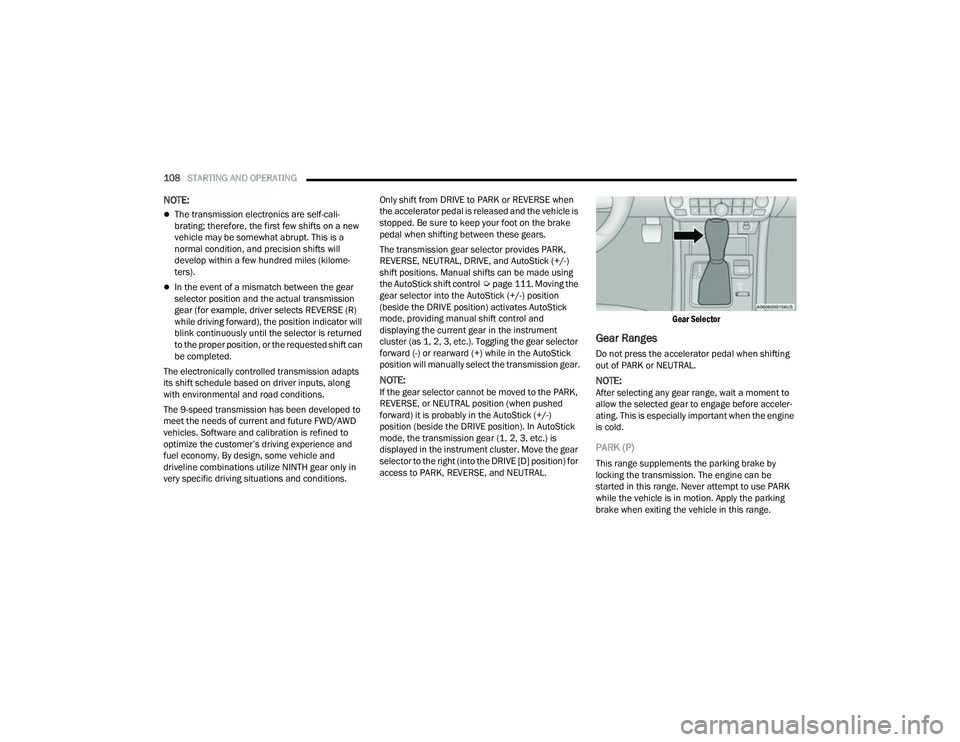
Gear Selector
Gear Ranges
Do not press the accelerator pedal when shifting
out of PARK or NEUTRAL.
NOTE:After selecting any gear range, wait a moment to
allow the selected gear to engage before acceler
-
ating. This is especially important when the engine
is cold.
PARK (P)
This range supplements the parking brake by
locking the transmission. The engine can be
started in this range. Never attempt to use PARK
while the vehicle is in motion. Apply the parking
brake when exiting the vehicle in this range.
22_MP_OM_EN_USC_t.book Page 108
Page 112 of 344
110STARTING AND OPERATING
The following indicators should be used to ensure
that you have properly engaged the transmission
into the PARK position:
When shifting into PARK, push the lock button
on the gear selector, and firmly move the
selector all the way forward until it stops and is
fully seated.
Look at the transmission gear position display
and verify that it indicates the PARK position (P).
With the brake pedal released, verify that the
gear selector will not move out of PARK.
REVERSE (R)
This range is for moving the vehicle backward.
Shift into REVERSE only after the vehicle has come
to a complete stop.
NEUTRAL (N)
Use this range when the vehicle is standing for
prolonged periods with the engine running. The
engine may be started in this range. Apply the
parking brake and shift the transmission into
PARK if you must exit the vehicle.
DRIVE (D)
This range should be used for most city and
highway driving. It provides the smoothest upshifts
and downshifts, and the best fuel economy. The
transmission automatically upshifts through all
forward gears. When frequent transmission shifting occurs (such
as when operating the vehicle under heavy loading
conditions, in hilly terrain, traveling into strong
head winds, or while towing a heavy trailer), use
the AutoStick shift control to select a lower gear
Ú
page 111. Under these conditions, using a lower
gear will improve performance and extend
transmission life by reducing excessive shifting
and heat build-up.
If the transmission temperature exceeds normal
operating limits, the transmission controller may
modify the transmission shift schedule, reduce
engine torque, and/or expand the range of torque
converter clutch engagement. This is done to
prevent transmission damage due to overheating.
If the transmission becomes extremely hot, the
Transmission Temperature Warning Light may
illuminate, and the transmission may operate
differently until the transmission cools down.
During cold temperatures, transmission operation
may be modified depending on engine and/or
transmission temperature as well as vehicle
speed. This feature improves warm-up time of the
engine and transmission to achieve maximum
efficiency. Engagement of the torque converter
clutch (and, for the 9-speed, shifts into EIGHTH or
NINTH gear), are inhibited until the engine and/or
transmission is warm. Normal operation will
resume once the temperature(s) have risen to a
suitable level.
WARNING!
Do not coast in NEUTRAL and never turn off the
ignition to coast down a hill. These are unsafe
practices that limit your response to changing
traffic or road conditions. You might lose control
of the vehicle and have a collision.
CAUTION!
Towing the vehicle, coasting, or driving for any
other reason with the transmission in NEUTRAL
can cause severe transmission damage.
For Recreational Towing Ú page 160.
For Towing A Disabled Vehicle Ú page 264.
22_MP_OM_EN_USC_t.book Page 110
Page 114 of 344
112STARTING AND OPERATING
5. Restart the engine.
6. Shift into the desired gear range. If the problem is no longer detected, the
transmission will return to normal operation.
NOTE:Even if the transmission can be reset, we
recommend that you visit an authorized dealer at
your earliest possible convenience. An authorized
dealer has diagnostic equipment to assess the
condition of your transmission. If the transmission
cannot be reset, authorized dealer service is
required.
TORQUE CONVERTER CLUTCH
A feature designed to improve fuel economy has
been included in the automatic transmission on
your vehicle. A clutch within the torque converter
engages automatically at calibrated speeds. This
may result in a slightly different feeling or response
during normal operation in the upper gears. When
the vehicle speed drops or during some
accelerations, the clutch automatically
disengages.
NOTE:The torque converter clutch will not engage until
the engine and/or transmission is warm (usually
after 1 to 3 miles [2 to 5 km] of driving). Because
the engine speed is higher when the torque
converter clutch is not engaged, it may seem as if the transmission is not shifting properly when the
vehicle is cold. This is normal. The torque converter
clutch will function normally once the powertrain is
sufficiently warm.
FOUR-WHEEL DRIVE OPERATION —
IF EQUIPPED
JEEP® ACTIVE DRIVE
Your vehicle may be equipped with a Power
Transfer Unit (PTU). This system is automatic
with no driver inputs or additional driving skills
required. Under normal driving conditions, the
front wheels provide most of the traction. If the
front wheels begin to lose traction, power is shifted
automatically to the rear wheels. The greater the
front wheel traction loss, the greater the power
transfer to the rear wheels.
Additionally, on dry pavement under heavy throttle
input (where one may have no wheel spin), torque
will be sent to the rear in a preemptive effort to
improve vehicle launch and performance
characteristics.
Four-Wheel Drive (4x4)
The four-wheel drive (4WD) is fully automatic in
normal driving mode.
NOTE:It is not possible to carry out the change of mode
when the vehicle exceeds the speed of 75 mph
(120 km/h).
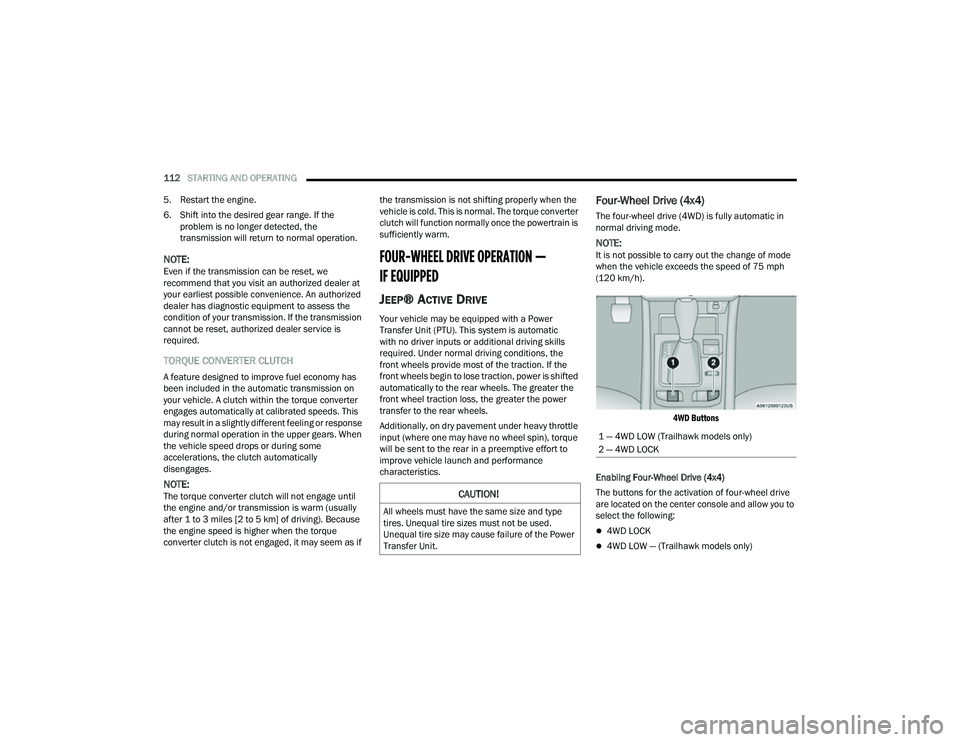
4WD Buttons
Enabling Four-Wheel Drive (4x4)
The buttons for the activation of four-wheel drive
are located on the center console and allow you to
select the following:
4WD LOCK
4WD LOW — (Trailhawk models only)
CAUTION!
All wheels must have the same size and type
tires. Unequal tire sizes must not be used.
Unequal tire size may cause failure of the Power
Transfer Unit.
1 — 4WD LOW (Trailhawk models only)
2 — 4WD LOCK
22_MP_OM_EN_USC_t.book Page 112
Page 116 of 344

114STARTING AND OPERATING
NOTE:
ROCK mode is only available on the vehicles
equipped with the Off-Road package.
Activate the Hill Descent Control for steep down -
hill control Ú page 188.
POWER STEERING
The electric power steering system will provide
increased vehicle response and ease of
maneuverability. The electric power steering
system adapts to different driving conditions.
If the “SERVICE POWER STEERING” or “POWER
STEERING ASSIST OFF - SERVICE SYSTEM”
message and a steering wheel icon are displayed
on the instrument cluster display, it indicates that
the vehicle needs to be taken to an authorized
dealer for service. It is likely the vehicle has lost
power steering assistance Ú page 77.If the “POWER STEERING SYSTEM HOT -
PERFORMANCE MAY BE LIMITED” message and an
icon are displayed on the instrument cluster
display, it indicates that extreme steering
maneuvers may have occurred, which caused an
over temperature condition in the electric power
steering system. You will lose power steering
assistance momentarily until the over temperature
condition no longer exists. Once driving conditions
are safe, pull over and let the vehicle idle for a few
moments until the light turns off Ú
page 77.
NOTE:
Even if the power steering system is no longer
operational, it is still possible to steer the
vehicle. Under these conditions there will be a
substantial increase in steering effort, espe -
cially at low speeds and during parking maneu -
vers.
If the condition persists, see an authorized
dealer for service.
STOP/START SYSTEM — IF EQUIPPED
The Stop/Start function is developed to reduce
fuel consumption. The system will stop the engine
automatically during a vehicle stop if the required
conditions are met. Releasing the brake pedal or
pressing the accelerator pedal will automatically
restart the engine. This vehicle has been upgraded with a heavy-duty
starter, enhanced battery, and other upgraded
engine parts, to handle the additional engine
starts.
AUTOSTOP MODE
The Stop/Start feature is enabled after every
normal customer engine start. At that time, the
system will go into STOP/START READY.
To Activate The Autostop Mode, The Following
Must Occur:
The system must be in STOP/START READY
state. A “STOP/START READY” message will be
displayed in the instrument cluster display
within the Stop/Start section Ú
page 77.
The vehicle must be completely stopped.
The gear selector must be in a forward gear and
the brake pedal pressed.
The engine will shut down, the tachometer will
move to the zero position, and the Stop/Start
telltale will illuminate indicating you are in
Autostop. Customer settings will be maintained
upon return to an engine-running condition.
WARNING!
Continued operation with reduced assist could
pose a safety risk to yourself and others. Service
should be obtained as soon as possible.
22_MP_OM_EN_USC_t.book Page 114
Page 121 of 344
STARTING AND OPERATING119
(Continued)
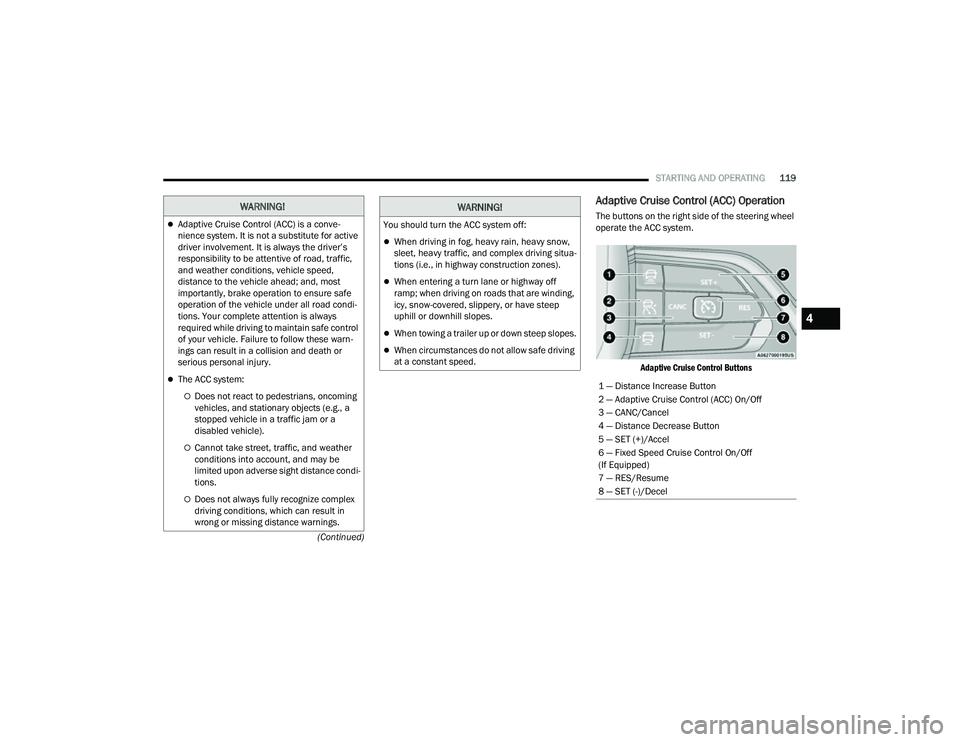
Adaptive Cruise Control (ACC) Operation
The buttons on the right side of the steering wheel
operate the ACC system.
Adaptive Cruise Control Buttons
WARNING!
Adaptive Cruise Control (ACC) is a conve -
nience system. It is not a substitute for active
driver involvement. It is always the driver’s
responsibility to be attentive of road, traffic,
and weather conditions, vehicle speed,
distance to the vehicle ahead; and, most
importantly, brake operation to ensure safe
operation of the vehicle under all road condi -
tions. Your complete attention is always
required while driving to maintain safe control
of your vehicle. Failure to follow these warn -
ings can result in a collision and death or
serious personal injury.
The ACC system:
Does not react to pedestrians, oncoming
vehicles, and stationary objects (e.g., a
stopped vehicle in a traffic jam or a
disabled vehicle).
Cannot take street, traffic, and weather
conditions into account, and may be
limited upon adverse sight distance condi -
tions.
Does not always fully recognize complex
driving conditions, which can result in
wrong or missing distance warnings.
You should turn the ACC system off:
When driving in fog, heavy rain, heavy snow,
sleet, heavy traffic, and complex driving situa -
tions (i.e., in highway construction zones).
When entering a turn lane or highway off
ramp; when driving on roads that are winding,
icy, snow-covered, slippery, or have steep
uphill or downhill slopes.
When towing a trailer up or down steep slopes.
When circumstances do not allow safe driving
at a constant speed.
WARNING!
1 — Distance Increase Button
2 — Adaptive Cruise Control (ACC) On/Off
3 — CANC/Cancel
4 — Distance Decrease Button
5 — SET (+)/Accel
6 — Fixed Speed Cruise Control On/Off
(If Equipped)
7 — RES/Resume
8 — SET (-)/Decel
4
22_MP_OM_EN_USC_t.book Page 119
Page 131 of 344
STARTING AND OPERATING129
(Continued)
HIGHWAY ASSIST SYSTEM — IF EQUIPPED
OPERATION
The Highway Assist system (HAS) is combined with
the Adaptive Cruise Control (ACC) system, and
centers the vehicle in the driving lane while
traveling on controlled access highways at speeds
up to 90 mph (145 km/h).
For ACC system operating instructions and system
limitations, see Ú page 118.
NOTE:
The driver should always obey traffic laws and
speed limits. Never drive above applicable
speed limit restrictions.
The driver can override HAS at any time by
braking, accelerating, or steering the vehicle.
Just like ACC, HAS will maintain a set speed as long
as the set distance between your vehicle and the
vehicle in front is maintained. HAS will also keep
your vehicle centered between the lane lines, and
monitor for other vehicles in adjacent lanes by
utilizing the Blind Spot Monitoring sensors. HAS uses sensors within the steering wheel to
measure driver attentiveness. HAS requires the
driver’s hands on the steering wheel at all times.
The system will generally aim to keep the vehicle
centered in the lane, but when the driver turns the
steering wheel (e.g. to move further away from a
large vehicle in the next lane) the system will
reduce its control and enter "co-steering" mode.
While in co-steering mode, the system will provide
reduced assistance and allow the driver to control
the path of the vehicle. Once the driver stops
providing input to the steering wheel, the system
will require a few seconds to fully resume lane
centering assistance, especially during curves.
WARNING!
The Highway Assist system is a convenience
system. It is not a substitute for active driver
involvement. It is always the driver’s
responsibility to be attentive of road traffic,
weather conditions, vehicle speed, distance to
the vehicle ahead, position in the lane compared
to other vehicles, and brake operation to ensure
safe operation of the vehicle under all road
conditions. Your complete attention is always
required while driving to maintain safe control of
your vehicle. Failure to follow these warnings can
result in a collision and death or serious
personal injury.
You should turn off the Highway Assist system:
When driving in complex driving situations
(e.g. urban environments, construction zones,
etc.), adverse weather (e.g. rain, snow, fog,
sleet, dust), or adverse road conditions
(e.g. heavy traffic, worn or missing lane
markings, etc.).
When entering a highway off ramp, when
driving on roads that are, icy, snow covered, or
slippery.
When circumstances do not allow safe driving
at a constant speed.
WARNING!
4
22_MP_OM_EN_USC_t.book Page 129
Page 134 of 344

132STARTING AND OPERATING
(Continued)
Highway Assist Indicators Are Yellow
Driver inattentiveness has been detected,
warning the driver to place hands on the
steering wheel.
Highway Assist Indicators Are Red
Driver inattentiveness is still being detected,
warning the driver to place hands on the
steering wheel.
NOTE:The driver MUST replace hands on the steering
wheel and take control of the vehicle when the
system is deactivated.
Highway Assist Cancelled Message
SYSTEM STATUS
Along with changes in the system’s indicator lights
(green, yellow, and red), the system can also issue
a steering wheel vibration to accompany these
warnings. The vibration warning (if enabled) will
occur if the vehicle crosses a lane marker, for
example, when driving on a tight curve. This
feature can be turned on or off within the Uconnect
system Ú page 165.
SYSTEM OPERATION/LIMITATIONS
The Highway Assist system DOES NOT:
Warn or prevent collisions with other vehicles
Steer your vehicle around stopped vehicles,
slower vehicles, construction equipment,
pedestrians, or animals
Respond to traffic lights or stop signs
Merge onto highways or exit off-ramps
Change lanes or turn
React to cross traffic
NOTE:Adaptive Cruise Control (ACC) is a core component
of the Highway Assist system. For ACC system
limitations Úpage 118.
WARNING!
Highway Assist is an SAE Level 2 Driver Assist
feature, requiring driver attention at all times.
To prevent serious injury or death:
Always remain alert and be ready to take
control of the vehicle in the event that the
Highway Assist system disables.
Always keep your hands on the steering wheel
when the Highway Assist system is activated.
Do not use a hand-held device when the
Highway Assist system is engaged.
Maintain a safe distance from other vehicles
and pay attention to traffic conditions.
Do not place any objects on the steering wheel
(e.g. steering wheel covers) which could inter -
fere with the hand detection sensors.
WARNING!
22_MP_OM_EN_USC_t.book Page 132
Page 135 of 344
STARTING AND OPERATING133
The Highway Assist system may have limited or
reduced functionality when one of the following
conditions occur:
The vehicle’s radar sensors and/or forward
facing camera is damaged, covered, misaligned,
or obstructed (e.g. by mud, ice, snow, etc.)
Driving near highway toll booths
NOTE:If damage to the windshield occurs, have the
windshield replaced by an authorized dealer as
soon as possible.
PARKSENSE FRONT/REAR PARK ASSIST
SYSTEM — IF EQUIPPED
The ParkSense Park Assist system provides visual
and audible indications of the distance between
the rear, and if equipped, the front fascia/bumper
and a detected obstacle when backing up or
moving forward (e.g. during a parking maneuver).
NOTE:
The system is provided to assist the driver and
not to substitute the driver.
The driver must stay in full control of the
vehicle's acceleration and braking and is
responsible for controlling the vehicle's move -
ments Ú page 137. ParkSense will retain the last system state
(enabled or disabled) from the last ignition cycle
when the ignition is changed to the ON/RUN
position.
ParkSense is active in DRIVE or REVERSE, as long
as the system is on. The system will remain active
until the vehicle speed is increased to
approximately 7 mph (11 km/h) or above. While in
REVERSE and above the system's operating speed,
a warning will appear in the instrument cluster
display indicating the vehicle speed is too fast. The
system will become active again if the vehicle
speed is decreased to speeds less than
approximately 6 mph (9 km/h).
PARKSENSE SENSORS
The six ParkSense sensors (four when vehicle is
not equipped with front sensors), located in the
rear fascia/bumper, and the six ParkSense
sensors located in the front fascia/bumper,
monitor the area in front and behind the vehicle
that is within the sensors’ field of view. The front
sensors detect obstacles from approximately
12 inches (30 cm) up to 47 inches (120 cm) from
the front fascia/bumper. The rear sensors can
detect obstacles from approximately 12 inches
(30 cm) up to 79 inches (200 cm) from the rear
fascia/bumper. These distances depend on the
location, type and orientation of the obstacle in the
horizontal direction.
PARKSENSE WARNING DISPLAY
The ParkSense Warning screen will only be
displayed if “Sound and Display” is selected from
the Customer - Programmable Features section of
the Uconnect system Ú
page 165.
The ParkSense Warning screen is located within
the instrument cluster display Ú page 77. It
provides visual warnings to indicate the distance
between the rear fascia/bumper and/or front
fascia/bumper and the detected obstacle.
PARKSENSE DISPLAY
The warning display will turn on indicating the
system status when the vehicle is in REVERSE or
when the vehicle is in DRIVE and an obstacle has
been detected.
The system will indicate a detected obstacle by
showing a single arc in the left and/or right front or
rear regions based on the object’s distance and
location relative to the vehicle.
If an object is detected in the left and/or right rear
region, the display will show a single arc in the
left and/or right rear region and the system will
produce a tone. As the vehicle moves closer to the
object, the display will show the single arc moving
closer to the vehicle and the tone will change from
a single 1/2 second tone to slow, to fast, to
continuous.
4
22_MP_OM_EN_USC_t.book Page 133
Page 139 of 344
STARTING AND OPERATING137
(Continued)
SERVICE THE PARKSENSE PARK ASSIST
S
YSTEM
During vehicle start up, when the ParkSense
System has detected a faulted condition, the
instrument cluster will actuate a single chime,
once per ignition cycle, and it will display the
"PARKSENSE UNAVAILABLE SERVICE REQUIRED"
message for five seconds.
If "PARKSENSE UNAVAILABLE WIPE REAR
SENSORS" or "PARKSENSE UNAVAILABLE WIPE
FRONT SENSORS" appears in the instrument
cluster display make sure the outer surface and
the underside of the rear fascia/bumper and/or
front fascia/bumper is clean and clear of snow,
ice, mud, dirt or other obstruction and then cycle
the ignition. If the message continues to appear
see an authorized dealer.
If the "PARKSENSE UNAVAILABLE SERVICE
REQUIRED" message appears in the instrument
cluster display, see an authorized dealer.
CLEANING THE PARKSENSE SYSTEM
Clean the ParkSense sensors with water, car wash
soap and a soft cloth. Do not use rough or hard
cloths. Do not scratch or poke the sensors.
Otherwise, you could damage the sensors.
PARKSENSE SYSTEM USAGE
P
RECAUTIONS
NOTE:
Ensure that the front and rear fascias/bumpers
are free of snow, ice, mud, dirt and debris to
keep the ParkSense system operating properly.
Jackhammers, large trucks, and other vibrations
could affect the performance of ParkSense.
When you turn ParkSense off, the instrument
cluster display will read “PARKSENSE OFF.”
Furthermore, once you turn ParkSense off, it
remains off until you turn it on again, even if you
cycle the ignition.
ParkSense, when on, will reduce the volume of
the radio when it is sounding a tone.
Clean the ParkSense sensors regularly, taking
care not to scratch or damage them. The
sensors must not be covered with ice, snow,
slush, mud, dirt or debris. Failure to do so can
result in the system not working properly. The
ParkSense system might not detect an obstacle
behind or in front of the fascia/bumper, or it
could provide a false indication that an obstacle
is behind or in front of the fascia/bumper.
Use the ParkSense switch to turn the ParkSense
system off if objects such as bicycle carriers,
etc. are attached to the rear fascia/bumper.
Failure to do so can result in the system misin -terpreting a close object as a sensor problem,
causing the “ParkSense Unavailable Service
Required” message to be displayed in the
instrument cluster display.
NOTE:If any objects are attached to the bumper within a
6.5 ft (2 m) field of view, they will interfere and
cause false alerts and possibly blockage.
There may be a delay in the object detection
rate if the object is moving.
The rear sensors are automatically deactivated
when the trailer’s electric plug is inserted in the
vehicle’s tow socket. The front sensors stay
active and can provide acoustic and visual
warnings. The rear sensors are automatically
reactivated when the trailer's cable plug is
removed.
WARNING!
Drivers must be careful when backing up even
when using ParkSense. Always check carefully
behind your vehicle, look behind you, and be
sure to check for pedestrians, animals, other
vehicles, obstructions, and blind spots before
backing up. You are responsible for safety and
must continue to pay attention to your
surroundings. Failure to do so can result in
serious injury or death.
4
22_MP_OM_EN_USC_t.book Page 137