navigation system JEEP COMPASS 2023 Owners Manual
[x] Cancel search | Manufacturer: JEEP, Model Year: 2023, Model line: COMPASS, Model: JEEP COMPASS 2023Pages: 344, PDF Size: 18.8 MB
Page 39 of 344
GETTING TO KNOW YOUR VEHICLE37
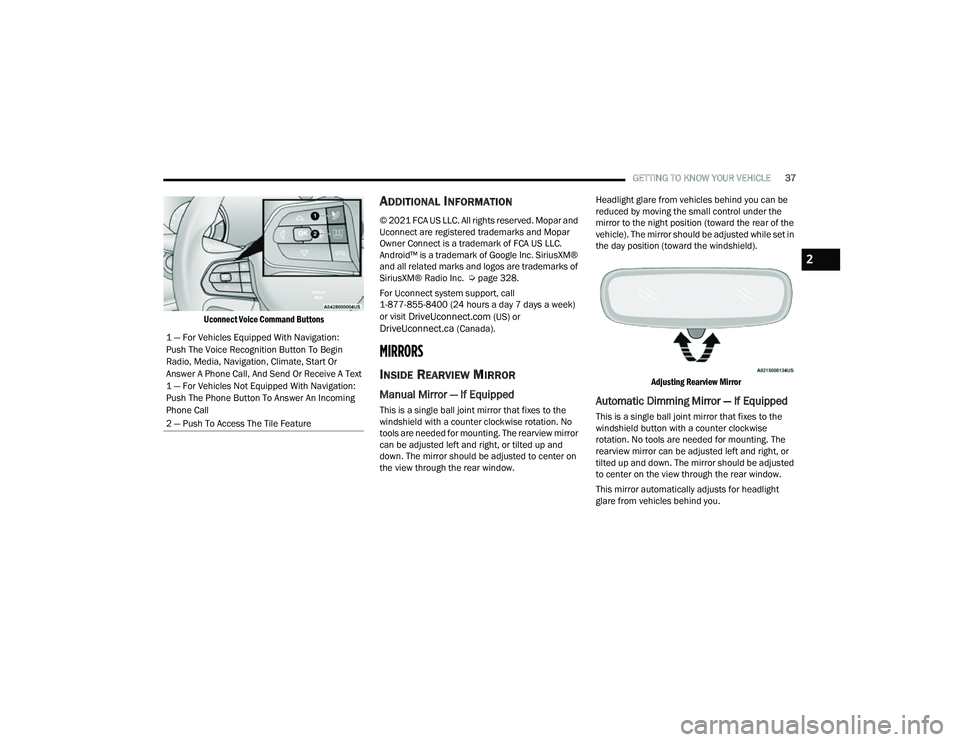
Uconnect Voice Command Buttons
ADDITIONAL INFORMATION
© 2021 FCA US LLC. All rights reserved. Mopar and
Uconnect are registered trademarks and Mopar
Owner Connect is a trademark of FCA US LLC.
Android™ is a trademark of Google Inc. SiriusXM®
and all related marks and logos are trademarks of
SiriusXM® Radio Inc. Ú page 328.
For Uconnect system support, call
1-877-855-8400 (24 hours a day 7 days a week)
or visit
DriveUconnect.com (US) or DriveUconnect.ca (Canada).
MIRRORS
INSIDE REARVIEW MIRROR
Manual Mirror — If Equipped
This is a single ball joint mirror that fixes to the
windshield with a counter clockwise rotation. No
tools are needed for mounting. The rearview mirror
can be adjusted left and right, or tilted up and
down. The mirror should be adjusted to center on
the view through the rear window. Headlight glare from vehicles behind you can be
reduced by moving the small control under the
mirror to the night position (toward the rear of the
vehicle). The mirror should be adjusted while set in
the day position (toward the windshield).
Adjusting Rearview Mirror
Automatic Dimming Mirror — If Equipped
This is a single ball joint mirror that fixes to the
windshield button with a counter clockwise
rotation. No tools are needed for mounting. The
rearview mirror can be adjusted left and right, or
tilted up and down. The mirror should be adjusted
to center on the view through the rear window.
This mirror automatically adjusts for headlight
glare from vehicles behind you.
1 — For Vehicles Equipped With Navigation:
Push The Voice Recognition Button To Begin
Radio, Media, Navigation, Climate, Start Or
Answer A Phone Call, And Send Or Receive A Text
1 — For Vehicles Not Equipped With Navigation:
Push The Phone Button To Answer An Incoming
Phone Call
2 — Push To Access The Tile Feature
2
22_MP_OM_EN_USC_t.book Page 37
Page 86 of 344
84GETTING TO KNOW YOUR INSTRUMENT PANEL
NOTE:The instrument cluster display will return to the last
display selected after five seconds of no ACC
display activity Úpage 118.
The instrument cluster display displays the current
Active Lane Management system settings. The
information displayed depends on Active Lane
Management system status and the conditions
that need to be met Ú page 145.
FUEL ECONOMY
Push and release the up or down arrow
button until the Fuel Economy menu title is
displayed in the instrument cluster display. Push
and hold the OK button to reset average fuel
economy feature.
Range – The display shows the estimated
distance (mi or km) that can be traveled with the
fuel remaining in the tank. When the Range
value is less than 30 miles (48 km) estimated
driving distance, the Range display will change
to a “LOW FUEL” message. Adding a significant
amount of fuel to the vehicle will turn off the
“LOW FUEL” message and a new Range value
will display. Range cannot be reset through the
OK button.
NOTE:Significant changes in driving style or vehicle
loading will greatly affect the actual drivable
distance of the vehicle, regardless of the Range
displayed value.
Average – The display shows the average fuel
economy (MPG, or L/100 km, or km/L) since
the last reset.
Current – This display shows the current fuel
economy (MPG, or L/100 km, or km/L) while
driving.
TRIP INFO
Push and release the up or down arrow
button until the Trip menu title is displayed in the
instrument cluster display. Toggle the left or
right arrow button to select Trip A or Trip B. The
Trip information will display the following:
Distance – Shows the total distance (mi or km)
traveled for Trip A or Trip B since the last reset.
Average Fuel Economy – Shows the average
fuel economy (MPG or L/100 km or km/L) of
Trip A or Trip B since the last reset.
Elapsed Time – Shows the total elapsed time of
travel since Trip A or Trip B has been reset.
Hold the OK button to reset feature information.
NAVIGATION — IF EQUIPPED
Push and release the left or right arrow
button until the Navigation display icon/title is
highlighted in the instrument cluster display. Start
Route will display when no active route is set.
Cancel Route will display when an active route
is set.
OFF ROAD — IF EQUIPPED
Push and release the up or down arrow
button until the Off Road Menu icon/title is
highlighted. Push the left or right arrow
button to scroll the submenus.
Terrain Status
Selec-Terrain Status
Air Suspension Status
Vehicle Dynamics
Wheel Articulation
Transfer Case Status
Steering Angle
Sway Bar Status
Axle Lock Status
Pitch And Roll
Vehicle Pitch
Vehicle Roll
22_MP_OM_EN_USC_t.book Page 84
Page 88 of 344
86GETTING TO KNOW YOUR INSTRUMENT PANEL
VEHICLE SETTINGS — IF EQUIPPED
Push and release the up or down arrow
button until the Vehicle Setup Menu item is
displayed in the instrument cluster display. This
menu item allows you to change the settings for
the following:
Display
Navigation Repetition
Security
Passenger Airbag
Seat Belt Reminder
Safety and Assistance
Speed Warning
Hill Start Assist
NOTE:Most vehicle settings will be moved into the radio
if a touchscreen radio is present Ú page 165.
Display
By selecting Display, the following settings can be
selected:
Language: select the language in which to
display the information/warnings.
Phone Repetition: displays information relating
to the phone mode. Units
By selecting Units, the unit of measurement to use
for displaying various values can be set. Possible
options are:
US
Metric
Custom: allows individual changes of units for
temperature, distance, consumption, and tire
pressure.
Clock And Date
By selecting Clock and Date, the time and date can
be set. Possible options are:
Set Time: adjust hours/minutes
Set Format: adjust the time format “12h”
(12 hours) or “24h” (24 hours)
Set Date: adjust day/month/year
Security
Passenger Air Bag Disable (PAD): a selection of
Passenger Air Bag Disable (ON/OFF) may be made
if a child restraint must be installed in the front
seat. Safety And Assistance
By selecting the item Safety and Assistance, the
following adjustments can be made:
ParkSense (If Equipped): a selection of the type
of information provided by ParkSense
Front ParkSense Volume (If Equipped): selec
-
tion of the volume of the beeps provided by the
front ParkSense
Rear ParkSense Volume (If Equipped): selection
of the volume of the beeps provided by the rear
ParkSense
Forward Collision Warning (FCW) (If Equipped): a
selection of operating modes of the system
Forward Collision Warning Plus
FCW Sensitivity (If Equipped): a selection of the
“readiness” of intervention of the Forward Colli -
sion Warning Plus system, based on the
distance to the obstacle
Rain Sensing Wipers (If Equipped): enabling/
disabling the automatic operation of wipers in
the event of rain
Active Lane Management Force (If Equipped):
selection of the force to be applied to the
steering wheel to put the car in the roadway
through the system of electrical drive, in case of
operation of the system Active Lane Manage -
ment
22_MP_OM_EN_USC_t.book Page 86
Page 129 of 344
STARTING AND OPERATING127
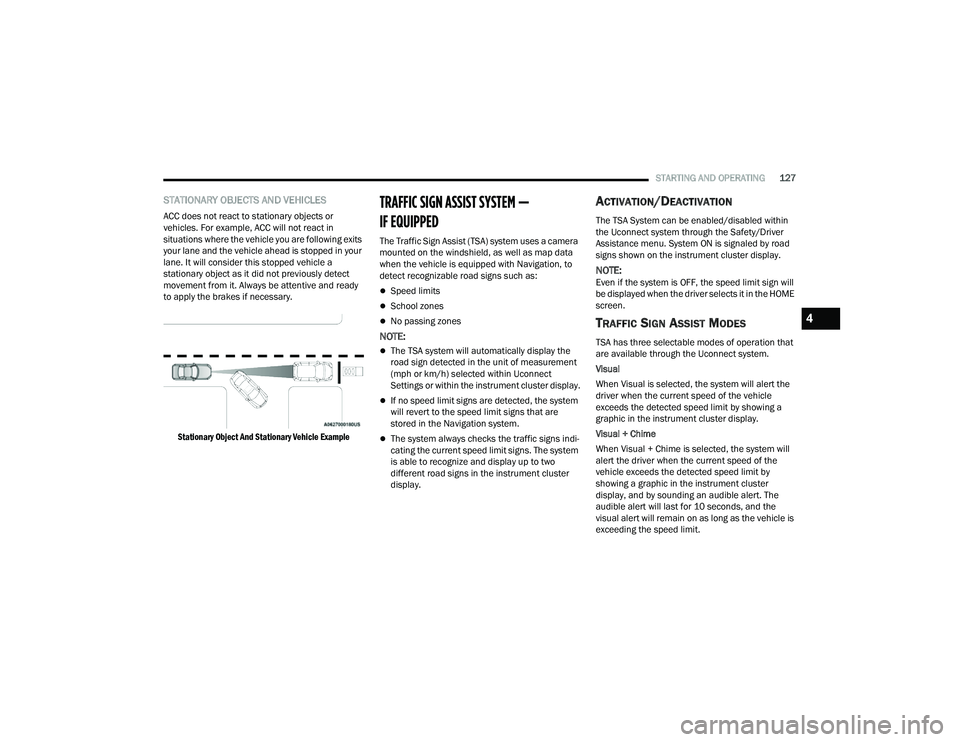
STATIONARY OBJECTS AND VEHICLES
ACC does not react to stationary objects or
vehicles. For example, ACC will not react in
situations where the vehicle you are following exits
your lane and the vehicle ahead is stopped in your
lane. It will consider this stopped vehicle a
stationary object as it did not previously detect
movement from it. Always be attentive and ready
to apply the brakes if necessary.
Stationary Object And Stationary Vehicle Example
TRAFFIC SIGN ASSIST SYSTEM —
IF EQUIPPED
The Traffic Sign Assist (TSA) system uses a camera
mounted on the windshield, as well as map data
when the vehicle is equipped with Navigation, to
detect recognizable road signs such as:
Speed limits
School zones
No passing zones
NOTE:
The TSA system will automatically display the
road sign detected in the unit of measurement
(mph or km/h) selected within Uconnect
Settings or within the instrument cluster display.
If no speed limit signs are detected, the system
will revert to the speed limit signs that are
stored in the Navigation system.
The system always checks the traffic signs indi -
cating the current speed limit signs. The system
is able to recognize and display up to two
different road signs in the instrument cluster
display.
ACTIVATION/DEACTIVATION
The TSA System can be enabled/disabled within
the Uconnect system through the Safety/Driver
Assistance menu. System ON is signaled by road
signs shown on the instrument cluster display.
NOTE:Even if the system is OFF, the speed limit sign will
be displayed when the driver selects it in the HOME
screen.
TRAFFIC SIGN ASSIST MODES
TSA has three selectable modes of operation that
are available through the Uconnect system.
Visual
When Visual is selected, the system will alert the
driver when the current speed of the vehicle
exceeds the detected speed limit by showing a
graphic in the instrument cluster display.
Visual + Chime
When Visual + Chime is selected, the system will
alert the driver when the current speed of the
vehicle exceeds the detected speed limit by
showing a graphic in the instrument cluster
display, and by sounding an audible alert. The
audible alert will last for 10 seconds, and the
visual alert will remain on as long as the vehicle is
exceeding the speed limit.
4
22_MP_OM_EN_USC_t.book Page 127
Page 150 of 344
148STARTING AND OPERATING
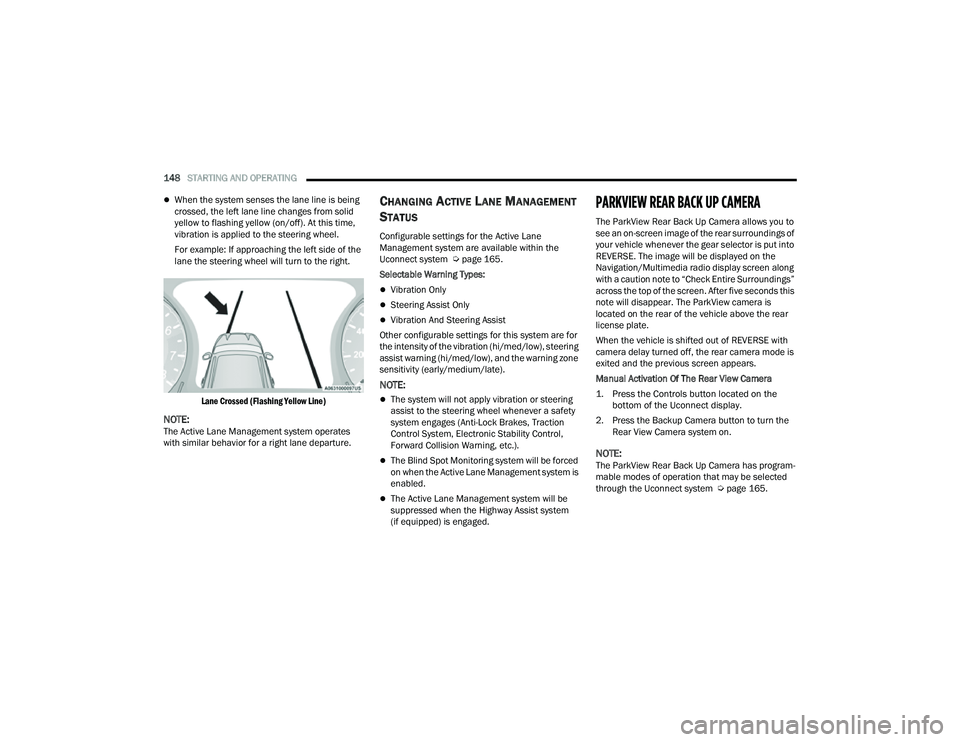
When the system senses the lane line is being
crossed, the left lane line changes from solid
yellow to flashing yellow (on/off). At this time,
vibration is applied to the steering wheel.
For example: If approaching the left side of the
lane the steering wheel will turn to the right.
Lane Crossed (Flashing Yellow Line)
NOTE:The Active Lane Management system operates
with similar behavior for a right lane departure.
CHANGING ACTIVE LANE MANAGEMENT
S
TATUS
Configurable settings for the Active Lane
Management system are available within the
Uconnect system Ú page 165.
Selectable Warning Types:
Vibration Only
Steering Assist Only
Vibration And Steering Assist
Other configurable settings for this system are for
the intensity of the vibration (hi/med/low), steering
assist warning (hi/med/low), and the warning zone
sensitivity (early/medium/late).
NOTE:
The system will not apply vibration or steering
assist to the steering wheel whenever a safety
system engages (Anti-Lock Brakes, Traction
Control System, Electronic Stability Control,
Forward Collision Warning, etc.).
The Blind Spot Monitoring system will be forced
on when the Active Lane Management system is
enabled.
The Active Lane Management system will be
suppressed when the Highway Assist system
(if equipped) is engaged.
PARKVIEW REAR BACK UP CAMERA
The ParkView Rear Back Up Camera allows you to
see an on-screen image of the rear surroundings of
your vehicle whenever the gear selector is put into
REVERSE. The image will be displayed on the
Navigation/Multimedia radio display screen along
with a caution note to “Check Entire Surroundings”
across the top of the screen. After five seconds this
note will disappear. The ParkView camera is
located on the rear of the vehicle above the rear
license plate.
When the vehicle is shifted out of REVERSE with
camera delay turned off, the rear camera mode is
exited and the previous screen appears.
Manual Activation Of The Rear View Camera
1. Press the Controls button located on the bottom of the Uconnect display.
2. Press the Backup Camera button to turn the Rear View Camera system on.
NOTE:The ParkView Rear Back Up Camera has program -
mable modes of operation that may be selected
through the Uconnect system Ú page 165.
22_MP_OM_EN_USC_t.book Page 148
Page 168 of 344
166MULTIMEDIA
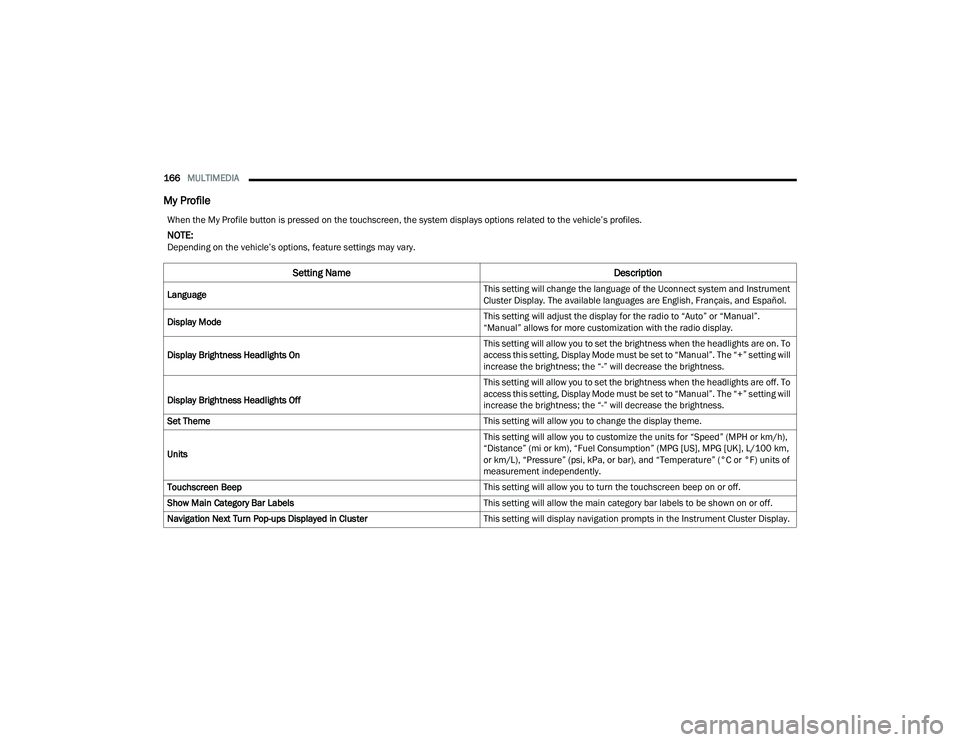
My Profile
When the My Profile button is pressed on the touchscreen, the system displays options related to the vehicle’s profiles.
NOTE:Depending on the vehicle’s options, feature settings may vary.
Setting Name Description
Language This setting will change the language of the Uconnect system and Instrument
Cluster Display. The available languages are English, Français, and Español.
Display Mode This setting will adjust the display for the radio to “Auto” or “Manual”.
“Manual” allows for more customization with the radio display.
Display Brightness Headlights On This setting will allow you to set the brightness when the headlights are on. To
access this setting, Display Mode must be set to “Manual”. The “+” setting will
increase the brightness; the “-” will decrease the brightness.
Display Brightness Headlights Off This setting will allow you to set the brightness when the headlights are off. To
access this setting, Display Mode must be set to “Manual”. The “+” setting will
increase the brightness; the “-” will decrease the brightness.
Set Theme This setting will allow you to change the display theme.
Units This setting will allow you to customize the units for “Speed” (MPH or km/h),
“Distance” (mi or km), “Fuel Consumption” (MPG [US], MPG [UK], L/100 km,
or km/L), “Pressure” (psi, kPa, or bar), and “Temperature” (°C or °F) units of
measurement independently.
Touchscreen Beep This setting will allow you to turn the touchscreen beep on or off.
Show Main Category Bar Labels This setting will allow the main category bar labels to be shown on or off.
Navigation Next Turn Pop-ups Displayed in Cluster This setting will display navigation prompts in the Instrument Cluster Display.
22_MP_OM_EN_USC_t.book Page 166
Page 169 of 344
MULTIMEDIA167
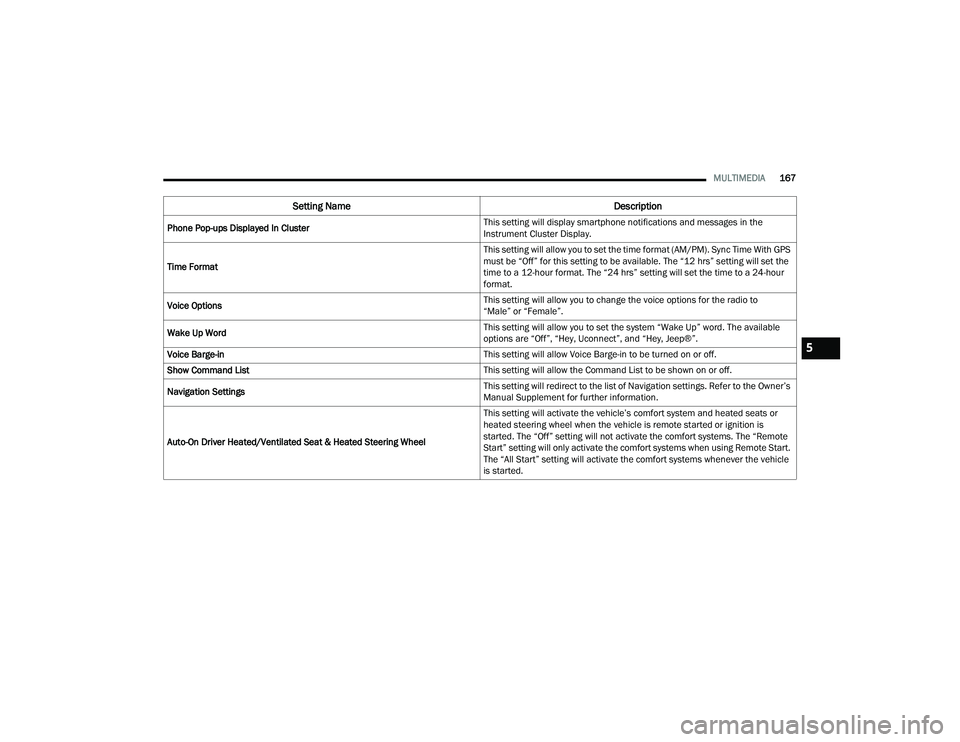
Phone Pop-ups Displayed In Cluster This setting will display smartphone notifications and messages in the
Instrument Cluster Display.
Time Format This setting will allow you to set the time format (AM/PM). Sync Time With GPS
must be “Off” for this setting to be available. The “12 hrs” setting will set the
time to a 12-hour format. The “24 hrs” setting will set the time to a 24-hour
format.
Voice Options This setting will allow you to change the voice options for the radio to
“Male” or “Female”.
Wake Up Word This setting will allow you to set the system “Wake Up” word. The available
options are “Off”, “Hey, Uconnect”, and “Hey, Jeep®”.
Voice Barge-in This setting will allow Voice Barge-in to be turned on or off.
Show Command List This setting will allow the Command List to be shown on or off.
Navigation Settings This setting will redirect to the list of Navigation settings. Refer to the Owner’s
Manual Supplement for further information.
Auto-On Driver Heated/Ventilated Seat & Heated Steering Wheel This setting will activate the vehicle’s comfort system and heated seats or
heated steering wheel when the vehicle is remote started or ignition is
started. The “Off” setting will not activate the comfort systems. The “Remote
Start” setting will only activate the comfort systems when using Remote Start.
The “All Start” setting will activate the comfort systems whenever the vehicle
is started.
Setting Name
Description
5
22_MP_OM_EN_USC_t.book Page 167
Page 172 of 344
170MULTIMEDIA
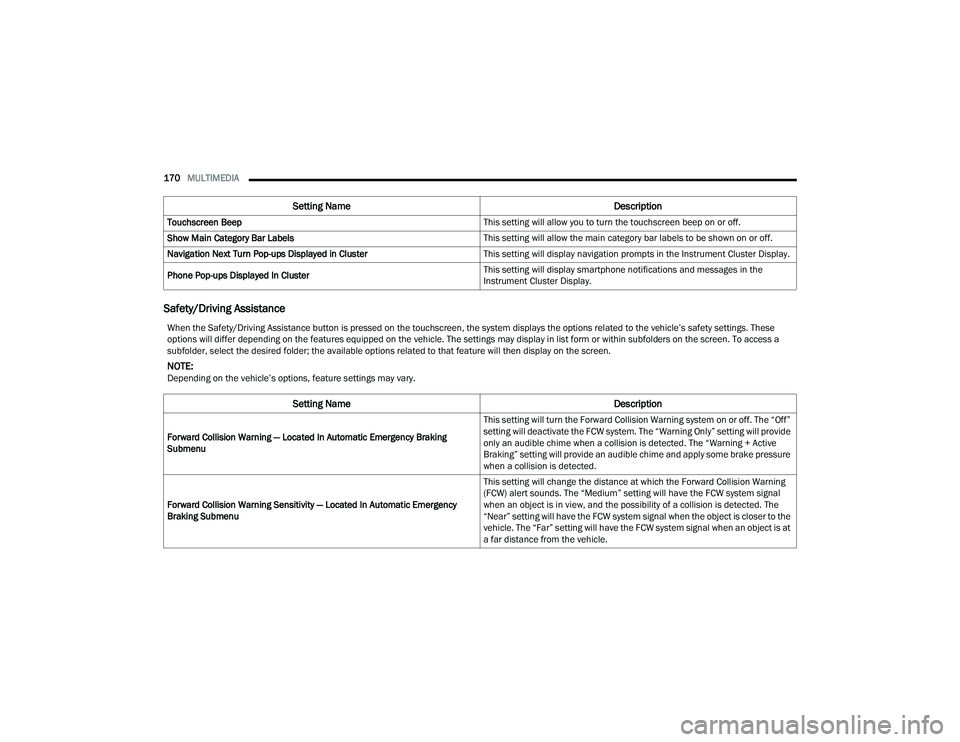
Safety/Driving Assistance
Touchscreen Beep This setting will allow you to turn the touchscreen beep on or off.
Show Main Category Bar Labels This setting will allow the main category bar labels to be shown on or off.
Navigation Next Turn Pop-ups Displayed in Cluster This setting will display navigation prompts in the Instrument Cluster Display.
Phone Pop-ups Displayed In Cluster This setting will display smartphone notifications and messages in the
Instrument Cluster Display.
Setting Name
Description
When the Safety/Driving Assistance button is pressed on the touchscreen, the system displays the options related to the vehicle’s safety settings. These
options will differ depending on the features equipped on the vehicle. The settings may display in list form or within subfolders on the screen. To access a
subfolder, select the desired folder; the available options related to that feature will then display on the screen.
NOTE:Depending on the vehicle’s options, feature settings may vary.
Setting NameDescription
Forward Collision Warning — Located In Automatic Emergency Braking
Submenu This setting will turn the Forward Collision Warning system on or off. The “Off”
setting will deactivate the FCW system. The “Warning Only” setting will provide
only an audible chime when a collision is detected. The “Warning + Active
Braking” setting will provide an audible chime and apply some brake pressure
when a collision is detected.
Forward Collision Warning Sensitivity — Located In Automatic Emergency
Braking Submenu This setting will change the distance at which the Forward Collision Warning
(FCW) alert sounds. The “Medium” setting will have the FCW system signal
when an object is in view, and the possibility of a collision is detected. The
“Near” setting will have the FCW system signal when the object is closer to the
vehicle. The “Far” setting will have the FCW system signal when an object is at
a far distance from the vehicle.
22_MP_OM_EN_USC_t.book Page 170
Page 177 of 344
MULTIMEDIA175
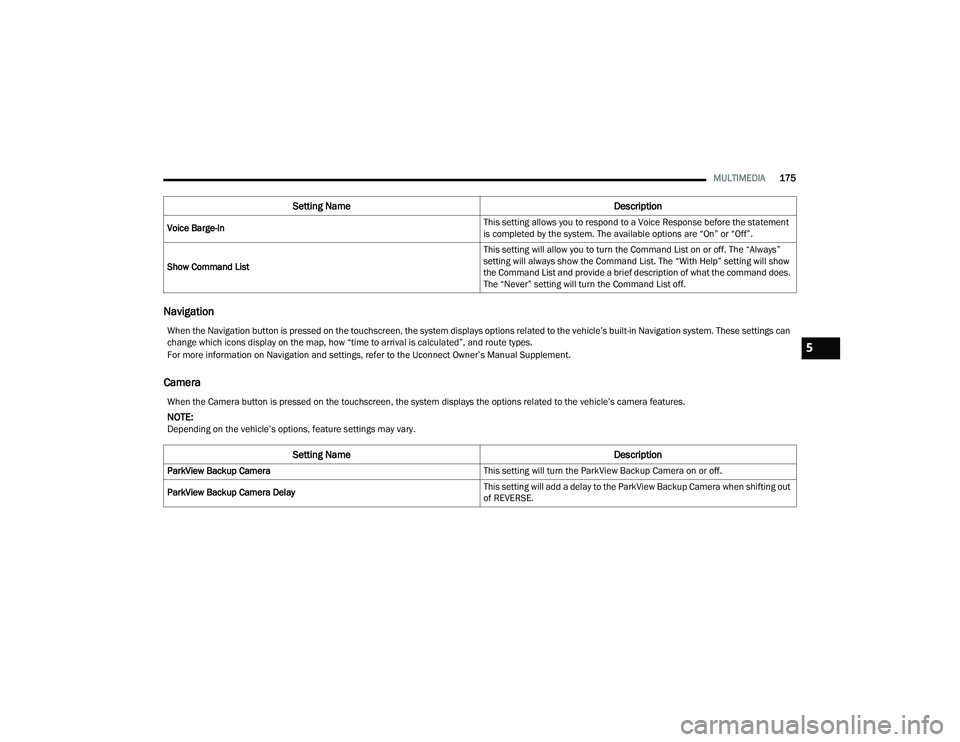
Navigation
Camera
Voice Barge-In This setting allows you to respond to a Voice Response before the statement
is completed by the system. The available options are “On” or “Off”.
Show Command List This setting will allow you to turn the Command List on or off. The “Always”
setting will always show the Command List. The “With Help” setting will show
the Command List and provide a brief description of what the command does.
The “Never” setting will turn the Command List off.
Setting Name
Description
When the Navigation button is pressed on the touchscreen, the system displays options related to the vehicle’s built-in Navigation system. These settings can
change which icons display on the map, how “time to arrival is calculated”, and route types.
For more information on Navigation and settings, refer to the Uconnect Owner’s Manual Supplement.
When the Camera button is pressed on the touchscreen, the system displays the options related to the vehicle’s camera features.
NOTE:Depending on the vehicle’s options, feature settings may vary.
Setting NameDescription
ParkView Backup Camera This setting will turn the ParkView Backup Camera on or off.
ParkView Backup Camera Delay This setting will add a delay to the ParkView Backup Camera when shifting out
of REVERSE.
5
22_MP_OM_EN_USC_t.book Page 175
Page 184 of 344
182MULTIMEDIA
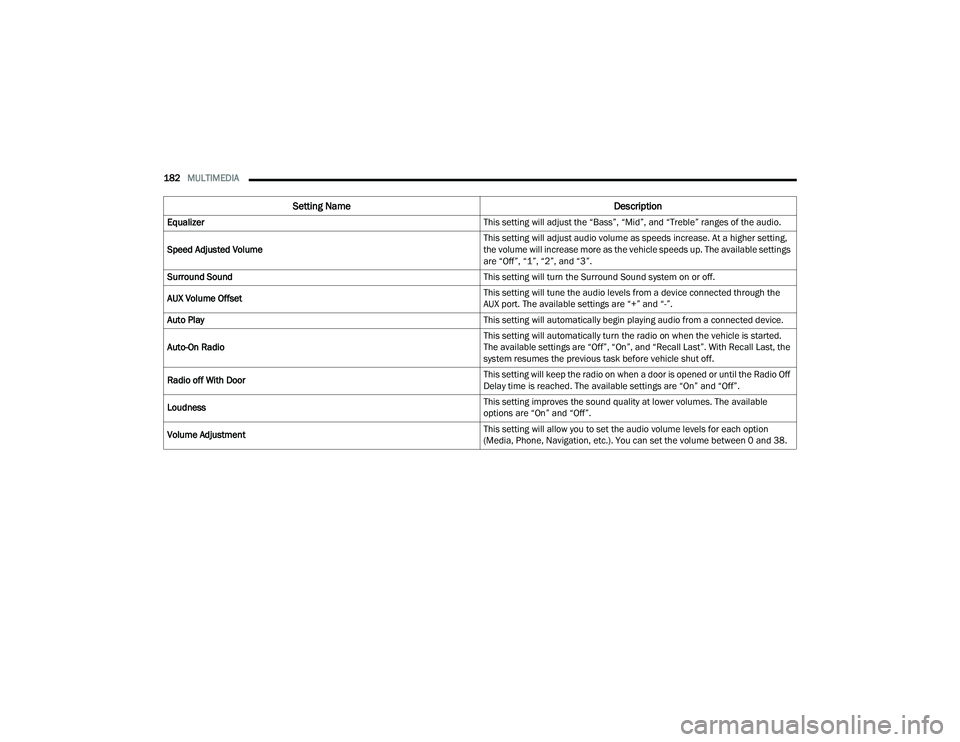
Equalizer This setting will adjust the “Bass”, “Mid”, and “Treble” ranges of the audio.
Speed Adjusted Volume This setting will adjust audio volume as speeds increase. At a higher setting,
the volume will increase more as the vehicle speeds up. The available settings
are “Off”, “1”, “2”, and “3”.
Surround Sound This setting will turn the Surround Sound system on or off.
AUX Volume Offset This setting will tune the audio levels from a device connected through the
AUX port. The available settings are “+” and “-”.
Auto Play This setting will automatically begin playing audio from a connected device.
Auto-On Radio This setting will automatically turn the radio on when the vehicle is started.
The available settings are “Off”, “On”, and “Recall Last”. With Recall Last, the
system resumes the previous task before vehicle shut off.
Radio off With Door This setting will keep the radio on when a door is opened or until the Radio Off
Delay time is reached. The available settings are “On” and “Off”.
Loudness This setting improves the sound quality at lower volumes. The available
options are “On” and “Off”.
Volume Adjustment This setting will allow you to set the audio volume levels for each option
(Media, Phone, Navigation, etc.). You can set the volume between 0 and 38.
Setting Name
Description
22_MP_OM_EN_USC_t.book Page 182