light JEEP DJ 1953 Service Manual
[x] Cancel search | Manufacturer: JEEP, Model Year: 1953, Model line: DJ, Model: JEEP DJ 1953Pages: 376, PDF Size: 19.96 MB
Page 306 of 376
N
REAR
AXLE
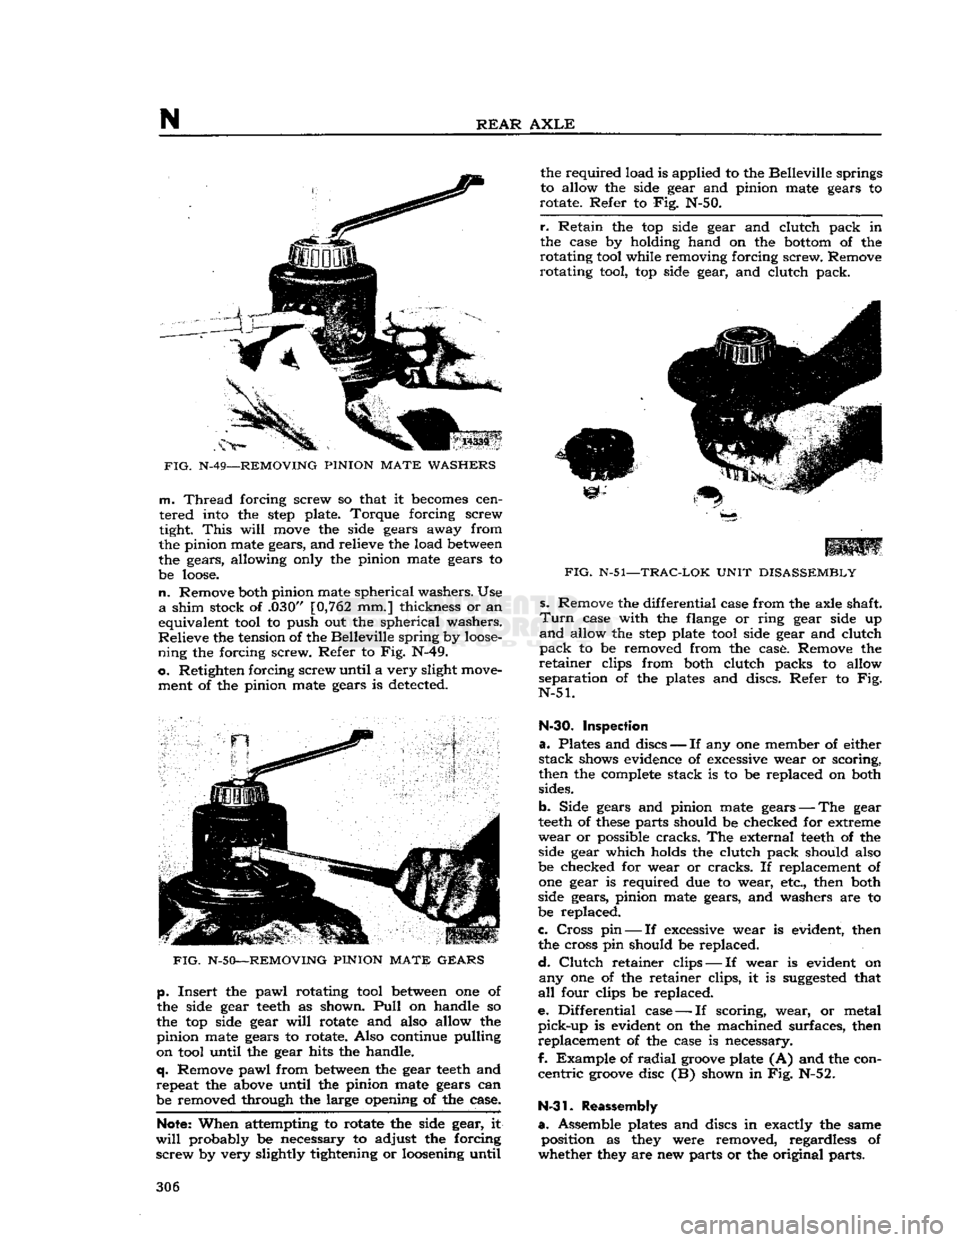
FIG.
N-49—REMOVING
PINION
MATE
WASHERS
m.
Thread
forcing screw so that it becomes cen
tered into the
step
plate. Torque forcing screw
tight.
This
will
move the side gears away from
the pinion mate gears, and relieve the load between
the gears, allowing only the pinion mate gears to
be
loose.
n.
Remove both pinion mate spherical washers. Use
a
shim stock of .030" [0,762 mm.] thickness or an
equivalent tool to push out the spherical washers.
Relieve
the tension of the Belleville spring by
loose
ning
the forcing screw. Refer to Fig. N-49.
o.
Retighten forcing screw until a very slight move ment of the pinion mate gears is detected.
FIG.
N-50—-REMOVING
PINION
MATE
GEARS
p.
Insert the pawl rotating tool between one of
the side gear
teeth
as shown.
Pull
on handle so
the top side gear
will
rotate and also allow the
pinion mate gears to rotate. Also continue pulling
on tool until the gear hits the handle,
q.
Remove pawl from between the gear
teeth
and
repeat the above until the pinion mate gears can
be removed through the large opening of the case.
Note:
When attempting to rotate the side gear, it
will
probably be necessary to adjust the forcing
screw
by very slightly tightening or loosening until the required load is applied to the Belleville springs
to allow the side gear and pinion mate gears to
rotate. Refer to Fig. N-50.
r.
Retain the top side gear and clutch pack in
the case by holding hand on the bottom of the
rotating tool while removing forcing screw. Remove
rotating tool, top side gear, and clutch pack.
FIG.
N-51—-TRAC-LOK
UNIT
DISASSEMBLY
s. Remove the differential case from the axle shaft.
Turn
case with the flange or ring gear side up
and
allow the
step
plate tool side gear and clutch
pack
to be removed from the case. Remove the
retainer
clips from both clutch packs to allow
separation of the plates and discs. Refer to Fig.
N-51.
N-30.
Inspection
a.
Plates and discs —
If
any one member of either
stack
shows evidence of excessive wear or scoring,
then the complete stack is to be replaced on both
sides.
b.
Side gears and pinion mate gears —
The
gear
teeth
of
these
parts should be checked for extreme
wear
or possible
cracks.
The external
teeth
of the side gear which holds the clutch pack should also
be checked for wear or
cracks.
If replacement of one gear is required due to wear, etc., then both
side gears, pinion mate gears, and washers are to
be replaced.
c.
Cross
pin
— If excessive wear is evident, then
the cross pin should be replaced.
d.
Clutch
retainer clips — If wear is evident on
any
one of the retainer clips, it is
suggested
that
all
four clips be replaced.
e. Differential case — If scoring, wear, or metal
pick-up
is evident on the machined surfaces, then replacement of the case is necessary.
I.
Example of
radial
groove plate (A) and the con
centric
groove disc (B) shown in Fig. N-52.
N-31.
Reassembly
a.
Assemble plates and discs in exactly the same position as they were removed, regardless of
whether they are new parts or the original parts. 306
Page 308 of 376
N
REAR
AXLE
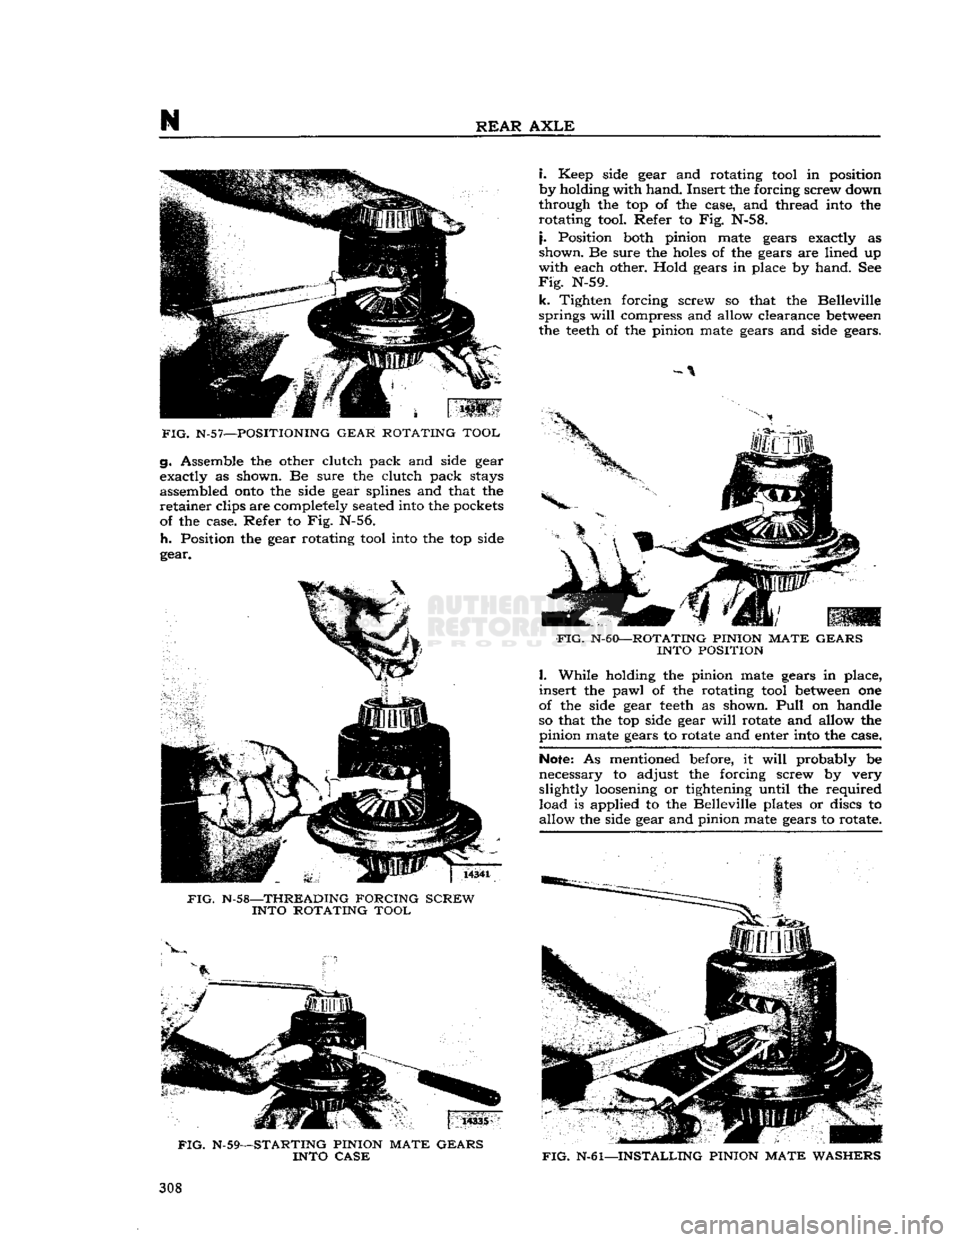
FIG.
N-57—POSITIONING GEAR ROTATING TOOL
g. Assemble the other clutch pack and side gear
exactly as shown. Be sure the clutch pack stays
assembled
onto
the side gear splines and that the
retainer
clips are completely seated into the pockets
of the case. Refer to Fig. N-56.
h.
Position the gear rotating tool into the top side
gear.
FIG.
N-58—THREADING FORCING SCREW
INTO ROTATING TOOL
FIG.
N-59—STARTING PINION MATE GEARS INTO CASE
i.
Keep side gear and rotating tool in position
by holding with hand. Insert the forcing screw down
through the top of the case, and thread into the
rotating tool. Refer to Fig. N-58.
j.
Position both pinion mate gears exactly as
shown. Be sure the holes of the gears are lined up
with
each other. Hold gears in place by hand. See
Fig.
N-59.
k.
Tighten forcing screw so that the Belleville
springs
will
compress and allow clearance between
the
teeth
of the pinion mate gears and side gears.
FIG.
N-60—ROTATING PINION MATE GEARS
INTO POSITION
I.
While holding the pinion mate gears in place,
insert
the pawl of the rotating tool between one
of the side gear
teeth
as shown.
Pull
on handle
so that the top side gear
will
rotate and allow the pinion mate gears to rotate and enter into the case.
Note:
As mentioned before, it
will
probably be
necessary to adjust the forcing screw by very
slightly loosening or tightening until the required load is applied to the Belleville plates or discs to allow the side gear and pinion mate gears to rotate.
FIG.
N-61—INSTALLING PINION MATE WASHERS
308
Page 310 of 376
m
REAR AXLE
c. Attach the brake line
hose
at tee fitting on top
of housing.
d.
Attach parking brake cables at rear of brake
backing plate. DJ
models
only.
e. Connect the shock absorbers at the axle mount
ing pads.
f. Connect the propeller shaft at the rear universal
joint.
g. Adjust and bleed brakes. (See Section P).
h.
Install
wheels
and lower vehicle to floor.
i.
Check parking brake as described in Section P.
j.
Fill
the axle housing with the proper lubricant.
For
correct lubricant refer to the
Lubrication
Chart.
N-34.
TROUBLE
SHOOTING
The
following problems can be present with either the conventional differential,
Powr-Lok
or
Trac-
Lok
differential.
N-35. Backlash
Excessive
backlash in the vehicle drive line may be the results of
excessive
backlash in the trans
mission, propeller shaft spline, universal joint, ring gear and pinion, the axle shaft spline, or the dif
ferential.
Excessive
backlash in the differential may be meas
ured
as follows:
a.
Jack
up one rear wheel.
b. Put the transmission in gear.
c. Measure the travel of the jacked-up wheel on
a
10"
[25,40
cm.] radius from the wheel center.
This
total
movement
should not
exceed
IVi" [3,17 cm.] in a new unit. In order to restrict the
backlash
to the axles only, make sure that the
yoke of the propeller shaft
does
not
move
during
the check.
d.
If all causes of backlash mentioned
above
have
been
eliminated with the exception of the differen
tial
and that still
exceeds
the maximum allowable
movement, overhaul the differential.
N-36.
Rear
Wheel
Noise
Looseness of the rear axle shaft nut on semifloat- ing tapered rear axles may produce a clicking or
creaking
noise.
This
noise
can usually be
stopped
by torquing the wheel hub nut 150 to 175 lb-ft. [20,7 a 24,2 kg-m.]. If the condition has continued
for
some
time, slight wear may have resulted allow
ing the
noise
to persist. In this case, coat the hub,
key, and keyway on tapered axle shafts with white
lead and torque the nut as specified. If the
noise
persists after this treatment, replace the worn parts.
N-37.
SERVICE DIAGNOSIS
SYMPTOMS
Axle
Noisy on Pull and
Coast
Excessive
Back
Lash
Bevel
Gear
and Pinion. . . . . Adjust
End
Play Pinion Shaft Adjust
Worn
Pinion Shaft Bearing Adjust
Pinion
Set too Deep in Bevel
Gear
too Tight..... Adjust
Wrong
Lubricant
Being Used
(Powr-Lok
or
Trac-Lok
Differential) . Replace
Axle
Noisy on
Pull
Pinion
and Bevel
Gear
Improperly Adjusted Adjust
Pinion
Bearings Rough....................... Adjust
Pinion
Bearings Loose Adjust
Axle
Noisy on Coast
Excessive
Back
Lash
in Bevel
Gear
and Pinion. . . Adjust
End
Play in Pinion Shaft. . Adjust
Improper
Tooth Contact.
....................
Adjust
Rough Bearings Replace
Back
Lash
Worn
Differential Pinion
Gear
Washers Adjust
Excessive
Back
Lash
in Bevel
Gear
and Pinion. . . Adjust
Worn
Universal Joints Replace
PROBABLE REMEDY
310
Page 315 of 376
'Jeep'
UNIVERSAL
SERIES SERVICE
MANUAL
O Note:
If the steering-gear-to-frame
bolts
are not
properly
torqued, they
will
eventually
loosen
dur
ing operation of the vehicle. Loose
bolts
will
result
in
elongated
bolt
holes
making maintenance of bolt torque difficult, and may allow position of the
steering columns to be misaligned. Therefore,
proper
torquing is extremely important.
Do not tighten the steering gear to dampen out
steering trouble. Adjust the steering gear only to
remove lost motion or play within the unit.
0-5. Steering
Gear
Adjustment
The
cam and lever steering gear is illustrated in
Fig.
0-2. It consists of a
spiral
cam, and a cross shaft and lever assembly with two lever studs.
When
the steering wheel is turned, the cam
moves
the studs, causing rotary movement of the cross
shaft, which in
turn
causes angular movement of
the*steering arm.
Two
adjustments of the steering gear are necessary:
up and down play of the steering shaft, and adjustment of the lever studs (tapered pins) in the
cam
groove.
Adjustment
of the
ball
thrust bearings to eliminate up and down play of the steering shaft is ac
complished by removing shims which are installed
between
the steering gear housing and the upper
cover. Before making this adjustment
loosen
the
housing side cover adjusting screw to free the pins
in
the cam groove. Loosen the housing cover to
cut and remove a shim or more as required.
Install
the screws and tighten. Adjustment should be
made to have a slight drag but allow the steering
wheel to
turn
freely with thumb and forefinger
lightly gripping the rim.
Shims
installed for adjustment are .002*, .003", and .010"
[.0508,
.0762
and .254 mm.] in thickness.
Adjustment
of the tapered pins in the cam
groove
is accomplished by adjusting screw. Unlock the
adjusting
screw and
turn
it in until a very slight
drag
is felt through the mid-position when turning
the steering wheel slowly from one extreme position
to the other.
Backlash
of the pins in the
groove
shows up as
end play of lever shaft, also as backlash of steer ing arm.
The
cam
groove
is purposely cut shallow in the
straight
ahead driving position for each pin.
This
feature permits a
close
adjustment for normal
straight
ahead driving and provides precision steer ing and permits take up of backlash at this point
after the wear occurs without causing a bind else
where.
Always
adjust within the high range through
the mid-position of pin travel. Do not adjust off
"straight
ahead" position.
Backlash
in turned posi
tions is not objectionable.
0-6.
Front
Wheel Alignment Adjustments
To
ensure correct alignment, a definite procedure
for inspection of the steering system is recom mended. It is
suggested
that the following sequence
be used:
a.
Equalize
tire pressures and level vehicle.
b.
Check
steering gear to steering column align
ment.
c.
Inspect steering knuckle pivots, spindle, and
wheel bearing
looseness.
d.
Check
wheel runout.
e.
Test wheel balance and bearing adjustment.
f.
Check
for spring sag.
g.
Inspect brakes and shock absorbers.
h.
Check
steering gear assembly adjustment and
steering connecting rod.
i.
Check
caster,
j.
Check
toe-in.
k.
Check
toe-out
on turns.
I.
Check
camber.
m.
Check
tracking of front and
rear
wheels,
n.
Check
frame alignment.
The
factors of alignment, caster, camber, and toe-
in,
are all interrelated and if one adjustment is
made, another adjustment may be affected.
There
fore, after an alignment job is completed, make a
complete recheck of all the adjustments to be sure
the
settings
are within the limit. Be sure all front
suspension and steering system nuts and
bolts
are
all
properly torqued before taking wheel alignment readings.
Proper
alignment of front wheels must be main
tained in order to ensure
ease
of steering and satisfactory tire life.
The
most important factors of front wheel alignment are wheel camber, axle caster and wheel
toe-in.
Wheel
toe-in is the distance the wheels are closer
together
at the front than at the
rear.
Wheel
camber is the amount the wheels incline out
ward
at the top from a vertical position.
Front
axle caster is the amount in
degrees
that the
steering pivot pins are tilted towards the front or
rear
of the vehicle. Positive caster is inclination of
the top of the pivot pin towards the
rear
of the ve
hicle.
Zero caster is the vertical position of the
pivot pin. Negative or reverse caster is the in
clination
of the top of the pin towards the front
of the vehicle.
These
points should be checked at regular inter
vals,
particularly when the front axle has been
subjected to a heavy impact. When checking wheel alignment, it is important that wheel bearings and
knuckle
bearings be in proper adjustment. Loose bearings
will
affect instrument readings when
checking
the camber, pivot pin inclination and
toe-in.
To
accurately check camber and caster, use a wheel
aligning fixture.
Camber
and caster of the front
wheels are both preset.
Camber
cannot be altered
but caster can be adjusted by installing caster shims
between
the axle pad and the springs. Wheel toe-in
may
be adjusted. To measure wheel toe-in, use a
wheel aligning fixture or follow the procedure given
in Par.
0-8.
0-7.
Front Wheel Toe-in
Toe-in
as illustrated in
Fig.
0-3, is necessary to
off
set the
effect
of camber as shown in Fig. Q-4. 315
Page 317 of 376
'Jeep'
UNIVERSAL SERIES SERVICE
MANUAL
The
purpose of caster Fig. O-S, is to provide steer
ing stability which
will
keep the front wheels in the
straight
ahead position and also assist in straighten
ing up the wheels when coming out of a
turn.
Caster
of the front wheels is preset. If the angle of
caster,
when accurately measured, is found to be
incorrect,
correct it to the specification given at
the end of this section by either installing new
parts
or installing caster shims
between
the axle
pad
and the springs.
If
the camber and toe-in are correct and it is known
the the axle is not twisted, a satisfactory check
may
be made by testing the vehicle on the road.
Before road testing, make sure all tires are properly
inflated,
being particularly careful that both front
tires are inflated to exactly the same pressure.
If
vehicle turns easily to either side but is
hard
to
straighten out, insufficient caster for easy handling of vehicle is indicated. If correction is necessary, it
can
usually be accomplished by installing shims
between
the springs and axle pads to secure the
desired
result.
0-11-
Front
Wheel
Turning
Angle
When
the front wheels are turned, the inside wheel
on the
turn
travels in a smaller circle than the outside wheel, therefore, it is necessary for the wheels
to toe out to prevent the tire on the inside wheel
frOm
being scuffed sideways.
This
angle for toe out
on turns is designed to permit both front wheels to
turn
on a common center by having the ends of the
steering
knuckle
arms closer
together
than the king
pins.
To
avoid possible damage to the universal joints
on the front axles of 4-wheel drive vehicles, it is advisable to check the turning angle.
Wearing
away
of the upset
edge
on the spindle housing bolt which
10607
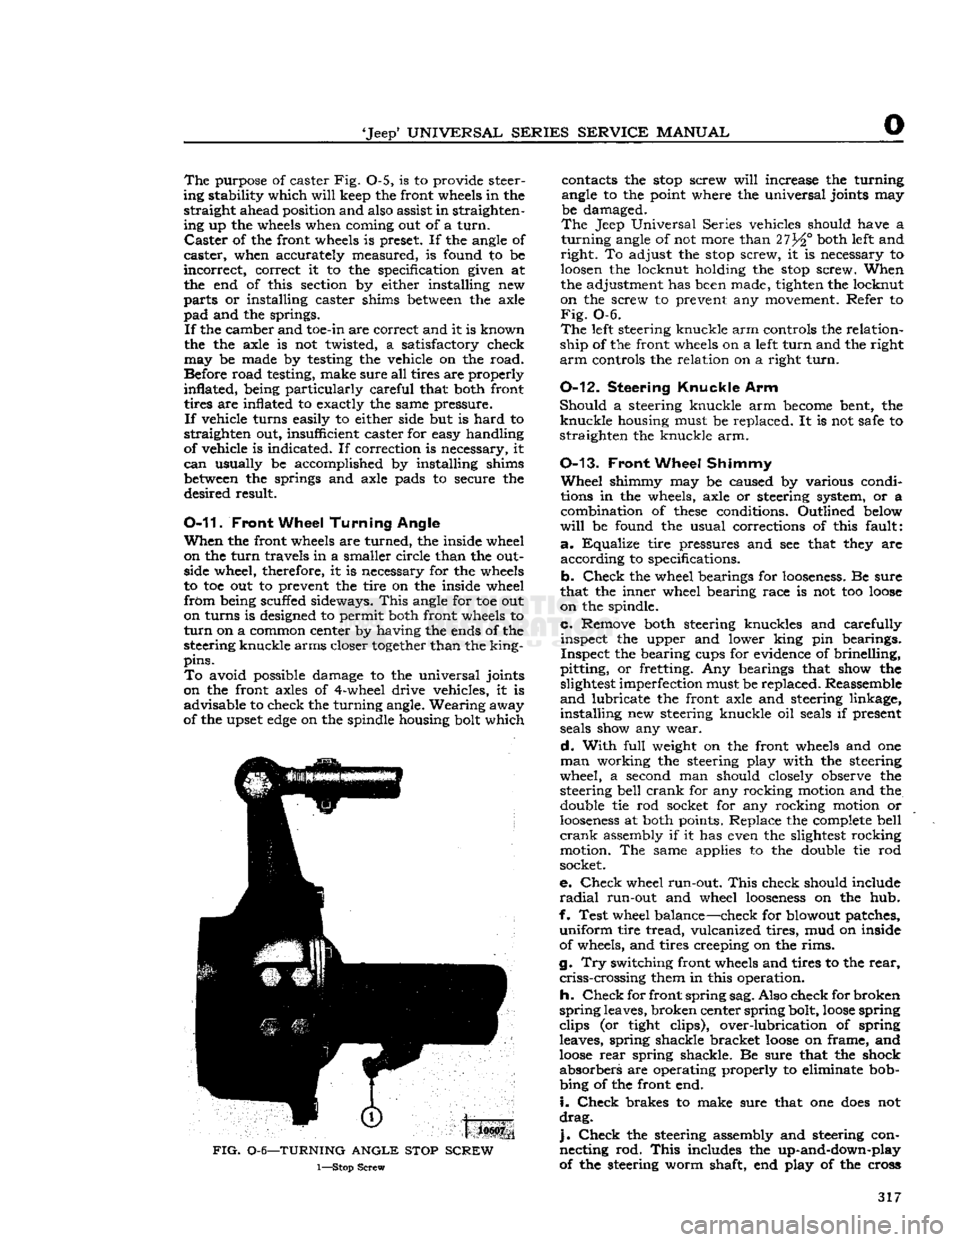
FIG.
0-6—TURNING
ANGLE
STOP
SCREW
1—Stop
Screw
contacts the
stop
screw
will
increase the turning
angle to the point where the universal joints may
be damaged.
The
Jeep Universal Series vehicles should have a
turning
angle of not more than 27^° both left and
right.
To adjust the
stop
screw, it is necessary to
loosen
the locknut holding the
stop
screw. When
the adjustment has been made, tighten the locknut
on the screw to prevent any movement. Refer to
Fig.
O 6.
The
left steering knuckle arm controls the relation
ship of the front wheels on a left
turn
and the right
arm
controls the relation on a right
turn.
0-12. Steering
Knuckle
Arm
Should
a steering knuckle arm
become
bent, the
knuckle
housing must be replaced. It is not safe to
straighten the knuckle arm.
0-13.
Front
Wheel
Shimmy
Wheel
shimmy may be caused by various condi
tions in the wheels, axle or steering system, or a
combination of
these
conditions. Outlined below
will
be found the usual corrections of this fault:
a.
Equalize
tire pressures and see that they are
according
to specifications.
b.
Check
the wheel bearings for
looseness.
Be sure
that the inner wheel bearing race is not too
loose
on the spindle.
c.
Remove both steering knuckles and carefully inspect the upper and lower king pin bearings.
Inspect
the bearing cups for evidence of brinelling,
pitting, or fretting. Any bearings that show the slightest imperfection must be
replaced.
Reassemble
and
lubricate the front axle and steering linkage,
installing
new steering knuckle oil seals if present
seals show any wear.
d.
With
full
weight on the front wheels and one
man
working the steering play with the steering
wheel, a second man should closely observe the steering bell
crank
for any rocking motion and the
double tie rod socket for any rocking motion or
looseness
at both points. Replace the complete bell
crank
assembly if it has even the slightest rocking motion. The same applies to the double tie rod
socket.
e.
Check
wheel run-out.
This
check should include
radial
run-out and wheel
looseness
on the hub.
f- Test wheel balance—check for blowout patches,
uniform
tire tread, vulcanized tires, mud on inside
of wheels, and tires creeping on the
rims.
g.
Try
switching front wheels and tires to the
rear,
criss-crossing
them in this operation.
h.
Check
for front
spring
sag. Also check for broken
spring
leaves, broken center
spring
bolt,
loose
spring
clips
(or tight clips), over-lubrication of spring leaves, spring shackle bracket
loose
on frame, and
loose
rear
spring shackle. Be sure that the shock
absorbers
are operating properly to eliminate bobbing of the front end.
i.
Check
brakes to make sure that one
does
not
drag.
j.
Check
the steering assembly and steering con necting rod.
This
includes the up-and-down-play
of the steering worm shaft, end play of the cross 317
Page 319 of 376
'Jeep*
UNIVERSAL
SERIES SERVICE
MANUAL
D
©—P3
10789
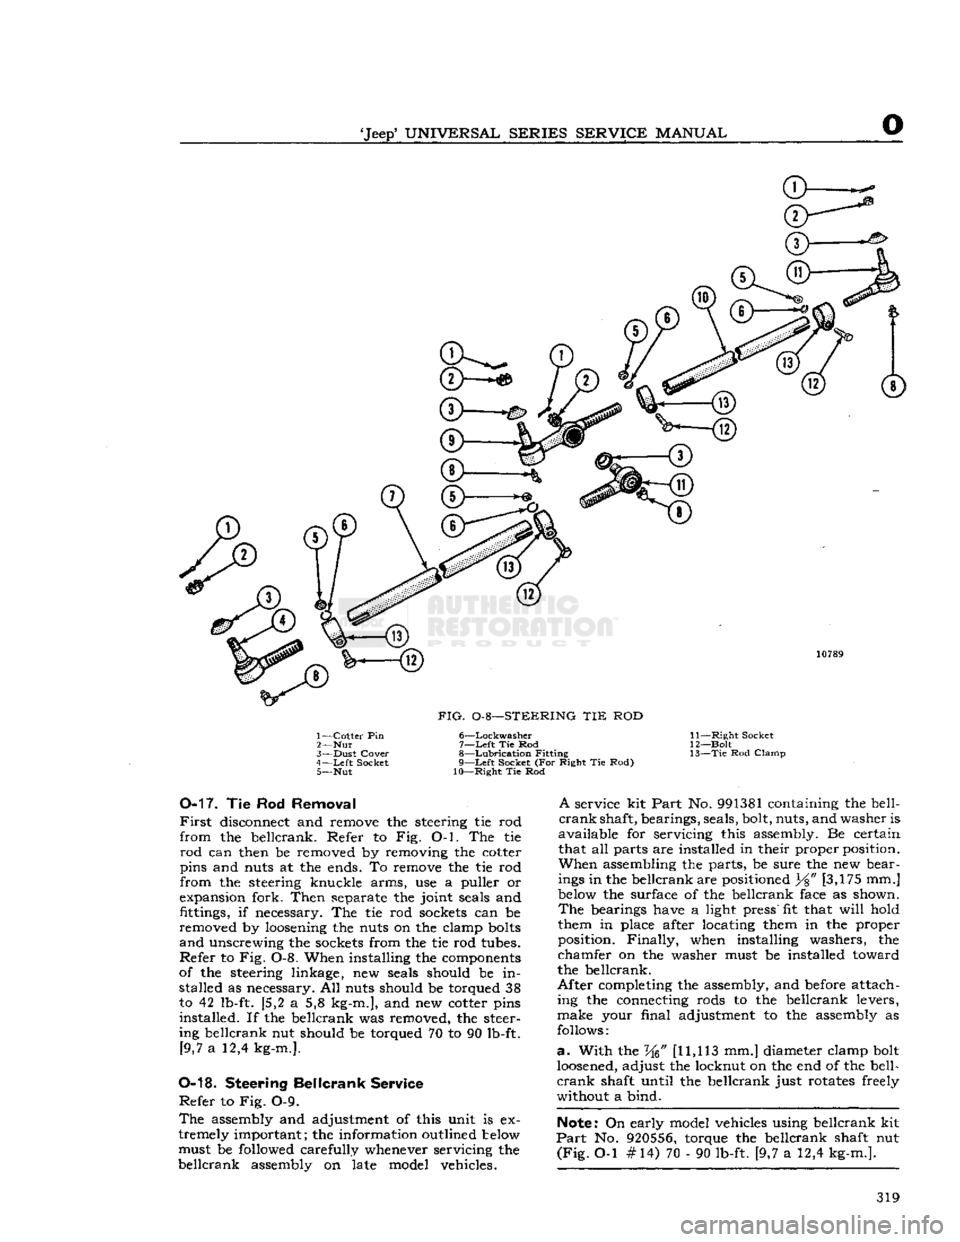
FIG.
0-8—STEERING TIE ROD
1—
Cotter
Pin 6—Lockwasher
2—
Nut 7—Left Tie Rod
3—
Dust
Cover
8—Lubrication
Fitting
4—
Left
Socket 9—Left Socket (For Right Tie Rod) 5— Nut 10—Right Tie Rod 11—
Right
Socket
12—
Bolt
13— Tie
Rod
Clamp
0-17.
Tie Rod
Removal
First
disconnect and remove the steering tie rod
from
the bellcrank. Refer to Fig. O-l. The tie
rod
can then be removed by removing the cotter
pins and
nuts
at the
ends.
To remove the tie rod
from
the steering knuckle arms, use a puller or
expansion
fork.
Then
separate
the
joint
seals
and
fittings,
if
necessary.
The tie rod
sockets
can be
removed by loosening the
nuts
on the clamp bolts
and unscrewing the
sockets
from
the tie rod
tubes.
Refer to Fig. 0-8. When installing the
components
of
the steering linkage, new
seals
should be in stalled as
necessary.
All
nuts
should be torqued 38
to 42
lb-ft.
{5,2 a 5,8
kg-m.],
and new cotter pins
installed.
If the bellcrank was removed, the
steer
ing
bellcrank nut should be torqued 70 to 90
lb-ft.
[9,7
a 12,4
kg-m.].
0-18.
Steering
Bellcrank
Service
Refer to Fig. 0-9.
The
assembly
and adjustment of this unit is ex
tremely important; the information outlined below must be
followed
carefully whenever servicing the
bellcrank
assembly
on late model vehicles.
A
service kit
Part
No. 991381 containing the
bell
crank shaft, bearings,
seals,
bolt, nuts, and
washer
is
available for servicing this
assembly.
Be certain that all
parts
are installed in their proper position.
When assembling the parts, be
sure
the new
bear
ings in the bellcrank are positioned
Y%"
[3,175 mm.]
below the
surface
of the bellcrank
face
as shown. The
bearings
have
a
light
press"
fit that
will
hold
them in
place
after locating them in the proper
position.
Finally, when installing
washers,
the
chamfer on the
washer
must be installed toward
the bellcrank.
After
completing the
assembly,
and before attach
ing
the connecting
rods
to the bellcrank levers,
make
your
final
adjustment to the
assembly
as
follows:
a.
With
the W [11,113 mm.] diameter clamp bolt
loosened, adjust the locknut on the end of the
bell
crank shaft
until
the bellcrank just
rotates
freely
without
a bind.
Note:
On early model vehicles using bellcrank kit
Part
No. 920556, torque the bellcrank shaft nut
(Fig.
O-l #14) 70 - 90
lb-ft.
[9,7 a 12,4
kg-m.].
319
Page 322 of 376
o
STEERING
SYSTEM 0-28.
SBKF1CE
DIAGNOSIS
SYMPTOMS PROBABLE REMEDY
Hard Steering
Lack
of Lubrication Lubricate all Connections
Tie
Rod
Ends
Worn.
Replace
Connecting Rod
Ball
Joints
Tight. Adjust
Cross
Shaft Improperly Adjusted Adjust Steering
Gear
Parts
Worn...................
Replace
Steering
Loose
Tie
Rod
Ends
Worn
Replace
Connecting Rod
Ball
Sockets
Worn
Replace
Steering
Gear
Parts
Worn.
Replace
Steering
Gear
Improperly Adjusted.
......
Adjust
Road Shook; Steering Connecting Rod too Tight;
Axle
Spring
Clip
Loose; Wheel Bearings Loose;
Poor
Shock Absorber
Control,
Turning Radius
Short One
Side
Center
Bolt
in Spring
Sheered
Off,
Axle
Shifted, Steering Arm Bent, Steering Arm not Properly Located
on
Steering
Gear.
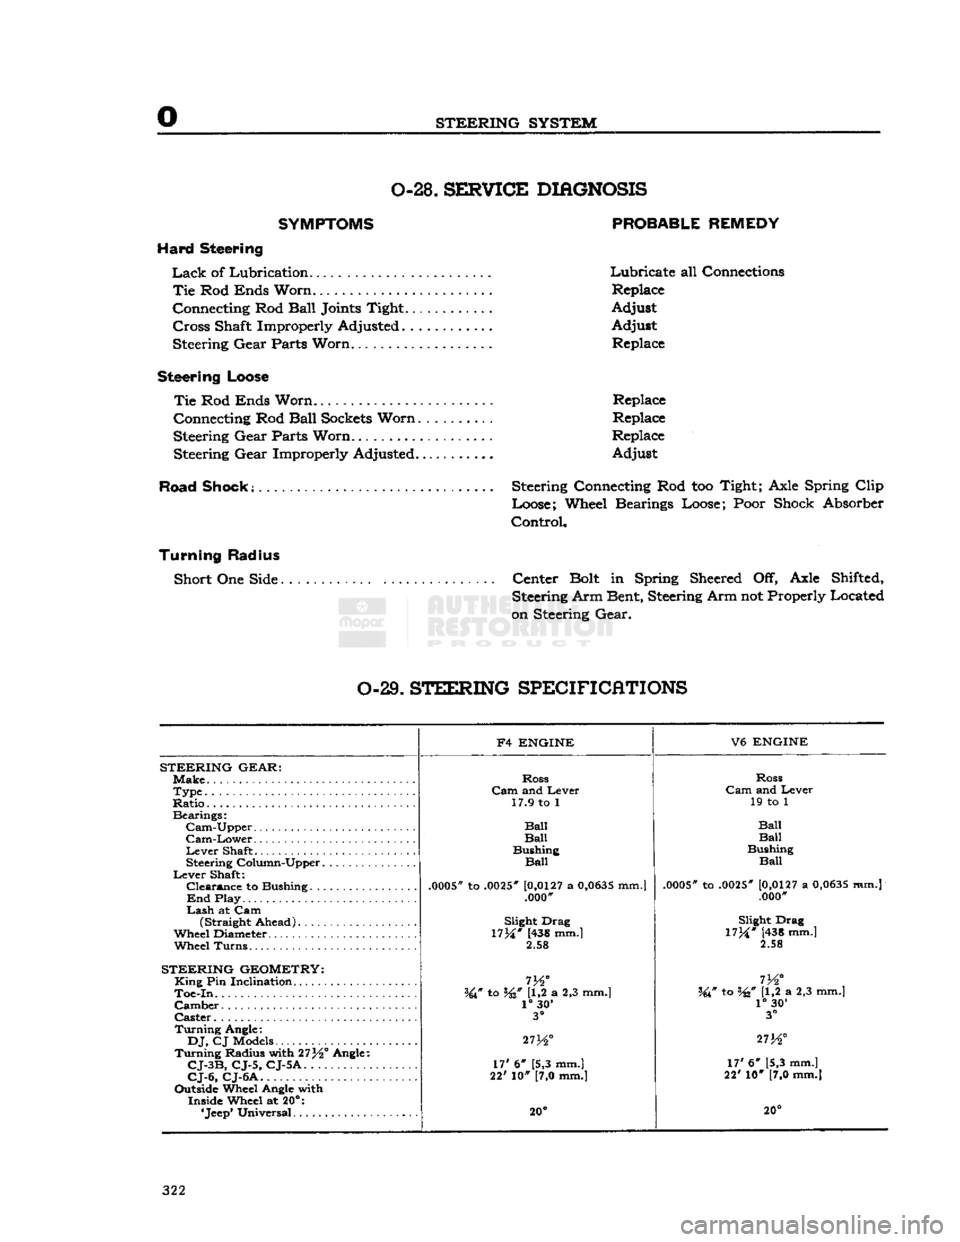
0-29.
STEERING
SPECIFICATIONS
F4
ENGINE
V6
ENGINE
STEERING
GEAR:
Make.
Ross
Ross
Type
Cam
and Lever
Cam
and Lever
Ratio..
17.9 to 1
19 to 1
Bearings:
Ball
Cam-Upper
Ball Ball
Cam-Lower
Ball Ball
Lever
Shaft Bushing
Bushing
Steering Column-Upper
Ball
Ball
Lever
Shaft:
.0005*
to
.0025"
[0,0127
a
0,0635
mm.]
Clearance
to Bushing
.0005"
to
.0025"
[0,0127
a
0,0635
mm.j
.0005*
to
.0025"
[0,0127
a
0,0635
mm.]
End
Play .000'
.000"
Lash
at Cam (Straight Ahead) Slight Drag
Slight Drag
Wheel Diameter.
17M*
(438 mm.]
17M*
[438 mm.]
Wheel
Turns.
2.58
2.58
STEERING
GEOMETRY:
King
Pin Inclination
m°
I
72
Toe-In.
W to W U,2 a 2,3 mm.] W to W [1,2 a 2,3 mm.]
Camber
1°
30'
1°
30'
Caster
3°
3°
Turning
Angle:
27K°
DJ,
CJ Models
27K° 273^°
Turning
Radius with 27^° Angle: 17' 6" [5,3 mm.]
CJ-3B,
CJ-5, CJ-5A.
17' 6" [5,3 mm.]
17' 6" [5,3 mm.]
CJ-6,
CJ-6A
22' 10" [7,0 mm.]
22' 10" [7,0 mm.]
Outside Wheel Angle with Inside Wheel at 20°:
20° 20°
322
Page 323 of 376
'Jeep'
UNIVERSAL
SERIES SERVICE
MANUAL
P
BRAKES
SUBJECT
PAR
GENERAL.
. P-l
Brake
Maintenance P-5
Master
Cylinder.
P-2
Parking
Brake
P-3
Transmission
Brake
P-4
BRAKE SERVICE
.P-6 Bleeding Brakes P-7
Brake
Adjustments P-14
Brake
Hoses P-8
Brake
Shoe
Initial
Adjustment P-l9
Brake
Shoe Installation P-l8
Brake
Pedal Adjustment P-9
Hand
Brake.
P-10 Inspection P-17
SUBJECT
PAR
Brake
Shoe Removal P-l6
Master
Cylinder Reconditioned. . P-20
Parking
Brake
Adjustment
.P-l 1
Relining
Transmission
Brake
P-13
Relining
Wheel
Brake
P-l5
Transmission
Brake
Adjustment .P-12
Wheel
Brake
Units P-14
Wheel
Cylinder Reconditioning P-21
TROUBLESHOOTING
P-2 2 Squeaky Brakes P-23
Rattles in Brakes P-24
SERVICE
DIAGNOSIS.
P-25
SPECIFICATIONS
P-2 6
P-1. GENERAL
A
double-safety
hydraulic brake system in con
junction with self-adjusting wheel brake units are
standard
equipment on all current production
'Jeep* vehicles. The
double-safety
brake system
Is
equipped with dual
stop
light switches that op
erate independently of each other, thus eliminating
possible
stop
light failure. Service information for
self adjusting brakes starts with Par. P-14.
All
four-wheel-drive vehicles are equipped with a transmission brake that operates in the drive line
and
is mounted to the rear of the transfer case. Two-wheel-drive vehicles
(DJ-5,
DJ-6)
are equipped
with a hand-operated parking brake that operates at the rear wheels.
P-2.
Master Cylinder —
Double Safety-Brake System
The
master cylinder (cast integrally with the res
ervoir)
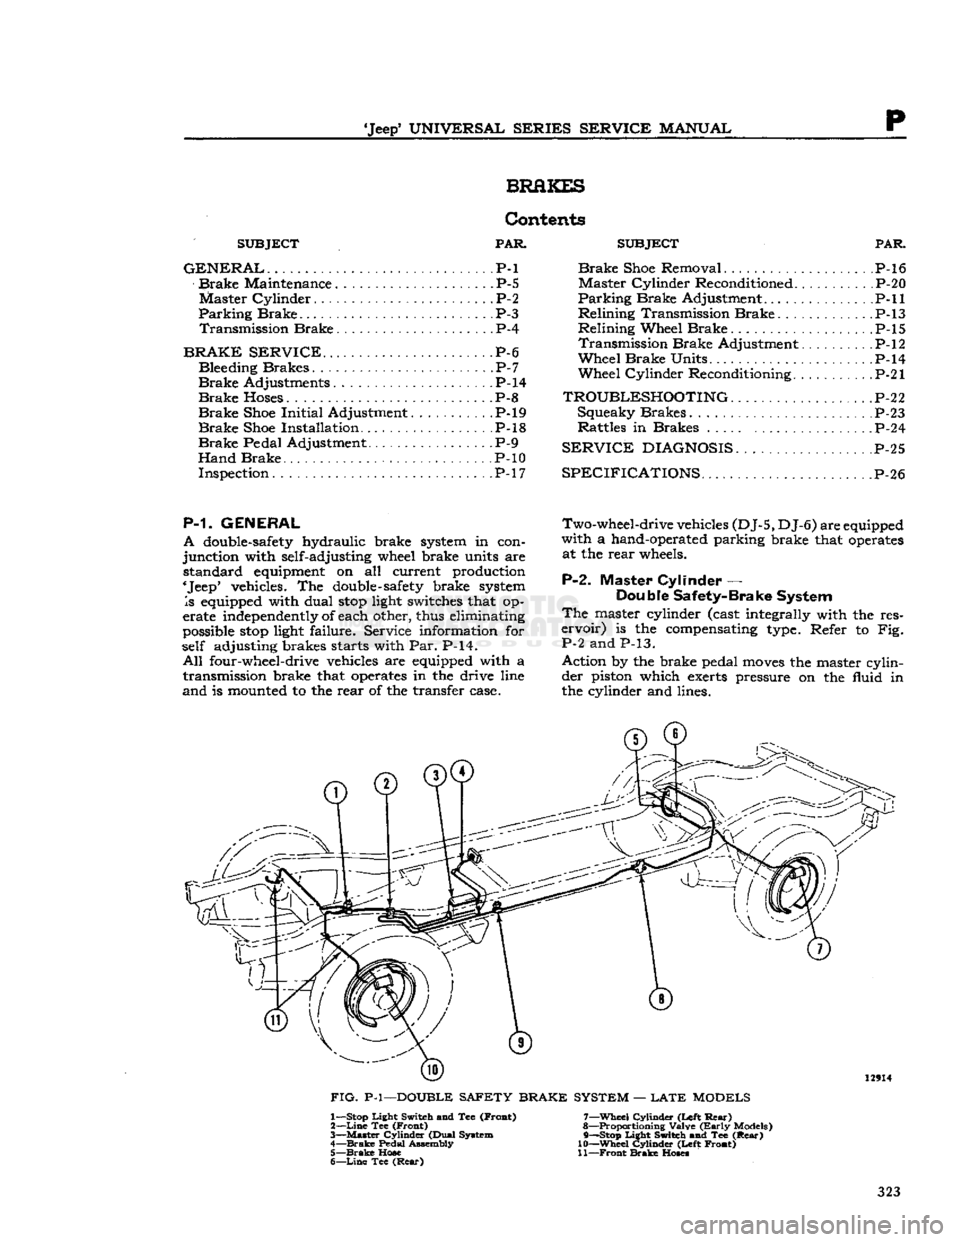
is the compensating type. Refer to Fig.
P-2 and P-13.
Action by the brake pedal
moves
the master cylinder piston which exerts pressure on the fluid in
the cylinder and lines. 12914
FIG.
P-l—DOUBLE SAFETY BRAKE SYSTEM —
LATE
MODELS 1— Stop Light Switch and Tee (Froat)
2—
Line
Tee (Front)
3—
Master
Cylinder (Dual System
4—
Brake
Pedal Assembly 5—
Brake
Hose
6—
Line
Tee
(Rear)
7—
Wheel
Cylinder (Left
Rear)
8— Proportioning Valve
(Early
Models)
9— —Stop Light Switch and Tee
(Rear)
10—
Wheel
Cylinder (Left Front)
11—
Front
Brake
Hoses
323
Page 324 of 376
p
BRAKES
13264
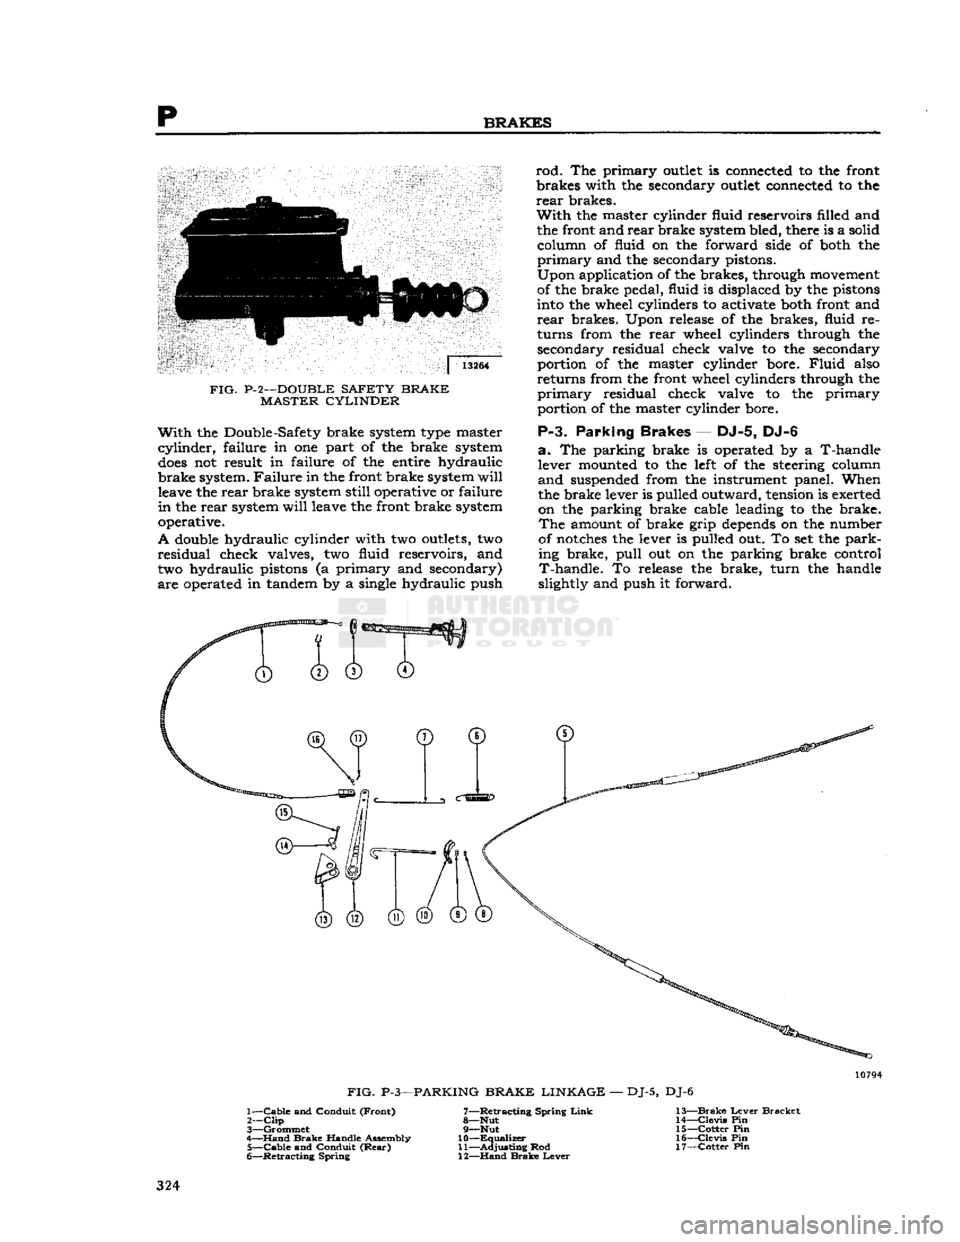
FIG- P-2—DOUBLE
SAFETY BRAKE
MASTER
CYLINDER
With
the Double-Safety brake system type master
cylinder,
failure
in one part of the brake system
does
not result in
failure
of the entire hydraulic
brake system. Failure in the
front
brake system
will
leave the rear brake system
still
operative or
failure
in
the rear system
will
leave the
front
brake system
operative.
A
double hydraulic
cylinder
with
two outlets, two
residual
check valves, two
fluid
reservoirs, and
two
hydraulic pistons (a
primary
and secondary)
are operated in tandem by a single hydraulic push
rod.
The
primary
outlet is connected to the
front
brakes
with
the secondary outlet connected to the rear brakes.
With
the master
cylinder
fluid
reservoirs
filled
and the
front
and rear brake system
bled,
there is a
solid
column
of
fluid
on the
forward
side of both the
primary
and the secondary pistons.
Upon
application
of the brakes, through movement
of
the brake pedal,
fluid
is displaced by the pistons
into
the wheel cylinders to activate both
front
and
rear brakes.
Upon
release
of the brakes,
fluid
re
turns
from
the rear wheel cylinders through the secondary residual check valve to the secondary
portion
of the master
cylinder
bore.
Fluid
also
returns
from
the
front
wheel cylinders through the
primary
residual check valve to the
primary
portion
of the master
cylinder
bore.
P-3.
Parking
Brakes
— DJ-5, DJ-6
a.
The parking brake is operated by a T-handle
lever
mounted to the
left
of the steering
column
and
suspended
from
the instrument panel. When
the brake lever is
pulled
outward, tension is exerted
on
the parking brake cable leading to the brake.
The
amount of brake
grip
depends
on the number
of
notches the lever is
pulled
out. To set the park
ing
brake,
pull
out on the parking brake
control
T-handle.
To
release
the brake,
turn
the handle
slightly
and push it
forward.
0
FIG.
P-3—PARKING
BRAKE LINKAGE
—
DJ-5,
DJ-6
1—
Cable
and
Conduit
(Front)
7—Retracting
Spring
Link
13—Brake
Lever
Bracket
2—
Clip
8—Nut
14—Clevis
Pin
3—
Grommet
9—Nut
15—Cotter
Pin
4—
Hand
Brake
Handle
Assembly
10—Equalizer
16—Clevis
Pin
5—
Cable
and
Conduit
(Rear)
11—Adjusting
Rod
17—Cotter
Pin
6—
Retracting
Spring
12—Hand
Brake
Lever
324
Page 327 of 376
'Jeep'
UNIVERSAL
SERIES SERVICE
MANUAL
P
lengthening of the brake master cylinder eye bolt.
This
is
done
so the primary cup
will
clear the by
pass port when the piston is in the off position,
otherwise the compensating action of the master
cylinder
for expansion and contraction of the fluid
in
the system, due to temperature changes,
will
be destroyed and cause the brakes to drag.
Note:
Some older 'Jeep' vehicles may
develop
side
movement
of the clutch and brake pedals resulting
from wear of the pedals, shafts, and bushings. One
way to
compensate
for this wear is to install a pedal
slack
adjuster kit,
Part
No.
921936.
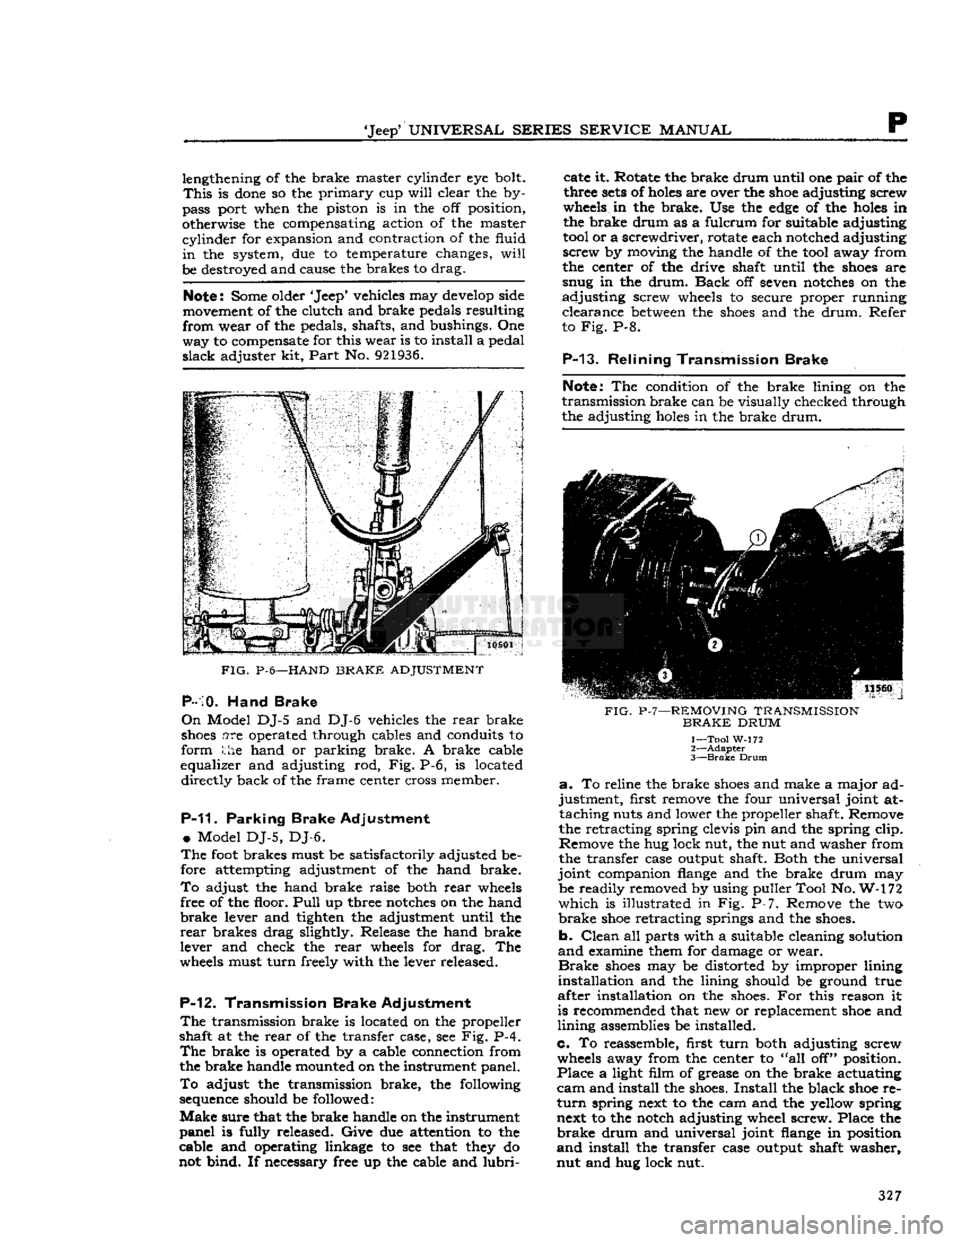
FIG.
P-6—HAND
BRAKE
ADJUSTMENT
P-10.
Hand Brake
On
Model DJ-5 and DJ-6 vehicles the rear brake
shoes
are operated through cables and conduits to
form the hand or parking brake. A brake cable
equalizer and adjusting rod, Fig. P-6, is located directly back of the frame center cross member.
P-11.
Parking Brake Adjustment
•
Model DJ-5, DJ-6.
The
foot
brakes must be satisfactorily adjusted be
fore attempting adjustment of the hand brake.
To
adjust the hand brake raise both rear
wheels
free of the floor.
Pull
up three
notches
on the hand
brake
lever and tighten the adjustment until the
rear
brakes drag slightly. Release the hand brake
lever and check the rear
wheels
for drag. The
wheels
must turn freely with the lever released.
P-12.
Transmission Brake Adjustment
The
transmission brake is located on the propeller
shaft at the rear of the transfer case, see Fig. P-4.
The
brake is operated by a cable connection from
the brake handle mounted on the instrument panel.
To
adjust the transmission brake, the following
sequence
should be followed:
Make
sure that the brake handle on the instrument
panel is fully released. Give due attention to the
cable and operating linkage to see that
they
do
not bind. If necessary free up the cable and
lubri
cate it. Rotate the brake drum until one pair of the
three
sets
of
holes
are over the
shoe
adjusting screw
wheels
in the brake. Use the
edge
of the
holes
in
the brake drum as a fulcrum for suitable adjusting
tool
or a screwdriver, rotate each notched adjusting
screw by moving the handle of the
tool
away from
the center of the drive shaft until the
shoes
are
snug in the drum.
Back
off seven
notches
on the
adjusting screw
wheels
to secure proper running clearance
between
the
shoes
and the drum. Refer
to Fig. P-8.
P-13.
Relining Transmission Brake
Note:
The condition of the brake lining on the
transmission brake can be visually checked through
the adjusting
holes
in the brake drum.
FIG.
P-7—REMOVING
TRANSMISSION
BRAKE
DRUM
1— Tool W-172
2—
Adapter
3—
Brake
Drum
a.
To reline the brake
shoes
and make a major ad
justment, first remove the four universal joint at taching nuts and lower the propeller shaft. Remove
the retracting spring clevis pin and the spring clip.
Remove the hug lock nut, the nut and washer from
the transfer case output shaft. Both the universal
joint companion
flange
and the brake drum may be readily removed by using puller Tool No. W-172
which
is illustrated in Fig. P-7. Remove the two
brake
shoe
retracting springs and the
shoes.
b. Clean all parts with a suitable cleaning solution
and
examine them for damage or wear.
Brake
shoes
may be distorted by improper lining
installation and the lining should be ground true
after installation on the
shoes.
For this reason it
is recommended that new or replacement
shoe
and
lining assemblies be installed.
c. To reassemble, first turn both adjusting screw
wheels
away from the center to "all off" position.
Place a light film of grease on the brake actuating
cam
and install the
shoes.
Install the black
shoe
re
turn
spring next to the cam and the yellow spring next to the notch adjusting wheel screw. Place the
brake
drum and universal joint
flange
in position
and
install the transfer case output shaft washer,
nut and hug lock nut. 327