checking oil JEEP DJ 1953 User Guide
[x] Cancel search | Manufacturer: JEEP, Model Year: 1953, Model line: DJ, Model: JEEP DJ 1953Pages: 376, PDF Size: 19.96 MB
Page 51 of 376
![JEEP DJ 1953 User Guide
-Jeep*
UNIVERSAL
SERIES SERVICE
MANUAL
E>
[5,928 a
5,926
cm.] for all main bearings. Allowable
taper or out-of-round of the journals is .001"
[0,0254
mm.].
D-42.
Checking Connecting Ro JEEP DJ 1953 User Guide
-Jeep*
UNIVERSAL
SERIES SERVICE
MANUAL
E>
[5,928 a
5,926
cm.] for all main bearings. Allowable
taper or out-of-round of the journals is .001"
[0,0254
mm.].
D-42.
Checking Connecting Ro](/img/16/57041/w960_57041-50.png)
-Jeep*
UNIVERSAL
SERIES SERVICE
MANUAL
E>
[5,928 a
5,926
cm.] for all main bearings. Allowable
taper or out-of-round of the journals is .001"
[0,0254
mm.].
D-42.
Checking Connecting Rod
Crankpins
Check
the crankpin diameters with a micrometer
to ensure that they are not out-of-round or tapered more than .001"
[0,0254
mm.] The standard
crank-
pin
diameter is
1.9383*
to
1.9375"
[4,9233
a
4,9213
cm.].
D-43.
Crankshaft
Main
Bearings
The
crankshaft rotates on three main bearings
with
a running clearance of .0003" to .0029"
[0,0076
a
0,0736
mm.].
These
bearings are positioned and prevented from
rotating in their supports in the cylinder block by
dowel pins. Dowel pins are used in both the center
and
the
rear
bearing caps. No dowel pins are used
in
the front bearing cap because the bearing has
a
flange. The front main bearing takes the end
thrust
of the crankshaft. The main bearings are of premium type which provides long bearing life.
They
are replaceable and when correctly installed, provide proper clearance without filing, boring,
scraping,
or shimming. Crankshaft bearings can
be removed from this
engine
only with the
engine
out of the vehicle. Crankshaft bearings must be replaced as a complete set of three bearings, each
bearing consisting of two halves.
Main
bearings
are
available in the standard size and the following
undersizes:
.001" [0,025mm.] .012" [0,305 mm.] .002" [0,051mm.] .020" [0,508 mm.] .010" [0,254mm.] .030" [0,762 mm.]
The
.001" and .002" undersize main bearings are
for use with standard size crankshafts having
slightly worn
journals.
The .010", .020", and .030" undersize bearings are for use with undersize
crankshafts
in
those
sizes. The .012" undersize
bearings are for use with .010" undersize
crank
shafts having slightly worn journals. Bearing sizes
are
rubber stamped on the reverse side of each
bearing half.
D-44. Crankshaft
Main
Bearing Inspection
The
crankshaft
journals
must be carefully inspected
as detailed previously in Par. D-41. Worn journals
will
require undersize bearings. Scored, flaked, or
worn
bearings must be replaced. Measure the main
bearing bores in the cylinder block using a
telescope
gauge
and micrometer. Measure the bores at right
angles to the split line and at 45° to the split line.
The
bores should not be over .001"
[0,0254
mm.]
out-of-round or .001" in taper from end to end.
Also,
the bores should not be more then .001"
oversize, considering the average diameter of the
bore.
D-45.
Fitting Crankshaft
Main
Bearings
Using
Plastigage
After
wiping and carefully inspecting the bearing bore, install the proper bearing. See that the oil
hole
in the bearing upper half registers properly
with
the oil
hole
in the block, and that the bearing
lock fits properly in the notch in the block.
Install
the crankshaft if replacing bearings with the
engine
out of the vehicle. The desired running fit (dif
ference
between
the diameter of the crankshaft
journal
and the inside diameter of the fitted bear ing) for a main bearing is .0003" to .0029"
[0,0076
a
0,0736
mm.]. With a dimension in
excess
of this
standard
running fit, a satisfactory bearing replacement cannot be made and it
will
be necessary to
regrind
the crankshaft.
Install
the bearing lower
half
and the bearing cap and draw the nuts down
equally and only slightly tight. Rotate the
crank
shaft by hand to be sure it turns freely without
drag.
Pull
the nuts tighter, first one then the other,
a
little at a time, intermittently rotating the
crank
shaft by hand until the recommended torque of
35 to 45 lb-ft. [4,8 a 6,2 kg-m.] is reached. If the
bearings are of the correct size, and lubricated with
light oil before installation, the crankshaft should
turn
freely in the bearings. If the crankshaft cannot
be turned, a larger bearing is
required.
If there is no binding or tightness, it is still necessary to check
clearance to guard against too
loose
a fit. Never file
either the bearing cap or the bearing to compensate
for too much clearance. Do not use shims under a
bearing cap or behind a bearing shell. Do not run a
new bearing half with a worn bearing half. The use
of "Plastigage" of the proper size to measure .001" [0,025 mm.] clearance is recommended for check
ing crankshaft main bearing clearance. The method
of checking clearance is as follows:
a.
Remove the bearing cap and carefully wipe
all
oil from the bearing and the
journal.
b.
Lay a piece of "Plastigage" y%" [3 mm.]
shorter than the width of the bearing across the
journal
(lengthwise of the crankshaft).
c.
Install
the bearing and cap and tighten first
one nut, then the other, a little at a time to the specified torque. As the bearing
tightens
down
around
the
journal,
the "Plastigage" flattens to a
width that indicates the bearing clearance.
d.
Remove the cap and measure the width of
the flattened "Plastigage," using the scale printed
on the
edge
of the envelope. The proper size "Plasti
gage"
will
accurately measure clearance down to .001".
e. If the flattened "Plastigage" tapers toward the middle, or toward the end, or both ends, there
is a difference in clearance, indicating a taper, a
low
spot,
or other irregularity of the bearing or
journal.
D-46.
Fitting Crankshaft
Main
Bearings
Using
Shim Stock
Thin
feeler or shim stock may be used instead of "Plastigage" to check bearing clearances. The
method is simple, but care must be taken to protect
the bearing metal surface from
injury
by too much pressure against the feeler stock,
a.
Cut a piece of .001" [0,025 mm.] thick, by Yl [12,7 mm.] wide, feeler stock }4" [3 mm.]
shorter than the width of the bearing. Coat this 51
Page 53 of 376
'Jeep'
UNIVERSAL
SERIES
SERVICE
MANUAL
D
satisfactory bearing replacement cannot be made
and
it
will
be necessary to regrind the crankshaft.
Install
the bearing lower
half
and the connecting
rod
cap and draw the cap bolt nuts down equally
and
only slightly tight. Move the connecting rod
endwise, one way or the other, on the crankshaft to be sure the bearing is not tight.
Pull
the nuts tighter, first one then the other, a little at a time,
and
keep trying the fit of the rod on the crankshaft by hand until the recommended torque of 35 to 45 lb-ft. [4,8 a 6,2 kg-m.] is reached. If the
bearings are of the correct size, and have been
properly
lubricated with light
engine
oil before in
stallation,
the connecting rod should be easy to
slide back and forth parallel to the
crankpin.
If
the connecting rod is tight on the crankshaft, a
larger
bearing is required. If there is no binding
or
tightness, it is
still
necessary to check clearance
to guard against too
loose
a fit. The use of "Plasti
gage"
or shim stock of the proper size to measure .001" [0,025 mm.] clearance is recommended for
checking
connecting rod bearing clearances.
This
is the same material recommended for checking
crankshaft
main bearings and the method of check
ing is
similar.
Refer to
Par.
D-45 or D-46. Connect
ing rod bearings are fitted to the same clearance as the main bearings but the torque specified for con
necting rod cap
bolts
is different.
D-50.
Connecting
Rod
Side Play
Check
the connecting rod side play with a feeler
gauge
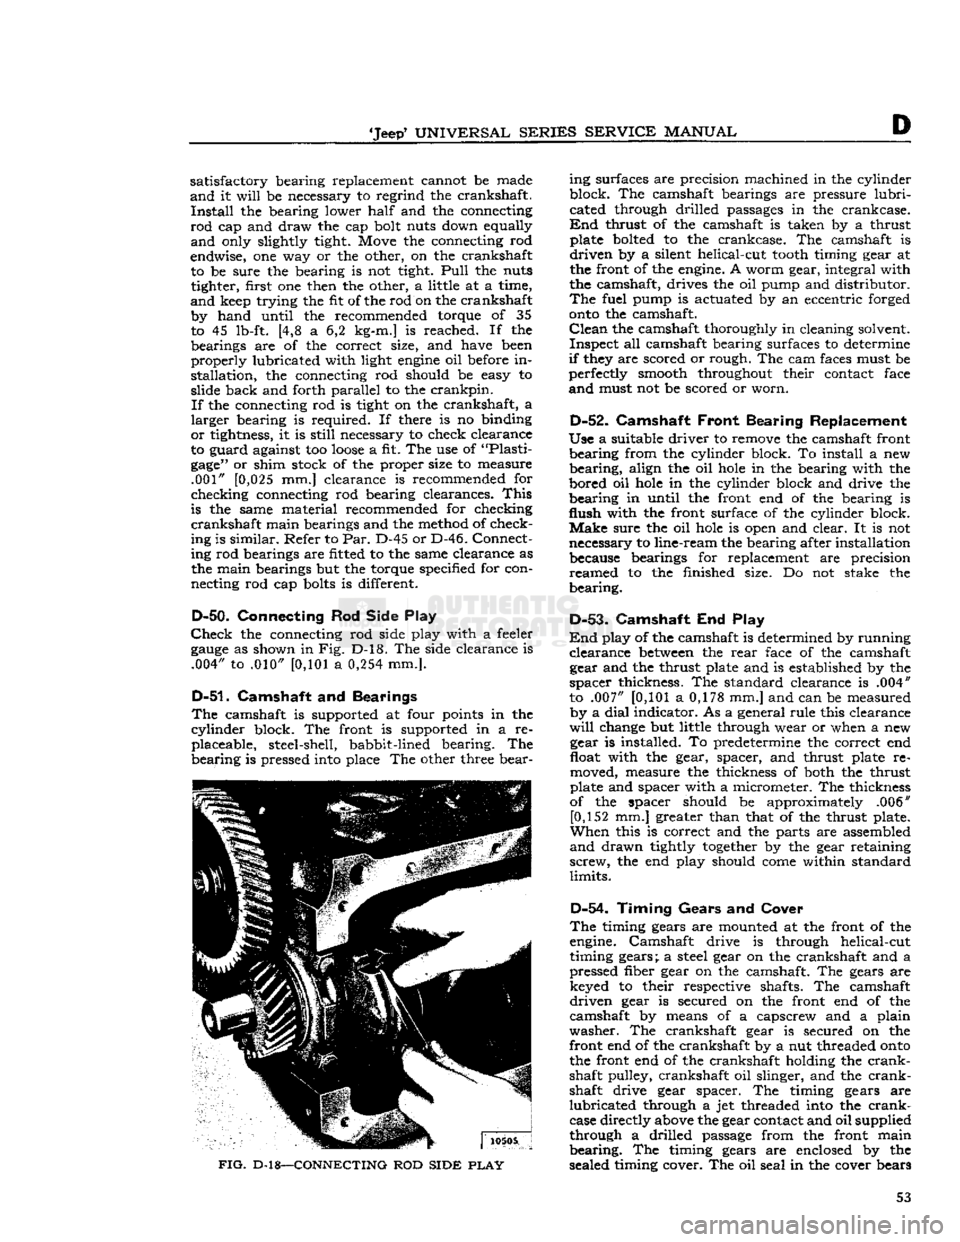
as shown in Fig. D-l8. The side clearance is .004" to .010"
[0,101
a
0,254
mm.].
D-51.
Camshaft and Bearings
The
camshaft is supported at four points in the
cylinder
block. The front is supported in a re placeable, steel-shell, babbit-lined bearing. The
bearing
is pressed into place The other three bear-
FIG.
D-18—CONNECTING
ROD
SIDE
PLAY
ing surfaces are precision machined in the cylinder
block. The camshaft bearings are pressure
lubri
cated through drilled passages in the crankcase.
End
thrust of the camshaft is taken by a thrust plate bolted to the crankcase. The camshaft is
driven
by a silent helical-cut
tooth
timing gear at
the front of the engine. A worm gear, integral with
the camshaft, drives the oil pump and distributor.
The
fuel pump is actuated by an eccentric forged
onto
the camshaft.
Clean
the camshaft thoroughly in cleaning solvent.
Inspect
all camshaft bearing surfaces to determine
if
they are scored or rough. The cam faces must be
perfectly smooth throughout their contact face
and
must not be scored or worn.
D-52.
Camshaft
Front Bearing Replacement
Use
a suitable driver to remove the camshaft front
bearing
from the cylinder block. To install a new
bearing,
align the oil
hole
in the bearing with the
bored oil
hole
in the cylinder block and drive the
bearing
in until the front end of the bearing is
flush
with the front surface of the cylinder block.
Make
sure the oil
hole
is open and clear. It is not
necessary to line-ream the bearing after installation because bearings for replacement are precision
reamed
to the finished size. Do not stake the
bearing.
D-53-
Camshaft End Play
End
play of the camshaft is determined by running
clearance
between
the
rear
face of the camshaft gear and the thrust plate and is established by the
spacer
thickness. The standard clearance is .004"
to .007"
[0,101
a 0,178 mm.] and can be measured by a
dial
indicator. As a general rule this clearance
will
change but little through wear or when a new gear is installed. To predetermine the correct end
float with the gear, spacer, and thrust plate re
moved, measure the thickness of both the thrust
plate and spacer with a micrometer. The thickness
of the spacer should be approximately .006" [0,152 mm.] greater than that of the thrust plate.
When
this is correct and the parts are assembled
and
drawn tightly
together
by the gear retaining
screw,
the end play should
come
within standard
limits.
D-54.
Timing Gears
and
Cover
The
timing gears are mounted at the front of the
engine. Camshaft drive is through helical-cut
timing gears; a steel gear on the crankshaft and a
pressed fiber gear on the camshaft. The gears are keyed to their respective shafts. The camshaft
driven
gear is secured on the front end of the
camshaft by means of a capscrew and a plain
washer.
The crankshaft gear is secured on the
front end of the crankshaft by a nut threaded
onto
the front end of the crankshaft holding the
crank
shaft pulley, crankshaft oil slinger, and the
crank
shaft drive gear spacer. The timing gears are
lubricated
through a jet threaded into the
crank
case directly above the gear contact and oil supplied
through a drilled passage from the front main
bearing.
The timing gears are enclosed by the
sealed timing cover. The oil seal in the cover bears 53
Page 55 of 376
'Jeep'
UNIVERSAL
SERIES SERVICE
MANUAL
develop
into surface cracks and cause failure.
Measure
the over all free length of the springs and
replace any that do not measure to standard: 1%" [35,7 mm.] for intake valve springs and 2j^"
[63,5 mm.] for exhaust valve springs. If possible,
check each valve spring in a valve spring testing
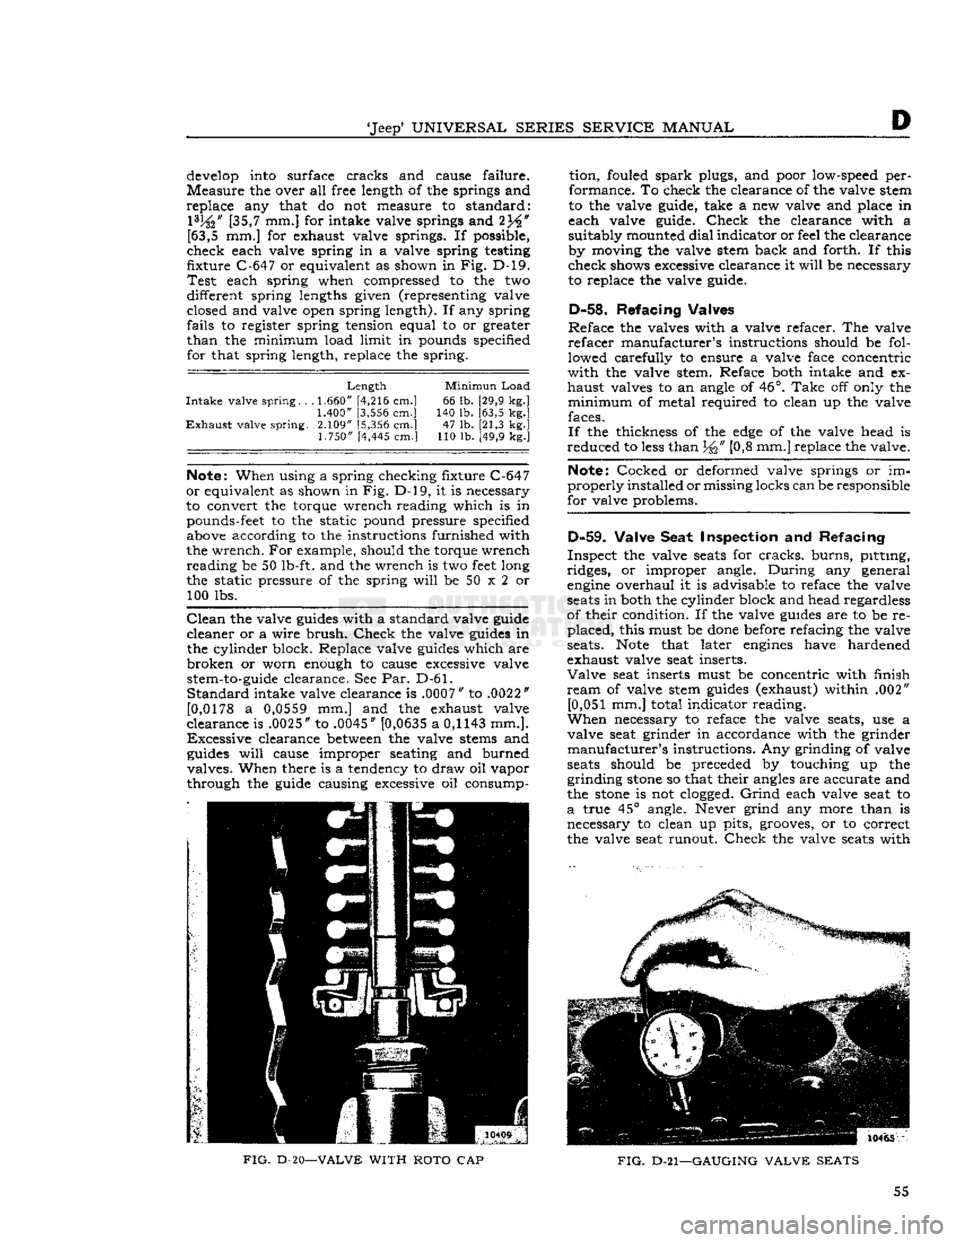
fixture C-647 or equivalent as shown in Fig. D-l9.
Test
each spring when compressed to the two
different spring lengths given (representing valve closed and valve open spring length). If any spring
fails to register spring tension equal to or greater
than
the minimum load limit in pounds specified for that spring length, replace the spring.
Length
Minimun
Load
Intake
valve spring. . .
1.660"
[4,216 cm.] 66 lb. [29,9 kg.]
1.400"
[3,556 cm.] 140 lb. [63,5 kg.]
Exhaust
valve spring. 2.109" [5,356 cm.] 47 lb. [21,3 kg.]
1.750"
[4,445 cm.] 110 lb. [49,9 kg.]
Note:
When using a spring checking fixture C-647
or
equivalent as shown in Fig. D-l9, it is necessary
to convert the torque wrench reading which is in pounds-feet to the static pound pressure specified above according to the instructions furnished with
the wrench. For example, should the torque wrench reading be 50 lb-ft. and the wrench is two
feet
long
the static pressure of the spring
will
be 50 x 2 or 100 lbs.
Clean
the valve
guides
with a standard valve guide
cleaner or a wire
brush.
Check
the valve
guides
in the cylinder block. Replace valve
guides
which are
broken
or worn enough to cause excessive valve
stem-to-guide
clearance. See Par. D-61.
Standard
intake valve clearance is .0007" to .0022"
[0,0178
a
0,0559
mm.] and the exhaust valve
clearance is .0025" to .0045" [0,0635 a
0,1143
mm.].
Excessive
clearance
between
the valve
stems
and
guides
will
cause improper seating and burned
valves. When there is a tendency to draw oil vapor
through the guide causing excessive oil consump tion, fouled
spark
plugs, and poor low-speed per
formance. To check the clearance of the valve stem
to the valve guide, take a new valve and place in
each valve guide.
Check
the clearance with a
suitably mounted
dial
indicator or feel the clearance by moving the valve stem back and forth. If this
check shows excessive clearance it
will
be necessary to replace the valve guide.
D-58.
Refacing Valves
Re
face the valves with a valve refacer. The valve
refacer
manufacturer's instructions should be fol
lowed carefully to ensure a valve face concentric
with
the valve stem. Reface both intake and ex
haust valves to an angle of 46°.
Take
off only the
minimum
of metal required to clean up the valve faces.
If
the thickness of the
edge
of the valve head is
reduced to
less
than
J^>"
[0>8 mm.] replace the valve.
Note:
Cocked or deformed valve springs or im
properly
installed or missing locks can be responsible
for valve problems.
D-59.
Valve Seat Inspection
and
Refacing
Inspect the valve
seats
for
cracks,
burns, pitting,
ridges, or improper angle.
During
any general
engine
overhaul it is advisable to reface the valve
seats
in both the cylinder block and head regardless
of their condition. If the valve
guides
are to be re placed, this must be
done
before refacing the valve
seats.
Note
that later
engines
have hardened
exhaust valve seat inserts.
Valve
seat inserts must be concentric with finish
ream
of valve stem
guides
(exhaust) within .002"
[0,051
mm.] total indicator reading.
When
necessary to reface the valve seats, use a
valve seat grinder in accordance with the grinder
manufacturer's
instructions. Any grinding of valve
seats
should be preceded by touching up the
grinding
stone
so that their angles are accurate and
the
stone
is not
clogged.
Grind
each valve seat to
a
true 45° angle. Never grind any more than is necessary to clean up pits, grooves, or to correct
the valve seat runout.
Check
the valve
seats
with
10465
FIG.
D-20—VALVE
WITH
ROTO
CAP
FIG.
D-21—GAUGING
VALVE
SEATS
55
Page 60 of 376
HURRICANE
F4
ENGINE
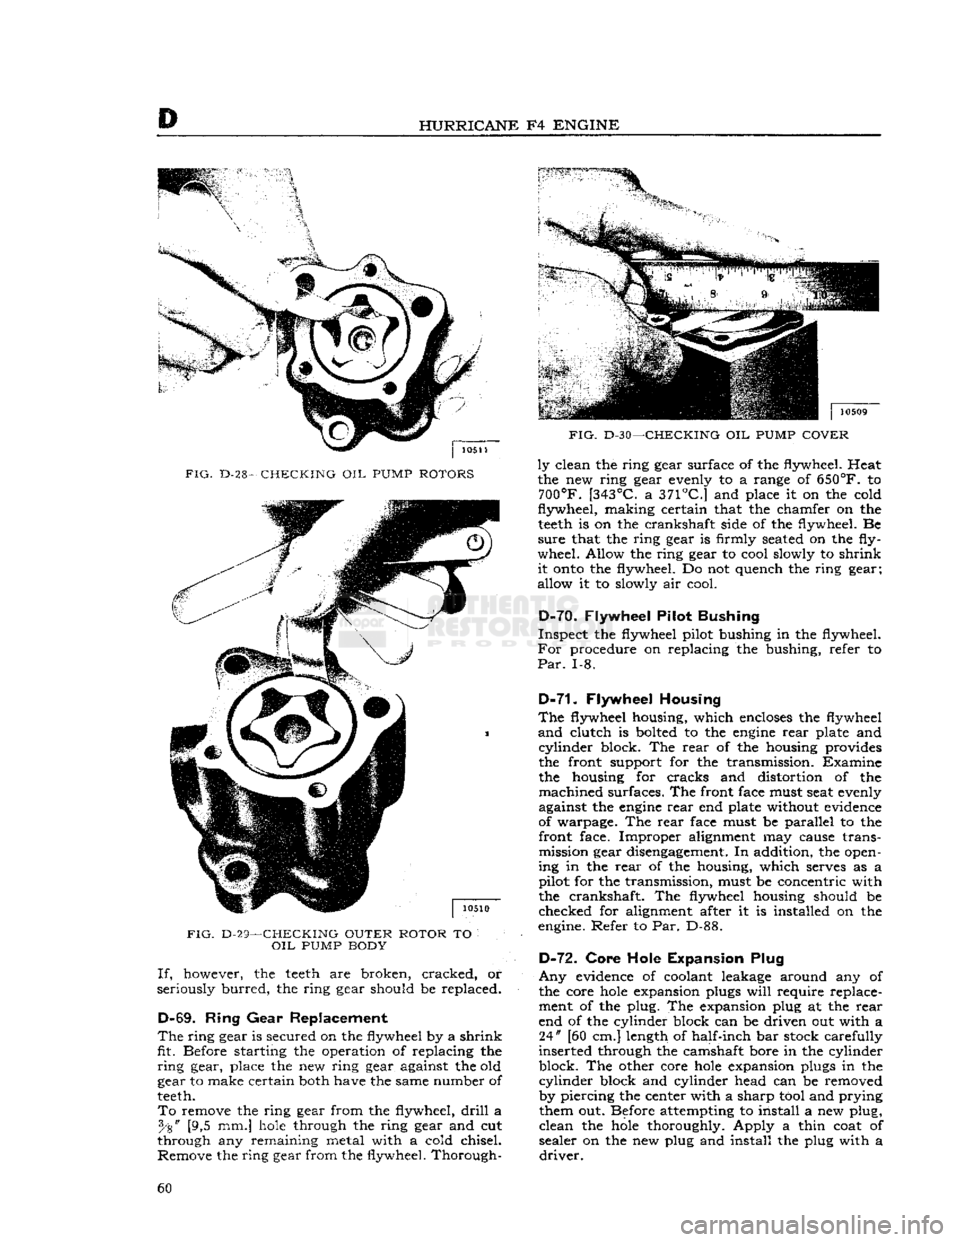
FIG.
D-28-
CHECKING
OIL
PUMP
ROTORS
FIG.
D-29—CHECKING OUTER ROTOR
TO
OIL
PUMP
BODY If,
however, the
teeth
are broken, cracked, or
seriously
burred,
the ring gear should be replaced.
D-69.
Ring
Gear
Replacement
The
ring
gear
is secured on the flywheel by a
shrink
fit. Before starting the operation of replacing the
ring
gear, place the new ring gear against the old
gear to make certain both have the same number of
teeth.
To
remove the ring gear from the flywheel,
drill
a [9,5 mm.]
hole
through the ring gear and cut
through any remaining metal with a cold chisel. Remove the ring gear from the flywheel. Thorough-
FIG.
D-30—CHECKING
OIL
PUMP
COVER
ly
clean the ring gear surface of the flywheel. Heat
the new ring gear evenly to a range of
650°F.
to
700°F.
[343°C.
a
371°C.]
and place it on the cold
flywheel,
making
certain that the chamfer on the
teeth
is on the crankshaft side of the flywheel. Be
sure
that the ring gear is firmly seated on the fly
wheel. Allow the ring gear to cool slowly to
shrink
it
onto
the flywheel. Do not quench the ring gear;
allow it to slowly air cool.
D-7Q.
Flywheel Pilot Bushing
Inspect
the flywheel pilot bushing in the flywheel.
For
procedure on replacing the bushing, refer to
Par.
1-8.
D-71.
Flywheel Housing
The
flywheel housing, which
encloses
the flywheel
and
clutch is bolted to the
engine
rear
plate and
cylinder
block. The
rear
of the housing provides
the front support for the transmission. Examine the housing for cracks and distortion of the
machined
surfaces. The front face must seat evenly
against the
engine
rear
end plate without evidence
of warpage. The
rear
face must be parallel to the front face. Improper alignment may cause transmission gear disengagement. In addition, the open
ing in the
rear
of the housing, which serves as a
pilot for the transmission, must be concentric with the crankshaft. The flywheel housing should be
checked for alignment after it is installed on the
engine. Refer to Par. D-88.
D-72.
Core Hole Expansion Plug
Any
evidence of coolant leakage around any of
the core
hole
expansion plugs
will
require replace ment of the plug. The expansion plug at the
rear
end of the cylinder block can be driven out with a 24" [60 cm.] length of half-inch bar stock carefully
inserted through the camshaft bore in the cylinder
block. The other core
hole
expansion plugs in the
cylinder
block and cylinder head can be removed
by piercing the center with a sharp tool and prying them out. Before attempting to install a new plug,
clean
the
hole
thoroughly. Apply a thin coat of
sealer on the new plug and install the plug with a
driver.
60
Page 65 of 376
'Jeep'
UNIVERSAL
SERIES
SERVICE
MANUAL
D
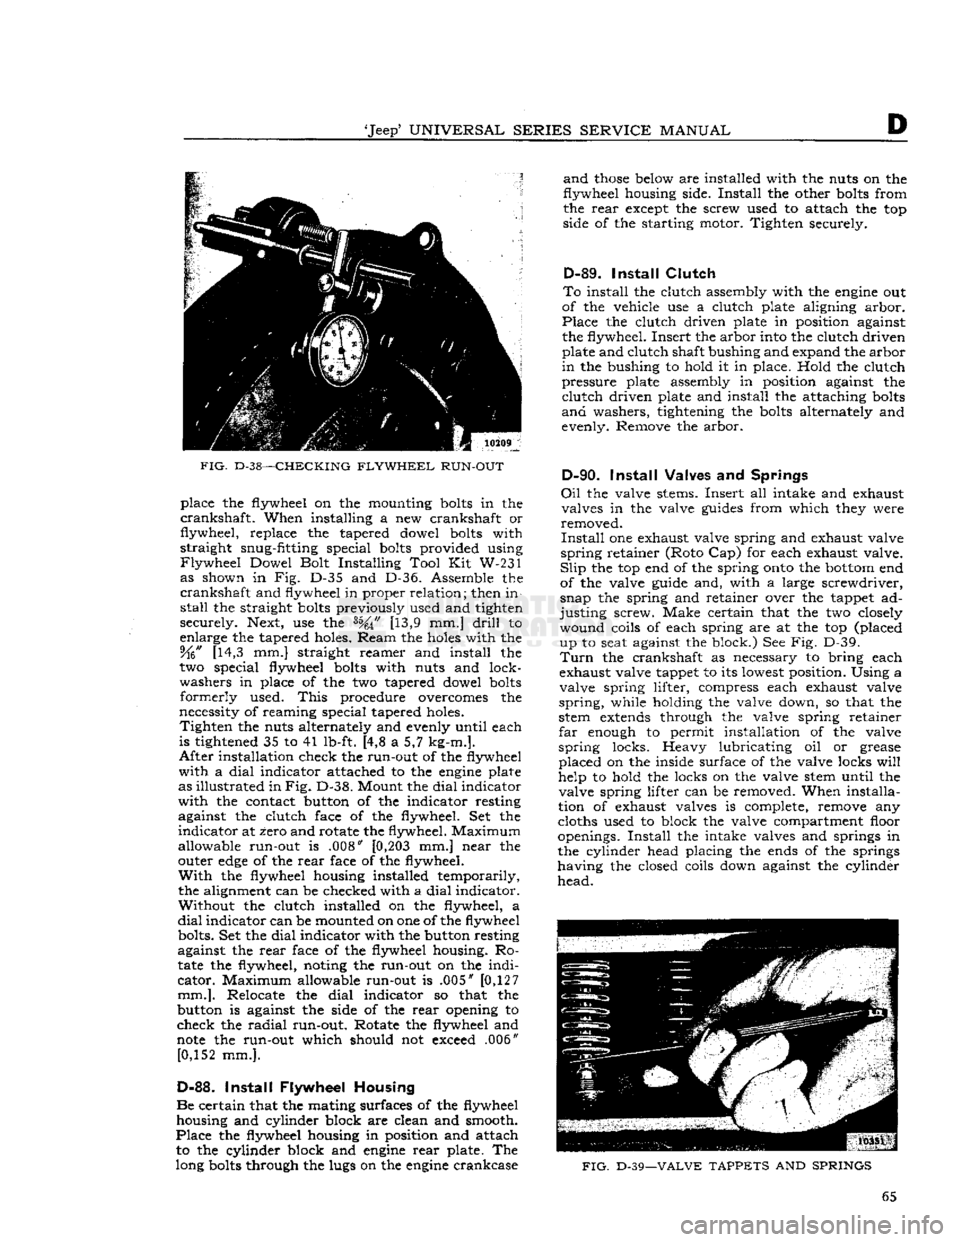
FIG.
D-38—CHECKING
FLYWHEEL
RUN-OUT
place the flywheel on the mounting
bolts
in the
crankshaft.
When installing a new crankshaft or
flywheel, replace the tapered dowel
bolts
with
straight snug-fitting special
bolts
provided using
Flywheel
Dowel Bolt Installing Tool Kit W-231 as shown in Fig. D-35 and D-36. Assemble the
crankshaft
and flywheel in proper relation; then in
stall
the straight
bolts
previously used and tighten
securely. Next, use the [13,9 mm.]
drill
to
enlarge the tapered holes. Ream the
holes
with the 5fo" [14,3 mm.] straight reamer and install the
two special flywheel
bolts
with nuts and lock
washers in place of the two tapered dowel
bolts
formerly
used.
This
procedure overcomes the
necessity of reaming special tapered holes.
Tighten
the nuts alternately and evenly until each
is tightened 35 to 41 lb-ft. [4,8 a 5,7 kg-m.].
After
installation check the run-out of the flywheel
with
a
dial
indicator attached to the
engine
plate
as illustrated in
Fig.
D-38. Mount the
dial
indicator
with
the contact button of the indicator resting against the clutch face of the flywheel. Set the
indicator
at zero and rotate the flywheel. Maximum
allowable run-out is .008"
[0,203
mm.] near the
outer
edge
of the
rear
face of the flywheel.
With
the flywheel housing installed temporarily,
the alignment can be checked with a
dial
indicator. Without the clutch installed on the flywheel, a
dial
indicator can be mounted on one of the flywheel bolts. Set the
dial
indicator with the button resting
against the
rear
face of the flywheel housing. Ro
tate
the flywheel, noting the run-out on the
indi
cator.
Maximum allowable run-out is .005" [0,127
mm.].
Relocate the
dial
indicator so that the
button is against the side of the
rear
opening to
check the
radial
run-out. Rotate the flywheel and
note
the run-out which should not exceed .006" [0,152 mm.].
D-88.
Install
Flywheel Housing
Be
certain that the mating surfaces of the flywheel housing and cylinder block are clean and smooth.
Place
the flywheel housing in position and attach to the cylinder block and
engine
rear
plate. The
long
bolts
through the lugs on the
engine
crankcase
and
those
below are installed with the nuts on the
flywheel housing side.
Install
the other
bolts
from
the
rear
except the screw used to attach the top
side of the starting motor. Tighten securely.
D-89.
Install
Clutch
To
install the clutch assembly with the
engine
out
of the vehicle use a clutch plate aligning arbor.
Place
the clutch driven plate in position against
the flywheel. Insert the arbor into the clutch driven plate and clutch shaft bushing and expand the arbor
in
the bushing to hold it in place. Hold the clutch
pressure plate assembly in position against the
clutch
driven plate and install the attaching
bolts
and
washers, tightening the
bolts
alternately and
evenly. Remove the arbor.
D-90.
Install
Valves and Springs
Oil
the valve stems. Insert all intake and exhaust valves in the valve
guides
from which they were
removed.
Install
one exhaust valve spring and exhaust valve
spring
retainer (Roto Cap) for each exhaust valve.
Slip
the top end of the spring
onto
the
bottom
end
of the valve guide and, with a large screwdriver,
snap the spring and retainer over the tappet ad
justing
screw. Make certain that the two closely wound coils of each spring are at the top (placed up to seat against the block.) See Fig. D-39.
Turn
the crankshaft as necessary to bring each
exhaust valve tappet to its lowest position. Using a
valve spring lifter, compress each exhaust valve
spring,
while holding the valve down, so that the
stem
extends
through the valve spring retainer
far
enough to permit installation of the valve
spring
locks. Heavy lubricating oil or grease
placed on the inside surface of the valve locks
will
help to hold the locks on the valve stem until the valve spring lifter can be removed. When installa
tion of exhaust valves is complete, remove any
cloths used to block the valve compartment floor
openings.
Install
the intake valves and springs in the cylinder head placing the ends of the springs
having the closed coils down against the cylinder
head.
FIG.
D-39—VALVE
TAPPETS
AND
SPRINGS
65
Page 92 of 376
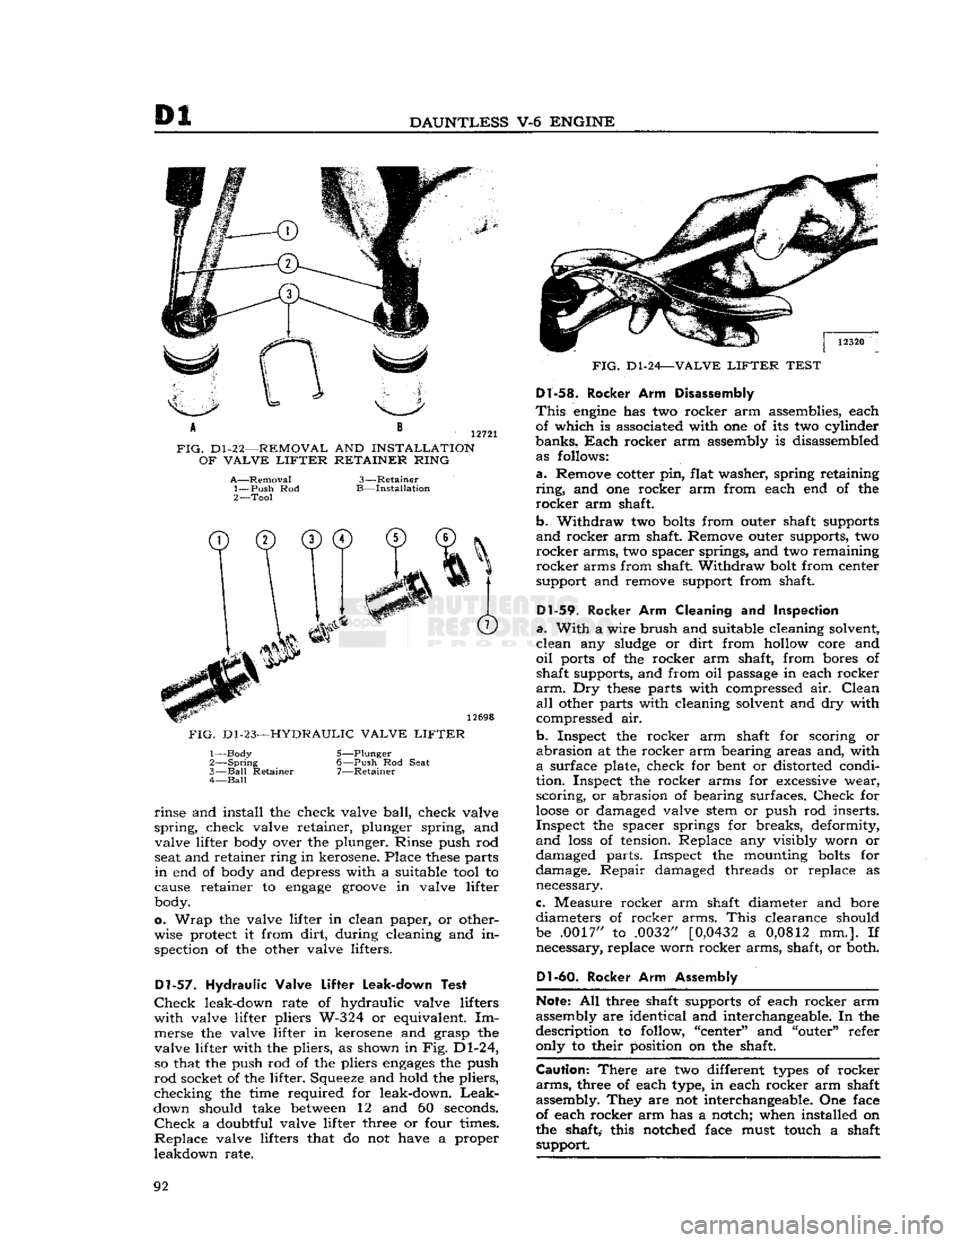
Di
DAUNTLESS
V-6
ENGINE
12721
FIG.
D1-22—REMOVAL
AND
INSTALLATION
OF
VALVE
LIFTER
RETAINER
RING
A—Removal'
1—
Push
Rod
2—
Tool
3-
B-
-Retainer
-Installation
T)
0
© ©
6
FIG.
D1-23—HYDRAULIC
VALVE
LIFTER
1—
Body
2—
Spring
3—
Ball
Retainer
4—
Ball
5— -Plunger
6—
Push
Rod
Seat
7—
-Retainer
rinse
and
install
the
check valve
ball,
check valve
spring,
check valve retainer, plunger spring,
and
valve lifter body over
the
plunger. Rinse push
rod
seat and retainer ring in kerosene. Place
these
parts
in
end of
body and depress with
a
suitable tool
to
cause retainer
to
engage
groove
in
valve lifter body.
o.
Wrap
the
valve lifter
in
clean paper,
or
other
wise protect
it
from
dirt,
during cleaning
and in
spection
of the
other valve lifters.
Dl-57.
Hydraulic Valve
Lifter
Leak-down
Test
Check
leak-down rate
of
hydraulic valve lifters
with
valve lifter pliers W-324
or
equivalent.
Im
merse
the
valve lifter
in
kerosene
and
grasp
the
valve lifter with
the
pliers,
as
shown
in
Fig. Dl-24, so that
the
push rod
of the
pliers
engages
the
push
rod
socket
of
the lifter. Squeeze and hold
the
pliers,
checking
the
time required
for
leak-down.
Leak-
down should take
between
12 and 60
seconds.
Check
a
doubtful valve lifter three
or
four times.
Replace
valve lifters that
do not
have
a
proper
leakdown rate.
FIG.
Dl-24—VALVE
LIFTER
TEST
Dl-58.
Rocker
Arm
Disassembly
This
engine
has two
rocker arm assemblies, each of which
is
associated with
one of its two
cylinder
banks.
Each
rocker arm assembly
is
disassembled as follows:
a.
Remove cotter pin, flat washer, spring retaining
ring,
and one
rocker
arm
from each
end of the
rocker
arm shaft.
b.
Withdraw
two
bolts
from outer shaft supports
and
rocker arm shaft. Remove outer supports,
two
rocker
arms, two spacer springs, and
two
remaining
rocker
arms from shaft. Withdraw bolt from center
support
and
remove support from shaft.
Dl-59.
Rocker
Arm Cleaning and
Inspection
a.
With
a
wire brush and suitable cleaning solvent,
clean
any
sludge
or
dirt
from hollow core
and
oil
ports
of the
rocker
arm
shaft, from bores
of
shaft supports, and from
oil
passage
in
each rocker
arm.
Dry
these
parts with compressed
air.
Clean
all
other parts with cleaning solvent and dry with
compressed
air.
b.
Inspect
the
rocker
arm
shaft
for
scoring
or
abrasion
at the
rocker arm bearing areas and, with
a
surface plate, check
for
bent
or
distorted condi
tion. Inspect
the
rocker arms
for
excessive wear,
scoring,
or
abrasion
of
bearing surfaces.
Check
for
loose
or
damaged valve stem
or
push
rod
inserts.
Inspect
the
spacer springs
for
breaks, deformity,
and
loss
of
tension. Replace
any
visibly worn
or
damaged parts. Inspect
the
mounting
bolts
for
damage.
Repair
damaged threads
or
replace
as
necessary.
c.
Measure rocker
arm
shaft diameter
and
bore
diameters
of
rocker arms.
This
clearance should be .0017"
to
.0032"
[0,0432
a
0,0812
mm.]. If
necessary, replace worn rocker arms, shaft,
or
both.
Dl-60.
Rocker
Arm Assembly
Note:
All three shaft supports
of
each rocker arm
assembly are identical and interchangeable. In
the
description
to
follow, "center"
and
"outer" refer only
to
their position
on the
shaft.
Caution:
There
are two
different
types
of
rocker
arms,
three
of
each type,
in
each rocker arm shaft
assembly. They
are not
interchangeable. One face
of each rocker arm
has a
notch; when installed
on
the shaft, this notched face must touch
a
shaft support.
92
Page 95 of 376
'Jeep*
UNIVERSAL
SERIES
SERVICE
MANUAL
Dl
Dl-65.
Rocker Arm Cover Cleaning
and Inspection
a.
Clean
both rocker arm covers with suitable
cleaning solvent and dry thoroughly.
b.
Inspect each rocker arm cover visually for
scratches,
bends, dents, and tears. Replace cover
if
unserviceable.
Dl-66.
Timing Chain
and
Sprocket Inspection
Inspect
the timing chain and both sprockets for
damage or excessive wear. Replace unserviceable
parts.
Dl-67.
Timing Chain Cover Cleaning and Inspection
a.
Clean
the timing chain cover with suitable clean
ing solvent and dry with compressed air.
b.
Inspect the cover visually for breaks,
cracks,
and
other damage.
With
a straightedge, check cylinder
block, water pump, and oil pump faces for bends
and
distortion.
c.
Install
oil pump gears in oil pump cavity of
timing gear cover.
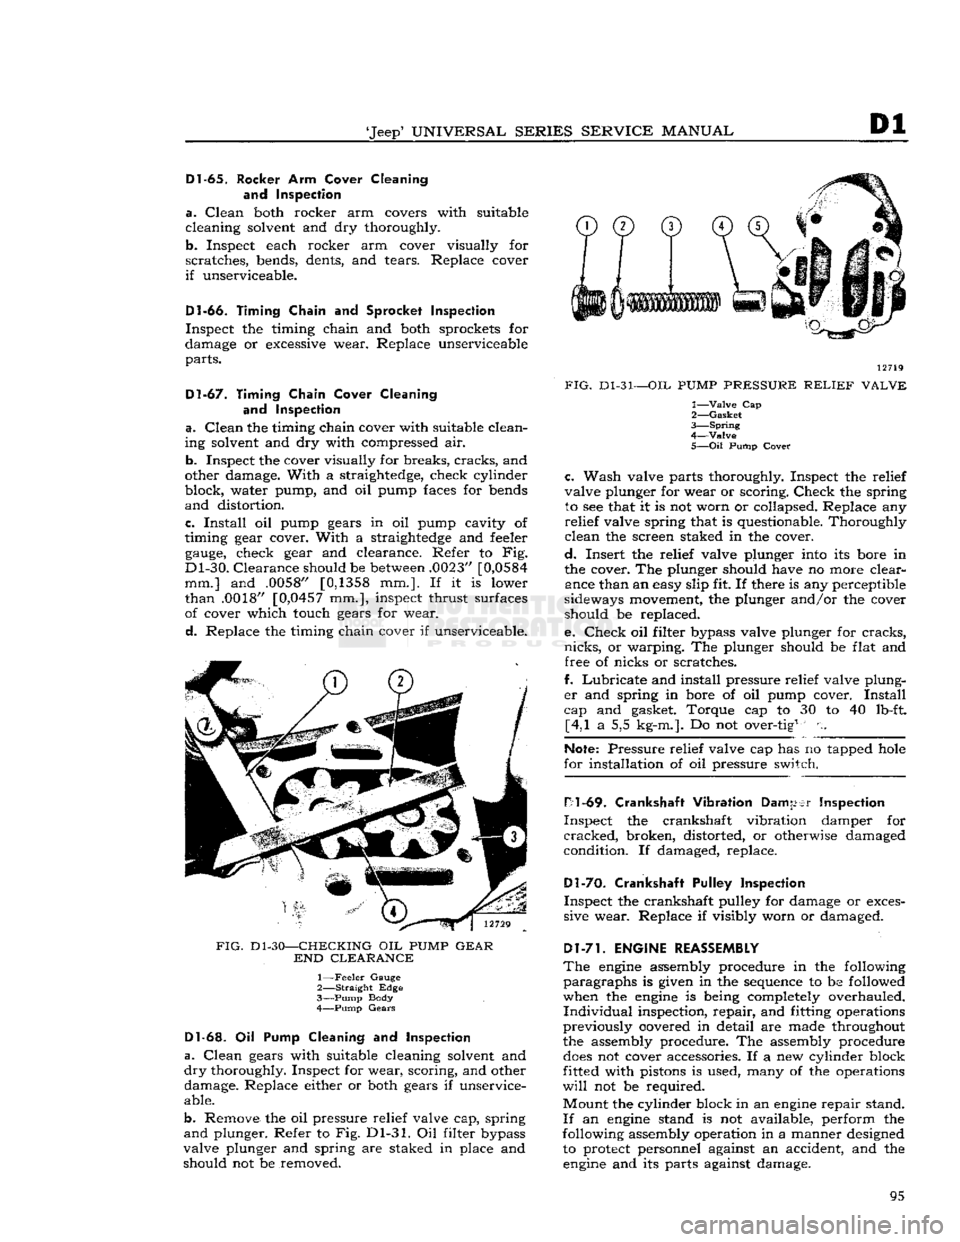
With
a straightedge and feeler
gauge,
check gear and clearance. Refer to Fig.
Dl-30.
Clearance
should be
between
.0023"
[0,0584
mm.] and .0058"
[0,1358
mm.]. If it is lower
than
.0018" [0,0457 mm.], inspect thrust surfaces
of cover which touch gears for wear.
d.
Replace the timing chain cover if unserviceable.
FIG.
Dl-30—CHECKING
OIL
PUMP
GEAR
END
CLEARANCE
1—
Feeler
Gauge
2—
Straight
Edge
3—
Pump
Body
4—
Pump
Gears
Dl-63.
Oil Pump Cleaning and
Inspection
a.
Clean
gears with suitable cleaning solvent and
dry
thoroughly. Inspect for wear, scoring, and other damage. Replace either or both gears if unservice
able.
b.
Remove the oil pressure relief valve cap, spring
and
plunger. Refer to Fig. Dl-31. Oil filter bypass
valve plunger and spring are staked in place and should not be removed. 12719
FIG.
Dl-31—OIL
PUMP
PRESSURE
RELIEF
VALVE
1—
Valve
Cap
2—
Gasket
3—
Spring
4—Valve
5—
Oil
Pump
Cover
c.
Wash valve parts thoroughly. Inspect the relief
valve plunger for wear or scoring.
Check
the spring to see that it is not worn or collapsed. Replace any
relief
valve spring that is questionable. Thoroughly
clean
the screen staked in the cover.
d.
Insert the relief valve plunger into its bore in
the cover. The plunger should have no more clear ance than an easy slip fit. If there is any perceptible
sideways movement, the plunger and/or the cover should be replaced.
e.
Check
oil filter bypass valve plunger for
cracks,
nicks,
or warping. The plunger should be flat and free of nicks or scratches.
f.
Lubricate
and install pressure relief valve plung
er
and spring in bore of oil pump cover.
Install
cap and gasket. Torque cap to 30 to 40 lb-ft. [4,1 a 5,5 kg-m.]. Do not over-tig1 n.
Note:
Pressure relief valve cap has no tapped
hole
for installation of oil pressure switch.
H1
-69.
Crankshaft Vibration
Damper
Inspection
Inspect
the crankshaft vibration damper for
cracked,
broken, distorted, or otherwise damaged
condition. If damaged, replace.
Dl-70.
Crankshaft Pulley Inspection
Inspect
the crankshaft pulley for damage or exces
sive wear. Replace if visibly worn or damaged.
Dl-71.
ENGINE REASSEMBLY
The
engine
assembly procedure in the following
paragraphs
is given in the sequence to be followed
when the
engine
is being completely overhauled.
Individual
inspection,
repair,
and fitting operations
previously covered in detail are made throughout
the assembly procedure. The assembly procedure
does
not cover accessories. If a new cylinder block
fitted with pistons is used, many of the operations
will
not be required.
Mount
the cylinder block in an
engine
repair stand.
If
an
engine
stand is not available, perform the
following assembly operation in a manner designed to protect personnel against an accident, and the
engine
and its parts against damage. 95
Page 172 of 376
H
ELECTRICAL
SYSTEM SUBJECT
PAR.
Directional
Signal
Lamps
H-138
Hazard
Warning
Lamps
H-139
Head
Lamp
Replacement H-130
Head
Lamp
Aiming Procedure H-131 Headlight Dimmer Switch H-127
License
Plate
Lamp
H-136
Main
Light
Switch. H-126
Marker
Lights .H-l40
Parking
and
Turn
Signal
Light
H-133
Stop
Light
Switch. H-l28
Tail,
Stop and
Turn
Signal
Lamp
.H-134
H-1. GENERAL
All
'Jeep' Universal vehicles are equipped with 12- volt electrical systems. Use caution around the higher
voltage
of the 12-volt system as accidental
short
circuits are more capable of damaging electri
cal
units. Also, arcs around the 12-volt battery are
more apt to ignite any gas that may be escaping
from
it. In the following paragraphs
will
be found
information about the battery, distributor, coil,
generator, alternator,
voltage
regulator and start ing motor. These units with the connecting wires,
make
up the
engine
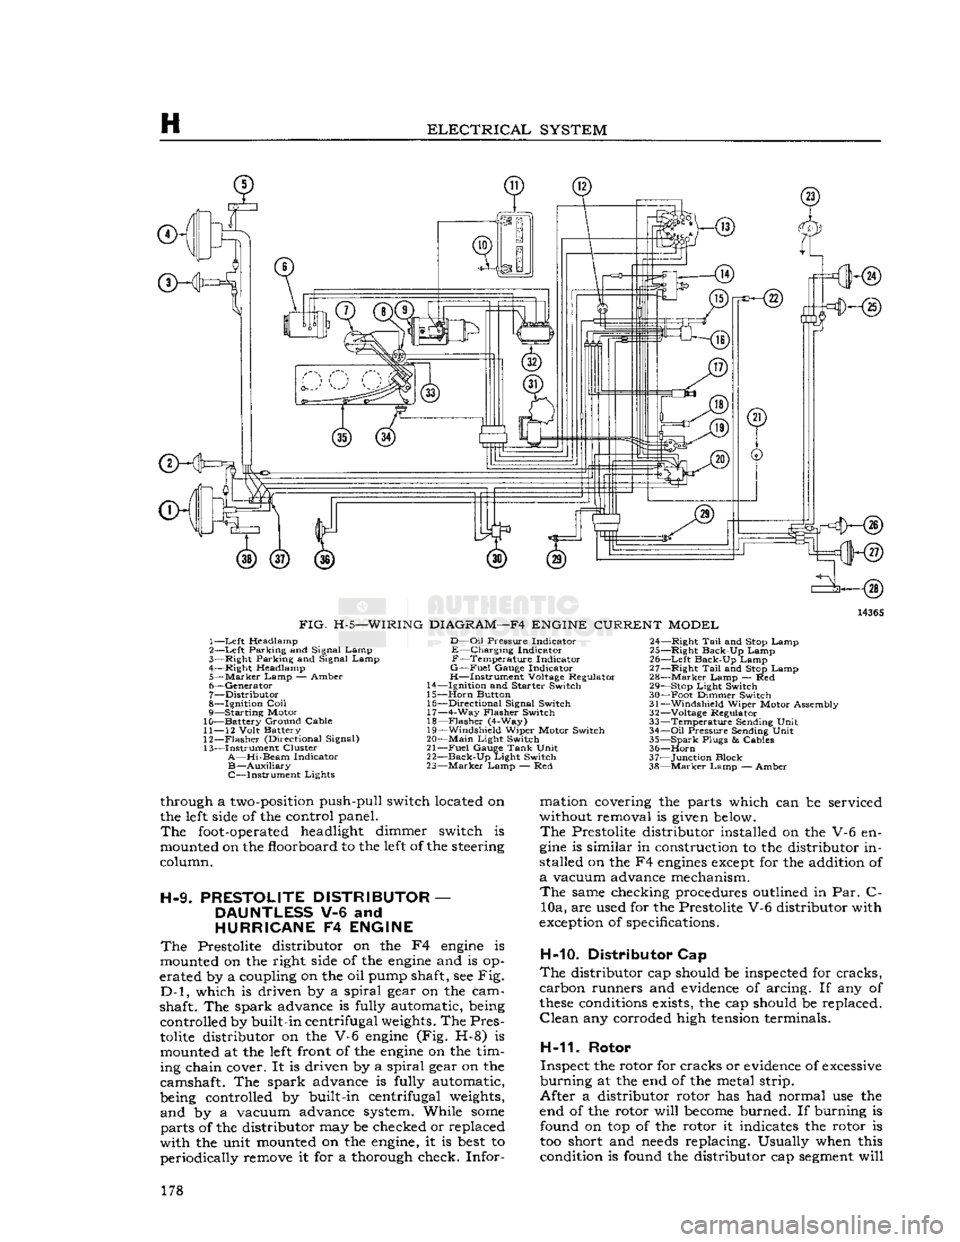
electrical system. The wiring
diagram
will
show the different circuits of the en
gine
electrical system and the various units which
make
up
those
circuits.
With
plastic-covered wiring harnesses use only
rubber-insulated
wiring clips.
Caution:
All current production vehicles are 12- volt, negative ground. Whenever servicing a 12-
volt electrical system, use caution, as an accidental
short
circuit is capable of damaging electrical units. Disconnect battery ground cable before changing
electrical
components.
H-2.
Battery
The
battery is a storage reservoir for electrical
energy produced by the alternator or generator.
The
battery should store sufficient energy for
operation of the entire electrical system when the
alternator
or generator is not pr 1,scing output,
such
as when the ignition is first turned on. Of
particular
importance is maintaining the electrolyte
at the correct level, regularly checking with a
hydrometer, and maintaining clean, tight cable connections.
Battery
service information is given in this section.
Caution:
Do not allow flames or sparks to be
brought near the vent
openings
of the battery since
hydrogen gas may be present in the battery and might explode.
Note:
The liquid in the battery (electrolyte) is a
solution of sulphuric acid which, on contact, can
injure
skin or
eyes,
or damage clothes. If it is spilled
on the skin or spattered in the
eyes,
promptly flush
it
away with quantities of clear water only. If the
acid
is spilled on clothes, wet it thoroughly with a
weak
solution of ammonia, or with a solution of sodium bicarbonate or baking soda.
SUBJECT
PAR.
HORN
H-137
ELECTRICAL
COMPONENT
REPLACEMENT
H-150
WINDSHIPLD
WIPER SYSTEM
H-141
thru
149
SERVICE
DIAGNOSIS.
. .H-151
ELECTRICAL
SPECIFICATIONS
H-152
Caution:
When installing the battery, the nega
tive terminal must be grounded. Reverse polarity of the battery can cause severe damage to the charging system.
Battery
Inspection
a.
Check
the specific gravity of the electrolyte in
each cell of the battery. A hydrometer reading of 1.260 indicates that the battery is fully charged.
If
the reading is 1.225 or below, the battery
needs
recharging.
If one or more cells is 25 "points" (.025) or more lower than the other cells, this in
dicates that the cell is shorted, the cell is about to
fail,
or there is a
crack
in the battery partition in
the case. Unless the battery is repaired or replaced, battery trouble
will
soon
be experienced.
b.
Check
the electrolyte level in each cell, add
distilled
water to maintain the solution [9,5 mm.] above the plates. Avoid overfilling. Replace
the filler caps and tighten securely. It is important to keep the electrolyte level above the plates at all
times because plates that are
exposed
for any
length of time
will
be seriously damaged.
c.
Check
the wing nuts on the hold-down frame for tightness. Tighten them only with finger pres
sure,
never with pliers or a wrench. Excessive
pressure
could damage the battery case.
d.
Clean
the battery terminals and cable con nectors. Prepare a strong solution of baking soda
and
water and brush it around the terminals to
remove any corrosion that is present. The cell caps must be tight and their vents sealed to prevent
cleaning solution entering the cells. After cleaning,
connect cables to battery and coat the terminals
with
heavy grease.
e.
Inspect the battery cables and replace if badly
corroded
or frayed.
Check
tightness
of terminal
screws to ensure
good
electrical connections.
Check
the
tightness
of the negative ground cable connection at the frame to ensure a
good
ground
connection.
f.
Load
test
the battery. Connect a voltmeter across the battery. Run the starting motor for 15 seconds. If the
voltage
does
not drop below 10
volts the battery is satisfactory. If the
voltage
falls
below the figure given, yet the specific gravity is
above
1.225,
the condition of the battery is questionable.
g. Be sure the
engine
ground strap connection, 172
Page 178 of 376
H
ELECTRICAL
SYSTEM
14365
FIG.
H-5—WIRING
DIAGRAM—F4
ENGINE
CURRENT
MODEL
1—
Left
Headlamp
2—
Left
Parking and Signal Lamp
3—
Right
Parking and Signal Lamp
4—
Right
Headlamp
5—
Marker
Lamp
— Amber
6—
Generator
7—
Distributor
8—
Ignition
Coil
9— Starting Motor
10— Battery Ground Cable
11—
12
Volt
Battery
12—
Flasher
(Directional Signal)
13— Instrument Cluster
A—Hi-Beam
Indicator
B—Auxiliary
C—Instrument Lights
D—Oil
Pressure
Indicator
E—Charging Indicator
F—Temperature Indicator
G—Fuel
Gauge
Indicator
H—Instrument Voltage Regulator
14—
Ignition
and
Starter
Switch
15—
Horn
Button 16—
Directional
Signal Switch 17— 4-Way
Flasher
Switch
18—
Flasher
(4-Way)
19—
Windshield
Wiper Motor Switch
20—
Main
Light
Switch
21—
Fuel
Gauge
Tank
Unit
22—
Back-Up
Light
Switch
23—
Marker
Lamp — Red 24—
Right
Tail
and Stop Lamp
25—
Right
Back-Up Lamp
26—
Left
Back-Up Lamp
27—
Right
Tail
and Stop Lamp
28—
Marker
Lamp — Red 29— Stop
Light
Switch
30— Foot Dimmer Switch
31—
Windshield
Wiper Motor Assembly
32—
Voltage Regulator
33— Temperature Sending
Unit
34—
Oil
Pressure
Sending
Unit
35— Spark
Plugs
&
Cables
36—
Horn
37— Junction Block
38—
Marker
Lamp — Amber
through a
two-position
push-pull switch located on
the
left
side
of the control panel.
The
foot-operated
headlight dimmer switch is
mounted on the floorboard to the
left
of the steering
column.
H-9.
PRESTOLITE
DISTRIBUTOR
—
DAUNTLESS
V-6 and
HURRICANE
F4
ENGINE
The
Prestolite distributor on the F4
engine
is
mounted on the right
side
of the
engine
and is op
erated by a coupling on the oil pump shaft, see Fig.
D-l,
which is driven by a spiral gear on the cam
shaft. The spark advance is fully automatic, being controlled by built-in centrifugal
weights.
The Pres
tolite
distributor on the V-6
engine
(Fig. H-8) is mounted at the
left
front of the
engine
on the tim
ing chain cover. It is driven by a spiral gear on the
camshaft. The spark advance is fully automatic,
being controlled by built-in centrifugal
weights,
and by a vacuum advance system. While
some
parts of the distributor may be checked or replaced
with the unit mounted on the
engine,
it is
best
to periodically remove it for a thorough check. Infor mation covering the parts which can be serviced
without removal is
given
below.
The
Prestolite distributor installed on the V-6 en
gine
is similar in construction to the distributor in
stalled on the F4
engines
except
for the addition of
a
vacuum advance mechanism.
The
same checking procedures outlined in Par. C- 10a, are used for the Prestolite V-6 distributor with
exception
of specifications.
H-10. Distributor Cap
The
distributor cap should be inspected for cracks,
carbon runners and
evidence
of arcing. If any of
these
conditions
exists, the cap should be replaced.
Clean
any corroded high
tension
terminals.
H-11.
Rotor
Inspect the rotor for cracks or
evidence
of
excessive
burning at the end of the metal strip.
After a distributor rotor has had normal use the
end of the rotor will
become
burned. If burning is found on top of the rotor it indicates the rotor is
too short and
needs
replacing. Usually when this condition is found the distributor cap
segment
will 178
Page 187 of 376
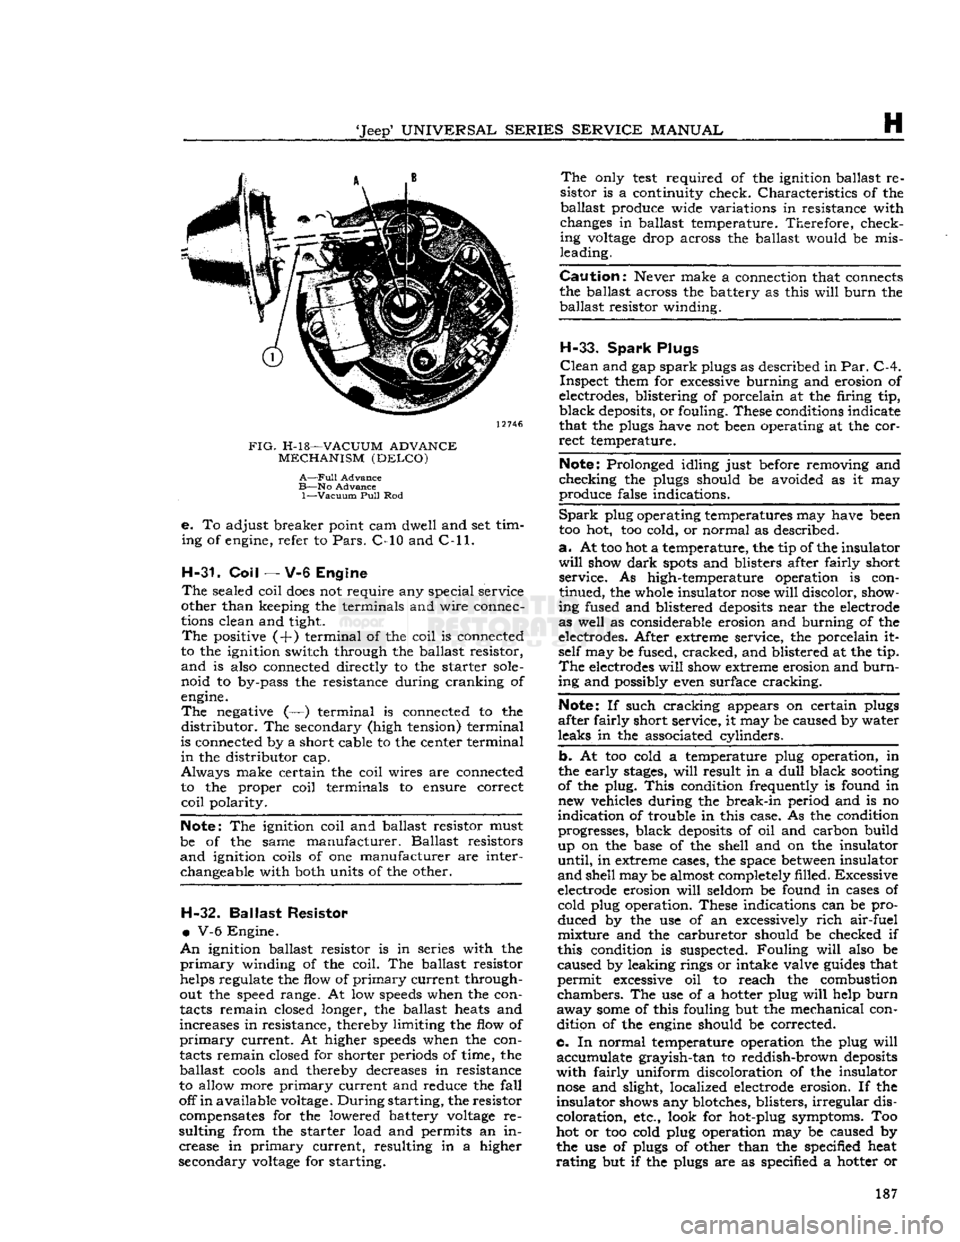
'Jeep'
UNIVERSAL
SERIES SERVICE
MANUAL
H
12746
FIG.
H-l8—VACUUM
ADVANCE
MECHANISM
(DELCO)
A—Full
Advance
B—No
Advance
1—Vacuum
Pull
Rod
e.
To adjust breaker point cam dwell and set tim
ing of engine, refer to
Pars.
C-10 and
C-ll.
H-31. Coil
— V-6 Engine
The
sealed coil
does
not require any special service
other than keeping the terminals and wire connec
tions clean and tight.
The
positive (+) terminal of the coil is connected
to the ignition switch through the ballast resistor,
and
is also connected directly to the starter
sole
noid to by-pass the resistance during cranking of
engine.
The
negative (—) terminal is connected to the
distributor.
The secondary (high tension) terminal
is connected by a short cable to the center terminal
in
the distributor cap.
Always
make certain the coil wires are connected to the proper coil terminals to ensure correct
coil
polarity.
Note:
The ignition coil and ballast resistor must
be of the same manufacturer. Ballast resistors
and
ignition coils of one manufacturer are interchangeable with both units of the other. H-32.
Ballast
Resistor
•
V-6 Engine.
An
ignition ballast resistor is in series with the
primary
winding of the coil. The ballast resistor
helps regulate the flow of
primary
current through
out the speed range. At low
speeds
when the con
tacts remain closed longer, the ballast heats and
increases in resistance, thereby limiting the flow of
primary
current. At higher
speeds
when the con
tacts remain closed for shorter periods of time, the ballast
cools
and thereby decreases in resistance
to allow more
primary
current and reduce the
fall
off
in
available voltage.
During
starting, the resistor compensates for the lowered battery
voltage
re
sulting from the starter load and permits an in crease in
primary
current, resulting in a higher
secondary
voltage
for starting.
The
only
test
required of the ignition ballast re
sistor is a continuity check. Characteristics of the ballast produce wide variations in resistance with
changes in ballast temperature. Therefore, check ing
voltage
drop across the ballast would be mis
leading.
Caution:
Never make a connection that connects
the ballast across the battery as this
will
burn
the ballast resistor winding.
H-33.
Spark
Plugs
Clean
and gap
spark
plugs as described in
Par.
C-4.
Inspect them for excessive burning and erosion of
electrodes, blistering of porcelain at the firing tip,
black
deposits, or fouling. These conditions indicate
that the plugs have not been operating at the cor
rect
temperature.
Note:
Prolonged idling just before removing and
checking the plugs should be avoided as it may
produce false indications.
Spark
plug operating temperatures may have been
too hot, too cold, or normal as described.
a.
At too hot a temperature, the tip of the insulator
will
show
dark
spots
and blisters after fairly short service. As high-temperature operation is con
tinued, the whole insulator
nose
will
discolor, show
ing fused and blistered
deposits
near the electrode
as well as considerable erosion and burning of the
electrodes. After extreme service, the porcelain it self may be fused, cracked, and blistered at the tip.
The
electrodes
will
show extreme erosion and
burn
ing and possibly even surface cracking.
Note:
If such cracking appears on certain plugs
after fairly short service, it may be caused by water
leaks in the associated cylinders.
b. At too cold a temperature plug operation, in
the early
stages,
will
result in a
dull
black
sooting
of the plug.
This
condition frequently is found in new vehicles during the break-in period and is no
indication of trouble in this case. As the condition progresses, black
deposits
of oil and carbon build
up on the base of the shell and on the insulator
until,
in extreme cases, the space
between
insulator
and
shell may be almost completely filled. Excessive
electrode erosion
will
seldom be found in cases of cold plug operation. These indications can be pro
duced by the use of an excessively
rich
air-fuel mixture and the carburetor should be checked if
this condition is suspected. Fouling
will
also be
caused by leaking rings or intake valve
guides
that
permit excessive oil to reach the combustion
chambers.
The use of a hotter plug
will
help
burn
away
some
of this fouling but the mechanical con dition of the
engine
should be corrected.
c. In normal temperature operation the plug
will
accumulate grayish-tan to reddish-brown
deposits
with
fairly uniform discoloration of the insulator
nose
and slight, localized electrode erosion. If the
insulator shows any blotches, blisters,
irregular
dis
coloration, etc., look for hot-plug symptoms. Too
hot or too cold plug operation may be caused by
the use of plugs of other than the specified heat
rating
but if the plugs are as specified a hotter or 187