seat adjustment JEEP DJ 1953 Owner's Manual
[x] Cancel search | Manufacturer: JEEP, Model Year: 1953, Model line: DJ, Model: JEEP DJ 1953Pages: 376, PDF Size: 19.96 MB
Page 232 of 376
CLUTCH
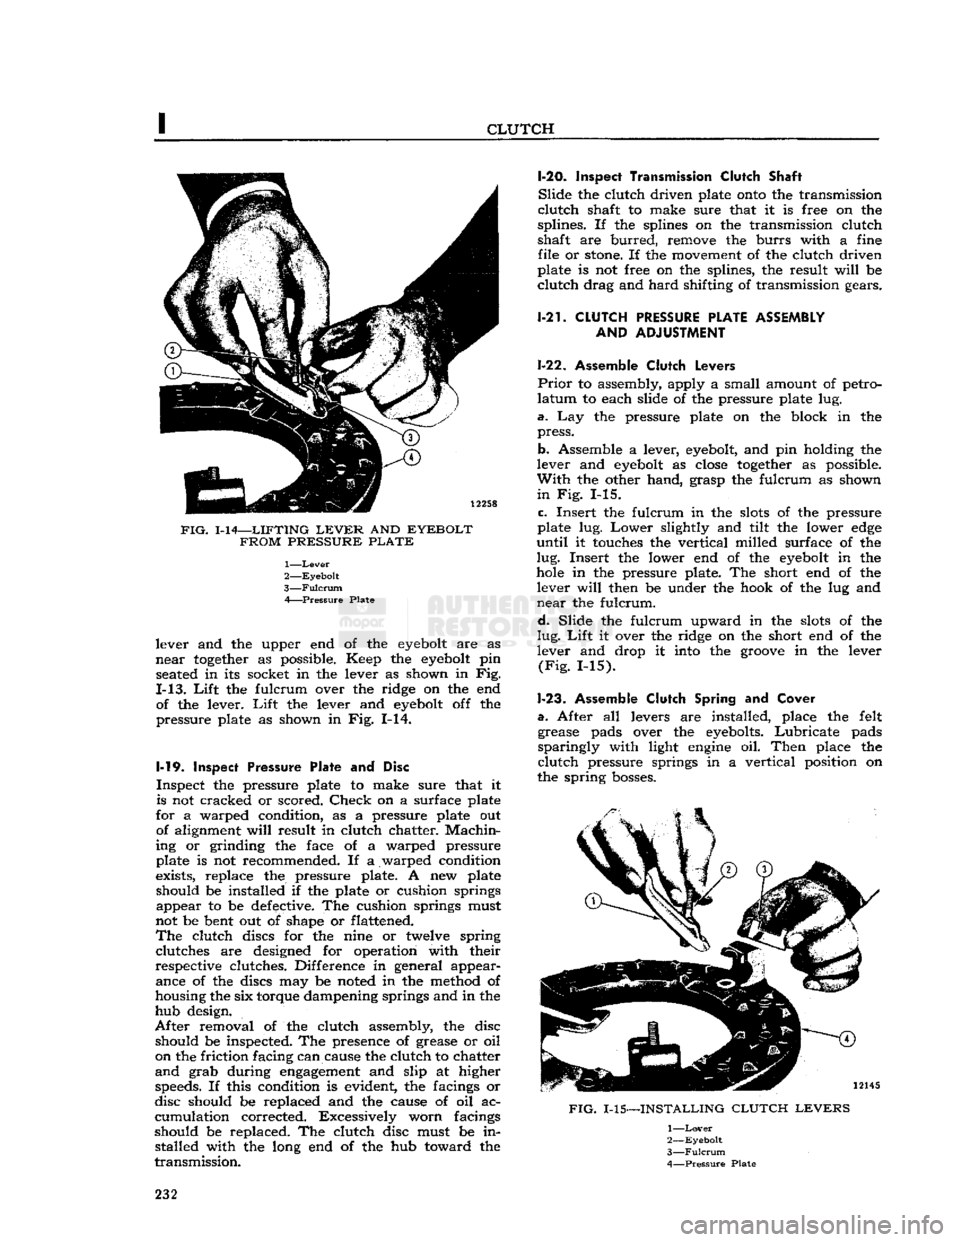
FIG.
1-14—LIFTING
LEVER
AND
EYEBOLT FROM PRESSURE PLATE
1—
Lever
2—
Eyebolt
3—
Fulcrum
A Pressure Plate
lever and the upper end of the
eyebolt
are as
near
together
as possible. Keep the
eyebolt
pin seated in its socket in the lever as shown in Fig.
1-13.
Lift
the fulcrum over the ridge on the end of the lever.
Lift
the lever and
eyebolt
off the
pressure plate as shown in Fig. 1-14.
1-19.
Inspect
Pressure Plate and Disc
Inspect the pressure plate to make sure that it is not cracked or scored.
Check
on a surface plate
for a warped condition, as a pressure plate out of alignment
will
result in clutch chatter.
Machin
ing or grinding the face of a warped pressure
plate is not recommended. If a warped condition
exists, replace the pressure plate. A new plate
should be installed if the plate or cushion springs appear to be defective. The cushion springs must
not be bent out of shape or flattened.
The
clutch discs for the nine or twelve spring clutches are designed for operation with their
respective clutches. Difference in general appear ance of the discs may be noted in the method of
housing the six torque dampening springs and in the
hub design.
After
removal of the clutch assembly, the disc should be inspected. The presence of grease or oil
on the friction facing can cause the clutch to chatter
and
grab during
engagement
and slip at higher speeds. If this condition is evident, the facings or
disc should be replaced and the cause of oil ac
cumulation corrected. Excessively worn facings
should be replaced. The clutch disc must be in stalled with the long end of the hub toward the
transmission.
1-20.
Inspect Transmission Clutch
Shaft
Slide
the clutch driven plate
onto
the transmission
clutch
shaft to make sure that it is free on the
splines. If the splines on the transmission clutch
shaft are
burred,
remove the
burrs
with a fine file or
stone.
If the movement of the clutch driven
plate is not free on the splines, the result
will
be
clutch
drag and
hard
shifting of transmission gears.
1-21.
CLUTCH
PRESSURE
PLATE ASSEMBLY AND
ADJUSTMENT
1-22. Assemble
Clutch
Levers
Prior
to assembly, apply a small amount of petro
latum
to each slide of the pressure plate lug.
a.
Lay the pressure plate on the block in the
press.
b. Assemble a lever,
eyebolt,
and pin holding the
lever and
eyebolt
as
close
together
as possible.
With
the other hand, grasp the fulcrum as shown
in
Fig. 1-15.
c.
Insert the fulcrum in the
slots
of the pressure
plate lug.
Lower
slightly and tilt the lower
edge
until
it touches the vertical milled surface of the
lug.
Insert the lower end of the
eyebolt
in the
hole
in the pressure plate. The short end of the lever
will
then be under the hook of the lug and
near
the fulcrum.
d.
Slide the fulcrum upward in the
slots
of the
lug.
Lift
it over the ridge on the short end of the
lever and drop it into the
groove
in the lever
(Fig.
1-15).
1-23.
Assemble
Clutch
Spring and
Cover
a.
After all levers are installed, place the felt grease pads over the eyebolts.
Lubricate
pads
sparingly
with light
engine
oil.
Then
place the
clutch
pressure springs in a vertical position on
the spring
bosses.
FIG.
1-15—INSTALLING
CLUTCH LEVERS
1—
Lover
2—
Eyebolt
3—
Fulcrum
4—
Pressure
Plate
232
Page 233 of 376
'Jeep*
UNIVERSAL SERIES
SERVICE
MANUAL
b.
Check
the anti-rattle springs in the clutch cover
and
place the cover on top of the pressure plate
assembly. The top of each pressure spring must enter its spring seat in the cover.
Line
up punch
marks
on cover and pressure plate for balance.
c.
Slowly compress the cover making sure that
the
eyebolts
and pressure plate lugs are guided through the proper
holes
in the cover.
d.
Hold the clutch under compression and screw
down the adjusting nuts until they are flush with
the
tops
of the eyebolts. Release the spindle of
the press.
1-24.
Clutch
Lever Adjustment
Important:
Always inspect release lever height
adjustment when installing a new clutch drive
plate.
Place
a clutch
gauge
plate on the flywheel in the
position normally occupied by the driven plate.
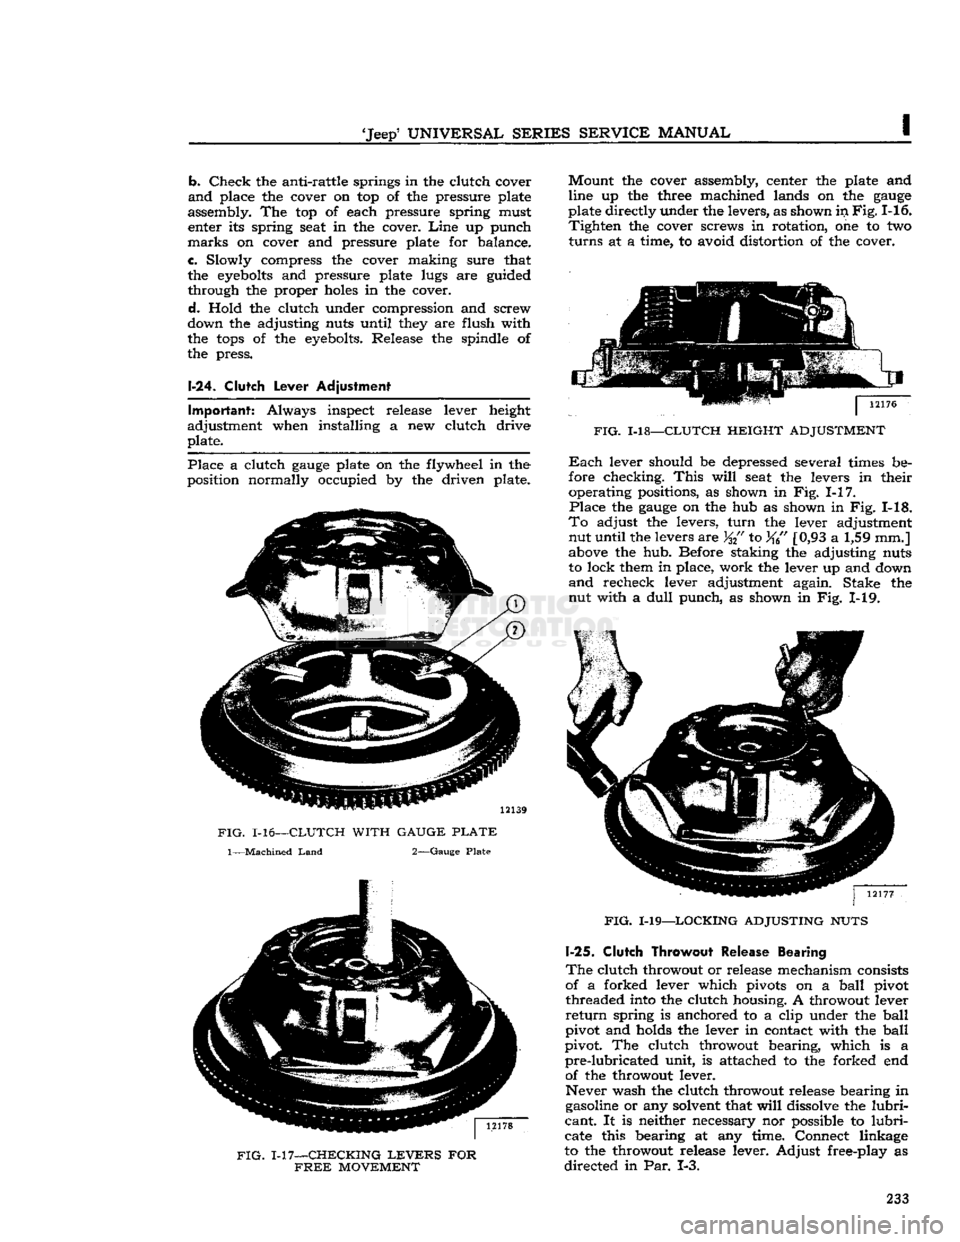
FIG.
1-16—CLUTCH WITH GAUGE
PLATE
1—Machined
Land
2—Gauge Plate
FIG.
1-17—CHECKING
LEVERS
FOR
FREE
MOVEMENT
Mount
the cover assembly, center the plate and
line up the three machined lands on the
gauge
plate directly under the levers, as shown in
Fig.
1-16.
Tighten
the cover screws in rotation, one to two
turns
at a time, to avoid distortion of the cover.
FIG.
1-18—CLUTCH HEIGHT ADJUSTMENT
Each
lever should be depressed several times be
fore checking.
This
will
seat the levers in their operating positions, as shown in Fig. 1-17.
Place
the
gauge
on the hub as shown in Fig. 1-18.
To
adjust the levers,
turn
the lever adjustment nut until the levers are
%{'
to %6" [0,93 a 1,59 mm.]
above the hub. Before staking the adjusting nuts
to lock them in place, work the lever up and down
and
recheck lever adjustment again. Stake the nut with a
dull
punch, as shown in Fig. 1-19.
FIG.
1-19—LOCKING ADJUSTING NUTS
1-25.
Clutch Throwout
Release Bearing
The
clutch throwout or release mechanism consists
of a forked lever which pivots on a
ball
pivot threaded into the clutch housing. A throwout lever
return
spring is anchored to a clip under the
ball
pivot and holds the lever in contact with the
ball
pivot. The clutch throwout bearing, which is a
pre-lubricated
unit, is attached to the forked end of the throwout lever.
Never wash the clutch throwout release bearing in
gasoline or any solvent that
will
dissolve the
lubri
cant.
It is neither necessary nor possible to
lubri
cate this bearing at any time. Connect linkage
to the throwout release lever. Adjust free-play as
directed
in Par. 1-3. 233
Page 235 of 376
![JEEP DJ 1953 Owners Manual
Jeep
UNIVERSAL
SERIES
SERVICE
MANUAL
I thickness: .285"
[0,724
cm.], .305"
[0,775
cm.].
Each
spacer should be hardened and ground to size, and then have the dimensional thickness
sta JEEP DJ 1953 Owners Manual
Jeep
UNIVERSAL
SERIES
SERVICE
MANUAL
I thickness: .285"
[0,724
cm.], .305"
[0,775
cm.].
Each
spacer should be hardened and ground to size, and then have the dimensional thickness
sta](/img/16/57041/w960_57041-234.png)
'Jeep'
UNIVERSAL
SERIES
SERVICE
MANUAL
I thickness: .285"
[0,724
cm.], .305"
[0,775
cm.].
Each
spacer should be hardened and ground to size, and then have the dimensional thickness
stamped thereon.
c.
From
flat bar stock at least Vfe" [3 mm.] thick,
make a
gauge
as shown in Fig. 1-22. Harden, grind
to size, and stamp sizes on the
gauge.
1-27.
Clutch Installation
a.
Very
sparingly, apply wheel bearing lubricant
to inner surface of pilot bushing in crankshaft.
Caution:
If
excessive
lubricant is applied to pilot bushing, it
will
run out on face of flywheel when
hot and
ruin
the driven plate facings.
b. Make sure that splines in the driven plate hub
are
clean; apply a light coat of lubricant to splines
of hub and transmission drive gear shaft. Slide plate over gear shaft several times; remove plate
from shaft and wipe off
excess
lubricant.
Caution:
Driven plate facings must be kept clean
and
dry.
c.
Fill
groove
in throwout bearing collar with wheel bearing lubricant. See Fig. 1-23. Make sure
that front bearing retainer of transmission is clean;
apply a light coat of wheel bearing lubricant. Slide
throwout bearing over bearing retainer several times. Remove bearing from retainer and wipe off
excess
lubricant.
12736
FIG.
1-23—LUBRICATION
POINTS
—
CLUTCH
THROWOUT
BEARING
COLLAR
1—Coat
This
Groove 2—Pack
This
Recess
d.
Clean
and apply wheel bearing lubricant to ball
stud in flywheel housing and to the
seat
in clutch
fork.
e.
If disassembled, install pressure plate in the cover assembly, lining up the
groove
on its
edge
with the
groove
on the
edge
of the cover.
Install
pressure plate retracting springs, and the three
drive
strap-to-pressure plate
bolts
and lock washers.
Torque
bolts
11 lb-ft. [1,51 kg-m.].
Note:
The diaphragm
type
clutch assembly is fac
tory calibrated and requires no adjustment
before
installation. Refer to Par. 1-14 to adjust Borg and
Beck
coil spring
type
clutch assembly.
f.
Install
the pressure plate and driven plate on
flywheel. Support both assemblies with a spare
main
drive gear.
Note:
Be certain that
mark
on clutch cover is
aligned with the
mark
made on the flywheel during
clutch removal.
g.
Install
clutch attaching
bolts
and tighten alter nately so that clutch is drawn squarely
into
position
on flywheel.
Each
bolt
must be
tightened
one turn at a time to avoid bending the clutch cover flange.
Torque
bolts
30 to 40 lb-ft. [4,1 a 5,5 kg-m.].
h.
Lubricate
the ball stud and clutch fork with
wheel bearing lubricant and install clutch fork.
Note:
Be certain that fork retaining spring is
tight
on pivot ball stud.
i.
Install
flywheel housing on
engine
cylinder
block.
Caution:
Be certain that dowel pins are installed
in
cylinder block.
j.
Lubricate
the recess on the inside of the throw-
out bearing collar. Be careful not to use too much
lubricant.
See Fig. 1-23.
Caution:
Make certain that the lips of the spring
retainer (attached to the clutch fork) are in
groove
of the bearing. See Fig. 1-24.
k.
Install
throwout bearing assembly and connect
clutch linkage.
I.
Install
transmission as described in Section J. m. Adjust clutch for %"
[19,05
mm.] free travel,
see
Par.
1-3. 235
Page 270 of 376
K
TRANSFER
CASE
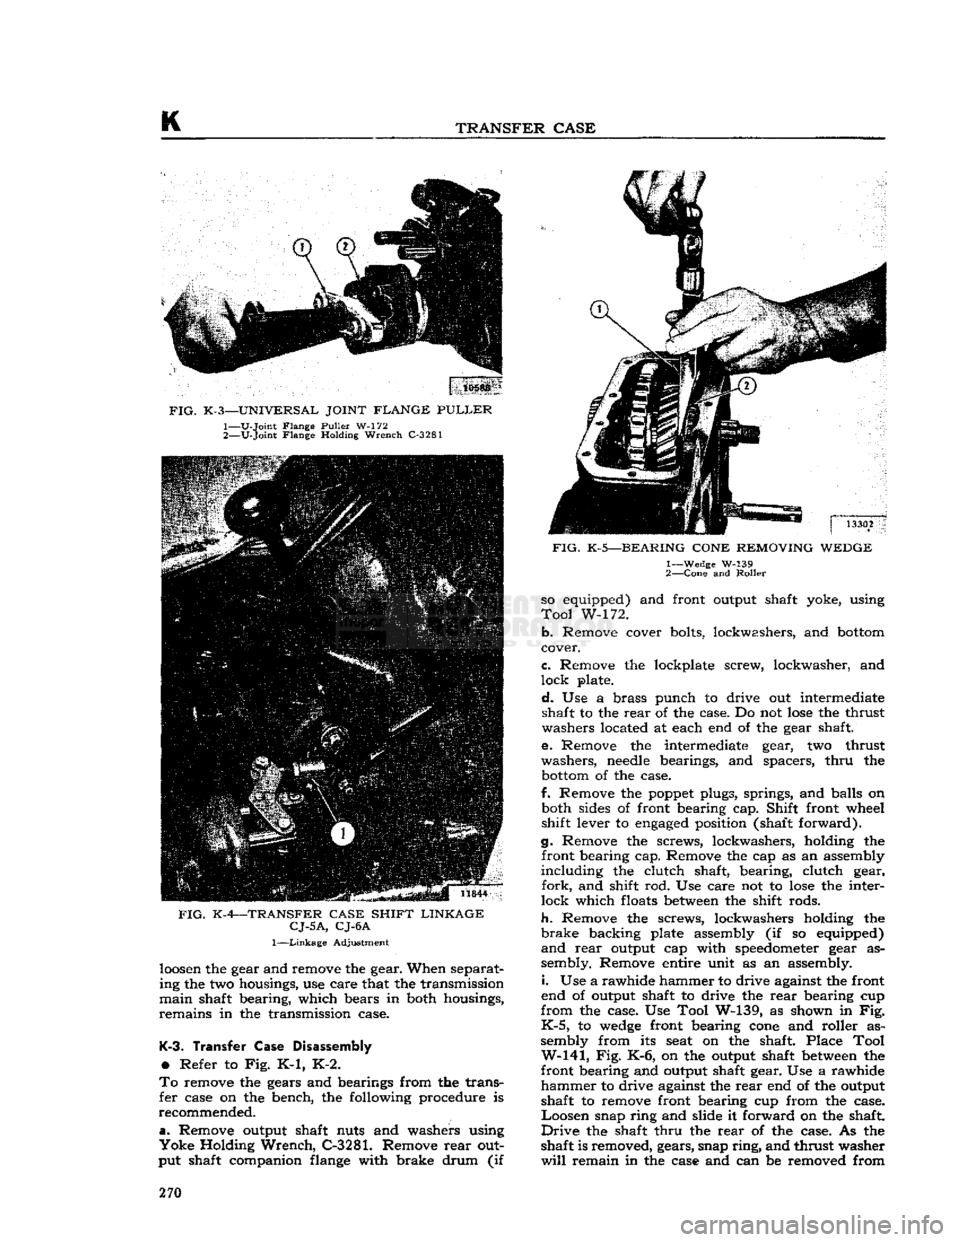
FIG.
K-3—UNIVERSAL JOINT FLANGE
PULLER
1—
U-Joint
Flange
Puller
W-172
2—
V-Joint
Flange Holding
Wrench
C-3281
FIG.
K-4—TRANSFER CASE SHIFT LINKAGE
CJ-5A,
CJ-6A
1—Linkage
Adjustment
loosen
the gear and remove the gear. When separat
ing the two housings, use care that the transmission
main
shaft bearing, which bears in both housings,
remains
in the transmission case.
K-3.
Transfer
Case
Disassembly
•
Refer to Fig. K-1, K-2.
To
remove the gears and bearings from the trans
fer
case on the bench, the following procedure is
recommended.
a.
Remove output shaft nuts and washers using
Yoke
Holding
Wrench,
C-3281. Remove
rear
out
put shaft companion flange with brake drum (if
FIG.
K-5—BEARING CONE REMOVING WEDGE
1— Wedge W-139
2—
Cone
and
Roller
so equipped) and front output shaft yoke, using
Tool
W-172.
b.
Remove cover bolts, lockwashers, and
bottom
cover.
c.
Remove the lockplate screw, lockwasher, and
lock
plate.
d.
Use a brass punch to drive out intermediate shaft to the
rear
of the case. Do not
lose
the thrust
washers located at each end of the gear shaft.
e. Remove the intermediate gear, two thrust
washers,
needle
bearings, and spacers,
thru
the
bottom
of the case.
f. Remove the
poppet
plugs, springs, and balls on both sides of front bearing cap. Shift front wheel
shift lever to
engaged
position (shaft forward).
g. Remove the screws, lockwashers, holding the front bearing cap. Remove the cap as an assembly
including
the clutch shaft, bearing, clutch gear,
fork,
and shift rod. Use care not to
lose
the inter
lock
which floats
between
the shift rods.
h.
Remove the screws, lockwashers holding the
brake
backing plate assembly (if so equipped)
and
rear
output cap with
speedometer
gear as
sembly. Remove entire unit as an assembly.
i.
Use a rawhide hammer to drive against the front
end of output shaft to drive the
rear
bearing cup
from
the case. Use Tool W-139, as shown in Fig.
K-5,
to
wedge
front bearing
cone
and roller as
sembly from its seat on the shaft. Place Tool
W-141,
Fig. K-6, on the output shaft
between
the
front bearing and output shaft gear. Use a rawhide
hammer
to drive against the
rear
end of the output shaft to remove front bearing cup from the case.
Loosen
snap ring and slide it forward on the shaft.
Drive
the shaft
thru
the
rear
of the case. As the shaft is removed, gears, snap
ring,
and thrust washer
will
remain in the case and can be removed from 270
Page 278 of 376
M
FRONT
AXLE
1— Nut
2—
Lock
Washer
3—
Bearing
Lock
Washer
4—
Wheel
Bearing Cup 5—
Cone
and Rollers
6—
Oil
Seal 7— Spindle
8— Spindle Bushing
9—
Filler
Plug
10—
Right
Knuckle and Arm
11— Shims
12— Pivot Pin
13—
Lock
Washer
14—
Cap
Screw
15— Nut
16—
Washer
17—
Universal
Joint Yoke
18—
Oil
Seal
19—
Oil
Slinger
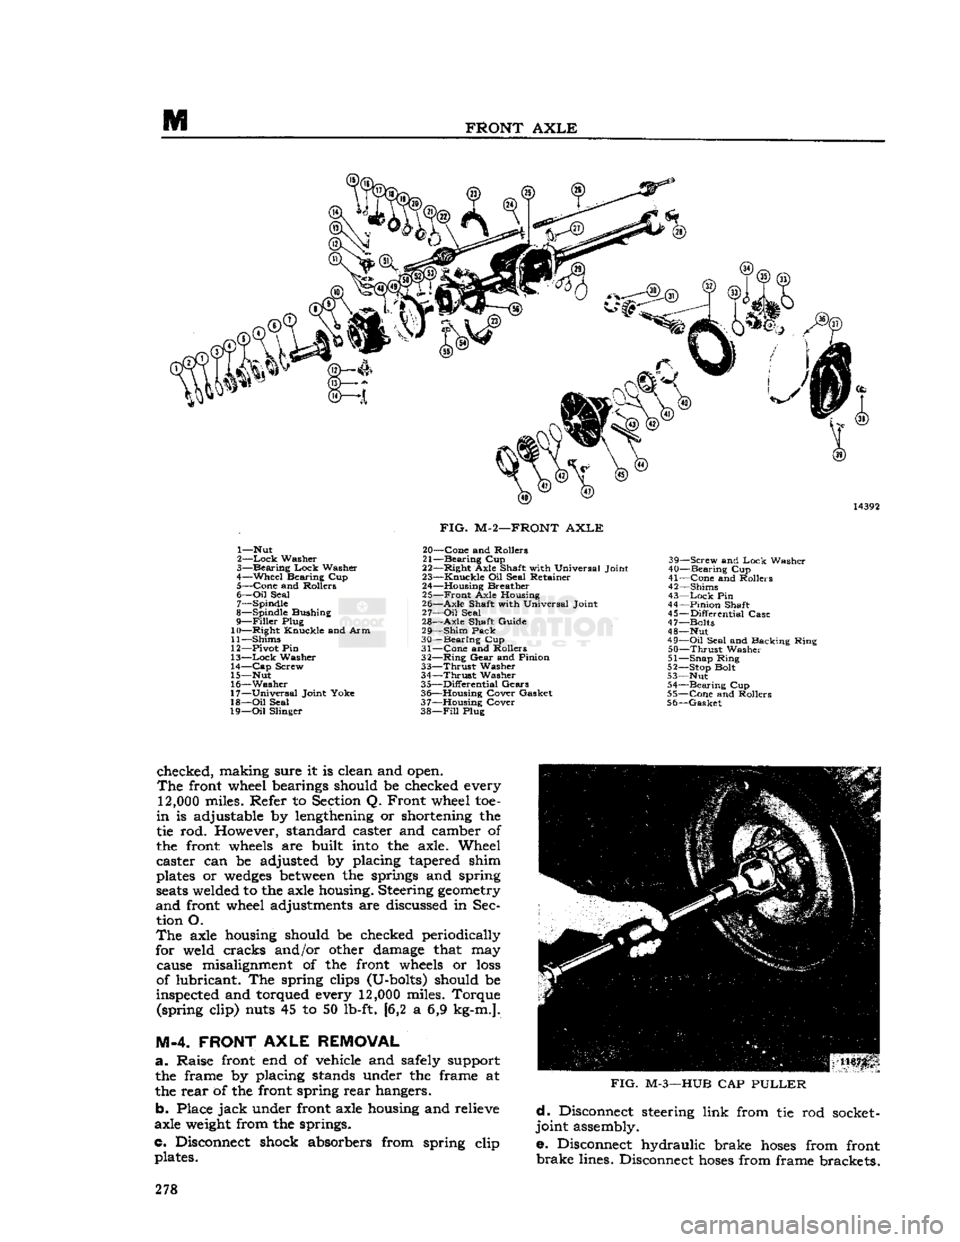
FIG.
M-2—FRONT
AXLE
20—
Cone
and Rollers
21—
Bearing
Cup
22—
Right
Axle Shaft with Universal Joint
23—
Knuckle
Oil Seal Retainer
24— Housing Breather 25—
Front
Axle Housing
26—
Axle
Shaft with Universal Joint
27—
Oil
Seal
28—
Axle
Shaft Guide
29—
Shim
Pack
30—
Bearing
Cup
31—
Cone
and Rollers
32—
Ring
Gear
and Pinion
33—
Thrust
Washer
34—
Thrust
Washer
35—
Differential
Gears
36— Housing Cover Gasket
37— Housing Cover
38—
Fill
Plug 39—
Screw
and
Lock
Washer
40—
Bearing
Cup
41—
Cone
and Rollers
42— Shims
43—
Lock
Pin
44—
Pinion
Shaft
45—
Differential
Case
47— Bolts
48— Nut
49—
Oil
Seal and Backing Ring
50—
Thrust
Washer
51— Snap Ring
52— Stop Bolt
53— Nut 54—
Bearing
Cup
55—
Cone
and Rollers
56—
Gasket
checked, making sure it is clean and open.
The
front wheel bearings should be checked every
12,000
miles. Refer to Section Q. Front wheel toe-
in
is adjustable by lengthening or shortening the
tie rod. However, standard caster and camber of
the front
wheels
are built
into
the axle. Wheel
caster can be adjusted by placing tapered shim
plates or
wedges
between
the springs and spring
seats
welded to the axle housing. Steering
geometry
and
front wheel adjustments are discussed in Sec tion O.
The
axle housing should be checked periodically
for weld cracks and/or other damage that may cause misalignment of the front
wheels
or
loss
of lubricant. The spring clips (U-bolts) should be
inspected and torqued every
12,000
miles. Torque (spring clip) nuts 45 to 50 lb-ft. [6,2 a 6,9 kg-m.].
M-4. FRONT
AXLE
REMOVAL
a.
Raise front end of vehicle
arid
safely support the frame by placing stands under the frame at
the rear of the front spring rear hangers.
b. Place
jack
under front axle housing and relieve
axle
weight
from the springs.
c. Disconnect shock absorbers from spring clip plates.
FIG.
M-3—HUB
CAP
PULLER
d.
Disconnect steering link from tie rod socket-
joint assembly.
e. Disconnect hydraulic brake
hoses
from front
brake
lines. Disconnect
hoses
from frame brackets. 278
Page 282 of 376
FRONT
AXLE
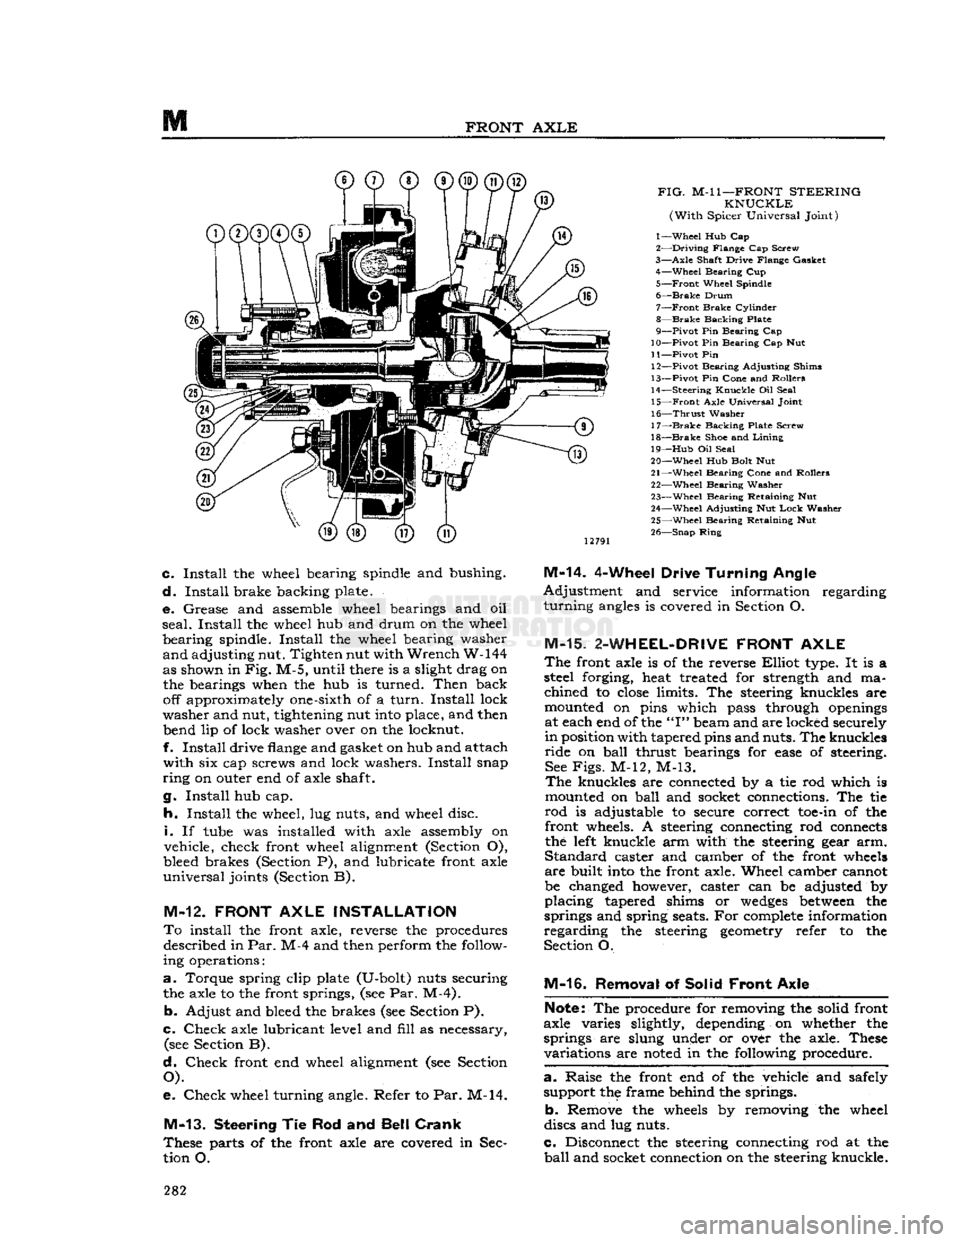
FIG.
M-l
1—FRONT
STEERING
KNUCKLE
(With
Spicer Universal Joint)
1—
Wheel
Hub Cap
2—
Driving
Flange Cap Screw
3—
Axle
Shaft Drive Flange Gasket 4—
Wheel
Bearing Cup
5—
Front
Wheel Spindle
6—
Brake
Drum
7—
Front
Brake
Cylinder
8—
Brake
Backing Plate
9—
Pivot
Pin Bearing Cap
10—
Pivot
Pin Bearing Cap Nut
11—
Pivot
Pin 12—
Pivot
Bearing Adjusting Shims
13—
Pivot
Pin Cone and Rollers
14—
Steering
Knuckle
Oil Seal 15—
Front
Axle Universal Joint
16—
Thrust
Washer
17—
Brake
Backing Plate Screw
18—
Brake
Shoe and
Lining
19—
Hub
Oil Seal
20—
Wheel
Hub Bolt Nut
21—
Wheel
Bearing Cone and Rollers 22—
Wheel
Bearing Washer
23—
Wheel
Bearing Retaining Nut
24—
Wheel
Adjusting Nut
Lock
Washer
25—
Wheel
Bearing Retaining Nut
26—
Snap
Ring
c.
Install
the wheel bearing spindle and bushing.
d.
Install
brake backing plate.
e.
Grease and assemble wheel bearings and oil
seal.
Install
the wheel hub and drum on the wheel
bearing
spindle.
Install
the wheel bearing washer
and
adjusting nut. Tighten nut with
Wrench
W-144
as shown in
Fig.
M-5, until there is a slight drag on the bearings when the hub is turned.
Then
back off approximately one-sixth of a
turn.
Install
lock
washer
and nut, tightening nut
into
place, and then bend lip of lock washer over on the locknut.
f.
Install
drive
flange
and gasket on hub and attach
with
six cap screws and lock washers.
Install
snap
ring
on outer end of axle shaft.
g.
Install
hub cap.
h.
Install
the wheel, lug nuts, and wheel disc.
i.
If
tube
was installed with axle assembly on
vehicle, check front wheel alignment (Section O),
bleed brakes (Section P), and lubricate front axle
universal
joints (Section B).
M-12.
FRONT
AXLE
INSTALLATION
To
install the front axle, reverse the procedures described in
Par.
M-4 and then perform the follow
ing operations:
a.
Torque spring clip plate (U-bolt) nuts securing the axle to the front springs, (see Par. M-4).
b.
Adjust and bleed the brakes (see Section P).
c.
Check
axle lubricant level and
fill
as necessary, (see Section B).
d.
Check
front end wheel alignment (see Section
O).
e.
Check
wheel turning angle. Refer to Par. M-14.
M-13.
Steering
Tie Rod and
Bell Crank
These
parts of the front axle are covered in Sec
tion O.
M-14.
4-Wheel Drive
Turning
Angle
Adjustment
and service information regarding
turning
angles
is covered in Section O.
M-15.
2-WHEEL-DRIVE
FRONT
AXLE
The
front axle is of the reverse
Elliot
type. It is a
steel forging, heat treated for strength and ma
chined
to
close
limits. The steering knuckles are
mounted on pins which pass through
openings
at each end of the
"I"
beam and are locked securely
in
position with tapered pins and nuts. The knuckles
ride
on
ball
thrust bearings for
ease
of steering. See
Figs.
M-12, M-13.
The
knuckles are connected by a tie rod which is
mounted on
ball
and socket connections. The tie
rod
is adjustable to secure correct
toe-in
of the front wheels. A steering connecting rod
connects
the
left
knuckle arm with the steering gear arm.
Standard
caster and camber of the front
wheels
are
built
into
the front axle. Wheel camber cannot
be changed however, caster can be adjusted by
placing
tapered shims or
wedges
between
the
springs and spring seats. For
complete
information
regarding
the steering
geometry
refer to the
Section O.
M-16.
Removal of Solid
Front
Axle
Note:
The procedure for removing the solid front
axle varies slightly, depending on whether the
springs are slung under or over the axle. These
variations
are
noted
in the following procedure.
a. -
Raise the front end of the vehicle and safely support the frame behind the springs.
b.
Remove the
wheels
by removing the wheel
discs and lug nuts.
c.
Disconnect the steering connecting rod at the
ball
and socket connection on the steering knuckle. 282
Page 297 of 376
'Jeep'
UNIVERSAL
SERIES SERVICE
MANUAL
N
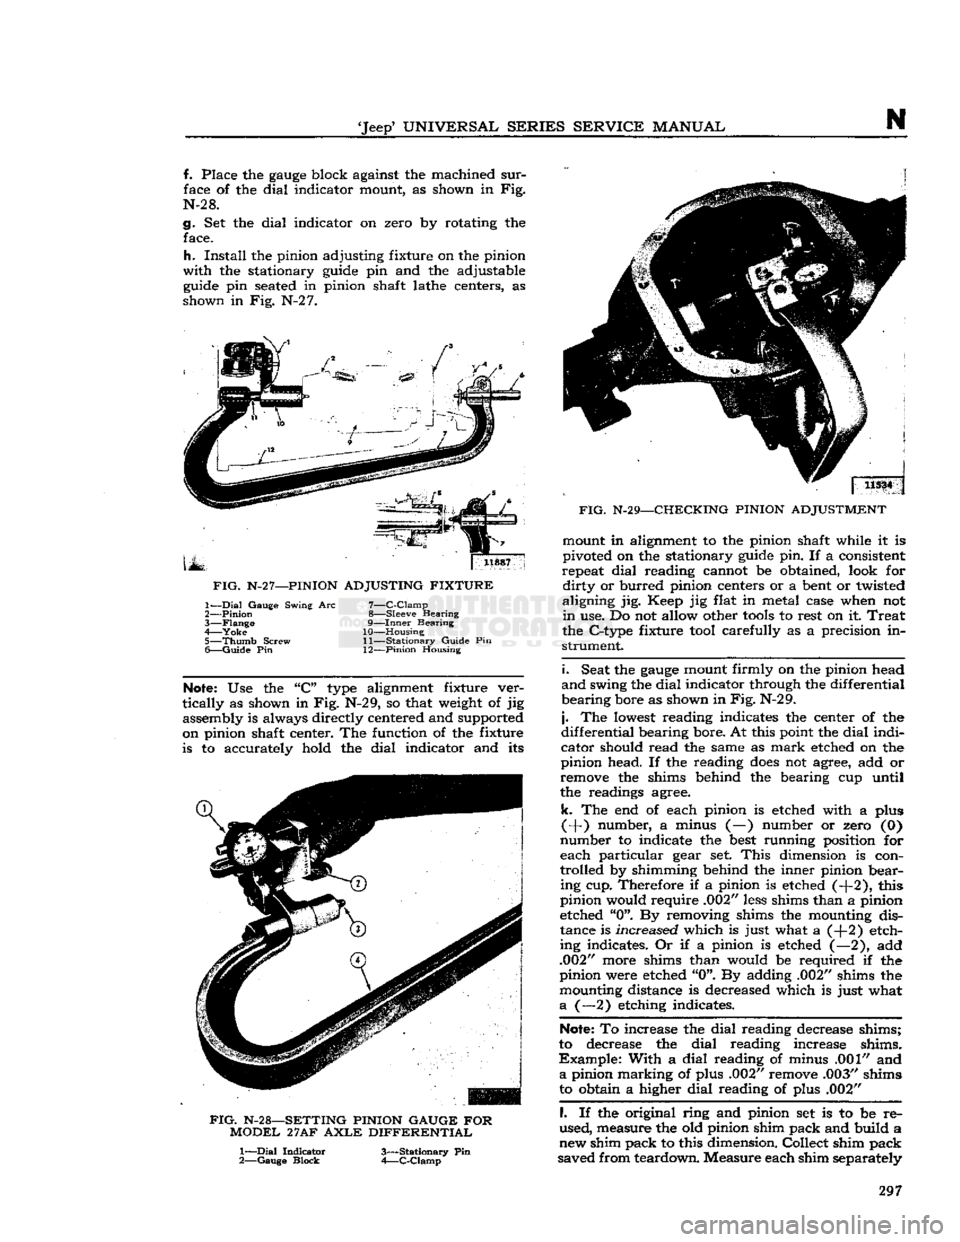
f. Place the
gauge
block against the machined
sur
face of the dial indicator mount, as shown in Fig.
N-2 8.
g. Set the dial indicator on zero by rotating the face.
h.
Install
the pinion adjusting fixture on the pinion
with
the stationary
guide
pin and the adjustable
guide
pin
seated
in pinion shaft lathe centers, as
shown in Fig. N-2 7.
FIG.
N-2
7—PINION
ADJUSTING FIXTURE
7—
C-Clamp
8— Sleeve Bearing
9—
Inner
Bearing
10— Housing 11—
Stationary
Guide Pin
1—
Dial
Gauge Swing Arc
2—
Pinion
3—
Flange
4—
Yoke
5—
Thumb
Screw
6—
Guide
Pin 12—Pinion Housing
Note:
Use the "C"
type
alignment fixture ver
tically
as shown in Fig. N-29, so that
weight
of jig assembly is always directly centered and supported
on pinion shaft center. The function of the fixture is to accurately hold the dial indicator and its
FIG.
N-28—SETTING
PINION
GAUGE FOR
MODEL
27AF
AXLE
DIFFERENTIAL
1—
Dial
Indicator
2—
Gauge
Block
3—
Stationary
Pin
4—
C-Clamp
j
11534 j
FIG.
N-29—CHECKING
PINION
ADJUSTMENT mount in alignment to the pinion shaft while it is
pivoted on the stationary
guide
pin. If a consistent
repeat dial reading cannot be obtained, look for
dirty
or burred pinion centers or a
bent
or twisted
aligning jig. Keep jig flat in metal case when not
in
use. Do not allow other
tools
to rest on it
Treat
the C-type fixture
tool
carefully as a precision in
strument.
i.
Seat the
gauge
mount firmly on the pinion head
and
swing the dial indicator through the differential
bearing bore as shown in
Fig.
N-29.
j.
The
lowest
reading indicates the center of the
differential bearing bore. At this point the dial indi
cator should read the same as
mark
etched on the
pinion head. If the reading
does
not agree, add or
remove the shims behind the bearing cup until
the readings agree.
k.
The end of each pinion is etched with a plus
(+) number, a minus (—) number or zero (0)
number to indicate the
best
running position for
each particular gear set.
This
dimension is con
trolled by shimming behind the inner pinion bear ing cup. Therefore if a pinion is etched (-f-2), this
pinion would require .002"
less
shims than a pinion
etched "0". By removing shims the mounting dis
tance is increased which is just what a (+2) etch
ing indicates. Or if a pinion is etched (—2), add
.002" more shims than would be required if the
pinion were etched "0". By adding .002" shims the mounting distance is decreased which is just what
a
(—2) etching indicates.
Note:
To increase the dial reading decrease shims;
to decrease the dial reading increase shims.
Example:
With a dial reading of minus .001" and
a
pinion marking of plus .002" remove .003" shims
to obtain a higher dial reading of plus .002"
I.
If the original ring and pinion set is to be re
used, measure the old pinion shim pack and build a
new shim pack to this dimension. Collect shim pack
saved from teardown. Measure each shim separately 297
Page 314 of 376
STEERING
SYSTEM
O-L
GENERAL
The
steering system on all Jeep Universal vehicles
consists of the steering gear, steering wheel, steering column and shaft, and steering linkage.
This
section covers wheel alignment, steering linkage,
steering gear, steering column and steering wheel.
0-2. Steering
Gear
Function
The
steering gear is a reducing gear. It exchanges a
relatively
large amount of movement with a small force (applied by the driver at the steering wheel), for a much smaller amount of movement with a
greatly increased force through a cam and lever
action type steering gear. The steering gear ratio is 17.9 to 1 on vehicles equipped with the F4
engine
and
19 to 1 with the V6 engine.
0-3. Steering
Linkage
Refer
to Fig. O-l.
The
steering linkage consists of a steering arm at
tached to the steering gear, a steering connecting
rod,
(drag
link),
connecting the steering arm to the
beilcrank,
and a steering tie rod connecting the
beilcrank
to the axle tie rod. The beilcrank pivots
on a pin mounted just to the left of the frame front crossmember. The steering tie rod is connected to
the beilcrank and
extends
to the right
ball
joint as sembly of tie rod. The tie rod
extends
to the wheels,
being connected to their respective steering knuckle
arms
at the wheels.
With
this linkage arrangement,
as the steering arm
moves
rearward,
the front
wheels
turn
to the left. As the steering arm
moves
forward,
the wheels
turn
to the right.
Ball
joints are used to secure the drag
link,
steering
connecting rod and tie rod ends. The
ball
joints
assist in maintaining
good
steering control and con
stant toe-in of the front wheels under all driving conditions. If the
ball
joints
become
worn enough
to allow free motion in the linkage, they should be,
replaced.
Note:
Ball
joint replacement of the tie rod requires
resetting of the wheel toe-in adjustment.
0-4.
Steering
Column
and Gear
Alignment
When
adjusting a steering gear remove all loads
from
the unit by disconnecting the steering con
necting rod (drag
link)
from the steering arm and
also
loosen
the instrument panel bracket and the
steering gear to frame
bolts
to allow the steering
post
to correctly align itself. When retightening the
steering gear to frame
bolts
use a torque wrench
pull
of 45 to 55 lb-ft. [6,2 a 7,6 kg-m.] on the
Vk*
bolts
and 30 to 40 lb-ft. [4,15 a 5,5 kg-m.] on the
Vs"
bolts. 10811
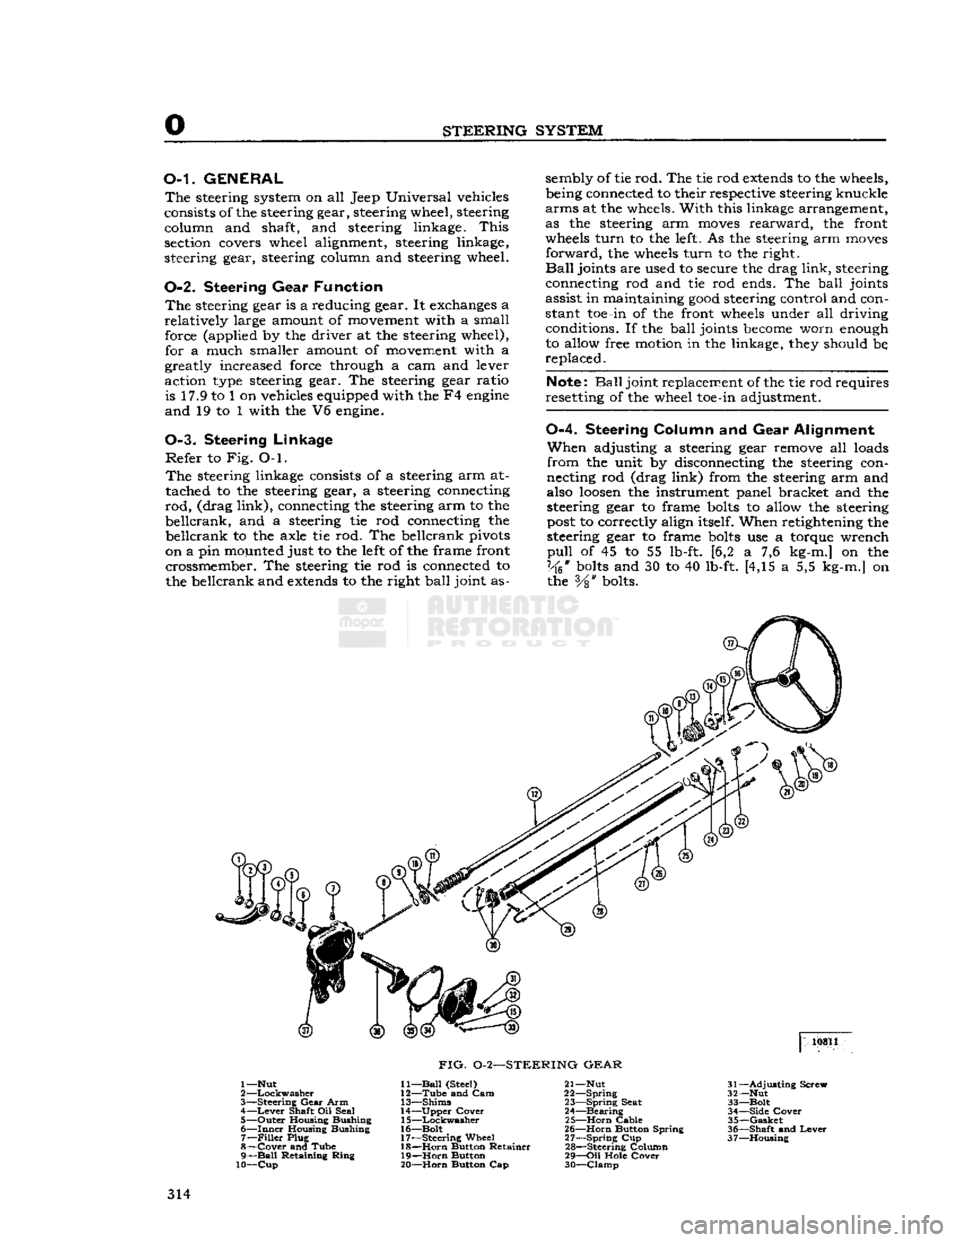
FIG.
0-2—STEERING
GEAR
1—Nut
2
—Lockwasher
3—
Steering
Gear
Arm 4—
Lever
Shaft Oil Seal
5—
Outer
Housing Bushing
6—
Inner
Housing Bushing 7—
Filler
Plug
8—
Cover
and Tube
9—
Ball
Retaining
Ring
10—Cup
11—
Ball
(Steel)
12—
Tube
and Cam
13—
Shims
14—
Upper
Cover
15—
Lockwasher
16—
Bolt
17—
Steering
Wheel 18—
Horn
Button Retainer
19—
Horn
Button
20—
Horn
Button Cap 21— Nut
22—
Spring
23—
Spring
Seat
24—
Bearing
25—
Horn
Cable
26—
Horn
Button Spring
27—
Spring
Cup
28—
Steering Column
29—
Oil
Hole
Cover
30—
Clamp
31—
Adjusting
Screw
32— Nut
33—
Bolt
34—
Side
Cover
35—
Gasket
36—
Shaft
and
Lever
37—
Housing
314
Page 318 of 376
o
STEERING
SYSTEM
10
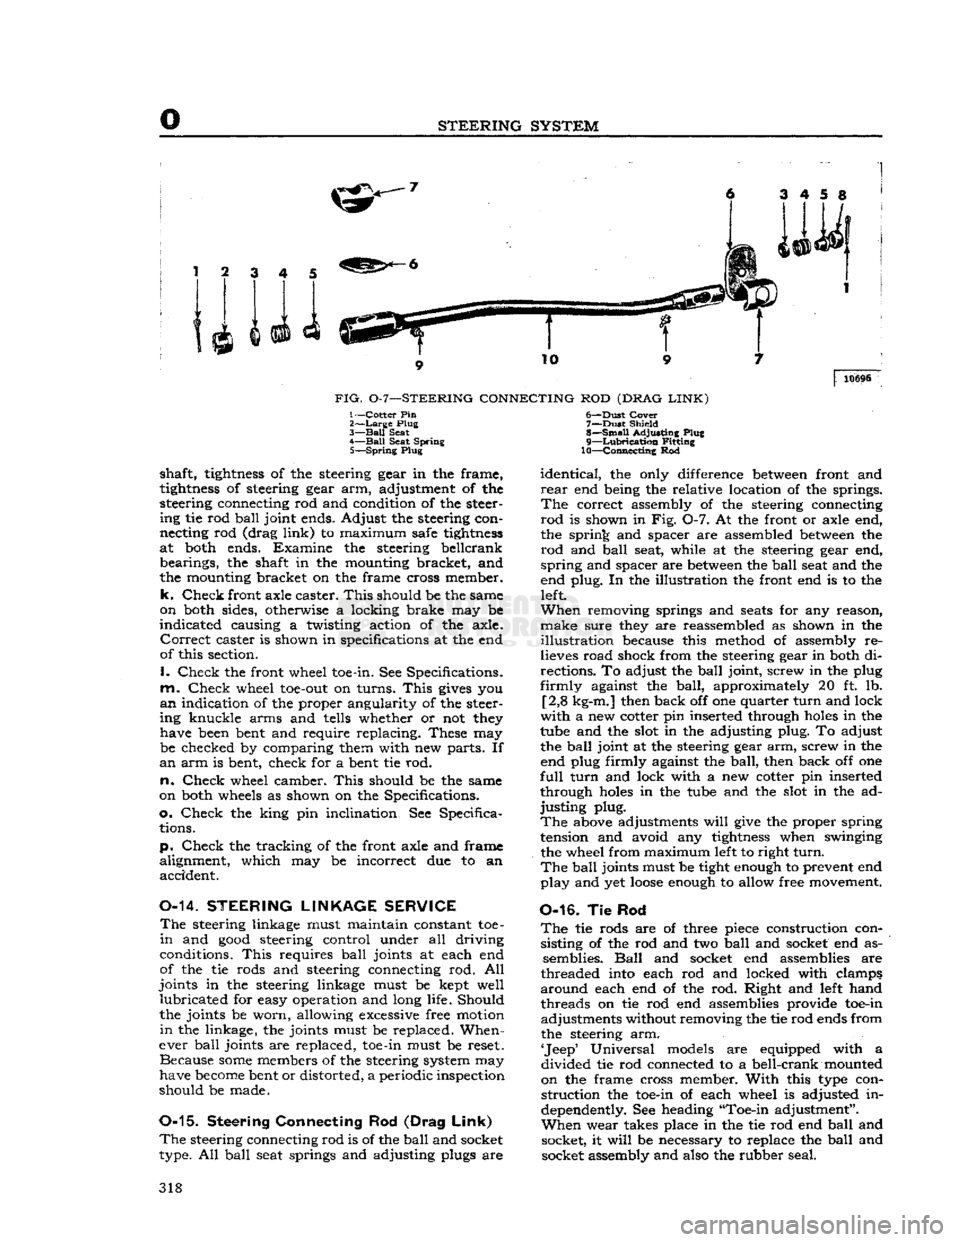
FIG.
0-7—STEERING
CONNECTING
ROD
(DRAG
LINK)
10696
1—Cotter Pin
2>—Large
Plug
3—
Ball
Seat
4—
Ball
Seat Spring 5—
Spring
Plug
shaft,
tightness
of the steering gear in the frame,
tightness
of steering gear arm, adjustment of the
steering connecting rod and condition of the steer ing tie rod
ball
joint ends. Adjust the steering con
necting rod (drag
link)
to maximum safe
tightness
at both ends. Examine the steering beilcrank bearings, the shaft in the mounting bracket, and
the mounting bracket on the frame cross member,
k.
Check
front axle caster.
This
should be the same
on both sides, otherwise a locking brake may be
indicated
causing a twisting action of the axle.
Correct
caster is shown in specifications at the end
of this section.
I.
Check
the front wheel toe-in. See Specifications,
m.
Check
wheel
toe-out
on turns.
This
gives
you
an
indication of the proper angularity of the steer
ing knuckle arms and tells whether or not they have been bent and require replacing. These may be checked by comparing them with new parts. If
an
arm is bent, check for a bent tie rod.
n.
Check
wheel camber.
This
should be the same
on both wheels as shown on the Specifications,
o.
Check
the king pin inclination. See Specifica tions.
p.
Check
the tracking of the front axle and frame
alignment, which may be incorrect due to an accident.
0-14.
STEERING
LINKAGE
SERVICE
The
steering linkage must maintain constant toe-
in
and
good
steering control under all driving
conditions.
This
requires
ball
joints at each end
of the tie rods and steering connecting rod. All
joints in the steering linkage must be kept well
lubricated
for easy operation and long life. Should
the joints be worn, allowing excessive free motion
in
the linkage, the joints must be replaced. When
ever
ball
joints are replaced, toe-in must be reset. Because
some
members of the steering system may
have
become
bent or distorted, a periodic inspection
should be made.
0-15.
Steering Connecting
Rod
(Drag
Link)
The
steering connecting rod is of the
ball
and socket
type. All
ball
seat springs and adjusting plugs are 6—
-Dust
Cover
7—
Dust
Shield
8—
Small
Adjusting Plug
9—
Lubrication
Fitting
10—Connecting Rod
identical,
the only difference
between
front and
rear
end being the relative location of the springs.
The
correct assembly of the steering connecting
rod
is shown in Fig. 0-7. At the front or axle end,
the spring and spacer are assembled
between
the
rod
and
ball
seat, while at the steering gear end,
spring
and spacer are
between
the
ball
seat and the
end plug. In the illustration the front end is to the left.
When
removing springs and
seats
for any reason,
make
sure they are reassembled as shown in the
illustration
because this method of assembly re
lieves road shock from the steering gear in both di
rections. To adjust the
ball
joint, screw in the plug
firmly
against the
ball,
approximately 20 ft. lb. [2,8 kg-m.] then back off one quarter
turn
and lock
with
a new cotter pin inserted through
holes
in the
tube and the slot in the adjusting plug. To adjust the
ball
joint at the steering gear arm, screw in the end plug firmly against the
ball,
then back off one
full
turn
and lock with a new cotter pin inserted
through
holes
in the tube and the slot in the ad
justing
plug.
The
above adjustments
will
give
the proper spring
tension and avoid any
tightness
when swinging
the wheel from maximum left to right
turn.
The
ball
joints must be tight enough to prevent end
play
and yet
loose
enough to allow free movement.
0-16. Tie Rod
The
tie rods are of three piece construction consisting of the rod and two
ball
and socket end as semblies.
Ball
and socket end assemblies are
threaded into each rod and locked with clamps,
around
each end of the rod. Right and left hand threads on tie rod end assemblies provide toe-in adjustments without removing the tie rod ends from
the steering arm.
'Jeep'
Universal models are equipped with a
divided
tie rod connected to a bell-crank mounted
on the frame cross member.
With
this type con
struction
the toe-in of each wheel is adjusted in
dependently. See heading "Toe-in adjustment".
When
wear takes place in the tie rod end
ball
and socket, it
will
be necessary to replace the
ball
and socket assembly and also the rubber seal. 318
Page 331 of 376
'Jeep*
UNIVERSAL SERIES SERVICE
MANUAL
P
f. On vehicles without a transmission brake hold
the brake
shoes
in their relative position and
engage
the parking brake cable
into
the parking
brake
lever.
g. On vehicles without a transmission brake in
stall
the parking brake strut and spring
between
the parking brake lever and the primary
shoe.
h.
Place the brake
shoes
on the backing plate and
install
the retainer pins, springs and retainers.
i.
Install the anchor pin plate.
j.
Install the lever and
sleeve
on the primary
shoe
then install the secondary return spring, then the
primary
return spring.
Important:
A
"L"
or "R" is located on the hex
agon
side of the lever crank for identification. The
lever crank marked "R" applies to the primary
shoe
on the
left
rear brake assembly. The lever
crank
marked
"L"
applies to the primary
shoe
on
the right rear brake assembly.
k. Place the upper linkage rod in the
groove
of the
anchor pin and
engage
the hook of the link rod
into
the adjusting lever.
I.
Install the brake drum. Install the wheel and
tire
assembly.
m. Adjust the brakes as described
below.
P-19.
Brake
Shoe
Initial
Adjustment —
a.
Should wheel brake units have
been
disassem bled for any reason, an initial adjustment
MUST
be made
before
drum installation.
b.
When the brake parts have
been
installed in
their correct position, initially adjust the adjusting
screw assemblies to a point where approximately Y% [9,53 mm.] of threads are
exposed
between
the
star
wheel and star wheel nut.
Note:
Following the initial adjustment and final
assembly, check brake pedal height to ensure
brake
operation. Then drive the car in reverse and
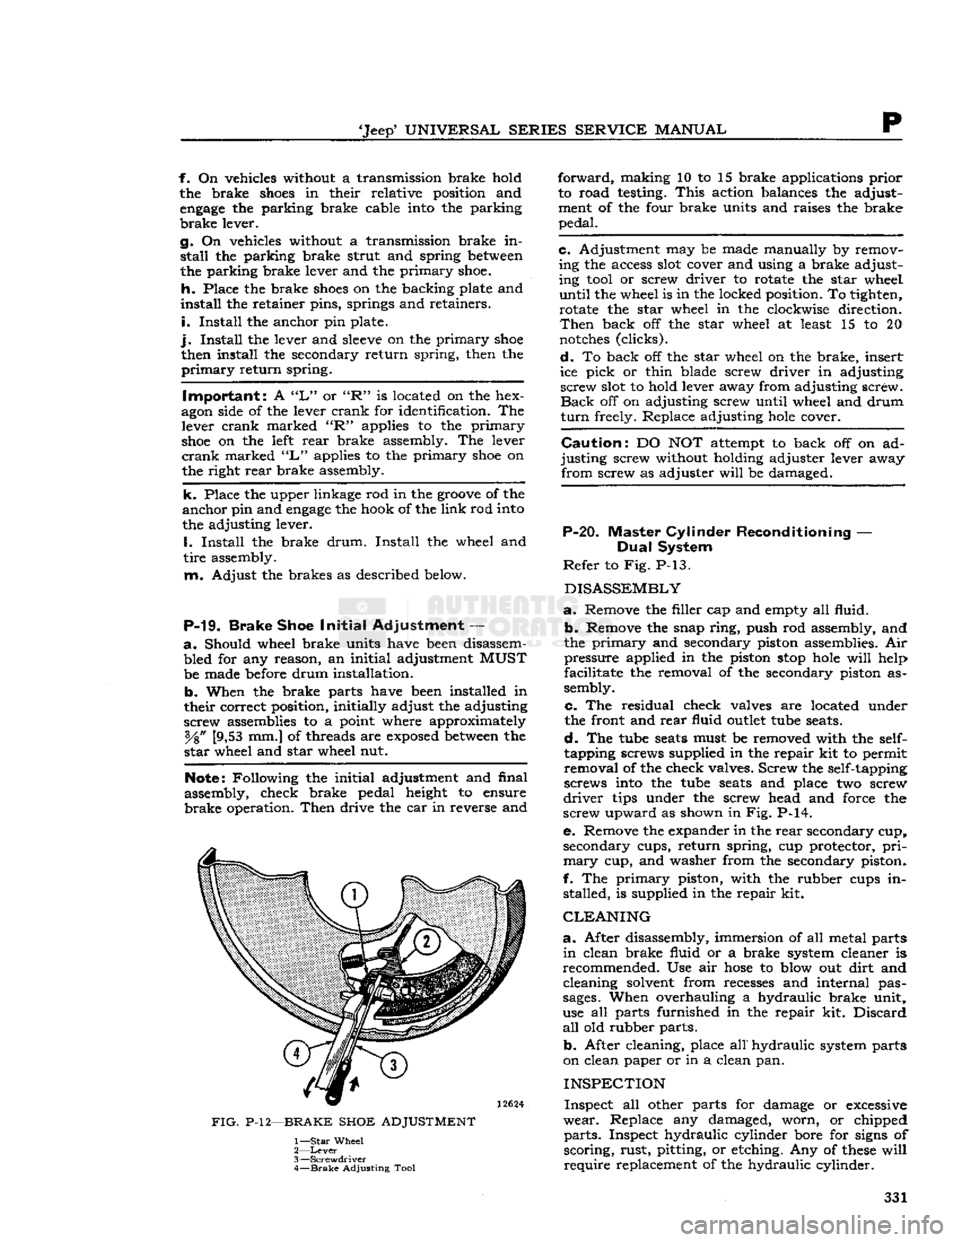
FIG.
P-12—BRAKE SHOE ADJUSTMENT
1—
Star
Wheel
2—
Lever
3—
Screwdriver
4—
Brake
Adjusting Tool
forward,
making 10 to 15 brake applications prior
to road testing.
This
action balances the adjust
ment of the four brake units and raises the brake
pedal.
c. Adjustment may be made manually by removing the access
slot
cover and using a brake adjust
ing
tool
or screw driver to rotate the star wheel
until
the wheel is in the locked position. To tighten, rotate the star wheel in the clockwise direction.
Then
back off the star wheel at least 15 to 20
notches
(clicks).
d.
To back off the star wheel on the brake, insert
ice pick or thin blade screw driver in adjusting screw
slot
to hold lever away from adjusting screw.
Back
off on adjusting screw until wheel and drum
turn
freely. Replace adjusting
hole
cover.
Caution:
DO NOT attempt to back off on ad
justing screw without holding adjuster lever away from screw as adjuster
will
be damaged.
P-20. Master Cylinder Reconditioning —
Dual
System
Refer
to Fig. P-13.
DISASSEMBLY
a.
Remove the filler cap and empty all fluid.
b.
Remove the snap ring, push rod assembly, and
the primary and secondary piston assemblies. Air pressure applied in the piston
stop
hole
will
help
facilitate the removal of the secondary piston as
sembly.
c. The residual check valves are located under
the front and rear fluid
outlet
tube
seats.
d.
The
tube
seats
must be removed with the
self-
tapping screws supplied in the repair kit to permit removal of the check valves. Screw the self-tapping
screws
into
the
tube
seats
and place two screw
driver
tips under the screw head and force the
screw upward as shown in Fig. P-14.
e. Remove the expander in the rear secondary cup, secondary cups, return spring, cup protector,
pri
mary
cup, and washer from the secondary piston.
f. The primary piston, with the rubber cups in stalled, is supplied in the repair kit.
CLEANING
a.
After disassembly, immersion of all metal parts
in
clean brake fluid or a brake system cleaner is
recommended. Use air
hose
to blow out dirt and cleaning solvent from recesses and internal pas
sages.
When overhauling a hydraulic brake unit,
use all parts furnished in the repair kit. Discard
all
old rubber parts.
b.
After cleaning, place
all"
hydraulic
system parts
on clean paper or in a clean pan.
INSPECTION
Inspect all other parts for damage or
excessive
wear.
Replace any damaged, worn, or chipped
parts.
Inspect hydraulic cylinder bore for
signs
of
scoring, rust, pitting, or etching. Any of
these
will
require
replacement of the hydraulic cylinder. 331