USB JEEP GLADIATOR 2023 Owners Manual
[x] Cancel search | Manufacturer: JEEP, Model Year: 2023, Model line: GLADIATOR, Model: JEEP GLADIATOR 2023Pages: 448, PDF Size: 17.37 MB
Page 5 of 448
3
EXTERIOR LIGHTS.................................................. 56 Headlight Switch...............................................56
Daytime Running Lights (DRLs) —
If Equipped .......................................................57
High/Low Beam Switch....................................57
Automatic High Beam Headlamp Control —
If Equipped .......................................................58
Flash-To-Pass....................................................58
Automatic Headlights — If Equipped ..............58
Lights-On Reminder..........................................58
Front Fog Lights — If Equipped .......................58
Turn Signals ......................................................59
Lane Change Assist — If Equipped ..................59
Bed Lights — If Equipped ................................59
INTERIOR LIGHTS ................................................. 59
Interior Courtesy Lights ....................................59
Dimmer Control ................................................60
WINDSHIELD WIPERS AND WASHERS .............. 60
Windshield Wiper Operation ............................60
CLIMATE CONTROLS ............................................. 61
Automatic Climate Control Descriptions And
Functions ..........................................................62
Manual Climate Control Descriptions And
Functions ..........................................................64
Automatic Temperature Control (ATC) —
If Equipped........................................................67
Climate Voice Commands................................67
Operating Tips .................................................67 INTERIOR STORAGE AND EQUIPMENT ............... 68
Storage..............................................................68
Lighted Cupholders — If Equipped ..................71
AUX/USB Control ..............................................71
Jeep® Wireless Speaker —
If Equipped........................................................72
Power Outlets ..................................................77
Power Inverters — If Equipped ........................78
Auxiliary Switches — If Equipped ....................79
POWER WINDOWS — IF EQUIPPED .....................81
Auto-Down Feature .........................................81
Manual Sliding Rear Window —
If Equipped........................................................81
Window Lockout Switch ...................................82
Wind Buffeting .................................................82
GLADIATOR TOPS .................................................82
Provided Tools ..................................................82
Lowering The Soft Top
S
..............................83
Raising The Soft Top
S
.................................89
Removing The Soft Top
S
.............................92
Installing The Soft Top .....................................93
Hard Top Front Panel(s) Removal
S
............95
Hard Top Front Panel(s) Installation ..............98
Removing The Hard Top
S
...........................98
Installing The Hard Top ................................. 100
Sunrider® For Hard Top —
If Equipped..................................................... 101 DOOR FRAME — IF EQUIPPED WITH A
SOFT TOP ............................................................. 104
Door Frame Removal .................................... 104
Door Frame Installation ................................ 105
FOLDING WINDSHIELD ...................................... 106
Lowering The Windshield.............................. 106
Raising The Windshield ................................ 108
HOOD .................................................................... 109
Opening The Hood ........................................ 109
Closing The Hood .......................................... 109
TAILGATE .............................................................. 110
Opening.......................................................... 110Three-Position Tailgate ................................. 110
Closing ........................................................... 111
BED RAIL TIE DOWN SYSTEM —
IF EQUIPPED ........................................................ 111
TONNEAU COVER — IF EQUIPPED ..................... 112
Tonneau Cover Installation .......................... 112
Tonneau Cover Removal .............................. 114
ROOF LUGGAGE RACK — IF EQUIPPED ............ 115
GETTING TO KNOW YOUR
INSTRUMENT PANEL
GASOLINE INSTRUMENT CLUSTERS ................ 116
Instrument Cluster Descriptions
S
........... 118
DIESEL INSTRUMENT CLUSTERS ...................... 119
Instrument Cluster Descriptions .................. 121
23_JT_OM_EN_USC_t.book Page 3
Page 73 of 448
GETTING TO KNOW YOUR VEHICLE71
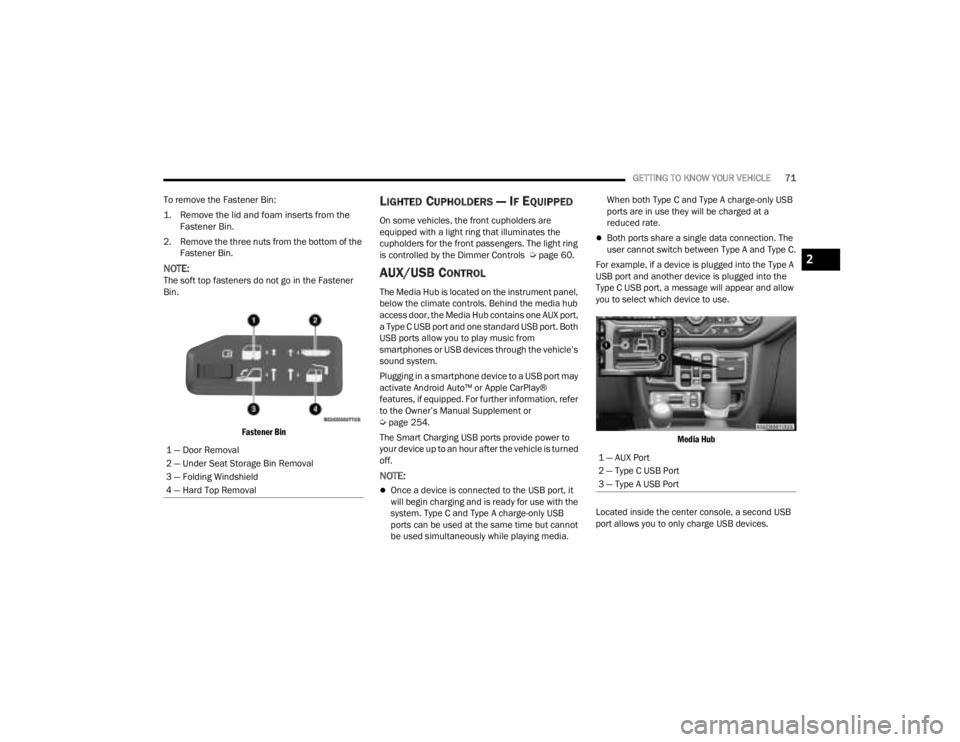
To remove the Fastener Bin:
1. Remove the lid and foam inserts from the Fastener Bin.
2. Remove the three nuts from the bottom of the Fastener Bin.
NOTE:The soft top fasteners do not go in the Fastener
Bin.
Fastener Bin
LIGHTED CUPHOLDERS — IF EQUIPPED
On some vehicles, the front cupholders are
equipped with a light ring that illuminates the
cupholders for the front passengers. The light ring
is controlled by the Dimmer Controls Ú page 60.
AUX/USB CONTROL
The Media Hub is located on the instrument panel,
below the climate controls. Behind the media hub
access door, the Media Hub contains one AUX port,
a Type C USB port and one standard USB port. Both
USB ports allow you to play music from
smartphones or USB devices through the vehicle’s
sound system.
Plugging in a smartphone device to a USB port may
activate Android Auto™ or Apple CarPlay®
features, if equipped. For further information, refer
to the Owner’s Manual Supplement or
Úpage 254.
The Smart Charging USB ports provide power to
your device up to an hour after the vehicle is turned
off.
NOTE:
Once a device is connected to the USB port, it
will begin charging and is ready for use with the
system. Type C and Type A charge-only USB
ports can be used at the same time but cannot
be used simultaneously while playing media. When both Type C and Type A charge-only USB
ports are in use they will be charged at a
reduced rate.
Both ports share a single data connection. The
user cannot switch between Type A and Type C.
For example, if a device is plugged into the Type A
USB port and another device is plugged into the
Type C USB port, a message will appear and allow
you to select which device to use.
Media Hub
Located inside the center console, a second USB
port allows you to only charge USB devices.
1 — Door Removal
2 — Under Seat Storage Bin Removal
3 — Folding Windshield
4 — Hard Top Removal
1 — AUX Port
2 — Type C USB Port
3 — Type A USB Port
2
23_JT_OM_EN_USC_t.book Page 71
Page 74 of 448
72GETTING TO KNOW YOUR VEHICLE
Depending on your vehicle’s specifications, the USB
port may contain playback capabilities and will allow
you to play music from your smartphone device or
USB devices through your vehicle’s sound system.
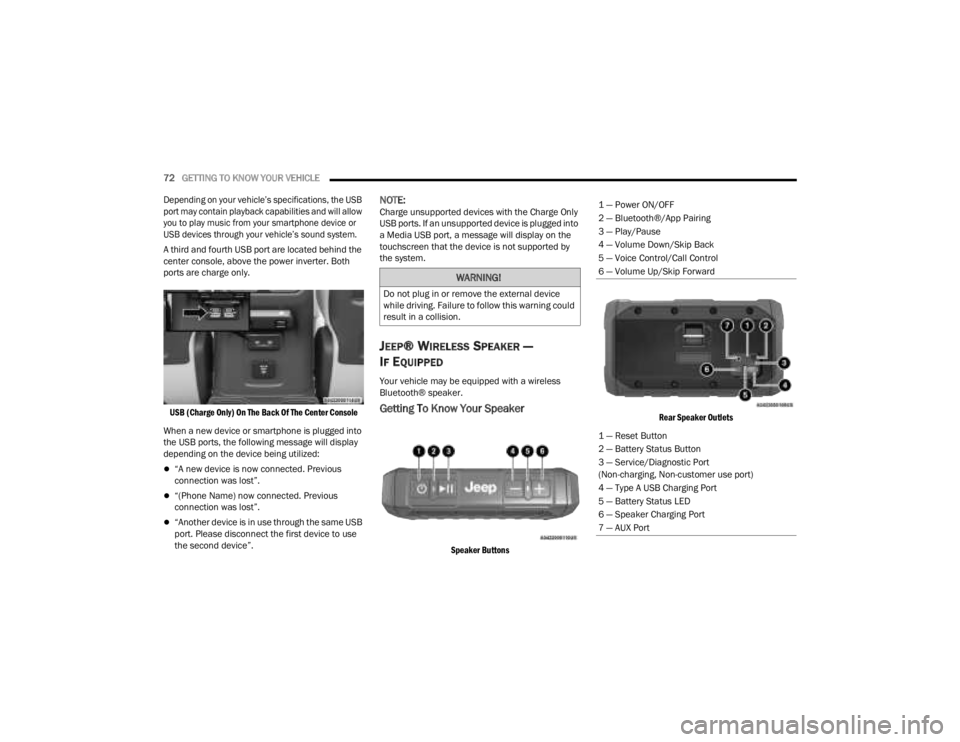
A third and fourth USB port are located behind the
center console, above the power inverter. Both
ports are charge only.
USB (Charge Only) On The Back Of The Center Console
When a new device or smartphone is plugged into
the USB ports, the following message will display
depending on the device being utilized:
“A new device is now connected. Previous
connection was lost”.
“(Phone Name) now connected. Previous
connection was lost”.
“Another device is in use through the same USB
port. Please disconnect the first device to use
the second device”.
NOTE:Charge unsupported devices with the Charge Only
USB ports. If an unsupported device is plugged into
a Media USB port, a message will display on the
touchscreen that the device is not supported by
the system.
JEEP® WIRELESS SPEAKER —
I
F EQUIPPED
Your vehicle may be equipped with a wireless
Bluetooth® speaker.
Getting To Know Your Speaker
Speaker Buttons Rear Speaker Outlets
WARNING!
Do not plug in or remove the external device
while driving. Failure to follow this warning could
result in a collision.
1 — Power ON/OFF
2 — Bluetooth®/App Pairing
3 — Play/Pause
4 — Volume Down/Skip Back
5 — Voice Control/Call Control
6 — Volume Up/Skip Forward
1 — Reset Button
2 — Battery Status Button
3 — Service/Diagnostic Port
(Non-charging, Non-customer use port)
4 — Type A USB Charging Port
5 — Battery Status LED
6 — Speaker Charging Port
7 — AUX Port
23_JT_OM_EN_USC_t.book Page 72
Page 75 of 448
GETTING TO KNOW YOUR VEHICLE73
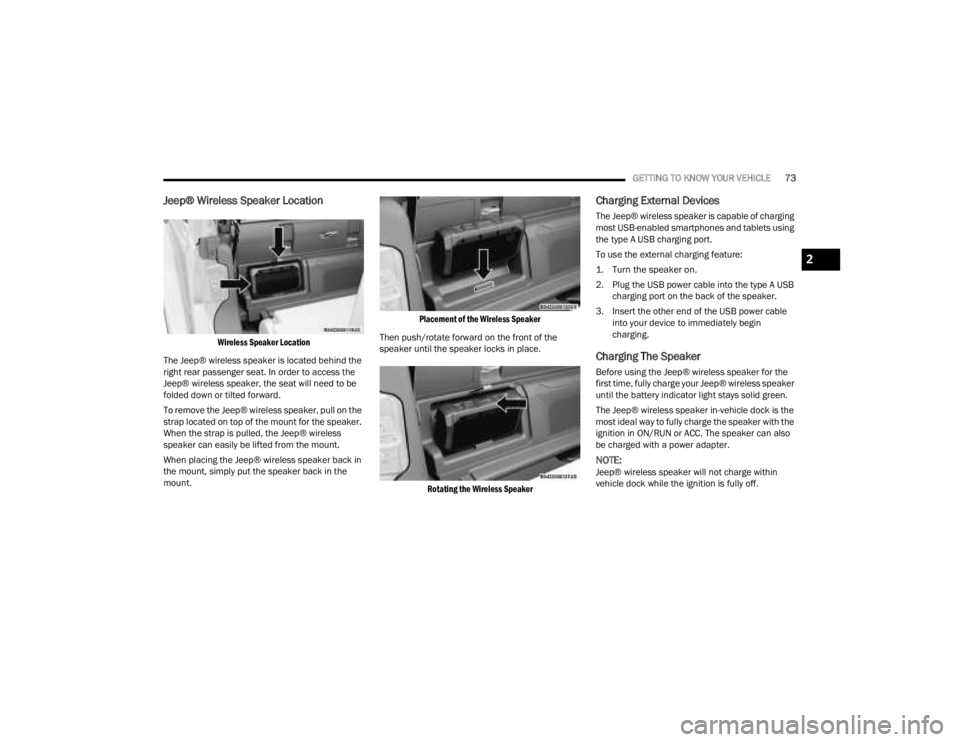
Jeep® Wireless Speaker Location
Wireless Speaker Location
The Jeep® wireless speaker is located behind the
right rear passenger seat. In order to access the
Jeep® wireless speaker, the seat will need to be
folded down or tilted forward.
To remove the Jeep® wireless speaker, pull on the
strap located on top of the mount for the speaker.
When the strap is pulled, the Jeep® wireless
speaker can easily be lifted from the mount.
When placing the Jeep® wireless speaker back in
the mount, simply put the speaker back in the
mount.
Placement of the Wireless Speaker
Then push/rotate forward on the front of the
speaker until the speaker locks in place.
Rotating the Wireless Speaker
Charging External Devices
The Jeep® wireless speaker is capable of charging
most USB-enabled smartphones and tablets using
the type A USB charging port.
To use the external charging feature:
1. Turn the speaker on.
2. Plug the USB power cable into the type A USB charging port on the back of the speaker.
3. Insert the other end of the USB power cable into your device to immediately begin
charging.
Charging The Speaker
Before using the Jeep® wireless speaker for the
first time, fully charge your Jeep® wireless speaker
until the battery indicator light stays solid green.
The Jeep® wireless speaker in-vehicle dock is the
most ideal way to fully charge the speaker with the
ignition in ON/RUN or ACC. The speaker can also
be charged with a power adapter.
NOTE:Jeep® wireless speaker will not charge within
vehicle dock while the ignition is fully off.
2
23_JT_OM_EN_USC_t.book Page 73
Page 129 of 448
GETTING TO KNOW YOUR INSTRUMENT PANEL127
BATTERY SAVER ON, BATTERY SAVER
M
ODE MESSAGE, AND ELECTRICAL
L
OAD REDUCTION ACTIONS
(I
F EQUIPPED)
This vehicle is equipped with an Intelligent Battery
Sensor (IBS) to perform additional monitoring of
the electrical system and status of the vehicle
battery.
In cases when the IBS detects charging system
failure, or the vehicle battery conditions are
deteriorating, electrical load reduction actions will
take place to extend the driving time and distance
of the vehicle. This is done by reducing power to or
turning off non-essential electrical loads.
Load reduction is only active when the engine is
running. It will display a message if there is a risk
of battery depletion to the point where the vehicle
may stall due to lack of electrical supply, or will not
restart after the current drive cycle.
When load reduction is activated, the message
“Battery Saver On Some Systems May Have
Reduced Power” will appear in the instrument
cluster. These messages indicate the vehicle battery has a
low state of charge and continues to lose electrical
charge at a rate that the charging system cannot
sustain.
NOTE:
The charging system is independent from load
reduction. The charging system performs a diag
-
nostic on the charging system continuously.
If the Battery Charge Warning Light is on it may
indicate a problem with the charging system
Ú page 133.
The electrical loads that may be switched off (if
equipped), and vehicle functions which can be
affected by load reduction:
Heated Seat/Vented Seats/Heated Wheel
Rear Defroster And Heated Mirrors
HVAC System
115 Volt AC Power Inverter System
Audio and Telematics System
Loss of battery charge may indicate one or more of
the following conditions:
The charging system cannot deliver enough
electrical power to the vehicle system because
the electrical loads are larger than the capability
of the charging system. The charging system is
still functioning properly.
Turning on all possible vehicle electrical loads
(e.g. HVAC to max settings, exterior and interior
lights, overloaded power outlets +12 Volt,
115 Volt AC, USB ports) during certain driving
conditions (city driving, towing, frequent stop -
ping).
Installing options like additional lights, upfitter
electrical accessories, audio systems, alarms
and similar devices.
Unusual driving cycles (short trips separated by
long parking periods).
The vehicle was parked for an extended period
of time (weeks, months).
The battery was recently replaced and was not
charged completely.
The battery was discharged by an electrical load
left on when the vehicle was parked.
The battery was used for an extended period
with the engine not running to supply radio,
lights, chargers, +12 Volt portable appliances
like vacuum cleaners, game consoles and
similar devices.
3
23_JT_OM_EN_USC_t.book Page 127
Page 130 of 448
128GETTING TO KNOW YOUR INSTRUMENT PANEL
What to do when an electrical load reduction
action message is present (“Battery Saver On” or
“Battery Saver Mode”)
During a trip:
Reduce power to unnecessary loads if possible:
Turn off redundant lights (interior or exte -
rior)
Check what may be plugged in to power
outlets +12 Volt, 115 Volts AC, USB ports
Check HVAC settings (blower, temperature)
Check the audio settings (volume)
After a trip:
Check if any aftermarket equipment was
installed (additional lights, upfitter electrical
accessories, audio systems, alarms) and review
specifications if any (load and ignition off draw
currents).
Evaluate the latest driving cycles (distance,
driving time and parking time).
The vehicle should have service performed if
the message is still present during consecutive
trips and the evaluation of the vehicle and
driving pattern did not help to identify the cause.
DIESEL DISPLAYS
When the appropriate conditions exist, the
following messages display in the instrument
cluster display:
Exhaust Filter Nearing Full Safely Drive at
Consistent Speeds to Clear
Exhaust Filter Full – Power Reduced See Dealer
Exhaust System Service Required – See Dealer
Exhaust System – Filter XX% Full Service
Required See Dealer
Exhaust System Regeneration in Process
Continue Driving
Exhaust System – Regeneration Completed
DIESEL PARTICULATE FILTER (DPF)
M
ESSAGES
This engine meets all required diesel engine
emissions standards. To achieve these emissions
standards, your vehicle is equipped with a
state-of-the-art engine and exhaust system. These
systems are seamlessly integrated into your
vehicle and managed by the Powertrain Control
Module (PCM). The PCM manages engine combustion to allow the exhaust system’s catalyst
to trap and burn Particulate Matter (PM)
pollutants, with no input or interaction on your part.
WARNING!
A malfunctioning catalytic converter, as
previously referenced, can reach higher
temperatures than in normal operating
conditions. This can cause a fire if you drive
slowly or park over flammable substances such
as dry plants, wood, cardboard, etc. This could
result in death or serious injury to the driver,
occupants or others.
CAUTION!
The engine may be switched off even if the
warning light is on: repeated interruptions of the
regeneration process could cause an early
deterioration of engine oil. For this reason it is
always advisable to wait for the symbol to go off
before turning off the engine, following the
previously mentioned instructions. Do not
complete the DPF regeneration process when
the vehicle is stopped.
23_JT_OM_EN_USC_t.book Page 128
Page 235 of 448
MULTIMEDIA233
Stop use immediately if a problem occurs.
Failure to do so may cause injury or damage to
the product. See an authorized dealer for repair.
Ensure the volume level of the system is set to a
level that still allows you to hear outside traffic
and emergency vehicles.
Safe Usage Of The Uconnect System
The Uconnect system is a sophisticated elec -
tronic device. Do not let young children use the
system.
Permanent hearing loss may occur if you play
your music or sound system at loud volumes.
Exercise caution when setting the volume on the
system.
Keep drinks, rain and other sources of moisture
away from the system. Besides damage to the
system, moisture can cause electric shocks as
with any electronic device.
NOTE:Many features of this system are speed
dependent. For your own safety, it is not possible to
use some of the touchscreen features while the
vehicle is in motion.
Care And Maintenance
Do not press the touchscreen with any hard or
sharp objects (pen, USB stick, jewelry, etc.),
which could scratch the surface.
Do not spray any liquid or chemicals directly on
the screen! Use a clean and dry microfiber lens
cleaning cloth in order to clean the touchscreen.
If necessary, use a lint-free cloth dampened
with a cleaning solution, such as isopropyl
alcohol or an isopropyl alcohol and water solu -
tion ratio of 50:50. Be sure to follow the solvent
manufacturer's precautions and directions
Ú page 432.
UCONNECT MODES
STEERING WHEEL AUDIO CONTROLS
The remote sound system controls are located on
the rear surface of the steering wheel at the three
and nine o’clock positions.
Remote Sound System Controls
The right-hand control is a rocker-type switch with
a push button in the center and controls the
volume and mode of the sound system. Pushing
the top of the rocker switch will increase the
volume, and pushing the bottom of the rocker
switch will decrease the volume.
Pushing the right-hand control’s center button will
make the radio switch between the various modes
available (AM/FM/SXM or Media, etc.).
The left-hand control is a rocker-type switch with a
push button in the center. The function of the
left-hand control is different depending on which
mode you are in.
The following describes the left-hand control
operation in each mode:
Radio Operation
Pushing the top of the switch will seek up for the
next available station and pushing the bottom of
the switch will seek down for the next available
station.
The button located in the center of the left-hand
control will tune to the next preset station that you
have programmed in the radio presets.
Media Mode
Pushing the top of the switch skips to the next
track on the selected media (AUX/USB/
Bluetooth®). Pushing the switch up twice will go
forward two tracks. Pushing the bottom switch
5
23_JT_OM_EN_USC_t.book Page 233
Page 243 of 448
MULTIMEDIA241
Audio Setting Description
Balance/FadePress the Balance/Fade button on the touchscreen to balance audio between
the front speakers or fade the audio between the rear and front speakers.
Press the Front, Rear, Left or Right button or press and drag the red Speaker
icon to adjust the Balance/Fade.
Equalizer Press the + or - button or press and drag the level bar to increase or decrease
each of the equalizer bands. The level value, which spans between plus or
minus nine, is displayed at the top of each of the bands.
Speed Adjusted Volume The Speed Adjusted Volume is adjusted by selecting from “Off”, “1”, “2”, and
“3”. This alters the automatic adjustment of the audio volume with variation
to vehicle speed. Volume increases automatically as speed increases to
compensate for normal road noise.
Surround Sound When Surround Sound is on, you can hear audio coming from every direction
as in a movie theatre or home theatre system.
Loudness When Loudness is on, the sound quality at lower volumes improves.
AUX Volume Offset The AUX Volume Offset is adjusted by pressing + and - buttons. This alters the
AUX input audio volume. The level value, which spans between plus or minus
three, is displayed above the adjustment bar.
Auto Play The Auto Play feature begins playing music as soon as a USB Media device is
connected to one of the vehicle’s Media USB ports, when it is turned on. Press
“Off” to turn the setting off.
Radio Off With Door The Radio Off With Door feature, when activated, keeps the radio on until the
driver or passenger door is opened or until the “Radio Off Delay” selected
time has expired.
5
23_JT_OM_EN_USC_t.book Page 241
Page 244 of 448
242MULTIMEDIA
MEDIA MODE
Operating Media Mode
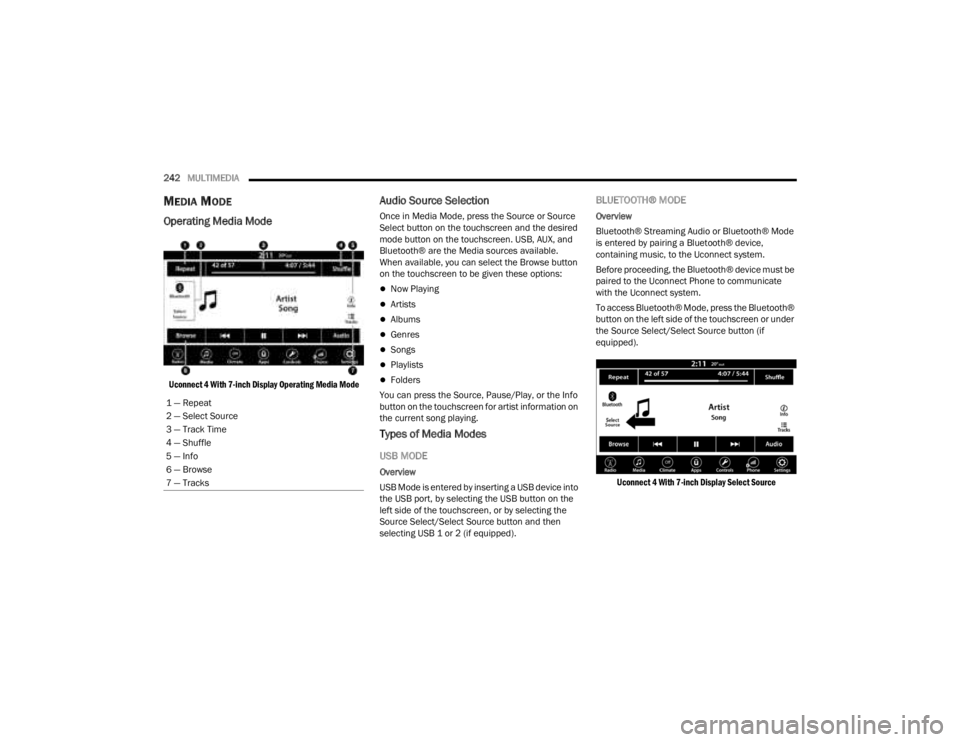
Uconnect 4 With 7-inch Display Operating Media Mode
Audio Source Selection
Once in Media Mode, press the Source or Source
Select button on the touchscreen and the desired
mode button on the touchscreen. USB, AUX, and
Bluetooth® are the Media sources available.
When available, you can select the Browse button
on the touchscreen to be given these options:
Now Playing
Artists
Albums
Genres
Songs
Playlists
Folders
You can press the Source, Pause/Play, or the Info
button on the touchscreen for artist information on
the current song playing.
Types of Media Modes
USB MODE
Overview
USB Mode is entered by inserting a USB device into
the USB port, by selecting the USB button on the
left side of the touchscreen, or by selecting the
Source Select/Select Source button and then
selecting USB 1 or 2 (if equipped).
BLUETOOTH® MODE
Overview
Bluetooth® Streaming Audio or Bluetooth® Mode
is entered by pairing a Bluetooth® device,
containing music, to the Uconnect system.
Before proceeding, the Bluetooth® device must be
paired to the Uconnect Phone to communicate
with the Uconnect system.
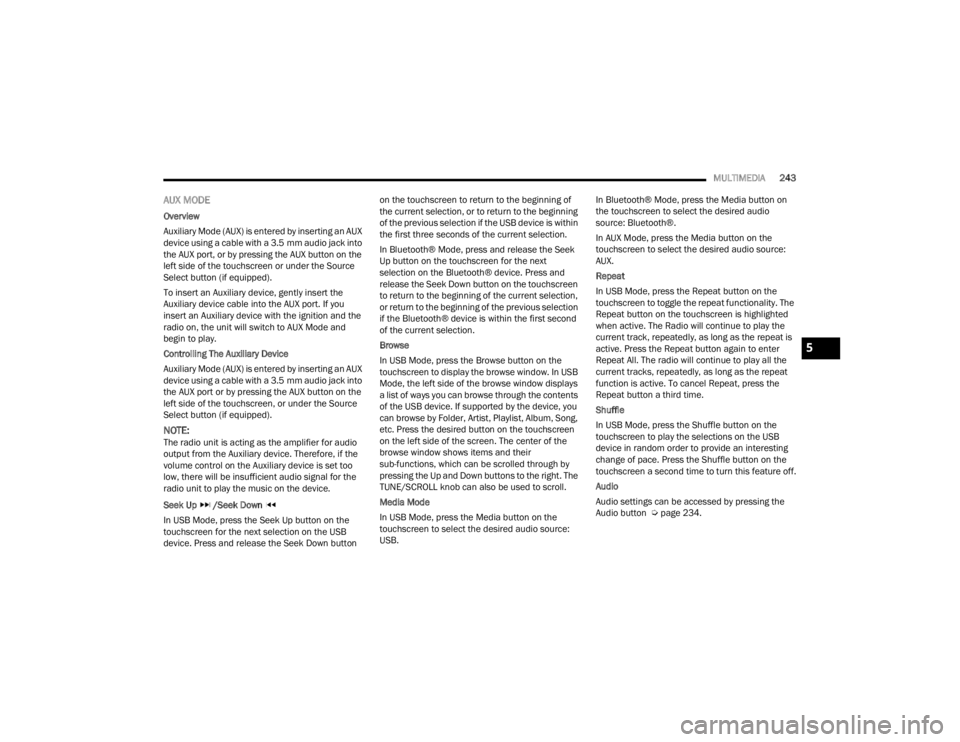
To access Bluetooth® Mode, press the Bluetooth®
button on the left side of the touchscreen or under
the Source Select/Select Source button (if
equipped).
Uconnect 4 With 7-inch Display Select Source
1 — Repeat
2 — Select Source
3 — Track Time
4 — Shuffle
5 — Info
6 — Browse
7 — Tracks
23_JT_OM_EN_USC_t.book Page 242
Page 245 of 448
MULTIMEDIA243
AUX MODE
Overview
Auxiliary Mode (AUX) is entered by inserting an AUX
device using a cable with a 3.5 mm audio jack into
the AUX port, or by pressing the AUX button on the
left side of the touchscreen or under the Source
Select button (if equipped).
To insert an Auxiliary device, gently insert the
Auxiliary device cable into the AUX port. If you
insert an Auxiliary device with the ignition and the
radio on, the unit will switch to AUX Mode and
begin to play.
Controlling The Auxiliary Device
Auxiliary Mode (AUX) is entered by inserting an AUX
device using a cable with a 3.5 mm audio jack into
the AUX port or by pressing the AUX button on the
left side of the touchscreen, or under the Source
Select button (if equipped).
NOTE:The radio unit is acting as the amplifier for audio
output from the Auxiliary device. Therefore, if the
volume control on the Auxiliary device is set too
low, there will be insufficient audio signal for the
radio unit to play the music on the device.
Seek Up /Seek Down
In USB Mode, press the Seek Up button on the
touchscreen for the next selection on the USB
device. Press and release the Seek Down button on the touchscreen to return to the beginning of
the current selection, or to return to the beginning
of the previous selection if the USB device is within
the first three seconds of the current selection.
In Bluetooth® Mode, press and release the Seek
Up button on the touchscreen for the next
selection on the Bluetooth® device. Press and
release the Seek Down button on the touchscreen
to return to the beginning of the current selection,
or return to the beginning of the previous selection
if the Bluetooth® device is within the first second
of the current selection.
Browse
In USB Mode, press the Browse button on the
touchscreen to display the browse window. In USB
Mode, the left side of the browse window displays
a list of ways you can browse through the contents
of the USB device. If supported by the device, you
can browse by Folder, Artist, Playlist, Album, Song,
etc. Press the desired button on the touchscreen
on the left side of the screen. The center of the
browse window shows items and their
sub-functions, which can be scrolled through by
pressing the Up and Down buttons to the right. The
TUNE/SCROLL knob can also be used to scroll.
Media Mode
In USB Mode, press the Media button on the
touchscreen to select the desired audio source:
USB.
In Bluetooth® Mode, press the Media button on
the touchscreen to select the desired audio
source: Bluetooth®.
In AUX Mode, press the Media button on the
touchscreen to select the desired audio source:
AUX.
Repeat
In USB Mode, press the Repeat button on the
touchscreen to toggle the repeat functionality. The
Repeat button on the touchscreen is highlighted
when active. The Radio will continue to play the
current track, repeatedly, as long as the repeat is
active. Press the Repeat button again to enter
Repeat All. The radio will continue to play all the
current tracks, repeatedly, as long as the repeat
function is active. To cancel Repeat, press the
Repeat button a third time.
Shuffle
In USB Mode, press the Shuffle button on the
touchscreen to play the selections on the USB
device in random order to provide an interesting
change of pace. Press the Shuffle button on the
touchscreen a second time to turn this feature off.
Audio
Audio settings can be accessed by pressing the
Audio button Ú
page 234.
5
23_JT_OM_EN_USC_t.book Page 243