bluetooth JEEP GLADIATOR 2023 Owners Manual
[x] Cancel search | Manufacturer: JEEP, Model Year: 2023, Model line: GLADIATOR, Model: JEEP GLADIATOR 2023Pages: 448, PDF Size: 17.37 MB
Page 74 of 448
72GETTING TO KNOW YOUR VEHICLE
Depending on your vehicle’s specifications, the USB
port may contain playback capabilities and will allow
you to play music from your smartphone device or
USB devices through your vehicle’s sound system.
A third and fourth USB port are located behind the
center console, above the power inverter. Both
ports are charge only.
USB (Charge Only) On The Back Of The Center Console
When a new device or smartphone is plugged into
the USB ports, the following message will display
depending on the device being utilized:
“A new device is now connected. Previous
connection was lost”.
“(Phone Name) now connected. Previous
connection was lost”.
“Another device is in use through the same USB
port. Please disconnect the first device to use
the second device”.
NOTE:Charge unsupported devices with the Charge Only
USB ports. If an unsupported device is plugged into
a Media USB port, a message will display on the
touchscreen that the device is not supported by
the system.
JEEP® WIRELESS SPEAKER —
I
F EQUIPPED
Your vehicle may be equipped with a wireless
Bluetooth® speaker.
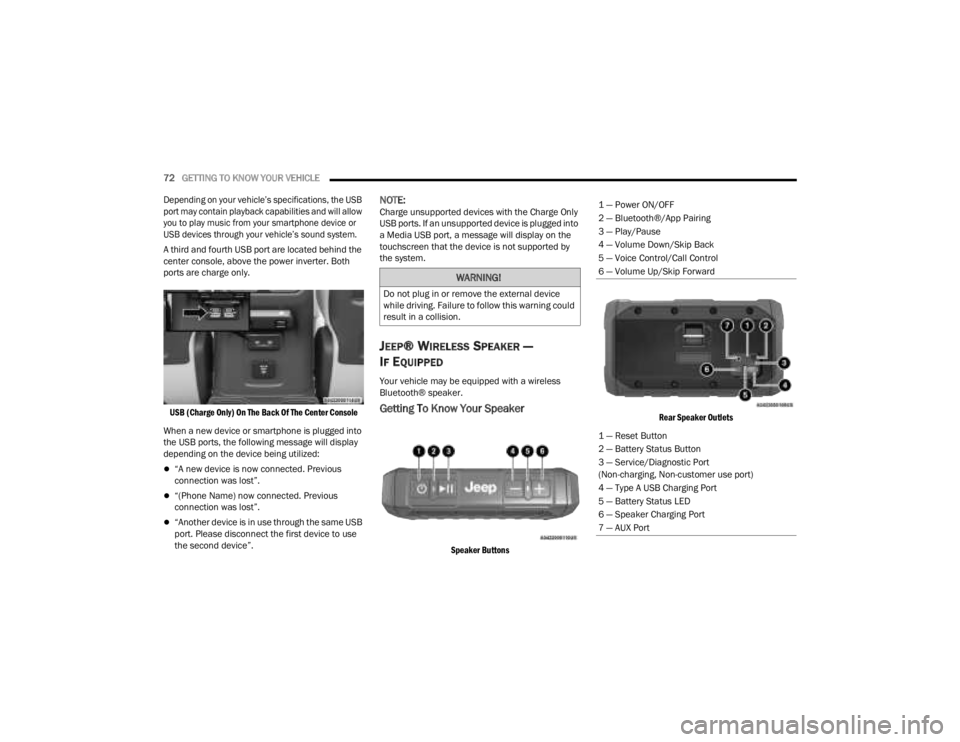
Getting To Know Your Speaker
Speaker Buttons Rear Speaker Outlets
WARNING!
Do not plug in or remove the external device
while driving. Failure to follow this warning could
result in a collision.
1 — Power ON/OFF
2 — Bluetooth®/App Pairing
3 — Play/Pause
4 — Volume Down/Skip Back
5 — Voice Control/Call Control
6 — Volume Up/Skip Forward
1 — Reset Button
2 — Battery Status Button
3 — Service/Diagnostic Port
(Non-charging, Non-customer use port)
4 — Type A USB Charging Port
5 — Battery Status LED
6 — Speaker Charging Port
7 — AUX Port
23_JT_OM_EN_USC_t.book Page 72
Page 77 of 448
GETTING TO KNOW YOUR VEHICLE75
Phone & Bluetooth® Pairing
A feature of the Jeep® wireless speaker is the
ability for the Jeep® wireless speaker to connect to
devices using Bluetooth®. Follow these simple
steps to connect a Bluetooth®-enabled device to
the Jeep® wireless speaker:
1. Press and hold the power button for 2-3 sec-
onds to turn the Jeep® wireless speaker on.
2. Turn “on” Bluetooth® for the device you desire to be connected to the Jeep® wireless
speaker. For instructions on how to turn on
and off Bluetooth® settings for the desired
device, refer to the device’s user manual.
3. When powered on, the Jeep® wireless speaker will automatically enter pairing mode.
To pair a second device, press and hold the
Bluetooth® button for 2-3 seconds, until an
audio cue is heard. Then go to the devices’
Bluetooth® settings and select “Jeep®
Speaker” from the list.
The Jeep® wireless speaker will remember the last
eight devices it has paired with.
NOTE:If the Jeep® wireless speaker is left on with an
inactive Bluetooth® connection for 30 minutes, it
will automatically turn off. The Jeep® wireless
speaker can be turned on again by pressing and
holding the power button for 2-3 seconds.
Resetting Your Jeep® Wireless Speaker
To reset the Jeep® wireless speaker to its original
factory setting, press and hold the reset button
under the back cover for 8-10 seconds.
Speakerphone
The speakerphone feature can be used by
pressing the “Voice Control” button on the Jeep®
wireless speaker. This feature can be used to
answer and end calls over the speakerphone.
Volume And Playback Control
Volume can be increased or decreased by briefly
pressing the + button or - button. When the
maximum volume is reached, an audio cue will
sound.
To skip to the next track, press and hold the
+ button. To go to the previous track, press the
- button.
Qualcomm TrueWireless™ Stereo
A feature of the Jeep® wireless speaker is being
able to pair two Jeep® wireless speakers together
for Qualcomm TrueWireless™ Stereo. This feature
allows for two Jeep® wireless speakers to play left
and right stereo sound. Below are the steps needed for Qualcomm
TrueWireless™ Stereo:
1. Push and hold the power button on both
Jeep® wireless speakers until both speakers
turn on.
2. Place both speakers into Qualcomm TrueWireless™ Stereo pairing mode. This can
be achieved by pressing and holding the
Battery Status button on both speakers until
an audio notification is heard from both
speakers.
3. Connect one of the Jeep® wireless speakers to the Bluetooth® source. Refer to previous
section “Phone & Bluetooth® Pairing” for
additional information.
4. Once the Jeep® wireless speaker is connected to the Bluetooth® device, audio will be played
from both speakers.
NOTE:While in Qualcomm TrueWireless™ Stereo mode,
the volume will not have independent speaker
control. Pushing the Up or Down Volume button on
either Jeep® wireless speaker will affect the audio
output on both, as well as volume adjustments on
the Bluetooth® device.
2
23_JT_OM_EN_USC_t.book Page 75
Page 78 of 448
76GETTING TO KNOW YOUR VEHICLE
Waterproof Features
The Jeep® wireless speaker is IP67 waterproof
certified with design in mind to withstand rainfall,
waterjets, splashing and being submerged in up to
3 ft (1 m) of water for up to 30 minutes.
Warnings, Caution & Legal Information
To reduce the risk of fire or electric shock, do not
expose the Jeep® wireless speaker to rain or
moisture while charging. The Jeep® wireless
speaker should not be exposed to dripping or
splashing, and objects filled with liquids, such as
vases, should not be placed on or near it while
being charged or charging other devices. As with
any electronic products, use care not to spill liquids
into any part of the product. Liquids can cause a
failure and/or a fire hazard. The power supply must
be used indoors only. Make no modifications to the
product or accessories. Unauthorized alterations
may compromise safety, regulatory compliance,
and system performance, and will void the
warranty. Do not place any flame sources, such as
lighted candles, on or near the Jeep® wireless speaker. The Jeep® wireless speaker contains
small parts that may be a choking hazard and is
not suitable for children under age 3. Do not
continue charging the battery if it does not reach
full charge within the specified charging time.
Overcharging may cause the battery to become
hot, rupture, or ignite. If you see any heat
deformation or leakage, properly dispose of the
battery. Do not attempt to charge the battery in
temperatures outside the range of 32°- 104°F
(0° - 40°C). If the battery begins to leak, do not
allow the liquid to come in contact with your skin or
eyes. If contact has been made, wash the affected
area with plenty of water and seek medical
attention immediately. Do not expose the Jeep®
wireless speaker or battery to excessive heat,
including direct sunlight or fire. Do not store or use
inside cars in hot weather, where it can be exposed
to temperatures in excess of 115°F (60°C). Doing
so may cause the battery and power supply to
generate heat, rupture, or ignite. Using the Jeep®
wireless speaker in this manner also may result in
a loss of performance and a shortened life
expectancy. Extended exposure to direct sunlight
may damage the external appearance and
material qualities. Do not step on, throw, or drop
batteries or the power supply or device, or expose
them to a strong shock. Do not pierce, crush, dent,
or deform the batteries or power supply in any way.
If either becomes deformed, properly dispose of it.
Do not short-circuit batteries. Do not attempt to service the Jeep® wireless speaker yourself.
Opening or removing covers may expose you to
dangerous voltages or other hazards and will void
the manufacturer’s warranty. To prevent risk of fire
or electric shock, avoid overloading wall outlets,
extension cords, or integral convenience
receptacles. Your Bluetooth® device (mobile
phone, music player, tablet, laptop, etc.) must
support the A2DP Bluetooth® profile in order to
work wirelessly with your Jeep® wireless speaker.
The A2DP profile is supported by most recent
mobile products with built-in Bluetooth®
capability. Please refer to your device’s user
manual for details and instruction regarding the
Bluetooth® profiles it supports. This device
complies with part 15 of the FCC Rules. Operation
is subject to the following two conditions: (1) This
device may not cause harmful interference, and
(2) this device must accept any interference
received, including interference that may cause
undesired operation.
Jeep® follows Safety Instruction for CE- LV. Do not
operate products in temperatures outside the
range of -5 to 40°C. Operating Frequency Band:
2402 MHz to 2480 MHz. Maximum RF power:
6 dBm EIRP. Do not install this equipment in a
confined space or building, such as a bookcase or
similar unit that is not well-ventilated. The
ventilation should not be impeded by covering the
ventilation openings with items such as
newspaper, tablecloths, curtains etc.
WARNING!
Any modifications or alterations to this vehicle
could seriously affect its roadworthiness and
safety and may lead to a collision resulting in
serious injury or death.
23_JT_OM_EN_USC_t.book Page 76
Page 79 of 448
GETTING TO KNOW YOUR VEHICLE77
NOTE:Please refer to the information on the bottom of
the Jeep® wireless speaker for electrical and
safety information before installing or operating
the Jeep® wireless speaker. Directive 2014/53/EU Article 10 Obligations of
Manufacturers
2. Manufacturers shall ensure that radio
equipment shall be so constructed that it can be
operated in at least one Member State without
infringing applicable requirements on the use of
radio spectrum.
10. In cases of restrictions on putting in to service
or of requirements for authorization of use,
information available on the packaging shall allow
the identification of the Member States or the
geographical area within a Member State where
restrictions on putting into service or requirements
for authorization of use exist. The Commission may
adopt implementing acts specifying how to present
that information. Those implementing acts shall be
adopted in accordance with the advisory
procedure referred to in Article 45 (2).
The Bluetooth® word mark and logos are
registered trademarks owned by Bluetooth SIG,
Inc. and any use of such marks by FCA US LLC is
under license. Other trademarks and trade names
are those of their respective owners.
POWER OUTLETS
There is a 12 Volt (13 A) auxiliary power outlet that
can provide power for accessories designed for
use with the standard power outlet adapters.
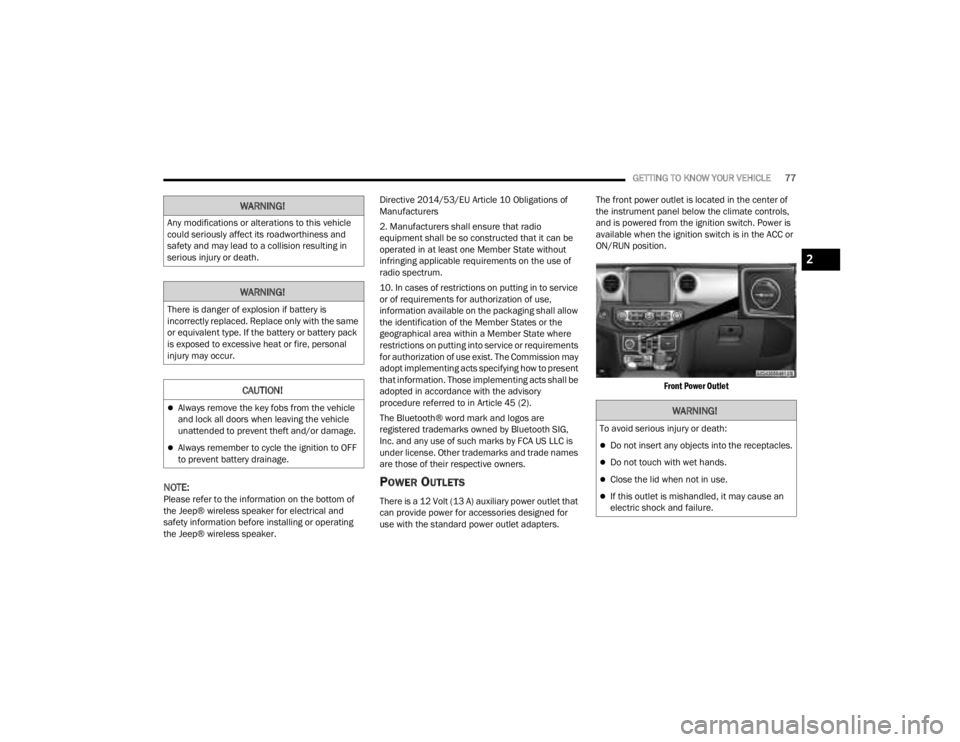
The front power outlet is located in the center of
the instrument panel below the climate controls,
and is powered from the ignition switch. Power is
available when the ignition switch is in the ACC or
ON/RUN position.
Front Power Outlet
WARNING!
Any modifications or alterations to this vehicle
could seriously affect its roadworthiness and
safety and may lead to a collision resulting in
serious injury or death.
WARNING!
There is danger of explosion if battery is
incorrectly replaced. Replace only with the same
or equivalent type. If the battery or battery pack
is exposed to excessive heat or fire, personal
injury may occur.
CAUTION!
Always remove the key fobs from the vehicle
and lock all doors when leaving the vehicle
unattended to prevent theft and/or damage.
Always remember to cycle the ignition to OFF
to prevent battery drainage.
WARNING!
To avoid serious injury or death:
Do not insert any objects into the receptacles.
Do not touch with wet hands.
Close the lid when not in use.
If this outlet is mishandled, it may cause an
electric shock and failure.
2
23_JT_OM_EN_USC_t.book Page 77
Page 229 of 448
MULTIMEDIA227
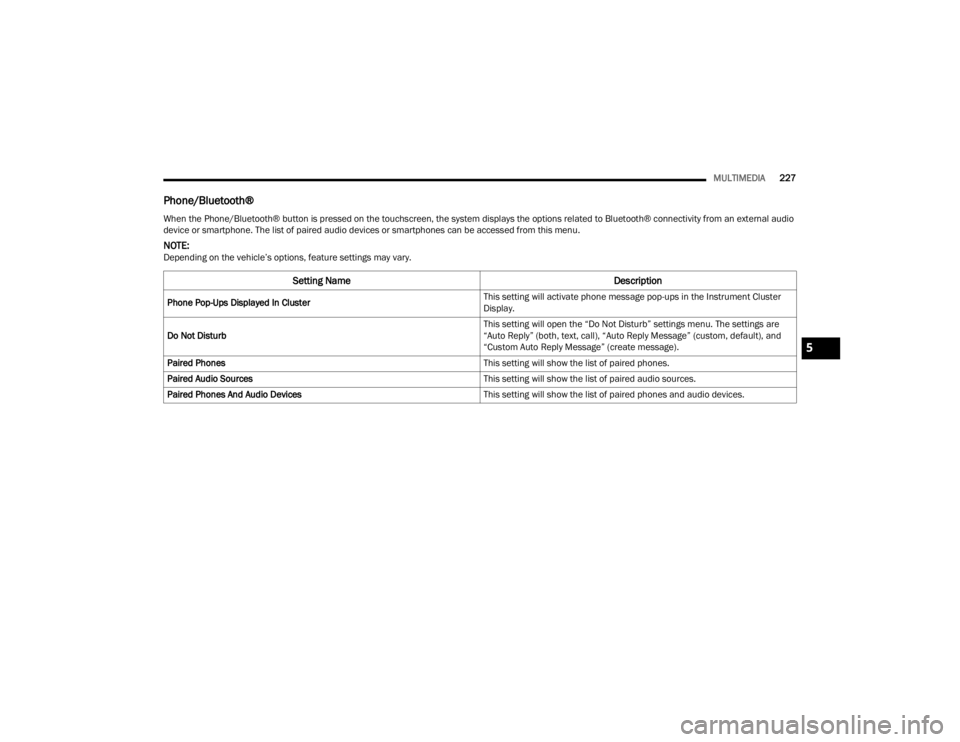
Phone/Bluetooth®
When the Phone/Bluetooth® button is pressed on the touchscreen, the system displays the options related to Bluetooth® connectivity from an external audio
device or smartphone. The list of paired audio devices or smartphones can be accessed from this menu.
NOTE:Depending on the vehicle’s options, feature settings may vary.
Setting Name Description
Phone Pop-Ups Displayed In Cluster This setting will activate phone message pop-ups in the Instrument Cluster
Display.
Do Not Disturb This setting will open the “Do Not Disturb” settings menu. The settings are
“Auto Reply” (both, text, call), “Auto Reply Message” (custom, default), and
“Custom Auto Reply Message” (create message).
Paired Phones This setting will show the list of paired phones.
Paired Audio Sources This setting will show the list of paired audio sources.
Paired Phones And Audio Devices This setting will show the list of paired phones and audio devices.
5
23_JT_OM_EN_USC_t.book Page 227
Page 230 of 448
228MULTIMEDIA
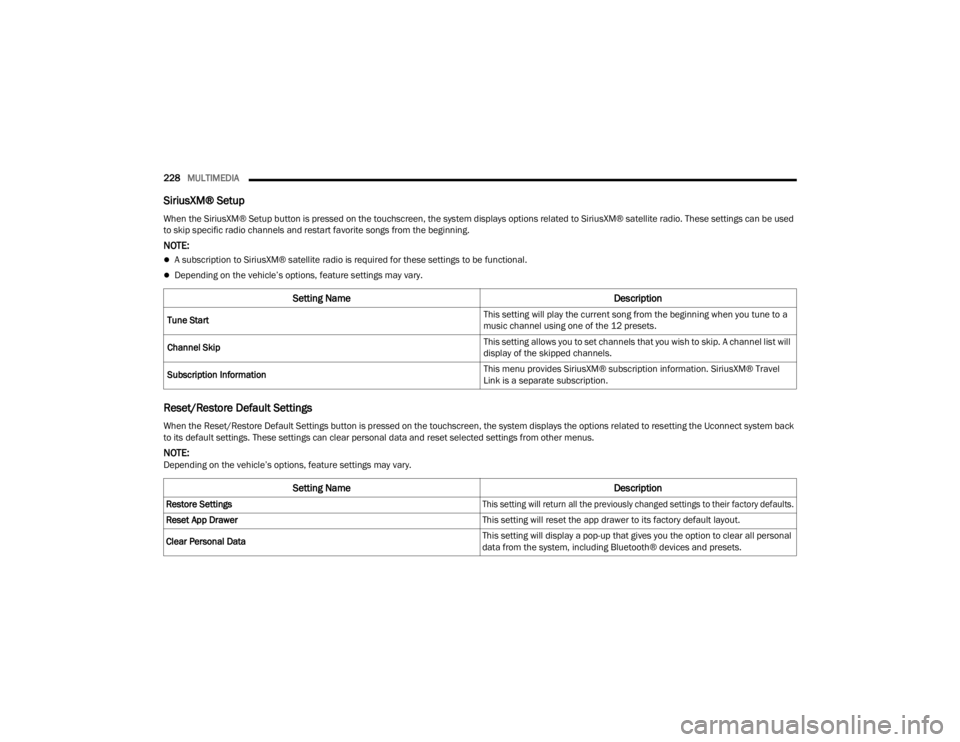
SiriusXM® Setup
Reset/Restore Default Settings
When the SiriusXM® Setup button is pressed on the touchscreen, the system displays options related to SiriusXM® satellite radio. These settings can be used
to skip specific radio channels and restart favorite songs from the beginning.
NOTE:
A subscription to SiriusXM® satellite radio is required for these settings to be functional.
Depending on the vehicle’s options, feature settings may vary.
Setting Name Description
Tune Start This setting will play the current song from the beginning when you tune to a
music channel using one of the 12 presets.
Channel Skip This setting allows you to set channels that you wish to skip. A channel list will
display of the skipped channels.
Subscription Information This menu provides SiriusXM® subscription information. SiriusXM® Travel
Link is a separate subscription.
When the Reset/Restore Default Settings button is pressed on the touchscreen, the system displays the options related to resetting the Uconnect system back
to its default settings. These settings can clear personal data and reset selected settings from other menus.
NOTE:Depending on the vehicle’s options, feature settings may vary.
Setting Name
Description
Restore Settings
This setting will return all the previously changed settings to their factory defaults.
Reset App Drawer This setting will reset the app drawer to its factory default layout.
Clear Personal Data This setting will display a pop-up that gives you the option to clear all personal
data from the system, including Bluetooth® devices and presets.
23_JT_OM_EN_USC_t.book Page 228
Page 231 of 448
MULTIMEDIA229
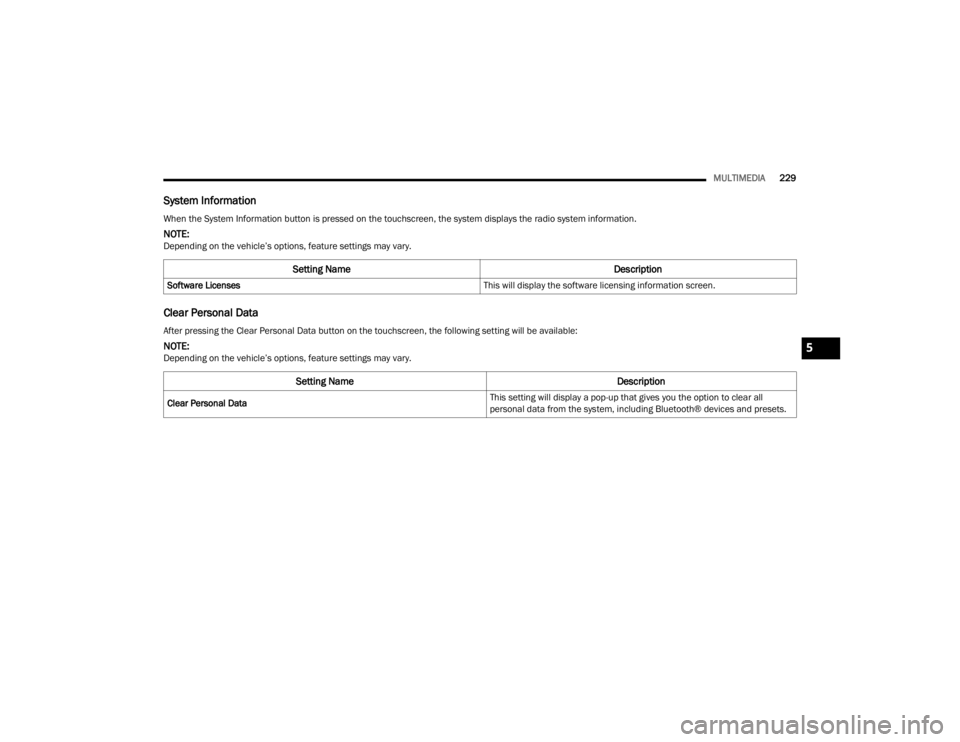
System Information
Clear Personal Data
When the System Information button is pressed on the touchscreen, the system displays the radio system information.
NOTE:Depending on the vehicle’s options, feature settings may vary.
Setting Name Description
Software Licenses This will display the software licensing information screen.
After pressing the Clear Personal Data button on the touchscreen, the following setting will be available:
NOTE:Depending on the vehicle’s options, feature settings may vary.
Setting NameDescription
Clear Personal Data This setting will display a pop-up that gives you the option to clear all
personal data from the system, including Bluetooth® devices and presets.
5
23_JT_OM_EN_USC_t.book Page 229
Page 235 of 448
MULTIMEDIA233
Stop use immediately if a problem occurs.
Failure to do so may cause injury or damage to
the product. See an authorized dealer for repair.
Ensure the volume level of the system is set to a
level that still allows you to hear outside traffic
and emergency vehicles.
Safe Usage Of The Uconnect System
The Uconnect system is a sophisticated elec -
tronic device. Do not let young children use the
system.
Permanent hearing loss may occur if you play
your music or sound system at loud volumes.
Exercise caution when setting the volume on the
system.
Keep drinks, rain and other sources of moisture
away from the system. Besides damage to the
system, moisture can cause electric shocks as
with any electronic device.
NOTE:Many features of this system are speed
dependent. For your own safety, it is not possible to
use some of the touchscreen features while the
vehicle is in motion.
Care And Maintenance
Do not press the touchscreen with any hard or
sharp objects (pen, USB stick, jewelry, etc.),
which could scratch the surface.
Do not spray any liquid or chemicals directly on
the screen! Use a clean and dry microfiber lens
cleaning cloth in order to clean the touchscreen.
If necessary, use a lint-free cloth dampened
with a cleaning solution, such as isopropyl
alcohol or an isopropyl alcohol and water solu -
tion ratio of 50:50. Be sure to follow the solvent
manufacturer's precautions and directions
Ú page 432.
UCONNECT MODES
STEERING WHEEL AUDIO CONTROLS
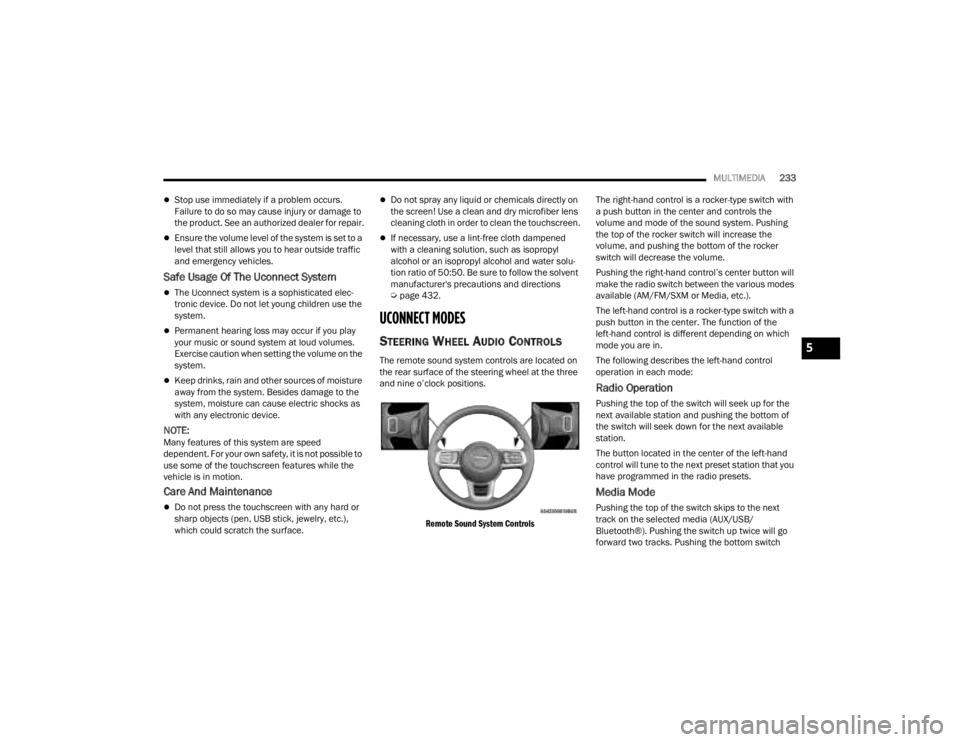
The remote sound system controls are located on
the rear surface of the steering wheel at the three
and nine o’clock positions.
Remote Sound System Controls
The right-hand control is a rocker-type switch with
a push button in the center and controls the
volume and mode of the sound system. Pushing
the top of the rocker switch will increase the
volume, and pushing the bottom of the rocker
switch will decrease the volume.
Pushing the right-hand control’s center button will
make the radio switch between the various modes
available (AM/FM/SXM or Media, etc.).
The left-hand control is a rocker-type switch with a
push button in the center. The function of the
left-hand control is different depending on which
mode you are in.
The following describes the left-hand control
operation in each mode:
Radio Operation
Pushing the top of the switch will seek up for the
next available station and pushing the bottom of
the switch will seek down for the next available
station.
The button located in the center of the left-hand
control will tune to the next preset station that you
have programmed in the radio presets.
Media Mode
Pushing the top of the switch skips to the next
track on the selected media (AUX/USB/
Bluetooth®). Pushing the switch up twice will go
forward two tracks. Pushing the bottom switch
5
23_JT_OM_EN_USC_t.book Page 233
Page 244 of 448
242MULTIMEDIA
MEDIA MODE
Operating Media Mode
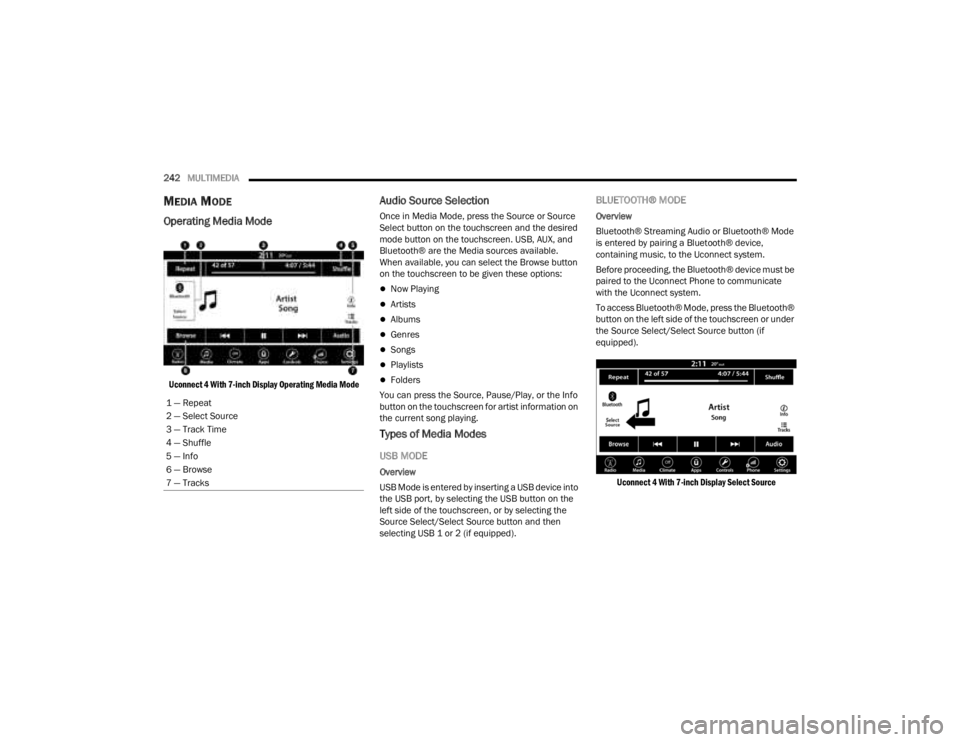
Uconnect 4 With 7-inch Display Operating Media Mode
Audio Source Selection
Once in Media Mode, press the Source or Source
Select button on the touchscreen and the desired
mode button on the touchscreen. USB, AUX, and
Bluetooth® are the Media sources available.
When available, you can select the Browse button
on the touchscreen to be given these options:
Now Playing
Artists
Albums
Genres
Songs
Playlists
Folders
You can press the Source, Pause/Play, or the Info
button on the touchscreen for artist information on
the current song playing.
Types of Media Modes
USB MODE
Overview
USB Mode is entered by inserting a USB device into
the USB port, by selecting the USB button on the
left side of the touchscreen, or by selecting the
Source Select/Select Source button and then
selecting USB 1 or 2 (if equipped).
BLUETOOTH® MODE
Overview
Bluetooth® Streaming Audio or Bluetooth® Mode
is entered by pairing a Bluetooth® device,
containing music, to the Uconnect system.
Before proceeding, the Bluetooth® device must be
paired to the Uconnect Phone to communicate
with the Uconnect system.
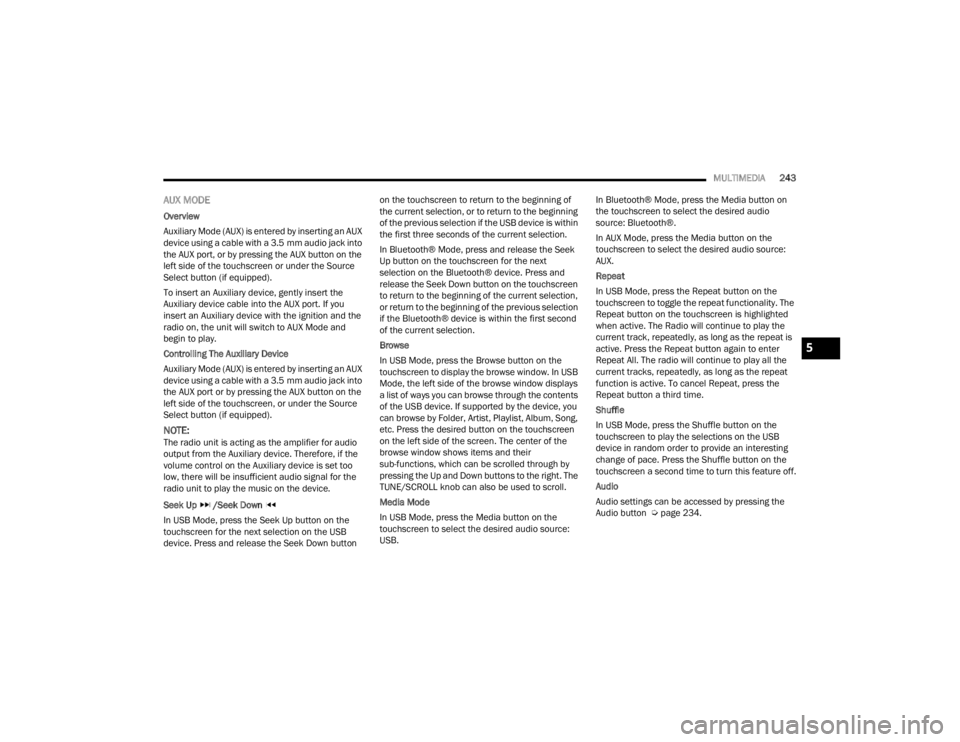
To access Bluetooth® Mode, press the Bluetooth®
button on the left side of the touchscreen or under
the Source Select/Select Source button (if
equipped).
Uconnect 4 With 7-inch Display Select Source
1 — Repeat
2 — Select Source
3 — Track Time
4 — Shuffle
5 — Info
6 — Browse
7 — Tracks
23_JT_OM_EN_USC_t.book Page 242
Page 245 of 448
MULTIMEDIA243
AUX MODE
Overview
Auxiliary Mode (AUX) is entered by inserting an AUX
device using a cable with a 3.5 mm audio jack into
the AUX port, or by pressing the AUX button on the
left side of the touchscreen or under the Source
Select button (if equipped).
To insert an Auxiliary device, gently insert the
Auxiliary device cable into the AUX port. If you
insert an Auxiliary device with the ignition and the
radio on, the unit will switch to AUX Mode and
begin to play.
Controlling The Auxiliary Device
Auxiliary Mode (AUX) is entered by inserting an AUX
device using a cable with a 3.5 mm audio jack into
the AUX port or by pressing the AUX button on the
left side of the touchscreen, or under the Source
Select button (if equipped).
NOTE:The radio unit is acting as the amplifier for audio
output from the Auxiliary device. Therefore, if the
volume control on the Auxiliary device is set too
low, there will be insufficient audio signal for the
radio unit to play the music on the device.
Seek Up /Seek Down
In USB Mode, press the Seek Up button on the
touchscreen for the next selection on the USB
device. Press and release the Seek Down button on the touchscreen to return to the beginning of
the current selection, or to return to the beginning
of the previous selection if the USB device is within
the first three seconds of the current selection.
In Bluetooth® Mode, press and release the Seek
Up button on the touchscreen for the next
selection on the Bluetooth® device. Press and
release the Seek Down button on the touchscreen
to return to the beginning of the current selection,
or return to the beginning of the previous selection
if the Bluetooth® device is within the first second
of the current selection.
Browse
In USB Mode, press the Browse button on the
touchscreen to display the browse window. In USB
Mode, the left side of the browse window displays
a list of ways you can browse through the contents
of the USB device. If supported by the device, you
can browse by Folder, Artist, Playlist, Album, Song,
etc. Press the desired button on the touchscreen
on the left side of the screen. The center of the
browse window shows items and their
sub-functions, which can be scrolled through by
pressing the Up and Down buttons to the right. The
TUNE/SCROLL knob can also be used to scroll.
Media Mode
In USB Mode, press the Media button on the
touchscreen to select the desired audio source:
USB.
In Bluetooth® Mode, press the Media button on
the touchscreen to select the desired audio
source: Bluetooth®.
In AUX Mode, press the Media button on the
touchscreen to select the desired audio source:
AUX.
Repeat
In USB Mode, press the Repeat button on the
touchscreen to toggle the repeat functionality. The
Repeat button on the touchscreen is highlighted
when active. The Radio will continue to play the
current track, repeatedly, as long as the repeat is
active. Press the Repeat button again to enter
Repeat All. The radio will continue to play all the
current tracks, repeatedly, as long as the repeat
function is active. To cancel Repeat, press the
Repeat button a third time.
Shuffle
In USB Mode, press the Shuffle button on the
touchscreen to play the selections on the USB
device in random order to provide an interesting
change of pace. Press the Shuffle button on the
touchscreen a second time to turn this feature off.
Audio
Audio settings can be accessed by pressing the
Audio button Ú
page 234.
5
23_JT_OM_EN_USC_t.book Page 243