fog light JEEP GLADIATOR 2023 Owners Manual
[x] Cancel search | Manufacturer: JEEP, Model Year: 2023, Model line: GLADIATOR, Model: JEEP GLADIATOR 2023Pages: 448, PDF Size: 17.37 MB
Page 5 of 448
3
EXTERIOR LIGHTS.................................................. 56 Headlight Switch...............................................56
Daytime Running Lights (DRLs) —
If Equipped .......................................................57
High/Low Beam Switch....................................57
Automatic High Beam Headlamp Control —
If Equipped .......................................................58
Flash-To-Pass....................................................58
Automatic Headlights — If Equipped ..............58
Lights-On Reminder..........................................58
Front Fog Lights — If Equipped .......................58
Turn Signals ......................................................59
Lane Change Assist — If Equipped ..................59
Bed Lights — If Equipped ................................59
INTERIOR LIGHTS ................................................. 59
Interior Courtesy Lights ....................................59
Dimmer Control ................................................60
WINDSHIELD WIPERS AND WASHERS .............. 60
Windshield Wiper Operation ............................60
CLIMATE CONTROLS ............................................. 61
Automatic Climate Control Descriptions And
Functions ..........................................................62
Manual Climate Control Descriptions And
Functions ..........................................................64
Automatic Temperature Control (ATC) —
If Equipped........................................................67
Climate Voice Commands................................67
Operating Tips .................................................67 INTERIOR STORAGE AND EQUIPMENT ............... 68
Storage..............................................................68
Lighted Cupholders — If Equipped ..................71
AUX/USB Control ..............................................71
Jeep® Wireless Speaker —
If Equipped........................................................72
Power Outlets ..................................................77
Power Inverters — If Equipped ........................78
Auxiliary Switches — If Equipped ....................79
POWER WINDOWS — IF EQUIPPED .....................81
Auto-Down Feature .........................................81
Manual Sliding Rear Window —
If Equipped........................................................81
Window Lockout Switch ...................................82
Wind Buffeting .................................................82
GLADIATOR TOPS .................................................82
Provided Tools ..................................................82
Lowering The Soft Top
S
..............................83
Raising The Soft Top
S
.................................89
Removing The Soft Top
S
.............................92
Installing The Soft Top .....................................93
Hard Top Front Panel(s) Removal
S
............95
Hard Top Front Panel(s) Installation ..............98
Removing The Hard Top
S
...........................98
Installing The Hard Top ................................. 100
Sunrider® For Hard Top —
If Equipped..................................................... 101 DOOR FRAME — IF EQUIPPED WITH A
SOFT TOP ............................................................. 104
Door Frame Removal .................................... 104
Door Frame Installation ................................ 105
FOLDING WINDSHIELD ...................................... 106
Lowering The Windshield.............................. 106
Raising The Windshield ................................ 108
HOOD .................................................................... 109
Opening The Hood ........................................ 109
Closing The Hood .......................................... 109
TAILGATE .............................................................. 110
Opening.......................................................... 110Three-Position Tailgate ................................. 110
Closing ........................................................... 111
BED RAIL TIE DOWN SYSTEM —
IF EQUIPPED ........................................................ 111
TONNEAU COVER — IF EQUIPPED ..................... 112
Tonneau Cover Installation .......................... 112
Tonneau Cover Removal .............................. 114
ROOF LUGGAGE RACK — IF EQUIPPED ............ 115
GETTING TO KNOW YOUR
INSTRUMENT PANEL
GASOLINE INSTRUMENT CLUSTERS ................ 116
Instrument Cluster Descriptions
S
........... 118
DIESEL INSTRUMENT CLUSTERS ...................... 119
Instrument Cluster Descriptions .................. 121
23_JT_OM_EN_USC_t.book Page 3
Page 16 of 448
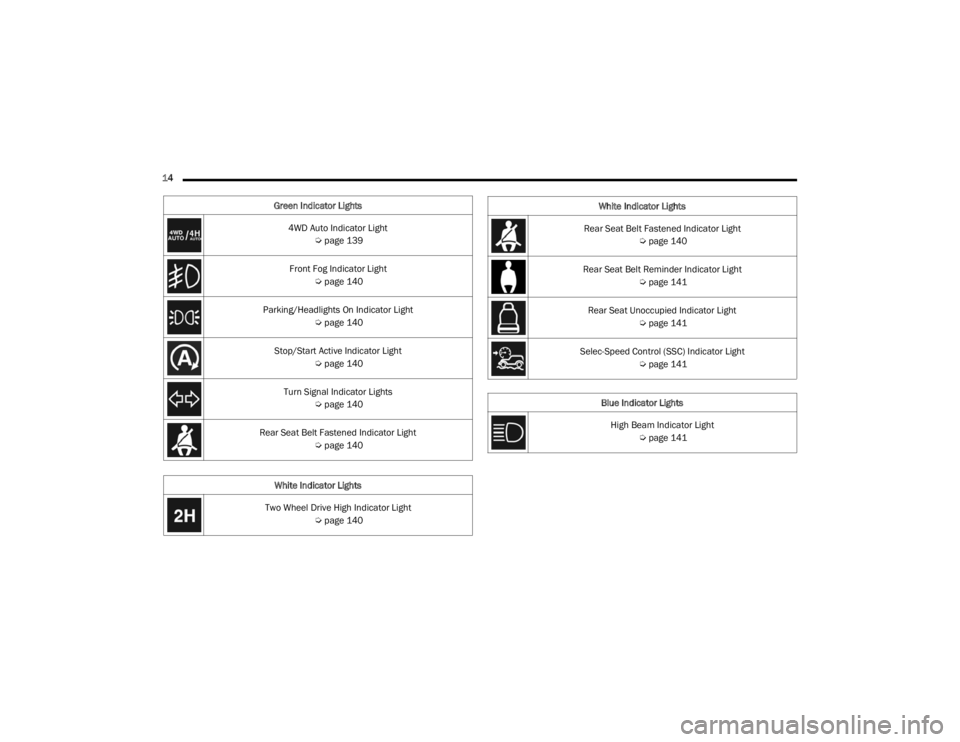
14 Green Indicator Lights4WD Auto Indicator Light Úpage 139
Front Fog Indicator Light Úpage 140
Parking/Headlights On Indicator Light Úpage 140
Stop/Start Active Indicator Light Úpage 140
Turn Signal Indicator Lights Úpage 140
Rear Seat Belt Fastened Indicator Light Úpage 140
White Indicator Lights
Two Wheel Drive High Indicator Light Úpage 140
Rear Seat Belt Fastened Indicator Light
Úpage 140
Rear Seat Belt Reminder Indicator Light Úpage 141
Rear Seat Unoccupied Indicator Light Úpage 141
Selec-Speed Control (SSC) Indicator Light Úpage 141
Blue Indicator Lights High Beam Indicator Light Úpage 141
White Indicator Lights
23_JT_OM_EN_USC_t.book Page 14
Page 58 of 448
56GETTING TO KNOW YOUR VEHICLE
SECURITY
It is advised to erase all channels before you sell or
turn in your vehicle.
To do this, push and hold the two outside buttons
for 20 seconds until the indicator flashes. Note
that all channels will be erased. Individual
channels cannot be erased.
The HomeLink® Universal Transceiver is disabled
when the Vehicle Security system is active.
NOTE:The universal garage door opener only operates
when the engine is running for security reasons
associated with removable tops and doors.
TROUBLESHOOTING TIPS
If you are having trouble programming
HomeLink®, here are some of the most common
solutions:
Replace the battery in the garage door opener
hand-held transmitter.
Push the LEARN button on the garage door
opener to complete the training for a rolling code.
Did you unplug the device for programming and
remember to plug it back in? If you have any problems, or require assistance,
please call toll-free 1-800-355-3515 or, on the
Internet at HomeLink.com for information or
assistance.
EXTERIOR LIGHTS
HEADLIGHT SWITCH
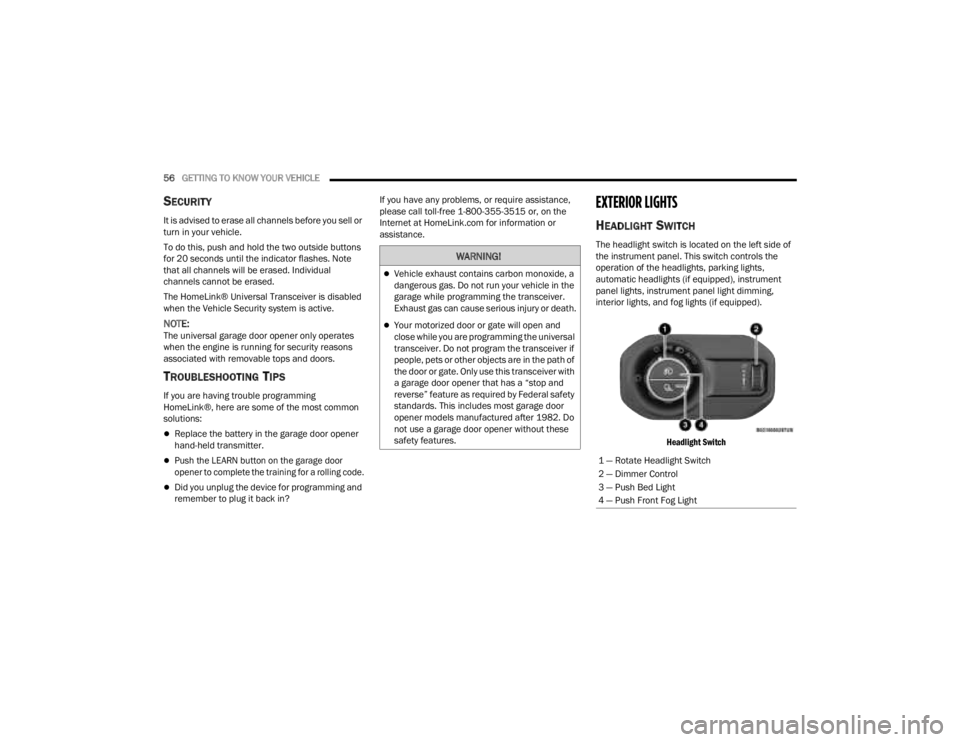
The headlight switch is located on the left side of
the instrument panel. This switch controls the
operation of the headlights, parking lights,
automatic headlights (if equipped), instrument
panel lights, instrument panel light dimming,
interior lights, and fog lights (if equipped).
Headlight Switch
WARNING!
Vehicle exhaust contains carbon monoxide, a
dangerous gas. Do not run your vehicle in the
garage while programming the transceiver.
Exhaust gas can cause serious injury or death.
Your motorized door or gate will open and
close while you are programming the universal
transceiver. Do not program the transceiver if
people, pets or other objects are in the path of
the door or gate. Only use this transceiver with
a garage door opener that has a “stop and
reverse” feature as required by Federal safety
standards. This includes most garage door
opener models manufactured after 1982. Do
not use a garage door opener without these
safety features.
1 — Rotate Headlight Switch
2 — Dimmer Control
3 — Push Bed Light
4 — Push Front Fog Light
23_JT_OM_EN_USC_t.book Page 56
Page 59 of 448
GETTING TO KNOW YOUR VEHICLE57
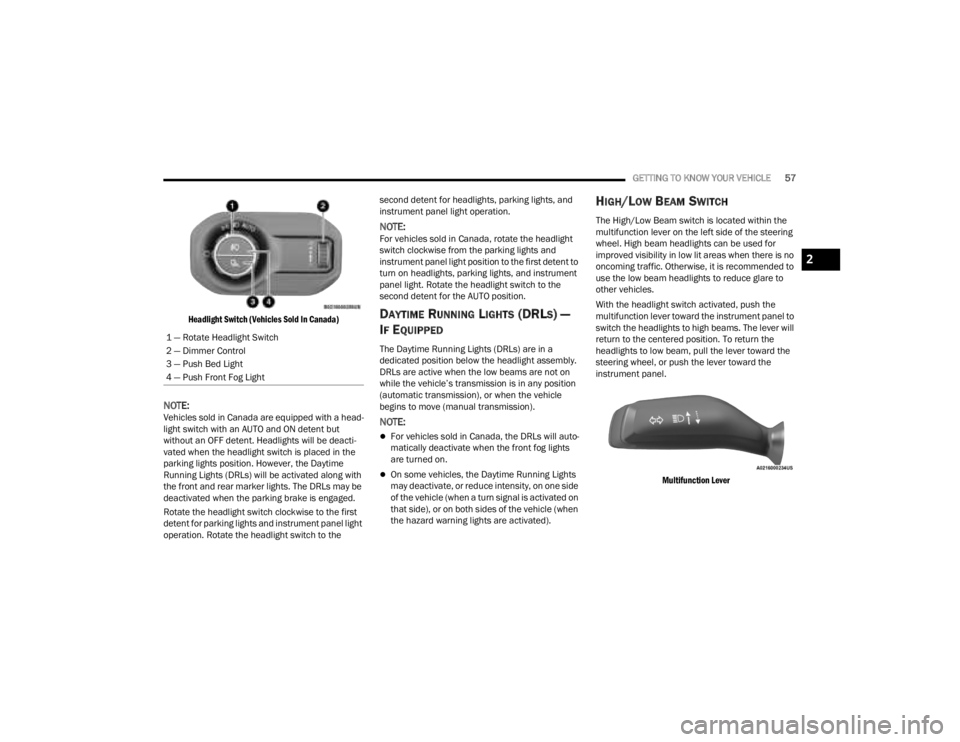
Headlight Switch (Vehicles Sold In Canada)
NOTE:Vehicles sold in Canada are equipped with a head -
light switch with an AUTO and ON detent but
without an OFF detent. Headlights will be deacti -
vated when the headlight switch is placed in the
parking lights position. However, the Daytime
Running Lights (DRLs) will be activated along with
the front and rear marker lights. The DRLs may be
deactivated when the parking brake is engaged.
Rotate the headlight switch clockwise to the first
detent for parking lights and instrument panel light
operation. Rotate the headlight switch to the second detent for headlights, parking lights, and
instrument panel light operation.
NOTE:For vehicles sold in Canada, rotate the headlight
switch clockwise from the parking lights and
instrument panel light position to the first detent to
turn on headlights, parking lights, and instrument
panel light. Rotate the headlight switch to the
second detent for the AUTO position.
DAYTIME RUNNING LIGHTS (DRLS) —
I
F EQUIPPED
The Daytime Running Lights (DRLs) are in a
dedicated position below the headlight assembly.
DRLs are active when the low beams are not on
while the vehicle’s transmission is in any position
(automatic transmission), or when the vehicle
begins to move (manual transmission).
NOTE:
For vehicles sold in Canada, the DRLs will auto -
matically deactivate when the front fog lights
are turned on.
On some vehicles, the Daytime Running Lights
may deactivate, or reduce intensity, on one side
of the vehicle (when a turn signal is activated on
that side), or on both sides of the vehicle (when
the hazard warning lights are activated).
HIGH/LOW BEAM SWITCH
The High/Low Beam switch is located within the
multifunction lever on the left side of the steering
wheel. High beam headlights can be used for
improved visibility in low lit areas when there is no
oncoming traffic. Otherwise, it is recommended to
use the low beam headlights to reduce glare to
other vehicles.
With the headlight switch activated, push the
multifunction lever toward the instrument panel to
switch the headlights to high beams. The lever will
return to the centered position. To return the
headlights to low beam, pull the lever toward the
steering wheel, or push the lever toward the
instrument panel.
Multifunction Lever
1 — Rotate Headlight Switch
2 — Dimmer Control
3 — Push Bed Light
4 — Push Front Fog Light
2
23_JT_OM_EN_USC_t.book Page 57
Page 60 of 448
58GETTING TO KNOW YOUR VEHICLE
AUTOMATIC HIGH BEAM HEADLAMP
C
ONTROL — IF EQUIPPED
The Automatic High Beam Headlamp Control
system provides increased forward lighting at night
by automatically controlling the high beams
through the use of a camera mounted on the
vehicle’s header. This camera detects vehicle
specific light and automatically switches from high
beams to low beams until the approaching vehicle
is out of view.
NOTE:
The Automatic High Beam Headlamp Control
can be turned on or off by selecting “ON” under
“Auto Dim High Beams” within your Uconnect
Settings Ú page 215, as well as turning the
headlight switch to the AUTO position and
placing the multifunction lever in the high beam
position.
Broken, muddy, or obstructed headlights and
taillights of vehicles in the field of view will
cause headlights to remain on longer (closer to
the vehicle). Also, dirt, film, and other obstruc -
tions on the windshield or camera lens will
cause the system to function improperly.
FLASH-TO-PASS
The Flash-To-Pass feature will illuminate the high
beam headlights temporarily to signal another
vehicle of a passing occurrence. Pull and hold the
Multifunction Lever to activate the Flash-To-Pass
feature. When the lever is released, the
Flash-To-Pass feature will deactivate.
AUTOMATIC HEADLIGHTS — IF EQUIPPED
The Automatic Headlight System will turn the
headlights on or off according to ambient light
levels. To turn the system on, rotate the headlight
switch clockwise to the last detent for automatic
headlight operation. When the system is on, the
headlight time delay feature is also on. This means
the headlights will stay on for up to 90 seconds
(programmable through the Uconnect Settings
Ú
page 215) after you place the ignition into the
OFF position. To turn the automatic system off,
move the headlight switch out of the AUTO position.
NOTE:The engine must be running before the headlights
will come on in the automatic mode.
LIGHTS-ON REMINDER
If the headlights or parking lights are left on after
the ignition is placed in the OFF position, the vehicle
will chime when the driver’s door is opened.
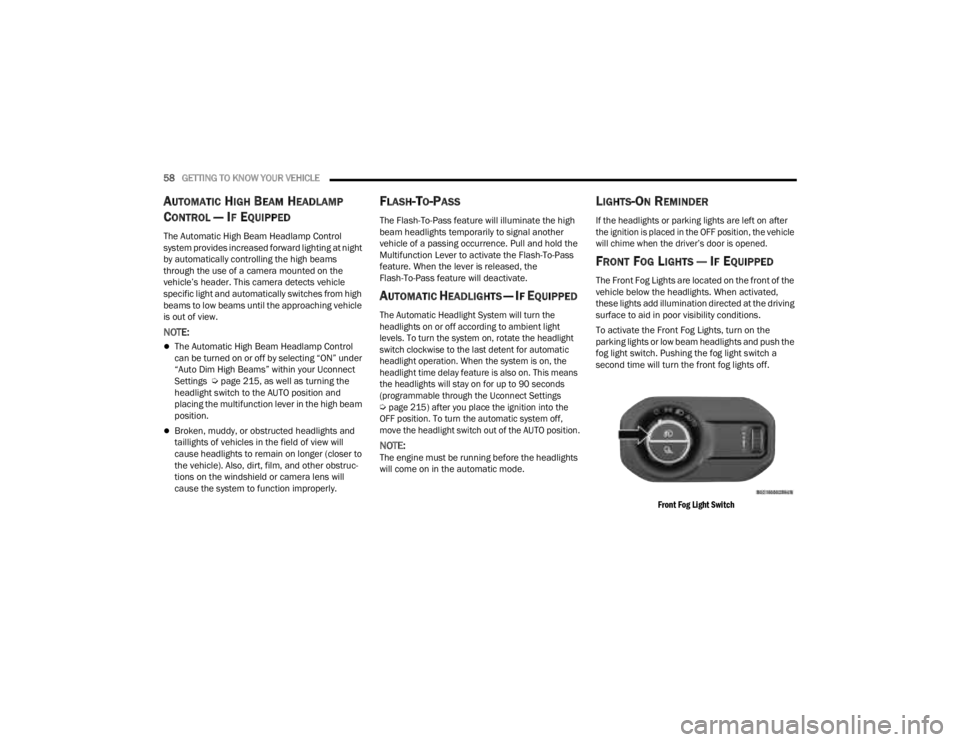
FRONT FOG LIGHTS — IF EQUIPPED
The Front Fog Lights are located on the front of the
vehicle below the headlights. When activated,
these lights add illumination directed at the driving
surface to aid in poor visibility conditions.
To activate the Front Fog Lights, turn on the
parking lights or low beam headlights and push the
fog light switch. Pushing the fog light switch a
second time will turn the front fog lights off.
Front Fog Light Switch
23_JT_OM_EN_USC_t.book Page 58
Page 61 of 448
GETTING TO KNOW YOUR VEHICLE59
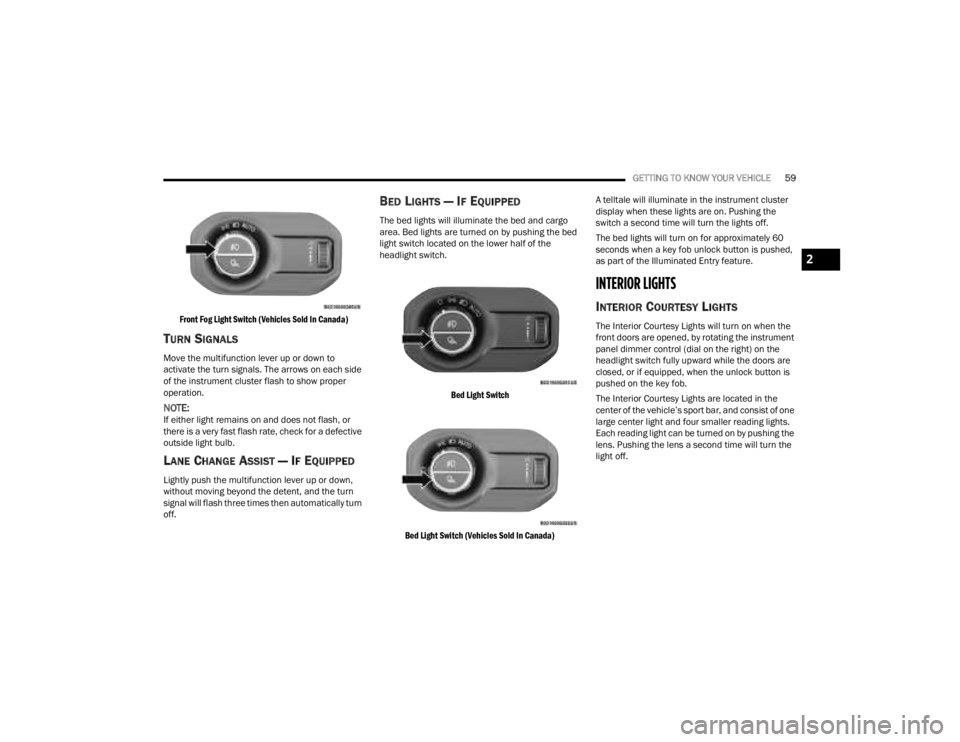
Front Fog Light Switch (Vehicles Sold In Canada)
TURN SIGNALS
Move the multifunction lever up or down to
activate the turn signals. The arrows on each side
of the instrument cluster flash to show proper
operation.
NOTE:If either light remains on and does not flash, or
there is a very fast flash rate, check for a defective
outside light bulb.
LANE CHANGE ASSIST — IF EQUIPPED
Lightly push the multifunction lever up or down,
without moving beyond the detent, and the turn
signal will flash three times then automatically turn
off.
BED LIGHTS — IF EQUIPPED
The bed lights will illuminate the bed and cargo
area. Bed lights are turned on by pushing the bed
light switch located on the lower half of the
headlight switch.
Bed Light Switch
Bed Light Switch (Vehicles Sold In Canada)
A telltale will illuminate in the instrument cluster
display when these lights are on. Pushing the
switch a second time will turn the lights off.
The bed lights will turn on for approximately 60
seconds when a key fob unlock button is pushed,
as part of the Illuminated Entry feature.
INTERIOR LIGHTS
INTERIOR COURTESY LIGHTS
The Interior Courtesy Lights will turn on when the
front doors are opened, by rotating the instrument
panel dimmer control (dial on the right) on the
headlight switch fully upward while the doors are
closed, or if equipped, when the unlock button is
pushed on the key fob.
The Interior Courtesy Lights are located in the
center of the vehicle’s sport bar, and consist of one
large center light and four smaller reading lights.
Each reading light can be turned on by pushing the
lens. Pushing the lens a second time will turn the
light off.
2
23_JT_OM_EN_USC_t.book Page 59
Page 142 of 448
140GETTING TO KNOW YOUR INSTRUMENT PANEL
Front Fog Indicator Light — If Equipped
This indicator light will illuminate when
the front fog lights are on Úpage 56.
Parking/Headlights On Indicator Light
This indicator light will illuminate when
the parking lights or headlights are
turned on.
Stop/Start Active Indicator Light —
If Equipped
This indicator light will illuminate when
the Stop/Start function is in “Autostop”
mode.
Turn Signal Indicator Lights
When the left or right turn signal is
activated, the turn signal indicator will
flash independently and the
corresponding exterior turn signal lamps
will flash. Turn signals can be activated when the
multifunction lever is moved down (left) or up
(right).
NOTE:
A continuous chime will sound if the vehicle is
driven more than 1 mile (1.6 km) with either
turn signal on.
Check for an inoperative outside light bulb if
either indicator flashes at a rapid rate.
Rear Seat Belt Fastened Indicator Light —
If Equipped With A Premium Instrument
Cluster
This light indicates when a rear seat belt
has been buckled in the second row. A
telltale will display in the upper right
corner of the instrument cluster display
to correspond to the specific seating position once
the seat belt has been buckled Ú page 299.
WHITE INDICATOR LIGHTS
Adaptive Cruise Control (ACC) Ready
Indicator Light — If Equipped With a
Premium Instrument Cluster
This light will turn on when the vehicle
equipped with Adaptive Cruise Control
(ACC) has been turned on, but not set.
Adaptive Cruise Control (ACC) Ready
Indicator Light — If Equipped With a Base
Instrument Cluster
This light will turn on when the vehicle
equipped with ACC has been turned on,
but not set.
Adaptive Cruise Control (ACC) Set Indicator
Light — If Equipped With a Base Instrument
Cluster
This light will turn on when the vehicle
equipped with ACC has been turned on,
but not set.
Two Wheel Drive High Indicator Light —
If Equipped With A Premium Instrument
Cluster
This light alerts the driver that the vehicle
is in the two wheel drive high mode.
Rear Seat Belt Fastened Indicator Light —
If Equipped With A Base Instrument
Cluster
This light indicates when a rear seat belt
has been buckled in the second row. A
telltale will display in the upper right
corner of the instrument cluster display
to correspond to the specific seating position once
the seat belt has been buckled.
23_JT_OM_EN_USC_t.book Page 140
Page 396 of 448
394SERVICING AND MAINTENANCE
10. Remove connector from bulb.
11. Push connector onto new bulb base, and push the connector locking tab to the lock position.
12. Reinstall bulb housing. Rotate the bulb a quarter turn clockwise.
NOTE:We recommend seeing an authorized dealer for
service.
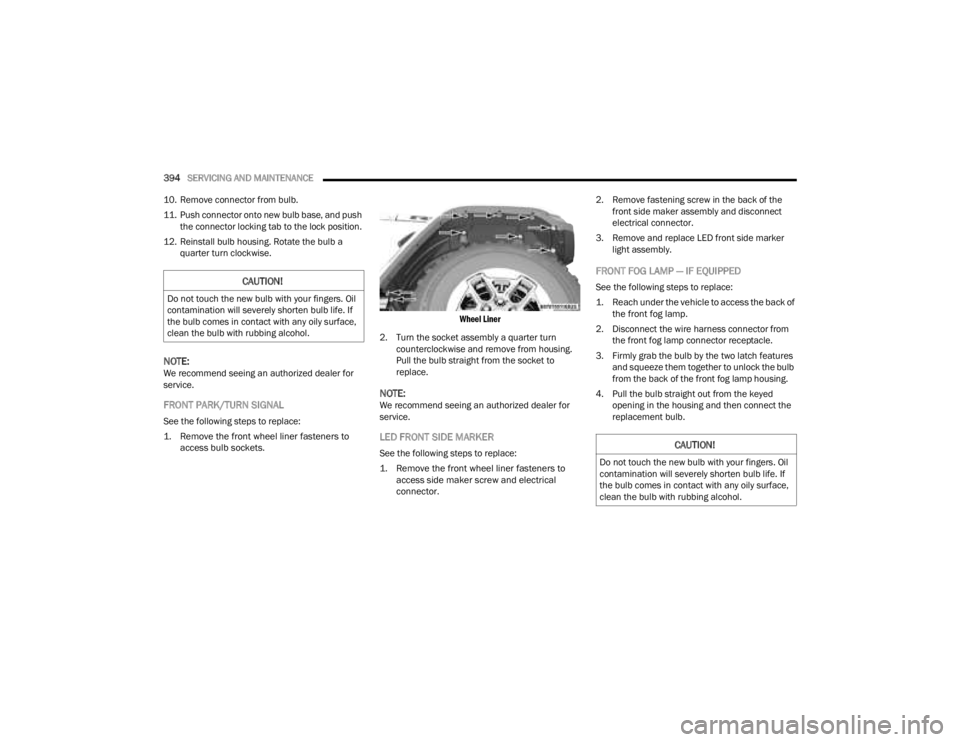
FRONT PARK/TURN SIGNAL
See the following steps to replace:
1. Remove the front wheel liner fasteners to access bulb sockets.
Wheel Liner
2. Turn the socket assembly a quarter turn counterclockwise and remove from housing.
Pull the bulb straight from the socket to
replace.
NOTE:We recommend seeing an authorized dealer for
service.
LED FRONT SIDE MARKER
See the following steps to replace:
1. Remove the front wheel liner fasteners to access side maker screw and electrical
connector.
2. Remove fastening screw in the back of the
front side maker assembly and disconnect
electrical connector.
3. Remove and replace LED front side marker light assembly.
FRONT FOG LAMP — IF EQUIPPED
See the following steps to replace:
1. Reach under the vehicle to access the back of the front fog lamp.
2. Disconnect the wire harness connector from the front fog lamp connector receptacle.
3. Firmly grab the bulb by the two latch features and squeeze them together to unlock the bulb
from the back of the front fog lamp housing.
4. Pull the bulb straight out from the keyed opening in the housing and then connect the
replacement bulb.CAUTION!
Do not touch the new bulb with your fingers. Oil
contamination will severely shorten bulb life. If
the bulb comes in contact with any oily surface,
clean the bulb with rubbing alcohol.
CAUTION!
Do not touch the new bulb with your fingers. Oil
contamination will severely shorten bulb life. If
the bulb comes in contact with any oily surface,
clean the bulb with rubbing alcohol.
23_JT_OM_EN_USC_t.book Page 394
Page 414 of 448
412SERVICING AND MAINTENANCE
(Continued)
which the vehicle is operated, extreme hot or cold
weather, and other extreme conditions will have an
adverse effect on paint, metal trim, and underbody
protection.
The following maintenance recommendations will
enable you to obtain maximum benefit from the
corrosion resistance built into your vehicle.
What Causes Corrosion?
Corrosion is the result of deterioration or removal
of paint and protective coatings from your vehicle.
The most common causes are:
Road salt, dirt and moisture accumulation
Stone and gravel impact.
Insects, tree sap and tar.
Salt in the air near seacoast localities.
Atmospheric fallout/industrial pollutants.
BODY AND UNDERBODY MAINTENANCE
Cleaning Headlights
Your vehicle is equipped with plastic headlights
and fog lights that are lighter and less susceptible
to stone breakage than glass headlights.
Plastic is not as scratch resistant as glass and
therefore different lens cleaning procedures must
be followed.
To minimize the possibility of scratching the lenses
and reducing light output, avoid wiping with a dry cloth. To remove road dirt, wash with a mild soap
solution followed by rinsing.
Do not use abrasive cleaning components,
solvents, steel wool, or other aggressive material
to clean the lenses.
PRESERVING THE BODYWORK
Washing
Wash your vehicle regularly. Always wash your
vehicle in the shade using Mopar® Car Wash, or
a mild car wash soap, and rinse the panels
completely with water.
If insects, tar, or other similar deposits have
accumulated on your vehicle, use Mopar®
Super Kleen Bug and Tar Remover to remove.
Use a high quality cleaner wax, such as Mopar®
Cleaner Wax, to remove road film and stains,
and to protect your paint finish. Use precautions
to not scratch the paint.
Avoid using abrasive compounds and power
buffing that may diminish the gloss or thin out
the paint finish.
Special Care
If you drive on salted or dusty roads or if you
drive near the ocean, hose off the undercarriage
at least once a month.
It is important that the drain holes in the lower
edges of the doors, rocker panels, and trunk be
kept clear and open.
If you detect any stone chips or scratches in the
paint, touch them up immediately.
If your vehicle is damaged due to a collision or
similar cause that destroys the paint and protec
-
tive coating, have your vehicle repaired as soon
as possible.
If you carry special cargo such as chemicals,
fertilizers, de-icer salt, etc., be sure that such
materials are well packaged and sealed.
If a lot of driving is done on gravel roads, consider
mud or stone shields behind each wheel.
Use Mopar® Touch Up Paint on scratches as
soon as possible. An authorized dealer has
touch up paint to match the color of your
vehicle.
CAUTION!
Do not use abrasive or strong cleaning mate -
rials, such as steel wool or scouring powder,
that will scratch metal and painted surfaces.
Use of power washers exceeding 1,200 psi
(8,274 kPa) can result in damage or removal
of paint and decals.
CAUTION!
23_JT_OM_EN_USC_t.book Page 412
Page 438 of 448
436
Ethanol
.......................................................... 420Exhaust Gas Caution..................................... 331Exhaust Gas Cautions.................................... 331Exhaust System................................... 331, 376Exterior Lights......................................... 56, 330
F
Fabric Care.................................................... 413Fabric Top...................................................... 413Family Alerts.................................................. 271Fastener Bin.................................................... 70Filters Air Cleaner................................................. 366Air Conditioning.................................. 68, 373Engine Fuel............................................... 368Engine Oil........................................ 366, 424Engine Oil Disposal................................... 366FlashersHazard Warning......................................... 332Turn Signal................................................ 330Turn Signals.................................... 394, 395Flash-To-Pass.................................................. 58Flooded Engine Starting................................ 147Fluid Capacities............................................. 423Fluid Leaks.................................................... 330Fluid LevelManual Transmission................................ 381Fluid Level Checks......................................... 380Brake........................................................ 380Engine Oil.................................................. 364
Fluid, Brake.................................................. 426Fog Lights..................................... 58, 140, 394Fog Lights, Service........................................ 394Fold-Flat Seats................................................. 43Folding Rear Seats........................................... 44Folding Windshield....................................... 106Forward Collision Warning................... 139, 291Four Wheel Drive.......................................... 161Operation................................................. 161Shifting..................................................... 161System..................................................... 161Four Wheel Drive Operation.......................... 163Four-Way Hazard Flasher.............................. 332Freedom Panels............................................... 97Freeing A Stuck Vehicle................................ 349Front Axle (Differential)................................. 380Front Door Removal
S
.................................. 28Front View Camera....................................... 190Fuel...................................................... 419, 421Adding............................................. 191, 192Additives................................................... 419Clean Air................................................... 419Ethanol..................................................... 420Filler Cap (Gas Cap)......................... 136, 191Filter......................................................... 368Gasoline................................................... 419Materials Added....................................... 419Methanol.................................................. 420Octane Rating.................................. 419, 424Requirements.................................. 421, 423
Specifications.................................. 421, 424Tank Capacity........................................... 423Fuel Filter Replacement................................ 369Fuel System Cautions................................... 420Fueling................................................. 191, 192Fuses............................................................ 382
G
Garage Door Opener (HomeLink).....................52Gas Cap (Fuel Filler Cap)...................... 191, 192Gasoline Instrument Clusters
S
................. 118Gasoline, (Fuel)............................................. 419Gasoline, Clean Air........................................ 419Gasoline, Reformulated................................ 419GaugesVoltage...................................................... 149Gear Ranges........................................ 154, 157Glass Cleaning.............................................. 417Gross Vehicle Weight Rating......................... 197GVWR............................................................ 196
H
Half-Door Installation.......................................35Half-Doors — If Equipped
S
...........................36Hard Top..........................................................82Hard Top Front Panel(s) Removal
S
..............95Hazard Warning Flashers.............................. 332Head Restraints...............................................48
23_JT_OM_EN_USC_t.book Page 436