steering JEEP GLADIATOR 2023 Owners Manual
[x] Cancel search | Manufacturer: JEEP, Model Year: 2023, Model line: GLADIATOR, Model: JEEP GLADIATOR 2023Pages: 448, PDF Size: 17.37 MB
Page 4 of 448
2
INTRODUCTION
SYMBOLS KEY ........................................................ 10
ROLLOVER WARNING .......................................... 10
CAMPERS ............................................................... 11
VEHICLE MODIFICATIONS/ALTERATIONS .......... 11
SYMBOL GLOSSARY.............................................. 11
GETTING TO KNOW YOUR VEHICLE
KEYS ....................................................................... 15
Key Fob .............................................................15
SENTRY KEY ........................................................... 17
IGNITION SWITCH .................................................. 18
Keyless Enter ‘n Go™ Ignition .........................18
REMOTE START — IF EQUIPPED (GASOLINE) .... 20
How To Use Remote Start ................................20
To Exit Remote Start Mode ..............................21
Remote Start Front Defrost Activation —
If Equipped........................................................21
Remote Start Comfort Systems —
If Equipped .......................................................21
Remote Start Windshield Wiper De-Icer
Activation — If Equipped ..................................22
Remote Start Cancel Message ........................22
REMOTE START — IF EQUIPPED (DIESEL) ......... 22
How To Use Remote Start ................................22
VEHICLE SECURITY SYSTEM — IF EQUIPPED .... 23
To Arm The System .........................................23
To Disarm The System ....................................23
Rearming Of The System .................................24 DOORS ....................................................................24
Manual Door Locks ..........................................24
Power Door Locks — If Equipped ....................25
Keyless Enter ‘n Go™ — Passive Entry
(If Equipped) .....................................................25
Automatic Door Locks —
If Equipped........................................................27
Child-Protection Door Lock System —
Rear Doors ........................................................27
Front Door Removal
S
..................................28
Rear Door Removal
S
...................................32
Door Off Mirror Kit — If Equipped ....................34
Half-Doors — If Equipped
S
..........................35
STEERING WHEEL ..................................................42
Tilt/Telescoping Steering Column ...................42
Heated Steering Wheel —
If Equipped........................................................42
SEATS .....................................................................43
Manual Adjustment Front Seats .....................43
60/40 Split Folding Rear Seat .......................44
Rear Seat Stadium Position ............................46
Heated Seats — If Equipped ...........................47
Rear Seat Armrest — If Equipped ....................47
Head Restraints ..............................................48
UCONNECT VOICE RECOGNITION ........................49
Introducing Voice Recognition.........................49
Basic Voice Commands ...................................50
Get Started .......................................................50
Additional Information .....................................50 MIRRORS ................................................................ 50
Inside Rearview Mirror..................................... 50
Illuminated Vanity Mirrors .............................. 51
Outside Mirrors ................................................ 51
Power Mirrors — If Equipped ........................... 52
Outside Mirrors With Turn
Signal — If Equipped ........................................ 52
Heated Mirrors — If Equipped ......................... 52
UNIVERSAL GARAGE DOOR OPENER
(HOMELINK®)
S
................................................. 52
Before You Begin Programming
HomeLink® ...................................................... 53
Erasing All The HomeLink® Channels ............ 53
Identifying Whether You Have A Rolling
Code Or Non-Rolling Code Device ................... 53
Programming HomeLink® To A Garage Door
Opener ..............................................................53
Programming HomeLink® To A
Miscellaneous Device ...................................... 54
Reprogramming A Single HomeLink®
Button ............................................................... 55
Canadian/Gate Operator Programming ......... 55
Security ............................................................. 56
Troubleshooting Tips........................................ 56
23_JT_OM_EN_USC_t.book Page 2
Page 6 of 448

4
INSTRUMENT CLUSTER DISPLAY ...................... 121 Instrument Cluster Display Location And
Controls .......................................................... 122
Oil Life Reset — If Equipped
S
................... 122
Off Road+ Display — If Equipped .................. 123
Instrument Cluster Display Selectable
Items .............................................................. 123
Instrument Cluster Display Menu Items ...... 124
Battery Saver On, Battery Saver Mode
Message, And Electrical Load Reduction
Actions
(If Equipped) .................................................. 127
Diesel Displays .............................................. 128 Diesel Particulate Filter (DPF) Messages .... 128Fuel System Messages ................................. 130
WARNING LIGHTS AND MESSAGES ................. 132
Red Warning Lights ....................................... 132
Yellow Warning Lights ................................... 135Yellow Indicator Lights .................................. 138
Green Indicator Lights................................... 139White Indicator Lights ................................... 140Blue Indicator Lights ..................................... 141
ONBOARD DIAGNOSTIC SYSTEM — OBD II ...... 141
Onboard Diagnostic System
(OBD II) Cybersecurity ................................... 142
EMISSIONS INSPECTION AND MAINTENANCE
PROGRAMS .......................................................... 142
STARTING AND OPERATING
STARTING THE ENGINE — GASOLINE ENGINE
(IF EQUIPPED) ...................................................... 144
Manual Transmission — If Equipped ........... 144Automatic Transmission —
If Equipped .................................................... 144
Normal Starting ............................................ 144
AutoPark ........................................................ 145Extreme Cold Weather
(Below –22°F Or −30°C) ............................ 146
Extended Park Starting ................................. 146
If Engine Fails To Start ................................. 147
After Starting ................................................. 147
STARTING THE ENGINE — DIESEL ENGINE
(IF EQUIPPED) ...................................................... 147
Automatic Transmission ............................... 148
Extreme Cold Weather .................................. 148
Normal Starting ............................................. 148Starting Fluids ............................................... 149
NORMAL OPERATION — DIESEL ENGINE ......... 149
Cold Weather Precautions ............................ 149
Engine Idling .................................................. 150
Stopping The Engine ..................................... 150
Cooling System Tips — Automatic
Transmission ................................................. 151
ENGINE BREAK-IN RECOMMENDATIONS —
GASOLINE ENGINE (IF EQUIPPED) ................... 151 ENGINE BREAK-IN RECOMMENDATIONS —
DIESEL ENGINE (IF EQUIPPED) .......................... 152
PARKING BRAKE ................................................. 152
MANUAL TRANSMISSION — IF EQUIPPED ....... 153
Shifting........................................................... 154
Downshifting.................................................. 155
AUTOMATIC TRANSMISSION —
IF EQUIPPED ......................................................... 155
Ignition Park Interlock................................... 156
Brake/Transmission Shift Interlock (BTSI)
System .......................................................... 1578–Speed Automatic Transmission .............. 157
Gear Ranges .................................................. 157
FOUR–WHEEL DRIVE OPERATION ................... 161
Four-Position Transfer Case —
If Equipped .................................................... 161
Five-Position Transfer Case —
If Equipped .................................................... 163
Trac-Lok Rear Axle — If Equipped ................ 165Axle Lock (Tru-Lok) Front And Rear —
If Equipped ................................................... 165
Axle Lock (Tru-Lok) Rear Only —
If Equipped ................................................... 166
Electronic Sway Bar Disconnect —
If Equipped ................................................... 166
OFF ROAD+ — If Equipped ............................ 168
ELECTRO-HYDRAULIC POWER STEERING ....... 168
23_JT_OM_EN_USC_t.book Page 4
Page 7 of 448

5
STOP/START SYSTEM — AUTOMATIC
TRANSMISSION (IF EQUIPPED) ........................ 169 Autostop Mode .............................................. 169Possible Reasons The Engine Does Not
Autostop ......................................................... 170
To Start The Engine While In Autostop
Mode .............................................................. 170
To Manually Turn Off The Stop/Start
System ........................................................... 171To Manually Turn On The Stop/Start
System ........................................................... 171System Malfunction ...................................... 171
STOP/START SYSTEM — MANUAL
TRANSMISSION (IF EQUIPPED) .........................171
Autostop Mode .............................................. 172Possible Reasons The Engine Does Not
Autostop ......................................................... 172
To Start The Engine While In Autostop
Mode .............................................................. 172
To Manually Turn Off The Stop/Start
System ........................................................... 173To Manually Turn On The Stop/Start
System ........................................................... 173System Malfunction ...................................... 173
CRUISE CONTROL SYSTEMS —
IF EQUIPPED ........................................................ 173
Cruise Control ............................................... 173
Adaptive Cruise Control (ACC) ...................... 175 PARKSENSE FRONT/REAR PARK ASSIST
SYSTEM — IF EQUIPPED .................................... 184
ParkSense Sensors ....................................... 184
ParkSense Warning Display ......................... 184
ParkSense Display ........................................ 184Enabling And Disabling ParkSense .............. 187Service The ParkSense Park Assist
System ........................................................... 187
Cleaning The ParkSense System ................. 187
ParkSense System Usage Precautions........ 188
PARKVIEW REAR BACK UP CAMERA............... 189
TRAILCAM SYSTEM — IF EQUIPPED ................ 190
REFUELING THE VEHICLE — GASOLINE
ENGINE (IF EQUIPPED) ....................................... 191 Fuel Filler Cap................................................ 191Loose Fuel Filler Cap Message ................... 192
REFUELING THE VEHICLE — DIESEL ENGINE
(IF EQUIPPED) ..................................................... 192
Avoid Using Contaminated Fuel ................... 193Bulk Fuel Storage — Diesel Fuel................... 193Diesel Exhaust Fluid ..................................... 193
VEHICLE LOADING .............................................. 195
Certification Label ......................................... 195
TRAILER TOWING ............................................... 197
Common Towing Definitions......................... 197
Trailer Hitch Classification ............................ 199
Trailer Towing Weights (Maximum Trailer
Weight Ratings) ............................................ 199
Trailer And Tongue Weight............................ 202
Towing Requirements ................................... 202Towing Tips .................................................... 204 RECREATIONAL TOWING (BEHIND
MOTORHOME) ...................................................... 205
Towing This Vehicle Behind Another
Vehicle ........................................................... 205
Recreational Towing — Four-Wheel Drive
Models ........................................................... 205
DRIVING TIPS ....................................................... 207
On-Road Driving Tips..................................... 207Off-Road Driving Tips .................................... 207
MULTIMEDIA
UCONNECT SYSTEMS ......................................... 214
CYBERSECURITY ................................................. 214
UCONNECT SETTINGS ......................................... 215 Customer Programmable Features ............. 215
UCONNECT INTRODUCTION................................ 230
System Overview .......................................... 230Drag & Drop Menu Bar ................................. 232
Safety And General Information................... 232
UCONNECT MODES ............................................. 233
Steering Wheel Audio Controls .................... 233
Radio Mode .................................................. 234Media Mode ................................................. 242
Phone Mode ................................................. 244
ANDROID AUTO™ & APPLE CARPLAY® —
IF EQUIPPED ......................................................... 254
Android Auto™
S
........................................ 254
Apple CarPlay®
S
....................................... 256
Android Auto™ And Apple CarPlay® Tips
And Tricks ...................................................... 258
23_JT_OM_EN_USC_t.book Page 5
Page 11 of 448
9
INTRODUCTION
Dear Customer,
Congratulations on the purchase of your Jeep® vehicle. Be assured that it represents precision workmanship, distinctive styling, and high quality.
This is a specialized utility vehicle. It can go places and perform tasks that are not intended for conventional passenger vehicles. It handles and maneuvers
differently from many passenger vehicles, both on-road and off-road, so take time to become familiar with your vehicle. If equipped, the two-wheel drive version
of this vehicle is designed for on-road use only. It is not intended for off-road driving or use in other severe conditions suited for a four-wheel drive vehicle. Before
you start to operate this vehicle, read the Owner’s Manual. Be sure you are familiar with all vehicle controls, particularly those used for braking, steering,
transmission, and transfer case operation. Learn how your vehicle handles on different road surfaces. Your driving skills will improve with experience. When
driving off-road, or operating the vehicle, don’t overload the vehicle or expect the vehicle to overcome the natural laws of physics. Always observe federal, state,
provincial and local laws wherever you drive. As with other vehicles of this type, failure to operate this vehicle correctly may result in loss of control or a collision.
See Úpage 207 for further information.
This Owner’s Manual has been prepared with the assistance of service and engineering specialists to acquaint you with the operation and maintenance of your
vehicle. It is supplemented by customer-oriented documents. Within this information, you will find a description of the services that FCA US LLC offers to its
customers as well as the details of the terms and conditions for maintaining its validity. Please take the time to read all of these publications carefully before
driving your vehicle for the first time. Following the instructions, recommendations, tips, and important warnings in this manual will help ensure safe and
enjoyable operation of your vehicle.
This Owner’s Manual describes all versions of this vehicle. Options and equipment dedicated to specific markets or versions are not expressly indicated in the
text. Therefore, you should only consider the information that is related to the trim level, engine, and version that you have purchased. Any content introduced
throughout the Owner’s Information that may or may not be applicable to your vehicle will be identified with the wording “If Equipped”. All information contained
in this publication is intended to help you use your vehicle in the best possible way. FCA US LLC aims towards a constant improvement of the vehicles produced.
For this reason, it reserves the right to make changes to the model described for technical and/or commercial reasons. For further information, contact an
authorized dealer.
When it comes to service, remember that authorized dealers know your Jeep® best, have factory-trained technicians, genuine Mopar® parts, and care about
your satisfaction.1
23_JT_OM_EN_USC_t.book Page 9
Page 13 of 448
11
CAMPERS
This vehicle is NOT recommended for slide-in camper applications.
VEHICLE MODIFICATIONS/ALTERATIONS
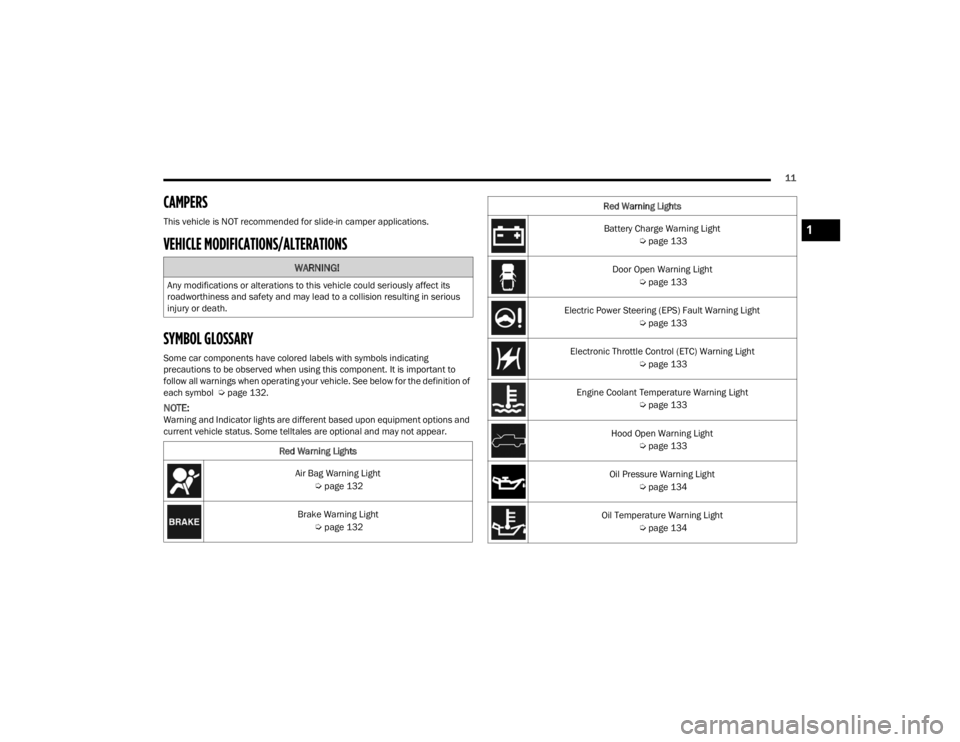
SYMBOL GLOSSARY
Some car components have colored labels with symbols indicating
precautions to be observed when using this component. It is important to
follow all warnings when operating your vehicle. See below for the definition of
each symbol Úpage 132.
NOTE:Warning and Indicator lights are different based upon equipment options and
current vehicle status. Some telltales are optional and may not appear.
WARNING!
Any modifications or alterations to this vehicle could seriously affect its
roadworthiness and safety and may lead to a collision resulting in serious
injury or death.
Red Warning LightsAir Bag Warning Light Úpage 132
Brake Warning Light Úpage 132
Battery Charge Warning Light
Úpage 133
Door Open Warning Light Úpage 133
Electric Power Steering (EPS) Fault Warning Light Úpage 133
Electronic Throttle Control (ETC) Warning Light Úpage 133
Engine Coolant Temperature Warning Light Úpage 133
Hood Open Warning Light Úpage 133
Oil Pressure Warning Light Úpage 134
Oil Temperature Warning Light Úpage 134
Red Warning Lights1
23_JT_OM_EN_USC_t.book Page 11
Page 23 of 448
GETTING TO KNOW YOUR VEHICLE21
Vehicle Security system indicator flashing
Ignition in OFF position
Fuel level meets minimum requirement
All removable doors must not be removed
Malfunction Indicator Light not illuminated
TO EXIT REMOTE START MODE
To drive the vehicle after starting the Remote Start
system, either push and release the unlock button
on the key fob to unlock the doors, or unlock the
vehicle using Keyless Enter ‘n Go™ — Passive Entry
via the door handles, and disarm the Vehicle
Security system (if equipped). Then, prior to the
end of the 15 minute cycle, push and release the
START/STOP ignition button.
The Remote Start system will turn the engine off if
the Remote Start button on the key fob is pushed
again, or if the engine is allowed to run for the
entire 15 minute cycle. Once the ignition is placed
in the ON/RUN position, the climate controls will
resume previously set operations (temperature,
blower control, etc.).
NOTE:
To avoid unintentional shutdowns, the system
will disable for two seconds after receiving a
valid Remote Start request.
For vehicles equipped with the Keyless
Enter ‘n Go™ — Passive Entry feature, the message “Remote Start Active — Push Start
Button” will display in the instrument cluster
display until you push the START/STOP ignition
button.
REMOTE START FRONT DEFROST
A
CTIVATION — IF EQUIPPED
When Remote Start is active, and the outside
ambient temperature is 40°F (4.5°C) or below, the
system will automatically activate front defrost for
15 minutes or less. The time is dependent on the
ambient temperature. Once the timer expires, the
system will automatically adjust the settings
depending on ambient conditions. See “Remote
Start Comfort Systems — If Equipped” in the next
section for detailed operation.
REMOTE START COMFORT SYSTEMS —
I
F EQUIPPED
When Remote Start is activated, the front and rear
defrost will automatically turn on in cold weather.
The heated steering wheel and driver heated seat
feature will also turn on if programmed in the
Comfort menu screen within Uconnect Settings
Ú page 215.
Automatic Temperature Control (ATC) —
If Equipped
The climate controls automatically adjust to an
optimal temperature and mode, dependent upon
the outside ambient temperature. When the
ignition is placed in the ON/RUN position, the
climate controls will resume their previous
settings.
Manual Temperature Control (MTC) — If Equipped
In ambient temperatures of 40°F (4.5°C) or
below, the climate settings will default to
maximum heat, with fresh air entering the
cabin. If the front defrost timer expires, the
vehicle will enter Mix Mode.
In ambient temperatures from 40°F (4.5°C) to
78°F (26°C), the climate settings will be based
on the last settings selected by the driver.
In ambient temperatures of 78°F (26°C) or
above, the climate settings will default to MAX
A/C, Bi-Level mode, and Recirculation on.
WARNING!
Do not start or run an engine in a closed
garage or confined area. Exhaust gas contains
carbon monoxide (CO) which is odorless and
colorless. Carbon monoxide is poisonous and
can cause serious injury or death when
inhaled.
Keep key fobs away from children. Operation
of the Remote Start system, windows, door
locks or other controls could cause serious
injury or death.
2
23_JT_OM_EN_USC_t.book Page 21
Page 44 of 448
42GETTING TO KNOW YOUR VEHICLE
Half-Door Removal
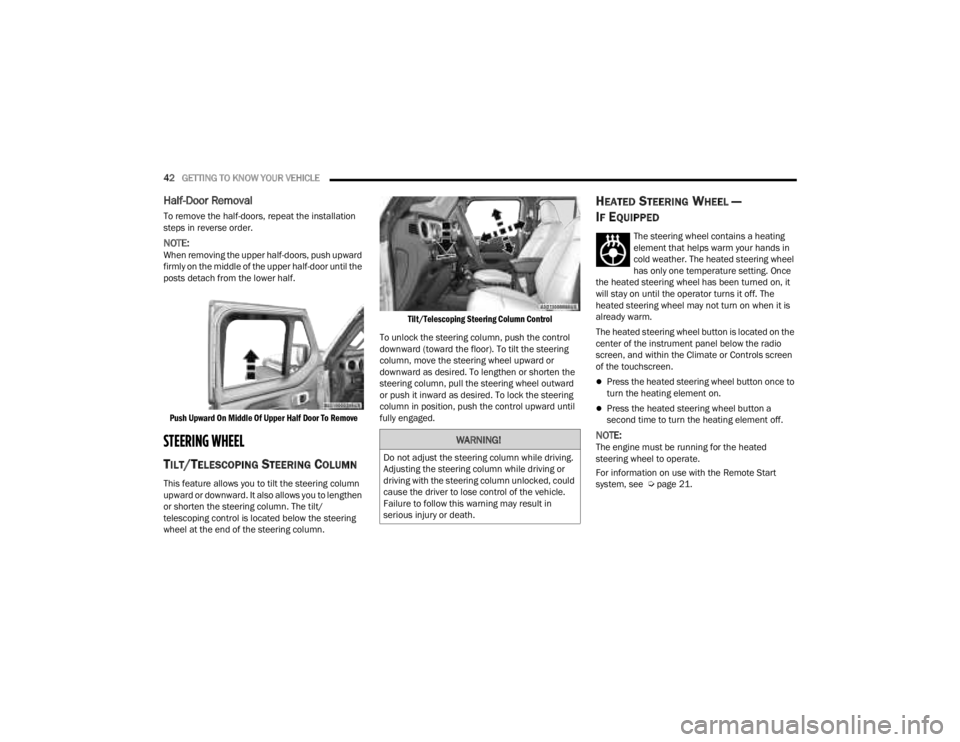
To remove the half-doors, repeat the installation
steps in reverse order.
NOTE:When removing the upper half-doors, push upward
firmly on the middle of the upper half-door until the
posts detach from the lower half.
Push Upward On Middle Of Upper Half Door To Remove
STEERING WHEEL
TILT/TELESCOPING STEERING COLUMN
This feature allows you to tilt the steering column
upward or downward. It also allows you to lengthen
or shorten the steering column. The tilt/
telescoping control is located below the steering
wheel at the end of the steering column.
Tilt/Telescoping Steering Column Control
To unlock the steering column, push the control
downward (toward the floor). To tilt the steering
column, move the steering wheel upward or
downward as desired. To lengthen or shorten the
steering column, pull the steering wheel outward
or push it inward as desired. To lock the steering
column in position, push the control upward until
fully engaged.
HEATED STEERING WHEEL —
I
F EQUIPPED
The steering wheel contains a heating
element that helps warm your hands in
cold weather. The heated steering wheel
has only one temperature setting. Once
the heated steering wheel has been turned on, it
will stay on until the operator turns it off. The
heated steering wheel may not turn on when it is
already warm.
The heated steering wheel button is located on the
center of the instrument panel below the radio
screen, and within the Climate or Controls screen
of the touchscreen.
Press the heated steering wheel button once to
turn the heating element on.
Press the heated steering wheel button a
second time to turn the heating element off.
NOTE:The engine must be running for the heated
steering wheel to operate.
For information on use with the Remote Start
system, see Ú page 21.WARNING!
Do not adjust the steering column while driving.
Adjusting the steering column while driving or
driving with the steering column unlocked, could
cause the driver to lose control of the vehicle.
Failure to follow this warning may result in
serious injury or death.
23_JT_OM_EN_USC_t.book Page 42
Page 45 of 448
GETTING TO KNOW YOUR VEHICLE43
(Continued)
SEATS
Seats are a part of the Occupant Restraint system
of the vehicle.
MANUAL ADJUSTMENT FRONT SEATS
Manual Front Seat Forward/Rearward
Adjustment
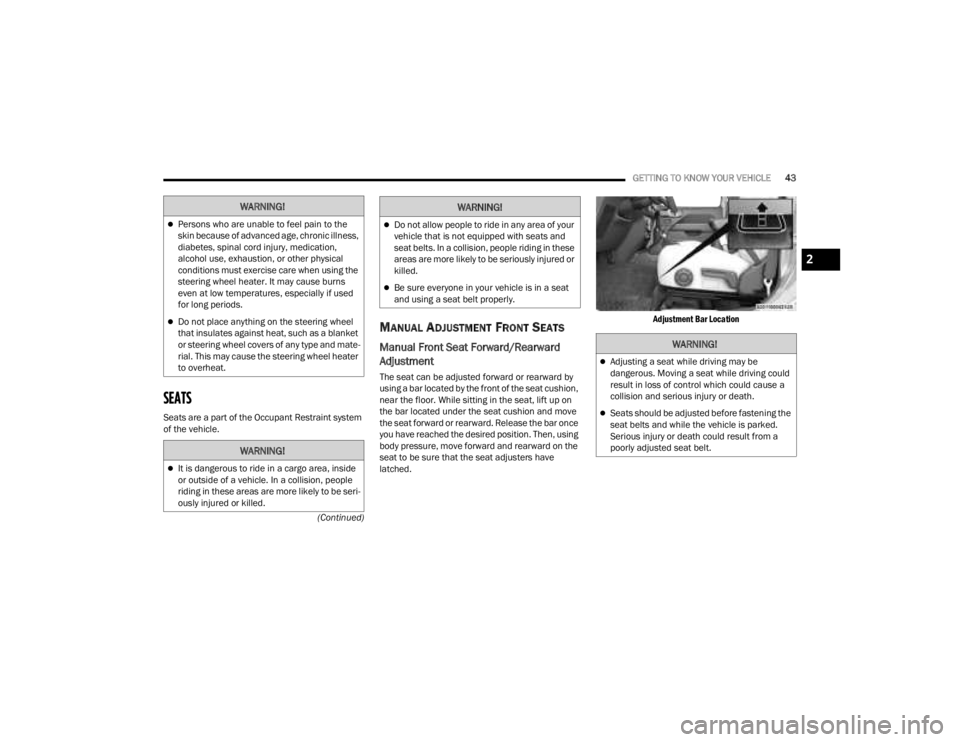
The seat can be adjusted forward or rearward by
using a bar located by the front of the seat cushion,
near the floor. While sitting in the seat, lift up on
the bar located under the seat cushion and move
the seat forward or rearward. Release the bar once
you have reached the desired position. Then, using
body pressure, move forward and rearward on the
seat to be sure that the seat adjusters have
latched.
Adjustment Bar Location
WARNING!
Persons who are unable to feel pain to the
skin because of advanced age, chronic illness,
diabetes, spinal cord injury, medication,
alcohol use, exhaustion, or other physical
conditions must exercise care when using the
steering wheel heater. It may cause burns
even at low temperatures, especially if used
for long periods.
Do not place anything on the steering wheel
that insulates against heat, such as a blanket
or steering wheel covers of any type and mate
-
rial. This may cause the steering wheel heater
to overheat.
WARNING!
It is dangerous to ride in a cargo area, inside
or outside of a vehicle. In a collision, people
riding in these areas are more likely to be seri -
ously injured or killed.
Do not allow people to ride in any area of your
vehicle that is not equipped with seats and
seat belts. In a collision, people riding in these
areas are more likely to be seriously injured or
killed.
Be sure everyone in your vehicle is in a seat
and using a seat belt properly.
WARNING!
WARNING!
Adjusting a seat while driving may be
dangerous. Moving a seat while driving could
result in loss of control which could cause a
collision and serious injury or death.
Seats should be adjusted before fastening the
seat belts and while the vehicle is parked.
Serious injury or death could result from a
poorly adjusted seat belt.
2
23_JT_OM_EN_USC_t.book Page 43
Page 59 of 448
GETTING TO KNOW YOUR VEHICLE57
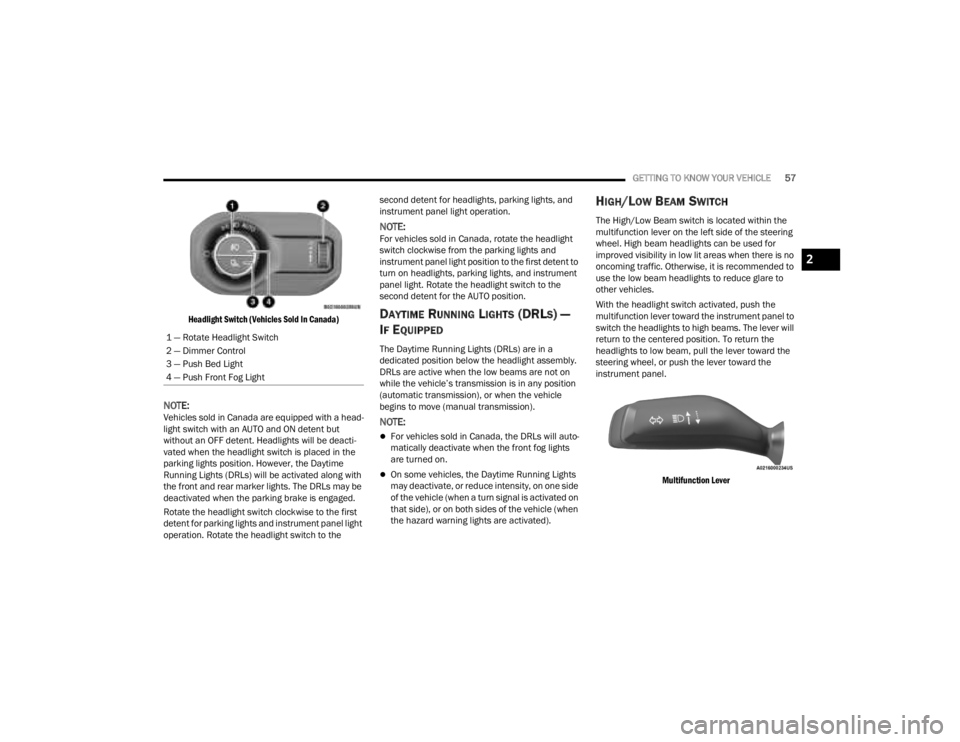
Headlight Switch (Vehicles Sold In Canada)
NOTE:Vehicles sold in Canada are equipped with a head -
light switch with an AUTO and ON detent but
without an OFF detent. Headlights will be deacti -
vated when the headlight switch is placed in the
parking lights position. However, the Daytime
Running Lights (DRLs) will be activated along with
the front and rear marker lights. The DRLs may be
deactivated when the parking brake is engaged.
Rotate the headlight switch clockwise to the first
detent for parking lights and instrument panel light
operation. Rotate the headlight switch to the second detent for headlights, parking lights, and
instrument panel light operation.
NOTE:For vehicles sold in Canada, rotate the headlight
switch clockwise from the parking lights and
instrument panel light position to the first detent to
turn on headlights, parking lights, and instrument
panel light. Rotate the headlight switch to the
second detent for the AUTO position.
DAYTIME RUNNING LIGHTS (DRLS) —
I
F EQUIPPED
The Daytime Running Lights (DRLs) are in a
dedicated position below the headlight assembly.
DRLs are active when the low beams are not on
while the vehicle’s transmission is in any position
(automatic transmission), or when the vehicle
begins to move (manual transmission).
NOTE:
For vehicles sold in Canada, the DRLs will auto -
matically deactivate when the front fog lights
are turned on.
On some vehicles, the Daytime Running Lights
may deactivate, or reduce intensity, on one side
of the vehicle (when a turn signal is activated on
that side), or on both sides of the vehicle (when
the hazard warning lights are activated).
HIGH/LOW BEAM SWITCH
The High/Low Beam switch is located within the
multifunction lever on the left side of the steering
wheel. High beam headlights can be used for
improved visibility in low lit areas when there is no
oncoming traffic. Otherwise, it is recommended to
use the low beam headlights to reduce glare to
other vehicles.
With the headlight switch activated, push the
multifunction lever toward the instrument panel to
switch the headlights to high beams. The lever will
return to the centered position. To return the
headlights to low beam, pull the lever toward the
steering wheel, or push the lever toward the
instrument panel.
Multifunction Lever
1 — Rotate Headlight Switch
2 — Dimmer Control
3 — Push Bed Light
4 — Push Front Fog Light
2
23_JT_OM_EN_USC_t.book Page 57
Page 62 of 448
60GETTING TO KNOW YOUR VEHICLE
Interior Courtesy Lights
When a door is open and the interior lights are on,
rotating the instrument panel dimmer control to
the extreme bottom position will cause all the
interior lights to turn off. This allows the doors to
stay open for extended periods of time without
discharging the vehicle’s battery.
DIMMER CONTROL
The dimmer control is part of the headlight switch
and is located on the left side of the instrument
panel.
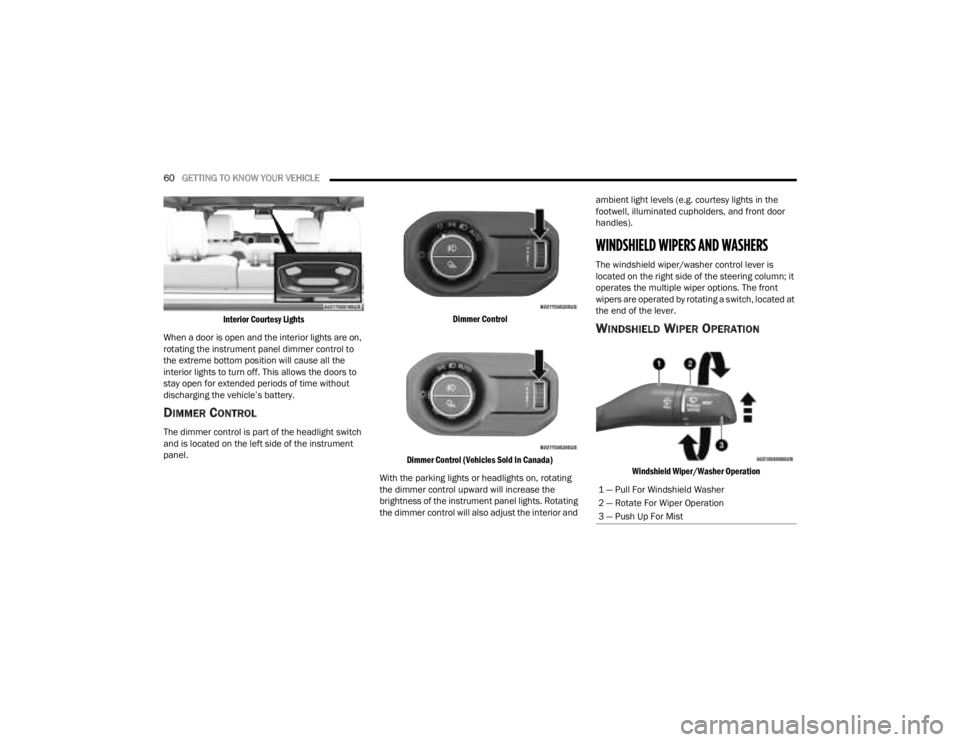
Dimmer Control
Dimmer Control (Vehicles Sold In Canada)
With the parking lights or headlights on, rotating
the dimmer control upward will increase the
brightness of the instrument panel lights. Rotating
the dimmer control will also adjust the interior and ambient light levels (e.g. courtesy lights in the
footwell, illuminated cupholders, and front door
handles).
WINDSHIELD WIPERS AND WASHERS
The windshield wiper/washer control lever is
located on the right side of the steering column; it
operates the multiple wiper options. The front
wipers are operated by rotating a switch, located at
the end of the lever.
WINDSHIELD WIPER OPERATION
Windshield Wiper/Washer Operation
1 — Pull For Windshield Washer
2 — Rotate For Wiper Operation
3 — Push Up For Mist
23_JT_OM_EN_USC_t.book Page 60