steering JEEP GLADIATOR 2023 Owner's Manual
[x] Cancel search | Manufacturer: JEEP, Model Year: 2023, Model line: GLADIATOR, Model: JEEP GLADIATOR 2023Pages: 448, PDF Size: 17.37 MB
Page 170 of 448
168STARTING AND OPERATING
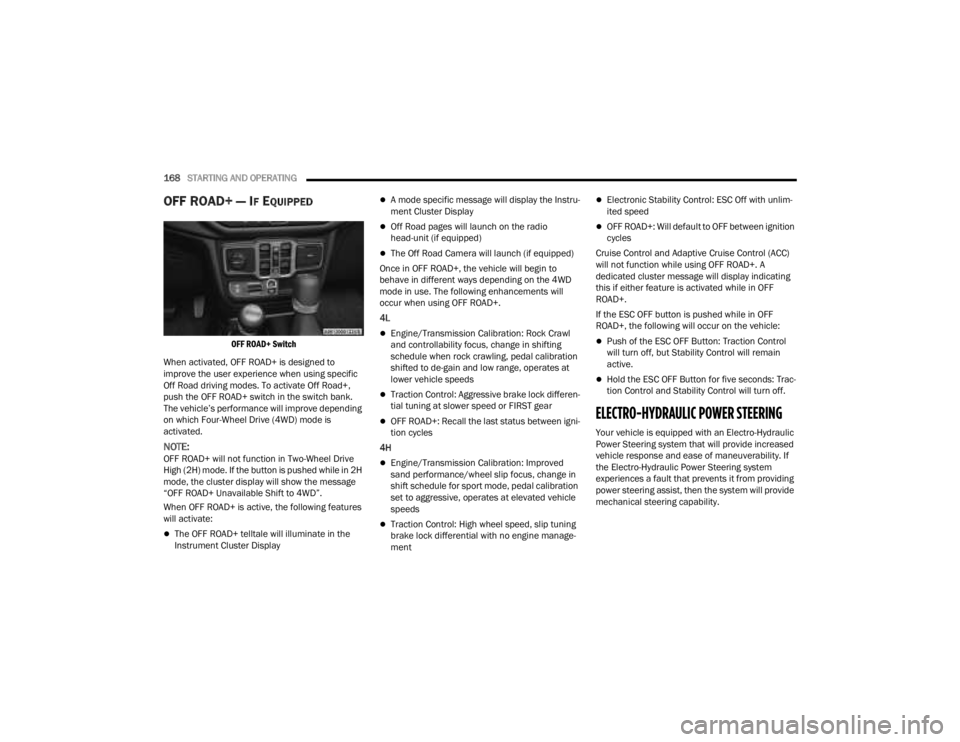
OFF ROAD+ — IF EQUIPPED
OFF ROAD+ Switch
When activated, OFF ROAD+ is designed to
improve the user experience when using specific
Off Road driving modes. To activate Off Road+,
push the OFF ROAD+ switch in the switch bank.
The vehicle’s performance will improve depending
on which Four-Wheel Drive (4WD) mode is
activated.
NOTE:OFF ROAD+ will not function in Two-Wheel Drive
High (2H) mode. If the button is pushed while in 2H
mode, the cluster display will show the message
“OFF ROAD+ Unavailable Shift to 4WD”.
When OFF ROAD+ is active, the following features
will activate:
The OFF ROAD+ telltale will illuminate in the
Instrument Cluster Display
A mode specific message will display the Instru -
ment Cluster Display
Off Road pages will launch on the radio
head-unit (if equipped)
The Off Road Camera will launch (if equipped)
Once in OFF ROAD+, the vehicle will begin to
behave in different ways depending on the 4WD
mode in use. The following enhancements will
occur when using OFF ROAD+.
4L
Engine/Transmission Calibration: Rock Crawl
and controllability focus, change in shifting
schedule when rock crawling, pedal calibration
shifted to de-gain and low range, operates at
lower vehicle speeds
Traction Control: Aggressive brake lock differen -
tial tuning at slower speed or FIRST gear
OFF ROAD+: Recall the last status between igni -
tion cycles
4H
Engine/Transmission Calibration: Improved
sand performance/wheel slip focus, change in
shift schedule for sport mode, pedal calibration
set to aggressive, operates at elevated vehicle
speeds
Traction Control: High wheel speed, slip tuning
brake lock differential with no engine manage -
ment
Electronic Stability Control: ESC Off with unlim -
ited speed
OFF ROAD+: Will default to OFF between ignition
cycles
Cruise Control and Adaptive Cruise Control (ACC)
will not function while using OFF ROAD+. A
dedicated cluster message will display indicating
this if either feature is activated while in OFF
ROAD+.
If the ESC OFF button is pushed while in OFF
ROAD+, the following will occur on the vehicle:
Push of the ESC OFF Button: Traction Control
will turn off, but Stability Control will remain
active.
Hold the ESC OFF Button for five seconds: Trac -
tion Control and Stability Control will turn off.
ELECTRO-HYDRAULIC POWER STEERING
Your vehicle is equipped with an Electro-Hydraulic
Power Steering system that will provide increased
vehicle response and ease of maneuverability. If
the Electro-Hydraulic Power Steering system
experiences a fault that prevents it from providing
power steering assist, then the system will provide
mechanical steering capability.
23_JT_OM_EN_USC_t.book Page 168
Page 171 of 448
STARTING AND OPERATING169
If the “SERVICE POWER STEERING”
message and a flashing icon are
displayed on the instrument cluster
screen, it indicates that the vehicle
needs to be taken to an authorized dealer for
service. It is likely the vehicle has lost power
steering assistance Ú page 121.
If the “POWER STEERING HOT” message and an
icon are displayed on the instrument cluster
screen, it indicates that extreme steering
maneuvers may have occurred, which caused an
over temperature condition in the power steering
system. You will lose power steering assistance
momentarily until the over temperature condition
no longer exists. Once driving conditions are safe,
pull over and let vehicle idle for a few moments
until the light turns off Ú page 121.
NOTE:
Even if power steering assistance is no longer
operational, it is still possible to steer the
vehicle. Under these conditions there will be a
substantial increase in steering effort, espe -cially at very low vehicle speeds and during
parking maneuvers.
If the condition persists, see an authorized
dealer for service.
STOP/START SYSTEM — AUTOMATIC
TRANSMISSION (IF EQUIPPED)
The Engine Stop/Start (ESS) function is developed
to reduce fuel consumption. The system will stop
the engine automatically during a vehicle stop if
the required conditions are met. Releasing the
brake pedal or pressing the accelerator pedal will
automatically restart the engine.
ESS vehicles have been upgraded with a
heavy-duty starter, enhanced battery, and other
upgraded engine parts, to handle the additional
engine starts.
NOTE:It is recommended that the Stop/Start system be
disabled during off-road use.
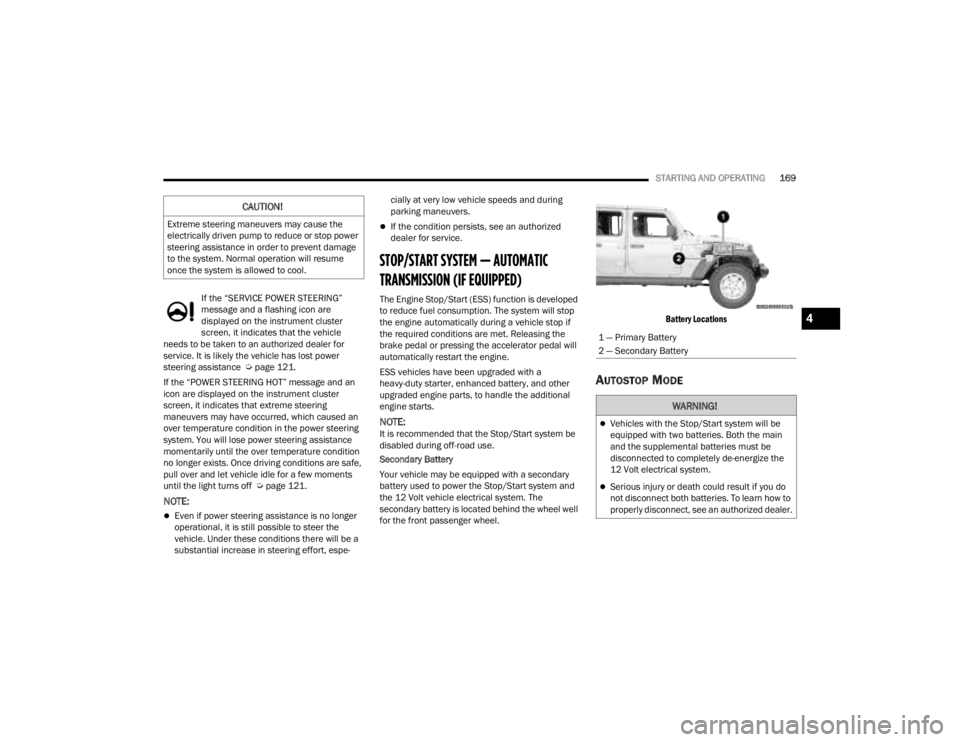
Secondary Battery
Your vehicle may be equipped with a secondary
battery used to power the Stop/Start system and
the 12 Volt vehicle electrical system. The
secondary battery is located behind the wheel well
for the front passenger wheel.
Battery Locations
AUTOSTOP MODE
CAUTION!
Extreme steering maneuvers may cause the
electrically driven pump to reduce or stop power
steering assistance in order to prevent damage
to the system. Normal operation will resume
once the system is allowed to cool.
1 — Primary Battery
2 — Secondary Battery
WARNING!
Vehicles with the Stop/Start system will be
equipped with two batteries. Both the main
and the supplemental batteries must be
disconnected to completely de-energize the
12 Volt electrical system.
Serious injury or death could result if you do
not disconnect both batteries. To learn how to
properly disconnect, see an authorized dealer.
4
23_JT_OM_EN_USC_t.book Page 169
Page 172 of 448
170STARTING AND OPERATING
The Stop/Start feature is enabled after every
normal customer engine start. At that time, the
system will go into STOP/START READY.
To Activate The Autostop Mode, The Following
Must Occur:
The system must be in STOP/START READY
state. A STOP/START READY message will be
displayed in the instrument cluster display
within the Stop/Start section Ú page 121.
The vehicle must be completely stopped.
The gear selector must be in a forward gear and
the brake pedal pressed.
The engine will shut down, the tachometer will
move to the zero position and the Stop/Start
telltale will illuminate indicating you are in
Autostop. Customer settings will be maintained
upon return to an engine-running condition.
POSSIBLE REASONS THE ENGINE DOES
N
OT AUTOSTOP
Prior to engine shut down, the system will check
many safety and comfort conditions to see if they
are fulfilled. Detailed information about the
operation of the Stop/Start system may be viewed
in the instrument cluster display Stop/Start Screen.
In the following situations, the engine will not stop:
Driver’s seat belt is not buckled
Driver’s door is not closed
Battery temperature is too warm or cold
Battery charge is low
The vehicle is on a steep grade
Cabin heating or cooling is in process and an
acceptable cabin temperature has not been
achieved
HVAC is set to full defrost mode at a high blower
speed
HVAC is set to MAX A/C
Engine has not reached normal operating
temperature
Engine or exhaust temperature is too high
The transmission is not in a forward gear
Hood is open
Transfer case is in 4L or N (Neutral)
Brake pedal is not pressed with sufficient pres -
sure
Accelerator pedal input
Vehicle speed threshold has not been achieved
from previous Autostop
Steering angle is beyond threshold
ACC is on and speed is set
Vehicle is at high altitude
System fault is present It may be possible for the vehicle to be driven
several times without the Stop/Start system going
into a STOP/START READY state under more
extreme conditions of the items listed above.
TO START THE ENGINE WHILE IN
A
UTOSTOP MODE
While in a forward gear, the engine will start when
the brake pedal is released or the throttle pedal is
pressed. The transmission will automatically
re-engage upon engine restart.
Conditions That Will Cause The Engine To Start
Automatically While In Autostop Mode:
The transmission selector is moved out of DRIVE
To maintain cabin temperature comfort
Actual cabin temperature is significantly
different than temperature set on Auto HVAC
HVAC is set to full defrost mode
HVAC system temperature or fan speed is
manually adjusted
Battery voltage drops too low
Stop/Start OFF switch is pushed
A Stop/Start system error occurs
Stop/Start Autostop Active time exceeds five
minutes
Transfer case is in 4L or N (Neutral)
Steering wheel is turned beyond threshold
23_JT_OM_EN_USC_t.book Page 170
Page 174 of 448
172STARTING AND OPERATING
AUTOSTOP MODE
The Stop/Start feature is enabled after every
normal customer engine start. It will remain in
STOP/START NOT READY until you drive forward
with a vehicle speed greater than 5 mph (8 km/h).
At that time, the system will go into STOP/START
READY and if all other conditions are met, can go
into an STOP/START AUTOSTOP ACTIVE mode.
To Activate The STOP/START AUTOSTOP ACTIVE
Mode, The Following Must Occur:
The system must be in STOP/START READY
state. A STOP/START READY message will be
displayed in the instrument cluster
Ú
page 121.
Vehicle speed must be less than 2 mph
(3 km/h).
The gear selector must be in the NEUTRAL posi -
tion and the clutch pedal must be fully released. The engine will shut down,
the tachometer will fall
to the Stop/Start position, the STOP/START
AUTOSTOP ACTIVE message will appear, and the
heater/air conditioning (HVAC) air flow will be
reduced.
POSSIBLE REASONS THE ENGINE DOES
N
OT AUTOSTOP
Prior to engine shut down, the system will check
many safety and comfort conditions to see if they
are fulfilled. In following situations the engine will
not stop:
Driver’s seat belt is not buckled
Outside temperature is less than 10°F (–12°C)
or greater than 109°F (43°C)
Actual cabin temperature is significantly
different than temperature set on Auto HVAC
HVAC is set to full defrost mode
Engine has not reached normal operating
temperature
Battery is discharged
When driving in REVERSE
Hood is open
Transfer case is in 4L or N (Neutral)
Driver's seat is not occupied or driver door is
open
Vehicle is at high altitude
The vehicle is on a steep grade
Forward Gear is engaged
Steering angle is beyond threshold
System fault is present
HVAC is set to MAX A/C
It may be possible for the vehicle to be driven
several times without the Stop/Start system going
into a STOP/START READY state under more
extreme conditions of the items listed above.
TO START THE ENGINE WHILE IN
A
UTOSTOP MODE
When the gear selector is in NEUTRAL, the engine
will start when the clutch pedal is pressed (does
not require complete/full pedal press). The vehicle
will go into STOP/START SYSTEM NOT READY
mode until the vehicle speed is greater than 5 mph
(8 km/h).
Conditions that will cause the engine to start
automatically while in STOP/START AUTOSTOP
ACTIVE mode, the engine will start automatically
when:
Actual cabin temperature is significantly
different than temperature set on Auto HVAC
HVAC is set to full defrost mode
Stop/Start Autostop Active time exceeds five
minutes
WARNING!
Vehicles with the Stop/Start system will be
equipped with two batteries. Both the main
and the supplemental batteries must be
disconnected to completely de-energize the
12 Volt electrical system.
Serious injury or death could result if you do
not disconnect both batteries. To learn how to
properly disconnect, see an authorized dealer.
23_JT_OM_EN_USC_t.book Page 172
Page 175 of 448
STARTING AND OPERATING173
Battery voltage drops too low
Vehicle is moving faster than 5 mph (8 km/h)
Stop/Start OFF switch is pressed
Transfer case is in 4L or N (Neutral)
Steering wheel is turned beyond threshold (ESS
Models Only)
TO MANUALLY TURN OFF THE STOP/
S
TART SYSTEM
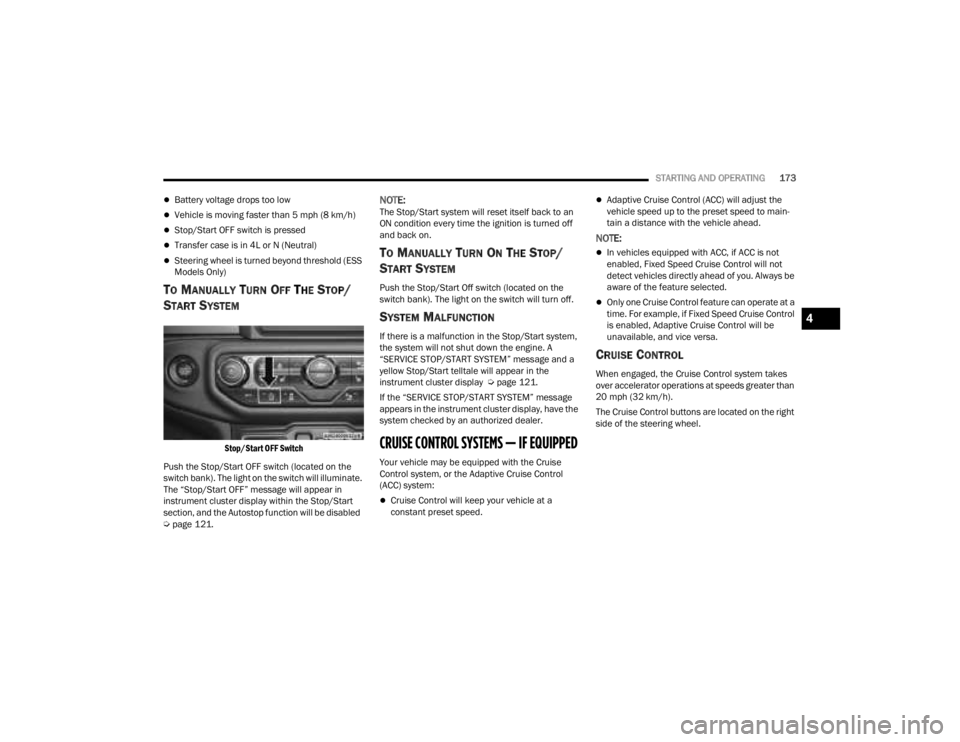
Stop/Start OFF Switch
Push the Stop/Start OFF switch (located on the
switch bank). The light on the switch will illuminate.
The “Stop/Start OFF” message will appear in
instrument cluster display within the Stop/Start
section, and the Autostop function will be disabled
Ú page 121.
NOTE:The Stop/Start system will reset itself back to an
ON condition every time the ignition is turned off
and back on.
TO MANUALLY TURN ON THE STOP/
S
TART SYSTEM
Push the Stop/Start Off switch (located on the
switch bank). The light on the switch will turn off.
SYSTEM MALFUNCTION
If there is a malfunction in the Stop/Start system,
the system will not shut down the engine. A
“SERVICE STOP/START SYSTEM” message and a
yellow Stop/Start telltale will appear in the
instrument cluster display Ú page 121.
If the “SERVICE STOP/START SYSTEM” message
appears in the instrument cluster display, have the
system checked by an authorized dealer.
CRUISE CONTROL SYSTEMS — IF EQUIPPED
Your vehicle may be equipped with the Cruise
Control system, or the Adaptive Cruise Control
(ACC) system:
Cruise Control will keep your vehicle at a
constant preset speed.
Adaptive Cruise Control (ACC) will adjust the
vehicle speed up to the preset speed to main -
tain a distance with the vehicle ahead.
NOTE:
In vehicles equipped with ACC, if ACC is not
enabled, Fixed Speed Cruise Control will not
detect vehicles directly ahead of you. Always be
aware of the feature selected.
Only one Cruise Control feature can operate at a
time. For example, if Fixed Speed Cruise Control
is enabled, Adaptive Cruise Control will be
unavailable, and vice versa.
CRUISE CONTROL
When engaged, the Cruise Control system takes
over accelerator operations at speeds greater than
20 mph (32 km/h).
The Cruise Control buttons are located on the right
side of the steering wheel.
4
23_JT_OM_EN_USC_t.book Page 173
Page 178 of 448
176STARTING AND OPERATING
(Continued)
Adaptive Cruise Control (ACC) Operation
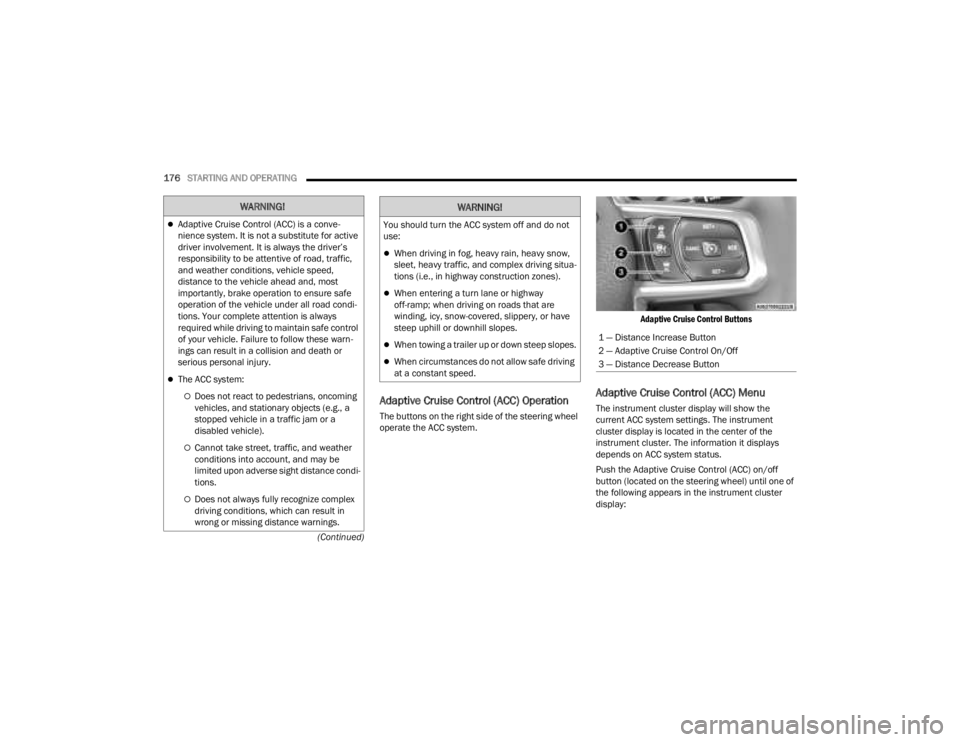
The buttons on the right side of the steering wheel
operate the ACC system.
Adaptive Cruise Control Buttons
Adaptive Cruise Control (ACC) Menu
The instrument cluster display will show the
current ACC system settings. The instrument
cluster display is located in the center of the
instrument cluster. The information it displays
depends on ACC system status.
Push the Adaptive Cruise Control (ACC) on/off
button (located on the steering wheel) until one of
the following appears in the instrument cluster
display:
WARNING!
Adaptive Cruise Control (ACC) is a conve
-
nience system. It is not a substitute for active
driver involvement. It is always the driver’s
responsibility to be attentive of road, traffic,
and weather conditions, vehicle speed,
distance to the vehicle ahead and, most
importantly, brake operation to ensure safe
operation of the vehicle under all road condi -
tions. Your complete attention is always
required while driving to maintain safe control
of your vehicle. Failure to follow these warn -
ings can result in a collision and death or
serious personal injury.
The ACC system:
Does not react to pedestrians, oncoming
vehicles, and stationary objects (e.g., a
stopped vehicle in a traffic jam or a
disabled vehicle).
Cannot take street, traffic, and weather
conditions into account, and may be
limited upon adverse sight distance condi -
tions.
Does not always fully recognize complex
driving conditions, which can result in
wrong or missing distance warnings.
You should turn the ACC system off and do not
use:
When driving in fog, heavy rain, heavy snow,
sleet, heavy traffic, and complex driving situa -
tions (i.e., in highway construction zones).
When entering a turn lane or highway
off-ramp; when driving on roads that are
winding, icy, snow-covered, slippery, or have
steep uphill or downhill slopes.
When towing a trailer up or down steep slopes.
When circumstances do not allow safe driving
at a constant speed.
WARNING!
1 — Distance Increase Button
2 — Adaptive Cruise Control On/Off
3 — Distance Decrease Button
23_JT_OM_EN_USC_t.book Page 176
Page 179 of 448
STARTING AND OPERATING177
Adaptive Cruise Control Off
When ACC is deactivated, the display will read
“Adaptive Cruise Control Off.”
Adaptive Cruise Control Ready
When ACC is activated, but the vehicle speed
setting has not been selected, the display will read
“Adaptive Cruise Control Ready.”
Adaptive Cruise Control Set
When the SET (+) or the SET (-) button (located on
the steering wheel) is pushed, the display will read
“ACC SET.”
When ACC is set, the set speed will show in the
instrument cluster display.
The ACC screen may display once again if any of
the following ACC activity occurs:
System Cancel
Driver Override
System Off
ACC Proximity Warning
ACC Unavailable Warning
The instrument cluster display will return to the last
display selected after five seconds of no ACC
display activity.
Activating Adaptive Cruise Control (ACC)
The minimum set speed for the ACC system is
20 mph (32 km/h).
When the system is turned on and in the ready
state, the instrument cluster displays “ACC Ready.”
When the system is off, the instrument cluster
displays “Adaptive Cruise Control (ACC) Off.”
NOTE:You cannot engage ACC under the following condi -
tions:
When in 4WD Low
When the brakes are applied
When the parking brake is applied
When the automatic transmission is in PARK,
REVERSE or NEUTRAL
When the manual transmission is in first gear
When the vehicle speed is below 20 mph
(32 km/h) (manual transmission)
When the vehicle speed is below the minimum
speed range
When the brakes are overheated
When the driver’s door is open at low speeds
When the driver’s seat belt is unbuckled at low
speeds
When ESC Full Off mode is active
When Off Road+ (if equipped) is active
To Activate/Deactivate
Push and release the Adaptive Cruise Control
(ACC) on/off button. The ACC menu in the
instrument cluster display will read “ACC Ready.”
To turn the system off, push and release the
Adaptive Cruise Control (ACC) on/off button again.
At this time, the system will turn off and the
instrument cluster display will read “Adaptive
Cruise Control (ACC) Off.”
To Set A Desired Speed
When the vehicle reaches the speed desired, push
the SET (+) button or the SET (-) button and
release. The instrument cluster display will show
the set speed.
NOTE:Fixed Speed Cruise Control can be used without
ACC enabled. To change between the different
modes, push the ACC on/off button which turns
the ACC and the Fixed Speed Cruise Control off.
WARNING!
Leaving the Adaptive Cruise Control (ACC)
system on when not in use is dangerous. You
could accidentally set the system or cause it to
go faster than you want. You could lose control
and have a collision. Always leave the system off
when you are not using it.
4
23_JT_OM_EN_USC_t.book Page 177
Page 191 of 448
STARTING AND OPERATING189
PARKVIEW REAR BACK UP CAMERA
The ParkView Rear Back Up Camera allows you to
see an on-screen image of the rear surroundings of
your vehicle whenever the gear selector is in
REVERSE. The image will be displayed in the
touchscreen display along with a caution note to
“Check Entire Surroundings” across the top of the
screen. After five seconds this note will disappear.
The ParkView camera is located on the tailgate,
above the vehicle license plate.
NOTE:Removing the tailgate will disable the rearview
camera function.
Manual Activation Of The Rear View Camera
1. Go to the Controls screen by pressing the
Controls button located on the bottom of the
Uconnect display, and then press Back Up
Camera.
2. Press the Back Up Camera button to turn the Rear View Camera system on.
When the vehicle is shifted out of REVERSE with
Camera delay turned off, the rear Camera mode is
exited and the previous screen appears again.
When the vehicle is shifted out of REVERSE with
Camera delay turned on, the rear Camera image
will be displayed for up to 10 seconds unless the
vehicle speed exceeds 8 mph (13 km/h), the transmission is shifted into PARK, the ignition is
placed in the OFF position, or the touchscreen X
button to disable display of the Rear View Camera
image is pressed.
Whenever the Rear View Camera image is
activated through the Back Up Camera button in
the Controls menu, and the vehicle speed is
greater than, or equal to 8 mph (13 km/h), a
display timer for the image is initiated. The image
will continue to be displayed until the display timer
exceeds 10 seconds.NOTE:
If the vehicle speed remains below 8 mph
(13 km/h), the Rear View Camera image will be
displayed continuously until deactivated via the
touchscreen X button, the transmission is
shifted into PARK, or the ignition is placed in the
OFF position.
The touchscreen X button to disable display of
the camera image is made available ONLY when
the vehicle is not in REVERSE.
When enabled, active guidelines are overlaid on
the image to illustrate the width of the vehicle and
its projected back up path based on the steering
wheel position. A dashed center line overlay
indicates the center of the vehicle to assist with
parking or aligning to a hitch/receiver. Different colored zones indicate the distance to
the rear of the vehicle.
The following table shows the approximate
distances for each zone:
Zone Distance To The Rear Of
The Vehicle
Red 0 - 1 ft (0 - 30 cm)
Yellow 1 ft - 6.5 ft (30 cm - 2 m)
Green 6.5 ft or greater
(2 m or greater)
WARNING!
Drivers must be careful when backing up even
when using the ParkView Rear Back Up Camera.
Always check carefully behind your vehicle, and
be sure to check for pedestrians, animals, other
vehicles, obstructions, or blind spots before
backing up. You are responsible for the safety of
your surroundings and must continue to pay
attention while backing up. Failure to do so can
result in serious injury or death.
4
23_JT_OM_EN_USC_t.book Page 189
Page 193 of 448
STARTING AND OPERATING191
The TrailCam view can also be activated by
pressing the icon on the Back Up Camera view.
The Back Up Camera view can also be activated by
pressing the icon on the TrailCam view.
When the vehicle is shifted out of REVERSE with
Camera Delay turned off and TrailCam view is
active, the TrailCam mode is exited and the
previous screen appears again.
When the vehicle is shifted out of REVERSE with
Camera Delay turned on and the TrailCam view is
active, the TrailCam image will be displayed for up
to 10 seconds unless the vehicle speed exceeds
8 mph (13 km/h), the transmission is shifted into
PARK, the ignition is placed in the OFF position, or
the touchscreen X button to disable display of the
TrailCam view is pressed.
Whenever the TrailCam image is activated through
the Manual Activation Methods, and the vehicle
speed is greater than or equal to 8 mph (13 km/h),
a display timer for the image is initiated. The image
will continue to be displayed until the display timer
exceeds 10 seconds.
NOTE:
If the vehicle speed remains below 8 mph
(13 km/h) while in 2WD or 4WD High, the
TrailCam image will be displayed continuously
until deactivated via the touchscreen X button,
the transmission is shifted into PARK, or the
ignition is placed in the OFF position.
The touchscreen X button to disable the display
of the camera image is made available ONLY
when the vehicle is not in REVERSE.
The TrailCam view will stay active regardless of
the vehicle speed and time while in 4WD Low.
Cleaning The TrailCam
Press and hold the Clean Camera button located
on the TrailCam view to wash the TrailCam. Washer
fluid will stop when the button is released.
The camera can be washed up to 20 seconds at
a time while holding the button.
The Clean Camera system is not available when
windshield washing is in process.
When enabled, active dynamic Tire Lines are
projected on the ground plane of the TrailCam view
based on the steering wheel position.
REFUELING THE VEHICLE — GASOLINE
ENGINE (IF EQUIPPED)
FUEL FILLER CAP
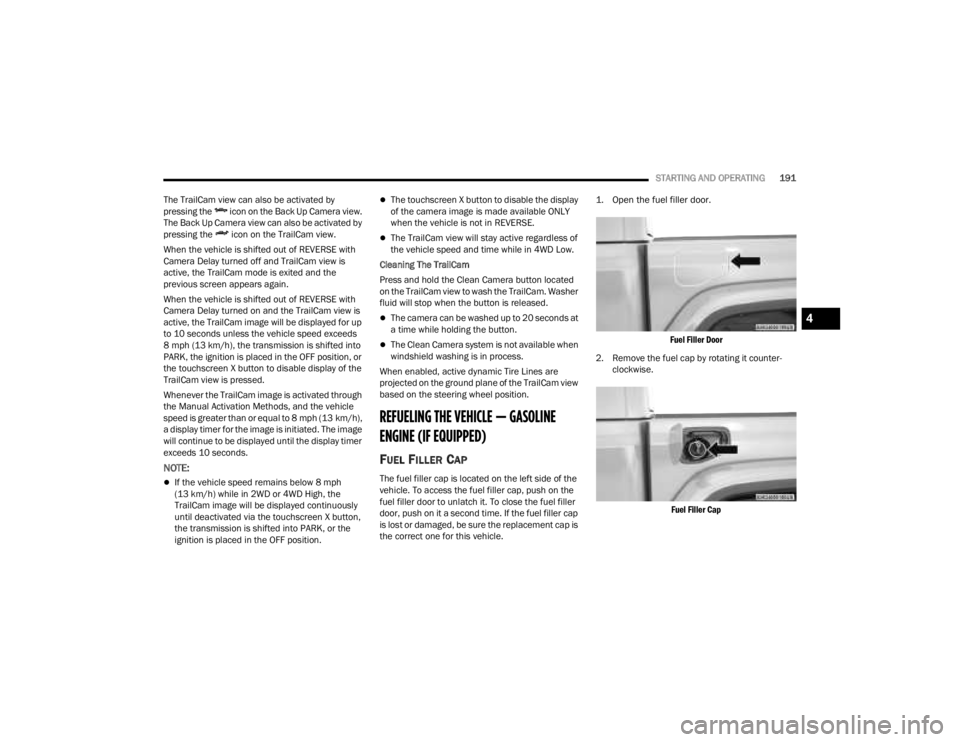
The fuel filler cap is located on the left side of the
vehicle. To access the fuel filler cap, push on the
fuel filler door to unlatch it. To close the fuel filler
door, push on it a second time. If the fuel filler cap
is lost or damaged, be sure the replacement cap is
the correct one for this vehicle.
1. Open the fuel filler door.
Fuel Filler Door
2. Remove the fuel cap by rotating it counter -
clockwise.
Fuel Filler Cap
4
23_JT_OM_EN_USC_t.book Page 191
Page 199 of 448
STARTING AND OPERATING197
TRAILER TOWING
In this section you will find safety tips and
information on limits to the type of towing you can
reasonably do with your vehicle. Before towing a
trailer, carefully review this information to tow your
load as efficiently and safely as possible.
To maintain the New Vehicle Limited Warranty
coverage, follow the requirements and
recommendations in this manual concerning
vehicles used for trailer towing.
COMMON TOWING DEFINITIONS
The following trailer towing related definitions will
assist you in understanding the following
information:
Gross Vehicle Weight Rating (GVWR)
The GVWR is the total allowable weight of your
vehicle. This includes driver, passengers, cargo
and tongue weight. The total load must be limited
so that you do not exceed the GVWR Ú page 195.
Gross Trailer Weight (GTW)
The GTW is the weight of the trailer plus the weight
of all cargo, consumables and equipment
(permanent or temporary) loaded in or on the trailer
in its "loaded and ready for operation" condition.
The recommended way to measure GTW is to put
your fully loaded trailer on a vehicle scale. The
entire weight of the trailer must be supported by
the scale.
Gross Combination Weight Rating (GCWR)
The GCWR is the total permissible weight of your
vehicle and trailer when weighed in combination.
Gross Axle Weight Rating (GAWR)
The GAWR is the maximum capacity of the front
and rear axles. Distribute the load over the front
and rear axles evenly. Make sure that you do not
exceed either front or rear GAWR Úpage 195.
Tongue Weight (TW)
The TW is the downward force exerted on the hitch
ball by the trailer. You must consider this as part of
the load on your vehicle.
Frontal Area
The frontal area is the maximum height multiplied
by the maximum width of the front of a trailer.
Trailer Sway Control (TSC) — If Equipped
The TSC is a telescoping link that can be installed
between the hitch receiver and the trailer tongue.
It typically provides adjustable friction associated
with the telescoping motion to dampen any
unwanted trailer swaying motions while traveling.
Weight-Carrying Hitch
A weight-carrying hitch supports the trailer tongue
weight, just as if it were luggage located at a hitch
ball or some other connecting point of the vehicle.
These kinds of hitches are commonly used to tow
small and medium sized trailers.
Weight-Distributing Hitch
A Weight-Distributing Hitch system works by
applying leverage through spring (load) bars. They
are typically used for heavier loads to distribute
trailer tongue weight to the tow vehicle's front axle
and the trailer axle(s). When used in accordance
with the manufacturer's directions, it provides for a
more level ride, offering more consistent steering
and brake control thereby enhancing towing
safety. The addition of a friction/hydraulic sway
control also dampens sway caused by traffic and
crosswinds and contributes positively to tow
vehicle and trailer stability. Trailer sway control and
WARNING!
If the gross trailer weight is 2,000 lb (907 kg) or
more, it is recommended to use a weight-
distributing hitch to ensure stable handling of
your vehicle. If you use a standard weight-
carrying hitch, you could lose control of your
vehicle and cause a collision.
WARNING!
It is important that you do not exceed the
maximum front or rear GAWR. A dangerous
driving condition can result if either rating is
exceeded.
4
23_JT_OM_EN_USC_t.book Page 197