Lever JEEP GRAND CHEROKEE 2002 WJ / 2.G Workshop Manual
[x] Cancel search | Manufacturer: JEEP, Model Year: 2002, Model line: GRAND CHEROKEE, Model: JEEP GRAND CHEROKEE 2002 WJ / 2.GPages: 2199, PDF Size: 76.01 MB
Page 1833 of 2199

(4) Install the transfer case shift cable to the
shifter assembly bracket. Seat cable in bracket and
install clip (Fig. 102).
(5) Verify the transfer case shift lever (at console)
is in the NEUTRAL position.
(6) Snap the cable onto the shift lever pin (Fig.
102).
(7) Raise the vehicle.
(8) Install the shift cable to the shift cable support
bracket and install clip (Fig. 101).(9) Verify that the transfer case is still in the
NEUTRAL position.
(10) Snap the shift cable onto the transfer case
shift lever (Fig. 101).
(11) Lower vehicle.
(12) Verify correct transfer case operation in all
ranges.
(13) Install any console parts removed for access to
transfer case shift cable.
21 - 314 TRANSFER CASE - NV242WJ
SHIFT CABLE (Continued)
Page 1835 of 2199

OPERATION
Under normal driving conditions, the system oper-
ates conventionally, and the majority of available
torque is applied to the rear wheels. However, when
front-to-rear wheel speed variations exist, the pro-
gressive differential transfers torque to the axle with
the better traction, thus minimizing wheel spin and
maximizing control.
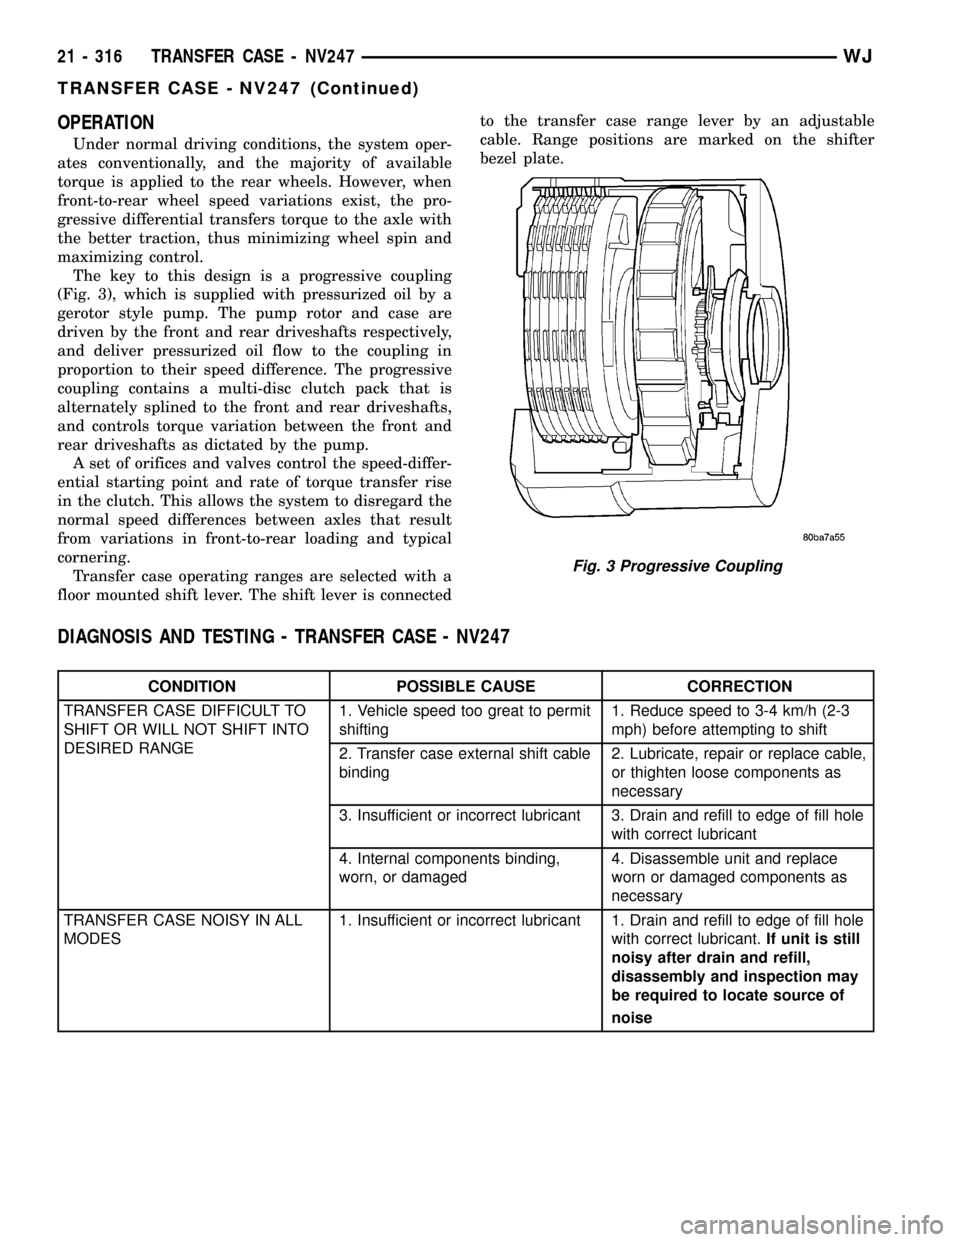
The key to this design is a progressive coupling
(Fig. 3), which is supplied with pressurized oil by a
gerotor style pump. The pump rotor and case are
driven by the front and rear driveshafts respectively,
and deliver pressurized oil flow to the coupling in
proportion to their speed difference. The progressive
coupling contains a multi-disc clutch pack that is
alternately splined to the front and rear driveshafts,
and controls torque variation between the front and
rear driveshafts as dictated by the pump.
A set of orifices and valves control the speed-differ-
ential starting point and rate of torque transfer rise
in the clutch. This allows the system to disregard the
normal speed differences between axles that result
from variations in front-to-rear loading and typical
cornering.
Transfer case operating ranges are selected with a
floor mounted shift lever. The shift lever is connectedto the transfer case range lever by an adjustable
cable. Range positions are marked on the shifter
bezel plate.
DIAGNOSIS AND TESTING - TRANSFER CASE - NV247
CONDITION POSSIBLE CAUSE CORRECTION
TRANSFER CASE DIFFICULT TO
SHIFT OR WILL NOT SHIFT INTO
DESIRED RANGE1. Vehicle speed too great to permit
shifting1. Reduce speed to 3-4 km/h (2-3
mph) before attempting to shift
2. Transfer case external shift cable
binding2. Lubricate, repair or replace cable,
or thighten loose components as
necessary
3. Insufficient or incorrect lubricant 3. Drain and refill to edge of fill hole
with correct lubricant
4. Internal components binding,
worn, or damaged4. Disassemble unit and replace
worn or damaged components as
necessary
TRANSFER CASE NOISY IN ALL
MODES1. Insufficient or incorrect lubricant 1. Drain and refill to edge of fill hole
with correct lubricant.If unit is still
noisy after drain and refill,
disassembly and inspection may
be required to locate source of
noise
Fig. 3 Progressive Coupling
21 - 316 TRANSFER CASE - NV247WJ
TRANSFER CASE - NV247 (Continued)
Page 1836 of 2199

CONDITION POSSIBLE CAUSE CORRECTION
NOISY INÐOR JUMPS OUT OF
4WD LOW RANGE1. Transfer case not completely
engaged in 4WD LOW (possibly
from shift to 4L while rolling)1. Stop vehicle, shift transfer case
to neutral, then shift back to 4WD
LOW
2. Shift linkage loose, binding, or is
misadjusted2. Tighten, lubricate, or repair
linkage as necessary. Adjust linkage
if necessary
3. Range fork cracked, inserts
worn, or fork is binding on shift rail3. Disassemble unit and repair as
necessary
4. Annulus gear or lockplate worn
or damaged4. Disassemble unit and repair as
necessary
LUBRICANT LEAKING FROM
OUTPUT SHAFT SEALS OR FROM
VENT1. Transfer case over filled 1. Drain to correct level
2. Vent closed or restricted 2. Clear or replace vent if necessary
3. Output shaft seals damaged or
installed correctly3. Replace seals. Be sure seal lip
faces interior of case when installed.
Also be sure yoke seal surfaces are
not scored or nicked. Remove
scores and nicks with fine
sandpaper or replace yoke(s) if
necessary.
REMOVAL
(1) Shift transfer case into NEUTRAL.
(2) Raise vehicle.
(3) Remove transfer case drain plug and drain
transfer case lubricant.
(4) Mark front and rear propeller shaft yokes for
alignment reference.
(5) Support transmission with jack stand.
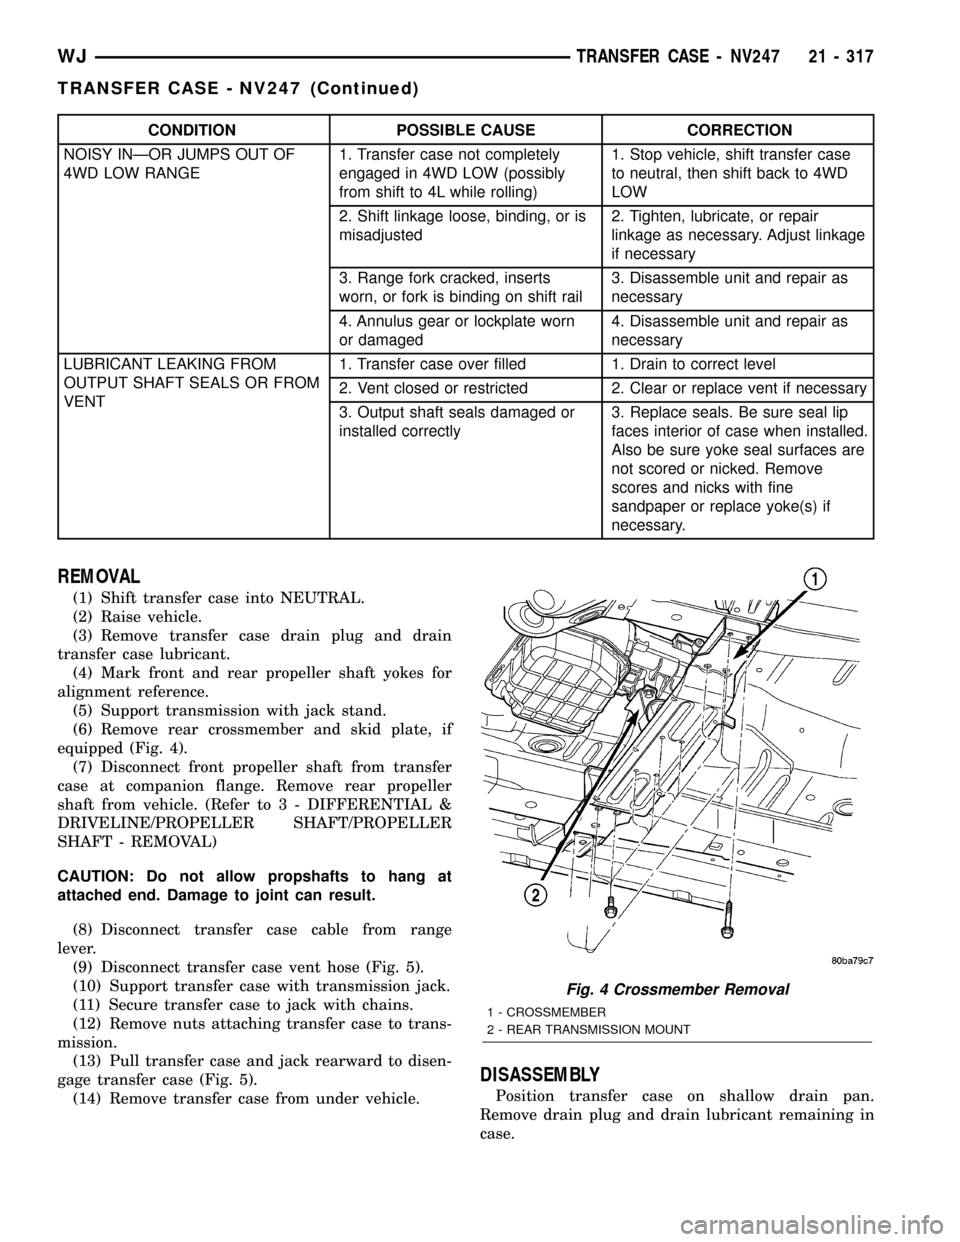
(6) Remove rear crossmember and skid plate, if
equipped (Fig. 4).
(7) Disconnect front propeller shaft from transfer
case at companion flange. Remove rear propeller
shaft from vehicle. (Refer to 3 - DIFFERENTIAL &
DRIVELINE/PROPELLER SHAFT/PROPELLER
SHAFT - REMOVAL)
CAUTION: Do not allow propshafts to hang at
attached end. Damage to joint can result.
(8) Disconnect transfer case cable from range
lever.
(9) Disconnect transfer case vent hose (Fig. 5).
(10) Support transfer case with transmission jack.
(11) Secure transfer case to jack with chains.
(12) Remove nuts attaching transfer case to trans-
mission.
(13) Pull transfer case and jack rearward to disen-
gage transfer case (Fig. 5).
(14) Remove transfer case from under vehicle.
DISASSEMBLY
Position transfer case on shallow drain pan.
Remove drain plug and drain lubricant remaining in
case.
Fig. 4 Crossmember Removal
1 - CROSSMEMBER
2 - REAR TRANSMISSION MOUNT
WJTRANSFER CASE - NV247 21 - 317
TRANSFER CASE - NV247 (Continued)
Page 1838 of 2199

(5) Remove rear bearing snap-ring.
(6) Remove rear bearing. Note position of bearing
locating ring groove for assembly reference.
(7) Disengage oil pickup tube from oil pump and
remove oil pump assembly (Fig. 11).
(8) Remove pick-up tube o-ring from oil pump (Fig.
12), if necessary. Do not disassemble the oil pump, it
is not serviceable.
COMPANION FLANGE AND RANGE LEVER
(1) Remove front companion flange nut as follows:
(a) Move range lever to 4L position.
(b) Remove nut with socket and impact wrench.
(2) Remove companion flange. If flange is difficult
to remove by hand, remove it with bearing splitter, orwith standard two jaw puller. Be sure puller tool is
positioned on flange and not on slinger as slinger will
be damaged.
(3) Remove seal washer from front output shaft.
Discard washer as it should not be reused.
(4) Remove nut and washer that attach range
lever to sector shaft. Then move sector to neutral
position and remove range lever from shaft.
NOTE: Note position of range lever so it can be re-
installed correctly.
Fig. 9 Disengaging Rear Bearing Locating Ring
1 - REAR RETAINER
2 - PARALLEL JAW SNAP-RING PLIERS
Fig. 10 Rear Retainer Removal
1 - REAR CASE
2 - REAR RETAINER
Fig. 11 Rear Bearing and Oil Pump Removal
1 - OIL PUMP
2 - TUBE O-RING
3 - OIL PICKUP TUBE
Fig. 12 Pick-up Tube O-ring Location
1 - OIL PUMP
2 - O-RING
WJTRANSFER CASE - NV247 21 - 319
TRANSFER CASE - NV247 (Continued)
Page 1853 of 2199

COMPANION FLANGE AND RANGE LEVER
(1) Install range lever, washer and locknut on sec-
tor shaft (Fig. 62). Tighten locknut to 27-34 N´m
(20-25 ft. lbs.) torque.
(2) Install new seal washer on front output shaft
(Fig. 63).
(3) Lubricate flange hub with transfer case lubri-
cant and install flange on front shaft.
(4) Install new seal washer on front shaft.
(5) Install companion flange and new nut on front
output shaft.
(6) Tighten flange nut to 122-176 N´m (90-130 ft.
lbs.) torque. Use Tool C-3281, or similar tool to hold
flange while tightening yoke nut.
REAR RETAINER AND OIL PUMP
(1) Install new O-ring on flanged end of oil pickup
tube.
(2) Install oil pump (Fig. 64).
(3) Insert oil pickup tube in pump (Fig. 65).(4) Install rear bearing on mainshaft (Fig. 65).
Locating ring groove in bearing goes toward end of
mainshaft.
(5) Install rear bearing retaining snap-ring (Fig.
66).
(6) Install rear bearing locating ring in rear
retainer, if ring was removed during overhaul.
Fig. 62 Range Lever Installation - Typical
1 - RANGE LEVER
2 - WASHER
3 - LOCKNUT
Fig. 63 Flange Seal Washer Installation
1 - YOKE SEAL WASHER
Fig. 64 Installing Oil Pump
1 - OIL PUMP
2 - TUBE O-RING
3 - OIL PICKUP TUBE
Fig. 65 Rear Bearing Installation
1 - REAR BEARING
Fig. 66 Rear Bearing Snap-Ring Installation
1 - REAR BEARING
2 - SNAP-RING PLIERS
3 - SNAP-RING
21 - 334 TRANSFER CASE - NV247WJ
TRANSFER CASE - NV247 (Continued)
Page 1855 of 2199

(6) Connect front propeller shaft and install rear
propeller shaft. (Refer to 3 - DIFFERENTIAL &
DRIVELINE/PROPELLER SHAFT/PROPELLER
SHAFT - INSTALLATION)
(7) Fill transfer case with correct fluid. Check
transmission fluid level. Correct as necessary.
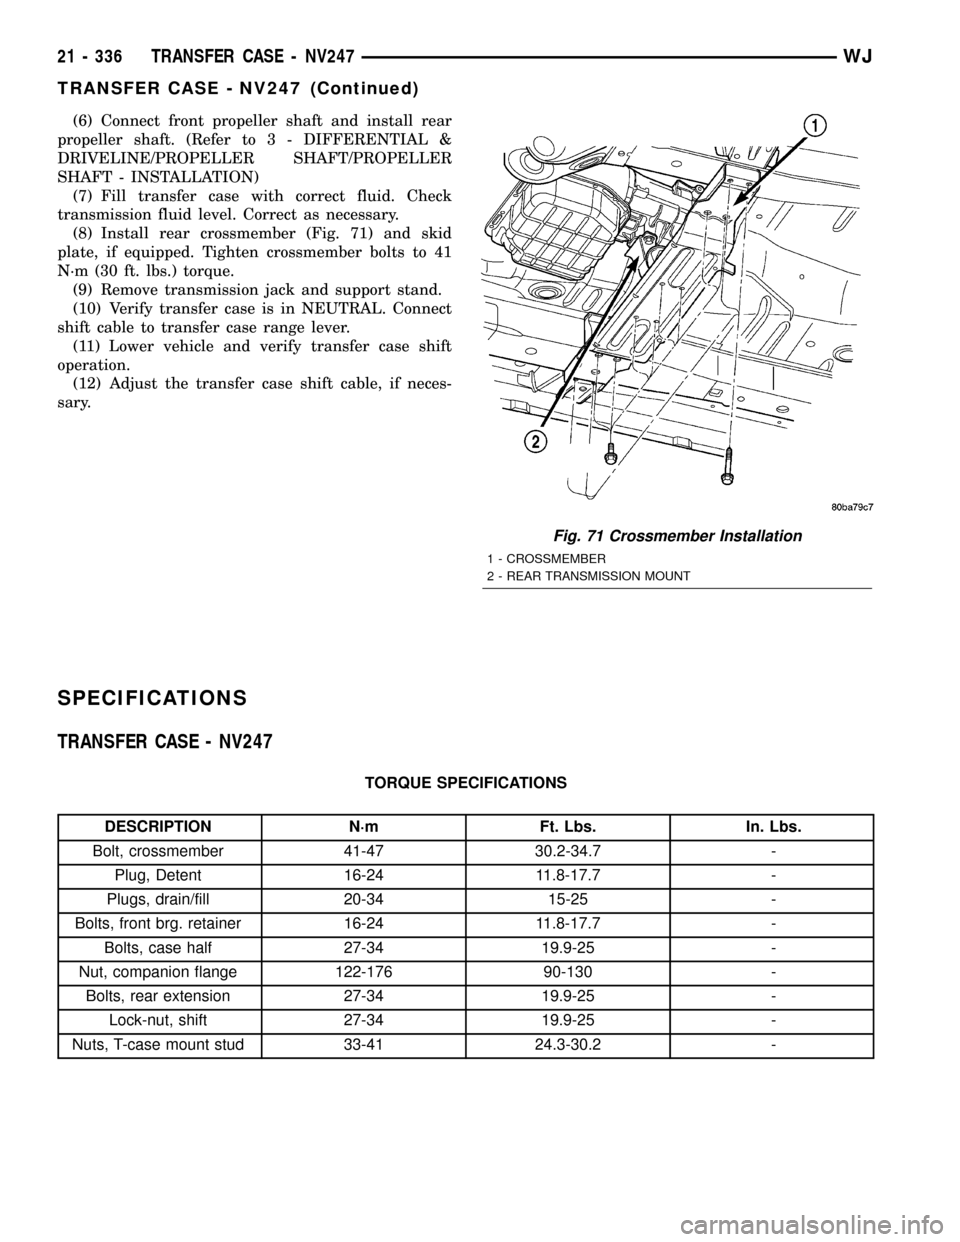
(8) Install rear crossmember (Fig. 71) and skid
plate, if equipped. Tighten crossmember bolts to 41
N´m (30 ft. lbs.) torque.
(9) Remove transmission jack and support stand.
(10) Verify transfer case is in NEUTRAL. Connect
shift cable to transfer case range lever.
(11) Lower vehicle and verify transfer case shift
operation.
(12) Adjust the transfer case shift cable, if neces-
sary.
SPECIFICATIONS
TRANSFER CASE - NV247
TORQUE SPECIFICATIONS
DESCRIPTION N´m Ft. Lbs. In. Lbs.
Bolt, crossmember 41-47 30.2-34.7 -
Plug, Detent 16-24 11.8-17.7 -
Plugs, drain/fill 20-34 15-25 -
Bolts, front brg. retainer 16-24 11.8-17.7 -
Bolts, case half 27-34 19.9-25 -
Nut, companion flange 122-176 90-130 -
Bolts, rear extension 27-34 19.9-25 -
Lock-nut, shift 27-34 19.9-25 -
Nuts, T-case mount stud 33-41 24.3-30.2 -
Fig. 71 Crossmember Installation
1 - CROSSMEMBER
2 - REAR TRANSMISSION MOUNT
21 - 336 TRANSFER CASE - NV247WJ
TRANSFER CASE - NV247 (Continued)
Page 1859 of 2199

SHIFT CABLE
REMOVAL
(1) Shift transfer case into NEUTRAL.
(2) Raise vehicle.
(3) Disconnect the shift cable eyelet from the
transfer case shift lever (Fig. 78).
(4) Remove shift cable from the cable support
bracket.
(5) Lower vehicle.
(6) Remove any necessary console parts for access
to shift lever assembly and shift cable.
(7) Disconnect cable at shift lever and shifter
assembly bracket (Fig. 79).
(8) Remove the nuts holding the shift cable seal
plate to the floor pan (Fig. 80).
(9) Pull cable through floor panel opening.
(10) Remove transfer case shift cable from vehicle.
INSTALLATION
(1) Route cable through hole in floor pan.
(2) Install seal plate to studs in floor pan.
(3) Install nuts to hold seal plate to floor pan (Fig.
80). Tighten nuts to 7 N´m (65 in.lbs.).
(4) Install the transfer case shift cable to the
shifter assembly bracket. Seat cable in bracket and
install clip (Fig. 79).
(5) Verify the transfer case shift lever (at console)
is in the NEUTRAL position.
(6) Snap the cable onto the shift lever pin (Fig.
79).
(7) Raise the vehicle.(8) Install the shift cable to the shift cable support
bracket and install clip (Fig. 78).
(9) Verify that the transfer case is still in the
NEUTRAL position.
(10) Snap the shift cable onto the transfer case
shift lever (Fig. 78).
(11) Lower vehicle.
(12) Verify correct transfer case operation in all
ranges.
(13) Install any console parts removed for access to
transfer case shift cable.
Fig. 78 Transfer Case Shift Cable at Transfer Case
1 - TRANSFER CASE SHIFT LEVER
2 - TRANSFER CASE SHIFT CABLE
Fig. 79 Transfer Case Shift Cable at Shifter
1 - CLIP
2 - SHIFTER
3 - TRANSFER CASE SHIFT LEVER PIN
4 - TRANSFER CASE SHIFT CABLE
Fig. 80 Shift Cables at Floor Pan
1 - SEAL PLATES
2 - TRANSMISSION SHIFT CABLE
3 - TRANSFER CASE SHIFT CABLE
21 - 340 TRANSFER CASE - NV247WJ
Page 1904 of 2199

(4) Remove the screws attaching the supports to
the roof panel.
(5) Separate the supports from the roof panel.
NOTE: If a crossbar needs to be serviced, the for-
ward or rearward supports will have to be removed.
INSTALLATION
(1) Position the supports on the roof panel and
install the screw. Be sure that the gasket is properly
seated.
(2) Position the luggage rack on the supports.
(3) Install the screws attaching the side rails to
the supports.
(4) Position the supports covers on the supports
and press into place.
SIDE VIEW MIRROR GLASS
REMOVAL
(1) With damaged mirror still on vehicle, position
mirror glass down and centered.
(2) Position a wide leverage device between the
bottom edge of the glass and the mirror shell.
(3) Firmly apply pressure in an upward direction
until glass assembly disengages from adapter plate.
(4) Disconnect the heater wire terminal, if
equipped, or the EC plug, if equipped.
INSTALLATION
(1) Connect the heater wire terminal or the EC
plug, if equipped.
(2) Position the replacement glass in the mirror
shell and align the four snap tabs with the four cav-
ities in the shell.
(3) Apply firm pressure inward until the replace-
ment glass assembly engages with the adapter plate.
Correct assembly will result in a firm click. Glass
assembly should exhibit even gaps to the shell when
complete.
(4) Pull lightly on corners of glass assembly to
ensure all four snaps are engaged and there is no
free play.
SIDE VIEW MIRROR
REMOVAL
(1) Remove door trim panel, refer to (Refer to 23 -
BODY/DOOR - FRONT/TRIM PANEL - REMOVAL).
(2) Disengage power mirror harness connector, if
equipped.
(3) Remove mirror flag seal.
(4) Remove nuts attaching mirror to door (Fig. 11).
(5) Separate mirror from door.
INSTALLATION
(1) Position mirror on door. Verify that gasket seal
is properly positioned.
(2) Install nuts attaching mirror to door (Fig. 11).
(3) Install mirror retaining nuts.
(4) Install mirror flag seal.
(5) Engage power mirror harness connector, if
equipped.
(6) Install door trim panel, refer to (Refer to 23 -
BODY/DOOR - FRONT/TRIM PANEL - INSTALLA-
TION).
Fig. 11 Side View Mirror
1 - SIDEVIEW MIRROR
2 - MIRROR FLAG SEAL
3 - CONNECTOR
WJEXTERIOR 23 - 31
LUGGAGE RACK (Continued)
Page 1949 of 2199

FLOOR CONSOLE
REMOVAL
CAUTION: The ACM should be depowered by dis-
connecting the negative battery cable in any opera-
tion requiring the key to be turned ªONº, while
working in the console area. E.G. console, carpet,
or seat removal or installation; shifter linkage
adjustment or replacement; parking brake cable
replacement or adjustment. Failure to take proper
precautions could result in accidental airbag
deployment and possible personal injury.
(1) Set park brake.
(2) Place transmission shift lever and transfer case
lever in full rearward position.
(3) Remove mat from front bin and remove screws
attaching front of console to floor (Fig. 8).
(4) Remove screws attaching rear bin to console.
(5) Remove rear bin.
(6) Pull rear passenger cupholder outward to
access screws.
(7)
Remove screws attaching rear of console to floor.
(8) Lift the console upward and rearward.
(9) Remove console from vehicle.
INSTALLATION
CAUTION: The ACM should be depowered by dis-
connecting the negative battery cable in any opera-
tion requiring the key to be turned ªONº, while
working in the console area. E.G. console, carpet,
or seat removal or installation; shifter linkage
adjustment or replacement; parking brake cable
replacement or adjustment. Failure to take proper
precautions could result in accidental airbag
deployment and possible personal injury.
(1) Position console in vehicle. Ensure rear passen-
ger HEVAC duct is engaged.
(2) Install screws attaching rear of console to floor.
(3) Position rear bin in console.
(4) Install screws attaching rear bin to console.
(5) Install screws attaching front of console to floor
and place front bin mat in front bin.
(6) Return transmission shift lever and transfer
case lever to original position.
(7) Release park brake.
Fig. 8 Floor Console
1 - REAR BIN
2 - CONSOLE LID
3 - SHIFTER CONSOLE
4 - BRACKET5 - PARKING BRAKE
6 - FRONT PIN
7-MAT
23 - 76 INTERIORWJ
Page 1961 of 2199

REAR HEADREST
REMOVAL
(1) Depress head rest release button and lift head
rest to full up position.
(2) Using a small flat blade, depress tab on out-
board side head rest release button and using your
hand, simultaneously press tab on inboard side head
rest release button (Fig. 9) and pull head rest up to
separate from seat back.
INSTALLATION
(1) Position head rest in seat back, press tab on
inboard side head rest release button cap and push
down head restraint to secure.
REAR HEADREST RELEASE
KNOB
REMOVAL
(1) Using a razor knife or equivalent, cut the
release knob from the release lever.
(2) Pull the release knob from the lever (Fig. 10).
INSTALLATION
(1) Position the release knob on the lever and
press to snap in place.
REAR HEADREST FOLDING
MECHANISM
REMOVAL
(1) Remove the head rest (Refer to 23 - BODY/
SEATS/REAR HEADREST - REMOVAL).
(2) Remove folding mechanism cover (Fig. 10).
(3) Remove the screws that secure the head rest
bun to the folding mechanism.
NOTE: The folding release knob is always located
on the outboard side.
INSTALLATION
(1) Position the head rest bun on the folding mech-
anism and install the screws.
(2) Install the folding mechanism cover.
(3) Install the head restraint (Refer to 23 - BODY/
SEATS/REAR HEADREST - INSTALLATION).
Fig. 9 Head Rest
1 - HEAD RESTRAINT
2 - FLAT BLADE
Fig. 10 Rear Seat Head Rest Folding Mechanism
1 - REAR SEAT HEAD REST FOLDING MECHANISM
2 - RELEASE KNOB
3 - FOLDING MECHANISM COVER
23 - 88 SEATSWJ