Outlet JEEP GRAND CHEROKEE 2002 WJ / 2.G Owner's Manual
[x] Cancel search | Manufacturer: JEEP, Model Year: 2002, Model line: GRAND CHEROKEE, Model: JEEP GRAND CHEROKEE 2002 WJ / 2.GPages: 2199, PDF Size: 76.01 MB
Page 619 of 2199
(4) Reinstall the washer hoses for the front washer
nozzle(s) into their routing clips on the underside of
the cowl grille cover.
(5) Position the cowl grille cover onto the cowl ple-
num and cowl top panels through the opening
between the hood and the base of the windshield
(Fig. 4).
(6) Lift the left end of the cowl grille cover off of
the cowl plenum panel far enough to access the front
washer plumbing.
(7) Reconnect the cowl grille cover washer hose to
the engine compartment washer hose at the elbow
connector.
(8) Install the six plastic nuts that secure the cowl
grille cover to the studs on the cowl top panel near
the base of the windshield. These nuts are to be
installed by pushing them onto the studs in the fol-
lowing sequence:
(a) First, install the short nuts to the third stud
from the right, then the second stud from the left.
(b) Next, install the long nuts to the right out-
board stud, then the left outboard stud.
(c) Finally, install the two remaining long nuts
to the third stud from the left, then the second
stud from the right.
(9) Starting at the ends and working toward the
center, push the hood to plenum seal onto the for-
ward flanges of the cowl grille cover and the plenum
panel.
(10) Close and latch the hood.
(11) Reinstall the wiper arms onto the wiper piv-
ots. (Refer to 8 - ELECTRICAL/FRONT WIPERS/
WASHERS/FRONT WIPER ARMS -
INSTALLATION).
(12) Reconnect the battery negative cable.
FRONT WASHER PUMP/
MOTOR
DESCRIPTION
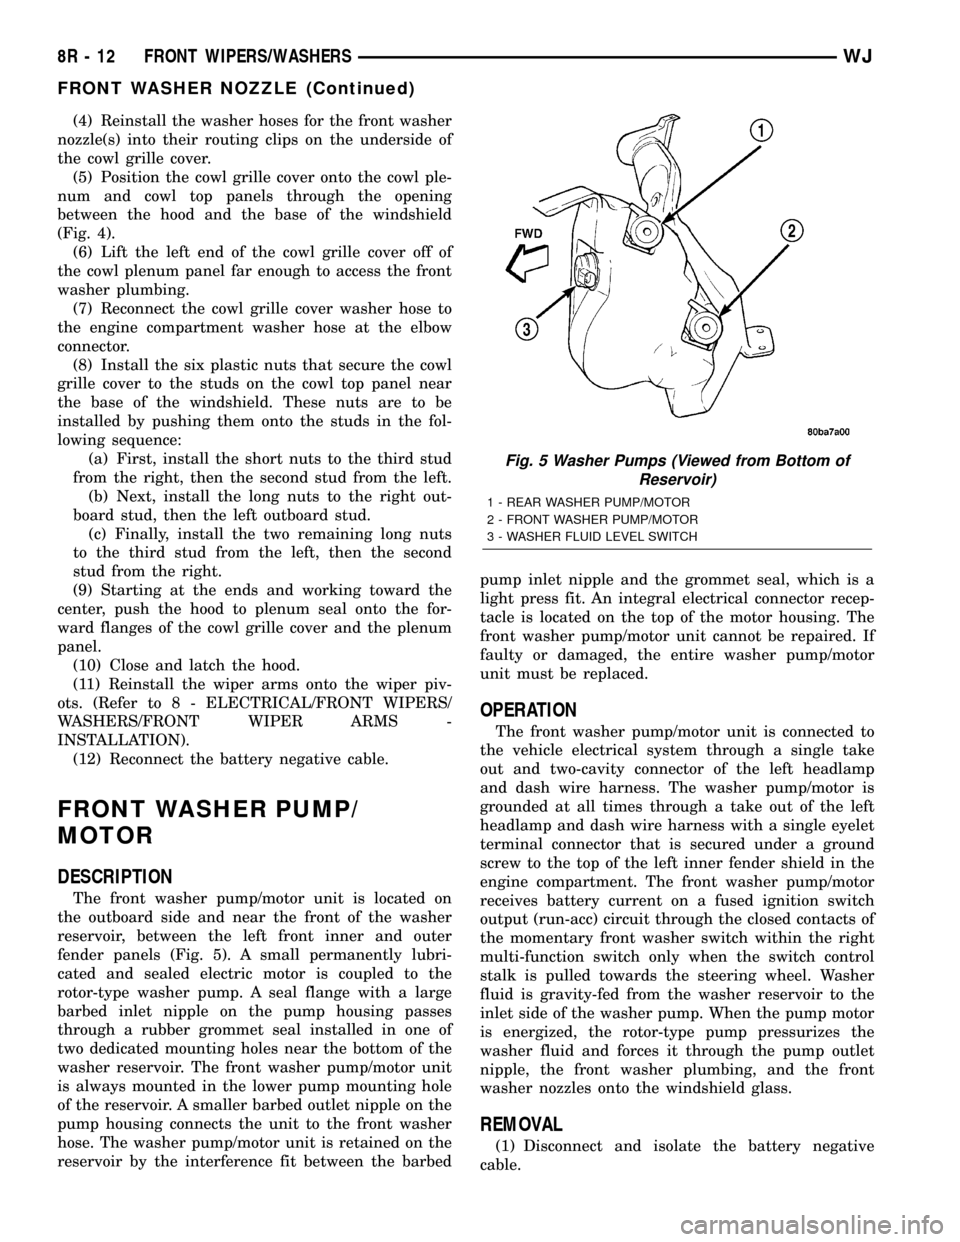
The front washer pump/motor unit is located on
the outboard side and near the front of the washer
reservoir, between the left front inner and outer
fender panels (Fig. 5). A small permanently lubri-
cated and sealed electric motor is coupled to the
rotor-type washer pump. A seal flange with a large
barbed inlet nipple on the pump housing passes
through a rubber grommet seal installed in one of
two dedicated mounting holes near the bottom of the
washer reservoir. The front washer pump/motor unit
is always mounted in the lower pump mounting hole
of the reservoir. A smaller barbed outlet nipple on the
pump housing connects the unit to the front washer
hose. The washer pump/motor unit is retained on the
reservoir by the interference fit between the barbedpump inlet nipple and the grommet seal, which is a
light press fit. An integral electrical connector recep-
tacle is located on the top of the motor housing. The
front washer pump/motor unit cannot be repaired. If
faulty or damaged, the entire washer pump/motor
unit must be replaced.
OPERATION
The front washer pump/motor unit is connected to
the vehicle electrical system through a single take
out and two-cavity connector of the left headlamp
and dash wire harness. The washer pump/motor is
grounded at all times through a take out of the left
headlamp and dash wire harness with a single eyelet
terminal connector that is secured under a ground
screw to the top of the left inner fender shield in the
engine compartment. The front washer pump/motor
receives battery current on a fused ignition switch
output (run-acc) circuit through the closed contacts of
the momentary front washer switch within the right
multi-function switch only when the switch control
stalk is pulled towards the steering wheel. Washer
fluid is gravity-fed from the washer reservoir to the
inlet side of the washer pump. When the pump motor
is energized, the rotor-type pump pressurizes the
washer fluid and forces it through the pump outlet
nipple, the front washer plumbing, and the front
washer nozzles onto the windshield glass.
REMOVAL
(1) Disconnect and isolate the battery negative
cable.
Fig. 5 Washer Pumps (Viewed from Bottom of
Reservoir)
1 - REAR WASHER PUMP/MOTOR
2 - FRONT WASHER PUMP/MOTOR
3 - WASHER FLUID LEVEL SWITCH
8R - 12 FRONT WIPERS/WASHERSWJ
FRONT WASHER NOZZLE (Continued)
Page 620 of 2199
(2) Raise and support the vehicle.
(3) Remove the liner from the left front fender
wheel house.
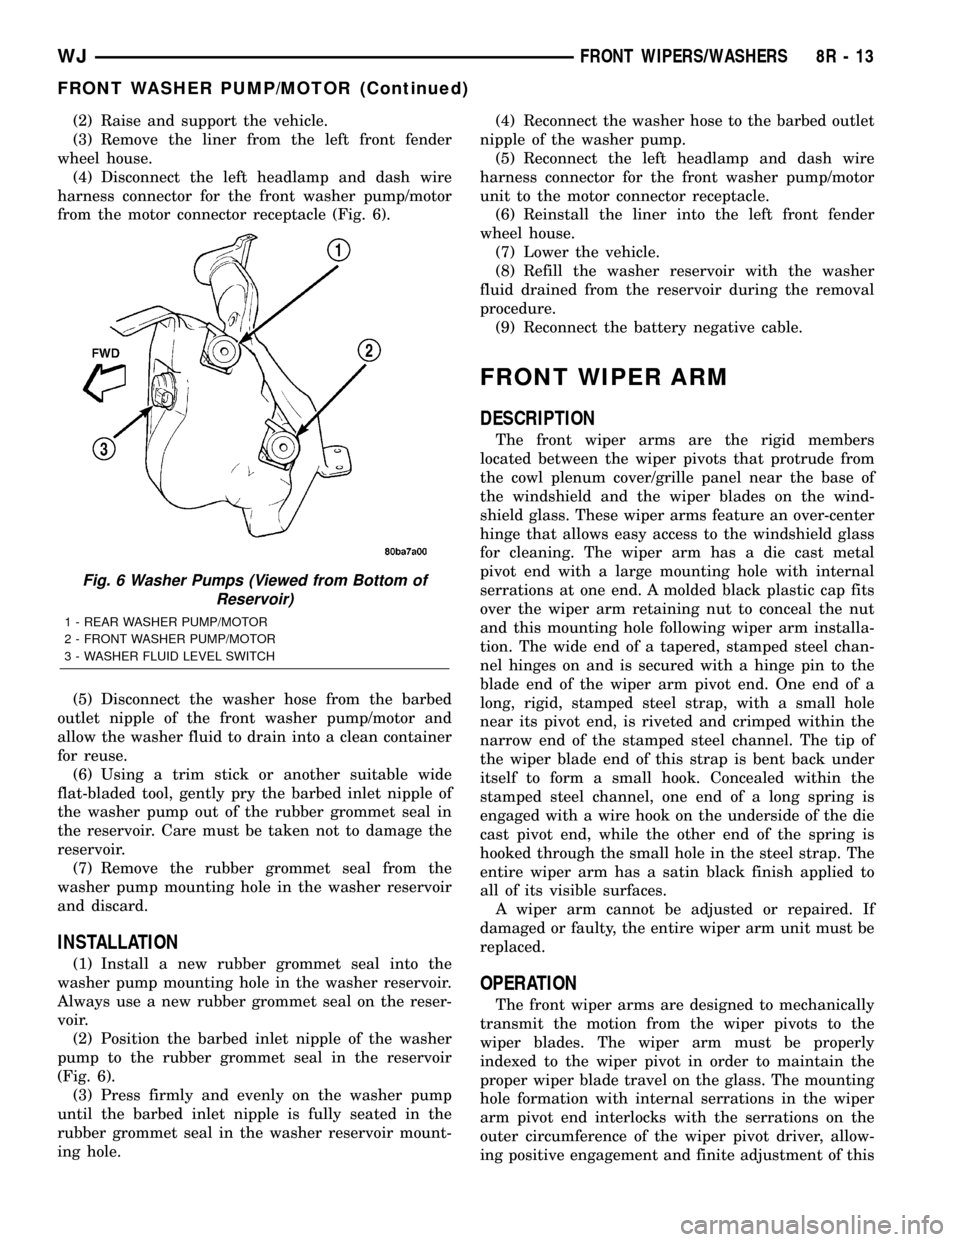
(4) Disconnect the left headlamp and dash wire
harness connector for the front washer pump/motor
from the motor connector receptacle (Fig. 6).
(5) Disconnect the washer hose from the barbed
outlet nipple of the front washer pump/motor and
allow the washer fluid to drain into a clean container
for reuse.
(6) Using a trim stick or another suitable wide
flat-bladed tool, gently pry the barbed inlet nipple of
the washer pump out of the rubber grommet seal in
the reservoir. Care must be taken not to damage the
reservoir.
(7) Remove the rubber grommet seal from the
washer pump mounting hole in the washer reservoir
and discard.
INSTALLATION
(1) Install a new rubber grommet seal into the
washer pump mounting hole in the washer reservoir.
Always use a new rubber grommet seal on the reser-
voir.
(2) Position the barbed inlet nipple of the washer
pump to the rubber grommet seal in the reservoir
(Fig. 6).
(3) Press firmly and evenly on the washer pump
until the barbed inlet nipple is fully seated in the
rubber grommet seal in the washer reservoir mount-
ing hole.(4) Reconnect the washer hose to the barbed outlet
nipple of the washer pump.
(5) Reconnect the left headlamp and dash wire
harness connector for the front washer pump/motor
unit to the motor connector receptacle.
(6) Reinstall the liner into the left front fender
wheel house.
(7) Lower the vehicle.
(8) Refill the washer reservoir with the washer
fluid drained from the reservoir during the removal
procedure.
(9) Reconnect the battery negative cable.
FRONT WIPER ARM
DESCRIPTION
The front wiper arms are the rigid members
located between the wiper pivots that protrude from
the cowl plenum cover/grille panel near the base of
the windshield and the wiper blades on the wind-
shield glass. These wiper arms feature an over-center
hinge that allows easy access to the windshield glass
for cleaning. The wiper arm has a die cast metal
pivot end with a large mounting hole with internal
serrations at one end. A molded black plastic cap fits
over the wiper arm retaining nut to conceal the nut
and this mounting hole following wiper arm installa-
tion. The wide end of a tapered, stamped steel chan-
nel hinges on and is secured with a hinge pin to the
blade end of the wiper arm pivot end. One end of a
long, rigid, stamped steel strap, with a small hole
near its pivot end, is riveted and crimped within the
narrow end of the stamped steel channel. The tip of
the wiper blade end of this strap is bent back under
itself to form a small hook. Concealed within the
stamped steel channel, one end of a long spring is
engaged with a wire hook on the underside of the die
cast pivot end, while the other end of the spring is
hooked through the small hole in the steel strap. The
entire wiper arm has a satin black finish applied to
all of its visible surfaces.
A wiper arm cannot be adjusted or repaired. If
damaged or faulty, the entire wiper arm unit must be
replaced.
OPERATION
The front wiper arms are designed to mechanically
transmit the motion from the wiper pivots to the
wiper blades. The wiper arm must be properly
indexed to the wiper pivot in order to maintain the
proper wiper blade travel on the glass. The mounting
hole formation with internal serrations in the wiper
arm pivot end interlocks with the serrations on the
outer circumference of the wiper pivot driver, allow-
ing positive engagement and finite adjustment of this
Fig. 6 Washer Pumps (Viewed from Bottom of
Reservoir)
1 - REAR WASHER PUMP/MOTOR
2 - FRONT WASHER PUMP/MOTOR
3 - WASHER FLUID LEVEL SWITCH
WJFRONT WIPERS/WASHERS 8R - 13
FRONT WASHER PUMP/MOTOR (Continued)
Page 633 of 2199
REMOVAL
The washer fluid level switch can be removed from
the washer reservoir without removing the reservoir
from the vehicle.
(1) Disconnect and isolate the battery negative
cable.
(2) Remove the one screw that secures the washer
reservoir filler neck to the left inner fender shield.
(3) Raise and support the vehicle.
(4) Remove the liner from the left front fender
wheel house.
(5) Disconnect the washer hose from the barbed
outlet nipple of the rearmost (front) washer pump/
motor unit and allow the washer fluid to drain into a
clean container for reuse.
(6) Remove the two screws that secure the inboard
mounting flange of the washer reservoir to the left
inner wheel house.
(7) Pull the bottom of the washer reservoir rear-
ward far enough to access the left headlamp and
dash wire harness connector for the washer fluid
level switch on the front of the reservoir.
(8) Disconnect the left headlamp and dash wire
harness connector for the washer fluid level switch
from the switch connector receptacle.
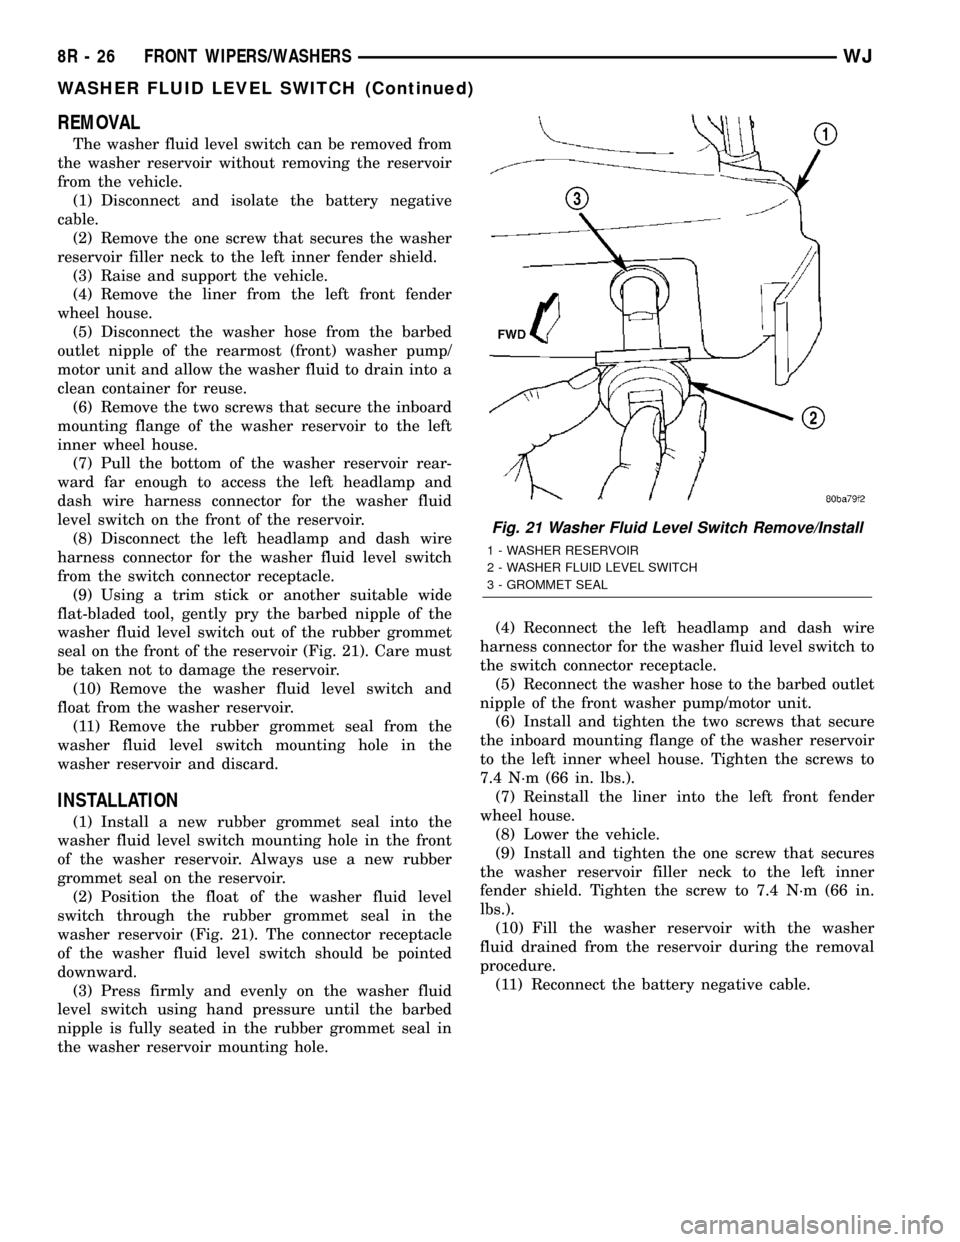
(9) Using a trim stick or another suitable wide
flat-bladed tool, gently pry the barbed nipple of the
washer fluid level switch out of the rubber grommet
seal on the front of the reservoir (Fig. 21). Care must
be taken not to damage the reservoir.
(10) Remove the washer fluid level switch and
float from the washer reservoir.
(11) Remove the rubber grommet seal from the
washer fluid level switch mounting hole in the
washer reservoir and discard.
INSTALLATION
(1) Install a new rubber grommet seal into the
washer fluid level switch mounting hole in the front
of the washer reservoir. Always use a new rubber
grommet seal on the reservoir.
(2) Position the float of the washer fluid level
switch through the rubber grommet seal in the
washer reservoir (Fig. 21). The connector receptacle
of the washer fluid level switch should be pointed
downward.
(3) Press firmly and evenly on the washer fluid
level switch using hand pressure until the barbed
nipple is fully seated in the rubber grommet seal in
the washer reservoir mounting hole.(4) Reconnect the left headlamp and dash wire
harness connector for the washer fluid level switch to
the switch connector receptacle.
(5) Reconnect the washer hose to the barbed outlet
nipple of the front washer pump/motor unit.
(6) Install and tighten the two screws that secure
the inboard mounting flange of the washer reservoir
to the left inner wheel house. Tighten the screws to
7.4 N´m (66 in. lbs.).
(7) Reinstall the liner into the left front fender
wheel house.
(8) Lower the vehicle.
(9) Install and tighten the one screw that secures
the washer reservoir filler neck to the left inner
fender shield. Tighten the screw to 7.4 N´m (66 in.
lbs.).
(10) Fill the washer reservoir with the washer
fluid drained from the reservoir during the removal
procedure.
(11) Reconnect the battery negative cable.
Fig. 21 Washer Fluid Level Switch Remove/Install
1 - WASHER RESERVOIR
2 - WASHER FLUID LEVEL SWITCH
3 - GROMMET SEAL
8R - 26 FRONT WIPERS/WASHERSWJ
WASHER FLUID LEVEL SWITCH (Continued)
Page 645 of 2199
CAL/REAR WIPERS/WASHERS - CLEANING). If
after cleaning the wiper blade and the glass, the
wiper blade fails to clear the glass without smearing,
streaking, chattering, hazing, or beading, replace the
wiper blade. Also, if a wiper blade is damaged or if
the squeegee rubber is damaged or deteriorated,
replace the wiper blade with a new unit. Do not
attempt to repair a wiper blade that is damaged.
WASHER SYSTEM
The washer system components should be
inspected periodically, not just when washer perfor-
mance problems are experienced. This inspection
should include the following points:
(1) Check for ice or other foreign material in the
washer reservoir. If contaminated, clean and flush
the washer system. (Refer to 8 - ELECTRICAL/
REAR WIPERS/WASHERS - CLEANING).
(2) Inspect the washer plumbing for pinched, leak-
ing, deteriorated, or incorrectly routed hoses and
damaged or disconnected hose fittings. Replace dam-
aged or deteriorated hoses and hose fittings. Leaking
washer hoses can sometimes be repaired by cutting
the hose at the leak and splicing it back togetherusing an in-line connector fitting. Similarly, sections
of deteriorated hose can be cut out and replaced by
splicing in new sections of hose using in-line connec-
tor fittings. Whenever routing a washer hose or a
wire harness containing a washer hose, it must be
routed away from hot, sharp, or moving parts. Also,
sharp bends that might pinch the washer hose must
be avoided.
REAR WASHER HOSES/TUBES
DESCRIPTION
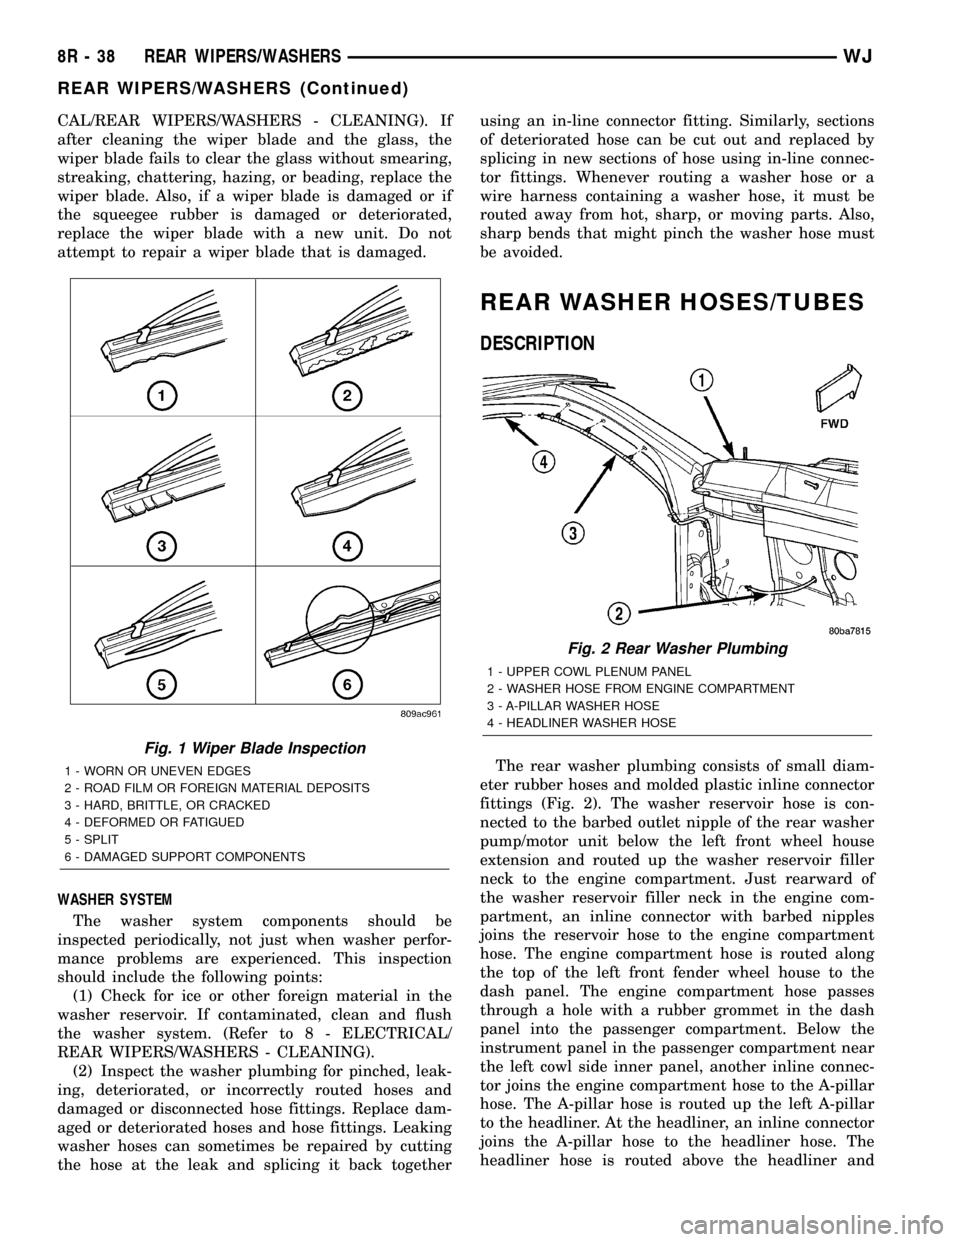
The rear washer plumbing consists of small diam-
eter rubber hoses and molded plastic inline connector
fittings (Fig. 2). The washer reservoir hose is con-
nected to the barbed outlet nipple of the rear washer
pump/motor unit below the left front wheel house
extension and routed up the washer reservoir filler
neck to the engine compartment. Just rearward of
the washer reservoir filler neck in the engine com-
partment, an inline connector with barbed nipples
joins the reservoir hose to the engine compartment
hose. The engine compartment hose is routed along
the top of the left front fender wheel house to the
dash panel. The engine compartment hose passes
through a hole with a rubber grommet in the dash
panel into the passenger compartment. Below the
instrument panel in the passenger compartment near
the left cowl side inner panel, another inline connec-
tor joins the engine compartment hose to the A-pillar
hose. The A-pillar hose is routed up the left A-pillar
to the headliner. At the headliner, an inline connector
joins the A-pillar hose to the headliner hose. The
headliner hose is routed above the headliner and
Fig. 1 Wiper Blade Inspection
1 - WORN OR UNEVEN EDGES
2 - ROAD FILM OR FOREIGN MATERIAL DEPOSITS
3 - HARD, BRITTLE, OR CRACKED
4 - DEFORMED OR FATIGUED
5 - SPLIT
6 - DAMAGED SUPPORT COMPONENTS
Fig. 2 Rear Washer Plumbing
1 - UPPER COWL PLENUM PANEL
2 - WASHER HOSE FROM ENGINE COMPARTMENT
3 - A-PILLAR WASHER HOSE
4 - HEADLINER WASHER HOSE
8R - 38 REAR WIPERS/WASHERSWJ
REAR WIPERS/WASHERS (Continued)
Page 647 of 2199
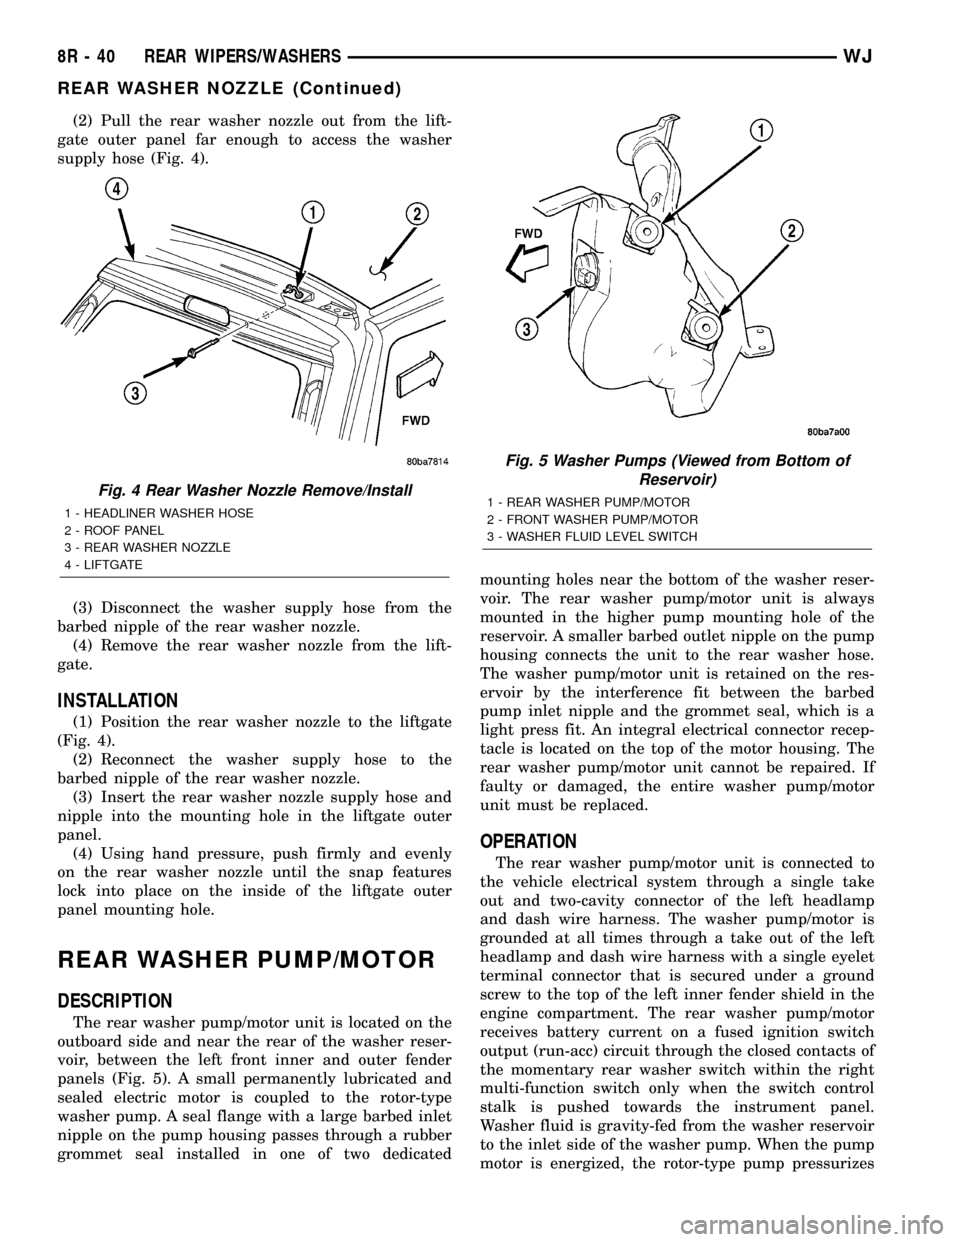
(2) Pull the rear washer nozzle out from the lift-
gate outer panel far enough to access the washer
supply hose (Fig. 4).
(3) Disconnect the washer supply hose from the
barbed nipple of the rear washer nozzle.
(4) Remove the rear washer nozzle from the lift-
gate.
INSTALLATION
(1) Position the rear washer nozzle to the liftgate
(Fig. 4).
(2) Reconnect the washer supply hose to the
barbed nipple of the rear washer nozzle.
(3) Insert the rear washer nozzle supply hose and
nipple into the mounting hole in the liftgate outer
panel.
(4) Using hand pressure, push firmly and evenly
on the rear washer nozzle until the snap features
lock into place on the inside of the liftgate outer
panel mounting hole.
REAR WASHER PUMP/MOTOR
DESCRIPTION
The rear washer pump/motor unit is located on the
outboard side and near the rear of the washer reser-
voir, between the left front inner and outer fender
panels (Fig. 5). A small permanently lubricated and
sealed electric motor is coupled to the rotor-type
washer pump. A seal flange with a large barbed inlet
nipple on the pump housing passes through a rubber
grommet seal installed in one of two dedicatedmounting holes near the bottom of the washer reser-
voir. The rear washer pump/motor unit is always
mounted in the higher pump mounting hole of the
reservoir. A smaller barbed outlet nipple on the pump
housing connects the unit to the rear washer hose.
The washer pump/motor unit is retained on the res-
ervoir by the interference fit between the barbed
pump inlet nipple and the grommet seal, which is a
light press fit. An integral electrical connector recep-
tacle is located on the top of the motor housing. The
rear washer pump/motor unit cannot be repaired. If
faulty or damaged, the entire washer pump/motor
unit must be replaced.
OPERATION
The rear washer pump/motor unit is connected to
the vehicle electrical system through a single take
out and two-cavity connector of the left headlamp
and dash wire harness. The washer pump/motor is
grounded at all times through a take out of the left
headlamp and dash wire harness with a single eyelet
terminal connector that is secured under a ground
screw to the top of the left inner fender shield in the
engine compartment. The rear washer pump/motor
receives battery current on a fused ignition switch
output (run-acc) circuit through the closed contacts of
the momentary rear washer switch within the right
multi-function switch only when the switch control
stalk is pushed towards the instrument panel.
Washer fluid is gravity-fed from the washer reservoir
to the inlet side of the washer pump. When the pump
motor is energized, the rotor-type pump pressurizes
Fig. 4 Rear Washer Nozzle Remove/Install
1 - HEADLINER WASHER HOSE
2 - ROOF PANEL
3 - REAR WASHER NOZZLE
4 - LIFTGATE
Fig. 5 Washer Pumps (Viewed from Bottom of
Reservoir)
1 - REAR WASHER PUMP/MOTOR
2 - FRONT WASHER PUMP/MOTOR
3 - WASHER FLUID LEVEL SWITCH
8R - 40 REAR WIPERS/WASHERSWJ
REAR WASHER NOZZLE (Continued)
Page 648 of 2199
the washer fluid and forces it through the pump out-
let nipple, the rear washer plumbing, and the rear
washer nozzle onto the liftgate glass.
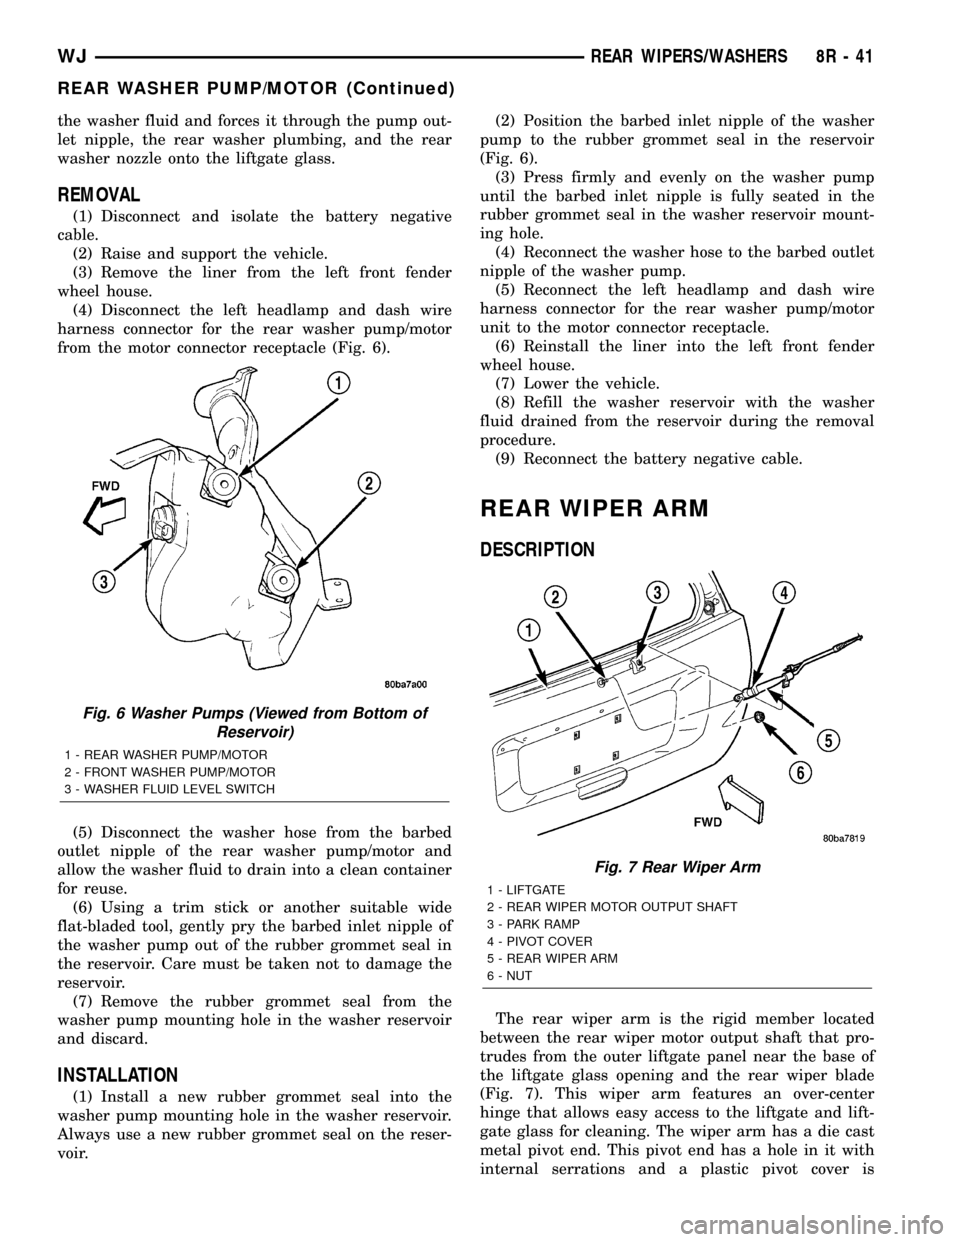
REMOVAL
(1) Disconnect and isolate the battery negative
cable.
(2) Raise and support the vehicle.
(3) Remove the liner from the left front fender
wheel house.
(4) Disconnect the left headlamp and dash wire
harness connector for the rear washer pump/motor
from the motor connector receptacle (Fig. 6).
(5) Disconnect the washer hose from the barbed
outlet nipple of the rear washer pump/motor and
allow the washer fluid to drain into a clean container
for reuse.
(6) Using a trim stick or another suitable wide
flat-bladed tool, gently pry the barbed inlet nipple of
the washer pump out of the rubber grommet seal in
the reservoir. Care must be taken not to damage the
reservoir.
(7) Remove the rubber grommet seal from the
washer pump mounting hole in the washer reservoir
and discard.
INSTALLATION
(1) Install a new rubber grommet seal into the
washer pump mounting hole in the washer reservoir.
Always use a new rubber grommet seal on the reser-
voir.(2) Position the barbed inlet nipple of the washer
pump to the rubber grommet seal in the reservoir
(Fig. 6).
(3) Press firmly and evenly on the washer pump
until the barbed inlet nipple is fully seated in the
rubber grommet seal in the washer reservoir mount-
ing hole.
(4) Reconnect the washer hose to the barbed outlet
nipple of the washer pump.
(5) Reconnect the left headlamp and dash wire
harness connector for the rear washer pump/motor
unit to the motor connector receptacle.
(6) Reinstall the liner into the left front fender
wheel house.
(7) Lower the vehicle.
(8) Refill the washer reservoir with the washer
fluid drained from the reservoir during the removal
procedure.
(9) Reconnect the battery negative cable.
REAR WIPER ARM
DESCRIPTION
The rear wiper arm is the rigid member located
between the rear wiper motor output shaft that pro-
trudes from the outer liftgate panel near the base of
the liftgate glass opening and the rear wiper blade
(Fig. 7). This wiper arm features an over-center
hinge that allows easy access to the liftgate and lift-
gate glass for cleaning. The wiper arm has a die cast
metal pivot end. This pivot end has a hole in it with
internal serrations and a plastic pivot cover is
Fig. 6 Washer Pumps (Viewed from Bottom of
Reservoir)
1 - REAR WASHER PUMP/MOTOR
2 - FRONT WASHER PUMP/MOTOR
3 - WASHER FLUID LEVEL SWITCH
Fig. 7 Rear Wiper Arm
1 - LIFTGATE
2 - REAR WIPER MOTOR OUTPUT SHAFT
3 - PARK RAMP
4 - PIVOT COVER
5 - REAR WIPER ARM
6 - NUT
WJREAR WIPERS/WASHERS 8R - 41
REAR WASHER PUMP/MOTOR (Continued)
Page 654 of 2199
WIRING
TABLE OF CONTENTS
page page
WIRING DIAGRAM INFORMATION....... 8W-01-1
COMPONENT INDEX.................. 8W-02-1
POWER DISTRIBUTION............... 8W-10-1
JUNCTION BLOCK.................... 8W-12-1
GROUND DISTRIBUTION.............. 8W-15-1
BUS COMMUNICATIONS.............. 8W-18-1
CHARGING SYSTEM.................. 8W-20-1
STARTING SYSTEM.................. 8W-21-1
FUEL/IGNITION SYSTEM.............. 8W-30-1
TRANSMISSION CONTROL SYSTEM..... 8W-31-1
VEHICLE SPEED CONTROL............ 8W-33-1
ANTILOCK BRAKES................... 8W-35-1
VEHICLE THEFT SECURITY SYSTEM..... 8W-39-1
INSTRUMENT CLUSTER............... 8W-40-1
HORN/CIGAR LIGHTER/POWER OUTLET . . 8W-41-1
AIR CONDITIONING-HEATER........... 8W-42-1
AIRBAG SYSTEM.................... 8W-43-1
INTERIOR LIGHTING.................. 8W-44-1
BODY CONTROL MODULE............. 8W-45-1AUDIO SYSTEM..................... 8W-47-1
REAR WINDOW DEFOGGER............ 8W-48-1
OVERHEAD CONSOLE................. 8W-49-1
FRONT LIGHTING.................... 8W-50-1
REAR LIGHTING..................... 8W-51-1
TURN SIGNALS...................... 8W-52-1
WIPERS............................ 8W-53-1
TRAILER TOW....................... 8W-54-1
POWER WINDOWS................... 8W-60-1
POWER DOOR LOCKS................ 8W-61-1
POWER MIRRORS................... 8W-62-1
POWER SEATS...................... 8W-63-1
POWER SUNROOF................... 8W-64-1
SPLICE INFORMATION................ 8W-70-1
CONNECTOR PIN-OUT................ 8W-80-1
CONNECTOR/GROUND/SPLICE
LOCATION........................ 8W-91-1
POWER DISTRIBUTION............... 8W-97-1 WJWIRING 8W - 1
Page 673 of 2199
Component Page
Power Outlet......................... 8W-41
Power Seats.......................... 8W-63
Power Windows....................... 8W-60
Powertrain Control Module.............. 8W-30
Radio............................... 8W-47
Rain Sensor.......................... 8W-49
Recirculation Door Motor/Actuator........ 8W-42
Red Brake Warning Indicator Switch....... 8W-35
Remote Keyless Module................. 8W-39
Remote Radio Switches................. 8W-47
Splices.............................. 8W-10
Seat Belt Switch...................... 8W-43
Seat Module.......................... 8W-63
Sentry Key Immobilizer Module.......... 8W-39
Shifter Assembly...................... 8W-31
Side Impact Sensors................... 8W-43
Side Marker Lamps.................... 8W-50
Side Repeater Lamps................... 8W-52
Siren............................... 8W-49
Speakers............................ 8W-47Component Page
Speed Control Switches................. 8W-33
Sunroof............................. 8W-64
Temperature Valve Actuator............. 8W-42
Throttle Position Sensor................ 8W-30
Trailer Tow.......................... 8W-54
Transfer Case Position Sensor............ 8W-31
Transmission......................... 8W-31
Turn Signal Lamps.................... 8W-52
Underhood Lamp...................... 8W-44
Vehicle Information Center.............. 8W-49
Viscous/Cabin Heater................... 8W-30
Visor/Vanity Lamps.................... 8W-44
Washer Fluid Level Switch.............. 8W-53
Wastegate Solenoid.................... 8W-30
Water In Fuel Sensor................... 8W-30
Wheel Speed Sensors................... 8W-35
Window Defogger...................... 8W-48
Wiper High/Low Relay.................. 8W-53
Wiper Motor.......................... 8W-53
Washer Pump......................... 8W-5
8W - 02 - 2 8W-02 COMPONENT INDEXWJ
Page 674 of 2199
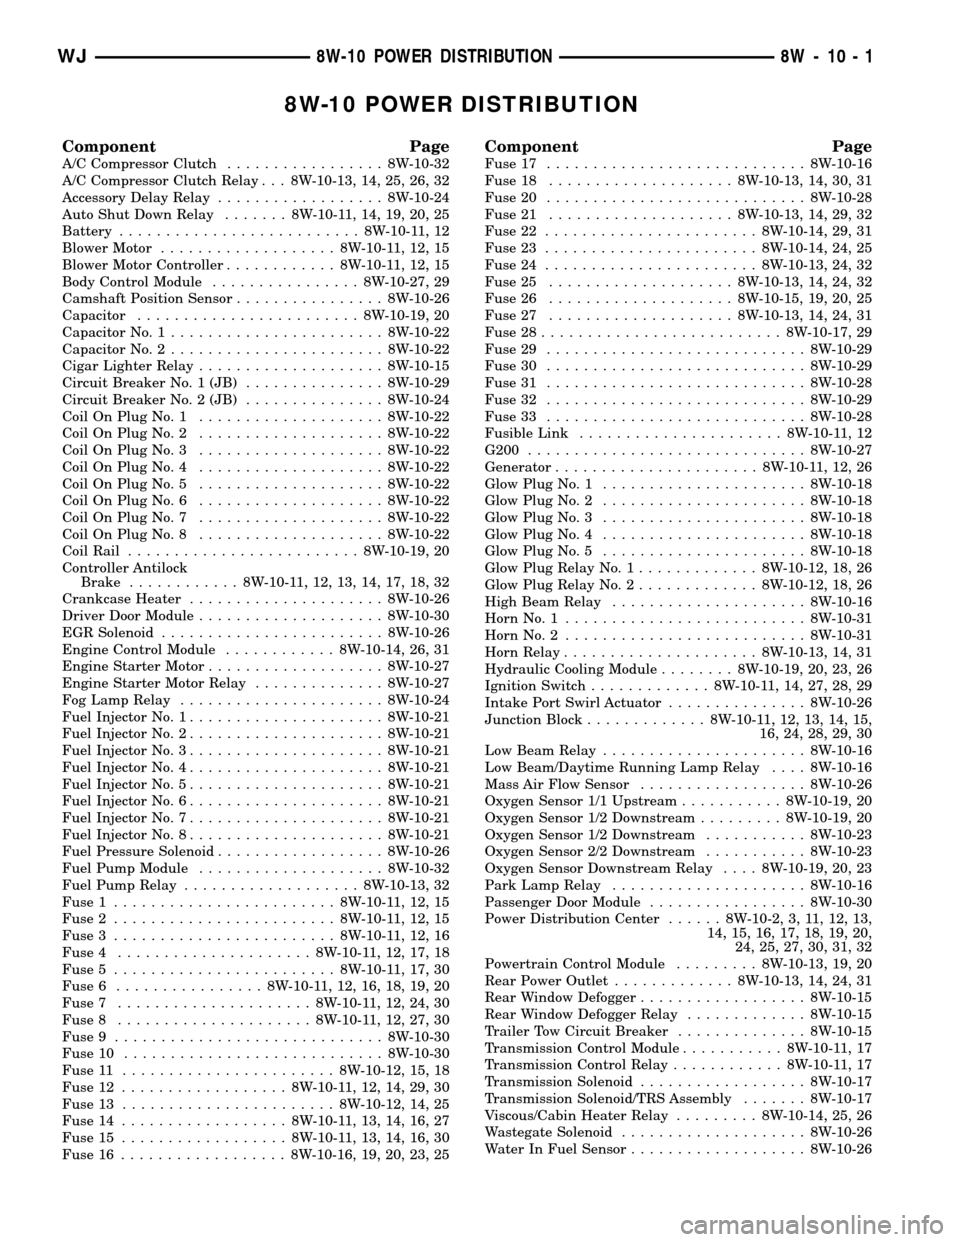
8W-10 POWER DISTRIBUTION
Component Page
A/C Compressor Clutch................. 8W-10-32
A/C Compressor Clutch Relay . . . 8W-10-13, 14, 25, 26, 32
Accessory Delay Relay.................. 8W-10-24
Auto Shut Down Relay....... 8W-10-11, 14, 19, 20, 25
Battery.......................... 8W-10-11, 12
Blower Motor................... 8W-10-11, 12, 15
Blower Motor Controller............ 8W-10-11, 12, 15
Body Control Module................ 8W-10-27, 29
Camshaft Position Sensor................ 8W-10-26
Capacitor........................ 8W-10-19, 20
Capacitor No. 1....................... 8W-10-22
Capacitor No. 2....................... 8W-10-22
Cigar Lighter Relay.................... 8W-10-15
Circuit Breaker No. 1 (JB)............... 8W-10-29
Circuit Breaker No. 2 (JB)............... 8W-10-24
Coil On Plug No. 1.................... 8W-10-22
Coil On Plug No. 2.................... 8W-10-22
Coil On Plug No. 3.................... 8W-10-22
Coil On Plug No. 4.................... 8W-10-22
Coil On Plug No. 5.................... 8W-10-22
Coil On Plug No. 6.................... 8W-10-22
Coil On Plug No. 7.................... 8W-10-22
Coil On Plug No. 8.................... 8W-10-22
Coil Rail......................... 8W-10-19, 20
Controller Antilock
Brake............ 8W-10-11, 12, 13, 14, 17, 18, 32
Crankcase Heater..................... 8W-10-26
Driver Door Module.................... 8W-10-30
EGR Solenoid........................ 8W-10-26
Engine Control Module............ 8W-10-14, 26, 31
Engine Starter Motor................... 8W-10-27
Engine Starter Motor Relay.............. 8W-10-27
Fog Lamp Relay...................... 8W-10-24
Fuel Injector No. 1..................... 8W-10-21
Fuel Injector No. 2..................... 8W-10-21
Fuel Injector No. 3..................... 8W-10-21
Fuel Injector No. 4..................... 8W-10-21
Fuel Injector No. 5..................... 8W-10-21
Fuel Injector No. 6..................... 8W-10-21
Fuel Injector No. 7..................... 8W-10-21
Fuel Injector No. 8..................... 8W-10-21
Fuel Pressure Solenoid.................. 8W-10-26
Fuel Pump Module.................... 8W-10-32
Fuel Pump Relay................... 8W-10-13, 32
Fuse 1........................ 8W-10-11, 12, 15
Fuse 2........................ 8W-10-11, 12, 15
Fuse 3........................ 8W-10-11, 12, 16
Fuse 4..................... 8W-10-11, 12, 17, 18
Fuse 5........................ 8W-10-11, 17, 30
Fuse 6................ 8W-10-11, 12, 16, 18, 19, 20
Fuse 7..................... 8W-10-11, 12, 24, 30
Fuse 8..................... 8W-10-11, 12, 27, 30
Fuse 9............................. 8W-10-30
Fuse 10............................ 8W-10-30
Fuse 11....................... 8W-10-12, 15, 18
Fuse 12.................. 8W-10-11, 12, 14, 29, 30
Fuse 13....................... 8W-10-12, 14, 25
Fuse 14.................. 8W-10-11, 13, 14, 16, 27
Fuse 15.................. 8W-10-11, 13, 14, 16, 30
Fuse 16.................. 8W-10-16, 19, 20, 23, 25
Component Page
Fuse 17............................ 8W-10-16
Fuse 18.................... 8W-10-13, 14, 30, 31
Fuse 20............................ 8W-10-28
Fuse 21.................... 8W-10-13, 14, 29, 32
Fuse 22....................... 8W-10-14, 29, 31
Fuse 23....................... 8W-10-14, 24, 25
Fuse 24....................... 8W-10-13, 24, 32
Fuse 25.................... 8W-10-13, 14, 24, 32
Fuse 26.................... 8W-10-15, 19, 20, 25
Fuse 27.................... 8W-10-13, 14, 24, 31
Fuse 28.......................... 8W-10-17, 29
Fuse 29............................ 8W-10-29
Fuse 30............................ 8W-10-29
Fuse 31............................ 8W-10-28
Fuse 32............................ 8W-10-29
Fuse 33............................ 8W-10-28
Fusible Link...................... 8W-10-11, 12
G200.............................. 8W-10-27
Generator...................... 8W-10-11, 12, 26
Glow Plug No. 1...................... 8W-10-18
Glow Plug No. 2...................... 8W-10-18
Glow Plug No. 3...................... 8W-10-18
Glow Plug No. 4...................... 8W-10-18
Glow Plug No. 5...................... 8W-10-18
Glow Plug Relay No. 1............. 8W-10-12, 18, 26
Glow Plug Relay No. 2............. 8W-10-12, 18, 26
High Beam Relay..................... 8W-10-16
Horn No. 1.......................... 8W-10-31
Horn No. 2.......................... 8W-10-31
Horn Relay..................... 8W-10-13, 14, 31
Hydraulic Cooling Module........ 8W-10-19, 20, 23, 26
Ignition Switch............. 8W-10-11, 14, 27, 28, 29
Intake Port Swirl Actuator............... 8W-10-26
Junction Block............. 8W-10-11, 12, 13, 14, 15,
16, 24, 28, 29, 30
Low Beam Relay...................... 8W-10-16
Low Beam/Daytime Running Lamp Relay.... 8W-10-16
Mass Air Flow Sensor.................. 8W-10-26
Oxygen Sensor 1/1 Upstream........... 8W-10-19, 20
Oxygen Sensor 1/2 Downstream......... 8W-10-19, 20
Oxygen Sensor 1/2 Downstream........... 8W-10-23
Oxygen Sensor 2/2 Downstream........... 8W-10-23
Oxygen Sensor Downstream Relay.... 8W-10-19, 20, 23
Park Lamp Relay..................... 8W-10-16
Passenger Door Module................. 8W-10-30
Power Distribution Center...... 8W-10-2, 3, 11, 12, 13,
14, 15, 16, 17, 18, 19, 20,
24, 25, 27, 30, 31, 32
Powertrain Control Module......... 8W-10-13, 19, 20
Rear Power Outlet............. 8W-10-13, 14, 24, 31
Rear Window Defogger.................. 8W-10-15
Rear Window Defogger Relay............. 8W-10-15
Trailer Tow Circuit Breaker.............. 8W-10-15
Transmission Control Module........... 8W-10-11, 17
Transmission Control Relay............ 8W-10-11, 17
Transmission Solenoid.................. 8W-10-17
Transmission Solenoid/TRS Assembly....... 8W-10-17
Viscous/Cabin Heater Relay......... 8W-10-14, 25, 26
Wastegate Solenoid.................... 8W-10-26
Water In Fuel Sensor................... 8W-10-26
WJ8W-10 POWER DISTRIBUTION 8W - 10 - 1
Page 706 of 2199
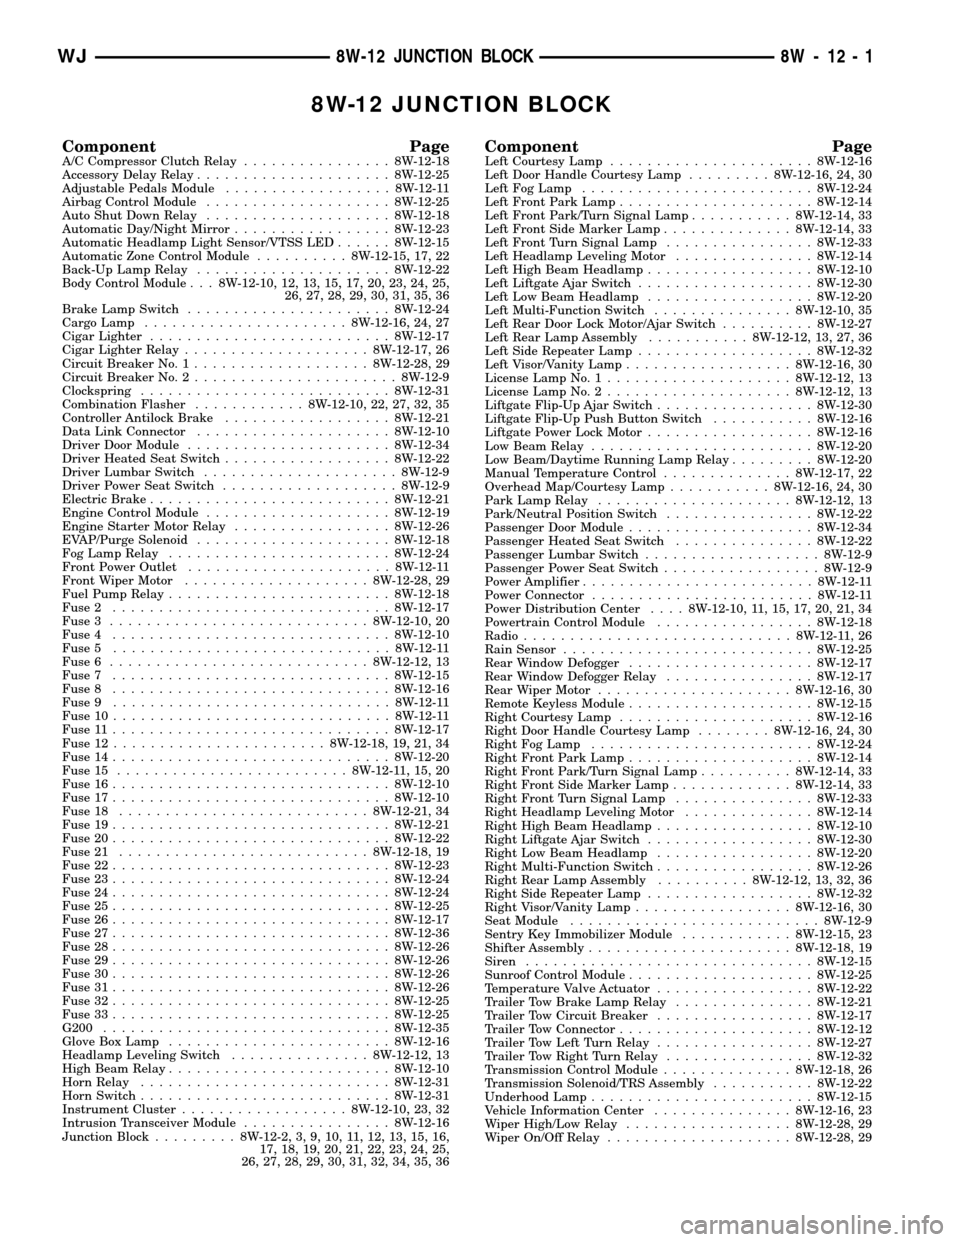
8W-12 JUNCTION BLOCK
Component PageA/C Compressor Clutch Relay................8W-12-18
Accessory Delay Relay.....................8W-12-25
Adjustable Pedals Module..................8W-12-11
Airbag Control Module....................8W-12-25
Auto Shut Down Relay....................8W-12-18
Automatic Day/Night Mirror.................8W-12-23
Automatic Headlamp Light Sensor/VTSS LED......8W-12-15
Automatic Zone Control Module..........8W-12-15, 17, 22
Back-Up Lamp Relay.....................8W-12-22
Body Control Module . . . 8W-12-10, 12, 13, 15, 17, 20, 23, 24, 25,
26, 27, 28, 29, 30, 31, 35, 36
Brake Lamp Switch......................8W-12-24
Cargo Lamp......................8W-12-16, 24, 27
Cigar Lighter..........................8W-12-17
Cigar Lighter Relay....................8W-12-17, 26
Circuit Breaker No. 1...................8W-12-28, 29
Circuit Breaker No. 2......................8W-12-9
Clockspring...........................8W-12-31
Combination Flasher............8W-12-10, 22, 27, 32, 35
Controller Antilock Brake..................8W-12-21
Data Link Connector.....................8W-12-10
Driver Door Module......................8W-12-34
Driver Heated Seat Switch..................8W-12-22
Driver Lumbar Switch.....................8W-12-9
Driver Power Seat Switch...................8W-12-9
Electric Brake..........................8W-12-21
Engine Control Module....................8W-12-19
Engine Starter Motor Relay.................8W-12-26
EVAP/Purge Solenoid.....................8W-12-18
Fog Lamp Relay........................8W-12-24
Front Power Outlet......................8W-12-11
Front Wiper Motor....................8W-12-28, 29
Fuel Pump Relay........................8W-12-18
Fuse 2..............................8W-12-17
Fuse 3............................8W-12-10, 20
Fuse 4..............................8W-12-10
Fuse 5..............................8W-12-11
Fuse 6............................8W-12-12, 13
Fuse 7..............................8W-12-15
Fuse 8..............................8W-12-16
Fuse 9..............................8W-12-11
Fuse 10..............................8W-12-11
Fuse 11..............................8W-12-17
Fuse 12.......................8W-12-18, 19, 21, 34
Fuse 14..............................8W-12-20
Fuse 15.........................8W-12-11, 15, 20
Fuse 16..............................8W-12-10
Fuse 17..............................8W-12-10
Fuse 18...........................8W-12-21, 34
Fuse 19..............................8W-12-21
Fuse 20..............................8W-12-22
Fuse 21...........................8W-12-18, 19
Fuse 22..............................8W-12-23
Fuse 23..............................8W-12-24
Fuse 24..............................8W-12-24
Fuse 25..............................8W-12-25
Fuse 26..............................8W-12-17
Fuse 27..............................8W-12-36
Fuse 28..............................8W-12-26
Fuse 29..............................8W-12-26
Fuse 30..............................8W-12-26
Fuse 31..............................8W-12-26
Fuse 32..............................8W-12-25
Fuse 33..............................8W-12-25
G200...............................8W-12-35
Glove Box Lamp........................8W-12-16
Headlamp Leveling Switch...............8W-12-12, 13
High Beam Relay........................8W-12-10
Horn Relay...........................8W-12-31
Horn Switch...........................8W-12-31
Instrument Cluster..................8W-12-10, 23, 32
Intrusion Transceiver Module................8W-12-16
Junction Block.........8W-12-2, 3, 9, 10, 11, 12, 13, 15, 16,
17, 18, 19, 20, 21, 22, 23, 24, 25,
26, 27, 28, 29, 30, 31, 32, 34, 35, 36Component PageLeft Courtesy Lamp......................8W-12-16
Left Door Handle Courtesy Lamp.........8W-12-16, 24, 30
Left Fog Lamp.........................8W-12-24
Left Front Park Lamp.....................8W-12-14
Left Front Park/Turn Signal Lamp...........8W-12-14, 33
Left Front Side Marker Lamp..............8W-12-14, 33
Left Front Turn Signal Lamp................8W-12-33
Left Headlamp Leveling Motor...............8W-12-14
Left High Beam Headlamp..................8W-12-10
Left Liftgate Ajar Switch...................8W-12-30
Left Low Beam Headlamp..................8W-12-20
Left Multi-Function Switch...............8W-12-10, 35
Left Rear Door Lock Motor/Ajar Switch..........8W-12-27
Left Rear Lamp Assembly...........8W-12-12, 13, 27, 36
Left Side Repeater Lamp...................8W-12-32
Left Visor/Vanity Lamp..................8W-12-16, 30
License Lamp No. 1....................8W-12-12, 13
License Lamp No. 2....................8W-12-12, 13
Liftgate Flip-Up Ajar Switch.................8W-12-30
Liftgate Flip-Up Push Button Switch...........8W-12-16
Liftgate Power Lock Motor..................8W-12-16
Low Beam Relay........................8W-12-20
Low Beam/Daytime Running Lamp Relay.........8W-12-20
Manual Temperature Control..............8W-12-17, 22
Overhead Map/Courtesy Lamp...........8W-12-16, 24, 30
Park Lamp Relay.....................8W-12-12, 13
Park/Neutral Position Switch................8W-12-22
Passenger Door Module....................8W-12-34
Passenger Heated Seat Switch...............8W-12-22
Passenger Lumbar Switch...................8W-12-9
Passenger Power Seat Switch.................8W-12-9
Power Amplifier.........................8W-12-11
Power Connector........................8W-12-11
Power Distribution Center....8W-12-10, 11, 15, 17, 20, 21, 34
Powertrain Control Module.................8W-12-18
Radio.............................8W-12-11, 26
Rain Sensor...........................8W-12-25
Rear Window Defogger....................8W-12-17
Rear Window Defogger Relay................8W-12-17
Rear Wiper Motor.....................8W-12-16, 30
Remote Keyless Module....................8W-12-15
Right Courtesy Lamp.....................8W-12-16
Right Door Handle Courtesy Lamp........8W-12-16, 24, 30
Right Fog Lamp........................8W-12-24
Right Front Park Lamp....................8W-12-14
Right Front Park/Turn Signal Lamp..........8W-12-14, 33
Right Front Side Marker Lamp.............8W-12-14, 33
Right Front Turn Signal Lamp...............8W-12-33
Right Headlamp Leveling Motor..............8W-12-14
Right High Beam Headlamp.................8W-12-10
Right Liftgate Ajar Switch..................8W-12-30
Right Low Beam Headlamp.................8W-12-20
Right Multi-Function Switch.................8W-12-26
Right Rear Lamp Assembly..........8W-12-12, 13, 32, 36
Right Side Repeater Lamp..................8W-12-32
Right Visor/Vanity Lamp.................8W-12-16, 30
Seat Module...........................8W-12-9
Sentry Key Immobilizer Module............8W-12-15, 23
Shifter Assembly......................8W-12-18, 19
Siren...............................8W-12-15
Sunroof Control Module....................8W-12-25
Temperature Valve Actuator.................8W-12-22
Trailer Tow Brake Lamp Relay...............8W-12-21
Trailer Tow Circuit Breaker.................8W-12-17
Trailer Tow Connector.....................8W-12-12
Trailer Tow Left Turn Relay.................8W-12-27
Trailer Tow Right Turn Relay................8W-12-32
Transmission Control Module..............8W-12-18, 26
Transmission Solenoid/TRS Assembly...........8W-12-22
Underhood Lamp........................8W-12-15
Vehicle Information Center...............8W-12-16, 23
Wiper High/Low Relay..................8W-12-28, 29
Wiper On/Off Relay....................8W-12-28, 29
WJ8W-12 JUNCTION BLOCK 8W - 12 - 1