check engine JEEP GRAND CHEROKEE 2004 WK / 3.G Owner's Manual
[x] Cancel search | Manufacturer: JEEP, Model Year: 2004, Model line: GRAND CHEROKEE, Model: JEEP GRAND CHEROKEE 2004 WK / 3.GPages: 344, PDF Size: 6.09 MB
Page 270 of 344

dirty or rusty in appearance, the system should be
drained, flushed and refilled with fresh coolant.
Check the front of the radiator for any accumulation of
bugs, leaves, etc. Clean the radiator by gently spraying
water from a garden hose at the back of the core.
Check the engine cooling system hoses for condition and
tightness of connection. Inspect the entire system for
leaks. Any hoses that show cuts or severe abrasion must
be replaced.
Cooling System Ð Drain, Flush, And Refill
At the intervals shown in the appropriate ªMaintenance
Schedule,º the system should be drained, flushed, and
refilled.
If the solution is dirty and contains a considerable
amount of sediment, clean and flush with reliable cooling
system cleaner. Follow with a thorough rinsing to remove
all deposits and chemicals.
Engine Coolant Disposal
Used ethylene glycol-based engine coolant is a regulated
substance requiring proper disposal. Check with your
local authorities to determine the disposal rules for your
community. Do not store ethylene glycol-based engine
coolant in open containers or allow it to remain in
puddles on the ground. Prevent ingestion by animals and
children. If ingested by a child, contact a physician
immediately. Clean up any ground spills immediately.
Selection Of Coolant
Use only the manufacturer's recommended coolant, refer
to Recommended Fluids, Lubricants, and Genuine Parts
for correct coolant type.
270 MAINTAINING YOUR VEHICLE
Page 272 of 344

Cooling System Pressure Cap
The cap must be fully tightened to prevent loss of
coolant, and to insure that coolant will return to the
radiator from the coolant reserve tank.
The cap should be inspected and cleaned if there is any
accumulation of foreign material on the sealing surfaces.
WARNING!
The warning words DO NOT OPEN HOT on the
cooling system pressure cap are a safety precaution.
Never add coolant when the engine is overheated.
Do not loosen or remove the cap to cool an over-
heated engine. Heat causes pressure to build up in
the cooling system. To prevent scalding or injury, do
not remove the pressure cap while the system is hot
or under pressure.
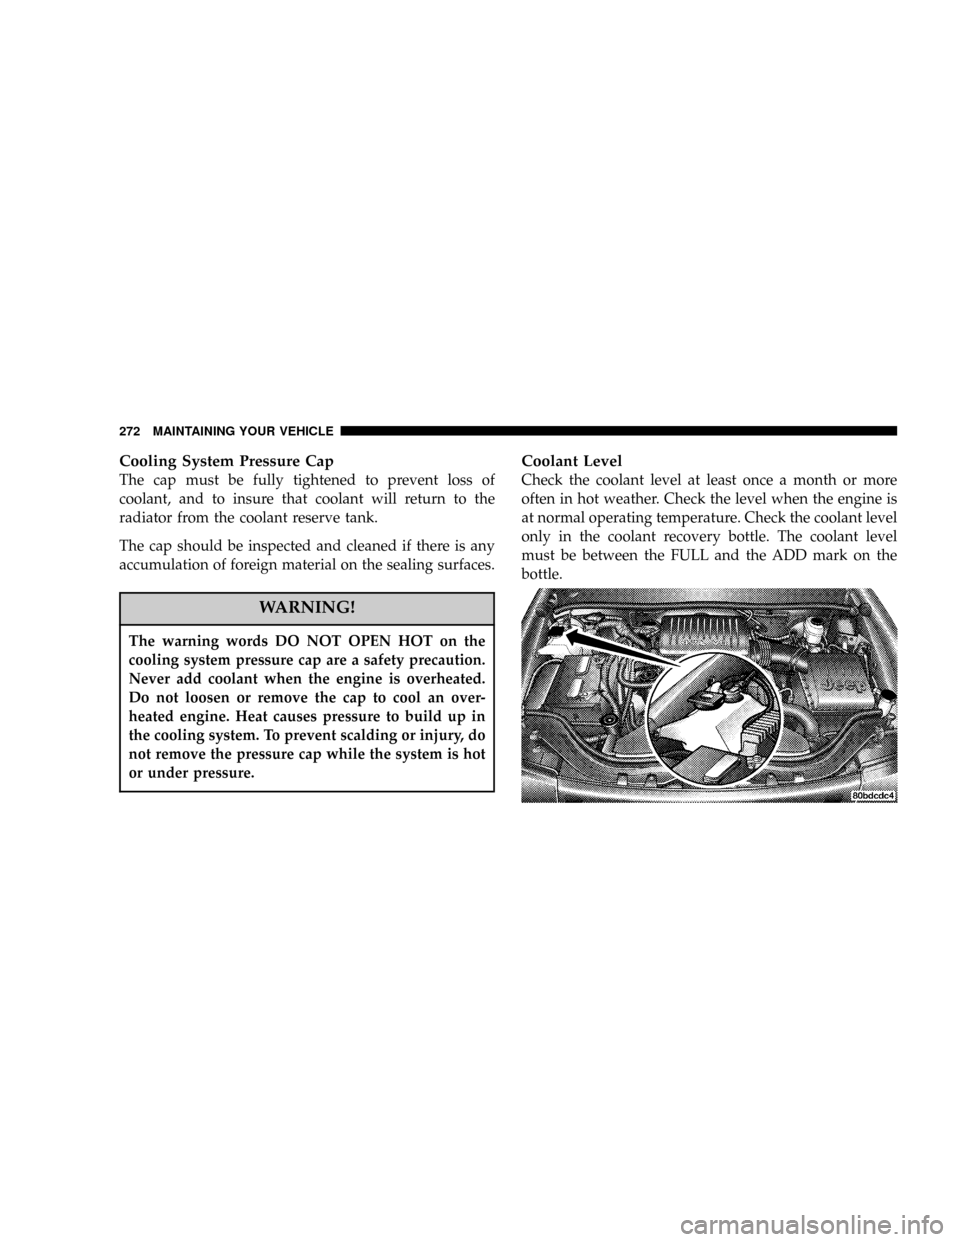
Coolant Level
Check the coolant level at least once a month or more
often in hot weather. Check the level when the engine is
at normal operating temperature. Check the coolant level
only in the coolant recovery bottle. The coolant level
must be between the FULL and the ADD mark on the
bottle.
272 MAINTAINING YOUR VEHICLE
Page 273 of 344

See your authorized dealer if the coolant level drops
quickly.
Points To Remember
NOTE:When the vehicle is stopped after a few miles of
operation, you may observe vapor coming from the front
of the engine compartment. This is normally a result of
moisture from rain, snow, or high humidity accumulat-
ing on the radiator and being vaporized when the
thermostat opens, allowing hot coolant to enter the
radiator.
If an examination of your engine compartment shows no
evidence of radiator or hose leaks, the vehicle may be
safely driven. The vapor will soon dissipate.
²Do not overfill the coolant bottle.
²Check coolant freeze point in the system.
²If frequent coolant additions are required, or if the
level in the recovery bottle does not drop when the
engine cools, the cooling system should be pressure
tested for leaks.
²Maintain coolant concentration at 50% ethylene glycol
antifreeze (minimum) in water for proper corrosion
protection of your engine that contains aluminum
components.
²Make sure that the radiator and coolant bottle hoses
are not kinked or obstructed.
²Do not change the thermostat for summer or winter
operation. If replacement is ever necessary, install
ONLY the correct type thermostat. Other designs may
result in unsatisfactory cooling performance, poor gas
mileage, and increased emissions.
MAINTAINING YOUR VEHICLE 273
7
Page 277 of 344

WARNING!
Overfilling the brake fluid reservoir can result in
spilling brake fluid on hot engine parts and the
brake fluid catching fire.
Use only brake fluid that has been in a tightly closed
container to avoid contamination from foreign matter. Do
not allow petroleum base fluid to contaminate the brake
fluid as seal damage will result.
Automatic Transmission
Selection of Lubricant
It is important that the proper lubricant is used in the
transmission to assure optimum transmission perfor-
mance. Use only manufacturer's recommended transmis-
sion fluid, refer to Recommended Fluids, Lubricants, andGenuine Parts for correct fluid type. It is important that
the transmission fluid be maintained at the prescribed
level using the recommended fluid.
CAUTION!
Using a transmission fluid other than the manufac-
turer's recommended fluid may cause deterioration
in transmission shift quality and/or torque converter
shudder. Using a transmission fluid other than the
manufacturer's recommended fluid will result in
more frequent fluid and filter changes. Refer to
Recommended Fluids, Lubricants, and Genuine
Parts for correct fluid type.
Fluid Level Check ± 4.0L Engines (42RE)
This fluid level should be checked when the engine is
fully warmed up and the fluid in the transmission is
heated to its normal operating temperature. Operation of
MAINTAINING YOUR VEHICLE 277
7
Page 278 of 344

the transmission with an improper fluid level will greatly
reduce the life of the transmission and of the fluid.
To check the automatic transmission fluid level properly,
the following procedure must be used:
1. The vehicle must be on level ground.
2. The engine should be running at curb idle speed for a
minimum of 60 seconds.
3. Fully apply parking brake.
4. Apply the brakes and shift the transmission into P
(Park).
5. The fluidMUSTbe checked with the transmission in
P (Park) to be sure that the fluid is accurate.
6. Wipe the dipstick clean and reinsert until seated.
Remove dipstick and note reading.At normal operating temperature (approximately 180É F
(82É C), the fluid level is correct if it is in the HOT region
(cross-hatched area) on the oil level indicator. The fluid
level indicator should be in the COLD region at 70É F (21É
C) fluid temperature.
If the fluid level is low, add sufficient fluid to bring to the
proper level. Refer to Recommended Fluids, Lubricants
and Genuine Parts for correct fluid type.
Fluid is added through the dipstick tube.
NOTE:To prevent dirt and water from entering the
transmission after checking or replenishing fluid, make
certain that the dipstick cap is properly reseated.
Fluid Level Check ± 4.7L Engines (5±45RFE)
Check the fluid level while the transmission is at normal
operating temperature 180ÉF (82ÉC). This occurs after at
278 MAINTAINING YOUR VEHICLE
Page 279 of 344

least 15 miles (25 km) of driving. At normal operating
temperature the fluid cannot be held comfortably be-
tween the fingertips.
To check the automatic transmission fluid level properly,
the following procedure must be used:
1. Operate the engine at idle speed and normal operating
temperature.
2. The vehicle must be on level ground.
3. Fully apply the parking brake and press the brake
pedal.
4. Place the gear selector momentarily in each gear
position ending with the lever in P (Park).
5. Remove the dipstick, wipe it clean and reinsert it until
seated.
6. Remove the dipstick again and note the fluid level on
both sides. The fluid level should be between the ªHOTº(upper) reference holes on the dipstick at normal operat-
ing temperature. Verify that solid coating of oil is seen on
both sides of the dipstick. If the fluid is low, add as
required into the dipstick tube.Do not overfill.After
adding any quantity of oil through the oil fill tube, wait
a minimum of two (2) minutes for the oil to fully drain
into the transmission before rechecking the fluid level.
NOTE:If it is necessary to check the transmissionbelow
the operating temperature, the fluid level should be
between the two ªCOLDº (lower) holes on the dipstick
with the fluid at approximately 70ÉF (21ÉC) (room tem-
perature). If the fluid level is correctly established at
room temperature, it should be between the ªHOTº
(upper) reference holes when the transmission reaches
180ÉF (82ÉC). Remember it is best to check the level at the
normal operating temperature.
MAINTAINING YOUR VEHICLE 279
7
Page 297 of 344

²Taxi, police, or delivery service (commercial service)
²Off-road or desert driving
²If equipped for and operated with E-85 (ethanol)
fuel.
NOTE:Most vehicles are operated under the conditions
listed for Schedule ªB.º
NOTE:IfANYof these apply to you, change your
engine oil every 3,000 miles (5 000 km) or 3 months,
whichever comes first, and follow the maintenance rec-
ommendations in ªMaintenance Schedule B.º
Second is ScheduleªAº. It is for vehicles that are not
operated under any of the conditions listed under Sched-
ule ªB.º
Use the schedule that best describes your driving condi-
tions. Where time and mileage are listed, follow the
interval that occurs first.
CAUTION!
Failure to perform the required maintenance items
may result in damage to the vehicle.
At Each Stop for Fuel
²Check the engine oil level about 5 minutes after a fully
warmed engine is shut off. Checking the oil level while
the vehicle is on level ground will improve the accu-
racy of the oil level reading. Add oil only when the
level is at or below the ADD or MIN mark.
²Check the windshield washer solvent, add as required.
MAINTENANCE SCHEDULES 297
8
M
A
I
N
T
E
N
A
N
C
E
S
C
H
E
D
U
L
E
S
Page 298 of 344

Once a Month
²Check the tire pressure and look for unusual wear or
damage.
²Inspect the battery and clean and tighten the terminals
as required.
²Check the fluid levels of the coolant reservoir, brake
master cylinder, and transmission, and add as needed.
²Check all lights and all other electrical items for correct
operation.At Each Oil Change
²Change the engine oil filter.
²Inspect the exhaust system.
²Inspect brake hoses.
²Check the coolant level, hoses, and clamps.
²Rotate the tires at each oil change interval shown on
Schedule ªAº 6,000 miles (10 000 km) or every other
interval shown on Schedule ªBº 6,000 miles (10 000
km).
²After completion of off-road operation, the underside
of the vehicle should be thoroughly inspected. Exam-
ine threaded fasteners for looseness.
298 MAINTENANCE SCHEDULES
8
M
A
I
N
T
E
N
A
N
C
E
S
C
H
E
D
U
L
E
S
Page 328 of 344

Adding Washer Fluid..................... 171
Adjustable Pedals........................ 84
Air Cleaner, Engine...................... 264
Air Conditioner Maintenance............... 265
Air Conditioning........................ 164
Air Conditioning Refrigerant............... 266
Air Conditioning System.................. 164
Air Filter.............................. 264
Air Pressure, Tires....................... 212
Airbag................................ 35
Airbag Deployment....................... 42
Airbag Light.......................44,52,129
Airbag Maintenance....................... 43
Alarm................................ 23
Alarm, Panic............................ 21
Alarm System........................... 23
Alignment and Balance................... 217
Alterations/Modifications, Vehicle............. 8
Antenna, Satellite Radio................... 155Antifreeze (Engine Coolant)................ 291
Anti-Lock Brake System................... 197
Anti-Lock Warning Light.................. 133
Anti-Theft System........................ 23
Appearance Care........................ 281
Arming Theft System...................... 23
Automatic Dimming Mirror................. 60
Automatic Door Locks..................... 19
Automatic Headlights..................... 77
Automatic Temperature Control............. 167
Automatic Transmission................179,277
Adding Fluid......................278,279
Fluid and Filter Changes................. 277
Fluid Level Check...................277,278
Fluid Type........................... 277
Gear Ranges.......................... 181
Overdrive........................... 182
Shifting............................. 179
Special Additives...................... 280
328 INDEX
Page 330 of 344

Cassette Tape and Player Maintenance......... 162
Cassette Tape Player...................143,147
Catalytic Converter...................... 261
Caution, Exhaust Gas...................... 51
CD Changer......................140,150,156
CD Player....................136,139,143,149
CD Player Maintenance................... 163
Cellular Phone.......................... 164
Center Lap Belts......................... 33
Chains, Tire............................ 220
Chart, Tire Sizing........................ 204
Check Engine Light...................... 130
Checks, Safety.........................52,53
Child Restraint.......................... 44
Child Restraint Tether Anchors............... 47
Child Safety Locks........................ 18
Climate Control......................... 164
Clock................................ 135
Compact Disc Maintenance................. 163Compact Spare Tire...................... 241
Compass...........................101,104
Compass Calibration..................... 104
Compass Variance....................... 105
Computer, Trip/Travel.................... 101
Console, Overhead....................... 89
Contract, Service........................ 320
Converter, Catalytic...................... 261
Cooling System......................... 269
Adding Coolant (Antifreeze).............. 271
Coolant Capacity...................... 291
Coolant Level......................... 272
Disposal of Used Coolant................ 270
Drain, Flush, and Refill.................. 270
Inspection........................... 269
Points to Remember.................... 273
Pressure Cap......................... 272
Radiator Cap......................... 272
Selection of Coolant..................270,291
330 INDEX