JEEP GRAND CHEROKEE 2007 WK / 3.G SRT Owners Manual
Manufacturer: JEEP, Model Year: 2007, Model line: GRAND CHEROKEE, Model: JEEP GRAND CHEROKEE 2007 WK / 3.GPages: 395, PDF Size: 6.1 MB
Page 331 of 395

²If your vehicle is damaged due to an accident or
similar cause which destroys the paint and protective
coating have your vehicle repaired as soon as possible.
The cost of such repairs is considered the responsibil-
ity of the owner.
²If you carry special cargo such as chemicals, fertilizers,
de-icer salt, etc., assure that such materials are well
packaged and sealed.
²If a lot of driving is done on gravel roads, consider
mud or stone shields behind each wheel.
²Use MopartTouch Up Paint on scratches or chips as
soon as possible. Your authorized dealer has touch up
paint to match the color of your vehicle.
Wheel and Wheel Trim Care
All wheels and wheel trim, especially aluminum and
chrome plated wheels should be cleaned regularly with a
mild soap and water to prevent corrosion. To removeheavy soil, use MopartWheel Cleaner or select a non-
abrasive, non-acidic cleaner. Do not use scouring pads,
steel wool, a bristle brush or metal polishes. Only Mo-
partcleaners are recommended. Do not use oven cleaner.
Avoid automatic car washes that use acidic solutions or
harsh brushes that may damage the wheels' protective
finish.
Interior Care
Use MopartTotal Clean to clean fabric upholstery and
carpeting.
Interior Trim should be cleaned starting with a damp
cloth, a damp cloth with MopartTotal Clean, then
MopartSpot & Stain Remover if absolutely necessary. Do
not use harsh cleaners or Armorall. Use MopartTotal
Clean to clean vinyl upholstery.
Leather Seat Care & Cleaning
MopartTotal Clean is specifically recommended for
leather upholstery.
MAINTAINING YOUR VEHICLE 331
7
Page 332 of 395
Your leather upholstery can be best preserved by regular
cleaning with a damp soft cloth. Small particles of dirt
can act as an abrasive and damage the leather upholstery
and should be removed promptly with a damp cloth.
Stubborn soils can be removed easily with a soft cloth
and MopartTotal Clean. Care should be taken to avoid
soaking your leather upholstery with any liquid. Please
do not use polishes, oils, cleaning fluids, solvents, deter-
gents, or ammonia based cleaners to clean your leather
upholstery. Application of a leather conditioner is not
required to maintain the original condition.
WARNING!
Do not use volatile solvents for cleaning purposes.
Many are potentially flammable, and if used in
closed areas they may cause respiratory harm.
Glass Surfaces
All glass surfaces should be cleaned on a regular basis
with MopartGlass Cleaner or any commercial
household-type glass cleaner. Never use an abrasive type
cleaner. Use caution when cleaning inside rear windows
equipped with electric defrosters. Do not use scrapers or
other sharp instruments which may scratch the elements.
When cleaning the rear view mirror, spray cleaner on the
towel or rag that you are using. Do not spray cleaner
directly on the mirror.
Cleaning Plastic Instrument Cluster Lenses
The lenses in front of the instruments in this vehicle are
molded in clear plastic. When cleaning the lenses, care
must be taken to avoid scratching the plastic.
1. Clean with a wet soft rag. A mild soap solution may be
used, but do not use high alcohol content or abrasive
cleaners. If soap is used, wipe clean with a clean damp
rag.
332 MAINTAINING YOUR VEHICLE
Page 333 of 395

2. Dry with a soft tissue.
Seat Belt Maintenance
Do not bleach, dye or clean the belts with chemical
solvents or abrasive cleaners. This will weaken the fabric.
Sun damage will also weaken the fabric.
If the belts need cleaning, use MopartTotal Clean, a mild
soap solution, or lukewarm water. Do not remove the
belts from the vehicle to wash them.
Replace the belts if they appear frayed or worn or if the
buckles do not work properly.
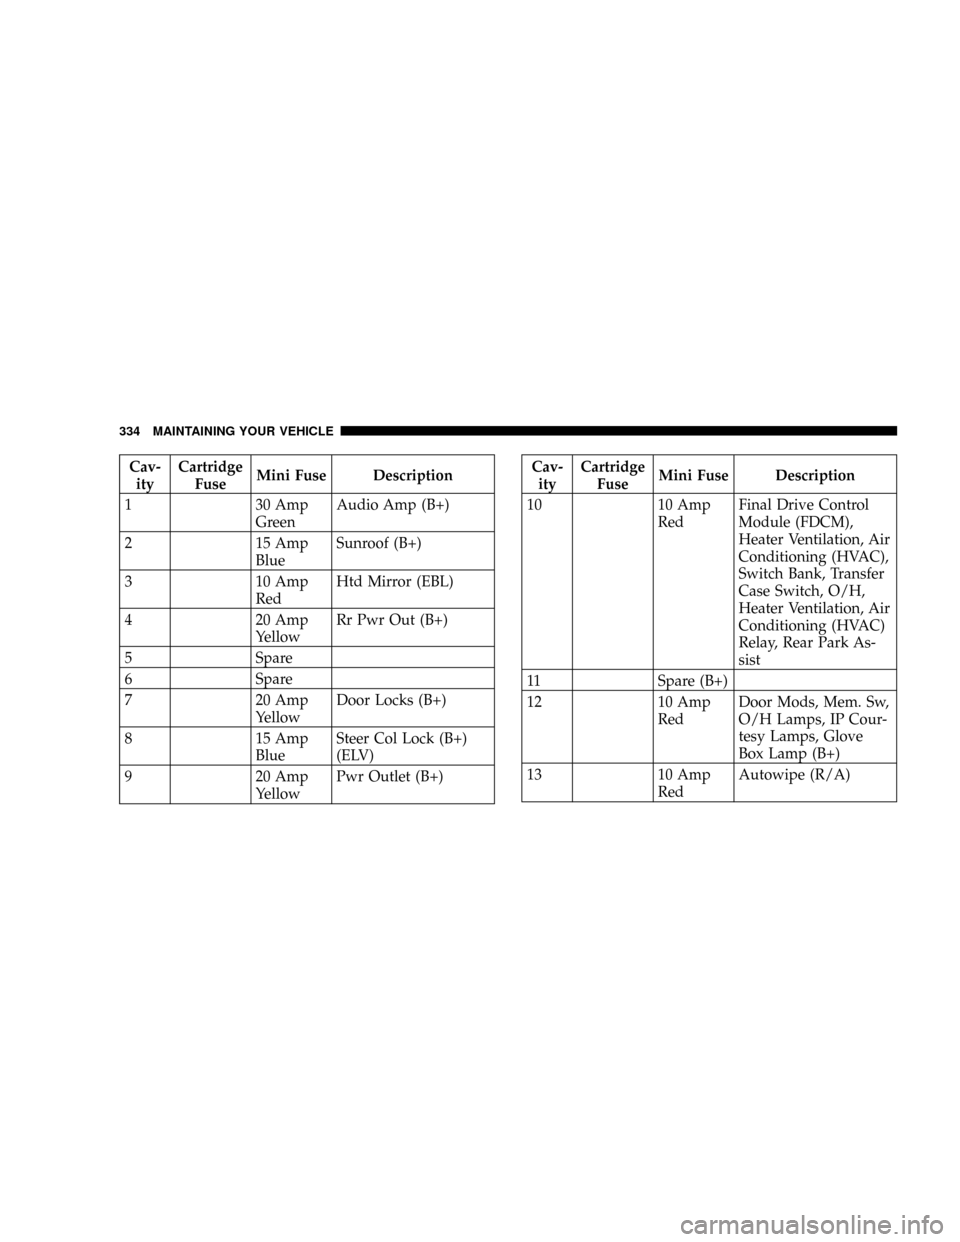
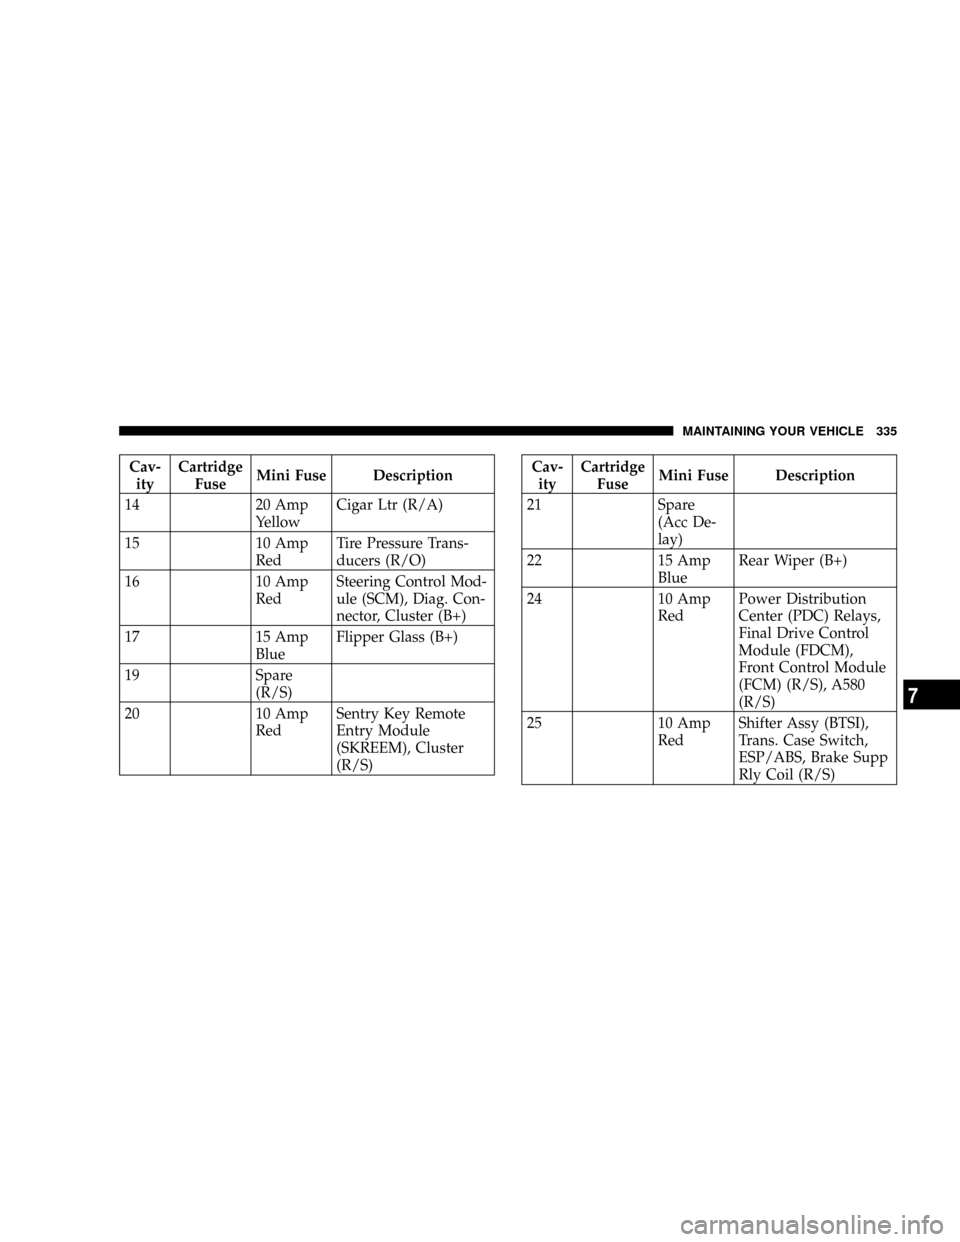
FUSE PANEL
Interior Fuses
The fuse panel is on the lower instrument panel just to
the left of the steering column.
Fuse Panel Location
MAINTAINING YOUR VEHICLE 333
7
Page 334 of 395
Cav-
ityCartridge
FuseMini Fuse Description
1 30 Amp
GreenAudio Amp (B+)
2 15 Amp
BlueSunroof (B+)
3 10 Amp
RedHtd Mirror (EBL)
4 20 Amp
YellowRr Pwr Out (B+)
5 Spare
6 Spare
7 20 Amp
YellowDoor Locks (B+)
8 15 Amp
BlueSteer Col Lock (B+)
(ELV)
9 20 Amp
YellowPwr Outlet (B+)Cav-
ityCartridge
FuseMini Fuse Description
10 10 Amp
RedFinal Drive Control
Module (FDCM),
Heater Ventilation, Air
Conditioning (HVAC),
Switch Bank, Transfer
Case Switch, O/H,
Heater Ventilation, Air
Conditioning (HVAC)
Relay, Rear Park As-
sist
11 Spare (B+)
12 10 Amp
RedDoor Mods, Mem. Sw,
O/H Lamps, IP Cour-
tesy Lamps, Glove
Box Lamp (B+)
13 10 Amp
RedAutowipe (R/A)
334 MAINTAINING YOUR VEHICLE
Page 335 of 395
Cav-
ityCartridge
FuseMini Fuse Description
14 20 Amp
YellowCigar Ltr (R/A)
15 10 Amp
RedTire Pressure Trans-
ducers (R/O)
16 10 Amp
RedSteering Control Mod-
ule (SCM), Diag. Con-
nector, Cluster (B+)
17 15 Amp
BlueFlipper Glass (B+)
19 Spare
(R/S)
20 10 Amp
RedSentry Key Remote
Entry Module
(SKREEM), Cluster
(R/S)Cav-
ityCartridge
FuseMini Fuse Description
21 Spare
(Acc De-
lay)
22 15 Amp
BlueRear Wiper (B+)
24 10 Amp
RedPower Distribution
Center (PDC) Relays,
Final Drive Control
Module (FDCM),
Front Control Module
(FCM) (R/S), A580
(R/S)
25 10 Amp
RedShifter Assy (BTSI),
Trans. Case Switch,
ESP/ABS, Brake Supp
Rly Coil (R/S)
MAINTAINING YOUR VEHICLE 335
7
Page 336 of 395
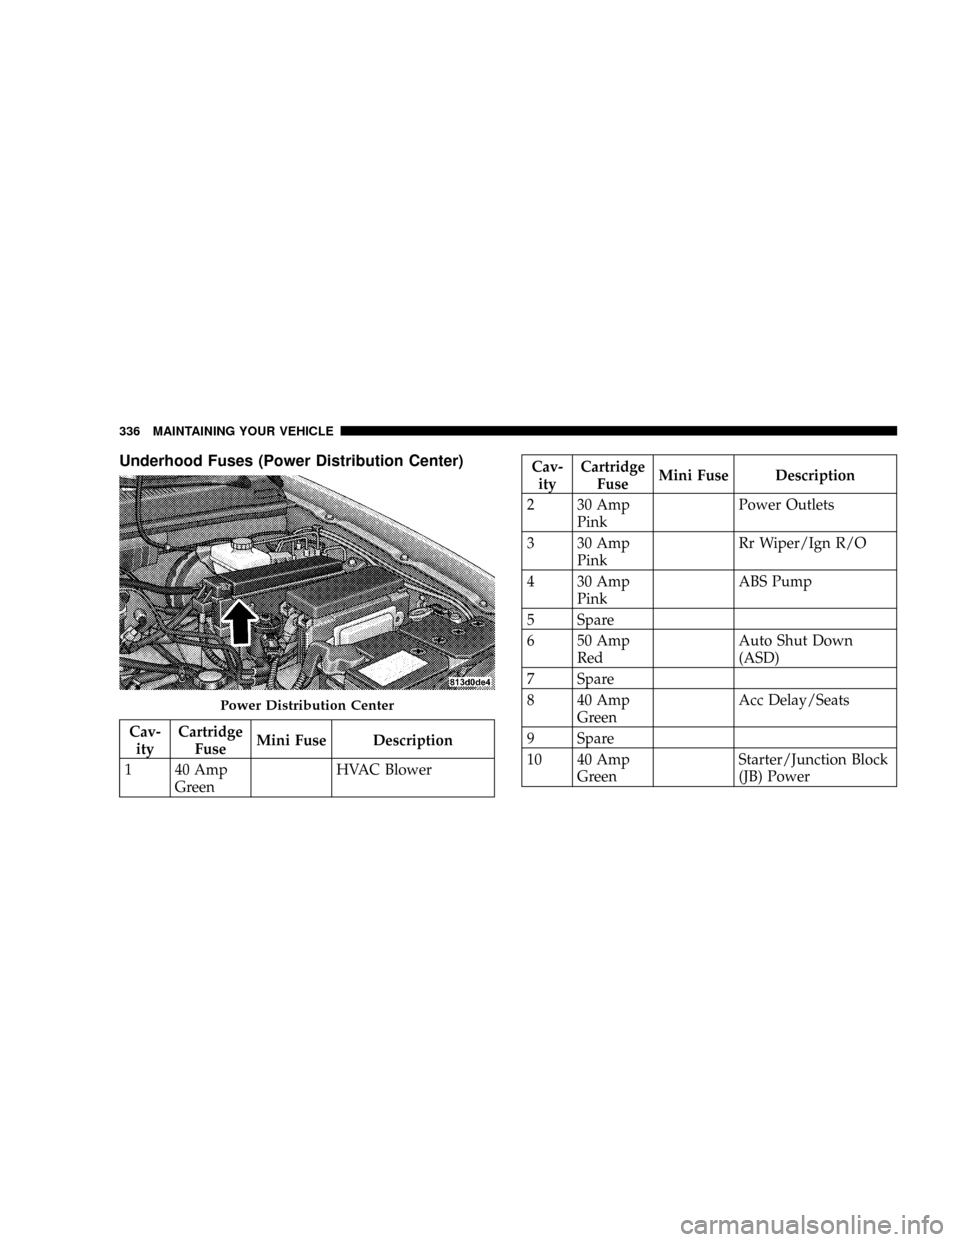
Underhood Fuses (Power Distribution Center)
Cav-
ityCartridge
FuseMini Fuse Description
1 40 Amp
GreenHVAC Blower
Cav-
ityCartridge
FuseMini Fuse Description
2 30 Amp
PinkPower Outlets
3 30 Amp
PinkRr Wiper/Ign R/O
4 30 Amp
PinkABS Pump
5 Spare
6 50 Amp
RedAuto Shut Down
(ASD)
7 Spare
8 40 Amp
GreenAcc Delay/Seats
9 Spare
10 40 Amp
GreenStarter/Junction Block
(JB) Power
Power Distribution Center
336 MAINTAINING YOUR VEHICLE
Page 337 of 395
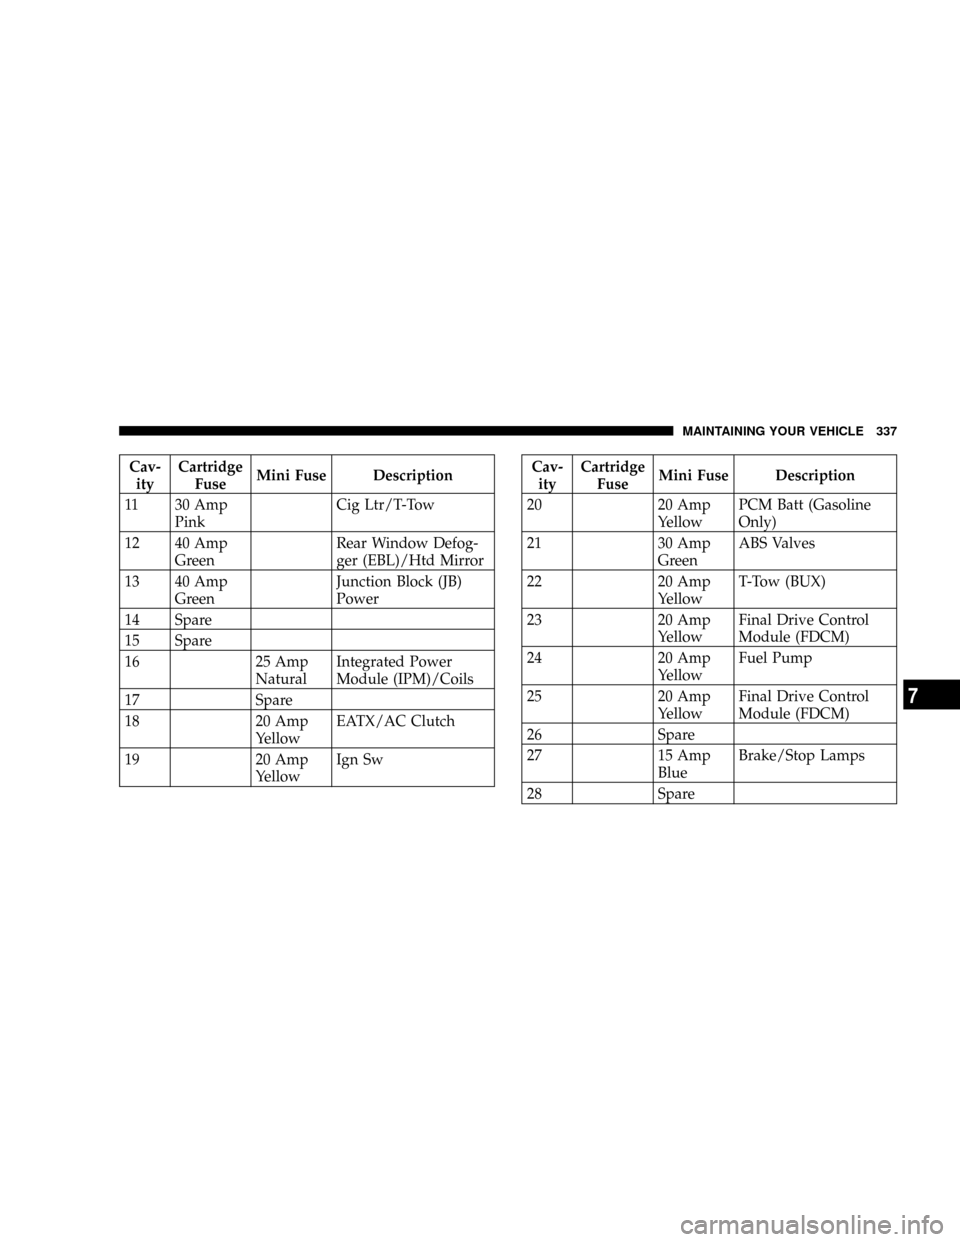
Cav-
ityCartridge
FuseMini Fuse Description
11 30 Amp
PinkCig Ltr/T-Tow
12 40 Amp
GreenRear Window Defog-
ger (EBL)/Htd Mirror
13 40 Amp
GreenJunction Block (JB)
Power
14 Spare
15 Spare
16 25 Amp
NaturalIntegrated Power
Module (IPM)/Coils
17 Spare
18 20 Amp
YellowEATX/AC Clutch
19 20 Amp
YellowIgn SwCav-
ityCartridge
FuseMini Fuse Description
20 20 Amp
YellowPCM Batt (Gasoline
Only)
21 30 Amp
GreenABS Valves
22 20 Amp
YellowT-Tow (BUX)
23 20 Amp
YellowFinal Drive Control
Module (FDCM)
24 20 Amp
YellowFuel Pump
25 20 Amp
YellowFinal Drive Control
Module (FDCM)
26 Spare
27 15 Amp
BlueBrake/Stop Lamps
28 Spare
MAINTAINING YOUR VEHICLE 337
7
Page 338 of 395
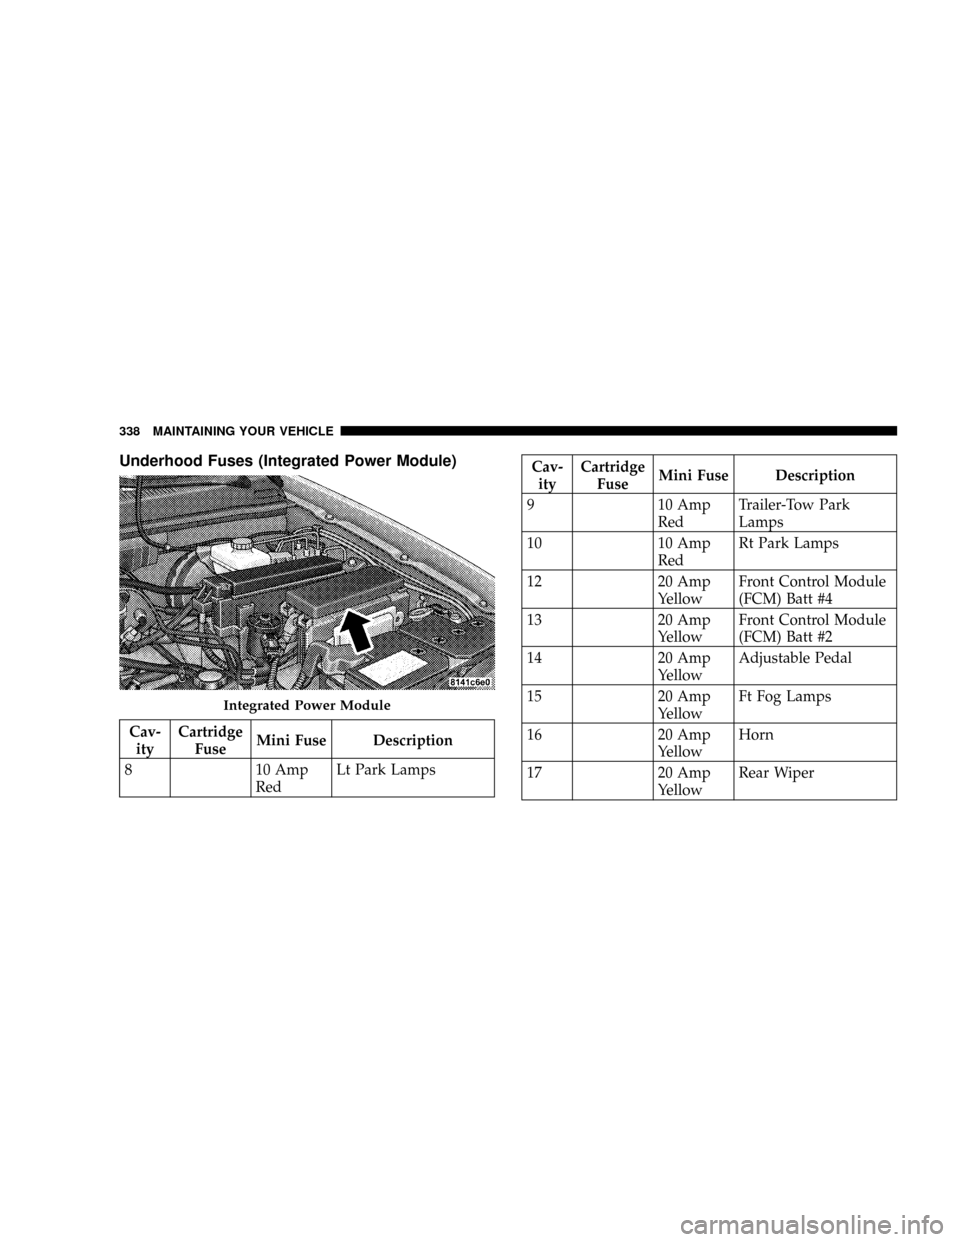
Underhood Fuses (Integrated Power Module)
Cav-
ityCartridge
FuseMini Fuse Description
8 10 Amp
RedLt Park Lamps
Cav-
ityCartridge
FuseMini Fuse Description
9 10 Amp
RedTrailer-Tow Park
Lamps
10 10 Amp
RedRt Park Lamps
12 20 Amp
YellowFront Control Module
(FCM) Batt #4
13 20 Amp
YellowFront Control Module
(FCM) Batt #2
14 20 Amp
YellowAdjustable Pedal
15 20 Amp
YellowFt Fog Lamps
16 20 Amp
YellowHorn
17 20 Amp
YellowRear Wiper
Integrated Power Module
338 MAINTAINING YOUR VEHICLE
Page 339 of 395
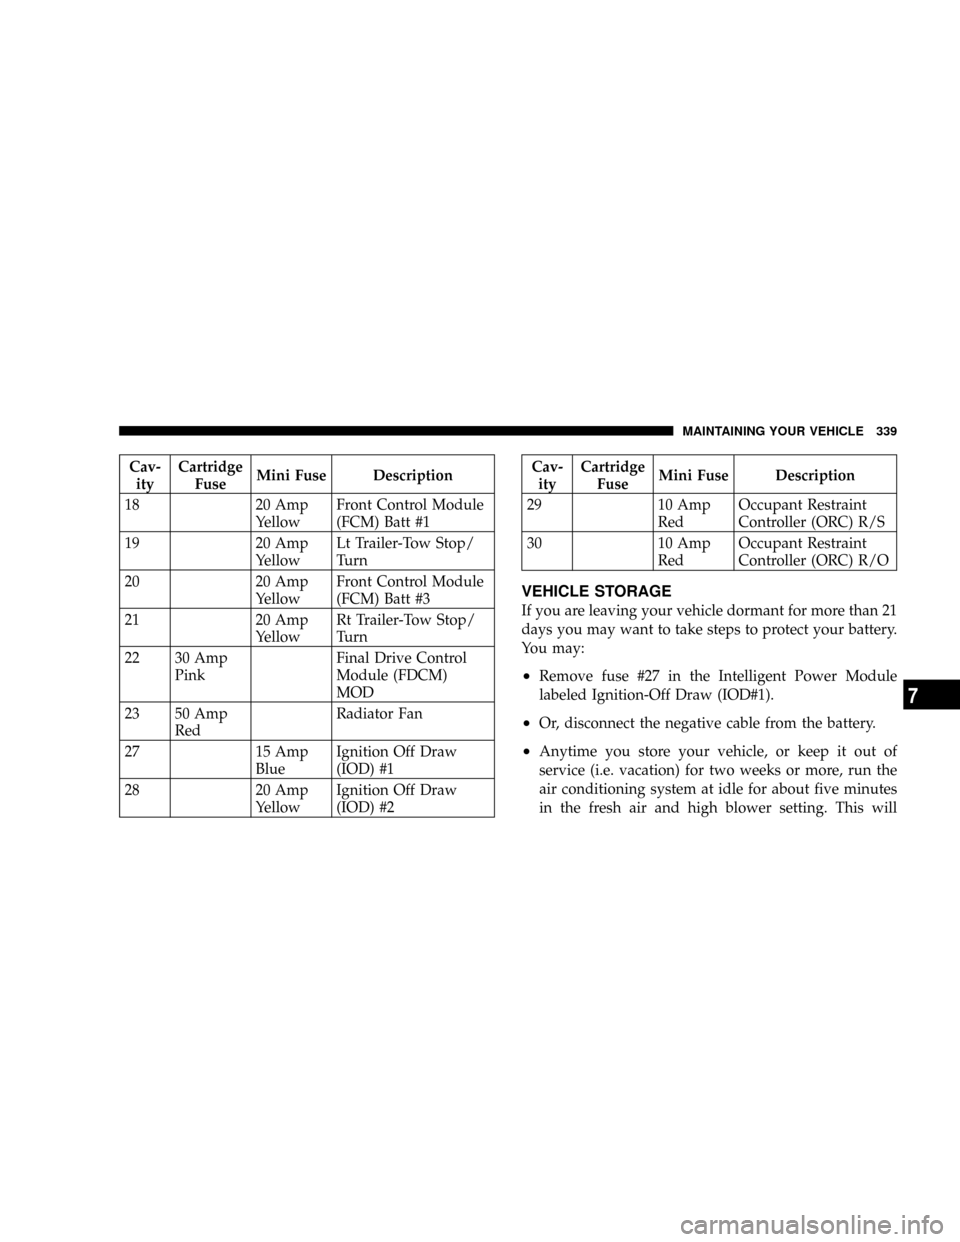
Cav-
ityCartridge
FuseMini Fuse Description
18 20 Amp
YellowFront Control Module
(FCM) Batt #1
19 20 Amp
YellowLt Trailer-Tow Stop/
Turn
20 20 Amp
YellowFront Control Module
(FCM) Batt #3
21 20 Amp
YellowRt Trailer-Tow Stop/
Turn
22 30 Amp
PinkFinal Drive Control
Module (FDCM)
MOD
23 50 Amp
RedRadiator Fan
27 15 Amp
BlueIgnition Off Draw
(IOD) #1
28 20 Amp
YellowIgnition Off Draw
(IOD) #2Cav-
ityCartridge
FuseMini Fuse Description
29 10 Amp
RedOccupant Restraint
Controller (ORC) R/S
30 10 Amp
RedOccupant Restraint
Controller (ORC) R/O
VEHICLE STORAGE
If you are leaving your vehicle dormant for more than 21
days you may want to take steps to protect your battery.
You may:
²Remove fuse #27 in the Intelligent Power Module
labeled Ignition-Off Draw (IOD#1).
²Or, disconnect the negative cable from the battery.
²Anytime you store your vehicle, or keep it out of
service (i.e. vacation) for two weeks or more, run the
air conditioning system at idle for about five minutes
in the fresh air and high blower setting. This will
MAINTAINING YOUR VEHICLE 339
7
Page 340 of 395

insure adequate system lubrication to minimize the
possibility of compressor damage when the system is
started again.
REPLACEMENT BULBS
Interior Lights Bulb Type
Glove Box Light......................... 194
Grab Handle Light................L002825W5W
Overhead Console Reading Lights..........VT4976
Rear Cargo Light.......................214±2
Visor Vanity Light.....................V26377
Underpanel Courtesy Lights................. 906
Instrument Cluster (General Illumination)....... 103
Telltale/Hazard Light...................... 74
* Available only from authorized dealers.Exterior Lights Bulb Type
Backup Lights.........................3157K
Front Fog Lights........................9145
Front Park/Turn Light...................3157K
Front Side Marker.......................2825
Headlights (Low Beam)...................9006
Headlights (High Beam)...................9005
Rear License Plate Light.................... 168
Rear Stop/Tail Lights....................3157K
Rear Turn/Tail Lights (2)..................3157
NOTE:Numbers refer to commercial bulb types that
can be purchased from your authorized dealer.
If a bulb needs to be replaced, visit your authorized
dealer or refer to the applicable Service Manual.
340 MAINTAINING YOUR VEHICLE