steering wheel JEEP GRAND CHEROKEE 2011 WK2 / 4.G Owner's Manual
[x] Cancel search | Manufacturer: JEEP, Model Year: 2011, Model line: GRAND CHEROKEE, Model: JEEP GRAND CHEROKEE 2011 WK2 / 4.GPages: 100, PDF Size: 5.46 MB
Page 59 of 100
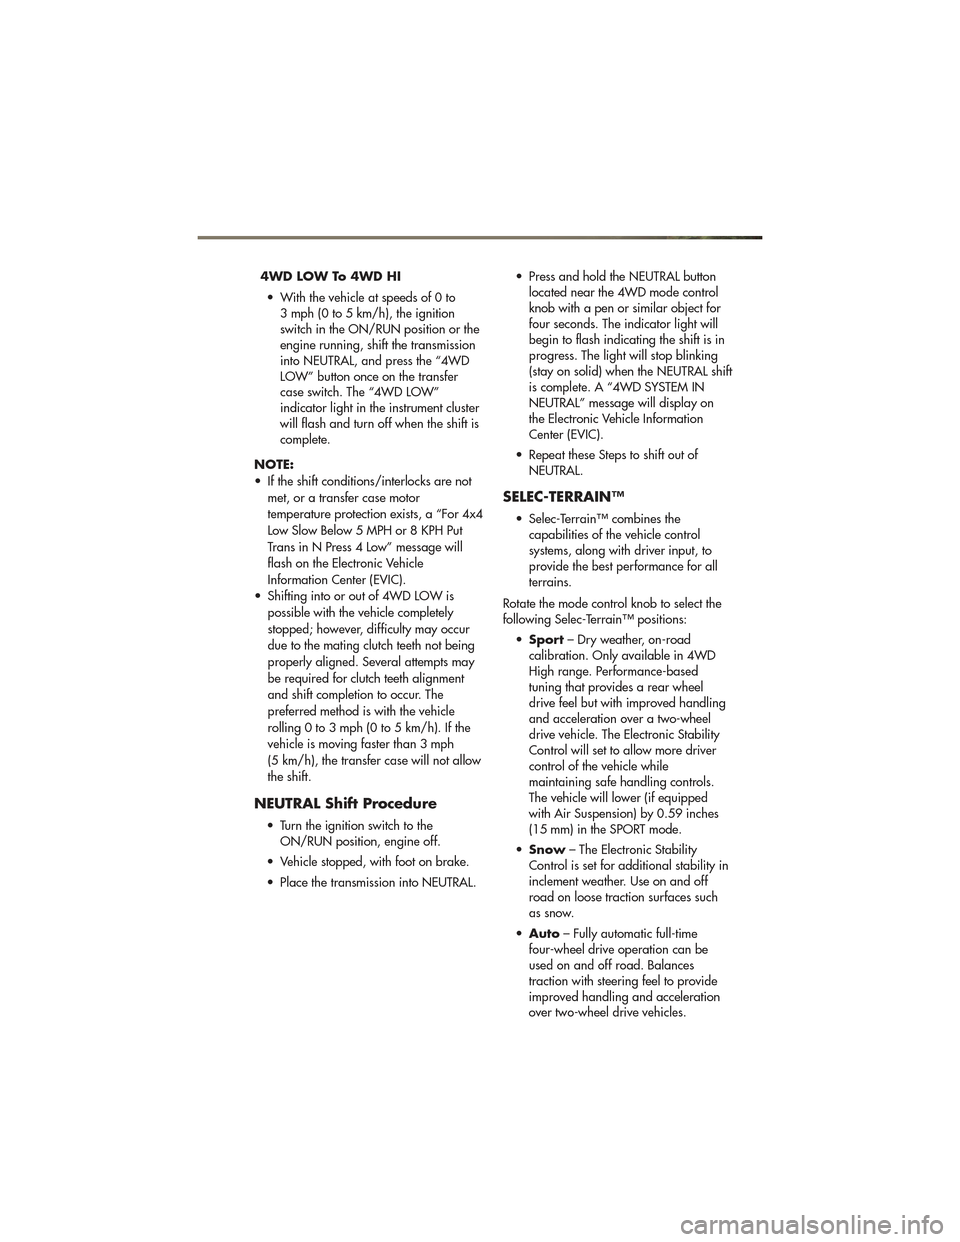
4WD LOW To 4WD HI• With the vehicle at speeds of 0 to 3 mph (0 to 5 km/h), the ignition
switch in the ON/RUN position or the
engine running, shift the transmission
into NEUTRAL, and press the “4WD
LOW” button once on the transfer
case switch. The “4WD LOW”
indicator light in the instrument cluster
will flash and turn off when the shift is
complete.
NOTE:
• If the shift conditions/interlocks are not met, or a transfer case motor
temperature protection exists, a “For 4x4
Low Slow Below 5 MPH or 8 KPH Put
Trans in N Press 4 Low” message will
flash on the Electronic Vehicle
Information Center (EVIC).
• Shifting into or out of 4WD LOW is possible with the vehicle completely
stopped; however, difficulty may occur
due to the mating clutch teeth not being
properly aligned. Several attempts may
be required for clutch teeth alignment
and shift completion to occur. The
preferred method is with the vehicle
rolling 0 to 3 mph (0 to 5 km/h). If the
vehicle is moving faster than 3 mph
(5 km/h), the transfer case will not allow
the shift.
NEUTRAL Shift Procedure
• Turn the ignition switch to theON/RUN position, engine off.
• Vehicle stopped, with foot on brake.
• Place the transmission into NEUTRAL. • Press and hold the NEUTRAL button
located near the 4WD mode control
knob with a pen or similar object for
four seconds. The indicator light will
begin to flash indicating the shift is in
progress. The light will stop blinking
(stay on solid) when the NEUTRAL shift
is complete. A “4WD SYSTEM IN
NEUTRAL” message will display on
the Electronic Vehicle Information
Center (EVIC).
• Repeat these Steps to shift out of NEUTRAL.
SELEC-TERRAIN™
• Selec-Terrain™ combines thecapabilities of the vehicle control
systems, along with driver input, to
provide the best performance for all
terrains.
Rotate the mode control knob to select the
following Selec-Terrain™ positions: • Sport – Dry weather, on-road
calibration. Only available in 4WD
High range. Performance-based
tuning that provides a rear wheel
drive feel but with improved handling
and acceleration over a two-wheel
drive vehicle. The Electronic Stability
Control will set to allow more driver
control of the vehicle while
maintaining safe handling controls.
The vehicle will lower (if equipped
with Air Suspension) by 0.59 inches
(15 mm) in the SPORT mode.
• Snow – The Electronic Stability
Control is set for additional stability in
inclement weather. Use on and off
road on loose traction surfaces such
as snow.
• Auto – Fully automatic full-time
four-wheel drive operation can be
used on and off road. Balances
traction with steering feel to provide
improved handling and acceleration
over two-wheel drive vehicles.
OFF-ROAD CAPABILITIES
57
Page 79 of 100
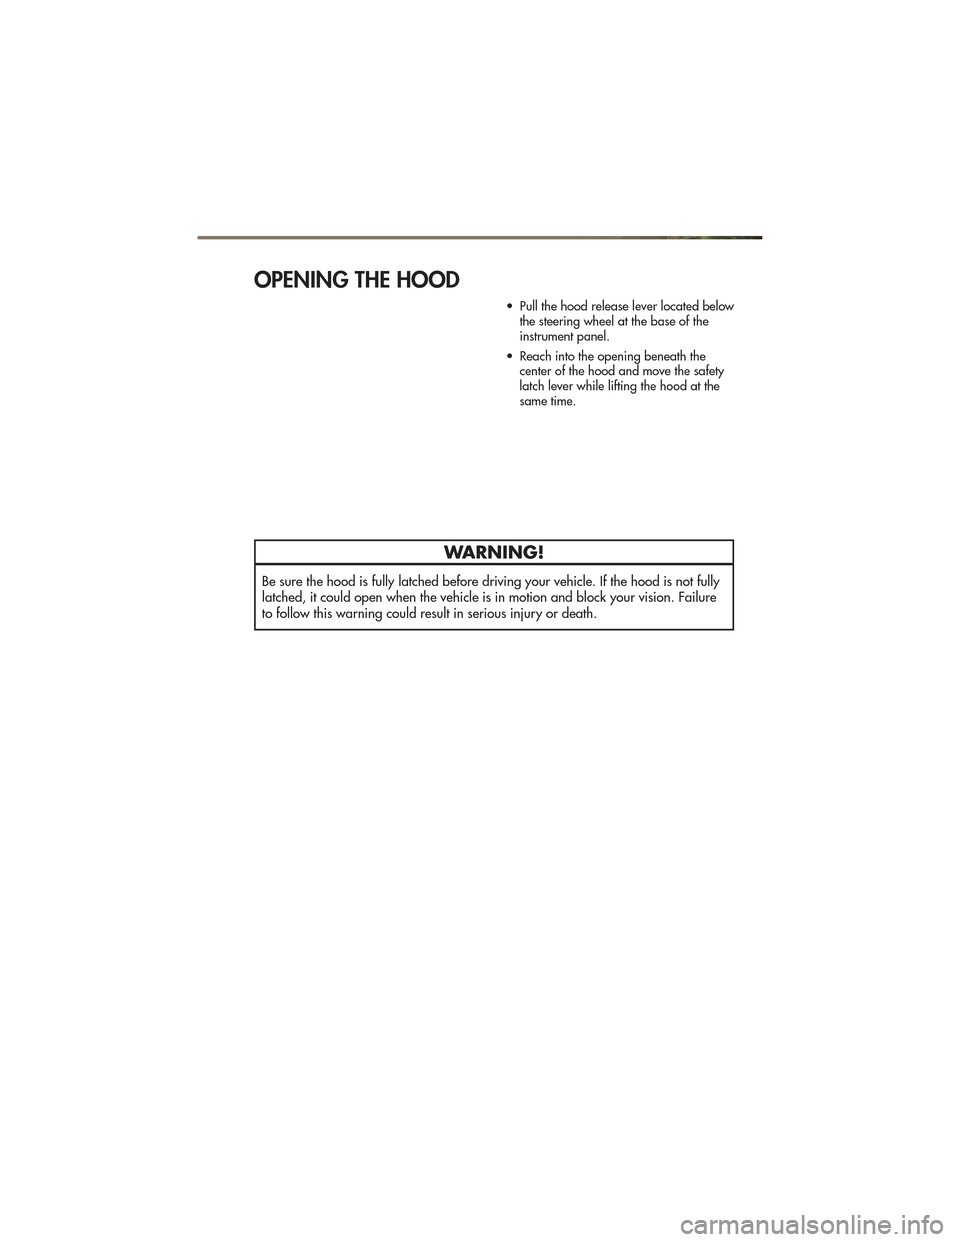
OPENING THE HOOD
• Pull the hood release lever located belowthe steering wheel at the base of the
instrument panel.
• Reach into the opening beneath the center of the hood and move the safety
latch lever while lifting the hood at the
same time.
WARNING!
Be sure the hood is fully latched before driving your vehicle. If the hood is not fully
latched, it could open when the vehicle is in motion and block your vision. Failure
to follow this warning could result in serious injury or death.
MAINTAINING YOUR VEHICLE
77
Page 87 of 100
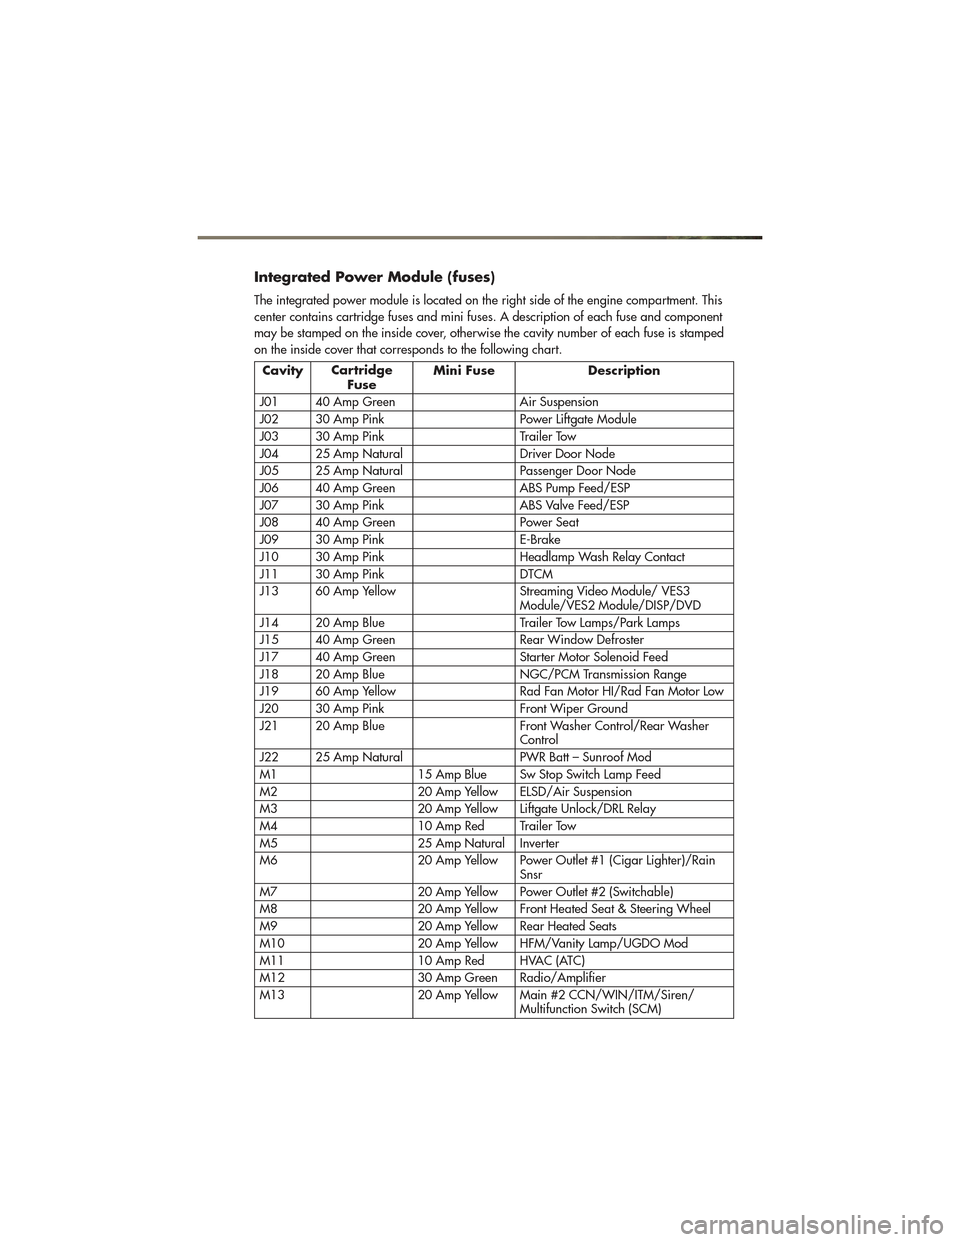
Integrated Power Module (fuses)
The integrated power module is located on the right side of the engine compartment. This
center contains cartridge fuses and mini fuses. A description of each fuse and component
may be stamped on the inside cover, otherwise the cavity number of each fuse is stamped
on the inside cover that corresponds to the following chart.
CavityCartridge
Fuse Mini Fuse Description
J01 40 Amp Green Air Suspension
J02 30 Amp Pink Power Liftgate Module
J03 30 Amp Pink Trailer Tow
J04 25 Amp Natural Driver Door Node
J05 25 Amp Natural Passenger Door Node
J06 40 Amp Green ABS Pump Feed/ESP
J07 30 Amp Pink ABS Valve Feed/ESP
J08 40 Amp Green Power Seat
J09 30 Amp Pink E-Brake
J10 30 Amp Pink Headlamp Wash Relay Contact
J11 30 Amp Pink DTCM
J13 60 Amp Yellow Streaming Video Module/ VES3 Module/VES2 Module/DISP/DVD
J14 20 Amp Blue Trailer Tow Lamps/Park Lamps
J15 40 Amp Green Rear Window Defroster
J17 40 Amp Green Starter Motor Solenoid Feed
J18 20 Amp Blue NGC/PCM Transmission Range
J19 60 Amp Yellow Rad Fan Motor HI/Rad Fan Motor Low
J20 30 Amp Pink Front Wiper Ground
J21 20 Amp Blue Front Washer Control/Rear Washer Control
J22 25 Amp Natural PWR Batt – Sunroof Mod
M1 15 Amp Blue Sw Stop Switch Lamp Feed
M2 20 Amp Yellow ELSD/Air Suspension
M3 20 Amp Yellow Liftgate Unlock/DRL Relay
M4 10 Amp Red Trailer Tow
M5 25 Amp Natural Inverter
M6 20 Amp Yellow Power Outlet #1 (Cigar Lighter)/Rain Snsr
M7 20 Amp Yellow Power Outlet #2 (Switchable)
M8 20 Amp Yellow Front Heated Seat & Steering Wheel
M9 20 Amp Yellow Rear Heated Seats
M10 20 Amp Yellow HFM/Vanity Lamp/UGDO Mod
M11 10 Amp Red HVAC (ATC)
M12 30 Amp Green Radio/Amplifier
M13 20 Amp Yellow Main #2 CCN/WIN/ITM/Siren/ Multifunction Switch (SCM)
MAINTAINING YOUR VEHICLE
85
Page 88 of 100
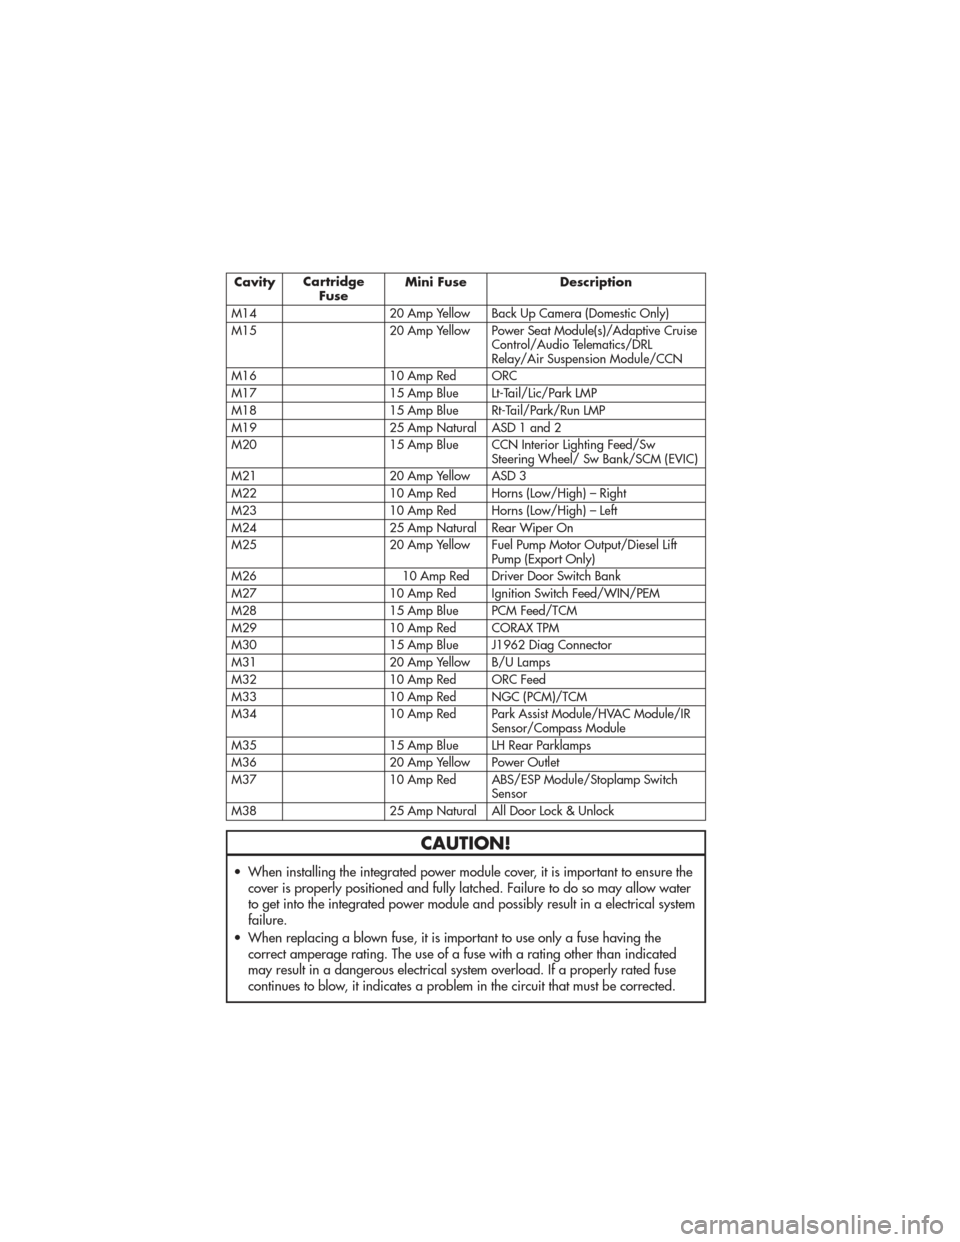
CavityCartridge
Fuse Mini Fuse Description
M14 20 Amp Yellow Back Up Camera (Domestic Only)
M15 20 Amp Yellow Power Seat Module(s)/Adaptive Cruise Control/Audio Telematics/DRL
Relay/Air Suspension Module/CCN
M16 10 Amp Red ORC
M17 15 Amp Blue Lt-Tail/Lic/Park LMP
M18 15 Amp Blue Rt-Tail/Park/Run LMP
M19 25 Amp Natural ASD 1 and 2
M20 15 Amp Blue CCN Interior Lighting Feed/Sw Steering Wheel/ Sw Bank/SCM (EVIC)
M21 20 Amp Yellow ASD 3
M22 10 Amp Red Horns (Low/High) – Right
M23 10 Amp Red Horns (Low/High) – Left
M24 25 Amp Natural Rear Wiper On
M25 20 Amp Yellow Fuel Pump Motor Output/Diesel Lift Pump (Export Only)
M26 10 Amp Red Driver Door Switch Bank
M27 10 Amp Red Ignition Switch Feed/WIN/PEM
M28 15 Amp Blue PCM Feed/TCM
M29 10 Amp Red CORAX TPM
M30 15 Amp Blue J1962 Diag Connector
M31 20 Amp Yellow B/U Lamps
M32 10 Amp Red ORC Feed
M33 10 Amp Red NGC (PCM)/TCM
M34 10 Amp Red Park Assist Module/HVAC Module/IR Sensor/Compass Module
M35 15 Amp Blue LH Rear Parklamps
M36 20 Amp Yellow Power Outlet
M37 10 Amp Red ABS/ESP Module/Stoplamp Switch Sensor
M38 25 Amp Natural All Door Lock & Unlock
CAUTION!
• When installing the integrated power module cover, it is important to ensure the cover is properly positioned and fully latched. Failure to do so may allow water
to get into the integrated power module and possibly result in a electrical system
failure.
• When replacing a blown fuse, it is important to use only a fuse having the correct amperage rating. The use of a fuse with a rating other than indicated
may result in a dangerous electrical system overload. If a properly rated fuse
continues to blow, it indicates a problem in the circuit that must be corrected.
MAINTAINING YOUR VEHICLE
86
Page 89 of 100
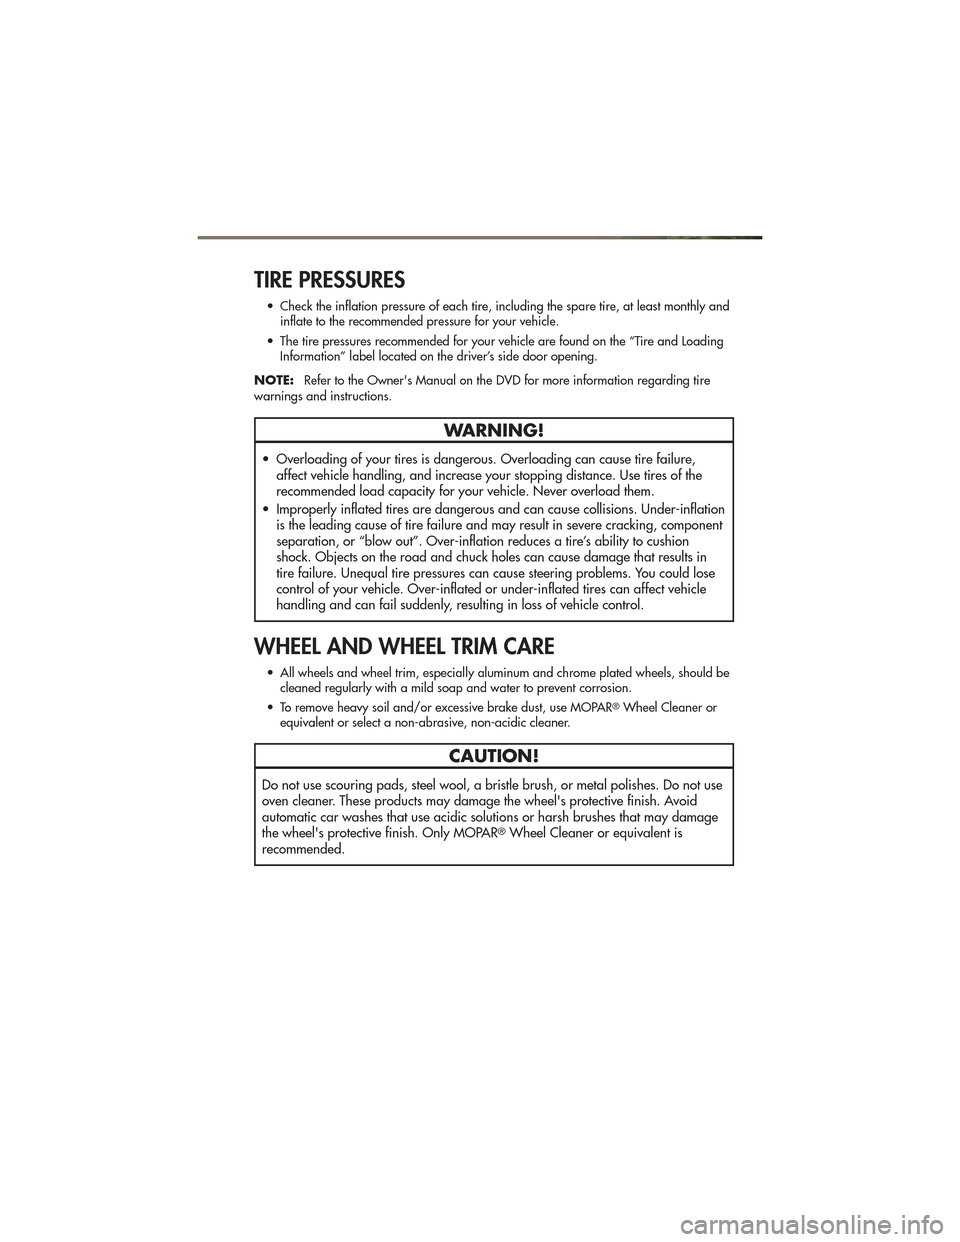
TIRE PRESSURES
• Check the inflation pressure of each tire, including the spare tire, at least monthly andinflate to the recommended pressure for your vehicle.
• The tire pressures recommended for your vehicle are found on the “Tire and Loading Information” label located on the driver’s side door opening.
NOTE: Refer to the Owner's Manual on the DVD for more information regarding tire
warnings and instructions.
WARNING!
• Overloading of your tires is dangerous. Overloading can cause tire failure, affect vehicle handling, and increase your stopping distance. Use tires of the
recommended load capacity for your vehicle. Never overload them.
• Improperly inflated tires are dangerous and can cause collisions. Under-inflation is the leading cause of tire failure and may result in severe cracking, component
separation, or “blow out”. Over-inflation reduces a tire’s ability to cushion
shock. Objects on the road and chuck holes can cause damage that results in
tire failure. Unequal tire pressures can cause steering problems. You could lose
control of your vehicle. Over-inflated or under-inflated tires can affect vehicle
handling and can fail suddenly, resulting in loss of vehicle control.
WHEEL AND WHEEL TRIM CARE
• All wheels and wheel trim, especially aluminum and chrome plated wheels, should becleaned regularly with a mild soap and water to prevent corrosion.
• To remove heavy soil and/or excessive brake dust, use MOPAR
®Wheel Cleaner or
equivalent or select a non-abrasive, non-acidic cleaner.
CAUTION!
Do not use scouring pads, steel wool, a bristle brush, or metal polishes. Do not use
oven cleaner. These products may damage the wheel's protective finish. Avoid
automatic car washes that use acidic solutions or harsh brushes that may damage
the wheel's protective finish. Only MOPAR
®Wheel Cleaner or equivalent is
recommended.
MAINTAINING YOUR VEHICLE
87
Page 95 of 100
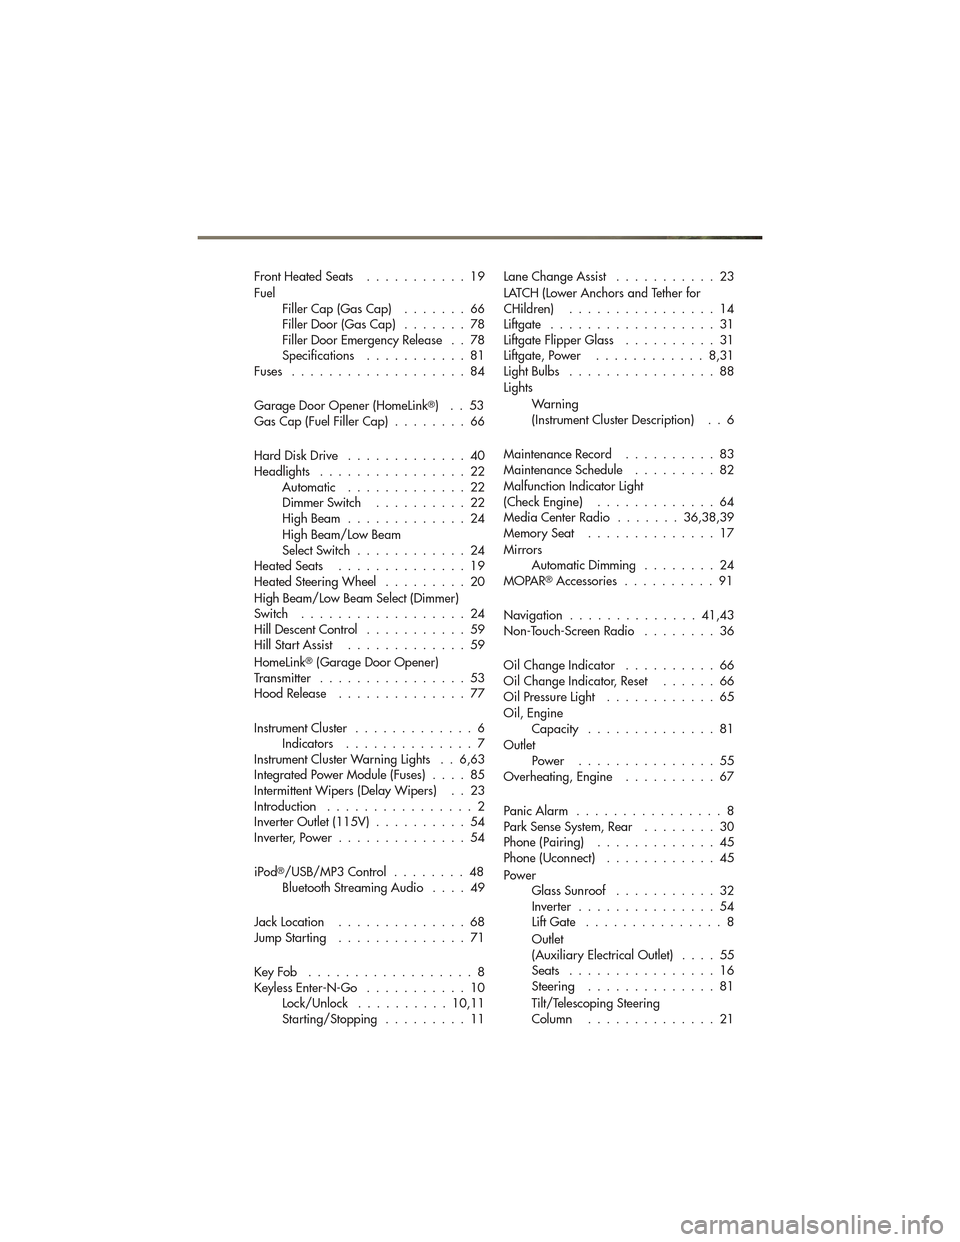
FrontHeatedSeats ...........19
FuelFiller Cap (Gas Cap) .......66
Filler Door (Gas Cap) .......78
Filler Door Emergency Release . . 78
Specifications ...........81
Fuses ...................84
Garage Door Opener (HomeLink
®)..53
Gas Cap (Fuel Filler Cap) ........66
Hard Disk Drive .............40
Headlights ................22 Automatic .............22
Dimmer Switch ..........22
HighBeam .............24
High Beam/Low Beam
Select Switch ............24
HeatedSeats ..............19
Heated Steering Wheel .........20
High Beam/Low Beam Select (Dimmer)
Switch ..................24
Hill Descent Control ...........59
Hill Start Assist .............59
HomeLink
®(Garage Door Opener)
Transmitter ................53
Hood Release ..............77
Instrument Cluster .............6
Indicators ..............7
Instrument Cluster Warning Lights . . 6,63
Integrated Power Module (Fuses) ....85
Intermittent Wipers (Delay Wipers) . . 23
Introduction ................2
Inverter Outlet (115V) ..........54
Inverter, Power ..............54
iPod
®/USB/MP3 Control ........48
Bluetooth Streaming Audio ....49
JackLocation ..............68
JumpStarting ..............71
KeyFob ..................8
Keyless Enter-N-Go ...........10
Lock/Unlock ..........10,11
Starting/Stopping .........11 Lane Change Assist
...........23
LATCH (Lower Anchors and Tether for
CHildren) ................14
Liftgate ..................31
Liftgate Flipper Glass ..........31
Liftgate, Power ............8,31
LightBulbs ................88
Lights
Warning
(Instrument Cluster Description) . . 6
MaintenanceRecord ..........83
MaintenanceSchedule .........82
Malfunction Indicator Light
(Check Engine) .............64
Media Center Radio .......36,38,39
MemorySeat ..............17
Mirrors AutomaticDimming ........24
MOPAR
®Accessories ..........91
Navigation ..............41,43
Non-Touch-Screen Radio ........36
Oil Change Indicator ..........66
Oil Change Indicator, Reset ......66
Oil Pressure Light ............65
Oil, Engine Capacity ..............81
Outlet Power ...............55
Overheating, Engine ..........67
PanicAlarm ................8
Park Sense System, Rear ........30
Phone (Pairing) .............45
Phone (Uconnect) ............45
Power GlassSunroof ...........32
Inverter ...............54
Lift Gate ...............8
Outlet
(Auxiliary Electrical Outlet) ....55
Seats ................16
Steering ..............81
Tilt/Telescoping Steering
Column ..............21
INDEX
93
Page 96 of 100
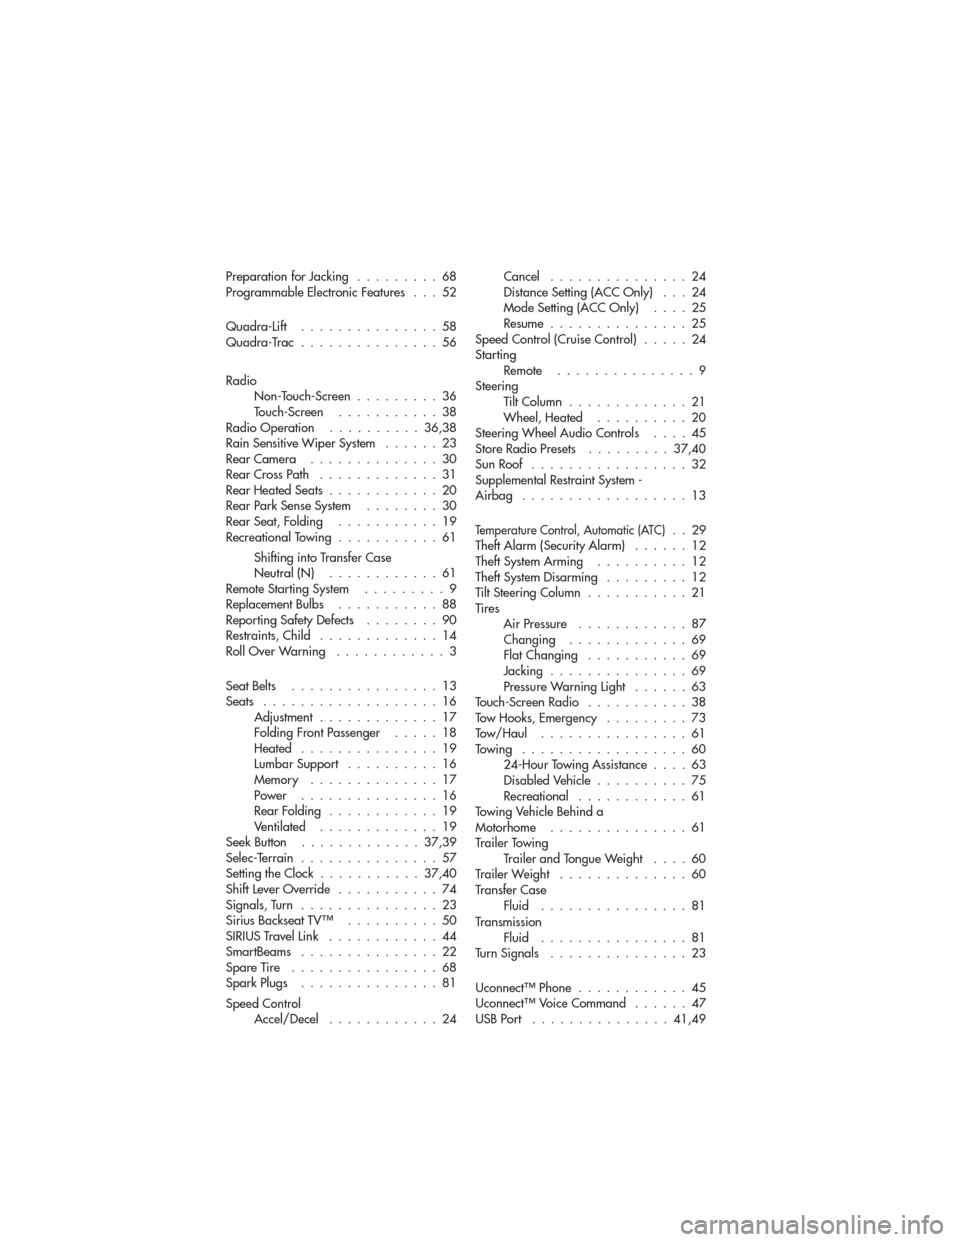
Preparation for Jacking.........68
Programmable Electronic Features . . . 52
Quadra-Lift ...............58
Quadra-Trac ...............56
Radio Non-Touch-Screen .........36
Touch-Screen ...........38
Radio Operation ..........36,38
Rain Sensitive Wiper System ......23
RearCamera ..............30
RearCrossPath .............31
RearHeatedSeats............20
Rear Park Sense System ........30
RearSeat,Folding ...........19
Recreational Towing ...........61
Shifting into Transfer Case
Neutral (N) ............61
Remote Starting System .........9
ReplacementBulbs ...........88
Reporting Safety Defects ........90
Restraints, Child .............14
RollOverWarning ............3
Seat Belts ................13
Seats ...................16 Adjustment .............17
Folding Front Passenger .....18
Heated ...............19
Lumbar Support ..........16
Memory ..............17
Power ...............16
RearFolding ............19
Ventilated .............19
Seek Button .............37,39
Selec-Terrain ...............57
Setting the Clock ...........37,40
Shift Lever Override ...........74
Signals,Turn ...............23
Sirius Backseat TV™ ..........50
SIRIUSTravelLink ............44
SmartBeams ...............22
Spare Tire ................68
Spark Plugs ...............81
Speed Control Accel/Decel ............24 Cancel
...............24
Distance Setting (ACC Only) . . . 24
Mode Setting (ACC Only) ....25
Resume ...............25
Speed Control (Cruise Control) .....24
Starting Remote ...............9
Steering TiltColumn .............21
Wheel, Heated ..........20
Steering Wheel Audio Controls ....45
Store Radio Presets .........37,40
Sun Roof .................32
Supplemental Restraint System -
Airbag ..................13
Temperature Control, Automatic (ATC)..29
Theft Alarm (Security Alarm) ......12
Theft System Arming ..........12
Theft System Disarming .........12
Tilt Steering Column ...........21
Tires Air Pressure ............87
Changing .............69
FlatChanging ...........69
Jacking ...............69
Pressure Warning Light ......63
Touch-Screen Radio ...........38
Tow Hooks, Emergency .........73
Tow/Haul ................61
Towing ..................60 24-Hour Towing Assistance ....63
Disabled Vehicle ..........75
Recreational ............61
Towing Vehicle Behind a
Motorhome ...............61
Trailer Towing Trailer and Tongue Weight ....60
Trailer Weight ..............60
Transfer Case Fluid ................81
Transmission Fluid ................81
Turn Signals ...............23
Uconnect™ Phone ............45
Uconnect™ Voice Command ......47
USBPort ...............41,49
INDEX
94