radio JEEP GRAND CHEROKEE 2011 WK2 / 4.G Owner's Manual
[x] Cancel search | Manufacturer: JEEP, Model Year: 2011, Model line: GRAND CHEROKEE, Model: JEEP GRAND CHEROKEE 2011 WK2 / 4.GPages: 100, PDF Size: 5.46 MB
Page 51 of 100
If Equipped with Media Center 130 with Satellite Radio (Sales
Code RES + RSC), Media Center 430/430N (Sales Code RBZ/RHB)
or Media Center 730N (RHR)
• There are many ways to play music fromiPod®players or other portable devices
through your vehicle's speakers. Your
choices depend on what radio your
vehicle is equipped with.
• The radio sales code is located on the lower right side of the radio faceplate.
• The USB port located within the center console, allows you to plug an iPod
®
into the vehicle's sound system.
• The USB port is located inside the center console. To hear audio from devices
connected to this port from a
non-touch-screen radio, press the AUX
button on the radio faceplate. From a
touch-screen radio, press the MEDIA
hard-key, then touch the AUX or iPod
®
soft-key.
• When connected to this feature: • The iPod
®audio can be played on the vehicle’s sound system.
• The iPod
®can be controlled using the radio buttons to Play, Browse, and List the
iPod®or external devices contents. Refer to the Owner's Manual on the DVD for
details.
• The iPod
®battery charges when plugged into the USB port (if supported by the
specific audio device).
NOTE:
• The USB port supports certain Mini, Classic, Nano, Touch, and iPhone
®devices. The
USB port also supports playing music from compatible external USB Mass Storage Class
memory devices. For supported audio file formats, refer to the USB Port section on the
Owner's Manual on the DVD. Refer to www.jeep.com/uconnect website for a list of
tested iPod
®s. Some iPod®software versions may not fully support the USB port
features. Please visit Apple’s website for iPod®software updates.
Bluetooth®Streaming Audio
• If equipped with Uconnect™ Voice Command, your bluetooth-equipped iPod®
devices, cellphones or other media players, may also be able to stream music to your
vehicle's speakers. Your connected device must be bluetooth-compatible, and paired
with your Media Center radio (see Uconnect™ Phone for pairing instructions). Press
the AUX button on the radio faceplate until "BT" is displayed on the radio screen.
WARNING!
Do not plug in or remove the iPod®or external device while driving. Failure to
follow this warning could result in a collision.
ELECTRONICS
49
Page 52 of 100
VIDEO ENTERTAINMENT SYSTEM (VES)™
System Operation
• The screen is located on the headlinerbehind the front seat. To lower the
screen, press the release button located
in the rear of the overhead console.
• The system may be controlled by the front seat occupants using the
touch-screen radio, or by the rear seat
occupants using the remote control.
•
The video screen displays information in a
split-screen format. The left side of the
screen is referred to as Channel 1 and the
right side of the screen is referred to as
Channel 2. All modes except video modes
are displayed in a split-screen format.
• To use the headphones, press the power button located on the right ear cup. Select the channel on the headphones (1 or 2) that corresponds to the channel selected on the
VES™ screen.
Operation Of The Touch-Screen Radio
• To view a DVD video, press the OPEN/CLOSE or LOAD hard-key and insert the disc.Playback will begin automatically after the DVD is recognized by the disc drive. If
playback does not begin automatically, follow these steps:
• Press the MENU hard-key, then touch the Rear VES™ soft-key. If a chapter list appears on the right side of the screen touch the HIDE LIST soft-key to display the
Rear VES™ Control screen.
• Touch the 1 soft-key to select an audio channel, then touch the DISC soft-key in the MEDIA column.
SIRIUS Backseat TV™ • Press the MENU hard-key, then touch the Rear VES™ soft-key. If a chapter list appears on the right side of the screen, touch the HIDE LIST soft key to display the Rear VES™
Control screen.
• Touch the 1 soft-key to select an audio channel, then touch the TV soft-key in the RADIO column to select SIRIUS Backseat TV™.
• To view SIRIUS Backseat TV™ using the remote, set the remote control channel selector switch to channel 1. Press the MODE button, then using the arrow buttons select TV
and press ENTER.
ELECTRONICS
50
Page 53 of 100
Operation Of The Remote
•The remote control operates similarly to any DVD remote you have used before and
allows the rear seat passengers to change stations, tracks, discs and audio/video modes.
• The remote control is designed to control either channel by using the selector switch located on the right side of the remote.
• Pressing the power button will turn the VES™ system ON/OFF.
• Pressing the MODE button causes the Mode Selection menu to appear on the VES™ screen. Use the remote control arrow buttons to scroll through the available modes,
then press ENTER to select the desired mode.
Auxiliary Audio/Video Input Jacks
• The Aux jacks are located on the rear of the center console.
• Connect the video game or other external media devices to the AUX jacks followingthe color coding for VES™ jacks.
• Using either the touch-screen radio or remote control, select AUX from the Rear VES™ Control or Mode Selection screen.
• Refer to “Uconnect™ Multimedia – Video Entertainment System (VES)™” in the Uconnect™ User's Manual on the DVD for further details.
ELECTRONIC VEHICLE INFORMATION CENTER (EVIC)
• The EVIC features a driver interactivedisplay that is located in the instrument
cluster. Pressing the controls on the left
side of the steering wheel allows the
driver to select vehicle information and
Personal Settings. For additional
information, refer to Programmable
Features in this guide.
• Press and release the UP
button to
scroll upward through the main menus
(Fuel Economy, Vehicle Info, Tire PSI,
Cruise, Messages, Units, System Setup)
and sub menus.
• Press and release the DOWN
button to scroll downward through the main
menus and sub menus.
• Press and release the SELECT
button for access to main menus, sub menus or to
select a personal setting in the setup menu.
• Press the BACK button to scroll back to a previous menu or sub menu.
ELECTRONICS
51
Page 73 of 100
WARNING!(Continued)
• If it is necessary to retrieve the spare tire from under the vehicle on the side ofthe vehicle close to moving traffic, pull far enough off the road to avoid the
danger of being hit.
• Carefully follow these tire changing procedures to help prevent personal injury or damage to your vehicle: Always park on a firm, level surface as far from the
edge of the roadway as possible before raising the vehicle.
• Raising the vehicle higher than necessary can make the vehicle less stable and could cause it to slip off the jack and hurt someone near it. Raise the vehicle
only enough to remove the tire.
• A loose tire or jack, thrown forward in a collision or hard stop, could endanger the occupants of the vehicle. Always stow the jack parts and the spare tire in the
places provided.
JUMP-STARTING
• If your vehicle has a discharged battery it can be jump-started using a set of jumpercables and a battery in another vehicle or by using a portable battery booster pack.
• Jump-starting can be dangerous if done improperly so please follow the procedures in this section carefully.
NOTE: When using a portable battery booster pack follow the manufacturer’s operating
instructions and precautions.
Preparations for Jump-Start
• The battery in your vehicle is located under the passengers front seat. There
are remote locations under the hood to
assist in jump starting.
• Set the parking brake, shift the automatic transmission into PARK and
turn the ignition to LOCK.
• Turn off the heater, radio, and all unnecessary electrical accessories.
• Remove the protective cover over the remote positive (+) battery post. Pull
upward on the cover to remove it.
• If using another vehicle to jump-start the battery, park the vehicle within the jumper cables reach, set the parking brake and make sure the ignition is OFF.
WHAT TO DO IN EMERGENCIES
71
Page 87 of 100
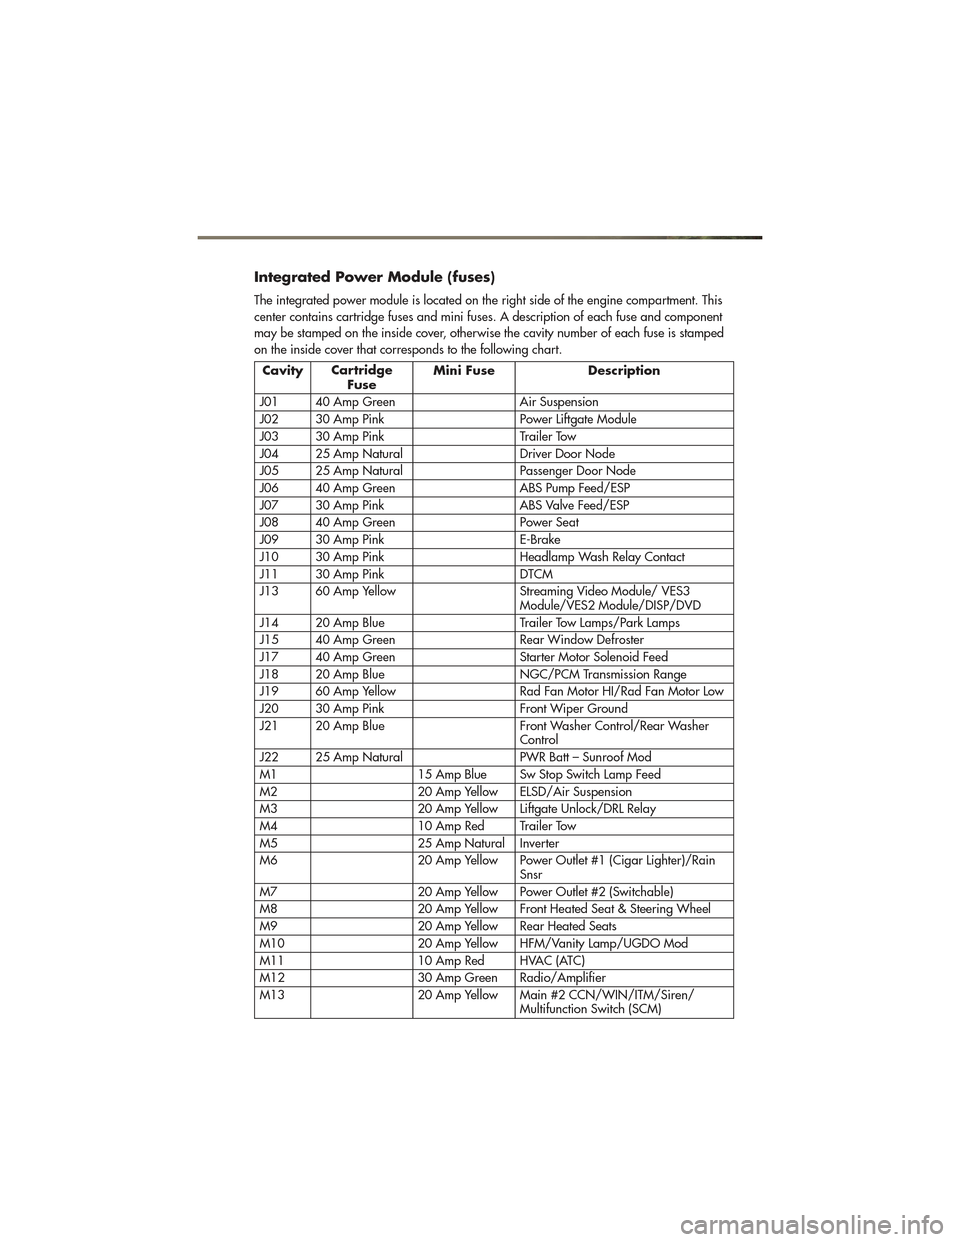
Integrated Power Module (fuses)
The integrated power module is located on the right side of the engine compartment. This
center contains cartridge fuses and mini fuses. A description of each fuse and component
may be stamped on the inside cover, otherwise the cavity number of each fuse is stamped
on the inside cover that corresponds to the following chart.
CavityCartridge
Fuse Mini Fuse Description
J01 40 Amp Green Air Suspension
J02 30 Amp Pink Power Liftgate Module
J03 30 Amp Pink Trailer Tow
J04 25 Amp Natural Driver Door Node
J05 25 Amp Natural Passenger Door Node
J06 40 Amp Green ABS Pump Feed/ESP
J07 30 Amp Pink ABS Valve Feed/ESP
J08 40 Amp Green Power Seat
J09 30 Amp Pink E-Brake
J10 30 Amp Pink Headlamp Wash Relay Contact
J11 30 Amp Pink DTCM
J13 60 Amp Yellow Streaming Video Module/ VES3 Module/VES2 Module/DISP/DVD
J14 20 Amp Blue Trailer Tow Lamps/Park Lamps
J15 40 Amp Green Rear Window Defroster
J17 40 Amp Green Starter Motor Solenoid Feed
J18 20 Amp Blue NGC/PCM Transmission Range
J19 60 Amp Yellow Rad Fan Motor HI/Rad Fan Motor Low
J20 30 Amp Pink Front Wiper Ground
J21 20 Amp Blue Front Washer Control/Rear Washer Control
J22 25 Amp Natural PWR Batt – Sunroof Mod
M1 15 Amp Blue Sw Stop Switch Lamp Feed
M2 20 Amp Yellow ELSD/Air Suspension
M3 20 Amp Yellow Liftgate Unlock/DRL Relay
M4 10 Amp Red Trailer Tow
M5 25 Amp Natural Inverter
M6 20 Amp Yellow Power Outlet #1 (Cigar Lighter)/Rain Snsr
M7 20 Amp Yellow Power Outlet #2 (Switchable)
M8 20 Amp Yellow Front Heated Seat & Steering Wheel
M9 20 Amp Yellow Rear Heated Seats
M10 20 Amp Yellow HFM/Vanity Lamp/UGDO Mod
M11 10 Amp Red HVAC (ATC)
M12 30 Amp Green Radio/Amplifier
M13 20 Amp Yellow Main #2 CCN/WIN/ITM/Siren/ Multifunction Switch (SCM)
MAINTAINING YOUR VEHICLE
85
Page 91 of 100
CHRYSLER GROUP LLC
CUSTOMER CENTER
P.O. Box 21–8004
Auburn Hills, MI 48321–8004
Phone: 1–877–426–5337
CHRYSLER CANADA
INC. CUSTOMER
CENTER
P.O. Box 1621
Windsor, Ontario N9A 4H6
Phone: 1–800–465–2001 (English)
Phone: 1–800–387–9983 (French)
ASSISTANCE FOR THE
HEARING IMPAIRED
• To assist customers who have hearingdifficulties, the manufacturer has
installed special TDD
(Telecommunication Devices for the
Deaf) equipment at its customer center.
Any hearing or speech impaired
customer, who has access to a TDD or
a conventional teletypewriter (TTY) in
the United States, can communicate
with the manufacturer by dialing
1–800–380–CHRY. Canadian
residents with hearing difficulties that
require assistance can use the special
needs relay service offered by Bell
Canada. For TTY teletypewriter users,
dial 711 and for Voice callers, dial
1–800–855–0511 to connect with a
Bell Relay Service operator.
WARNING!
Engine exhaust, some of its
constituents, and certain vehicle
components contain, or emit,
chemicals known to the State of
California to cause cancer and birth
defects, or other reproductive harm. In
addition, certain fluids contained in
vehicles and certain products of
component wear contain, or emit,
chemicals known to the State of
California to cause cancer and birth
defects, or other reproductive harm.
PUBLICATIONS
ORDERING
•If you are the first registered
retail owner of your vehicle,
you may obtain one free printed copy
of the Owner's Manual, Warranty
Booklet or Radio Manuals on your
DVD by calling 1–877–426–5337
(U.S.) or 1–800–387–1143 (Canada)
or by contacting your dealer.
• Replacement User Guide kits or DVDs or, if you prefer, additional printed
copies of the Owner's Manual,
Warranty Booklet or Radio Manuals
may be purchased by visiting
www.techauthority.com or by calling
1–800–890–4038 (U.S.) or
1–800–387–1143 (Canada). Visa,
Master Card, American Express and
Discover orders are accepted. If you
prefer mailing your order, please call
the above numbers for an order form.
NOTE: A street address is required when
ordering manuals (no P.O. Boxes).
NOTE:
• The Owner's Manual and User Guide electronic files are also available on the
Chrysler, Jeep, Ram Truck and Dodge
websites.
• Click on the "For Owners" tab, select "Owner/Service Manuals", then select
your desired model year and vehicle
from the drop-down lists.
CONSUMER ASSISTANCE
89
Page 93 of 100
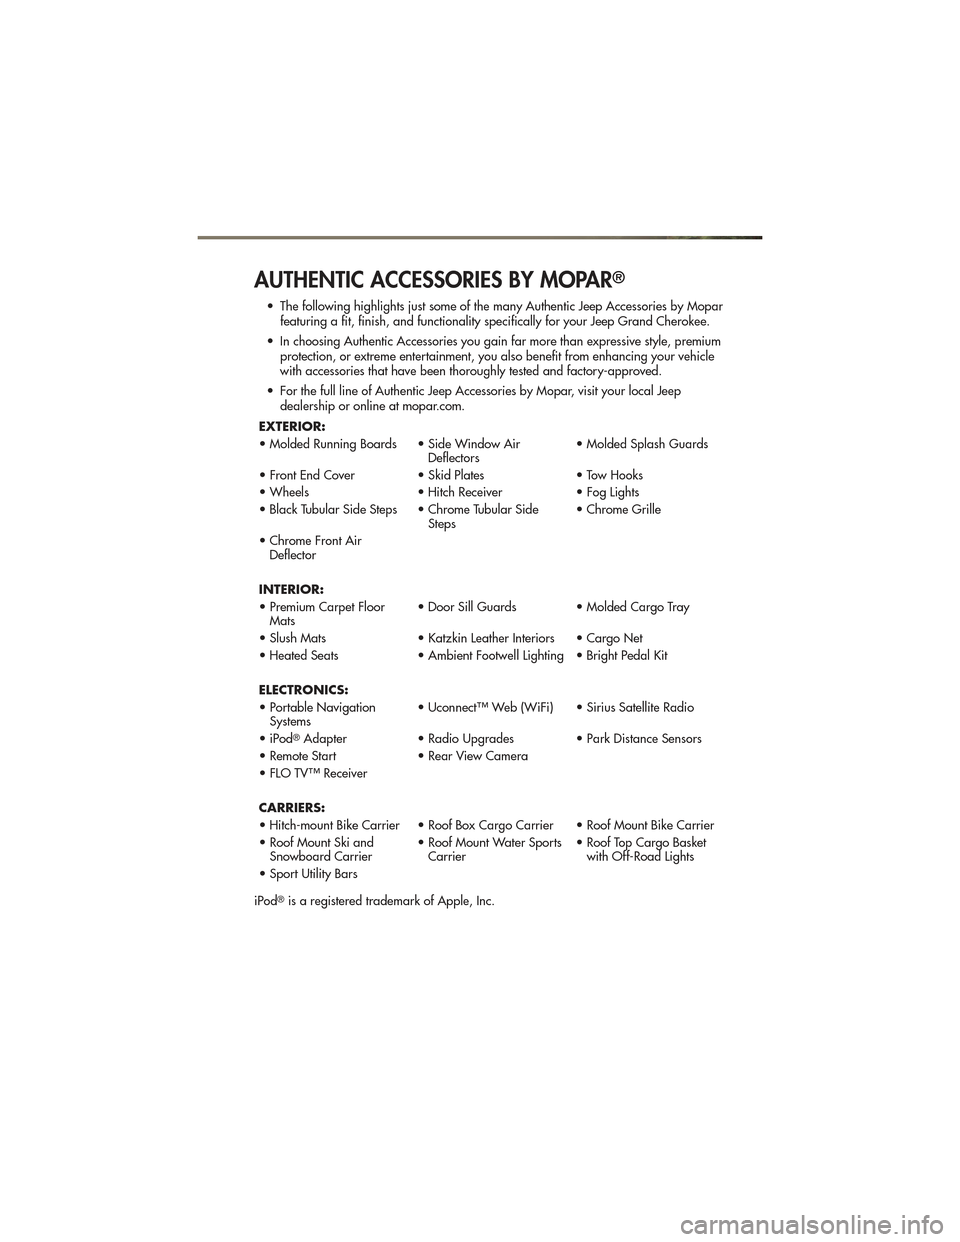
AUTHENTIC ACCESSORIES BY MOPAR®
• The following highlights just some of the many Authentic Jeep Accessories by Moparfeaturing a fit, finish, and functionality specifically for your Jeep Grand Cherokee.
• In choosing Authentic Accessories you gain far more than expressive style, premium protection, or extreme entertainment, you also benefit from enhancing your vehicle
with accessories that have been thoroughly tested and factory-approved.
• For the full line of Authentic Jeep Accessories by Mopar, visit your local Jeep dealership or online at mopar.com.
EXTERIOR:
• Molded Running Boards • Side Window Air Deflectors• Molded Splash Guards
• Front End Cover • Skid Plates• Tow Hooks
• Wheels • Hitch Receiver• Fog Lights
• Black Tubular Side Steps • Chrome Tubular Side Steps• Chrome Grille
• Chrome Front Air Deflector
INTERIOR:
• Premium Carpet Floor Mats • Door Sill Guards • Molded Cargo Tray
• Slush Mats • Katzkin Leather Interiors • Cargo Net
• Heated Seats • Ambient Footwell Lighting • Bright Pedal Kit
ELECTRONICS:
• Portable Navigation Systems • Uconnect™ Web (WiFi) • Sirius Satellite Radio
• iPod
®Adapter • Radio Upgrades • Park Distance Sensors
• Remote Start • Rear View Camera
• FLO TV™ Receiver
CARRIERS:
• Hitch-mount Bike Carrier • Roof Box Cargo Carrier • Roof Mount Bike Carrier
• Roof Mount Ski and Snowboard Carrier • Roof Mount Water Sports
Carrier • Roof Top Cargo Basket
with Off-Road Lights
• Sport Utility Bars
iPod
®is a registered trademark of Apple, Inc.
MOPAR ACCESSORIES
91
Page 95 of 100
FrontHeatedSeats ...........19
FuelFiller Cap (Gas Cap) .......66
Filler Door (Gas Cap) .......78
Filler Door Emergency Release . . 78
Specifications ...........81
Fuses ...................84
Garage Door Opener (HomeLink
®)..53
Gas Cap (Fuel Filler Cap) ........66
Hard Disk Drive .............40
Headlights ................22 Automatic .............22
Dimmer Switch ..........22
HighBeam .............24
High Beam/Low Beam
Select Switch ............24
HeatedSeats ..............19
Heated Steering Wheel .........20
High Beam/Low Beam Select (Dimmer)
Switch ..................24
Hill Descent Control ...........59
Hill Start Assist .............59
HomeLink
®(Garage Door Opener)
Transmitter ................53
Hood Release ..............77
Instrument Cluster .............6
Indicators ..............7
Instrument Cluster Warning Lights . . 6,63
Integrated Power Module (Fuses) ....85
Intermittent Wipers (Delay Wipers) . . 23
Introduction ................2
Inverter Outlet (115V) ..........54
Inverter, Power ..............54
iPod
®/USB/MP3 Control ........48
Bluetooth Streaming Audio ....49
JackLocation ..............68
JumpStarting ..............71
KeyFob ..................8
Keyless Enter-N-Go ...........10
Lock/Unlock ..........10,11
Starting/Stopping .........11 Lane Change Assist
...........23
LATCH (Lower Anchors and Tether for
CHildren) ................14
Liftgate ..................31
Liftgate Flipper Glass ..........31
Liftgate, Power ............8,31
LightBulbs ................88
Lights
Warning
(Instrument Cluster Description) . . 6
MaintenanceRecord ..........83
MaintenanceSchedule .........82
Malfunction Indicator Light
(Check Engine) .............64
Media Center Radio .......36,38,39
MemorySeat ..............17
Mirrors AutomaticDimming ........24
MOPAR
®Accessories ..........91
Navigation ..............41,43
Non-Touch-Screen Radio ........36
Oil Change Indicator ..........66
Oil Change Indicator, Reset ......66
Oil Pressure Light ............65
Oil, Engine Capacity ..............81
Outlet Power ...............55
Overheating, Engine ..........67
PanicAlarm ................8
Park Sense System, Rear ........30
Phone (Pairing) .............45
Phone (Uconnect) ............45
Power GlassSunroof ...........32
Inverter ...............54
Lift Gate ...............8
Outlet
(Auxiliary Electrical Outlet) ....55
Seats ................16
Steering ..............81
Tilt/Telescoping Steering
Column ..............21
INDEX
93
Page 96 of 100
Preparation for Jacking.........68
Programmable Electronic Features . . . 52
Quadra-Lift ...............58
Quadra-Trac ...............56
Radio Non-Touch-Screen .........36
Touch-Screen ...........38
Radio Operation ..........36,38
Rain Sensitive Wiper System ......23
RearCamera ..............30
RearCrossPath .............31
RearHeatedSeats............20
Rear Park Sense System ........30
RearSeat,Folding ...........19
Recreational Towing ...........61
Shifting into Transfer Case
Neutral (N) ............61
Remote Starting System .........9
ReplacementBulbs ...........88
Reporting Safety Defects ........90
Restraints, Child .............14
RollOverWarning ............3
Seat Belts ................13
Seats ...................16 Adjustment .............17
Folding Front Passenger .....18
Heated ...............19
Lumbar Support ..........16
Memory ..............17
Power ...............16
RearFolding ............19
Ventilated .............19
Seek Button .............37,39
Selec-Terrain ...............57
Setting the Clock ...........37,40
Shift Lever Override ...........74
Signals,Turn ...............23
Sirius Backseat TV™ ..........50
SIRIUSTravelLink ............44
SmartBeams ...............22
Spare Tire ................68
Spark Plugs ...............81
Speed Control Accel/Decel ............24 Cancel
...............24
Distance Setting (ACC Only) . . . 24
Mode Setting (ACC Only) ....25
Resume ...............25
Speed Control (Cruise Control) .....24
Starting Remote ...............9
Steering TiltColumn .............21
Wheel, Heated ..........20
Steering Wheel Audio Controls ....45
Store Radio Presets .........37,40
Sun Roof .................32
Supplemental Restraint System -
Airbag ..................13
Temperature Control, Automatic (ATC)..29
Theft Alarm (Security Alarm) ......12
Theft System Arming ..........12
Theft System Disarming .........12
Tilt Steering Column ...........21
Tires Air Pressure ............87
Changing .............69
FlatChanging ...........69
Jacking ...............69
Pressure Warning Light ......63
Touch-Screen Radio ...........38
Tow Hooks, Emergency .........73
Tow/Haul ................61
Towing ..................60 24-Hour Towing Assistance ....63
Disabled Vehicle ..........75
Recreational ............61
Towing Vehicle Behind a
Motorhome ...............61
Trailer Towing Trailer and Tongue Weight ....60
Trailer Weight ..............60
Transfer Case Fluid ................81
Transmission Fluid ................81
Turn Signals ...............23
Uconnect™ Phone ............45
Uconnect™ Voice Command ......47
USBPort ...............41,49
INDEX
94
Page 99 of 100
Driving and Alcohol:
The driver’s prima\bry responsibi\fity i\bs the safe operatio\bn of the vehic\fe. \briving whi\b\fe distracted can re\bsu\ft in \foss of vehi\bc\fe contro\f, resu\fting i\bn a co\f\fision and pe\brsona\f injury. Chry\bs\fer
Group LLC strong\fy r\becommends that the \bdriver use extreme\b caution when using \bany device or featu\bre that may take t\bheir
attention off the r\boad. Use of any e\fe\bctrica\f devices such \bas ce\f\f
phones, computers, \bportab\fe radios, ve\bhic\fe navigation or\b other devices by the driv\ber whi\fe the vehic\fe\b is moving is dang\berous
and cou\fd \fead to a serious co\f\fision. Texting whi\fe driving is a\fso dangerous and shou\b\fd never be done wh\bi\fe the vehic\fe is
moving. If you find \byourse\ff unab\fe to d\bevote your fu\f\f atte\bntion
to vehic\fe operation, pu\f\f off the road to a safe \focation and stop your vehic\fe. Some \bStates or Provinces\b prohibit the use o\bf
ce\f\fu\far te\fephones o\br texting whi\fe dri\bving. It is a\fways \bthe driver’s responsibi\b\fity to comp\fy with \ba\f\f \foca\f \faws.
This User Guide is\b intended to fami\fi\barize you with the\b important
features of your vehic\fe. The \bV\b enc\fosed contains your Owner’s Manua\f, Navigation/\bMedia Center Manua\b\fs, Warranty Book\fe\bts, Tire Warranty and \b24-Hour Towing Ass\bistance (new vehic\fe\bs purchased in the U.\bS.) or Roadside As\bsistance (new vehic\b\fes
purchased in Canada\b) in e\fectronic form\bat. We hope you fin\bd it usefu\f. Rep\facement \b\bV\b kits may be purc\bhased by visiting \bwww.techauthority.c\bom. Jeep
® is a registered t\brademark of
Chrys\fer Group LLC. \b© 2011 Chrys\fer Gro\bup LLC.
Important:
WARNING!
Driving after drinking can lead to a collision. Your perceptions are
less sharp, your reflexes are slower, and your judgment is
impaired when you have been drinking. Never drink and then drive.
Drunken driving is one of the most frequent causes of collisions. Your driving ability can be seriously impaired with blood alcohol
levels far below the legal minimum. If you are drinking, don)t drive. Ride with a
designated non-drinking driver, call a cab,
a friend, or use public transportation.
Drunken driving is one of the most frequent causes of collisions. Your driving ability can be seriously impaired with blood alcohol
levels far below the legal minimum. If you are drinking, don)t drive. Ride with a
designated non-drinking driver, call a cab,
a friend, or use public transportation.
Drunken driving is one of the most frequent causes of collisions. Your driving ability can be seriously impaired with blood alcohol
levels far below the legal minimum. If you are drinking, don)t drive. Ride with a
designated non-drinking driver, call a cab,
a friend, or use public transportation.
Drunken driving is one of the most frequent causes of collisions. Your driving ability can be seriously impaired with blood alcohol
levels far below the legal minimum. If you are drinking, don)t drive. Ride with a
designated non-drinking driver, call a cab,
a friend, or use public transportation.
Jep.Thp drpivrp’ds\bipdrmasirdrypTonrd\bpTep.Thdpbrva\ftrfp.Thpc .pT\bi \banp p\fTcgtacrni d.p
gdaniryp\fTg.pTepivrpwonrdusp, nh tfpj bam iaTnC ,rya pGrnirdp, nh \btspTdpL dd ni.pxTTk\btrip\b.p
\f ttanmpUIfiSSIPzVIOMMSpN/W\bBW2pTdpUIfi44IMfiSIUUPMp NG n y 2pTdp\b.p\fTni \fianmp.T\bhdpyr trdWp