tow JEEP GRAND CHEROKEE 2011 WK2 / 4.G User Guide
[x] Cancel search | Manufacturer: JEEP, Model Year: 2011, Model line: GRAND CHEROKEE, Model: JEEP GRAND CHEROKEE 2011 WK2 / 4.GPages: 100, PDF Size: 5.46 MB
Page 2 of 100
Driving and Alcohol:
The driver’s prima\bry responsibi\fity i\bs the safe operatio\bn of the vehic\fe. \briving whi\b\fe distracted can re\bsu\ft in \foss of vehi\bc\fe contro\f, resu\fting i\bn a co\f\fision and pe\brsona\f injury. Chry\bs\fer
Group LLC strong\fy r\becommends that the \bdriver use extreme\b caution when using \bany device or featu\bre that may take t\bheir
attention off the r\boad. Use of any e\fe\bctrica\f devices such \bas ce\f\f
phones, computers, \bportab\fe radios, ve\bhic\fe navigation or\b other devices by the driv\ber whi\fe the vehic\fe\b is moving is dang\berous
and cou\fd \fead to a serious co\f\fision. Texting whi\fe driving is a\fso dangerous and shou\b\fd never be done wh\bi\fe the vehic\fe is
moving. If you find \byourse\ff unab\fe to d\bevote your fu\f\f atte\bntion
to vehic\fe operation, pu\f\f off the road to a safe \focation and stop your vehic\fe. Some \bStates or Provinces\b prohibit the use o\bf
ce\f\fu\far te\fephones o\br texting whi\fe dri\bving. It is a\fways \bthe driver’s responsibi\b\fity to comp\fy with \ba\f\f \foca\f \faws.
This User Guide is\b intended to fami\fi\barize you with the\b important
features of your vehic\fe. The \bV\b enc\fosed contains your Owner’s Manua\f, Navigation/\bMedia Center Manua\b\fs, Warranty Book\fe\bts, Tire Warranty and \b24-Hour Towing Ass\bistance (new vehic\fe\bs purchased in the U.\bS.) or Roadside As\bsistance (new vehic\b\fes
purchased in Canada\b) in e\fectronic form\bat. We hope you fin\bd it usefu\f. Rep\facement \b\bV\b kits may be purc\bhased by visiting \bwww.techauthority.c\bom. Jeep
® is a registered t\brademark of
Chrys\fer Group LLC. \b© 2011 Chrys\fer Gro\bup LLC.
Important:
WARNING!
Driving after drinking can lead to a collision. Your perceptions are
less sharp, your reflexes are slower, and your judgment is
impaired when you have been drinking. Never drink and then drive.
Drunken driving is one of the most frequent causes of collisions. Your driving ability can be seriously impaired with blood alcohol
levels far below the legal minimum. If you are drinking, don)t drive. Ride with a
designated non-drinking driver, call a cab,
a friend, or use public transportation.
Drunken driving is one of the most frequent causes of collisions. Your driving ability can be seriously impaired with blood alcohol
levels far below the legal minimum. If you are drinking, don)t drive. Ride with a
designated non-drinking driver, call a cab,
a friend, or use public transportation.
Drunken driving is one of the most frequent causes of collisions. Your driving ability can be seriously impaired with blood alcohol
levels far below the legal minimum. If you are drinking, don)t drive. Ride with a
designated non-drinking driver, call a cab,
a friend, or use public transportation.
Drunken driving is one of the most frequent causes of collisions. Your driving ability can be seriously impaired with blood alcohol
levels far below the legal minimum. If you are drinking, don)t drive. Ride with a
designated non-drinking driver, call a cab,
a friend, or use public transportation.
Jep.Thp drpivrp’ds\bipdrmasirdrypTonrd\bpTep.Thdpbrva\ftrfp.Thpc .pT\bi \banp p\fTcgtacrni d.p
gdaniryp\fTg.pTepivrpwonrdusp, nh tfpj bam iaTnC ,rya pGrnirdp, nh \btspTdpL dd ni.pxTTk\btrip\b.p
\f ttanmpUIfiSSIPzVIOMMSpN/W\bBW2pTdpUIfi44IMfiSIUUPMp NG n y 2pTdp\b.p\fTni \fianmp.T\bhdpyr trdWp
Page 3 of 100
INTRODUCTION/WELCOMEWelcome From Chrysler Group LLC.....2
CONTROLS AT A GLANCEDriver Cockpit................4
Instrument Cluster ..............6
GETTING STARTEDKeyFOB...................8
Remote Start.................9
Keyless Enter-N-Go ............ 10
Theft Alarm ................ 12
Seat Belt .................. 13
Supplemental Restraint System (SRS) —
Airbags .................. 13
Child Restraints .............. 14
Front Seats ................ 16
Rear Seats ................. 19
Heated/Ventilated Seats ......... 19
Heated Steering Wheel .......... 20
Tilt/Telescoping Steering Column ..... 21
OPERATING YOUR VEHICLEHeadlight Switch............. 22
Turn Signal/Wiper/Washer/
High Beam Lever ............. 23
Auto Dimming Mirrors .......... 24
Speed Control ............... 24
Electronic Range Selection (ERS) ..... 27
Manual Climate Controls ......... 28
Automatic Temperature Controls (ATC) . . 29
Parksense
®Rear Park Assist ....... 30
Parkview®Rear Back-Up Camera .... 30
Blind Spot Monitoring ........... 31
Liftgate Flipper Glass ........... 31
Power Sunroof .............. 32
Wind Buffeting .............. 33
ELECTRONICSYour Vehicle's Sound System ....... 34
Non-Touch-Screen Radios ......... 36
Touch-Screen Radios ........... 38
Steering Wheel Audio Controls ...... 45
Uconnect™ Phone ............. 45
Uconnect™ Voice Command ....... 47
iPod
®/USB/MP3 Control ......... 48
Video Entertainment System (VES)™ . . . 50
Electronic Vehicle Information Center
(EVIC) ................... 51
Programmable Features .......... 52
Universal Garage Door Opener
(HomeLink
®) ............... 53 Power Inverter
............... 54
Power Outlets ............... 55
OFF-ROAD CAPABILITIES
Quadra-Trac I®Four-Wheel Drive .... 56
Quadra-Trac II®/Quadra-Drive II®
Four-Wheel Drive ............. 56
Hill Start Assist/Hill Descent Control . . . 59
UTILITY
Trailer Towing Weights
(Maximum Trailer Weight Ratings) .... 60
Tow/Haul Mode .............. 61
Recreational Towing
(Behind Motorhome, Etc.) ......... 61
WHAT TO DO IN EMERGENCIES
24-Hour Towing Assistance ........ 63
Instrument Cluster Warning Lights ..... 63
If Your Engine Overheats ......... 67
Jacking And Tire Changing ........ 68
Jump-Starting ............... 71
Emergency Tow Hooks .......... 73
Shift Lever Override ............ 74
Towing A Disabled Vehicle ........ 75
Event Data Recorder (EDR) ........ 76
MAINTAINING YOUR VEHICLE
Opening The Hood............ 77
Fuel Door Release ............. 78
Engine Compartment ........... 79
Fluids And Capacities ........... 81
Maintenance Chart ............ 82
Fuses ................... 84
Tire Pressures ............... 87
Wheel And Wheel Trim Care ....... 87
Exterior Bulbs ............... 88
CONSUMER ASSISTANCE
Chrysler Group LLC Customer Center . . . 89
Chrysler Canada Inc. Customer Center . . 89
Assistance For The Hearing Impaired . . . 89
Publications Ordering ........... 89
Reporting Safety Defects In The 50 United
States And Washington, D.C. ....... 90
MOPAR ACCESSORIES
Authentic Accessories By MOPAR®.... 91
INDEX.................92
TABLE OF CONTENTS
Page 9 of 100
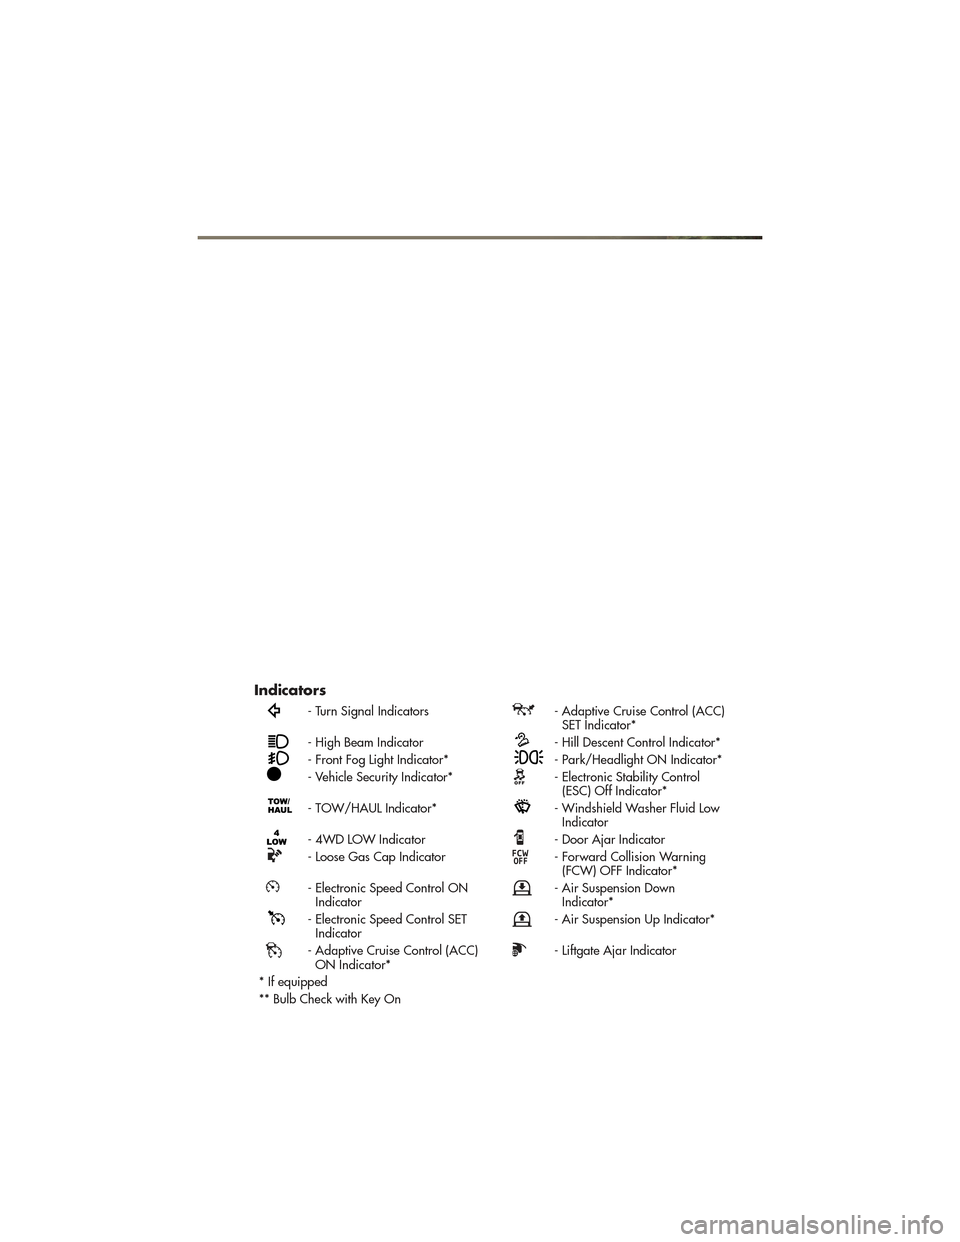
Indicators
- Turn Signal Indicators- Adaptive Cruise Control (ACC)SET Indicator*
- High Beam Indicator- Hill Descent Control Indicator*
- Front Fog Light Indicator*- Park/Headlight ON Indicator*
- Vehicle Security Indicator*- Electronic Stability Control(ESC) Off Indicator*
- TOW/HAUL Indicator*- Windshield Washer Fluid LowIndicator
- 4WD LOW Indicator- Door Ajar Indicator
- Loose Gas Cap Indicator- Forward Collision Warning(FCW) OFF Indicator*
- Electronic Speed Control ONIndicator- Air Suspension DownIndicator*
- Electronic Speed Control SETIndicator- Air Suspension Up Indicator*
- Adaptive Cruise Control (ACC)ON Indicator*- Liftgate Ajar Indicator
* If equipped
** Bulb Check with Key On
CONTROLS AT A GLANCE
7
Page 23 of 100
TILT/TELESCOPING STEERING COLUMN
Manual - Tilt/Telescoping Steering Column
• The tilt/telescoping control handle islocated below the steering wheel at the
end of the steering column.
• Push the handle down to unlock the steering column.
• To tilt the steering column, move the steering wheel upward or downward as
desired. To lengthen or shorten the
steering column, pull the steering wheel
outward or push it inward as desired.
• Pull up on the handle to lock the column firmly in place.
Power - Tilt/Telescoping Steering Column
• The power tilt/telescoping steeringcontrol is located below the turn
signal/wiper/washer/high beam lever
on the steering column.
• To tilt the steering column, move the power tilt/telescoping control up or
down as desired. To lengthen or shorten
the steering column, pull the control
toward you or push the control away
from you as desired.
WARNING!
• Do not adjust the steering wheel while driving. The tilt/telescoping adjustmentmust be locked while driving. Adjusting the steering wheel while driving or
driving without the tilt/telescoping adjustment locked could cause the driver to
lose control of the vehicle. Failure to follow this warning may result in you and
others being severely injured or killed.
• Moving the steering column while the vehicle is moving is dangerous. Without a stable steering column, you could lose control of the vehicle and have a
collision. Adjust the column only while the vehicle is stopped.
GETTING STARTED
21
Page 26 of 100
High Beam Operation
• Push the lever forward to activate the high beams. Pull the lever toward you for flashto pass.
NOTE: For safe driving, turn off high beams when oncoming traffic is present to prevent
headlight glare and as a courtesy to other motorists.
AUTO DIMMING MIRRORS
• The rearview and driver side exterior mirror automatically adjusts for headlight glare from vehicles behind you.
• You can turn the feature on or off by pressing the button at the base of the rearview mirror. A light next to the button will illuminate to indicate when the dimming feature
is activated.
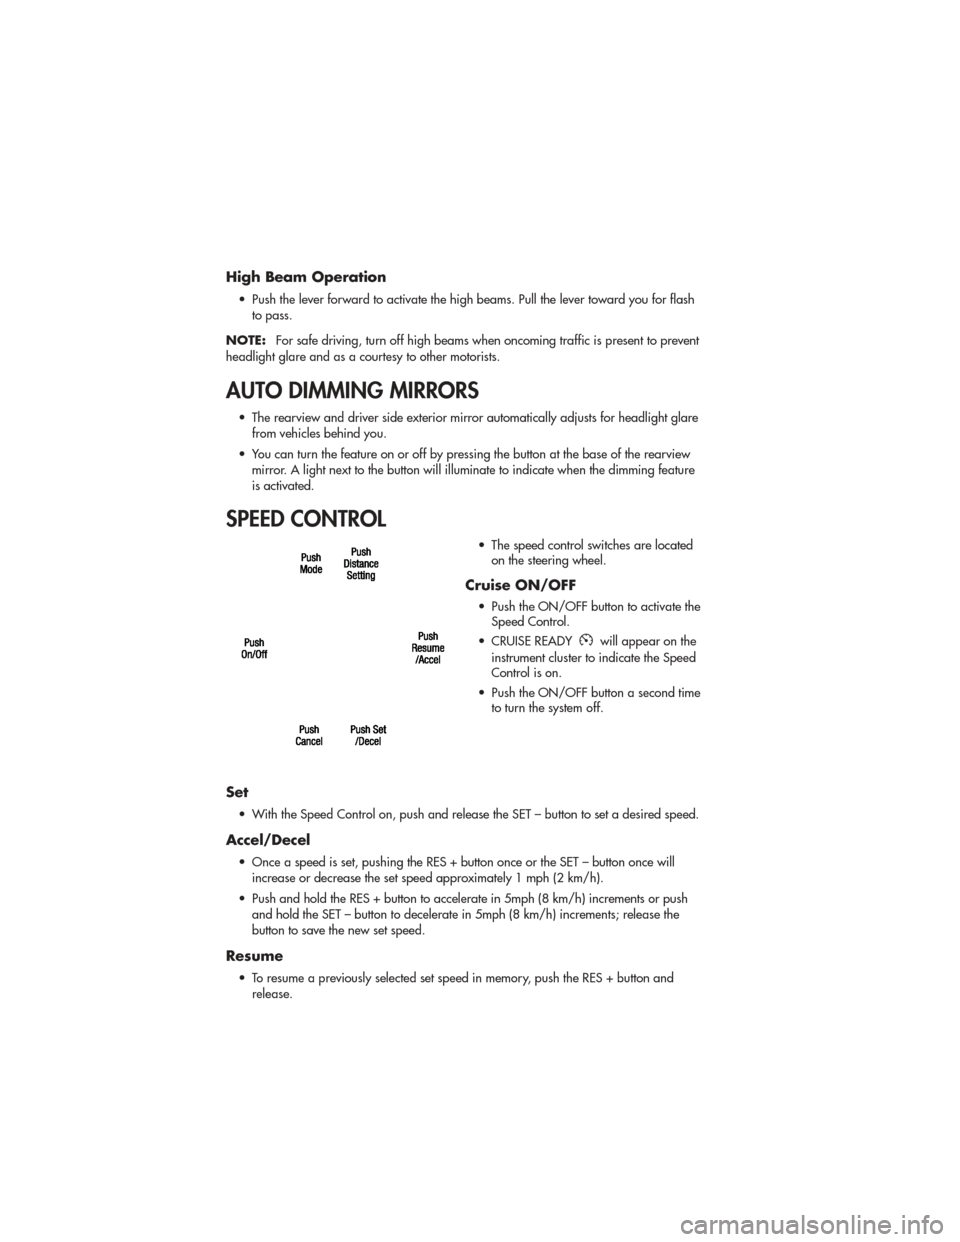
SPEED CONTROL
• The speed control switches are locatedon the steering wheel.
Cruise ON/OFF
• Push the ON/OFF button to activate theSpeed Control.
• CRUISE READY
will appear on the
instrument cluster to indicate the Speed
Control is on.
• Push the ON/OFF button a second time to turn the system off.
Set
• With the Speed Control on, push and release the SET – button to set a desired speed.
Accel/Decel
• Once a speed is set, pushing the RES + button once or the SET – button once will
increase or decrease the set speed approximately 1 mph (2 km/h).
• Push and hold the RES + button to accelerate in 5mph (8 km/h) increments or push and hold the SET – button to decelerate in 5mph (8 km/h) increments; release the
button to save the new set speed.
Resume
• To resume a previously selected set speed in memory, push the RES + button andrelease.
OPERATING YOUR VEHICLE
24
Page 28 of 100
WARNING!
• Leaving the Electronic or Adaptive Speed Control system on when not in use isdangerous. You could accidentally set the system or cause it to go faster than
you want. You could lose control and have a collision. Always leave the
Electronic or Adaptive Speed Control system off when you are not using it.
• Electronic Speed Control can be dangerous where the system cannot maintain a constant speed. Your vehicle could go too fast for the conditions, and you could
lose control. A collision could be the result. Do not use Electronic Speed Control
in heavy traffic or on roads that are winding, icy, snow-covered or slippery.
• Adaptive Cruise Control (ACC) is a convenience system. It is not a substitute for active driving involvement. Pay attention to road, traffic, and weather
conditions, vehicle speed, distance to the vehicle ahead; and, brake operation to
ensure safe operation of the vehicle under all road conditions. Your attention is
always required while driving to maintain safe control of your vehicle. Failure to
follow these warnings can result in a collision or serious personal injury.
The ACC system:
• Does not react to pedestrians, oncoming vehicles, and stationary objects (i.e., a stopped vehicle in a traffic jam or a disabled vehicle).
• Cannot take street, traffic, and weather conditions into account, and may be limited upon adverse sight distance conditions.
• Does not predict the lane curvature or the movement of preceding vehicles and will not compensate for such changes.
• Does not always fully recognize complex driving conditions, which can result in wrong or missing distance warnings.
• May not detect a vehicle ahead when strong light (for example, sunrise or sunset) is directly shining on the front of the vehicle.
• Can only apply a maximum of 25% of the vehicle’s braking capability, and will not bring the vehicle to a complete stop.
You should switch off the ACC system:
• When driving in fog, heavy rain, heavy snow, sleet, heavy traffic, and complex driving situations (i.e., in highway construction zones).
• When entering a turn lane or highway off ramp; when driving on roads that are winding, icy, snow-covered, slippery, or have steep uphill or downhill slopes;
and when towing a trailer.
• When circumstances do not allow safe driving at a constant speed.
• Failure to follow these warnings can result in a collision.
• Forward Collision Warning (FCW) is not intended to avoid a collision on its own. The driver has the responsibility to avoid a collision by controlling the
vehicle via braking and steering. Failure to follow this warning could lead to
serious injury or death.
OPERATING YOUR VEHICLE
26
Page 29 of 100
ELECTRONIC RANGE SELECTION (ERS)
• Electronic Range Select (ERS) allows youto limit the highest available
transmission gear, and can be activated
during any driving condition. When
towing a trailer or operating the vehicle
in off-road conditions, using ERS shift
control will help you maximize both
performance and engine braking.
• To switch from DRIVE mode to ERS mode, tap the shift lever to the left (-) once. The instrument cluster will display the current gear (the transmission may downshift), and
the transmission will not upshift beyond that gear. Tapping the shift lever to the left (-)
or right (+) will decrease or increase the top available gear. To disable ERS, simply
hold the shift lever to the right (+) until “D” is again displayed in the instrument cluster.
• Switching between ERS and DRIVE mode can be done at any vehicle speed.
• Refer to your Owner's Manual on the DVD for further details.
OPERATING YOUR VEHICLE
27
Page 50 of 100
WARNING!
Any voice commanded system should be used only in safe driving conditions
following local laws and phone use. All attention should be kept on the roadway
ahead. Failure to do so may result in a collision causing you and others to be
severely injured or killed.
iPod®/USB/MP3 CONTROL
•There are many ways to play music from iPod®players or other portable devices through
your vehicle's speakers. Your choices depend on what radio your vehicle is equipped with.
• The radio sales code is located on the lower right side of the radio faceplate.
If Equipped with Media Center 730N (Sales Code RER)
• This feature allows you to plug an iPod®
device into the vehicle’s sound system
through the iPod®Control port.
• The iPod
®Control port is located inside
the instrument panel storage bin. To get
into the iPod
®Control mode from a
touch-screen radio, press the MEDIA
hard-key, then touch the AUX or iPod
®
soft-key.
• The iPod
®Control cable may be equipped with a piece of VELCRO®for mounting
purposes, the VELCRO®is attached to the end of the iPod®Control cable that plugs
into the iPod®. To adhere the VELCRO®, remove the paper backing and stick the
adhesive side of the VELCRO®to the right side of the storage bin being careful that
the storage bin door will still close when the iPod®is mounted or when the cable is
stowed.
• When connected to this feature: • The iPod
®audio can be played on the vehicle’s sound system.
• The iPod
®can be controlled using the radio buttons to Play, Browse, and List the
iPod®contents. Refer to the Owner's Manual on the DVD for details.
• The iPod
®battery charges when plugged into the iPod®Control port (if supported
by the specific audio device).
NOTE:
• iPod
®Control supports Mini, 4G, Photo, Nano, 5G iPod®and iPhone®devices. Some
iPod®software versions may not fully support the iPod®Control features. Please visit
Apple’s website for software updates.
ELECTRONICS
48
Page 62 of 100
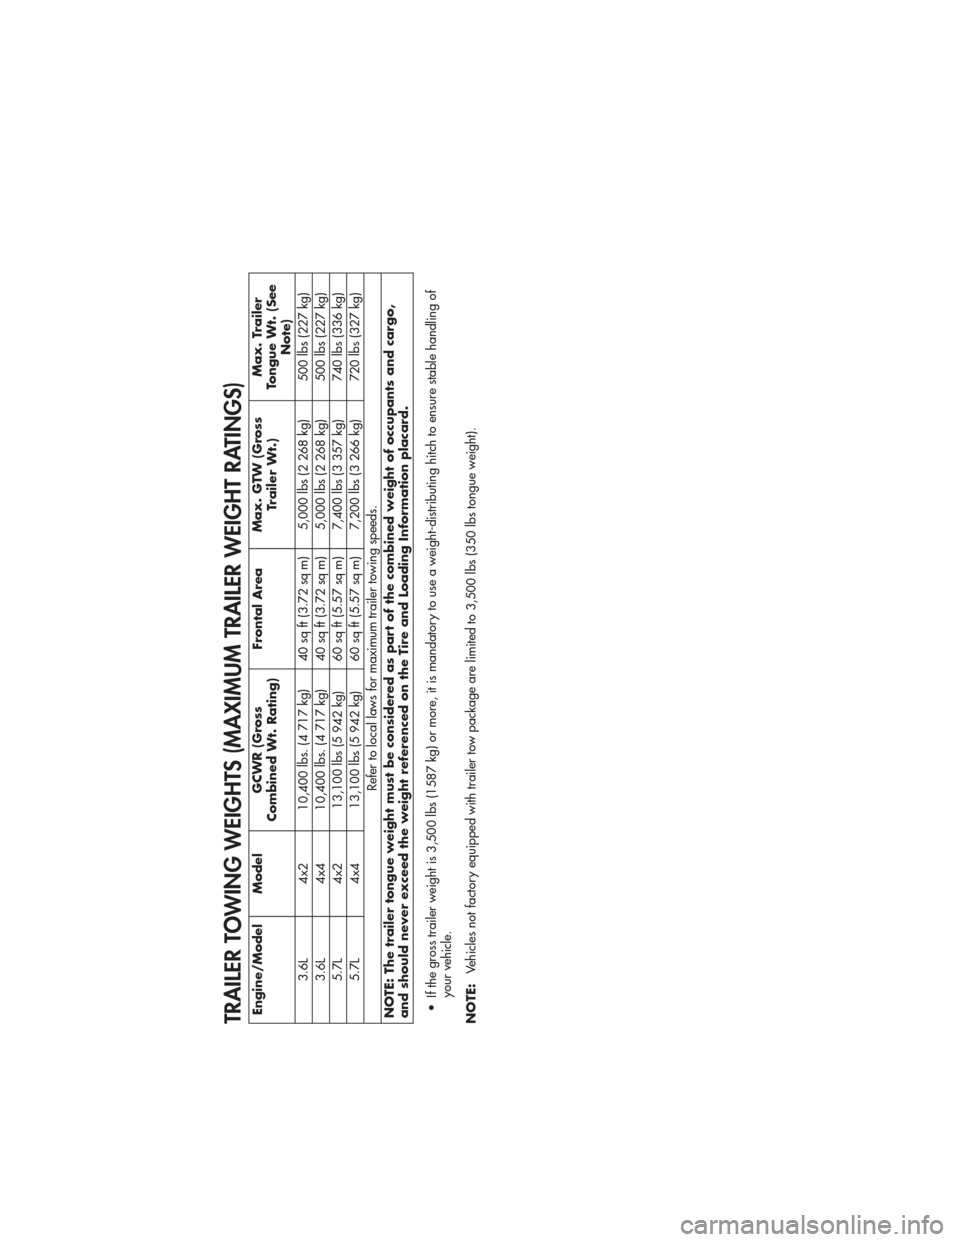
TRAILER TOWING WEIGHTS (MAXIMUM TRAILER WEIGHT RATINGS)Engine/Model ModelGCWR (Gross
Combined Wt. Rating) Frontal Area
Max. GTW (Gross
Trailer Wt.) Max. Trailer
Tongue Wt. (See
Note)
3.6L 4x2 10,400 lbs. (4 717 kg) 40 sq ft (3.72 sq m) 5,000 lbs (2 268 kg) 500 lbs (227 kg)
3.6L 4x4 10,400 lbs. (4 717 kg) 40 sq ft (3.72 sq m) 5,000 lbs (2 268 kg) 500 lbs (227 kg)
5.7L 4x2 13,100 lbs (5 942 kg) 60 sq ft (5.57 sq m) 7,400 lbs (3 357 kg) 740 lbs (336 kg)
5.7L 4x4 13,100 lbs (5 942 kg) 60 sq ft (5.57 sq m) 7,200 lbs (3 266 kg) 720 lbs (327 kg) Refer to local laws for maximum trailer towing speeds.
NOTE: The trailer tongue weight must be considered as part of the combined weight of occupants and cargo,
and should never exceed the weight referenced on the Tire and Loading Information placard.
• If the gross trailer weight is 3,500 lbs (1587 kg) or more, it is mandatory to use a weight-distributing hitch to ensure stable handling of your vehicle.
NOTE: Vehicles not factory equipped with trailer tow package are limited to 3,500 lbs (350 lbs tongue weight).
UTILITY
60
Page 63 of 100
TOW/HAUL MODE
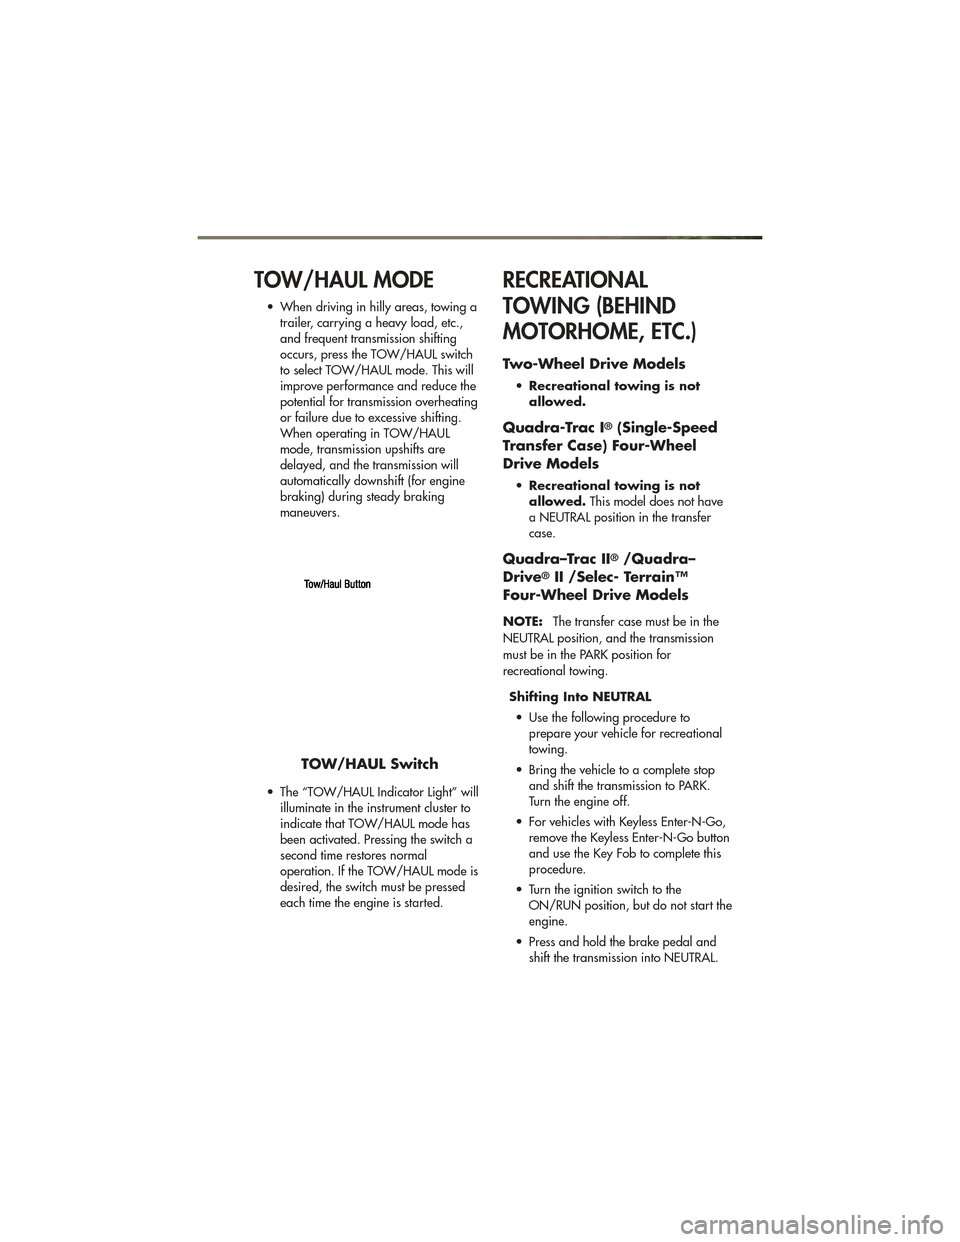
• When driving in hilly areas, towing atrailer, carrying a heavy load, etc.,
and frequent transmission shifting
occurs, press the TOW/HAUL switch
to select TOW/HAUL mode. This will
improve performance and reduce the
potential for transmission overheating
or failure due to excessive shifting.
When operating in TOW/HAUL
mode, transmission upshifts are
delayed, and the transmission will
automatically downshift (for engine
braking) during steady braking
maneuvers.
• The “TOW/HAUL Indicator Light” will illuminate in the instrument cluster to
indicate that TOW/HAUL mode has
been activated. Pressing the switch a
second time restores normal
operation. If the TOW/HAUL mode is
desired, the switch must be pressed
each time the engine is started.
RECREATIONAL
TOWING (BEHIND
MOTORHOME, ETC.)
Two-Wheel Drive Models
•Recreational towing is not
allowed.
Quadra-Trac I®(Single-Speed
Transfer Case) Four-Wheel
Drive Models
• Recreational towing is not
allowed. This model does not have
a NEUTRAL position in the transfer
case.
Quadra–Trac II®/Quadra–
Drive®II /Selec- Terrain™
Four-Wheel Drive Models
NOTE: The transfer case must be in the
NEUTRAL position, and the transmission
must be in the PARK position for
recreational towing.
Shifting Into NEUTRAL• Use the following procedure to prepare your vehicle for recreational
towing.
• Bring the vehicle to a complete stop and shift the transmission to PARK.
Turn the engine off.
• For vehicles with Keyless Enter-N-Go, remove the Keyless Enter-N-Go button
and use the Key Fob to complete this
procedure.
• Turn the ignition switch to the ON/RUN position, but do not start the
engine.
• Press and hold the brake pedal and shift the transmission into NEUTRAL.
TOW/HAUL Switch
UTILITY
61