sensor JEEP GRAND CHEROKEE 2012 WK2 / 4.G User Guide
[x] Cancel search | Manufacturer: JEEP, Model Year: 2012, Model line: GRAND CHEROKEE, Model: JEEP GRAND CHEROKEE 2012 WK2 / 4.GPages: 148, PDF Size: 5.91 MB
Page 33 of 148
• Push and hold the RES + button to accelerate in 5mph (8 km/h)increments or push and hold the SET – button to decelerate in 5mph
(8 km/h) increments; release the button to save the new set speed.
Resume
• To resume a previously selected set speed in memory, push the RES +button and release.
Cancel
• Push the CANCEL button, or apply the brakes to cancel the set speedand maintain the set speed memory.
• Push the ON/OFF button to turn the system off and erase the set speed memory.
Adaptive Cruise Control (ACC)
• If your vehicle is equipped with adaptive cruise control the controlsoperate exactly the same as the standard cruise control with one
difference. You can set a specified distance you would like to maintain
between you and the vehicle in front of you.
• If the ACC sensor detects a vehicle ahead, ACC will apply limited braking or acceleration automatically to maintain a preset following distance,
while matching the speed of the vehicle ahead.
• If the sensor does not detect a vehicle directly ahead of you, it functions like a standard cruise control system, maintaining the speed you set.
Distance Setting (ACC Only)
• To set or change the distance setting, press the Distance button andrelease. Each time the button is pressed, the distance setting adjusts
between long (3), medium (2), and short (1). The distance setting will
default to the last set mode the next time the vehicle is restarted and the
ACC system is turned on.
• The specified following distance for ACC can be set by varying the distance setting between 3 (long), 2 (medium), and 1 (short). Using this
distance setting and the vehicle speed, ACC calculates and sets the
distance to the vehicle ahead. This distance setting displays in the EVIC.
Mode (ACC Only)
• If desired, the Adaptive Cruise Control mode can be turned off and thesystem can be operated as a standard (fixed speed) Cruise Control.
When in the standard (fixed speed) Cruise Control mode the distance
setting feature will be disabled and the system will maintain the speed
you set.
• To change between the different cruise modes, press the MODE button when the system is in either the OFF, READY or SET state. Pressing of
the MODE button in any state will result in changing to the new Mode in
the OFF state.
• Refer to your Owner's Manual on the DVD for further information.
OPERATING YOUR VEHICLE
31
Page 38 of 148
Air Conditioning A/C
• If the air conditioning button is pressed while in the AUTO mode, theindicator light may flash three times to indicate the cabin air is being
controlled automatically.
SYNC Temperature Button
• Press the SYNC button once to control driver and passengertemperatures simultaneously. Press the SYNC button a second time to
control the temperatures individually.
Air Recirculation
• Use recirculation for maximum A/C operation.
• For window defogging, press air recirculation button off.
• If the recirculation button is pressed while in the AUTO mode, theindicator light may flash three times to indicate the cabin air is being
controlled automatically.
Heated Mirrors
• The mirrors are heated to melt frost or ice. This feature is activatedwhenever you turn on the rear window defroster.
PARKSENSE® REAR PARK ASSIST
• The four ParkSense® sensors, located in the rear fascia/bumper, monitorthe area behind the vehicle that is within the sensors’ field of view.
• When an object is detected within two meters behind the rear bumper while the vehicle is in REVERSE, a warning will display in the Electronic
Vehicle Information Center (EVIC) and a chime will sound (when Sound
and Display is selected from the Customer Programmable Features
section of the EVIC). As the vehicle moves closer to the object, the
chime rate will change from slow, to fast, to continuous.
Cleaning the ParkSense® Sensors
• If “CLEAN PARK ASSIST SENSORS” appears in the Electronic VehicleInformation Center (EVIC), clean the ParkSense® sensors with water, car
wash soap and a soft cloth. Do not use rough or hard cloths. Do not
scratch or poke the sensors. Otherwise, you could damage the sensors.
NOTE: When the Instrument Cluster reads either Clean Sensor or Blinded,
please clean off the bumper sensors to see if the condition is corrected.
PARKVIEW® REAR BACK-UP CAMERA
• You can see an on-screen image of the rear of your vehicle whenever the shift lever is put into REVERSE. The ParkView® Rear Back-Up Camera
image will be displayed on the radio display screen, located on the
center stack of the instrument panel.
• If the radio display screen appears foggy, clean the camera lens located on the liftgate.
OPERATING YOUR VEHICLE
36
Page 39 of 148
WARNING!
Drivers must be careful when backing up even when using the
ParkView® Rear Back-Up Camera. Alwayscheck carefully behind your
vehicle, and be sure to check for pedestrians, animals, other vehicles,
obstructions, or blind spots before backing up. You must continue to
pay attention while backing up. Failure to do so can result in serious
injury or death.
BLIND SPOT MONITORING
• The Blind Spot Monitoring (BSM) system uses two radar-based sensors, located inside the rear bumper fascia, to detect Highway licensable
vehicles (automobiles, trucks, motorcycles etc.) that enter the blind spot
zones from the rear/front/side of the vehicle.
• The Blind Spot Monitoring (BSM) system warning light, located in the outside mirrors, will illuminate if a vehicle moves into a blind spot zone.
• The BSM system can also be configured to sound an audible (chime) alert and mute the radio to notify you of objects that have entered the
detection zones.
• Refer to your owner's manual on the DVD for further details.
LIFTGATE FLIPPER GLASS
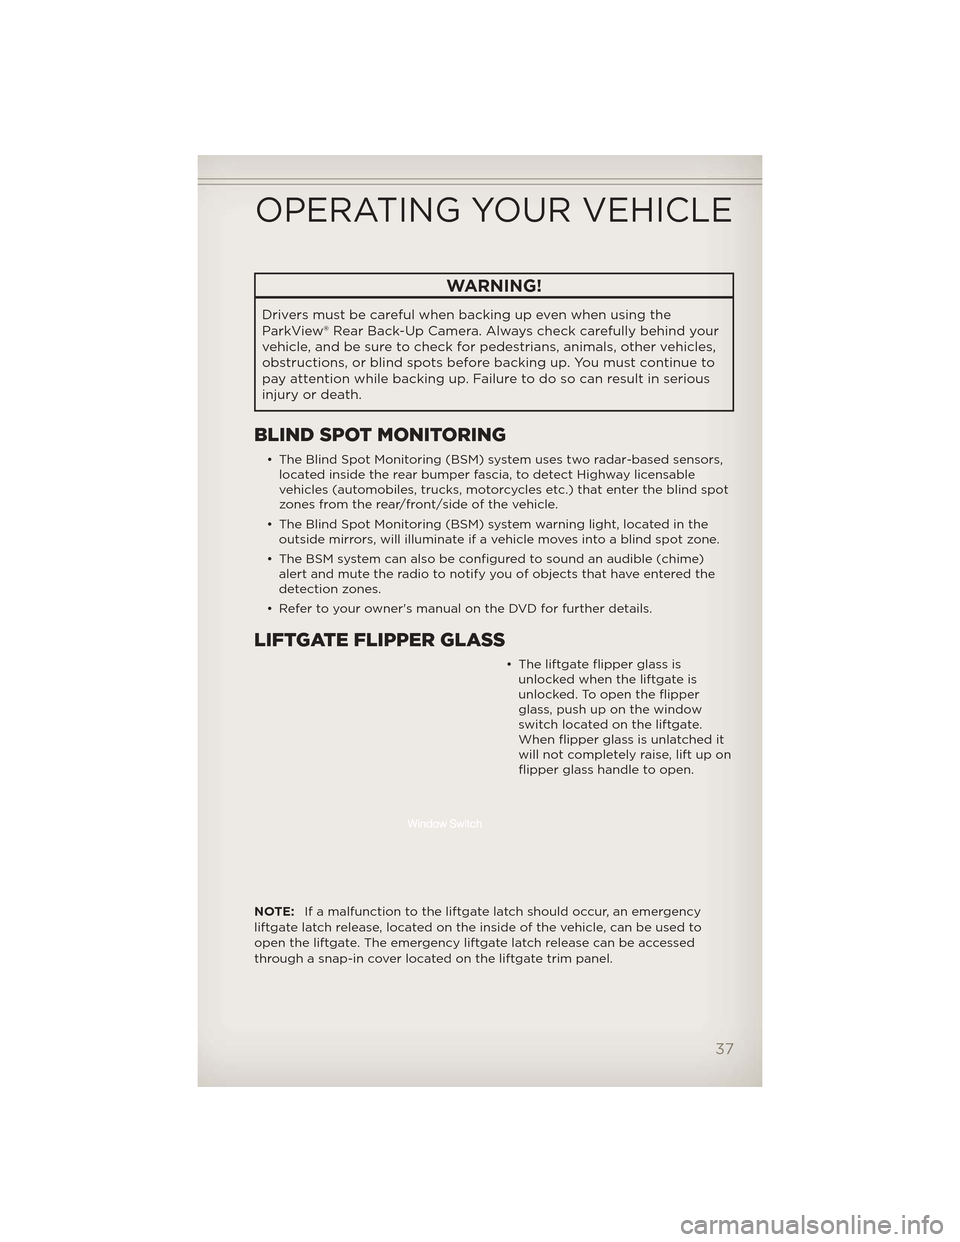
• The liftgate flipper glass is unlocked when the liftgate is
unlocked. To open the flipper
glass, push up on the window
switch located on the liftgate.
When flipper glass is unlatched it
will not completely raise, lift up on
flipper glass handle to open.
NOTE: If a malfunction to the liftgate latch should occur, an emergency
liftgate latch release, located on the inside of the vehicle, can be used to
open the liftgate. The emergency liftgate latch release can be accessed
through a snap-in cover located on the liftgate trim panel.
OPERATING YOUR VEHICLE
37
Page 100 of 148
• Your vehicle has also been equipped with a TPMS malfunction indicatorto indicate when the system is not operating properly. The TPMS
malfunction indicator is combined with the low tire pressure telltale.
When the system detects a malfunction, the telltale will flash for
approximately one minute and then remain continuously illuminated. This
sequence will continue each time the vehicle is restarted as long as the
malfunction exists.
• When the malfunction indicator is illuminated, the system may not be able to detect or signal low tire pressure as intended. TPMS malfunctions
may occur for a variety of reasons, including the installation of
replacement or alternate tires or wheels on the vehicle that prevent the
TPMS from functioning properly. Always check the TPMS malfunction
telltale after replacing one or more tires or wheels on your vehicle, to
ensure that the replacement or alternate tires and wheels allow the TPMS
to continue to function properly.
NOTE: Tire pressures change by approximately 1 psi (7 kPa) per 12° F (7° C)
of air temperature change. Keep this in mind when checking tire pressure
inside a garage, especially in the Winter. Example: If garage temperature is
68°F (20°C) and the outside temperature is 32°F (0°C), then the cold tire
inflation pressure should be increased by 3 psi (21 kPa), which equals 1 psi
(7 kPa) for every 12°F (7°C) for this outside temperature condition.
CAUTION!
The TPMS has been optimized for the original equipment tires and
wheels. TPMS pressures and warning have been established for the
tire size equipped on your vehicle. Undesirable system operation or
sensor damage may result when using replacement equipment that is
not of the same size, type, and/or style. Aftermarket wheels can cause
sensor damage. Do not use tire sealant from a can, or balance beads if
your vehicle is equipped with a TPMS, as damage to the sensors may
result.
BRAKE- Brake Warning Light
• The Brake Warning light illuminates when there is either a system malfunction or the parking brake is applied. If the light is on and the
parking brake is not applied, it indicates a possible brake hydraulic
malfunction, brake booster problem or an Anti-Lock Brake System
problem.
• Please have your vehicle serviced immediately.
WARNING!
Driving a vehicle with the red brake light on is dangerous. Part of the
brake system may have failed. It will take longer to stop the vehicle.
You could have a collision. Have the vehicle checked immediately.
WHAT TO DO IN EMERGENCIES
98
Page 131 of 148
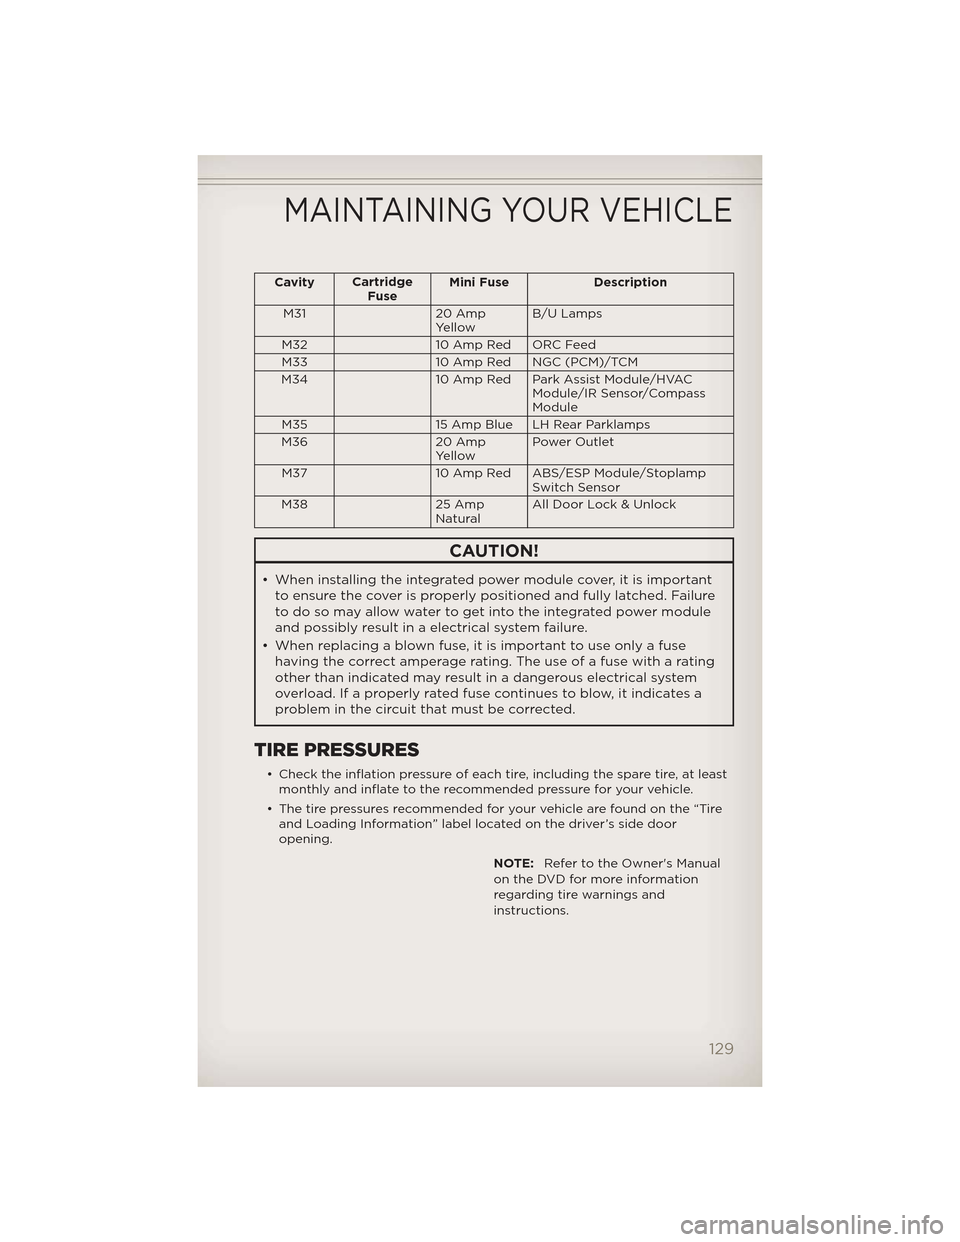
CavityCartridge
Fuse Mini Fuse Description
M31 20 Amp YellowB/U Lamps
M32 10 Amp Red ORC Feed
M33 10 Amp Red NGC (PCM)/TCM
M34 10 Amp Red Park Assist Module/HVAC Module/IR Sensor/Compass
Module
M35 15 Amp Blue LH Rear Parklamps
M36 20 Amp YellowPower Outlet
M37 10 Amp Red ABS/ESP Module/Stoplamp Switch Sensor
M38 25 Amp NaturalAll Door Lock & Unlock
CAUTION!
• When installing the integrated power module cover, it is important
to ensure the cover is properly positioned and fully latched. Failure
to do so may allow water to get into the integrated power module
and possibly result in a electrical system failure.
• When replacing a blown fuse, it is important to use only a fuse having the correct amperage rating. The use of a fuse with a rating
other than indicated may result in a dangerous electrical system
overload. If a properly rated fuse continues to blow, it indicates a
problem in the circuit that must be corrected.
TIRE PRESSURES
• Check the inflation pressure of each tire, including the spare tire, at leastmonthly and inflate to the recommended pressure for your vehicle.
• The tire pressures recommended for your vehicle are found on the “Tire and Loading Information” label located on the driver’s side door
opening.
NOTE:Refer to the Owner's Manual
on the DVD for more information
regarding tire warnings and
instructions.
MAINTAINING YOUR VEHICLE
129
Page 136 of 148
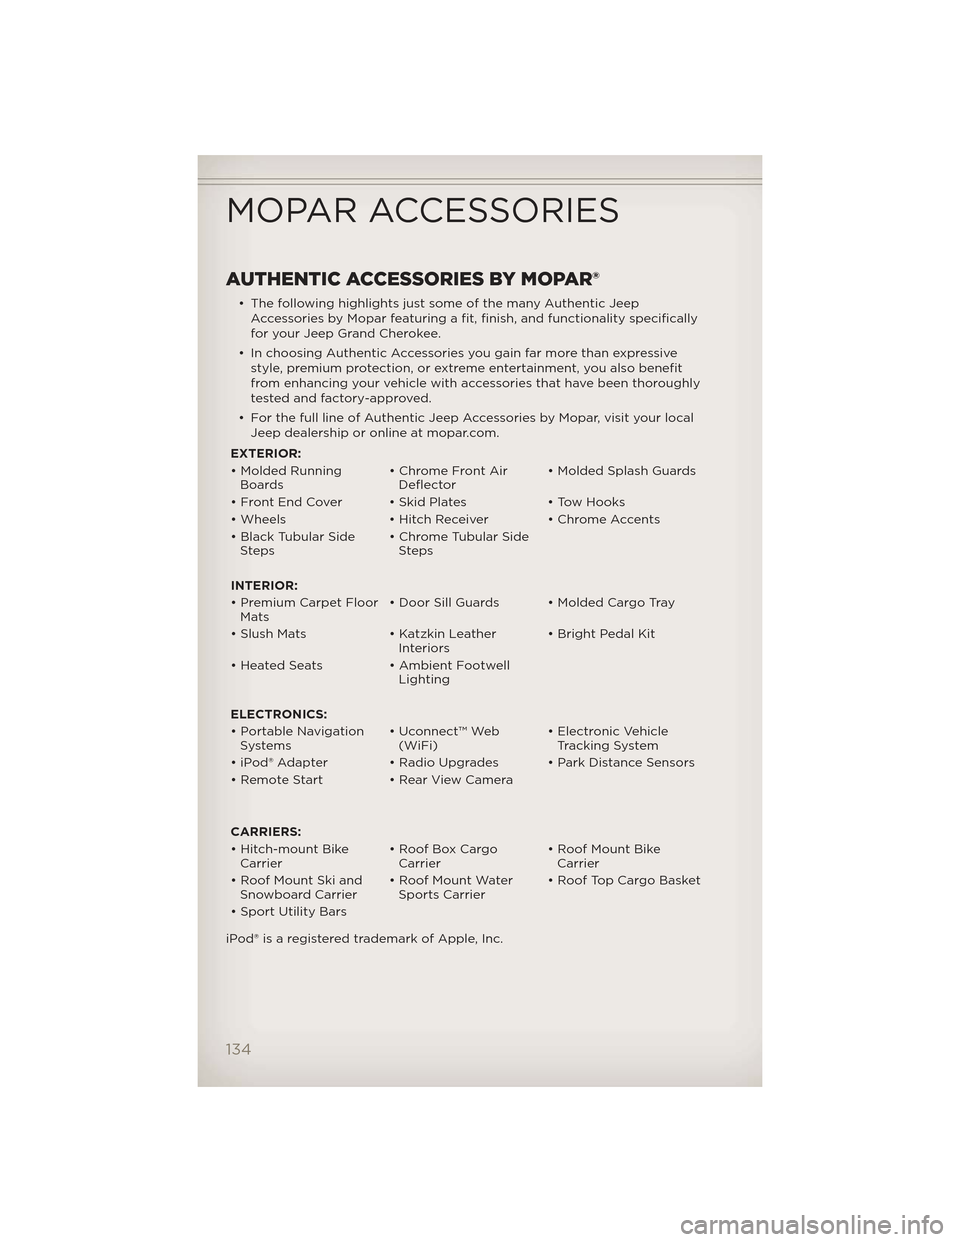
AUTHENTIC ACCESSORIES BY MOPAR®
• The following highlights just some of the many Authentic JeepAccessories by Mopar featuring a fit, finish, and functionality specifically
for your Jeep Grand Cherokee.
• In choosing Authentic Accessories you gain far more than expressive style, premium protection, or extreme entertainment, you also benefit
from enhancing your vehicle with accessories that have been thoroughly
tested and factory-approved.
• For the full line of Authentic Jeep Accessories by Mopar, visit your local Jeep dealership or online at mopar.com.
EXTERIOR:
• Molded Running Boards • Chrome Front Air
Deflector • Molded Splash Guards
• Front End Cover • Skid Plates • Tow Hooks
• Wheels • Hitch Receiver • Chrome Accents
• Black Tubular Side Steps • Chrome Tubular Side
Steps
INTERIOR:
• Premium Carpet Floor Mats • Door Sill Guards • Molded Cargo Tray
• Slush Mats • Katzkin Leather Interiors• Bright Pedal Kit
• Heated Seats • Ambient Footwell Lighting
ELECTRONICS:
• Portable Navigation Systems • Uconnect™ Web
(WiFi) • Electronic Vehicle
Tracking System
• iPod® Adapter • Radio Upgrades • Park Distance Sensors
• Remote Start • Rear View Camera
CARRIERS:
• Hitch-mount Bike Carrier • Roof Box Cargo
Carrier • Roof Mount Bike
Carrier
• Roof Mount Ski and Snowboard Carrier • Roof Mount Water
Sports Carrier • Roof Top Cargo Basket
• Sport Utility Bars
iPod® is a registered trademark of Apple, Inc.
MOPAR ACCESSORIES
134