window JEEP GRAND CHEROKEE 2012 WK2 / 4.G User Guide
[x] Cancel search | Manufacturer: JEEP, Model Year: 2012, Model line: GRAND CHEROKEE, Model: JEEP GRAND CHEROKEE 2012 WK2 / 4.GPages: 148, PDF Size: 5.91 MB
Page 9 of 148
A. Headlight Switch pg. 28
B. Electronic Vehicle InformationCenter (EVIC) Controls pg. 78
C. Turn Signal/Wiper/Washer/High Beams Lever (behind steering
wheel) pg. 29
D. Instrument Cluster pg. 8
E. Electronic Vehicle Information Center (EVIC) Display pg. 78
F. Ignition Switch (behind steering wheel)
G. Audio System (touch-screen-radio shown) pg. 42 H. Climate Controls pg. 35
I. Transmission Gear Selector
J. SWITCH PANEL
− Electronic Stability Controlpg. 99
− Tow/Haul pg. 90
− Heated Steering Wheel pg. 25
− Hazard Switch
− Power Inverter pg. 82
− ParkSense® pg. 36 K. Speed Control pg. 30
L. Fuel Door Release pg. 114
M. Hood Release pg. 114
N. Parking Brake Release
O. Power Mirrors
P. Power Windows
Q. Power Door Locks
CONTROLS AT A GLANCE
7
Page 14 of 148
WARNING!
• Leaving unattended children in a vehicle is dangerous for a numberof reasons. A child or others could be severely injured or killed.
Children should be warned not to touch the parking brake, brake
pedal, or the shift lever. Do not leave the Key Fob inside the vehicle
or in the ignition. A child could start the vehicle, operate power
windows, other controls, or move the vehicle.
• Do not leave children or animals inside parked vehicles in hot weather. Interior heat build-up may cause them to be severely
injured or killed.
• Keep Key Fob transmitters away fromchildren. Operation of the
Remote Start System, windows, door locks or other controls could
cause serious injury or death.
• Driving with the liftgate open can allow poisonous exhaust gases into your vehicle. You and your passengers could be injured by
these fumes. Keep the flipper glass closed when you are operating
the vehicle.
REMOTE START
• Press the REMOTE START buttonx2on the Key Fob twice within five
seconds. Pressing the REMOTE START button a third time shuts the
engine off.
• To drive the vehicle, with a valid Keyless Enter-N-Go™ Key Fob within 5 ft (1.5m) of the driver's side of the vehicle, grab the front driver door
handle to unlock the driver's door automatically, then press the
Start/Stop switch. Or press the UNLOCK button, insert the Key Fob in
the ignition and turn to the ON/RUN position.
• With remote start, the engine will only run for 15 minutes (timeout) unless the ignition is placed in the ON/RUN position.
• The vehicle must be started with the Key Fob after two consecutive timeouts.
WARNING!
• Do not start or run an engine in a closed garage or confined area.Exhaust gas contains Carbon Monoxide (CO) which is odorless and
colorless. Carbon Monoxide is poisonous and can cause you or
others to be severely injured or killed when inhaled.
• Keep Key Fob transmitters away fromchildren. Operation of the
Remote Start System, windows, door locks or other controls could
cause you and others to be severely injured or killed.
GETTING STARTED
12
Page 19 of 148
• A belt that is too loose will not protect you properly. In a sudden stopyou could move too far forward, increasing the possibility of injury. Wear
your seat belt snugly.
• A frayed or torn belt could rip apart in a collision and leave you with no protection. Inspect the belt system periodically, checking for cuts, frays,
or loose parts. Damaged parts must be replaced immediately. Do not
disassemble or modify the system. Seat belt assemblies must be
replaced after a collision if they have been damaged (bent retractor, torn
webbing, etc.).
• The seat belts for both front seating positions are equipped with pretensioning devices that are designed to remove slack from the seat
belt in the event of a collision.
• A deployed pretensioner or a deployed air bag must be replaced immediately.
WARNING!
In a collision, you and your passengers can suffer much greater
injuries if you are not buckled up properly. You can strike the interior
of your vehicle or other passengers, or you can be thrown out of the
vehicle. Always be sure you and others in your vehicle are buckled up
properly.
SUPPLEMENTAL RESTRAINT SYSTEM (SRS) — AIR
BAGS
• This vehicle has Advanced Front Air Bags for both the driver and right front passenger as a supplement to the seat belt restraint system. The
Advanced Front Air Bags will not deploy in every type of collision.
• Advanced Front Air Bags are designed to provide additional protection by supplementing the seat belts in certain frontal collisions depending
on the severity and type of collision. Advanced Front Air Bags are not
expected to reduce the risk of injury in rear, side, or rollover collisions.
• This vehicle is equipped with Supplemental Side Air Bag Inflatable Curtains to protect the driver, front and rear passengers sitting next to a
window.
• This vehicle is equipped with Supplemental Seat-Mounted Side Air Bags to provide enhanced protection to help protect an occupant during a
side impact.
• If the Air Bag Warning Light
is not on during starting, stays on, or
turns on while driving, have the vehicle serviced by an authorized service
center immediately.
• Refer to the Owner's Manual on the DVD for further details regarding the Supplemental Restraint System (SRS).
GETTING STARTED
17
Page 20 of 148
WARNING!
• Relying on the air bags alone could lead to more severe injuries in acollision. The air bags work with your seat belt to restrain you
properly. In some collisions, the air bags won't deploy at all. Always
wear your seat belts even though you have air bags.
• Being too close to the steering wheel or instrument panel during Advanced Front Air Bag deployment could cause serious injury,
including death. Air bags need room to inflate. Sit back, comfortably
extending your arms to reach the steering wheel or instrument
panel.
• Supplemental Side Air Bag Inflatable Curtains and Supplemental Seat-Mounted Side Air Bags need room to inflate. Do not lean
against the door or window. Sit upright in the center of the seat.
• Being too close to the Supplemental Side Air Bag Inflatable Curtain and/or Seat-Mounted Side Air Bag during deployment could cause
you to be severely injured or killed.
• Do not drive your vehicle after the air bags have deployed. If you are involved in another collision, the air bags will not be in place to
protect you.
• After any collision, the vehicle should be taken to an authorized dealer immediately.
CHILD RESTRAINTS
• Children 12 years and under should ride properly buckled up in a rearseat, if available. According to crash statistics, children are safer when
properly restrained in the rear seats rather than in the front.
• Every state in the United States and all Canadian provinces require that small children ride in proper restraint systems. This is the law, and you
can be prosecuted for ignoring it.
Installing The LATCH - Compatible Child Restraint System
• Your vehicle's second row passenger seats are equipped with the childrestraint anchorage system called LATCH, which stands for Lower
Anchors and Tether for CHildren.
• All three rear seating positions have lower anchorages that are capable of accommodating LATCH-compatible child seats having flexible,
webbing-mounted lower attachments.
• Child seats with fixed lower attachments must be installed in the outboard positions only.
• The vehicle's seat belt must be used for the center position.
• Never install LATCH-compatible child seats such that two seats share a common lower anchorage.
GETTING STARTED
18
Page 37 of 148
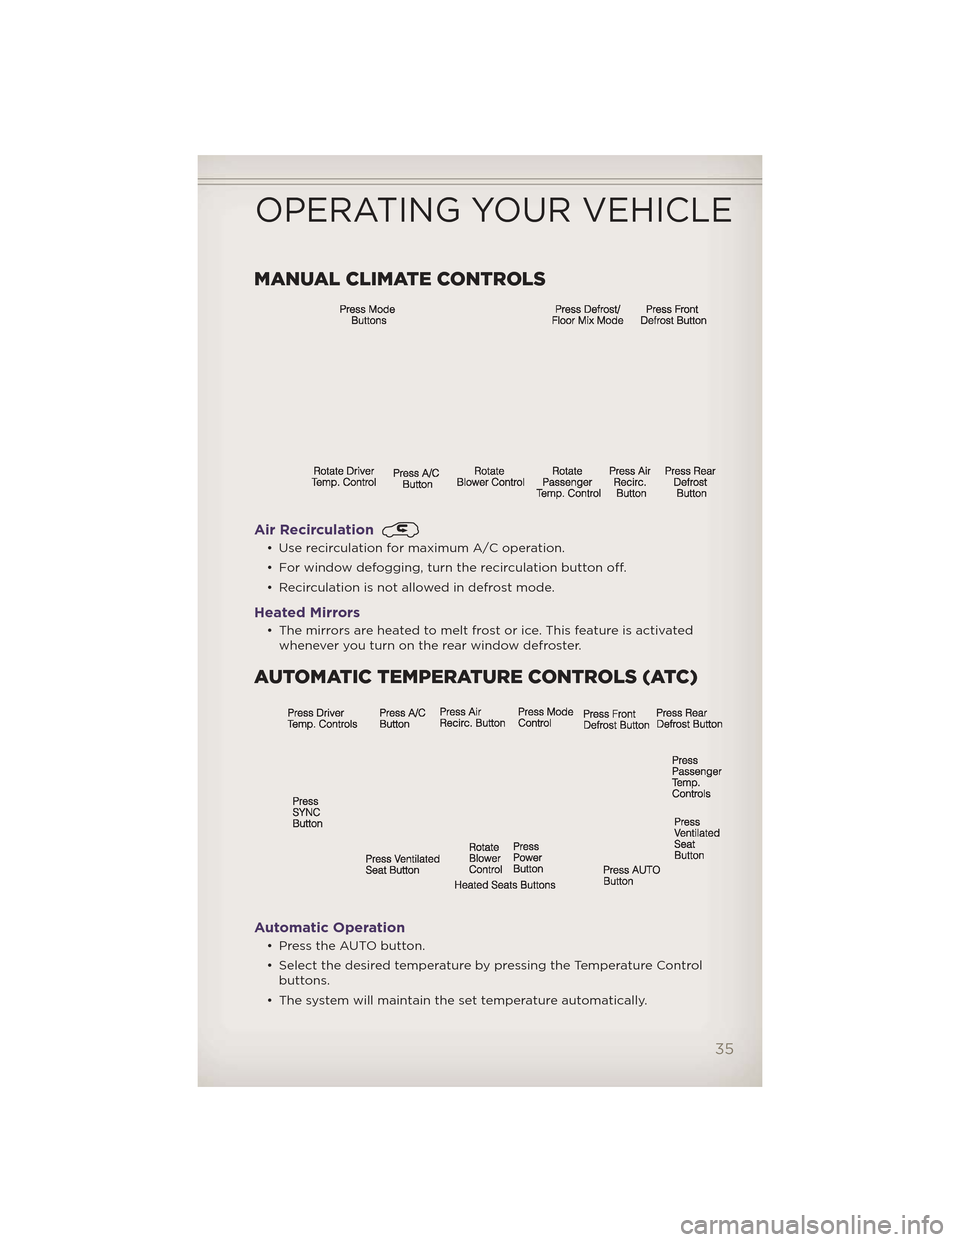
MANUAL CLIMATE CONTROLS
Air Recirculation
• Use recirculation for maximum A/C operation.
• For window defogging, turn the recirculation button off.
• Recirculation is not allowed in defrost mode.
Heated Mirrors
• The mirrors are heated to melt frost or ice. This feature is activatedwhenever you turn on the rear window defroster.
AUTOMATIC TEMPERATURE CONTROLS (ATC)
Automatic Operation
• Press the AUTO button.
• Select the desired temperature by pressing the Temperature Controlbuttons.
• The system will maintain the set temperature automatically.
OPERATING YOUR VEHICLE
35
Page 38 of 148
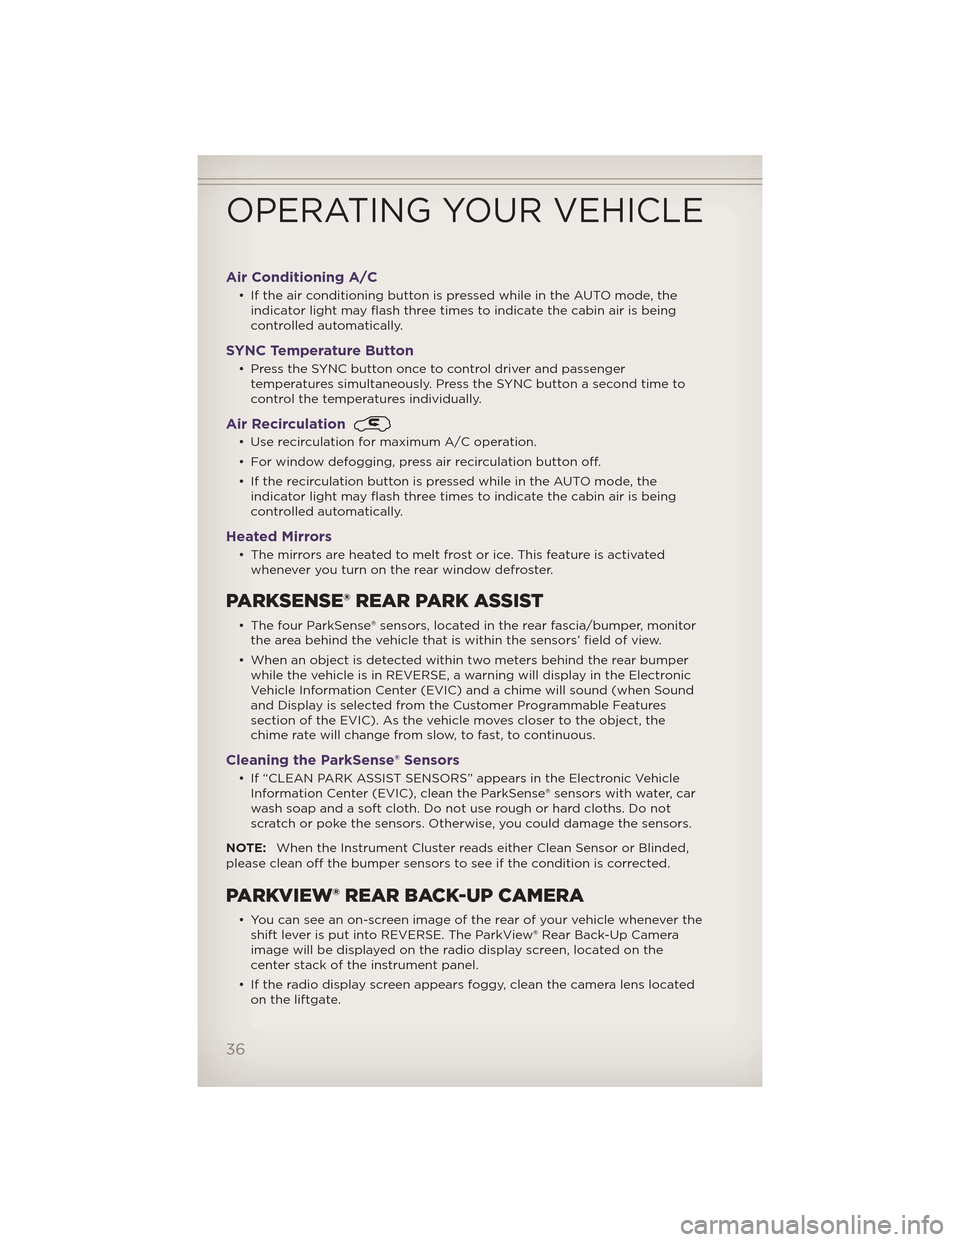
Air Conditioning A/C
• If the air conditioning button is pressed while in the AUTO mode, theindicator light may flash three times to indicate the cabin air is being
controlled automatically.
SYNC Temperature Button
• Press the SYNC button once to control driver and passengertemperatures simultaneously. Press the SYNC button a second time to
control the temperatures individually.
Air Recirculation
• Use recirculation for maximum A/C operation.
• For window defogging, press air recirculation button off.
• If the recirculation button is pressed while in the AUTO mode, theindicator light may flash three times to indicate the cabin air is being
controlled automatically.
Heated Mirrors
• The mirrors are heated to melt frost or ice. This feature is activatedwhenever you turn on the rear window defroster.
PARKSENSE® REAR PARK ASSIST
• The four ParkSense® sensors, located in the rear fascia/bumper, monitorthe area behind the vehicle that is within the sensors’ field of view.
• When an object is detected within two meters behind the rear bumper while the vehicle is in REVERSE, a warning will display in the Electronic
Vehicle Information Center (EVIC) and a chime will sound (when Sound
and Display is selected from the Customer Programmable Features
section of the EVIC). As the vehicle moves closer to the object, the
chime rate will change from slow, to fast, to continuous.
Cleaning the ParkSense® Sensors
• If “CLEAN PARK ASSIST SENSORS” appears in the Electronic VehicleInformation Center (EVIC), clean the ParkSense® sensors with water, car
wash soap and a soft cloth. Do not use rough or hard cloths. Do not
scratch or poke the sensors. Otherwise, you could damage the sensors.
NOTE: When the Instrument Cluster reads either Clean Sensor or Blinded,
please clean off the bumper sensors to see if the condition is corrected.
PARKVIEW® REAR BACK-UP CAMERA
• You can see an on-screen image of the rear of your vehicle whenever the shift lever is put into REVERSE. The ParkView® Rear Back-Up Camera
image will be displayed on the radio display screen, located on the
center stack of the instrument panel.
• If the radio display screen appears foggy, clean the camera lens located on the liftgate.
OPERATING YOUR VEHICLE
36
Page 39 of 148
WARNING!
Drivers must be careful when backing up even when using the
ParkView® Rear Back-Up Camera. Alwayscheck carefully behind your
vehicle, and be sure to check for pedestrians, animals, other vehicles,
obstructions, or blind spots before backing up. You must continue to
pay attention while backing up. Failure to do so can result in serious
injury or death.
BLIND SPOT MONITORING
• The Blind Spot Monitoring (BSM) system uses two radar-based sensors, located inside the rear bumper fascia, to detect Highway licensable
vehicles (automobiles, trucks, motorcycles etc.) that enter the blind spot
zones from the rear/front/side of the vehicle.
• The Blind Spot Monitoring (BSM) system warning light, located in the outside mirrors, will illuminate if a vehicle moves into a blind spot zone.
• The BSM system can also be configured to sound an audible (chime) alert and mute the radio to notify you of objects that have entered the
detection zones.
• Refer to your owner's manual on the DVD for further details.
LIFTGATE FLIPPER GLASS
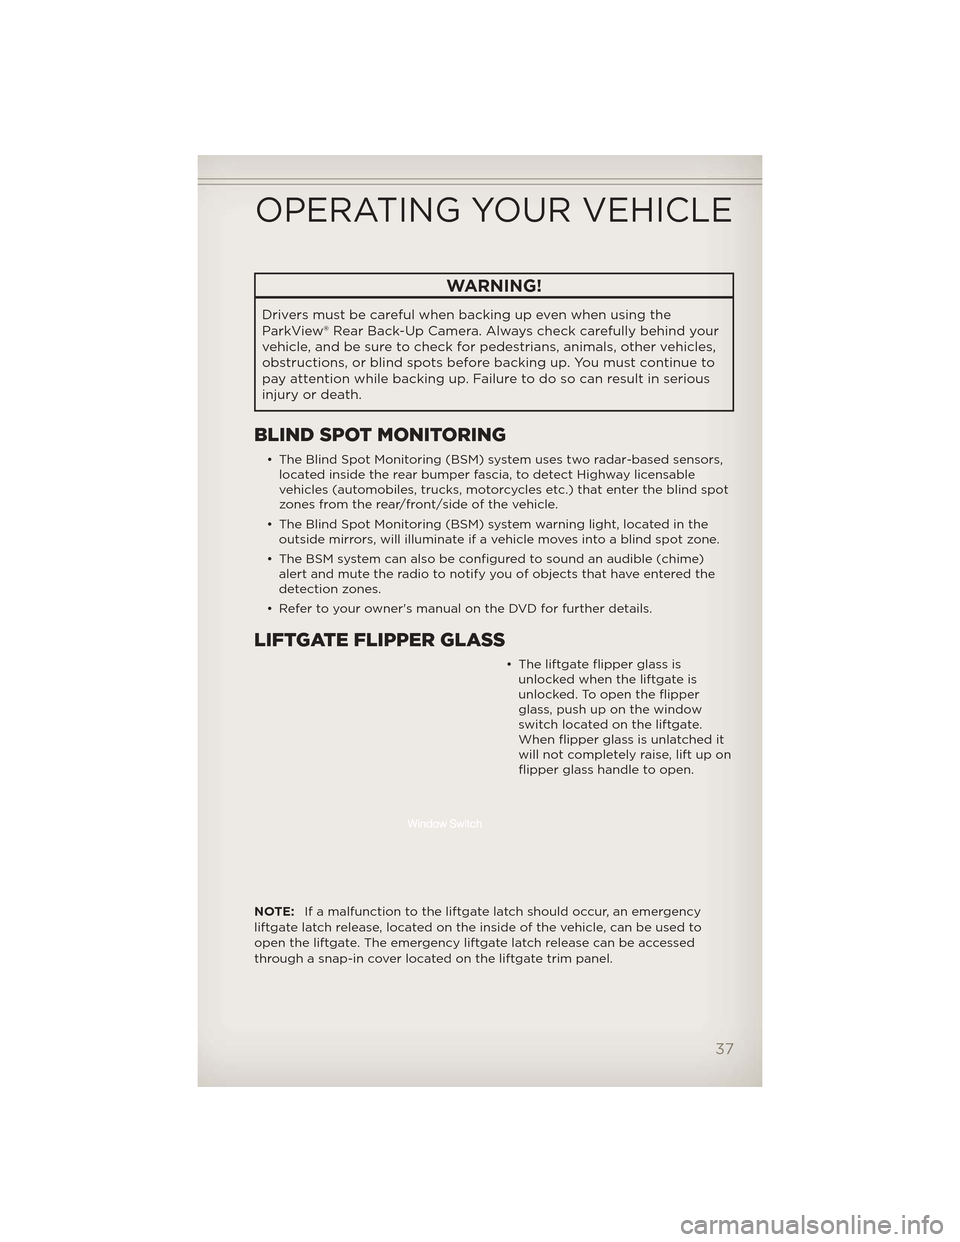
• The liftgate flipper glass is unlocked when the liftgate is
unlocked. To open the flipper
glass, push up on the window
switch located on the liftgate.
When flipper glass is unlatched it
will not completely raise, lift up on
flipper glass handle to open.
NOTE: If a malfunction to the liftgate latch should occur, an emergency
liftgate latch release, located on the inside of the vehicle, can be used to
open the liftgate. The emergency liftgate latch release can be accessed
through a snap-in cover located on the liftgate trim panel.
OPERATING YOUR VEHICLE
37
Page 43 of 148
WIND BUFFETING
• Wind buffeting can be described as a helicopter-type percussion sound.If buffeting occurs with the rear windows open, adjust the front and rear
windows together.
• If buffeting occurs with the sunroof open, adjust the sunroof opening, or adjust any window. This will minimize buffeting.
OPERATING YOUR VEHICLE
41
Page 129 of 148
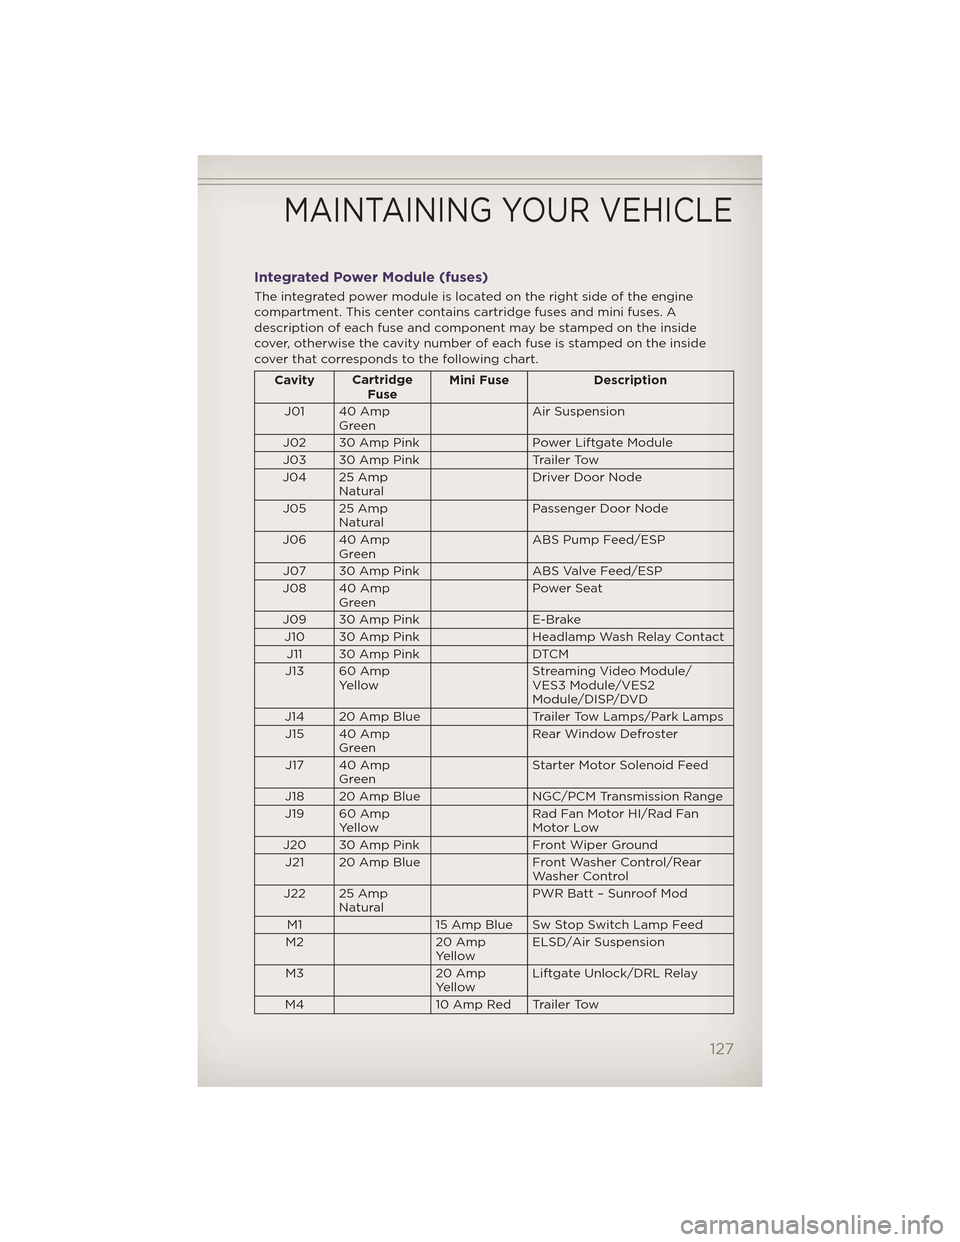
Integrated Power Module (fuses)
The integrated power module is located on the right side of the engine
compartment. This center contains cartridge fuses and mini fuses. A
description of each fuse and component may be stamped on the inside
cover, otherwise the cavity number of each fuse is stamped on the inside
cover that corresponds to the following chart.
CavityCartridge
Fuse Mini Fuse Description
J01 40 Amp Green Air Suspension
J02 30 Amp Pink Power Liftgate Module
J03 30 Amp Pink Trailer Tow
J04 25 Amp Natural Driver Door Node
J05 25 Amp Natural Passenger Door Node
J06 40 Amp Green ABS Pump Feed/ESP
J07 30 Amp Pink ABS Valve Feed/ESP
J08 40 Amp Green Power Seat
J09 30 Amp Pink E-Brake
J10 30 Amp Pink Headlamp Wash Relay Contact
J11 30 Amp Pink DTCM
J13 60 Amp Yellow Streaming Video Module/
VES3 Module/VES2
Module/DISP/DVD
J14 20 Amp Blue Trailer Tow Lamps/Park Lamps
J15 40 Amp Green Rear Window Defroster
J17 40 Amp Green Starter Motor Solenoid Feed
J18 20 Amp Blue NGC/PCM Transmission Range
J19 60 Amp Yellow Rad Fan Motor HI/Rad Fan
Motor Low
J20 30 Amp Pink Front Wiper Ground
J21 20 Amp Blue Front Washer Control/Rear
Washer Control
J22 25 Amp Natural PWR Batt – Sunroof Mod
M1 15 Amp Blue Sw Stop Switch Lamp Feed
M2 20 Amp
Yellow ELSD/Air Suspension
M3 20 Amp
Yellow Liftgate Unlock/DRL Relay
M4 10 Amp Red Trailer Tow
MAINTAINING YOUR VEHICLE
127
Page 137 of 148
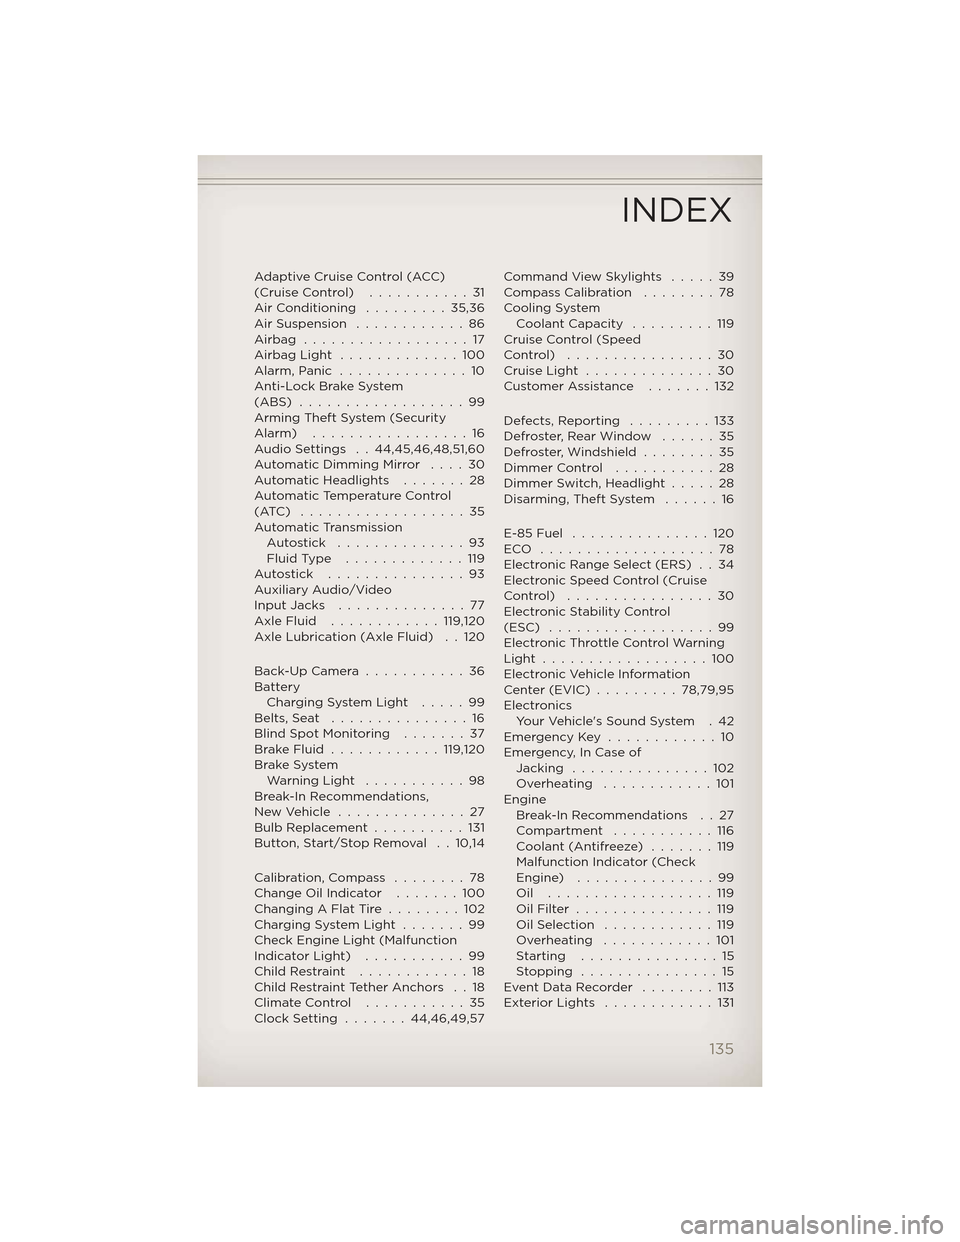
Adaptive Cruise Control (ACC)
(CruiseControl) ...........31
AirConditioning .........35,36
Air Suspension............86
Airbag ..................17
AirbagLight .............100
Alarm,Panic ..............10
Anti-Lock Brake System
(ABS) ..................99
Arming Theft System (Security
Alarm) .................16
Audio Settings . . 44,45,46,48,51,60
Automatic Dimming Mirror . . . . 30
Automatic Headlights .......28
Automatic Temperature Control
(ATC) ..................35
Automatic Transmission Autostick ..............93
FluidType .............119
Autostick ...............93
Auxiliary Audio/Video
Input Jacks ..............77
AxleFluid ............119,120
Axle Lubrication (Axle Fluid) . . 120
Back-Up Camera ...........36
Battery Charging System Light .....99
Belts, Seat ...............16
Blind Spot Monitoring . . . ....37
BrakeFluid ............119,120
Brake System WarningLight ...........98
Break-In Recommendations,
NewVehicle ..............27
Bulb Replacement ..........131
Button, Start/Stop Removal . . 10,14
Calibration, Compass ........78
Change Oil Indicator . . . . . . . 100
Changing A Flat Tire ........102
Charging System Light .......99
Check Engine Light (Malfunction
IndicatorLight) ...........99
ChildRestraint ............18
Child Restraint Tether Anchors . . 18
ClimateControl ...........35
Clock Setting .......44,46,49,57 Command View Skylights
.....39
Compass Calibration . . . . . . . . 78
Cooling System Coolant Capacity . . . . . ....119
Cruise Control (Speed
Control) ................30
CruiseLight ..............30
Customer Assistance . . . . . . . 132
Defects, Reporting . . . . . . . . . 133
Defroster, Rear Window . . . . . . 35
Defroster, Windshield . . . . . . . . 35
Dimmer Control . . . . . . . ....28
Dimmer Switch, Headlight . . . . . 28
Disarming, Theft System . . . . . . 16
E-85 Fuel . . . . . . . . . . . . . . . 120
ECO ...................78
Electronic Range Select (ERS) . . 34
Electronic Speed Control (Cruise
Control) ................30
Electronic Stability Control
(ESC) . . . . . . . . . . . . . . . . . . 99
Electronic Throttle Control Warning
Light ..................100
Electronic Vehicle Information
Center(EVIC).........78,79,95
Electronics Your Vehicle's Sound System . 42
Emergency Key . . . . . . . . . . . . 10
Emergency, In Case of Jacking . . . . . . . . . . . . . . . 102
Overheating . . . . . . . . . . . . 101
Engine Break-In Recommendations . . 27
Compartment . . . . . . . ....116
Coolant (Antifreeze) . . . . . . . 119
Malfunction Indicator (Check
Engine) . . . . . . . . . . . . . . . 99
Oil ..................119
OilFilter ...............119
OilSelection ............119
Overheating . . . . . . . . . . . . 101
Starting . . . . . . . . . . . . . . . 15
Stopping . . . . . . . . .......15
Event Data Recorder . . . . . . . . 113
ExteriorLights ............131
INDEX
135