check engine JEEP GRAND CHEROKEE 2013 WK2 / 4.G User Guide
[x] Cancel search | Manufacturer: JEEP, Model Year: 2013, Model line: GRAND CHEROKEE, Model: JEEP GRAND CHEROKEE 2013 WK2 / 4.GPages: 704, PDF Size: 5.14 MB
Page 488 of 704
WARNING!
If the engine stalls, you lose forward motion, or
cannot make it to the top of a steep hill or grade,
never attempt to turn around. To do so may result in
tipping and rolling the vehicle. Always back care-
fully straight down a hill in REVERSE gear. Never
back down a hill in NEUTRAL using only the brake.
Remember, never drive diagonally across a hill always
drive straight up or down.
If the wheels start to slip as you approach the crest of a
hill, ease off the accelerator and maintain forward motion
by turning the front wheels slowly. This may provide a
fresh “bite” into the surface and will usually provide
traction to complete the climb.
Traction Downhill
Shift the transmission into a low gear, and the transfer
case into 4WD LOW range. Let the vehicle go slowly
down the hill with all four wheels turning against engine
compression drag. This will permit you to control the
vehicle speed and direction.
When descending mountains or hills, repeated braking
can cause brake fade with loss of braking control. Avoid
repeated heavy braking by downshifting the transmis-
sion whenever possible.
After Driving Off-Road
Off-road operation puts more stress on your vehicle than
does most on-road driving. After going off-road, it is
always a good idea to check for damage. That way you
can get any problems taken care of right away and have
your vehicle ready when you need it.
486 STARTING AND OPERATING
Page 489 of 704
•Completely inspect the underbody of your vehicle.
Check tires, body structure, steering, suspension, and
exhaust system for damage.
•Inspect the radiator for mud and debris and clean as
required.
•Check threaded fasteners for looseness, particularly on
the chassis, drivetrain components, steering, and sus-
pension. Retighten them, if required, and torque to the
values specified in the Service Manual.
•Check for accumulations of plants or brush. These
things could be a fire hazard. They might hide damage
to fuel lines, brake hoses, axle pinion seals, and
propeller shafts.
•After extended operation in mud, sand, water, or
similar dirty conditions, have the radiator, fan, brake
rotors, wheels, brake linings, and axle yokes inspected
and cleaned as soon as possible.WARNING!
Abrasive material in any part of the brakes may cause
excessive wear or unpredictable braking. You might
not have full braking power when you need it to
prevent a collision. If you have been operating your
vehicle in dirty conditions, get your brakes checked
and cleaned as necessary.
•
If you experience unusual vibration after driving in mud,
slush or similar conditions, check the wheels for impacted
material. Impacted material can cause a wheel imbalance
and freeing the wheels of it will correct the situation.
POWER STEERING
3.6L Engine
Your vehicle is equipped with an electro-hydraulic power
steering system that will give you good vehicle response
and increased ease of maneuverability in tight spaces.
5
STARTING AND OPERATING 487
Page 492 of 704
WARNING!
Continued operation with reduced power steering
assist could pose a safety risk to yourself and others.
Service should be obtained as soon as possible.
CAUTION!
Prolonged operation of the steering system at the end
of the steering wheel travel will increase the steering
fluid temperature and it should be avoided when
possible. Damage to the power steering pump may
occur.
Power Steering Fluid Check
Checking the power steering fluid level at a defined
service interval is not required. The fluid should only be
checked if a leak is suspected, abnormal noises areapparent, and/or the system is not functioning as antici-
pated. Coordinate inspection efforts through an autho-
rized dealer.
CAUTION!
Do not use chemical flushes in your power steering
system as the chemicals can damage your power
steering components. Such damage is not covered by
the New Vehicle Limited Warranty.
WARNING!
Fluid level should be checked on a level surface and
with the engine off to prevent injury from moving
parts and to ensure accurate fluid level reading. Do
not overfill. Use only manufacturer’s recommended
power steering fluid.
490 STARTING AND OPERATING
Page 571 of 704
Towing Tips
Before setting out on a trip, practice turning, stopping
and backing the trailer up in an area away from heavy
traffic.
Automatic Transmission
The DRIVE range can be selected when towing. The
transmission controls include an adaptive drive strategy
to avoid frequent shifting when towing. However, if
frequent shifting does occur while in DRIVE, select
TOW/HAUL mode (if equipped), or a lower gear range
(using the Electronic Range Select [ERS] shift control).
NOTE:Using the TOW/HAUL mode (if equipped) or
selecting a lower gear range (using the ERS shift control)
while operating the vehicle under heavy loading condi-
tions, will improve performance and extend transmission
life by reducing excessive shifting and heat buildup. This
action will also provide better engine braking.If you REGULARLY tow a trailer for more than 45 min-
utes of continuous operation, then change the transmis-
sion fluid and filter(s) as specified for “police, taxi, fleet,
or frequent trailer towing.” Refer to the “Maintenance
Schedule” for the proper maintenance intervals.
NOTE:Check the transmission fluid level before towing
(5.7L engine).
Electronic Speed Control – If Equipped
•Do not use in hilly terrain or with heavy loads.
•When using the speed control, if you experience speed
drops greater than 10 mph (16 km/h), disengage until
you can get back to cruising speed.
•Use speed control in flat terrain and with light loads to
maximize fuel efficiency.5
STARTING AND OPERATING 569
Page 581 of 704
NOTE:When shifting out of transfer case NEU-
TRAL (N), turning the engine OFF may be required to
avoid gear clash.
9. After the NEUTRAL (N) indicator light turns off,
release the NEUTRAL (N) button.
10. After the NEUTRAL (N) button has been released,
the transfer case will shift to the position indicated by
the selector switch.
11. Shift the transmission into PARK.
12. Release the brake pedal.
13. Disconnect vehicle from the tow vehicle.14. Start the engine.
15. Press and hold the brake pedal.
16. Release the parking brake.
17. Shift the transmission into DRIVE, release the brake
pedal, and check that the vehicle operates normally.
18. The Keyless Enter-N-Go™ button (if equipped) may
now be reinstalled if desired. Refer to “Starting
Procedures/Keyless Enter-N-Go™” in “Starting and
Operating” for further information.
5
STARTING AND OPERATING 579
Page 612 of 704
“Understanding Your Instrument Panel” for further in-
formation. Tighten the fuel filler cap properly and press
the SELECT button to turn off the message. If the
problem continues, the message will appear the next time
the vehicle is started.
A loose, improperly installed, or damaged fuel filler cap
may also turn on the Malfunction Indicator Light (MIL).
EMISSIONS INSPECTION AND MAINTENANCE
PROGRAMS
In some localities, it may be a legal requirement to pass
an inspection of your vehicle’s emissions control system.
Failure to pass could prevent vehicle registration.
For states that require an Inspection and Mainte-
nance (I/M), this check verifies the “Malfunction
Indicator Light (MIL)” is functioning and is not
on when the engine is running, and that the OBD II
system is ready for testing.Normally, the OBD II system will be ready. The OBD II
system maynotbe ready if your vehicle was recently
serviced, recently had a dead battery or a battery replace-
ment. If the OBD II system should be determined not
ready for the I/M test, your vehicle may fail the test.
Your vehicle has a simple ignition key-actuated test,
which you can use prior to going to the test station. To
check if your vehicle’s OBD II system is ready, you must
do the following:
1. Turn the ignition switch to the ON position, but do not
crank or start the engine.
2. If you crank or start the engine, you will have to start
this test over.
3. As soon as you turn the ignition switch to the ON
position, you will see the MIL symbol come on as part
of a normal bulb check.
610 MAINTAINING YOUR VEHICLE
Page 613 of 704
4. Approximately 15 seconds later, one of two things will
happen:
•The MIL will flash for about 10 seconds and then
return to being fully illuminated until you turn OFF
the ignition or start the engine. This means that your
vehicle’s OBD II system isnot readyand you should
notproceed to the I/M station.
•The MIL will not flash at all and will remain fully
illuminated until you turn OFF the ignition or start the
engine. This means that your vehicle’s OBD II system
isreadyand you can proceed to the I/M station.
If your OBD II system isnot ready,you should see your
authorized dealer or repair facility. If your vehicle was
recently serviced or had a battery failure or replacement,
you may need to do nothing more than drive your
vehicle as you normally would in order for your OBD II
system to update. A recheck with the above test routine
may then indicate that the system is now ready.Regardless of whether your vehicle’s OBD II system is
ready or not, if the MIL is illuminated during normal
vehicle operation you should have your vehicle serviced
before going to the I/M station. The I/M station can fail
your vehicle because the MIL is on with the engine
running.
REPLACEMENT PARTS
Use of genuine MOPAR® parts for normal/scheduled
maintenance and repairs is highly recommended to en-
sure the designed performance. Damage or failures
caused by the use of non-MOPAR® parts for mainte-
nance and repairs will not be covered by the manufac-
turer’s warranty.
7
MAINTAINING YOUR VEHICLE 611
Page 615 of 704
CAUTION!(Continued)
•Your vehicle has been built with improved fluids
that protect the performance and durability of your
vehicle and also allow extended maintenance inter-
vals. Do not use chemical flushes in these compo-
nents as the chemicals can damage your engine,
transmission, power steering or air conditioning.
Such damage is not covered by the New Vehicle
Limited Warranty. If a flush is needed because of
component malfunction, use only the specified
fluid for the flushing procedure.
Engine Oil
Checking Oil Level
To assure proper engine lubrication, the engine oil must
be maintained at the correct level. Check the oil level at
regular intervals, such as every fuel stop. The best time tocheck the engine oil level is about five minutes after a
fully warmed engine is shut off, or before starting the
engine after it has sat overnight.
Checking the oil while the vehicle is on level ground will
improve the accuracy of the oil level readings. Maintain
the oil level in the SAFE level range. Adding 1 U.S. Quart
(0.95L) of oil when the level is at the bottom of the SAFE
range will result in the level being at the top of the SAFE
range.
CAUTION!
Overfilling or underfilling the crankcase will cause
aeration or loss of oil pressure. This could damage
your engine.7
MAINTAINING YOUR VEHICLE 613
Page 625 of 704
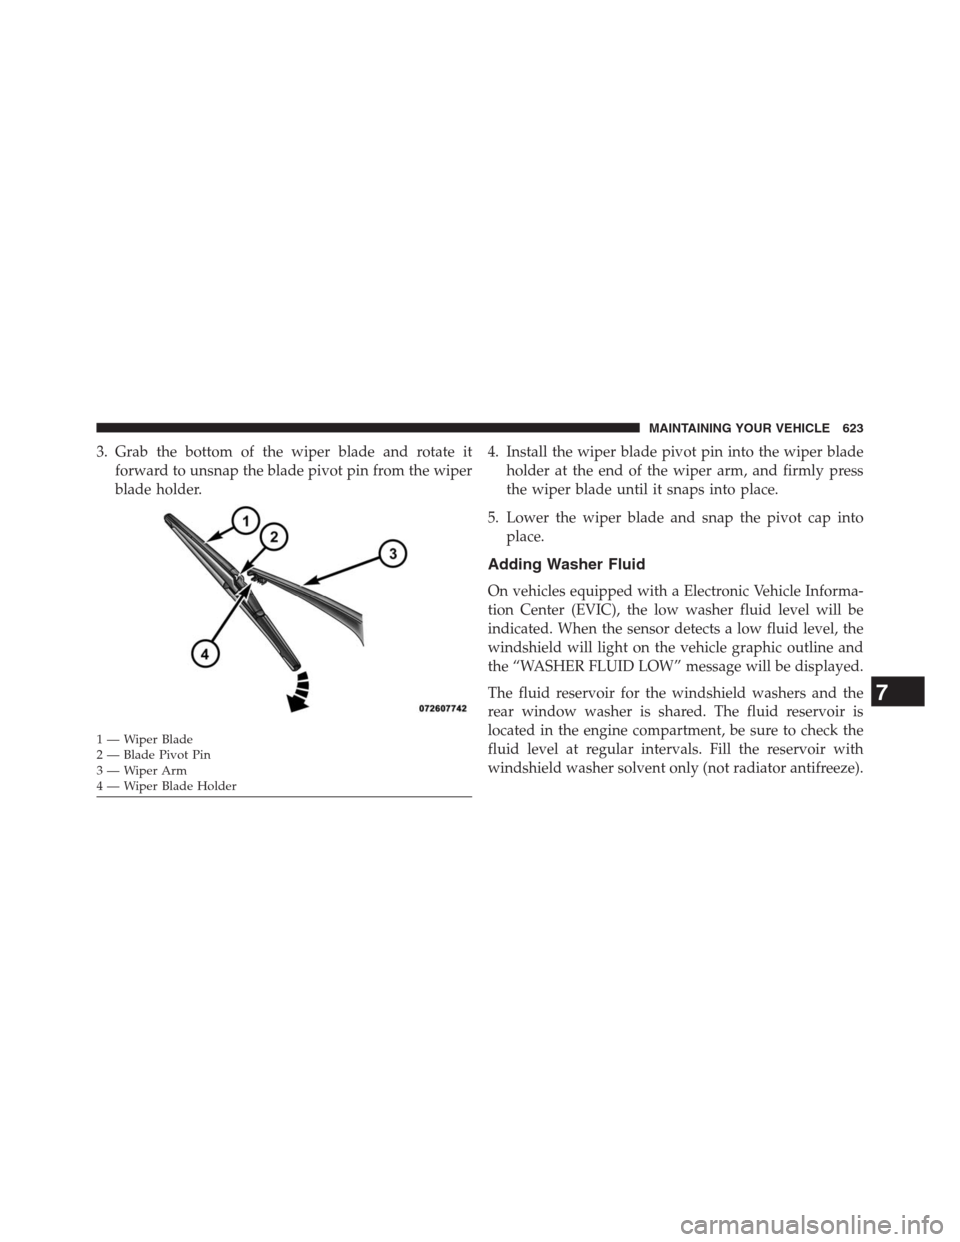
3. Grab the bottom of the wiper blade and rotate it
forward to unsnap the blade pivot pin from the wiper
blade holder.4. Install the wiper blade pivot pin into the wiper blade
holder at the end of the wiper arm, and firmly press
the wiper blade until it snaps into place.
5. Lower the wiper blade and snap the pivot cap into
place.
Adding Washer Fluid
On vehicles equipped with a Electronic Vehicle Informa-
tion Center (EVIC), the low washer fluid level will be
indicated. When the sensor detects a low fluid level, the
windshield will light on the vehicle graphic outline and
the “WASHER FLUID LOW” message will be displayed.
The fluid reservoir for the windshield washers and the
rear window washer is shared. The fluid reservoir is
located in the engine compartment, be sure to check the
fluid level at regular intervals. Fill the reservoir with
windshield washer solvent only (not radiator antifreeze).
1—WiperBlade
2 — Blade Pivot Pin
3—WiperArm
4 — Wiper Blade Holder
7
MAINTAINING YOUR VEHICLE 623
Page 629 of 704
Cooling System
WARNING!
You or others can be badly burned by hot engine
coolant (antifreeze) or steam from your radiator. If
you see or hear steam coming from under the hood,
do not open the hood until the radiator has had time
to cool. Never try to open a cooling system pressure
cap when the radiator or coolant bottle is hot.
Engine Coolant Checks
Check the engine coolant (antifreeze) protection every
12 months (before the onset of freezing weather, where
applicable). If the engine coolant (antifreeze) is dirty or
rusty in appearance, the system should be drained,
flushed and refilled with fresh engine coolant (anti-
freeze). Check the front of the A/C condenser for anyaccumulation of bugs, leaves, etc. If dirty, clean by gently
spraying water from a garden hose vertically down the
face of the condenser.
Check the engine cooling system hoses for brittle rubber,
cracking, tears, cuts, and tightness of the connection at
the coolant recovery bottle and radiator. Inspect the
entire system for leaks.
With the engine at normal operating temperature (but
not running), check the cooling system pressure cap for
proper vacuum sealing by draining a small amount of
engine coolant (antifreeze) from the radiator drain cock.
If the cap is sealing properly, the engine coolant (anti-
freeze) will begin to drain from the coolant recovery
bottle. DO NOT REMOVE THE COOLANT PRESSURE
CAP WHEN THE COOLING SYSTEM IS HOT.
7
MAINTAINING YOUR VEHICLE 627