ECU JEEP GRAND CHEROKEE 2014 WK2 / 4.G Owner's Manual
[x] Cancel search | Manufacturer: JEEP, Model Year: 2014, Model line: GRAND CHEROKEE, Model: JEEP GRAND CHEROKEE 2014 WK2 / 4.GPages: 220, PDF Size: 6.12 MB
Page 57 of 220
6.The Uconnect®Store will ask you to “Confirm Payment” using your default payment
method on file in your Payment Account. Press the “Complete” key to continue.
7. The Uconnect®Payment Account will then ask for your “Payment Account PIN,”
which you established when setting up your Uconnect®payment account. After
entering this four digit PIN, press the “Complete” key to make the purchase.
8. You will receive a confirmation message that your purchase has been submitted.
Press the OK button to end the process.
Purchasing WiFi Hotspot While In Your Vehicle
You must set up a Uconnect
®Access Payment Account online (log in to
moparownerconnect.com, go to Edit Profile, then Uconnect®Payment Account,to
set up and manage your Payment Account).
1. To purchase WiFi while in your vehicle, ensure the vehicle is running and in Park.
Press the Apps button on the touchscreen, then select WiFi within the Tools
menu. Follow the on-screen instructions. When asked for your payment PIN, use
the 4-digit PIN you established when setting up your payment account on Mopar
Owner Connect.
NOTE:
This may be different than the Uconnect
®Security PIN you established for using
features such as Remote Vehicle Start. After purchasing WiFi, it may take up to
30 minutes (with the vehicle running) before the WiFi will be active in your vehicle.
2. Select WiFi again, then note the hotspot name. Select this network when
connecting devices to the hotspot. Also click on View/Edit Passphrase, then note
the security passphrase you will need to connect to the network on each device.
If your devices cannot see the WiFi Hotspot network after 30 minutes, please contact
Uconnect
®Care by pressing the Assist button on the rear view mirror, or by calling
855-792-4241.
Using Uconnect® Access
Getting Started With Apps
Applications (Apps) and features in your Uconnect
®Access system deliver services
that are customized for the driver and are certified by Chrysler Group, LLC. Two
different types are:
1.Built-In Features— use the built-in 3G Cellular Network on your Uconnect
®8.4A
or 8.4AN radio.
2.Uconnect® Access via Mobile (if equipped)— uses the Uconnect Access app and
your smartphone's data plan to access your personal Pandora
®, iHeartRadio,
Aha™ and Slacker accounts from the vehicle and control them using the vehicle
touchscreen. Customer's data plan charges will apply.
ELECTRONICS
55
Page 59 of 220
Selling Your Vehicle
When you sell your vehicle, we recommend that you remove your Uconnect
®Access
Account information from the vehicle. You can do this using the radio touchscreen in
the vehicle(Uconnect® 8.4AN only)or on the Mopar Owner Connect website
(moparownerconnect.com). Removing your account information cancels your sub-
scription and makes your vehicle factory-ready for a new owner/subscriber.
1.
From your vehicle’s radio touchscreen, select “Uconnect®Store” from the Apps Menu.
2. Select “My Apps,” then “Settings.” Press “Remove Uconnect®Account.”
3. Enter your Uconnect
®Security PIN, select “Proceed to Remove Vehicle from
Uconnect Account.”
For additional information on Uconnect
®:
• U.S. residents - visit DriveUconnect.com or call 1-877-855-8400.
• Canadian Residents - visit DriveUconnect.ca or call, 1-800-465-2001 (English)
or 1-800-387-9983 (French).
Built-In Features (Uconnect® 8.4A And 8.4AN Only)
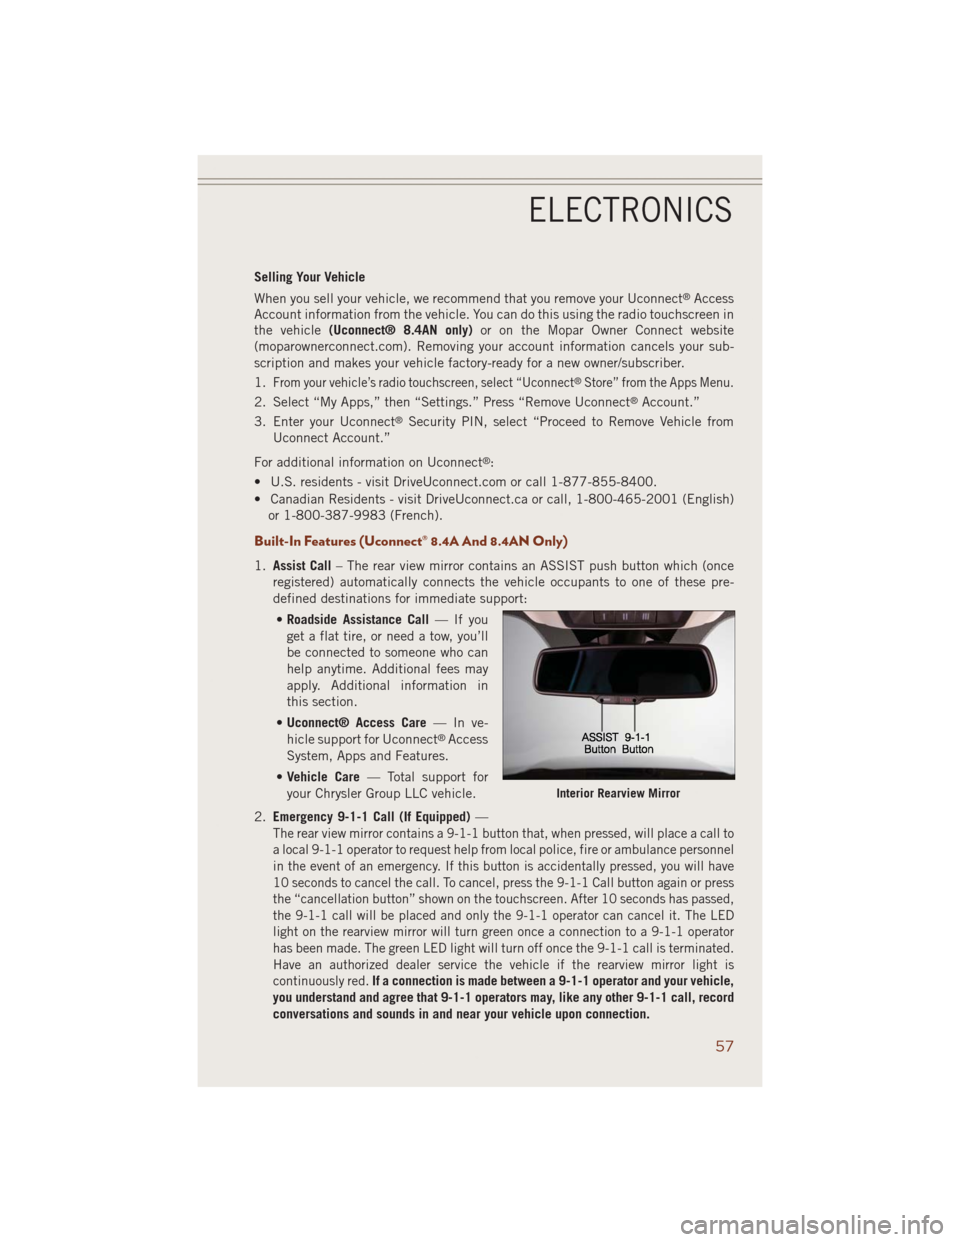
1.Assist Call– The rear view mirror contains an ASSIST push button which (once
registered) automatically connects the vehicle occupants to one of these pre-
defined destinations for immediate support:
•Roadside Assistance Call—Ifyou
get a flat tire, or need a tow, you’ll
be connected to someone who can
help anytime. Additional fees may
apply. Additional information in
this section.
•Uconnect® Access Care—Inve-
hicle support for Uconnect
®Access
System, Apps and Features.
•Vehicle Care— Total support for
your Chrysler Group LLC vehicle.
2.Emergency 9-1-1 Call (If Equipped)—
The rear view mirror contains a 9-1-1 button that, when pressed, will place a call to
a local 9-1-1 operator to request help from local police, fire or ambulance personnel
in the event of an emergency. If this button is accidentally pressed, you will have
10 seconds to cancel the call. To cancel, press the 9-1-1 Call button again or press
the “cancellation button” shown on the touchscreen. After 10 seconds has passed,
the 9-1-1 call will be placed and only the 9-1-1 operator can cancel it. The LED
light on the rearview mirror will turn green once a connection to a 9-1-1 operator
has been made. The green LED light will turn off once the 9-1-1 call is terminated.
Have an authorized dealer service the vehicle if the rearview mirror light is
continuously red.
If a connection is made between a 9-1-1 operator and your vehicle,
you understand and agree that 9-1-1 operators may, like any other 9-1-1 call, record
conversations and sounds in and near your vehicle upon connection.
Interior Rearview Mirror
ELECTRONICS
57
Page 60 of 220
3.Roadside Assistance (If Equipped)— If your vehicle is equipped with this feature
and within wireless range, you may be able to connect to Roadside Assistance by
pressing the “Assist” button on the rearview mirror. You will be presented with
Assist Care options. Make a selection by touching the prompts displayed on the
radio. If Roadside Assistance is provided to your vehicle, you agree to be
responsible for any additional roadside assistance service costs that you may
incur. In order to provide Uconnect
®Services to you, we may record and monitor
your conversations with Roadside Assistance, Uconnect®Care or Vehicle Care,
whether such conversations are initiated through the Uconnect®Services in your
vehicle, or via a landline or mobile telephone, and may share information
obtained through such recording and monitoring in accordance with regulatory
requirements. You acknowledge, agree and consent to any recording, monitoring
or sharing of information obtained through any such call recordings.
4.Yelp®— Customers have the ability to search for nearby destinations or a point
of interest (POI) either by category or custom search by using keywords (for
example, “Italian restaurant”). Searching can be done by voice or using the
touchscreen keypad. Using the touchscreen, launch Yelp
®by selecting the
“Apps” icon, touch the “All Apps” tab, and then touch “Yelp.” Using voice
recognition press the Voice Command (VR) button on the steering wheel and say
“Launch Yelp
®.”
5.Security Alarm Notification— The Security Alarm Notification feature notifies you
via email or text (SMS) message when the vehicle’s factory-installed security
alarm system has been set-off. There are a number of reasons why your alarm may
have been triggered, one of which could be that your vehicle was stolen. If so,
please see the details of the Stolen Vehicle Assistance service below. When you
register, Security Alarm Notification is automatically set to send you an email at
the mail address you provide should the alarm go off. You may also opt to have a
text message sent to your mobile device.
6.Stolen Vehicle Assistance— If your vehicle is stolen, contact local law enforce-
ment immediately to file a stolen vehicle report. Once this report has been filed,
Uconnect
®care can help locate your vehicle. The Uconnect®Care agent will ask
for the stolen vehicle report number issued by local law enforcement. Then, using
GPS technology and the built-in wireless connection within your vehicle, the
Uconnect
®Care agent will be able to locate the stolen vehicle and work with law
enforcement to help recover it. (Vehicle must be within the United States, have
network coverage and must be registered with Uconnect
®Access with an active
subscription that includes the applicable feature).
7.WiFi Hotspot— WiFi Hotspot is on-demand WiFi 3G connectivity that's built-in
and ready to go whenever you are. Once your vehicle is registered for Uconnect
®
Access, you can purchase a Wifi Hotspot subscription at the Uconnect®Store.
After you've made your purchase, turn on your signal and connect your devices.
It's never been easier to bring your home or office with you.
Your vehicle must have a working electrical system for any of the in vehicle Uconnect®
features to operate.
ELECTRONICS
58
Page 61 of 220
Uconnect® Access Remote Features
If you own a compatible iPhone®or Android®powered device, the Uconnect®Access
App allows you to remotely lock or unlock your doors, start your engine or activate your
horn and lights from virtually anywhere (Vehicle must be within the United States and
have network coverage). You can download the App from Mopar Owner Connect or from
the App Store (iPhone) or Google Play store. Visit UconnectPhone.com to determine
if your device is compatible. For Uconnect
®Phone customer support and to determine
if your device is compatible.
U.S. residents - visit UconnectPhone.com or call 1–877–855–8400
Remote Start— This feature provides the ability to start the engine on your vehicle,
without the keys and from virtually any distance. You can send a request to your
vehicle in one of two ways:
1. Using the Uconnect
®Access App from a compatible smartphone.
2. From the Mopar Owner Connect website.
• You can also send a command to turn-off an engine that has been remote
started.
• After 15 minutes if you have not entered your vehicle with the key, the engine
will shut off automatically.
• This remote function requires your vehicle to be equipped with a factory-
installed Remote Start system. To use this feature after the Uconnect
®Access
App is downloaded, login with your user name and Uconnect®Security PIN.
• You can set-up notifications for your account to receive an email or text (SMS)
message every time a command is sent. Login to Mopar Owner Connect
(moparownerconnect.com) and click on Edit Profile to manage Uconnect
®
Notifications.
Remote Door Lock/Unlock— This feature provides the ability to lock or unlock the door
on your vehicle, without the keys and from virtually any distance. You can send a
request to your vehicle in one of three ways:
1. Using the Uconnect
®Access App from a compatible smartphone.
2. From the Mopar Owner Connect website.
3. By contacting the Uconnect
®Care on the phone.
To use this feature after the Uconnect
®Access App is downloaded, login using your
user name and Uconnect®Security PIN. Press the “App” button on your smartphone
with the closed lock icon to lock the door, and press the “open lock” icon to unlock
the driver’s door.
You can set-up notifications for your account to receive an email or text (SMS) message
every time a command is sent. Login to Mopar Owner Connect (moparownerconnect.com)
and click on Edit Profile to manage Uconnect
®Notifications.
ELECTRONICS
59
Page 62 of 220
Remote Horn And Lights— It’s easy to locate a vehicle in a dark, crowded or noisy
parking area by activating the horn and lights. It may also help if you need to draw
attention to your vehicle for any reason. You can send a request to your vehicle in one
of three ways:
1. Using the Uconnect
®Access App from a compatible smartphone.
2. From the Mopar Owner Connect website.
3. By contacting the Uconnect
®Care on the phone.
To use this feature after the Uconnect
®Access App is downloaded, login using your
user name and Uconnect®Security PIN. You can set-up notifications for your
account to receive an email or text (SMS) message every time a command is sent.
Login to Mopar Owner Connect (moparownerconnect.com) and click on Edit Profile
to manage Uconnect
®Notifications.
Voice Texting (U.S. Residents Only)— Want to dictate a personal message? Register
with Uconnect
®Access to take advantage of a new, cloudbased Voice Texting service,
an enhancement to Voice Text Reply.
Voice Texting allows you to compose a new text or reply to an incoming text message.
Before you attempt to use the Voice Texting feature, check to ensure you have the
following:
1. A paired, Bluetooth
®enabled phone with the Message Access Profile (MAP). Not
all Bluetooth®enabled phones support MAP, including all iPhones®(Apple iOS).
Visit UconnectPhone.com for system and device compatibility information.
2. An active Uconnect
®Access trial or paid subscription. Press the “U” button on
the lower right hand corner of the touchscreen to begin the registration process.
3. Accept the Allow MAP profile request on your smart phone. (Please refer to device
manufacturer instructions for details).
To Send A Text Message:
1. Press the “Uconnect
®Phone” button.
2. Wait for the beep.
3. Say “Text.”
4. Uconnect
®will prompt you “Say the phone number, or full name and phone type
of the contact you want to send a message to.”
5. Wait for the beep and say a contact that is in your phonebook, or a mobile phone
number that you would like to send the message to.
6. Uconnect
®will prompt you “Please say the message that you would like to send.”
(If you do not hear this prompt, you may not have an active subscription with
Uconnect
®Access).
ELECTRONICS
60
Page 119 of 220
UNIVERSAL GARAGE DOOR OPENER (HomeLink®)
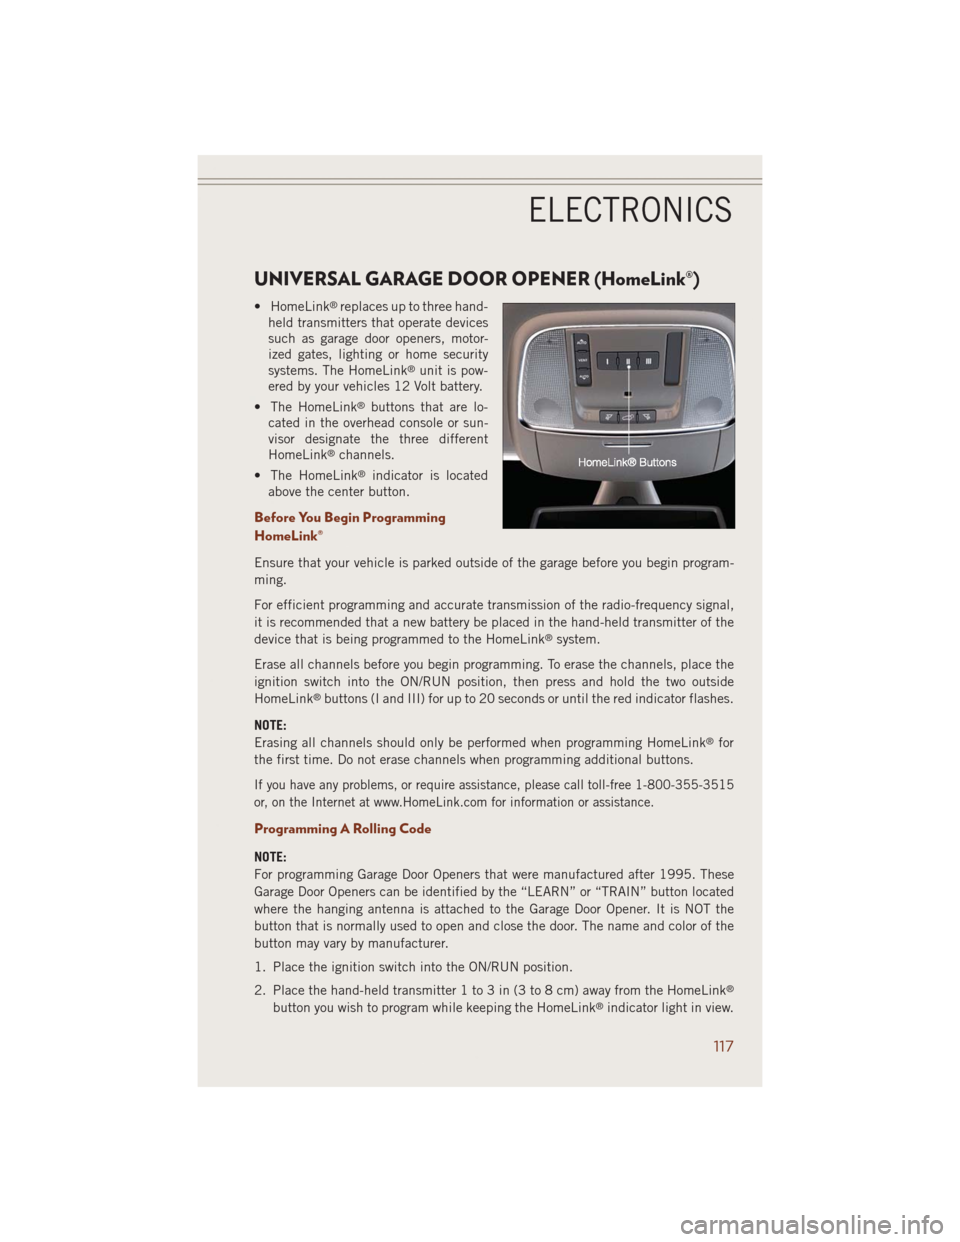
• HomeLink®replaces up to three hand-
held transmitters that operate devices
such as garage door openers, motor-
ized gates, lighting or home security
systems. The HomeLink
®unit is pow-
ered by your vehicles 12 Volt battery.
• The HomeLink
®buttons that are lo-
cated in the overhead console or sun-
visor designate the three different
HomeLink
®channels.
• The HomeLink
®indicator is located
above the center button.
Before You Begin Programming
HomeLink®
Ensure that your vehicle is parked outside of the garage before you begin program-
ming.
For efficient programming and accurate transmission of the radio-frequency signal,
it is recommended that a new battery be placed in the hand-held transmitter of the
device that is being programmed to the HomeLink
®system.
Erase all channels before you begin programming. To erase the channels, place the
ignition switch into the ON/RUN position, then press and hold the two outside
HomeLink
®buttons (I and III) for up to 20 seconds or until the red indicator flashes.
NOTE:
Erasing all channels should only be performed when programming HomeLink
®for
the first time. Do not erase channels when programming additional buttons.
If you have any problems, or require assistance, please call toll-free 1-800-355-3515
or, on the Internet at www.HomeLink.com for information or assistance.
Programming A Rolling Code
NOTE:
For programming Garage Door Openers that were manufactured after 1995. These
Garage Door Openers can be identified by the “LEARN” or “TRAIN” button located
where the hanging antenna is attached to the Garage Door Opener. It is NOT the
button that is normally used to open and close the door. The name and color of the
button may vary by manufacturer.
1. Place the ignition switch into the ON/RUN position.
2. Place the hand-held transmitter 1 to 3 in (3 to 8 cm) away from the HomeLink
®
button you wish to program while keeping the HomeLink®indicator light in view.
ELECTRONICS
117
Page 121 of 220
Using HomeLink®
To operate, press and release the programmed HomeLink®button. Activation will
now occur for the programmed device (i.e., garage door opener, gate operator,
security system, entry door lock, home/office lighting, etc.,). The hand-held trans-
mitter of the device may also be used at any time.
WARNING!
• Your motorized door or gate will open and close while you are programming the
universal transceiver. Do not program the transceiver if people or pets are in the
path of the door or gate.
• Do not run your vehicle in a closed garage or confined area while programming
the transceiver. Exhaust gas from your vehicle contains Carbon Monoxide (CO)
which is odorless and colorless. Carbon Monoxide is poisonous when inhaled
and can cause you and others to be severely injured or killed.
POWER INVERTER
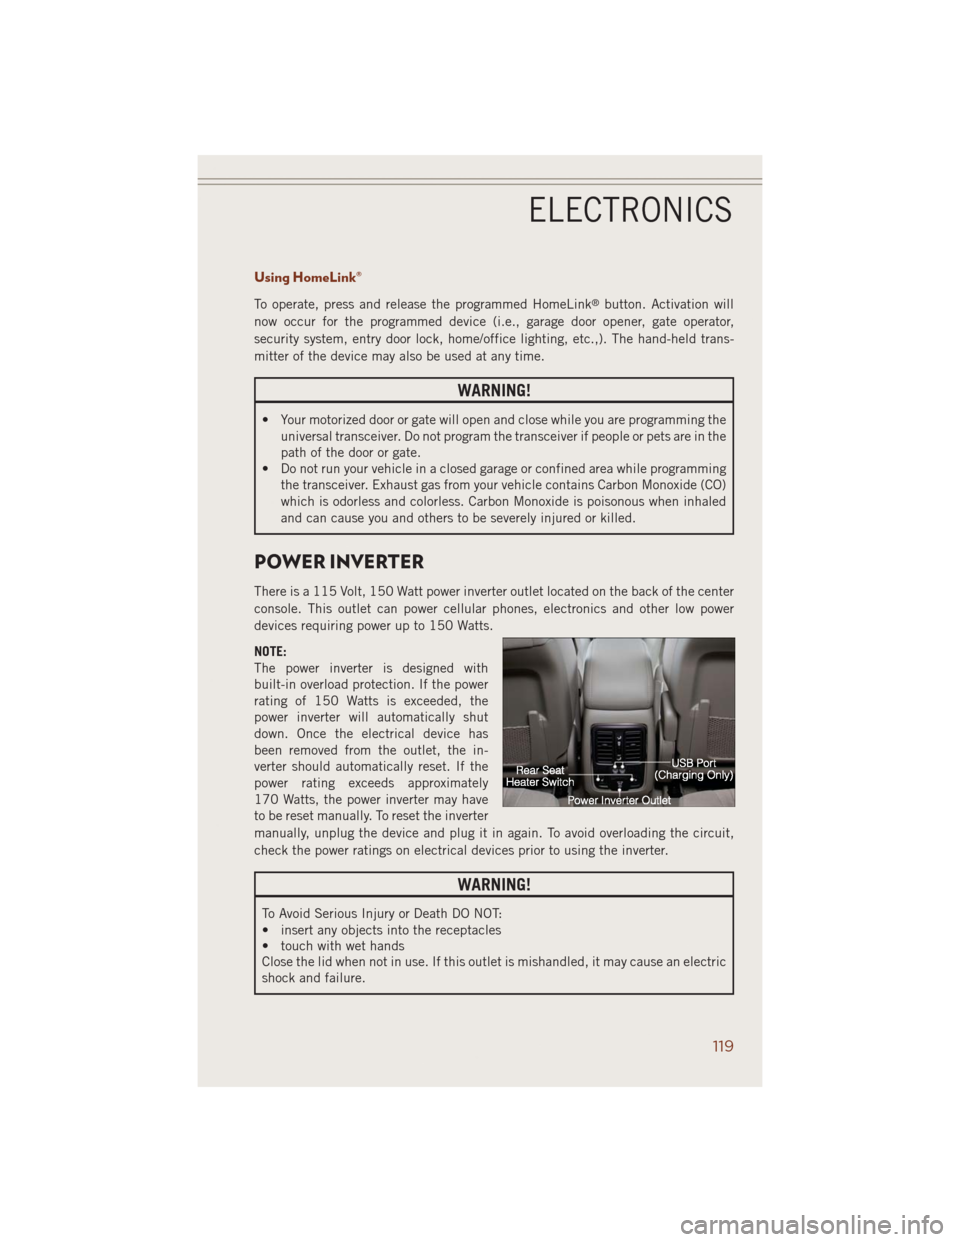
There is a 115 Volt, 150 Watt power inverter outlet located on the back of the center
console. This outlet can power cellular phones, electronics and other low power
devices requiring power up to 150 Watts.
NOTE:
The power inverter is designed with
built-in overload protection. If the power
rating of 150 Watts is exceeded, the
power inverter will automatically shut
down. Once the electrical device has
been removed from the outlet, the in-
verter should automatically reset. If the
power rating exceeds approximately
170 Watts, the power inverter may have
to be reset manually. To reset the inverter
manually, unplug the device and plug it in again. To avoid overloading the circuit,
check the power ratings on electrical devices prior to using the inverter.
WARNING!
To Avoid Serious Injury or Death DO NOT:
• insert any objects into the receptacles
• touch with wet hands
Close the lid when not in use. If this outlet is mishandled, it may cause an electric
shock and failure.
ELECTRONICS
119
Page 134 of 220
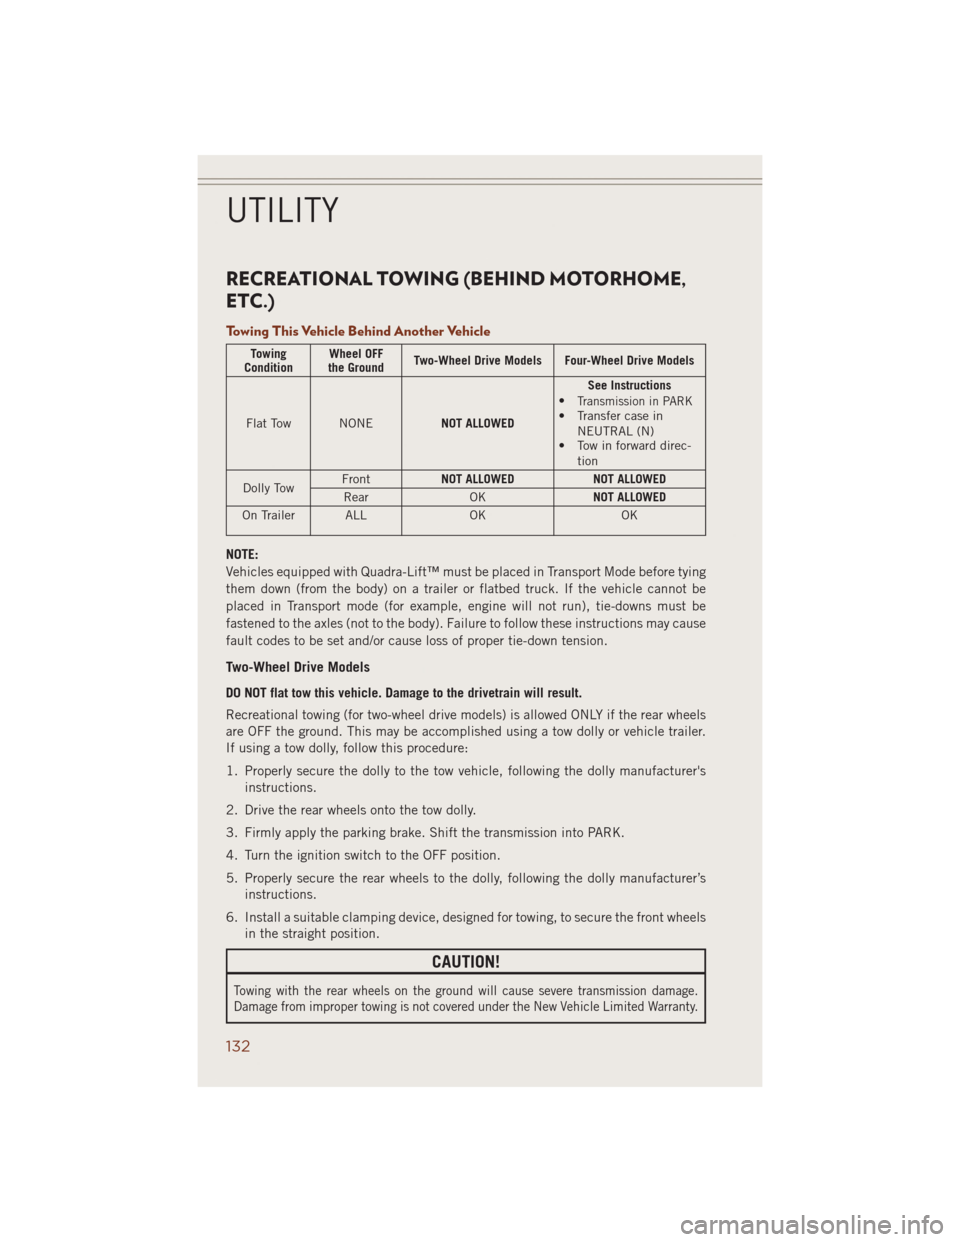
RECREATIONAL TOWING (BEHIND MOTORHOME,
ETC.)
Towing This Vehicle Behind Another Vehicle
Towing
ConditionWheel OFF
the GroundTwo-Wheel Drive Models Four-Wheel Drive Models
Flat Tow NONENOT ALLOWEDSee Instructions
•
Transmission in PARK• Transfer case in
NEUTRAL (N)
• Tow in forward direc-
tion
Dolly TowFrontNOT ALLOWED NOT ALLOWED
Rear OKNOT ALLOWED
On Trailer ALL OK OK
NOTE:
Vehicles equipped with Quadra-Lift™ must be placed in Transport Mode before tying
them down (from the body) on a trailer or flatbed truck. If the vehicle cannot be
placed in Transport mode (for example, engine will not run), tie-downs must be
fastened to the axles (not to the body). Failure to follow these instructions may cause
fault codes to be set and/or cause loss of proper tie-down tension.
Two-Wheel Drive Models
DO NOT flat tow this vehicle. Damage to the drivetrain will result.
Recreational towing (for two-wheel drive models) is allowed ONLY if the rear wheels
are OFF the ground. This may be accomplished using a tow dolly or vehicle trailer.
If using a tow dolly, follow this procedure:
1. Properly secure the dolly to the tow vehicle, following the dolly manufacturer's
instructions.
2. Drive the rear wheels onto the tow dolly.
3. Firmly apply the parking brake. Shift the transmission into PARK.
4. Turn the ignition switch to the OFF position.
5. Properly secure the rear wheels to the dolly, following the dolly manufacturer’s
instructions.
6. Install a suitable clamping device, designed for towing, to secure the front wheels
in the straight position.
CAUTION!
Towing with the rear wheels on the ground will cause severe transmission damage.
Damage from improper towing is not covered under the New Vehicle Limited Warranty.
UTILITY
132
Page 158 of 220
WARNING!
A hot engine cooling system is dangerous. You or others could be badly burned by
steam or boiling coolant.
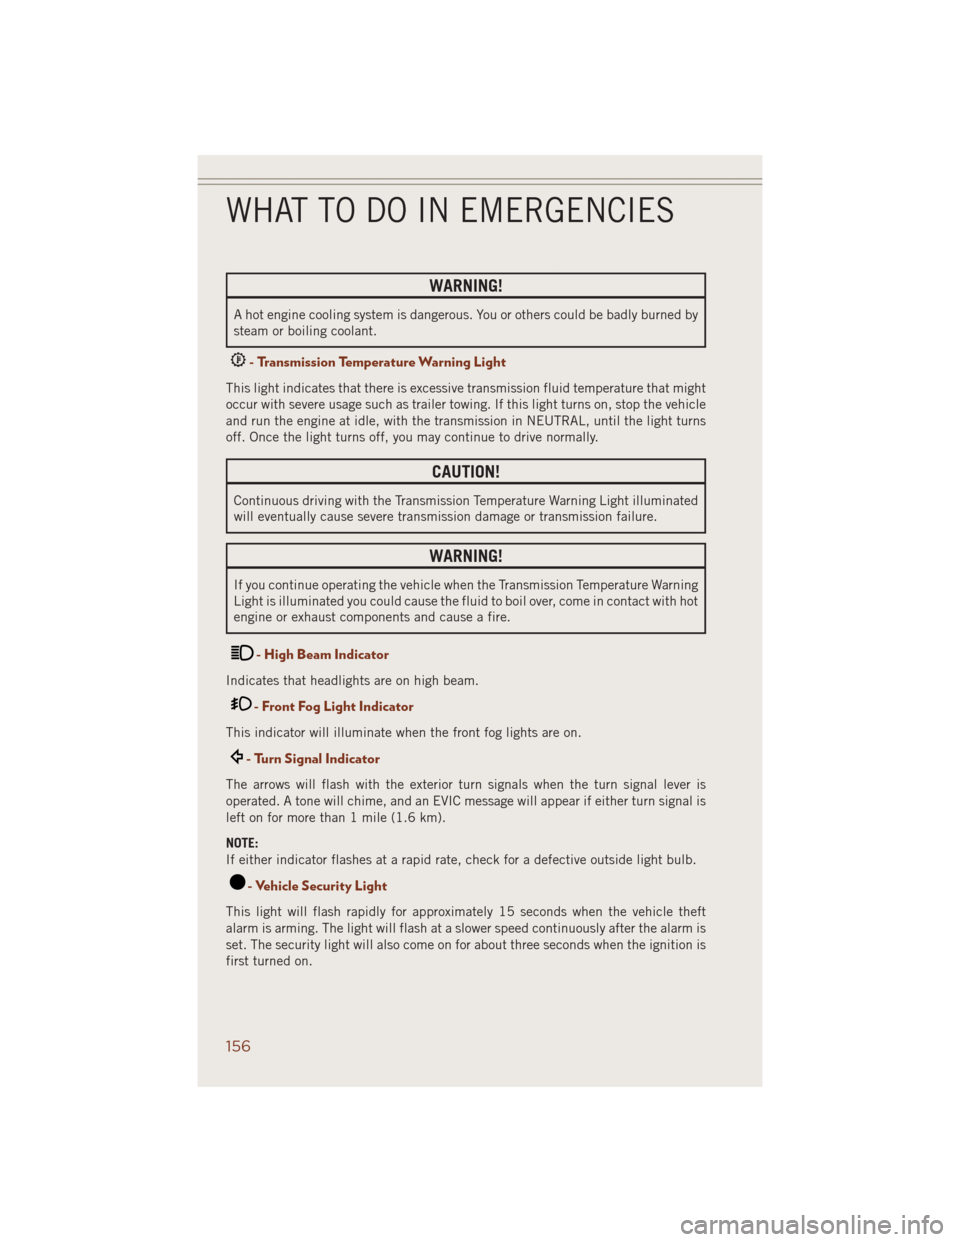
- Transmission Temperature Warning Light
This light indicates that there is excessive transmission fluid temperature that might
occur with severe usage such as trailer towing. If this light turns on, stop the vehicle
and run the engine at idle, with the transmission in NEUTRAL, until the light turns
off. Once the light turns off, you may continue to drive normally.
CAUTION!
Continuous driving with the Transmission Temperature Warning Light illuminated
will eventually cause severe transmission damage or transmission failure.
WARNING!
If you continue operating the vehicle when the Transmission Temperature Warning
Light is illuminated you could cause the fluid to boil over, come in contact with hot
engine or exhaust components and cause a fire.
- High Beam Indicator
Indicates that headlights are on high beam.
- Front Fog Light Indicator
This indicator will illuminate when the front fog lights are on.
- Turn Signal Indicator
The arrows will flash with the exterior turn signals when the turn signal lever is
operated. A tone will chime, and an EVIC message will appear if either turn signal is
left on for more than 1 mile (1.6 km).
NOTE:
If either indicator flashes at a rapid rate, check for a defective outside light bulb.
- Vehicle Security Light
This light will flash rapidly for approximately 15 seconds when the vehicle theft
alarm is arming. The light will flash at a slower speed continuously after the alarm is
set. The security light will also come on for about three seconds when the ignition is
first turned on.
WHAT TO DO IN EMERGENCIES
156
Page 161 of 220
WARNING!
• Do not exceed 50 mph (80 km/h) if the “Tire Pressure Monitoring Telltale
Light” is illuminated. Vehicle handling and braking may be reduced. You could
have a collision and be severely or fatally injured.
• Do not tow a trailer when using the compact spare tire.
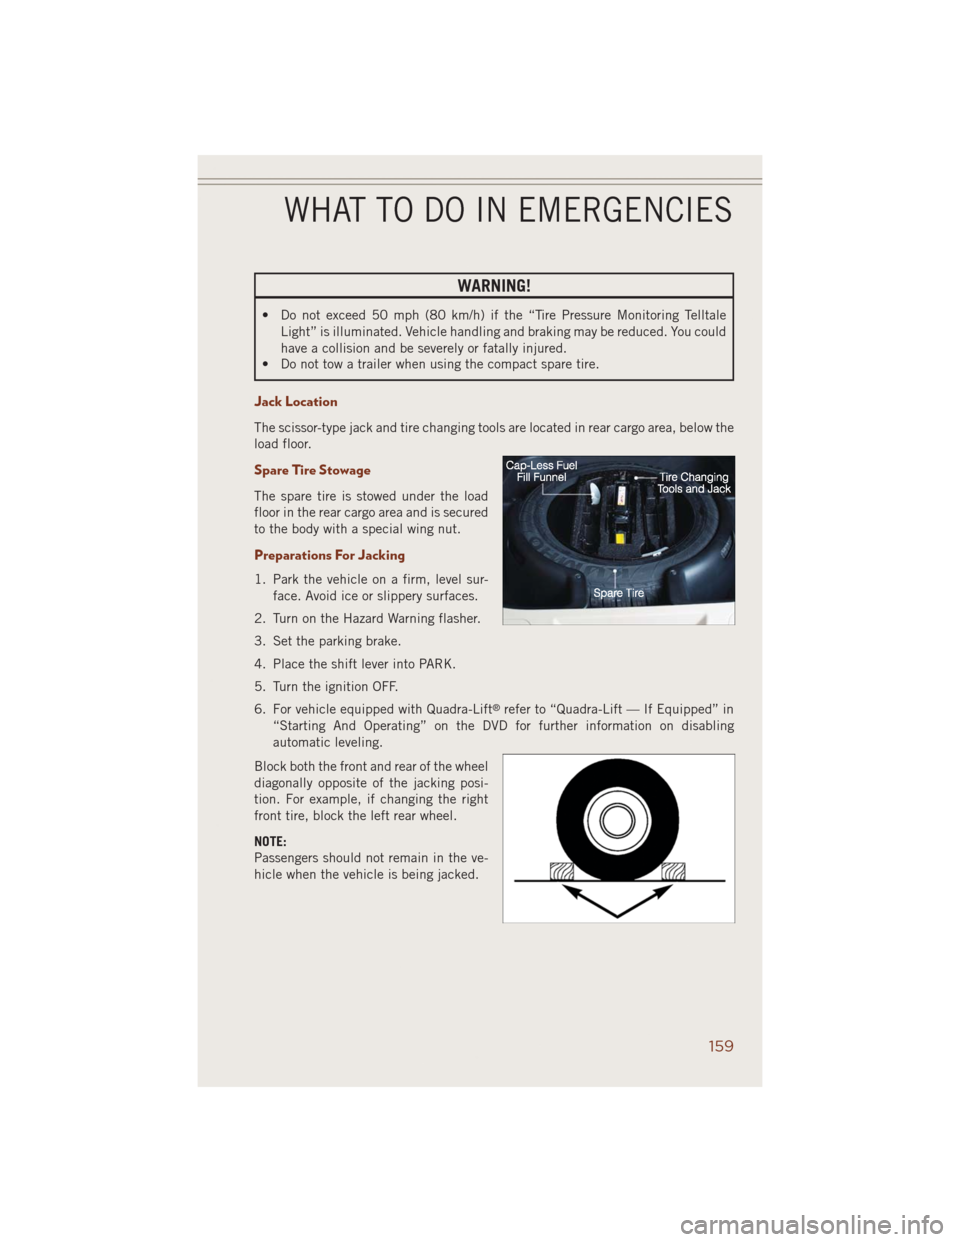
Jack Location
The scissor-type jack and tire changing tools are located in rear cargo area, below the
load floor.
Spare Tire Stowage
The spare tire is stowed under the load
floor in the rear cargo area and is secured
to the body with a special wing nut.
Preparations For Jacking
1. Park the vehicle on a firm, level sur-
face. Avoid ice or slippery surfaces.
2. Turn on the Hazard Warning flasher.
3. Set the parking brake.
4. Place the shift lever into PARK.
5. Turn the ignition OFF.
6. For vehicle equipped with Quadra-Lift
®refer to “Quadra-Lift — If Equipped” in
“Starting And Operating” on the DVD for further information on disabling
automatic leveling.
Block both the front and rear of the wheel
diagonally opposite of the jacking posi-
tion. For example, if changing the right
front tire, block the left rear wheel.
NOTE:
Passengers should not remain in the ve-
hicle when the vehicle is being jacked.
WHAT TO DO IN EMERGENCIES
159