instrument cluster JEEP GRAND CHEROKEE 2014 WK2 / 4.G User Guide
[x] Cancel search | Manufacturer: JEEP, Model Year: 2014, Model line: GRAND CHEROKEE, Model: JEEP GRAND CHEROKEE 2014 WK2 / 4.GPages: 220, PDF Size: 6.12 MB
Page 3 of 220
INTRODUCTION/WELCOME
WELCOME FROM CHRYSLER
GROUP LLC.................. 3
CONTROLS AT A GLANCE
DRIVER COCKPIT............... 6
INSTRUMENT CLUSTER.......... 8
GETTING STARTED
KEYFOB ................... 10
REMOTE START............... 10
KEYLESS ENTER-N-GO™......... 11
VEHICLE SECURITY ALARM....... 15
SEATBELT .................. 15
SUPPLEMENTAL RESTRAINT SYSTEM
(SRS) — AIR BAGS............ 16
CHILD RESTRAINTS............ 17
FRONT SEATS................ 21
REAR SEATS................. 24
HEATED/VENTILATED SEATS....... 24
HEATED STEERING WHEEL....... 26
TILT/TELESCOPING STEERING
COLUMN................... 27
OPERATING YOUR VEHICLE
ENGINE BREAK-IN
RECOMMENDATIONS........... 28
HEADLIGHT SWITCH............ 29
TURN SIGNAL/WIPER/WASHER/HIGH
BEAM LEVER................ 30
AUTOMATIC DIMMING MIRRORS.... 32
SPEED CONTROL.............. 32
ADAPTIVE CRUISE CONTROL (ACC) . . . 34
FORWARD COLLISION WARNING (FCW)
WITHMITIGATION ............. 36
ELECTRONIC SHIFTER........... 38
PADDLE SHIFT MODE........... 39
FUEL ECONOMY (ECO) MODE...... 39
AUTOMATIC CLIMATE CONTROLS
WITH TOUCHSCREEN........... 40
PARKSENSE
®FRONT AND REAR
PARK ASSIST................ 42
PARKVIEW
®REAR BACK-UP CAMERA . 43
BLIND SPOT MONITORING........ 44
POWER SUNROOF............. 44
WIND BUFFETING............. 47
ELECTRONICS
YOUR VEHICLE'S SOUND SYSTEM . . . 48
IDENTIFYING YOUR RADIO........ 50
Uconnect
®ACCESS............. 51
Uconnect®5.0 ................ 65
Uconnect®8.4A ............... 73
Uconnect®8.4AN .............. 93
STEERING WHEEL AUDIO CONTROLS . . 114ELECTRONIC VEHICLE INFORMATION
CENTER (EVIC).............. 114
PROGRAMMABLE FEATURES...... 115
UNIVERSAL GARAGE DOOR OPENER
(HomeLink
®) ................ 117
POWER INVERTER............ 119
POWER OUTLETS............. 120
OFF-ROAD CAPABILITIES
(4WD OPERATION)
QUADRA-TRAC I®FOUR-WHEEL
DRIVE .................... 122
QUADRA-TRAC II
®/QUADRA-DRIVE II®FOUR-WHEEL DRIVE.......... 122
SELEC-TERRAIN™............ 124
QUADRA-LIFT™.............. 125
HILL START ASSIST/HILL DESCENT
CONTROL/SELEC SPEED CONTROL . . 127
UTILITY
TRAILER TOWING WEIGHTS (MAXIMUM
TRAILER WEIGHT RATINGS)...... 128
RECREATIONAL TOWING (BEHIND
MOTORHOME, ETC.)........... 132
SRT
PADDLE SHIFT MODE.......... 136
SELEC-TRACK™.............. 137
SRT PERFORMANCE FEATURES.... 138
SUMMER/THREE-SEASON TIRES . . . 141
DIESEL
DIESEL ENGINE BREAK-IN
RECOMMENDATIONS.......... 142
DIESEL ENGINE STARTING
PROCEDURES............... 142
DIESEL FUEL FILTERS/WATER
SEPARATOR ................ 144
EXHAUST REGENERATION....... 145
DIESEL EXHAUST FLUID........ 146
WHAT TO DO IN EMERGENCIES
ROADSIDE ASSISTANCE......... 150
INSTRUMENT CLUSTER WARNING
LIGHTS................... 150
IF YOUR ENGINE OVERHEATS..... 158
JACKING AND TIRE CHANGING.... 158
BATTERY LOCATION........... 165
JUMP-STARTING............. 165
EMERGENCY TOW HOOKS....... 167
MANUAL PARK RELEASE 8-SPEED . . 168
TOWING A DISABLED VEHICLE.... 169
EVENT DATA RECORDER (EDR).... 170
CAP-LESS FUEL FILL FUNNEL..... 170
TABLE OF CONTENTS
Page 8 of 220
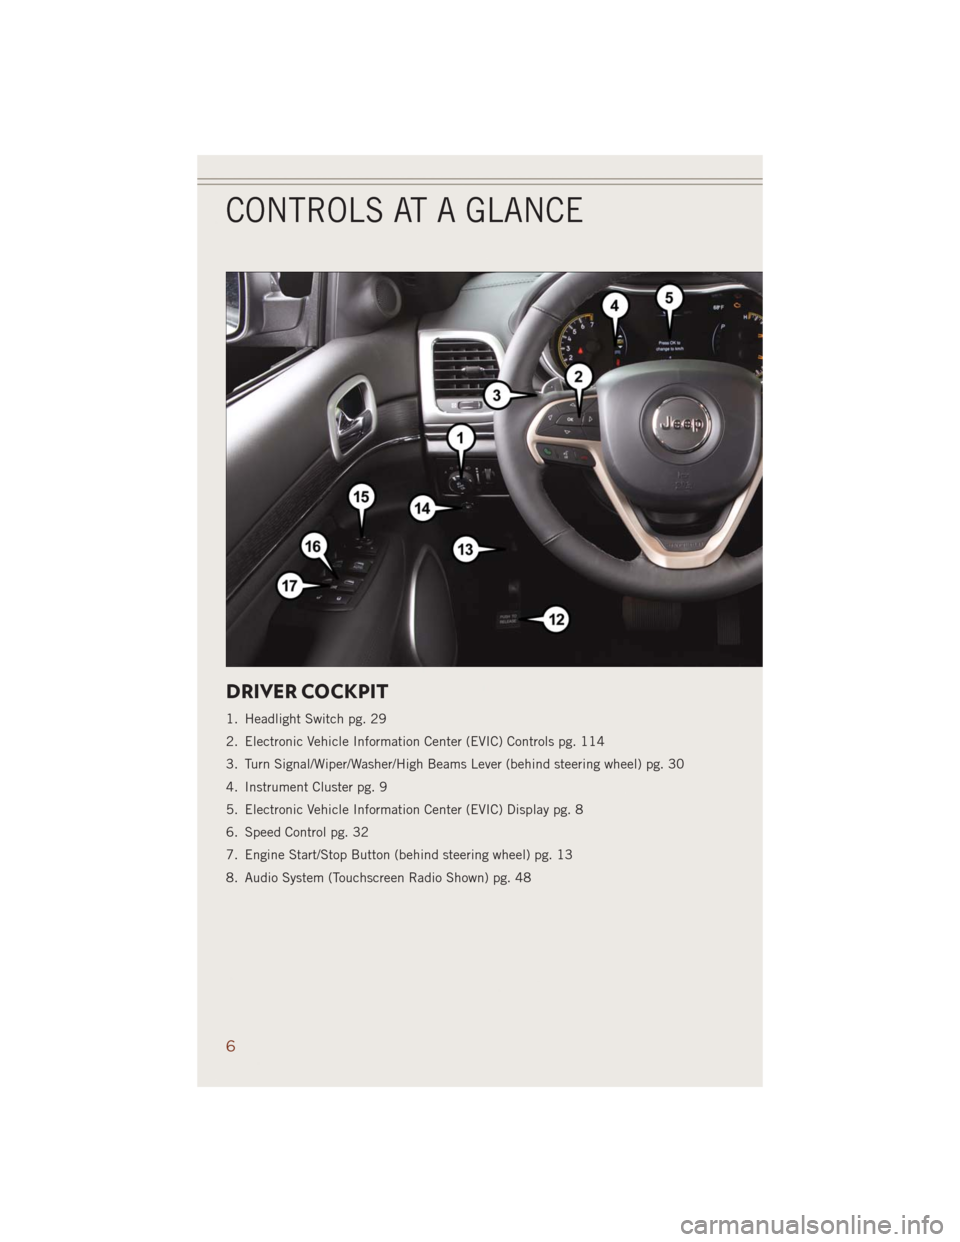
DRIVER COCKPIT
1. Headlight Switch pg. 29
2. Electronic Vehicle Information Center (EVIC) Controls pg. 114
3. Turn Signal/Wiper/Washer/High Beams Lever (behind steering wheel) pg. 30
4. Instrument Cluster pg. 9
5. Electronic Vehicle Information Center (EVIC) Display pg. 8
6. Speed Control pg. 32
7. Engine Start/Stop Button (behind steering wheel) pg. 13
8. Audio System (Touchscreen Radio Shown) pg. 48
CONTROLS AT A GLANCE
6
Page 10 of 220
INSTRUMENT CLUSTER
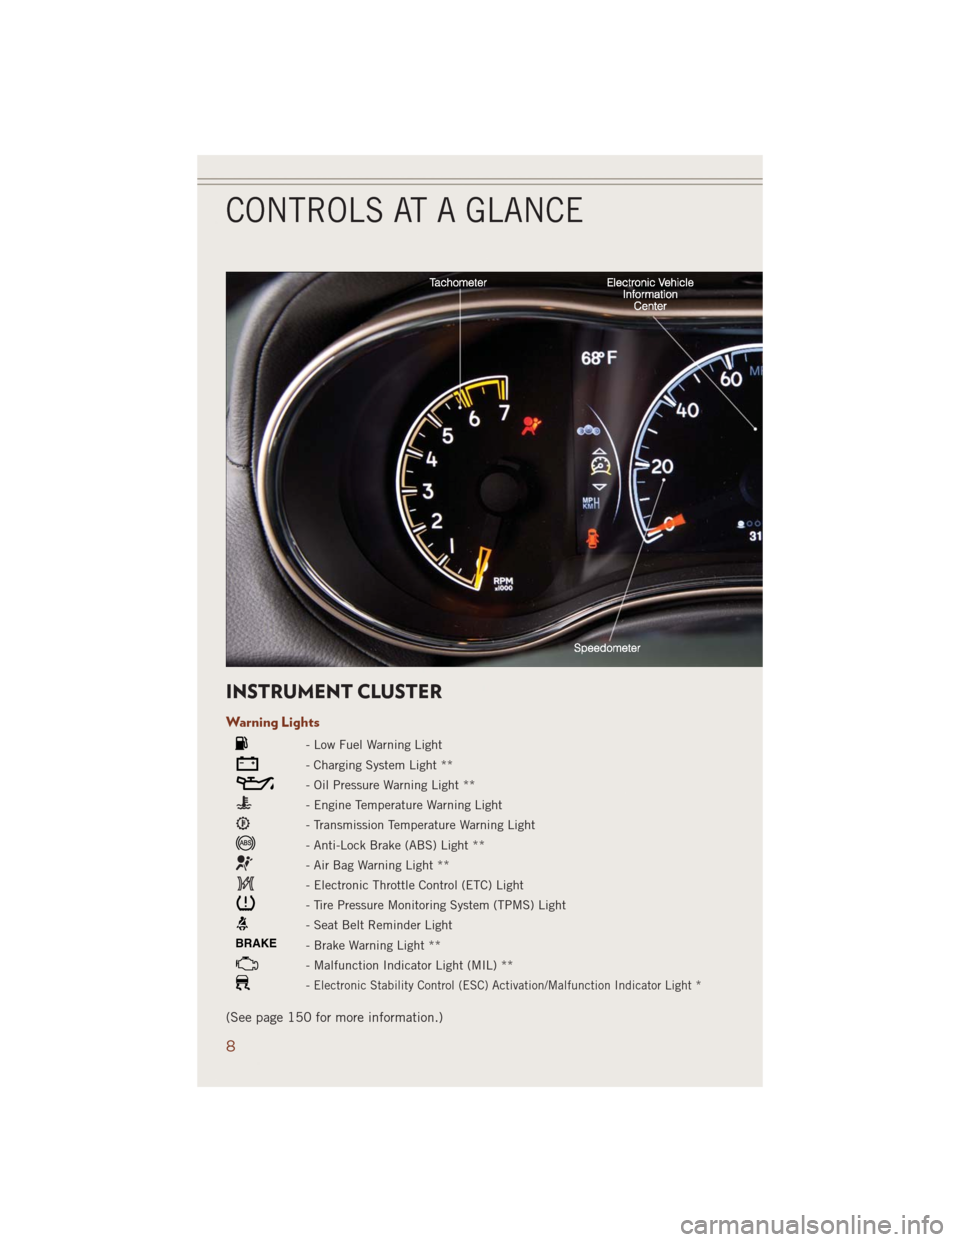
Warning Lights
- Low Fuel Warning Light
- Charging System Light **
- Oil Pressure Warning Light **
- Engine Temperature Warning Light
- Transmission Temperature Warning Light
- Anti-Lock Brake (ABS) Light **
- Air Bag Warning Light **
- Electronic Throttle Control (ETC) Light
- Tire Pressure Monitoring System (TPMS) Light
- Seat Belt Reminder Light
BRAKE- Brake Warning Light **
- Malfunction Indicator Light (MIL) **
-Electronic Stability Control (ESC) Activation/Malfunction Indicator Light *
(See page 150 for more information.)
CONTROLS AT A GLANCE
8
Page 34 of 220
AUTOMATIC DIMMING MIRRORS
The rearview and driver side exterior mirror automatically adjusts for headlight glare
from vehicles behind you.
SPEED CONTROL
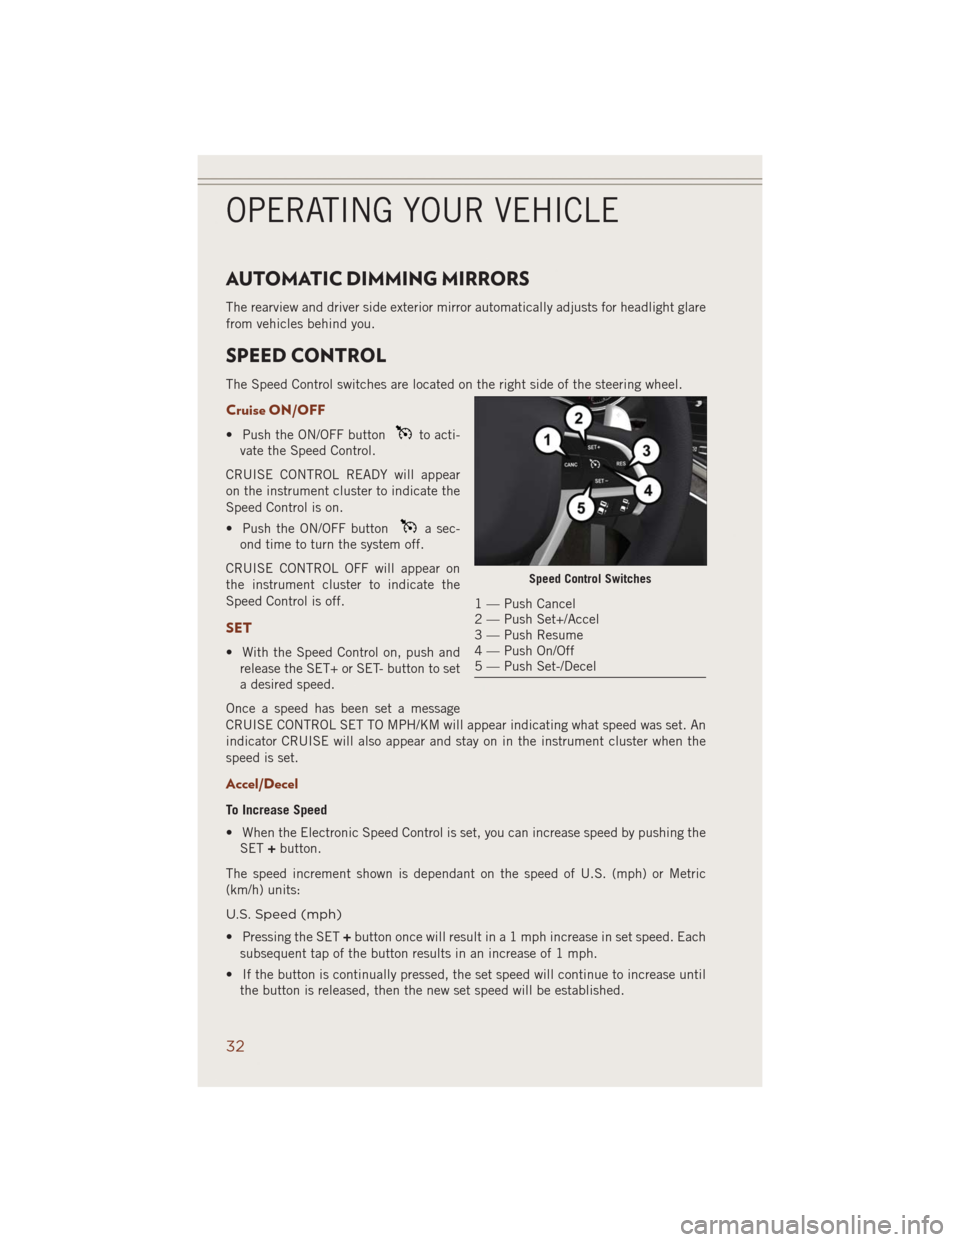
The Speed Control switches are located on the right side of the steering wheel.
Cruise ON/OFF
• Push the ON/OFF buttonto acti-
vate the Speed Control.
CRUISE CONTROL READY will appear
on the instrument cluster to indicate the
Speed Control is on.
• Push the ON/OFF button
a sec-
ond time to turn the system off.
CRUISE CONTROL OFF will appear on
the instrument cluster to indicate the
Speed Control is off.
SET
• With the Speed Control on, push and
release the SET+ or SET- button to set
a desired speed.
Once a speed has been set a message
CRUISE CONTROL SET TO MPH/KM will appear indicating what speed was set. An
indicator CRUISE will also appear and stay on in the instrument cluster when the
speed is set.
Accel/Decel
To Increase Speed
• When the Electronic Speed Control is set, you can increase speed by pushing the
SET+button.
The speed increment shown is dependant on the speed of U.S. (mph) or Metric
(km/h) units:
U.S. Speed (mph)
• Pressing the SET+button once will result in a 1 mph increase in set speed. Each
subsequent tap of the button results in an increase of 1 mph.
• If the button is continually pressed, the set speed will continue to increase until
the button is released, then the new set speed will be established.
Speed Control Switches
1 — Push Cancel
2 — Push Set+/Accel
3 — Push Resume
4 — Push On/Off
5 — Push Set-/Decel
OPERATING YOUR VEHICLE
32
Page 36 of 220
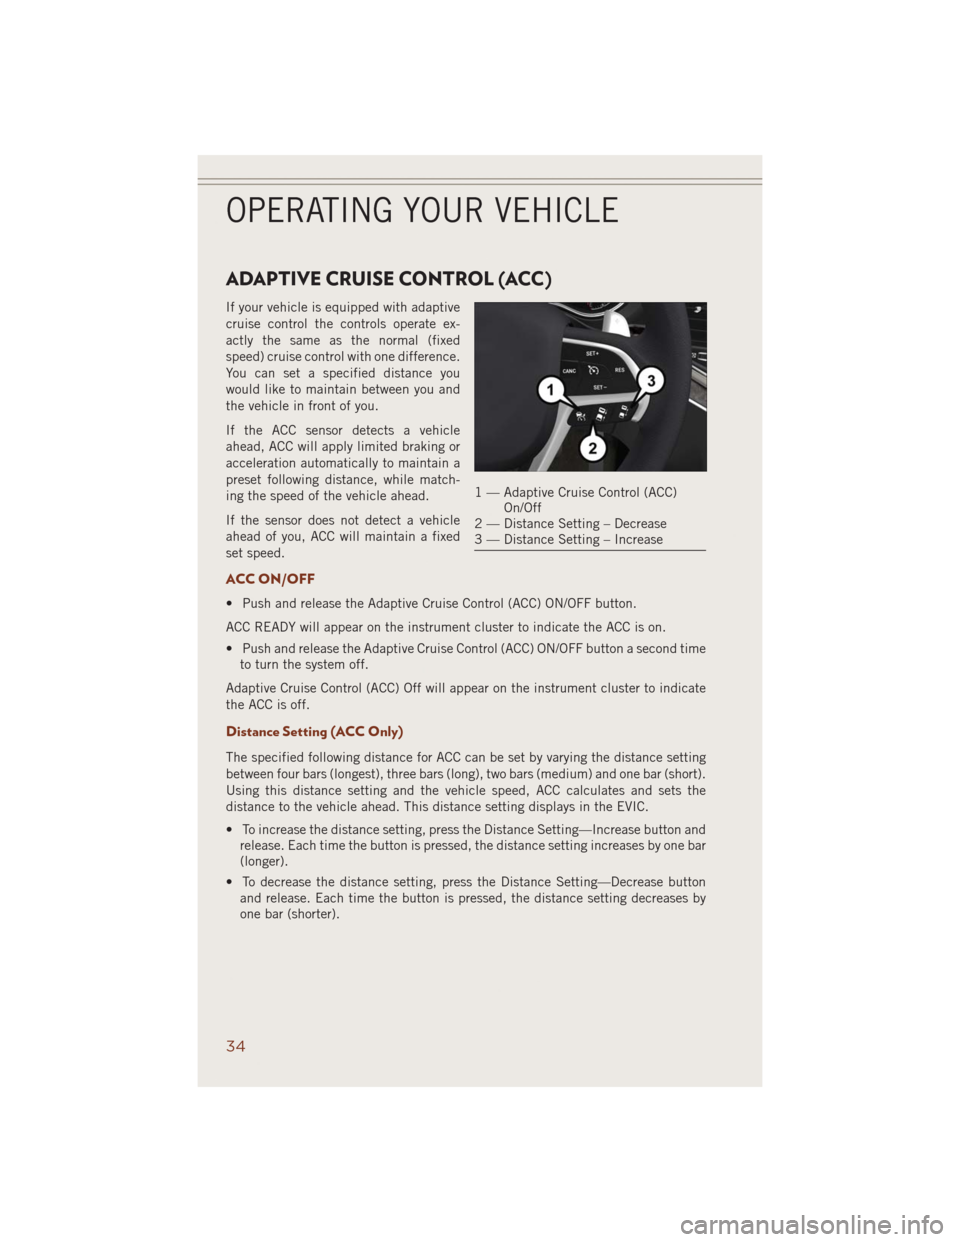
ADAPTIVE CRUISE CONTROL (ACC)
If your vehicle is equipped with adaptive
cruise control the controls operate ex-
actly the same as the normal (fixed
speed) cruise control with one difference.
You can set a specified distance you
would like to maintain between you and
the vehicle in front of you.
If the ACC sensor detects a vehicle
ahead, ACC will apply limited braking or
acceleration automatically to maintain a
preset following distance, while match-
ing the speed of the vehicle ahead.
If the sensor does not detect a vehicle
ahead of you, ACC will maintain a fixed
set speed.
ACC ON/OFF
• Push and release the Adaptive Cruise Control (ACC) ON/OFF button.
ACC READY will appear on the instrument cluster to indicate the ACC is on.
• Push and release the Adaptive Cruise Control (ACC) ON/OFF button a second time
to turn the system off.
Adaptive Cruise Control (ACC) Off will appear on the instrument cluster to indicate
the ACC is off.
Distance Setting (ACC Only)
The specified following distance for ACC can be set by varying the distance setting
between four bars (longest), three bars (long), two bars (medium) and one bar (short).
Using this distance setting and the vehicle speed, ACC calculates and sets the
distance to the vehicle ahead. This distance setting displays in the EVIC.
• To increase the distance setting, press the Distance Setting—Increase button and
release. Each time the button is pressed, the distance setting increases by one bar
(longer).
• To decrease the distance setting, press the Distance Setting—Decrease button
and release. Each time the button is pressed, the distance setting decreases by
one bar (shorter).
1 — Adaptive Cruise Control (ACC)
On/Off
2 — Distance Setting – Decrease
3 — Distance Setting – Increase
OPERATING YOUR VEHICLE
34
Page 45 of 220
Cleaning The ParkSense® Sensors
If “CLEAN PARK ASSIST SENSORS” appears in the Electronic Vehicle Information
Center (EVIC), clean the ParkSense®sensors with water, car wash soap and a soft
cloth. Do not use rough or hard cloths. Do not scratch or poke the sensors. Otherwise,
you could damage the sensors.
NOTE:
When the Instrument Cluster reads either Clean Sensor or Blinded, please clean off
the bumper sensors to see if the condition is corrected.
PARKVIEW® REAR BACK-UP CAMERA
You can see an on-screen image of the rear of your vehicle whenever the shift lever is
put into REVERSE. The ParkView®Rear Back-Up Camera image will be displayed on
the radio display screen, located on the center stack of the instrument panel.
If the radio display screen appears foggy, clean the camera lens located on the rear
of the vehicle above the rear license plate.
Refer to your Owner's Manual on the DVD for further details.
WARNING!
Drivers must be careful when backing up; even when using the ParkView®Rear
Back-Up Camera. Always check carefully behind your vehicle, and be sure to
check for pedestrians, animals, other vehicles, obstructions, or blind spots before
backing up. You must continue to pay attention while backing up. Failure to do so
can result in serious injury or death.
OPERATING YOUR VEHICLE
43
Page 116 of 220
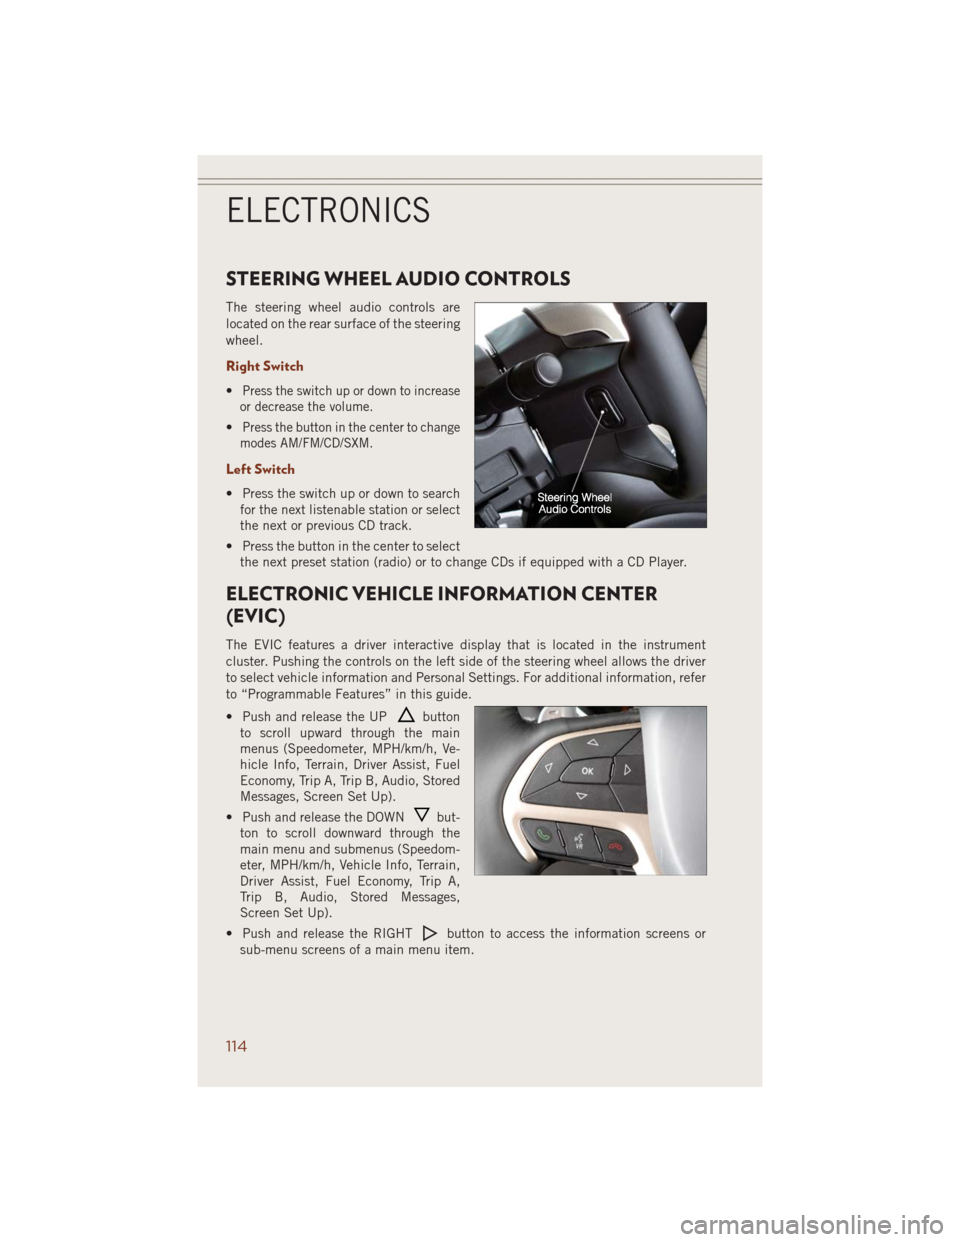
STEERING WHEEL AUDIO CONTROLS
The steering wheel audio controls are
located on the rear surface of the steering
wheel.
Right Switch
•Press the switch up or down to increase
or decrease the volume.
•Press the button in the center to change
modes AM/FM/CD/SXM.
Left Switch
• Press the switch up or down to search
for the next listenable station or select
the next or previous CD track.
• Press the button in the center to select
the next preset station (radio) or to change CDs if equipped with a CD Player.
ELECTRONIC VEHICLE INFORMATION CENTER
(EVIC)
The EVIC features a driver interactive display that is located in the instrument
cluster. Pushing the controls on the left side of the steering wheel allows the driver
to select vehicle information and Personal Settings. For additional information, refer
to “Programmable Features” in this guide.
• Push and release the UP
button
to scroll upward through the main
menus (Speedometer, MPH/km/h, Ve-
hicle Info, Terrain, Driver Assist, Fuel
Economy, Trip A, Trip B, Audio, Stored
Messages, Screen Set Up).
• Push and release the DOWN
but-
ton to scroll downward through the
main menu and submenus (Speedom-
eter, MPH/km/h, Vehicle Info, Terrain,
Driver Assist, Fuel Economy, Trip A,
Trip B, Audio, Stored Messages,
Screen Set Up).
• Push and release the RIGHT
button to access the information screens or
sub-menu screens of a main menu item.
ELECTRONICS
114
Page 118 of 220
• Touch the “Controls” or “Apps” soft-key located near the bottom of the screen,
then touch the “settings” soft-key to access the Settings screen. When making a
selection, scroll up or down until the preferred setting is highlighted, then press
and release the preferred setting until a check-mark appears next to the setting,
showing that setting has been selected. The following feature settings are
available:
• Display • Clock
• Safety & Driving Assistance • Doors & Locks
• Auto-On Comfort • Engine Off Options
• Compass (Uconnect
®5.0) • Audio
• Phone/Bluetooth®• SiriusXM Setup
• Lights • Trailer Brake
• Suspension • System Information
• Units • Voice
NOTE:
Depending on the vehicles options, feature settings may vary.
EVIC Reconfigurable Screen Setup
The following settings allow you to change what information is displayed in the
instrument cluster as well as the location that information is displayed.
Trip A
• Press and release the UP or DOWN arrow button until the Trip A icon is highlighted
in the EVIC (Toggle left or right to select Trip A or Trip B). Press and release the OK
button to display the Trip A information.
Trip B
• Press and release the UP or DOWN arrow button until the Trip B icon is highlighted
in the EVIC (Toggle left or right to select Trip A or Trip B). Press and release the OK
button to display the Trip B information.
Fuel Economy
• Press and release the UP or DOWN arrow button until the Fuel Economy icon is
highlighted. Press the RIGHT arrow button and the next screen will display the
following:
• Average Fuel Economy/Miles Per Gallon (MPG Bargraph)
• Range To Empty (RTE)
• Current Miles Per Gallon (MPG)
ELECTRONICS
116
Page 125 of 220
Shifting Procedures
4WD HI To 4WD LOW
With the vehicle at speeds of 0 to 3 mph (0 to 5 km/h), the ignition switch in the
ON/RUN position or the engine running, shift the transmission into NEUTRAL and
press the “4WD LOW” button once on the transfer case switch. The “4WD LOW”
indicator light in the instrument cluster will begin to flash and remain on solid when
the shift is complete.
4WD LOW To 4WD HI
With the vehicle at speeds of 0 to 3 mph (0 to 5 km/h), the ignition switch in the
ON/RUN position or the engine running, shift the transmission into NEUTRAL, and
press the “4WD LOW” button once on the transfer case switch. The “4WD LOW”
indicator light in the instrument cluster will flash and turn off when the shift is
complete.
NOTE:
• If the shift conditions/interlocks are not met, or a transfer case motor temperature
protection exists, a “For 4x4 Low Slow Below 5 mph (8 km/h) Put Trans in N Press
4 Low” message will flash on the Electronic Vehicle Information Center (EVIC).
• Shifting into or out of 4WD LOW is possible with the vehicle completely stopped;
however, difficulty may occur due to the mating clutch teeth not being properly
aligned. Several attempts may be required for clutch teeth alignment and shift
completion to occur. The preferred method is with the vehicle rolling 0 to 3 mph
(0 to 5 km/h). If the vehicle is moving faster than 3 mph (5 km/h), the transfer case
will not allow the shift.
NEUTRAL Shift Procedure
1. Bring the vehicle to a complete stop, with the engine running.
2. Press and hold the brake pedal.
3. Shift the transmission into NEUTRAL.
4. If vehicle is equipped with Quadra-Lift™ air suspension, ensure the vehicle is set
to Normal Ride Height.
5. Using a ballpoint pen or similar object, press and hold the recessed transfer case
NEUTRAL (N) button (located by the selector switch) for four seconds. The light
behind the N symbol will blink, indicating shift in progress. The light will stop
blinking (stay on solid) when the shift to NEUTRAL (N) is complete. A “FOUR
WHEEL DRIVE SYSTEM IN NEUTRAL” message will display on the EVIC
(Electronic Vehicle Information Center).
6. After the shift is completed and the NEUTRAL (N) light stays on, release the
NEUTRAL (N) button.
OFF-ROAD CAPABILITIES (4WD OPERATION)
123
Page 138 of 220
PADDLE SHIFT MODE
Paddle Shift Mode is a driver-interactive transmission feature that offers manual gear
shifting to provide you with more control of the vehicle. Paddle Shift Mode allows you
to maximize engine braking, eliminate undesirable upshifts and downshifts, and
improve overall vehicle performance.
This system can also provide you with more control during passing, city driving, cold
slippery conditions, mountain driving, trailer towing, and many other situations.
Refer to the “Starting And Operating” section of your vehicle’s Owner’s Manual on
the DVD for further details.
Paddle Shift Mode Operation
When the shift lever is in the DRIVE position, the transmission will operate
automatically, shifting between the five available gears. To engage Paddle Shift
Mode, simply tap the shift lever to the right or left (+/-) while in the DRIVE position,
or tap one of the steering wheel-mounted shift paddles (+/-). Tapping (-) to enter
Paddle Shift Mode will downshift the transmission to the next lower gear, while using
(+) to enter Paddle Shift Mode will retain the current gear.
When Paddle Shift mode is active, the current transmission gear is displayed in the
instrument cluster. In Paddle Shift Mode, the transmission will shift up or down when
(+/-) is manually selected by the driver (using the shift lever, or the shift paddles),
unless an engine lugging or overspeed condition would result. It will remain in the
selected gear until another upshift or downshift is chosen, except as described
below:
• Normally, in Paddle Shift Mode, the transmission will automatically shift up when
maximum engine speed is reached. If, however, Paddle Shift Mode is engaged
while in SPORT mode, the transmission will remain in the selected gear even when
maximum engine speed is reached. The transmission will upshift only when
commanded by the driver.
• The transmission will automatically downshift as the vehicle slows (to prevent
engine lugging) and will display the current gear.
• The transmission will automatically downshift to first gear when coming to a stop.
After a stop, the driver should manually upshift (+) the transmission as the vehicle
is accelerated.
• You can start out in first or second gear. Tapping (+) (at a stop) will allow starting
in second gear. Starting out in second gear is helpful in snowy or icy conditions.
• If a requested downshift would cause the engine to over-speed, that shift will not
occur.
• The system will ignore attempts to upshift at too low of a vehicle speed.
SRT
136