instrument cluster JEEP GRAND CHEROKEE 2014 WK2 / 4.G Owner's Manual
[x] Cancel search | Manufacturer: JEEP, Model Year: 2014, Model line: GRAND CHEROKEE, Model: JEEP GRAND CHEROKEE 2014 WK2 / 4.GPages: 220, PDF Size: 6.12 MB
Page 139 of 220
• Avoid using speed control when Paddle Shift mode is engaged.
• Transmission shifting will be more noticeable when Paddle Shift Mode is engaged.
• To disengage Paddle Shift Mode, hold the shift lever to the right or press and hold
the (+) shift paddle until “D” is once again displayed in the instrument cluster. You
can shift in or out of the Paddle Shift Mode at any time without taking your foot off
the accelerator pedal.
WARNING!
Do not downshift for additional engine braking on a slippery surface. The drive
wheels could lose their grip and the vehicle could skid, causing a collision or
personal injury.
SELEC-TRACK™
Selec-Track™ combines the capabilities of the vehicle control systems, along with
driver input, to provide the best performance for all terrains.
Rotate the mode control knob to select the following Selec-Track™ positions:
•Sport- Dry weather, on-road calibration. Performance based tuning that provides
a rear wheel drive feel but with improved handling and acceleration over a
two-wheel drive vehicle. The active suspension system will be in a semi firm mode,
and a green flag will light up in the instrument cluster.
•Snow- Tuning set for additional stability in inclement weather. Use on and off road
on loose traction surfaces such as snow.
•Auto- Fully automatic full time four-wheel drive operation can be used on and off
road. This position balances traction with seamless steering feel to provide
improved handling and acceleration over two-wheel drive vehicles.
•Track- This position offers track road calibration for use on high traction surfaces.
Driveline is maximized for traction. Some binding may be felt on less forgiving
surfaces.
•To w- Use this mode for towing. Vehicle suspension will go to Firm mode and peak
power will be limited in the engine controls.
SRT
137
Page 152 of 220
ROADSIDE ASSISTANCE
Dial toll-free 1-800-521-2779 for U.S. Residents or 1-800-363-4869 for Canadian
Residents.
• Provide your name, vehicle identification number, license plate number, and your
location, including the telephone number from which you are calling.
• Briefly describe the nature of the problem and answer a few simple questions.
• You will be given the name of the service provider and an estimated time of arrival.
If you feel you are in an “unsafe situation”, please let us know. With your consent,
we will contact local police or safety authorities.
INSTRUMENT CLUSTER WARNING LIGHTS
- Tire Pressure Monitoring System (TPMS) Light
Each tire, including the spare (if provided), should be checked monthly, when cold
and inflated to the inflation pressure recommended by the vehicle manufacturer on
the vehicle placard or tire inflation pressure label. (If your vehicle has tires of a
different size than the size indicated on the vehicle placard or tire inflation pressure
label, you should determine the proper tire inflation pressure for those tires.)
As an added safety feature, your vehicle has been equipped with a Tire Pressure
Monitoring System (TPMS) which display in the Electronic Vehicle Information
Center (EVIC) when one or more of your tires is significantly under-inflated.
Accordingly, when the low tire pressure EVIC display illuminates, you should stop and
check your tires as soon as possible, and inflate them to the proper pressure. Driving
on a significantly under-inflated tire causes the tire to overheat and can lead to tire
failure. Under-inflation also reduces fuel efficiency and tire tread life, and may affect
the vehicle’s handling and stopping ability.
IF THE LIGHT STARTS FLASHING INDICATING A LOW TIRE PRESSURE, ADJUST THE AIR
PRESSURE IN THE LOW TIRE TO THE AIR PRESSURE SHOWN ON THE VEHICLE PLACARD OR
TIRE INFLATION PRESSURE LABEL LOCATED ON THE DRIVER'S DOOR.
NOTE:
After inflation, the vehicle may need to be driven for 20 minutes before the flashing light
will turn off.
WHAT TO DO IN EMERGENCIES
150
Page 155 of 220
- Malfunction Indicator Light (MIL)
The Malfunction Indicator Light (MIL) is part of an onboard diagnostic system called
OBD II that monitors engine and automatic transmission control systems. The light
will illuminate when the key is in the ON/RUN position before engine start. If the bulb
does not come on when turning the key from OFF to ON/RUN, have the condition
checked promptly.
Certain conditions, poor fuel quality, etc., may illuminate the light after engine start.
The vehicle should be serviced if the light stays on through several of your typical
driving cycles. In most situations, the vehicle will drive normally and will not require
towing.
CAUTION!
Prolonged driving with the Malfunction Indicator Light (MIL) on could cause
damage to the engine control system. It also could affect fuel economy and
driveability. If the MIL is flashing, severe catalytic converter damage and power
loss will soon occur. Immediate service is required.
WARNING!
A malfunctioning catalytic converter, as referenced above, can reach higher tempera-
tures than in normal operating conditions. This can cause a fire if you drive slowly or
park over flammable substances such as dry plants, wood, cardboard, etc. This could
result in death or serious injury to the driver, occupants or others.
- Electronic Stability Control (ESC) Activation/Malfunction Indicator Light
The “ESC Activation/Malfunction Indicator Light” in the instrument cluster will
come on when the ignition switch is turned to the ON/RUN position. It should go out
with the engine running. If the “ESC Activation/Malfunction Indicator Light” comes
on continuously with the engine running, a malfunction has been detected in the
ESC system. If this light remains on after several ignition cycles, and the vehicle has
been driven several miles (kilometers) at speeds greater than 30 mph (48 km/h), see
your authorized dealer as soon as possible to have the problem diagnosed and
corrected.
NOTE:
• The “ESC Off Indicator Light” and the “ESC Activation/Malfunction Indicator
Light” come on momentarily each time the ignition switch is turned to ON/RUN.
• Each time the ignition is turned to ON/RUN, the ESC system will be ON, even if
it was turned off previously.
WHAT TO DO IN EMERGENCIES
153
Page 186 of 220
CAUTION!
• Mixing of engine coolant (antifreeze) other than specified Organic Additive
Technology (OAT) engine coolant (antifreeze), may result in engine damage and
may decrease corrosion protection. Organic Additive Technology (OAT) engine
coolant is different and should not be mixed with Hybrid Organic Additive
Technology (HOAT) engine coolant (antifreeze) or any “globally compatible”
coolant (antifreeze). If a non-OAT engine coolant (antifreeze) is introduced into
the cooling system in an emergency, the cooling system will need to be drained,
flushed, and refilled with fresh OAT coolant (conforming to MS-12106), by an
authorized dealer as soon as possible.
• Do not use water alone or alcohol-based engine coolant (antifreeze) products.
Do not use additional rust inhibitors or antirust products, as they may not be
compatible with the radiator engine coolant and may plug the radiator.
• This vehicle has not been designed for use with propylene glycol-based engine
coolant (antifreeze). Use of propylene glycol-based engine coolant (antifreeze)
is not recommended.
MAINTENANCE SCHEDULE — GASOLINE ENGINE
Your vehicle is equipped with an automatic oil change indicator system. The oil
change indicator system will remind you that it is time to take your vehicle in for
scheduled maintenance.
Based on engine operation conditions, the oil change indicator message will
illuminate. This means that service is required for your vehicle. Operating conditions
such as frequent short-trips, trailer tow, extremely hot or cold ambient temperatures,
and E85 fuel usage will influence when the “Oil Change Required” message is
displayed. Severe Operating Conditions can cause the change oil message to
illuminate as early as 3,500 miles (5,600 km) since last reset. Have your vehicle
serviced as soon as possible, within the next 500 miles (805 km).
Your authorized dealer will reset the oil change indicator message after completing the
scheduled oil change. If a scheduled oil change is performed by someone other than
your authorized dealer, the message can be reset by referring to the steps described
under “Instrument Cluster Warning Lights” in “What To Do In Emergencies” in this
guide or “Electronic Vehicle Information Center (EVIC)” in “Understanding Your
Instrument Panel” in your Owners Manual on the DVD for further information.
NOTE:
Under no circumstances should oil change intervals exceed 10,000 miles (16,000 km)
or twelve months, whichever comes first.
MAINTAINING YOUR VEHICLE
184
Page 191 of 220
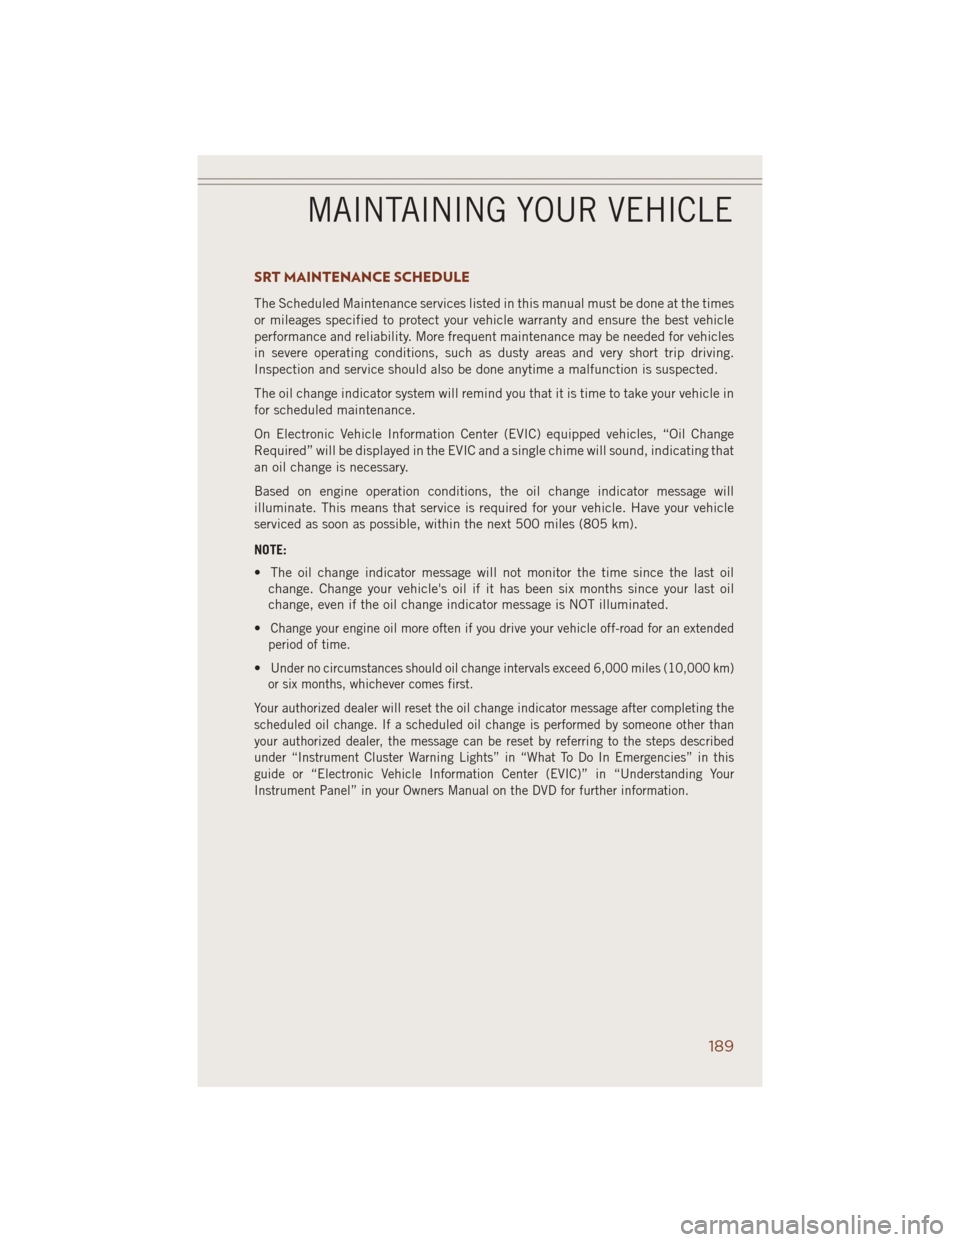
SRT MAINTENANCE SCHEDULE
The Scheduled Maintenance services listed in this manual must be done at the times
or mileages specified to protect your vehicle warranty and ensure the best vehicle
performance and reliability. More frequent maintenance may be needed for vehicles
in severe operating conditions, such as dusty areas and very short trip driving.
Inspection and service should also be done anytime a malfunction is suspected.
The oil change indicator system will remind you that it is time to take your vehicle in
for scheduled maintenance.
On Electronic Vehicle Information Center (EVIC) equipped vehicles, “Oil Change
Required” will be displayed in the EVIC and a single chime will sound, indicating that
an oil change is necessary.
Based on engine operation conditions, the oil change indicator message will
illuminate. This means that service is required for your vehicle. Have your vehicle
serviced as soon as possible, within the next 500 miles (805 km).
NOTE:
• The oil change indicator message will not monitor the time since the last oil
change. Change your vehicle's oil if it has been six months since your last oil
change, even if the oil change indicator message is NOT illuminated.
•
Change your engine oil more often if you drive your vehicle off-road for an extended
period of time.
•Under no circumstances should oil change intervals exceed 6,000 miles (10,000 km)
or six months, whichever comes first.
Your authorized dealer will reset the oil change indicator message after completing the
scheduled oil change. If a scheduled oil change is performed by someone other than
your authorized dealer, the message can be reset by referring to the steps described
under “Instrument Cluster Warning Lights” in “What To Do In Emergencies” in this
guide or “Electronic Vehicle Information Center (EVIC)” in “Understanding Your
Instrument Panel” in your Owners Manual on the DVD for further information.
MAINTAINING YOUR VEHICLE
189
Page 205 of 220
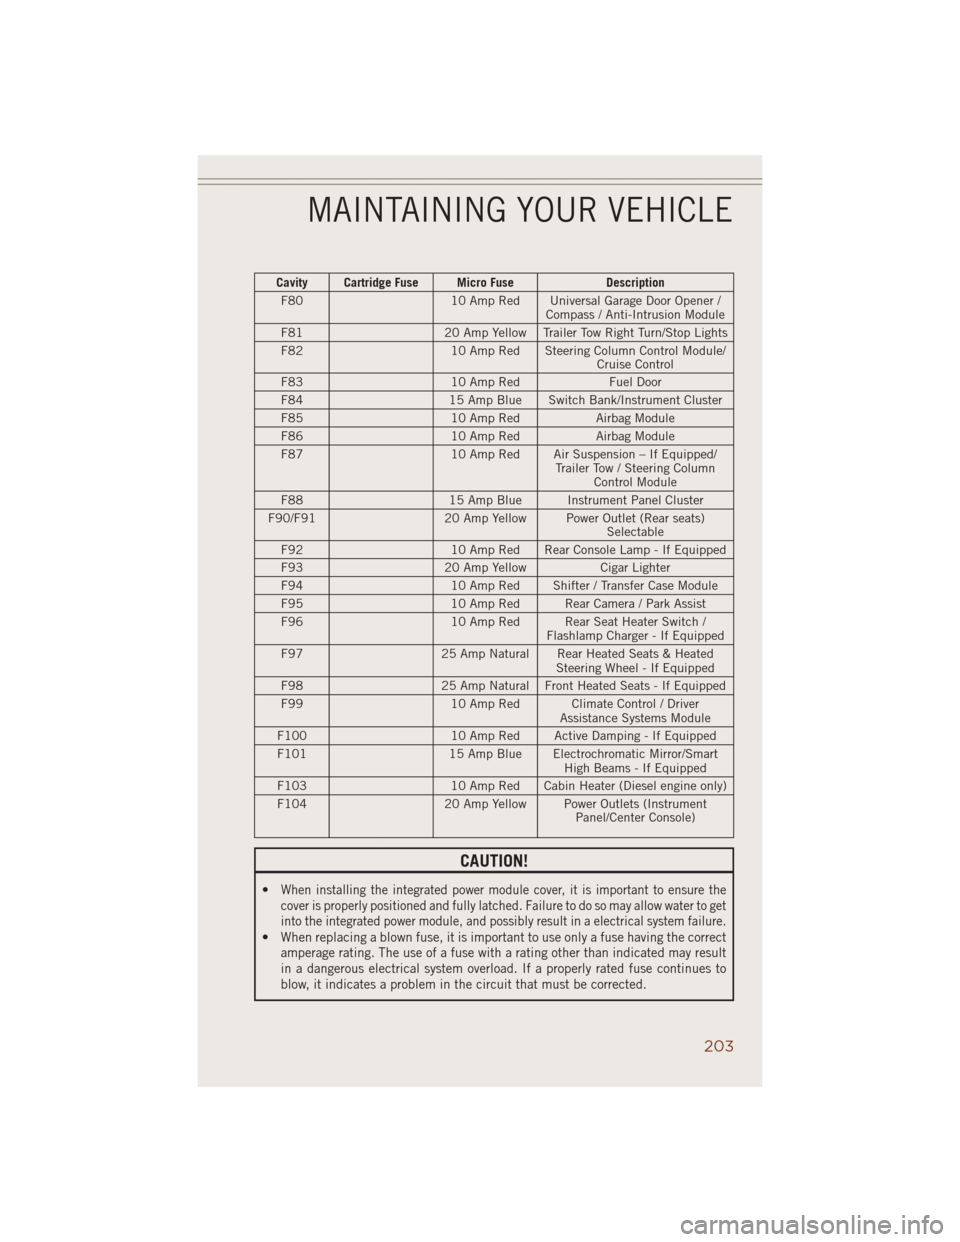
Cavity Cartridge Fuse Micro Fuse Description
F80 10 Amp Red Universal Garage Door Opener /
Compass / Anti-Intrusion Module
F81 20 Amp Yellow Trailer Tow Right Turn/Stop Lights
F82 10 Amp Red Steering Column Control Module/
Cruise Control
F83 10 Amp Red Fuel Door
F84 15 Amp Blue Switch Bank/Instrument Cluster
F85 10 Amp Red Airbag Module
F86 10 Amp Red Airbag Module
F87 10 Amp Red Air Suspension – If Equipped/
Trailer Tow / Steering Column
Control Module
F88 15 Amp Blue Instrument Panel Cluster
F90/F91 20 Amp Yellow Power Outlet (Rear seats)
Selectable
F92 10 Amp Red Rear Console Lamp - If Equipped
F93 20 Amp Yellow Cigar Lighter
F94 10 Amp Red Shifter / Transfer Case Module
F95 10 Amp Red Rear Camera / Park Assist
F96 10 Amp Red Rear Seat Heater Switch /
Flashlamp Charger - If Equipped
F97 25 Amp Natural Rear Heated Seats & Heated
Steering Wheel - If Equipped
F98 25 Amp Natural Front Heated Seats - If Equipped
F99 10 Amp Red Climate Control / Driver
Assistance Systems Module
F100 10 Amp Red Active Damping - If Equipped
F101 15 Amp Blue Electrochromatic Mirror/Smart
High Beams - If Equipped
F103 10 Amp Red Cabin Heater (Diesel engine only)
F104 20 Amp Yellow Power Outlets (Instrument
Panel/Center Console)
CAUTION!
•When installing the integrated power module cover, it is important to ensure the
cover is properly positioned and fully latched. Failure to do so may allow water to get
into the integrated power module, and possibly result in a electrical system failure.
•When replacing a blown fuse, it is important to use only a fuse having the correct
amperage rating. The use of a fuse with a rating other than indicated may result
in a dangerous electrical system overload. If a properly rated fuse continues to
blow, it indicates a problem in the circuit that must be corrected.
MAINTAINING YOUR VEHICLE
203
Page 215 of 220
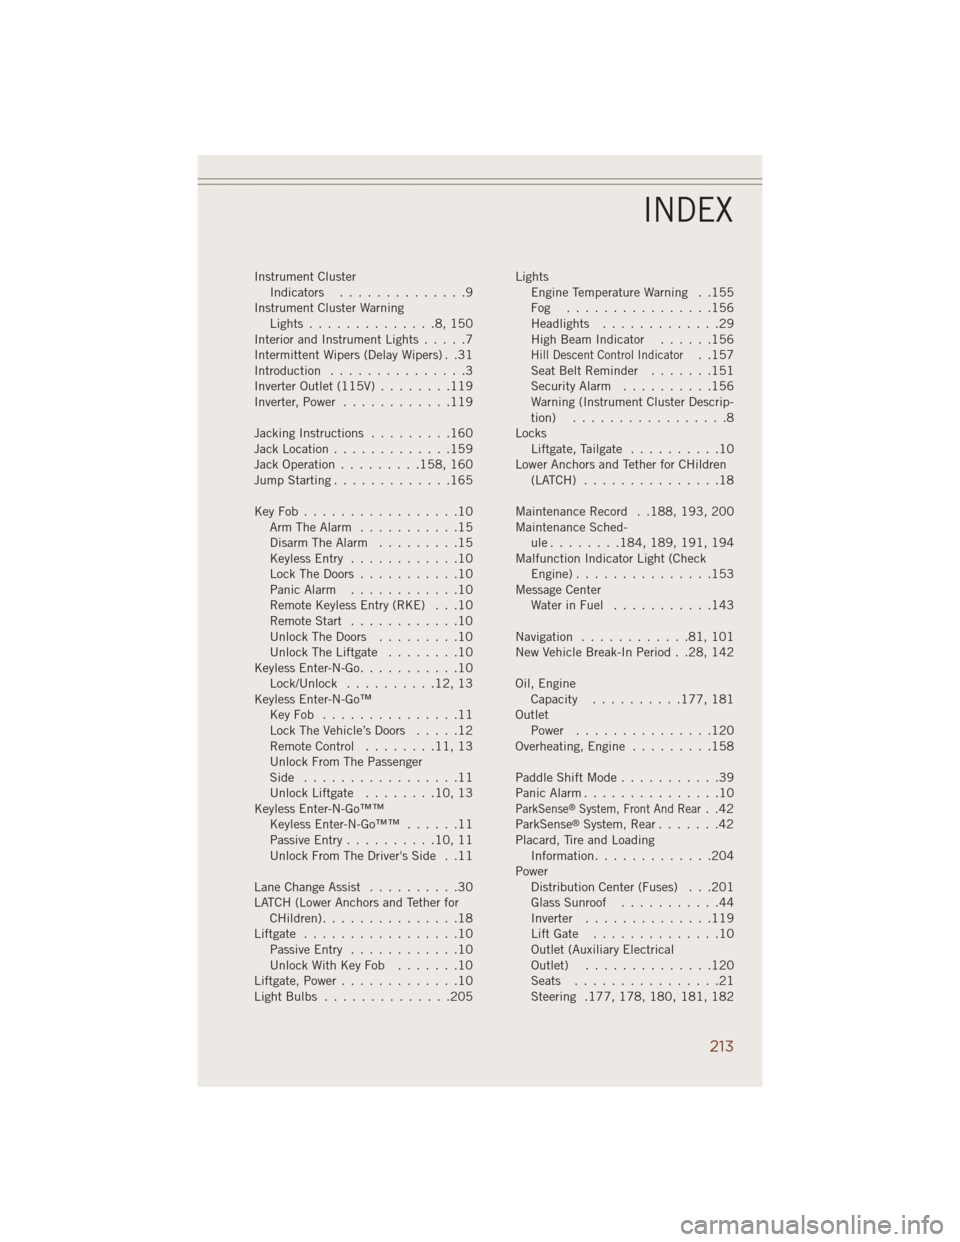
Instrument Cluster
Indicators..............9
Instrument Cluster Warning
Lights..............8,150
Interior and Instrument Lights.....7
Intermittent Wipers (Delay Wipers) . .31
Introduction...............3
Inverter Outlet (115V)........119
Inverter, Power............119
Jacking Instructions.........160
Jack Location.............159
Jack Operation.........158, 160
Jump Starting.............165
KeyFob.................10
Arm The Alarm...........15
Disarm The Alarm.........15
Keyless Entry............10
Lock The Doors...........10
Panic Alarm............10
Remote Keyless Entry (RKE) . . .10
RemoteStart ............10
UnlockTheDoors .........10
Unlock The Liftgate........10
Keyless Enter-N-Go...........10
Lock/Unlock ..........12,13
Keyless Enter-N-Go™
KeyFob ...............11
Lock The Vehicle’s Doors.....12
Remote Control........11,13
Unlock From The Passenger
Side .................11
Unlock Liftgate........10,13
Keyless Enter-N-Go™™
Keyless Enter-N-Go™™......11
Passive Entry..........10,11
Unlock From The Driver's Side . .11
Lane Change Assist..........30
LATCH (Lower Anchors and Tether for
CHildren)...............18
Liftgate.................10
Passive Entry............10
UnlockWithKeyFob .......10
Liftgate, Power.............10
LightBulbs ..............205Lights
Engine Temperature Warning . .155
Fog ................156
Headlights.............29
High Beam Indicator......156
Hill Descent Control Indicator. .157
Seat Belt Reminder.......151
Security Alarm..........156
Warning (Instrument Cluster Descrip-
tion) .................8
Locks
Liftgate, Tailgate..........10
Lower Anchors and Tether for CHildren
(LATCH)...............18
Maintenance Record . .188, 193, 200
Maintenance Sched-
ule........184, 189, 191, 194
Malfunction Indicator Light (Check
Engine)...............153
Message Center
Water in Fuel...........143
Navigation............81,101
New Vehicle Break-In Period . .28, 142
Oil, Engine
Capacity..........177, 181
Outlet
Power...............120
Overheating, Engine.........158
PaddleShiftMode...........39
Panic Alarm...............10
ParkSense®System, Front And Rear..42
ParkSense®System, Rear.......42
Placard, Tire and Loading
Information.............204
Power
Distribution Center (Fuses) . . .201
Glass Sunroof...........44
Inverter..............119
LiftGate ..............10
Outlet (Auxiliary Electrical
Outlet)..............120
Seats ................21
Steering .177, 178, 180, 181, 182
INDEX
213