radio JEEP GRAND CHEROKEE 2014 WK2 / 4.G Workshop Manual
[x] Cancel search | Manufacturer: JEEP, Model Year: 2014, Model line: GRAND CHEROKEE, Model: JEEP GRAND CHEROKEE 2014 WK2 / 4.GPages: 220, PDF Size: 6.12 MB
Page 108 of 220
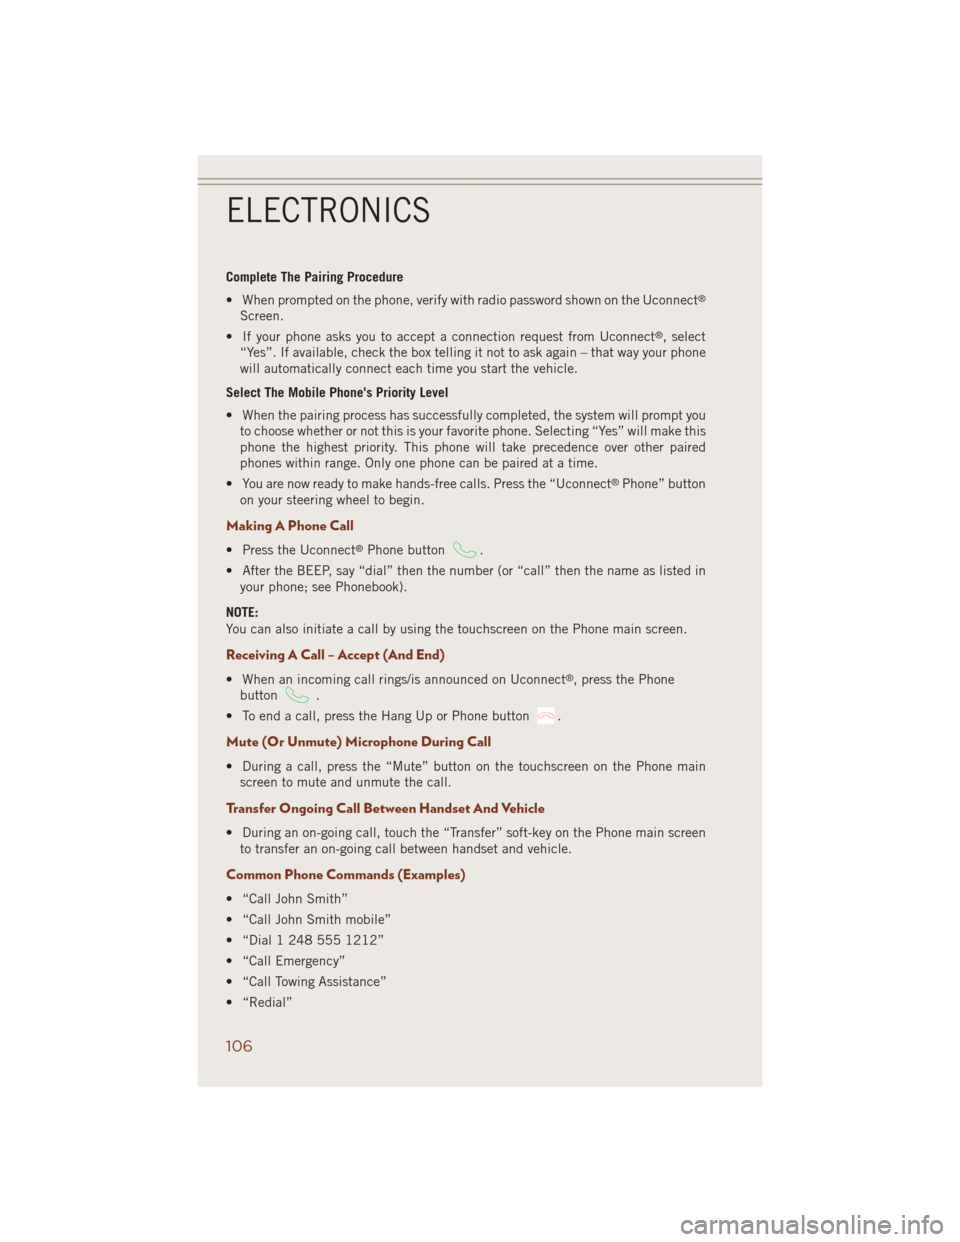
Complete The Pairing Procedure
• When prompted on the phone, verify with radio password shown on the Uconnect
®
Screen.
• If your phone asks you to accept a connection request from Uconnect
®, select
“Yes”. If available, check the box telling it not to ask again – that way your phone
will automatically connect each time you start the vehicle.
Select The Mobile Phone's Priority Level
• When the pairing process has successfully completed, the system will prompt you
to choose whether or not this is your favorite phone. Selecting “Yes” will make this
phone the highest priority. This phone will take precedence over other paired
phones within range. Only one phone can be paired at a time.
• You are now ready to make hands-free calls. Press the “Uconnect
®Phone” button
on your steering wheel to begin.
Making A Phone Call
• Press the Uconnect®Phone button.
• After the BEEP, say “dial” then the number (or “call” then the name as listed in
your phone; see Phonebook).
NOTE:
You can also initiate a call by using the touchscreen on the Phone main screen.
Receiving A Call – Accept (And End)
• When an incoming call rings/is announced on Uconnect®, press the Phone
button
.
• To end a call, press the Hang Up or Phone button
.
Mute (Or Unmute) Microphone During Call
• During a call, press the “Mute” button on the touchscreen on the Phone main
screen to mute and unmute the call.
Transfer Ongoing Call Between Handset And Vehicle
• During an on-going call, touch the “Transfer” soft-key on the Phone main screen
to transfer an on-going call between handset and vehicle.
Common Phone Commands (Examples)
• “Call John Smith”
• “Call John Smith mobile”
• “Dial 1 248 555 1212”
• “Call Emergency”
• “Call Towing Assistance”
• “Redial”
ELECTRONICS
106
Page 109 of 220
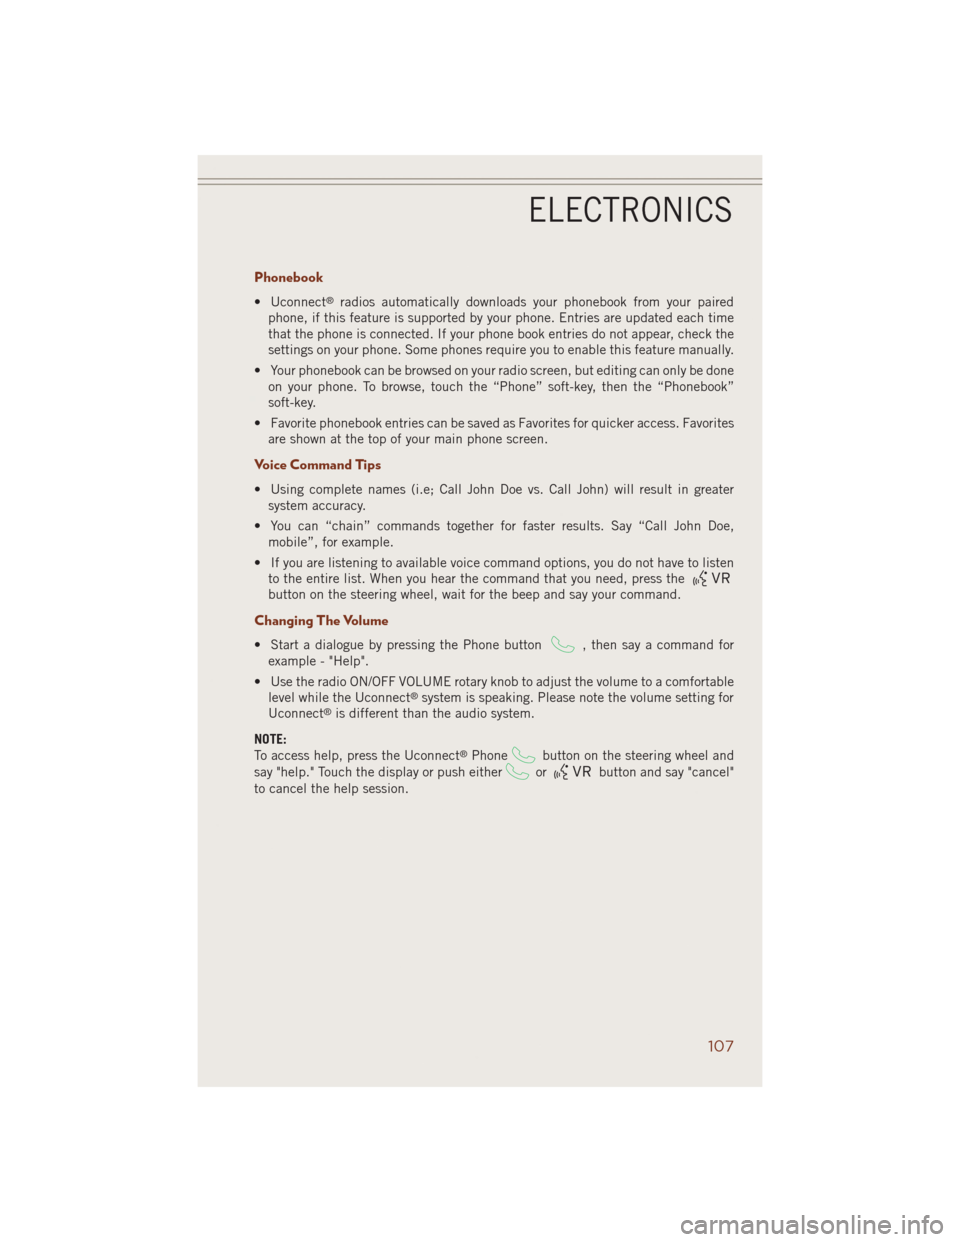
Phonebook
• Uconnect®radios automatically downloads your phonebook from your paired
phone, if this feature is supported by your phone. Entries are updated each time
that the phone is connected. If your phone book entries do not appear, check the
settings on your phone. Some phones require you to enable this feature manually.
• Your phonebook can be browsed on your radio screen, but editing can only be done
on your phone. To browse, touch the “Phone” soft-key, then the “Phonebook”
soft-key.
• Favorite phonebook entries can be saved as Favorites for quicker access. Favorites
are shown at the top of your main phone screen.
Voice Command Tips
• Using complete names (i.e; Call John Doe vs. Call John) will result in greater
system accuracy.
• You can “chain” commands together for faster results. Say “Call John Doe,
mobile”, for example.
• If you are listening to available voice command options, you do not have to listen
to the entire list. When you hear the command that you need, press the
button on the steering wheel, wait for the beep and say your command.
Changing The Volume
• Start a dialogue by pressing the Phone button, then say a command for
example - "Help".
• Use the radio ON/OFF VOLUME rotary knob to adjust the volume to a comfortable
level while the Uconnect
®system is speaking. Please note the volume setting for
Uconnect®is different than the audio system.
NOTE:
To access help, press the Uconnect
®Phonebutton on the steering wheel and
say "help." Touch the display or push either
orbutton and say "cancel"
to cancel the help session.
ELECTRONICS
107
Page 111 of 220
NOTE:
All phone oriented voice commands are accessible by first pressing the Phone Pick
Up
button, not the Voice Command button. To end a call, simply press the
Phone Hang Up
button. In some vehicles, the Phone Pickupbutton
serves the dual purpose of ending calls as well.
Voice Command (VR) User TIPs
• To hear available commands, press the Uconnect
®Voice Command button and
say “Help”. You will hear available commands for the menu displayed.
• At any time, you can say the words “Cancel” or “Help”. These commands are
universal and can be used from virtually any menu. All other specific commands
can be used depending upon the active application.
• You can interrupt the system prompts at any time by pressing the Uconnect
®Voice
Command button while the system is speaking. After the beep, you can say a
command.
• You can chain commands together for faster results. Say “Call Joe Doe mobile”,
for example.
• For best performance, adjust the rearview mirror to provide at least ½ inch (1 cm)
gap between the overhead console (if equipped) and the mirror.
• Always wait for the beep before speaking.
• Speak normally, without pausing, just as you would speak to a person sitting a few
feet/meters away from you.
• Make sure that no one other than you is speaking during a Voice Command period.
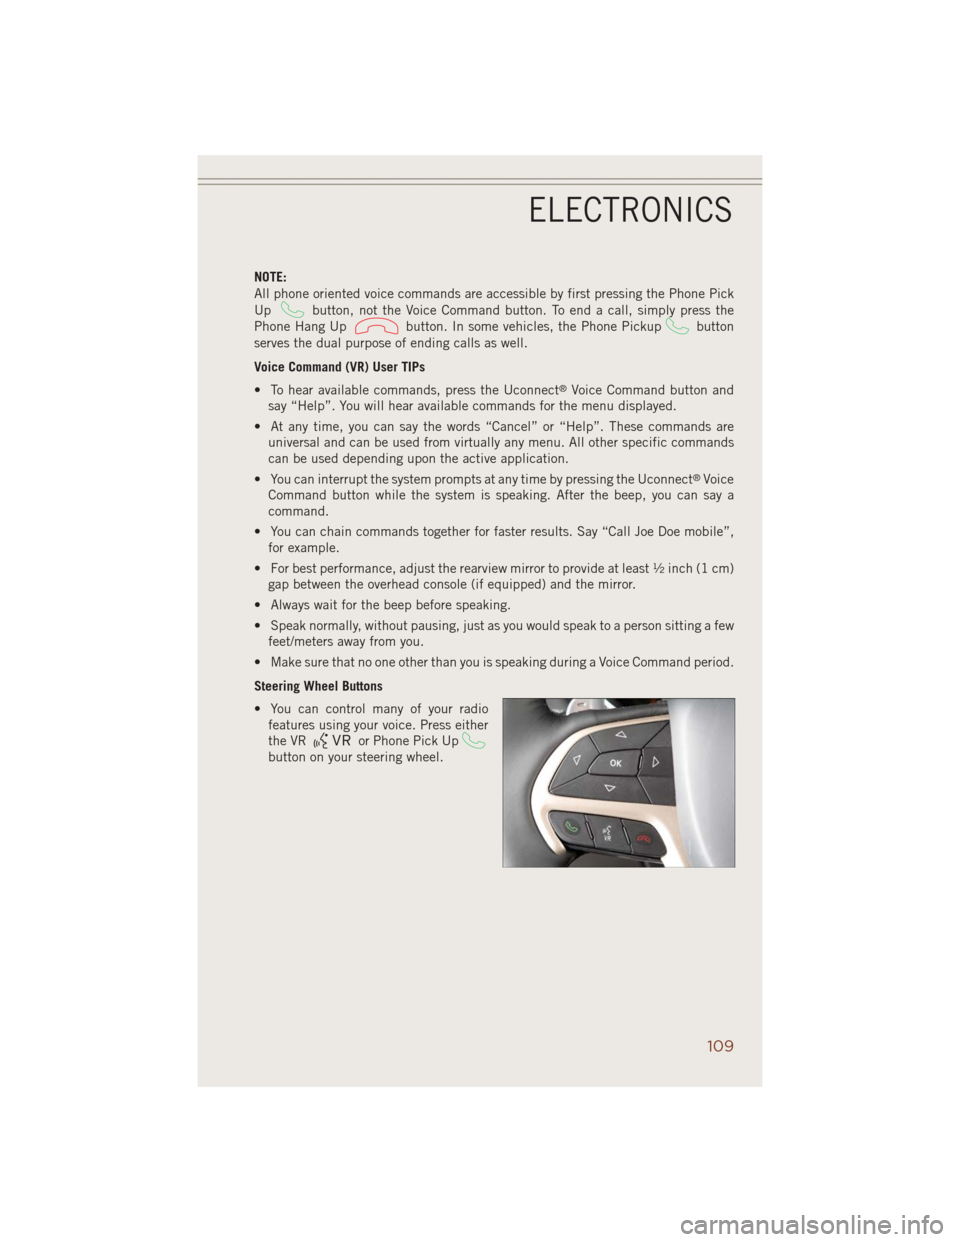
Steering Wheel Buttons
• You can control many of your radio
features using your voice. Press either
the VR
or Phone Pick Up
button on your steering wheel.
ELECTRONICS
109
Page 112 of 220
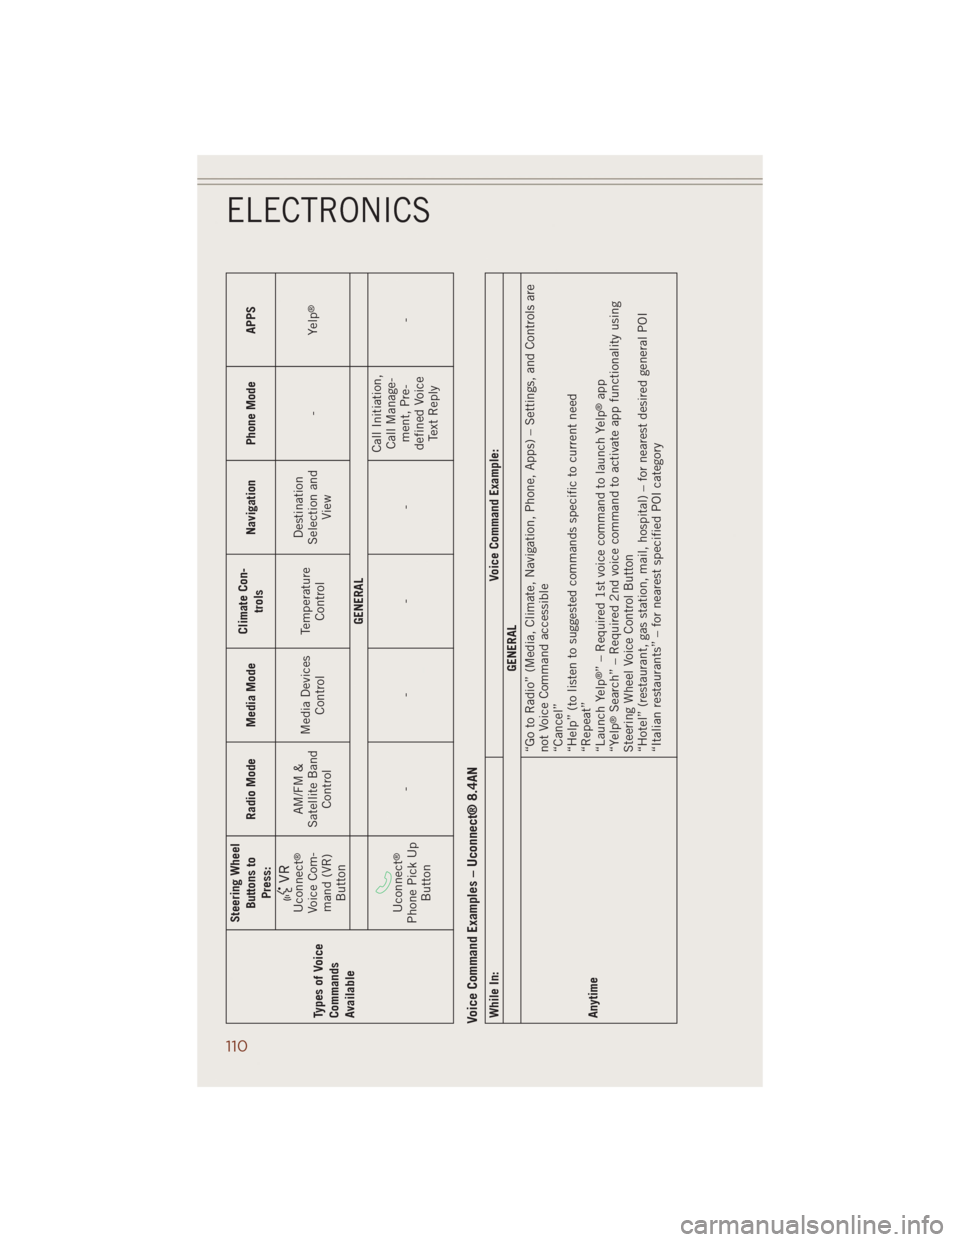
Types of Voice
Commands
AvailableSteering Wheel
Buttons to
Press:Radio Mode Media ModeClimate Con-
trolsNavigation Phone Mode APPS
Uconnect
®
Voice Com-
mand (VR)
ButtonAM/FM &
Satellite Band
ControlMedia Devices
ControlTemperature
ControlDestination
Selection and
View-Yelp
®
GENERAL
Uconnect
®
Phone Pick Up
Button----Call Initiation,
Call Manage-
ment, Pre-
defined Voice
Text Reply-
Voice Command Examples – Uconnect® 8.4ANWhile In: Voice Command Example:
GENERAL
Anytime“Go to Radio” (Media, Climate, Navigation, Phone, Apps) – Settings, and Controls are
not Voice Command accessible
“Cancel”
“Help” (to listen to suggested commands specific to current need
“Repeat”
“Launch Yelp
®” – Required 1st voice command to launch Yelp
®app
“Yelp
®Search” – Required 2nd voice command to activate app functionality using
Steering Wheel Voice Control Button
“Hotel” (restaurant, gas station, mail, hospital) – for nearest desired general POI
“Italian restaurants” – for nearest specified POI category
ELECTRONICS
110
Page 113 of 220
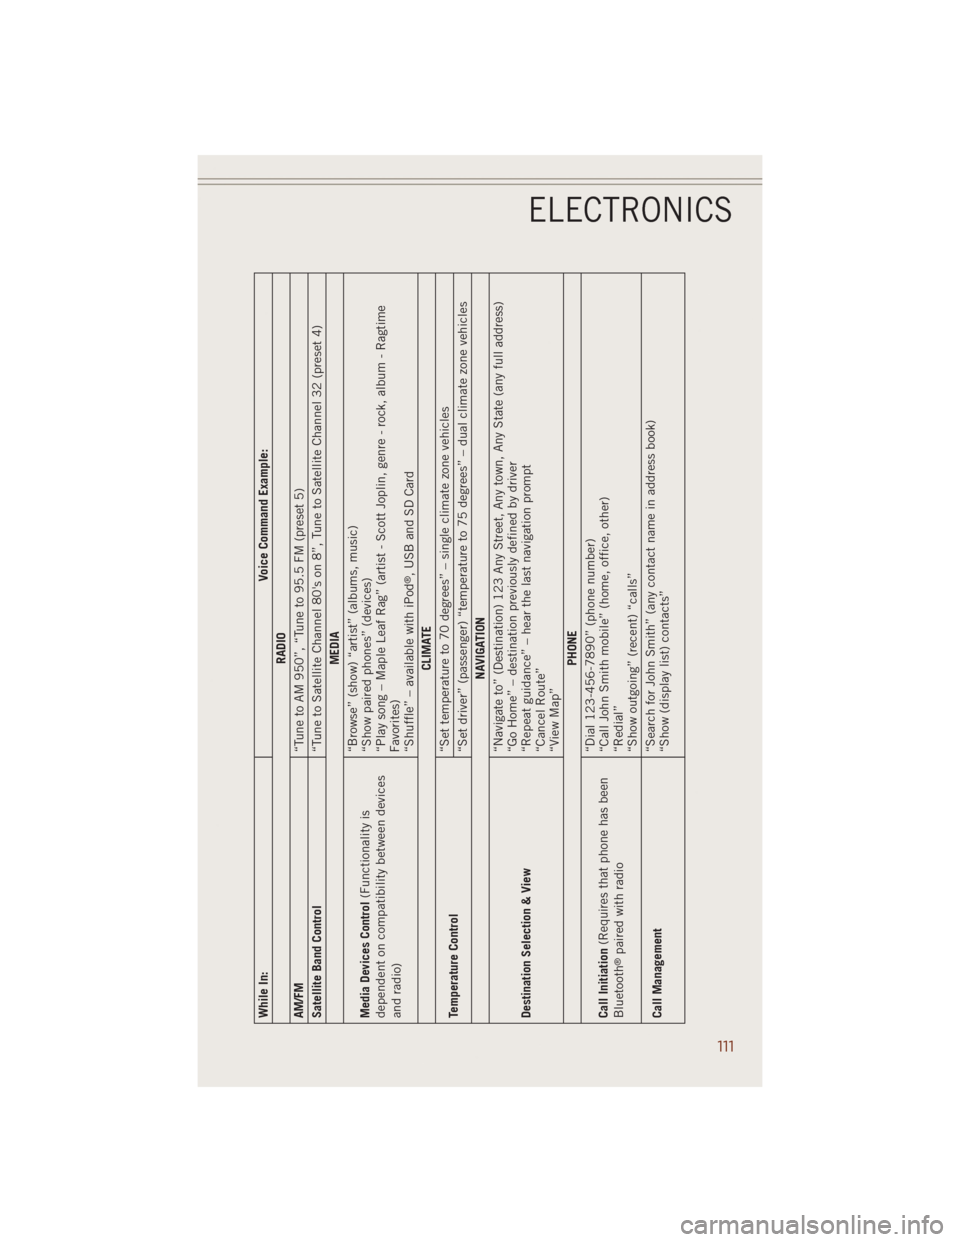
While In: Voice Command Example:
RADIO
AM/FM
“Tune to AM 950”, “Tune to 95.5 FM (preset 5)
Satellite Band Control
“Tune to Satellite Channel 80's on 8”, Tune to Satellite Channel 32 (preset 4)
MEDIA
Media Devices Control(Functionality is
dependent on compatibility between devices
and radio)“Browse” (show) “artist” (albums, music)
“Show paired phones” (devices)
“Play song – Maple Leaf Rag” (artist - Scott Joplin, genre - rock, album - Ragtime
Favorites)
“Shuffle” – available with iPod
®, USB and SD Card
CLIMATE
Temperature Control“Set temperature to 70 degrees” – single climate zone vehicles
“Set driver” (passenger) “temperature to 75 degrees” – dual climate zone vehicles
NAVIGATION
Destination Selection & View“Navigate to” (Destination) 123 Any Street, Any town, Any State (any full address)
“Go Home” – destination previously defined by driver
“Repeat guidance” – hear the last navigation prompt
“Cancel Route”
“View Map”
PHONE
Call Initiation(Requires that phone has been
Bluetooth
®paired with radio“Dial 123-456-7890” (phone number)
“Call John Smith mobile” (home, office, other)
“Redial”
“Show outgoing” (recent) “calls”
Call Management“Search for John Smith” (any contact name in address book)
“Show (display list) contacts”
ELECTRONICS
111
Page 114 of 220
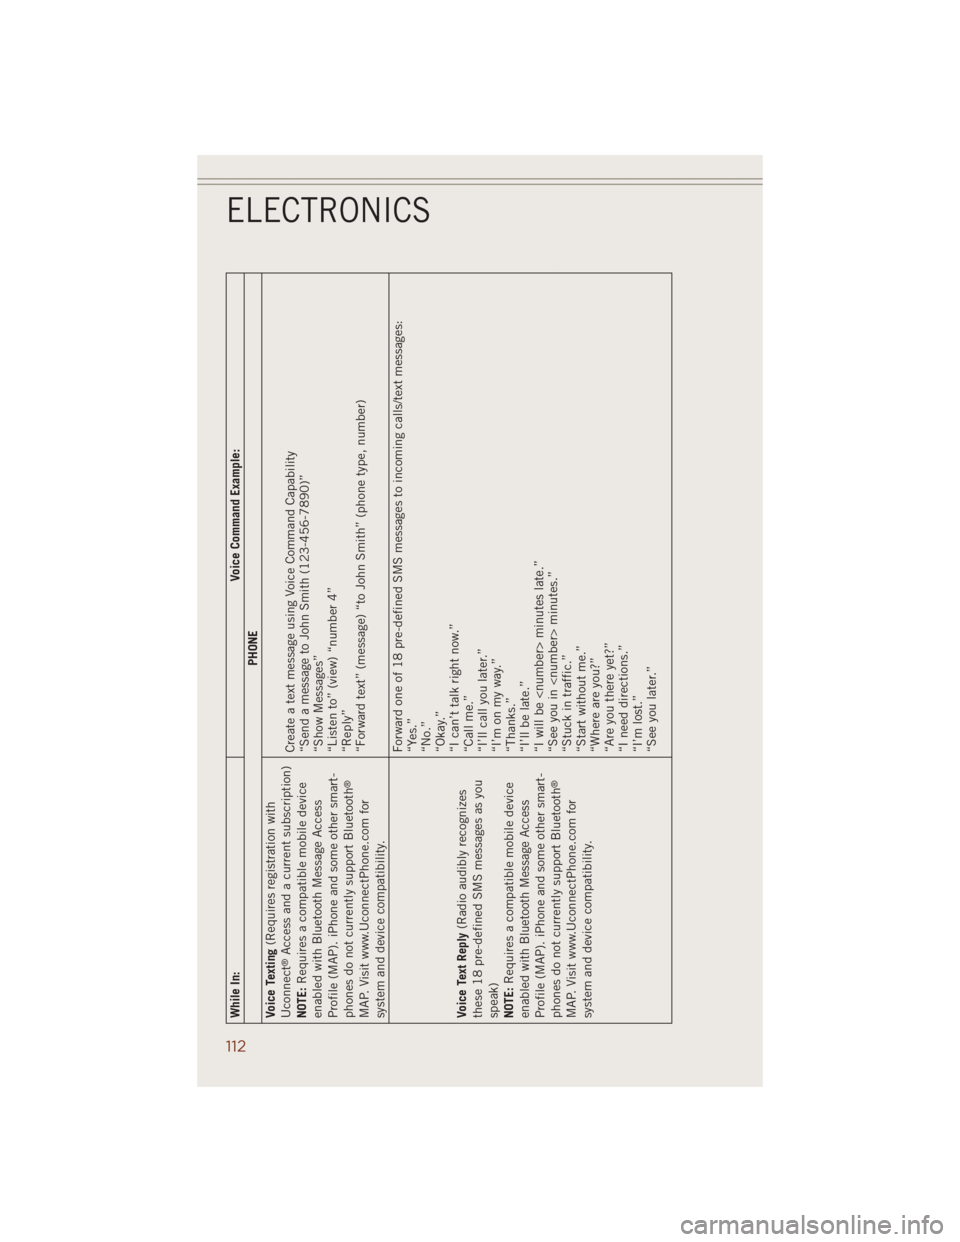
While In: Voice Command Example:
PHONE
Voice Texting(Requires registration with
Uconnect
®Access and a current subscription)
NOTE:Requires a compatible mobile device
enabled with Bluetooth Message Access
Profile (MAP). iPhone and some other smart-
phones do not currently support Bluetooth
®
MAP. Visit www.UconnectPhone.com for
system and device compatibility.Create a text message using Voice Command Capability
“Send a message to John Smith (123-456-7890)”
“Show Messages”
“Listen to” (view) “number 4”
“Reply”
“Forward text” (message) “to John Smith” (phone type, number)
Voice Text Reply(Radio audibly recognizes
these 18 pre-defined SMS messages as you
speak)
NOTE:Requires a compatible mobile device
enabled with Bluetooth Message Access
Profile (MAP). iPhone and some other smart-
phones do not currently support Bluetooth
®
MAP. Visit www.UconnectPhone.com for
system and device compatibility.Forward one of 18 pre-defined SMS messages to incoming calls/text messages:
“Yes.”
“No.”
“Okay.”
“I can’t talk right now.”
“Call me.”
“I’ll call you later.”
“I’m on my way.”
“Thanks.”
“I’ll be late.”
“I will be
“See you in
“Stuck in traffic.”
“Start without me.”
“Where are you?”
“Are you there yet?”
“I need directions.”
“I’m lost.”
“See you later.”
ELECTRONICS
112
Page 116 of 220
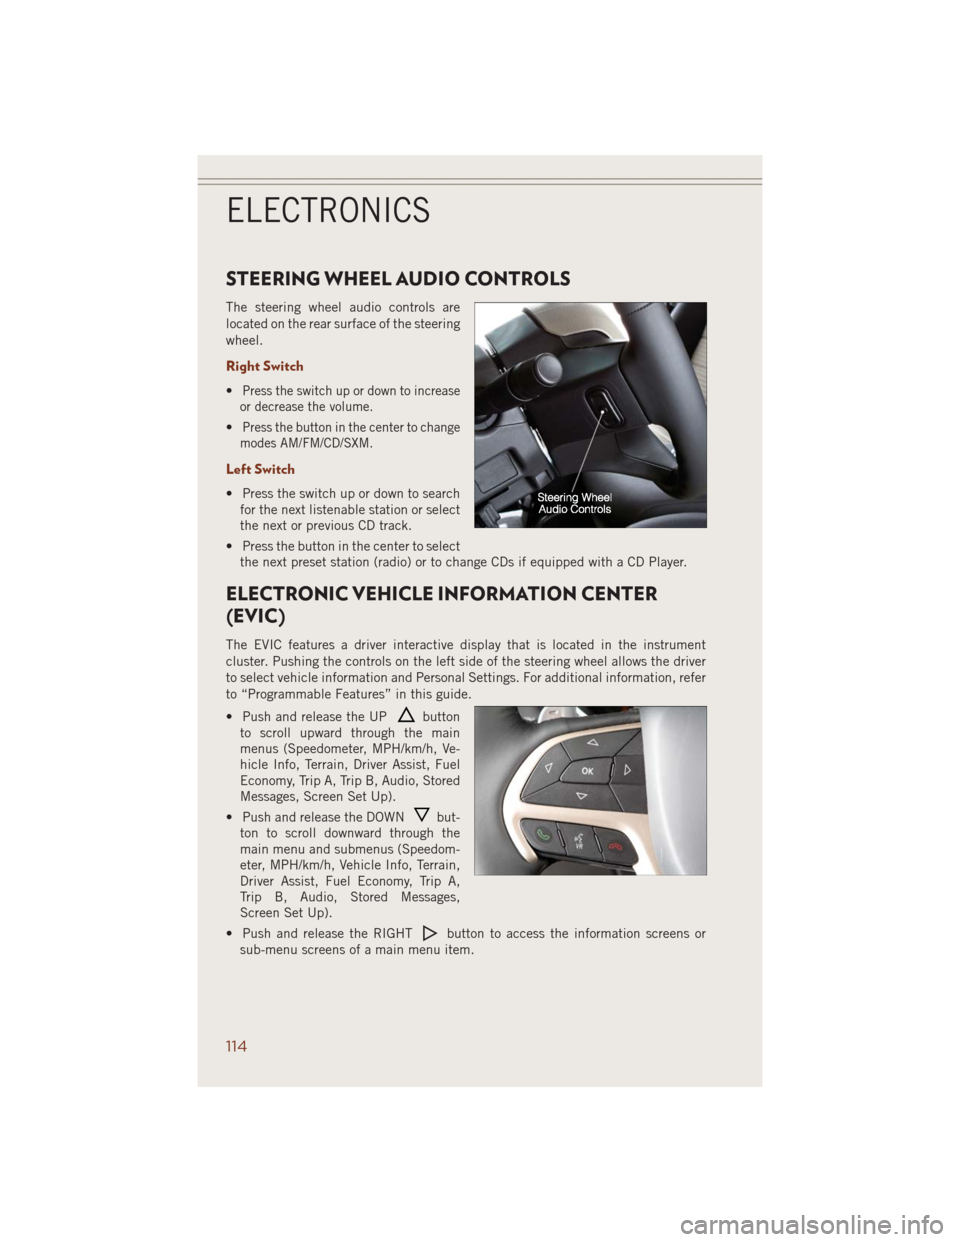
STEERING WHEEL AUDIO CONTROLS
The steering wheel audio controls are
located on the rear surface of the steering
wheel.
Right Switch
•Press the switch up or down to increase
or decrease the volume.
•Press the button in the center to change
modes AM/FM/CD/SXM.
Left Switch
• Press the switch up or down to search
for the next listenable station or select
the next or previous CD track.
• Press the button in the center to select
the next preset station (radio) or to change CDs if equipped with a CD Player.
ELECTRONIC VEHICLE INFORMATION CENTER
(EVIC)
The EVIC features a driver interactive display that is located in the instrument
cluster. Pushing the controls on the left side of the steering wheel allows the driver
to select vehicle information and Personal Settings. For additional information, refer
to “Programmable Features” in this guide.
• Push and release the UP
button
to scroll upward through the main
menus (Speedometer, MPH/km/h, Ve-
hicle Info, Terrain, Driver Assist, Fuel
Economy, Trip A, Trip B, Audio, Stored
Messages, Screen Set Up).
• Push and release the DOWN
but-
ton to scroll downward through the
main menu and submenus (Speedom-
eter, MPH/km/h, Vehicle Info, Terrain,
Driver Assist, Fuel Economy, Trip A,
Trip B, Audio, Stored Messages,
Screen Set Up).
• Push and release the RIGHT
button to access the information screens or
sub-menu screens of a main menu item.
ELECTRONICS
114
Page 117 of 220
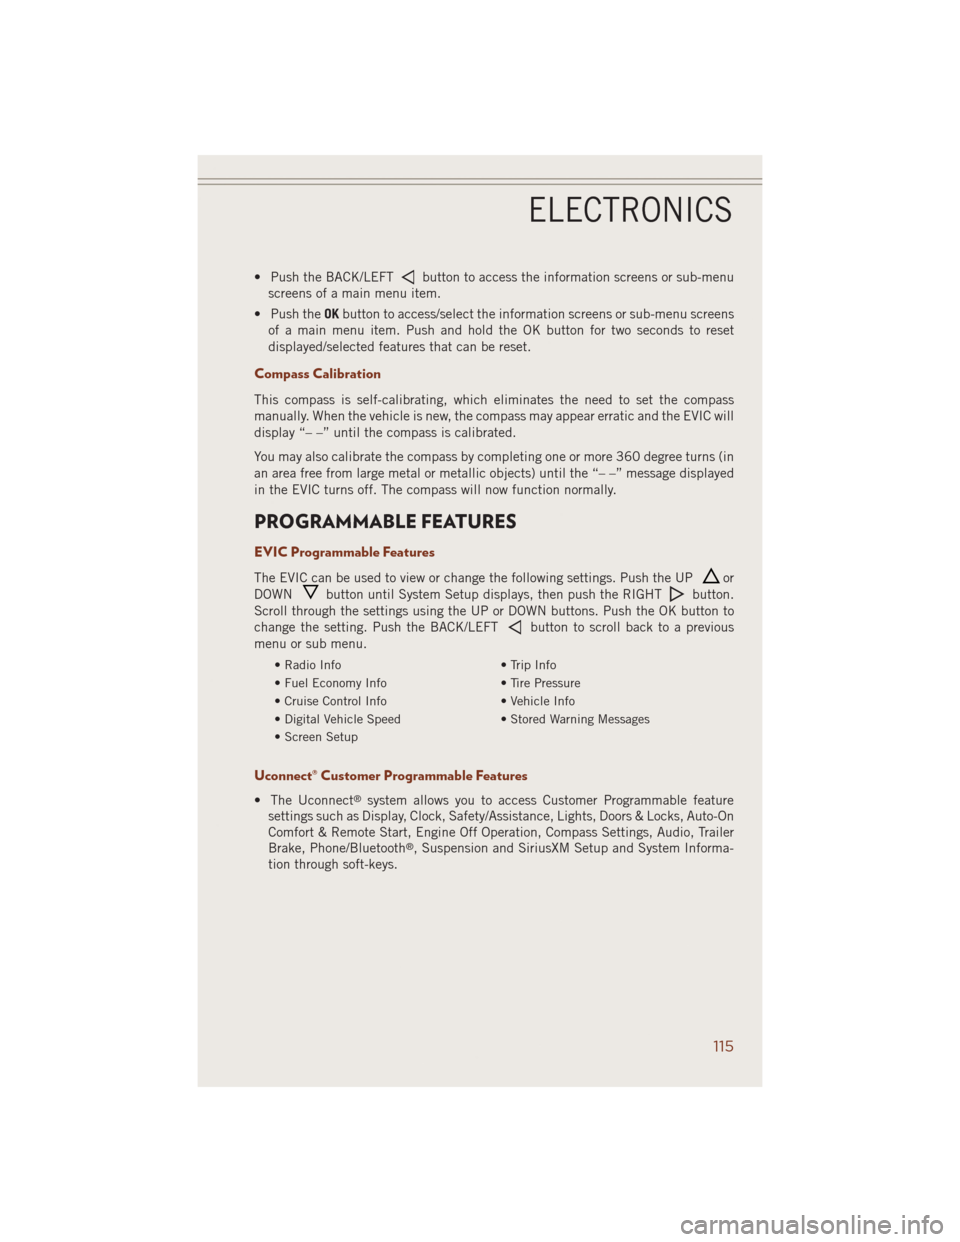
• Push the BACK/LEFTbutton to access the information screens or sub-menu
screens of a main menu item.
• Push theOKbutton to access/select the information screens or sub-menu screens
of a main menu item. Push and hold the OK button for two seconds to reset
displayed/selected features that can be reset.
Compass Calibration
This compass is self-calibrating, which eliminates the need to set the compass
manually. When the vehicle is new, the compass may appear erratic and the EVIC will
display “– –” until the compass is calibrated.
You may also calibrate the compass by completing one or more 360 degree turns (in
an area free from large metal or metallic objects) until the “– –” message displayed
in the EVIC turns off. The compass will now function normally.
PROGRAMMABLE FEATURES
EVIC Programmable Features
The EVIC can be used to view or change the following settings. Push the UPor
DOWN
button until System Setup displays, then push the RIGHTbutton.
Scroll through the settings using the UP or DOWN buttons. Push the OK button to
change the setting. Push the BACK/LEFT
button to scroll back to a previous
menu or sub menu.
• Radio Info • Trip Info
• Fuel Economy Info • Tire Pressure
• Cruise Control Info • Vehicle Info
• Digital Vehicle Speed • Stored Warning Messages
• Screen Setup
Uconnect® Customer Programmable Features
• The Uconnect®system allows you to access Customer Programmable feature
settings such as Display, Clock, Safety/Assistance, Lights, Doors & Locks, Auto-On
Comfort & Remote Start, Engine Off Operation, Compass Settings, Audio, Trailer
Brake, Phone/Bluetooth
®, Suspension and SiriusXM Setup and System Informa-
tion through soft-keys.
ELECTRONICS
115
Page 119 of 220
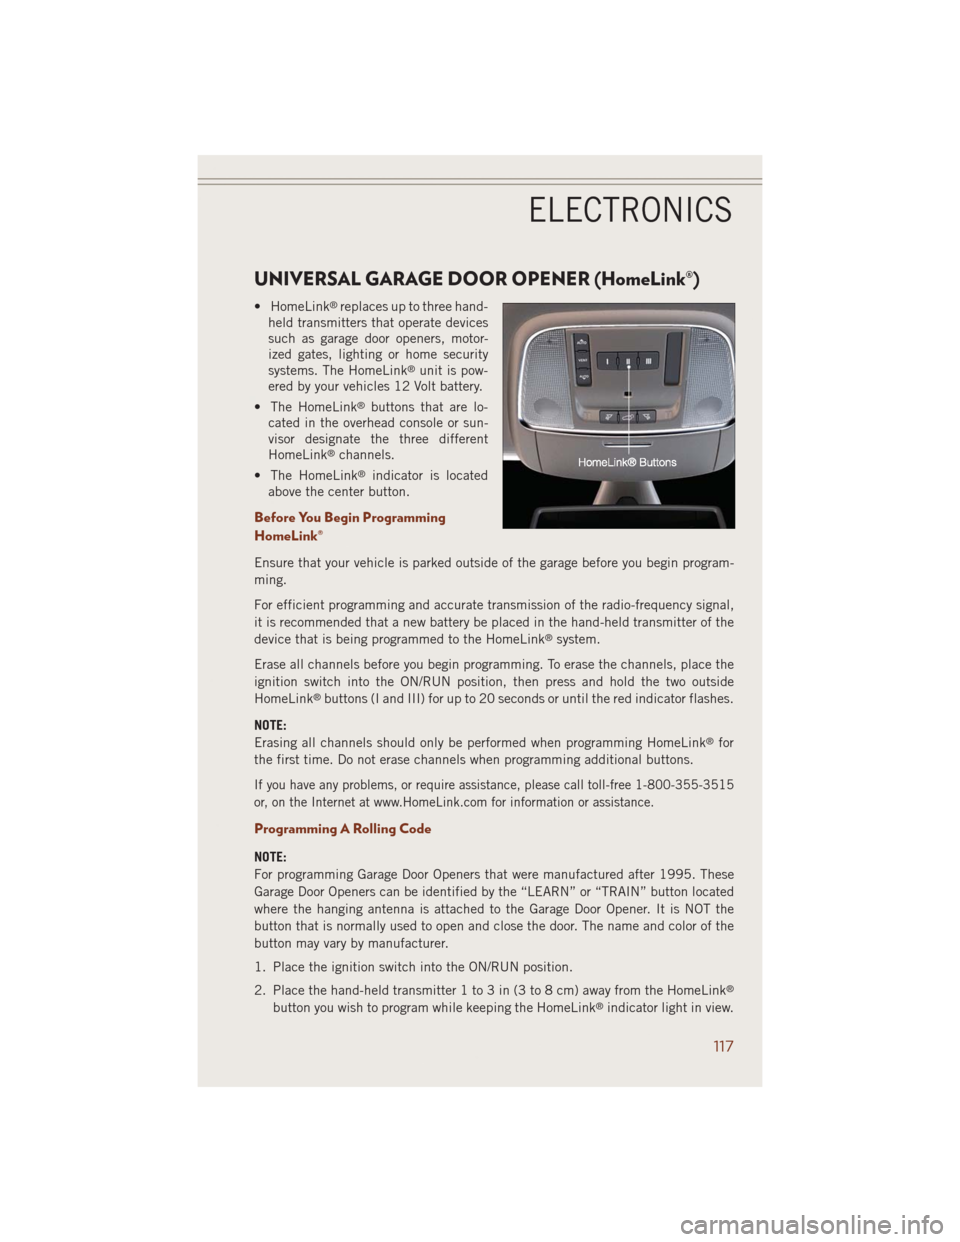
UNIVERSAL GARAGE DOOR OPENER (HomeLink®)
• HomeLink®replaces up to three hand-
held transmitters that operate devices
such as garage door openers, motor-
ized gates, lighting or home security
systems. The HomeLink
®unit is pow-
ered by your vehicles 12 Volt battery.
• The HomeLink
®buttons that are lo-
cated in the overhead console or sun-
visor designate the three different
HomeLink
®channels.
• The HomeLink
®indicator is located
above the center button.
Before You Begin Programming
HomeLink®
Ensure that your vehicle is parked outside of the garage before you begin program-
ming.
For efficient programming and accurate transmission of the radio-frequency signal,
it is recommended that a new battery be placed in the hand-held transmitter of the
device that is being programmed to the HomeLink
®system.
Erase all channels before you begin programming. To erase the channels, place the
ignition switch into the ON/RUN position, then press and hold the two outside
HomeLink
®buttons (I and III) for up to 20 seconds or until the red indicator flashes.
NOTE:
Erasing all channels should only be performed when programming HomeLink
®for
the first time. Do not erase channels when programming additional buttons.
If you have any problems, or require assistance, please call toll-free 1-800-355-3515
or, on the Internet at www.HomeLink.com for information or assistance.
Programming A Rolling Code
NOTE:
For programming Garage Door Openers that were manufactured after 1995. These
Garage Door Openers can be identified by the “LEARN” or “TRAIN” button located
where the hanging antenna is attached to the Garage Door Opener. It is NOT the
button that is normally used to open and close the door. The name and color of the
button may vary by manufacturer.
1. Place the ignition switch into the ON/RUN position.
2. Place the hand-held transmitter 1 to 3 in (3 to 8 cm) away from the HomeLink
®
button you wish to program while keeping the HomeLink®indicator light in view.
ELECTRONICS
117
Page 127 of 220
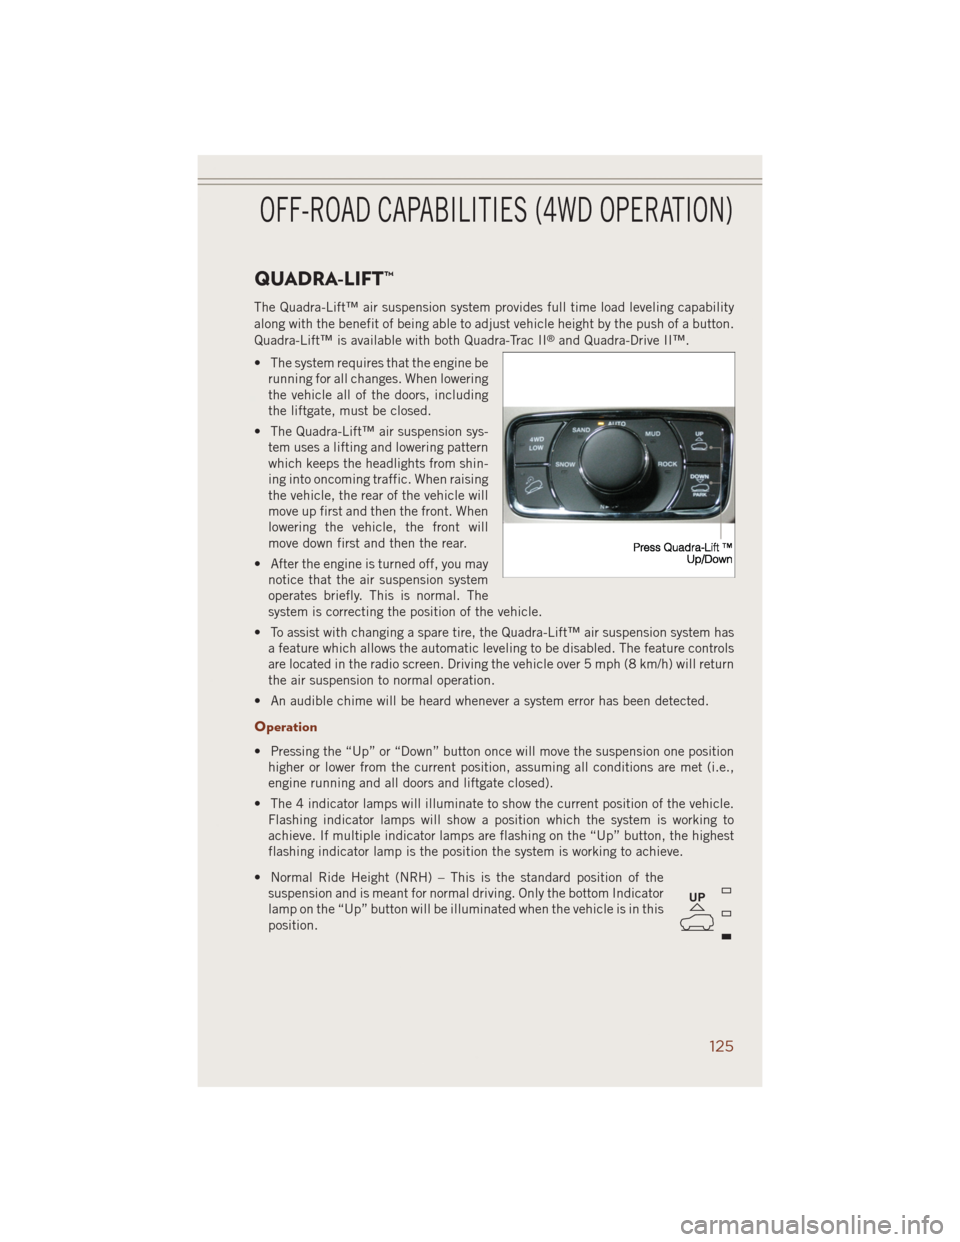
QUADRA-LIFT™
The Quadra-Lift™ air suspension system provides full time load leveling capability
along with the benefit of being able to adjust vehicle height by the push of a button.
Quadra-Lift™ is available with both Quadra-Trac II
®and Quadra-Drive II™.
• The system requires that the engine be
running for all changes. When lowering
the vehicle all of the doors, including
the liftgate, must be closed.
• The Quadra-Lift™ air suspension sys-
tem uses a lifting and lowering pattern
which keeps the headlights from shin-
ing into oncoming traffic. When raising
the vehicle, the rear of the vehicle will
move up first and then the front. When
lowering the vehicle, the front will
move down first and then the rear.
• After the engine is turned off, you may
notice that the air suspension system
operates briefly. This is normal. The
system is correcting the position of the vehicle.
• To assist with changing a spare tire, the Quadra-Lift™ air suspension system has
a feature which allows the automatic leveling to be disabled. The feature controls
are located in the radio screen. Driving the vehicle over 5 mph (8 km/h) will return
the air suspension to normal operation.
• An audible chime will be heard whenever a system error has been detected.
Operation
• Pressing the “Up” or “Down” button once will move the suspension one position
higher or lower from the current position, assuming all conditions are met (i.e.,
engine running and all doors and liftgate closed).
• The 4 indicator lamps will illuminate to show the current position of the vehicle.
Flashing indicator lamps will show a position which the system is working to
achieve. If multiple indicator lamps are flashing on the “Up” button, the highest
flashing indicator lamp is the position the system is working to achieve.
• Normal Ride Height (NRH) – This is the standard position of the
suspension and is meant for normal driving. Only the bottom Indicator
lamp on the “Up” button will be illuminated when the vehicle is in this
position.
UP
OFF-ROAD CAPABILITIES (4WD OPERATION)
125