remote start JEEP GRAND CHEROKEE 2015 WK2 / 4.G Owner's Guide
[x] Cancel search | Manufacturer: JEEP, Model Year: 2015, Model line: GRAND CHEROKEE, Model: JEEP GRAND CHEROKEE 2015 WK2 / 4.GPages: 717, PDF Size: 18.54 MB
Page 354 of 717
NOTE:If the vehicle is programmed 1st Press Of Key Fob
Unlocks “All Doors,” all doors will unlock no matter
which Passive Entry equipped door handle is grasped. If
1st Press Of Key Fob Unlocks “Driver Door” is pro-
grammed, only the driver ’s door will unlock when the
driver ’s door is grasped. With Passive Entry, if 1st Press
Of Key Fob Unlocks “Driver Door” is programmed,
touching the handle more than once will only result in
the driver ’s door opening. If “Driver Door” is selected,
once the driver door is opened, the interior door lock/
unlock switch can be used to unlock all doors (or use
RKE transmitter).
•Passive Entry
This feature allows you to lock and unlock the vehicles
door(s) without having to press the Remote Keyless
Entry (RKE) transmitter lock or unlock buttons. To make
your selection, press the “Passive Entry” button on the
touchscreen, until a check-mark appears next to setting,
showing that setting has been selected. Press the back
arrow button on the touchscreen to return to the previous
menu, or push the back button on the faceplate. Refer to
“Keyless Enter-N-Go™” in “Things To Know Before
Starting Your Vehicle”.
•Personal Settings Linked to Key Fob — If Equipped
This feature provides automatic recall of all settings
stored to a memory location (driver ’s seat, exterior
mirrors, steering column position and radio station pre-
sets) to enhance driver mobility when entering and
exiting the vehicle. To make your selection, press the
“Personal Settings Linked to Key Fob” button on the
touchscreen, until a check-mark appears next to setting,
showing that setting has been selected. Press the back
arrow button on the touchscreen to return to the previous
menu, or push the back button on the faceplate.
352 UNDERSTANDING YOUR INSTRUMENT PANEL
Page 355 of 717
NOTE:The seat will return to the memorized seat
location (if Recall Memory with Remote Key Unlock is set
to ON) when the Remote Keyless Entry (RKE) transmitter
is used to unlock the door. Refer to “Driver Memory
Seat” in “Understanding The Features Of Your Vehicle”
for further information.
•Power Lift Gate Chime — If Equipped
This feature plays an alert when the power lift gate is
raising or lowering. To make your selection, press the
“Power Lift Gate Chime” button on the touchscreen, until
a check-mark appears next to setting, showing that
setting has been selected. Press the back arrow button on
the touchscreen to return to the previous menu, or push
the back button on the faceplate.
Auto-On Comfort — If Equipped
After pressing the “Auto-On Comfort” button on the
touchscreen the following settings will be available:
•Auto-On Driver Heated/Ventilated Seat & Steering
Wheel With Vehicle Start — If Equipped
When this feature is selected the driver’s heated seat will
automatically turn on when temperatures are below 40° F
(4.4° C). When temperatures are above 80° F (26.7° C) the
driver vented seat will turn on. To make your selection,
press the “Auto-On Driver Heated/Ventilated Seat &
Steering Wheel With Vehicle Start” button on the touch-
screen, then select either “Off,” “Remote Start” or “All
Starts” until a check-mark appears next to setting, show-
ing that setting has been selected. Press the back arrow/
Done button on the touchscreen to return to the previous
menu.
4
UNDERSTANDING YOUR INSTRUMENT PANEL 353
Page 368 of 717
When connecting an external source to the AUX/HDMI
input, ensure to follow the standard color coding for the
audio/video jacks:
1. HDMI Input
2. Right audio in (red)
3. Left audio in (white)
4. Video in (yellow)
NOTE:Certain high-end video games, such as Playsta-
tion4 and XBox One will exceed this power limit of the
vehicle’s Power Inverter.
Play A DVD/Blu-ray™ Disc Using The
Touchscreen Radio
1. Insert the DVD/Blu-ray™ Disc with the label facing as
indicated on the DVD/Blu-ray™ Disc player. The
radio automatically selects the appropriate mode after
the disc is recognized and displays the menu screen or
starts playing the first track.
2. To watch a DVD/Blu-ray™ Disc on Rear 1 (driver’s
side rear passenger) ensure the Remote Control and
Headphone channel selector switch is on Rear 1.
3. To watch a DVD/Blu-ray™ Disc on Rear 2 (passen-
ger ’s side rear passenger) ensure the Remote Control
and Headphone channel selector switch is on Rear 2.
Using The Remote Control
1. Push the SOURCE button on the Remote Control.
2. While looking at Rear 1 or 2, highlight DISC by either
pushing Up/Down/Left/Right buttons, then push
ENTER/OK.
366 UNDERSTANDING YOUR INSTRUMENT PANEL
Page 381 of 717
•Other compression formats such as AAC, MP3 Pro,
Ogg Vorbis, and ATRAC3 will not play. The Blu-ray™
player will automatically skip the file and begin play-
ing the next available file.
•If you are creating your own files, the recommended
fixed bit rate for MP3 files is between 96 and 192Kbps
and the recommended fixed bit rate for WMA files is
between 64 and 192Kbps. Variable bit rates are also
supported. For both formats, the recommended
sample rate is either 44.1kHz or 48kHz.
•To change the current file, use the remote control’s or
Blu-ray™ Disc player ’s$button to advance to the
next file, or the#button to return to the start of the
current or previous file.
Disc Errors
If the Blu-ray™ Disc player is unable to read the disc, a
#Disc Error#message is displayed on the rear screen and
Radio displays. A dirty, damaged, or incompatible disc
format are all potential causes for a#Disc Error#message.
If a disc has a damaged track which results in audible or
visible errors that persists for two seconds, the Blu-ray™
Disc player will attempt to continue playing the disc by
skipping forward one to three seconds at a time. If the
end of the disc is reached, the Blu-ray™ Disc player will
return to the beginning of the disc and attempt to play
the start of the first track.
The Blu-ray™ Disc player may shut down during ex-
tremely hot conditions, such as when the vehicle’s inte-
rior temperature is above 120° F (48.9° C). When this
occurs, the player will display#High Temp#and will shut
off the Rear Seat displays until a safe temperature is
reached. This shutdown is necessary to protect the optics
of the Blu-ray™ Disc player.
4
UNDERSTANDING YOUR INSTRUMENT PANEL 379
Page 410 of 717
press the Apps button on the 8.4-inch touchscreen to get
started. Detailed registration instructions can be found
on the next page.
*Uconnect® Access is available only on equipped ve-
hicles purchased within the continental United States and
Alaska. Services can only be used where coverage is
available; see coverage map for details.
9-1-1 Call
Theft Alarm Notification
Remote Door Lock/Unlock
Stolen Vehicle Assistance
Remote Vehicle Start**
Remote Horn and Lights
Yelp® Search
Voice Texting
Roadside Assistance Call
Wi-Fi Hotspot***
**If vehicle is equipped.
***Extra charges apply.
Register (8.4A/8.4AN)
1. Press theAppsbutton on the bottom of the 8.4-inch
touchscreen.
2. If a pop-up message appears, pressRegisteror go to
theFavorite Appsmenu and pressUconnect® Regis-
tration.
3. Read through the registration instructions. Enter and
confirm your personal email address. Then press
Send.
4. Check your personal inbox for an email from
Uconnect® Access.
408 UNDERSTANDING YOUR INSTRUMENT PANEL
Page 411 of 717
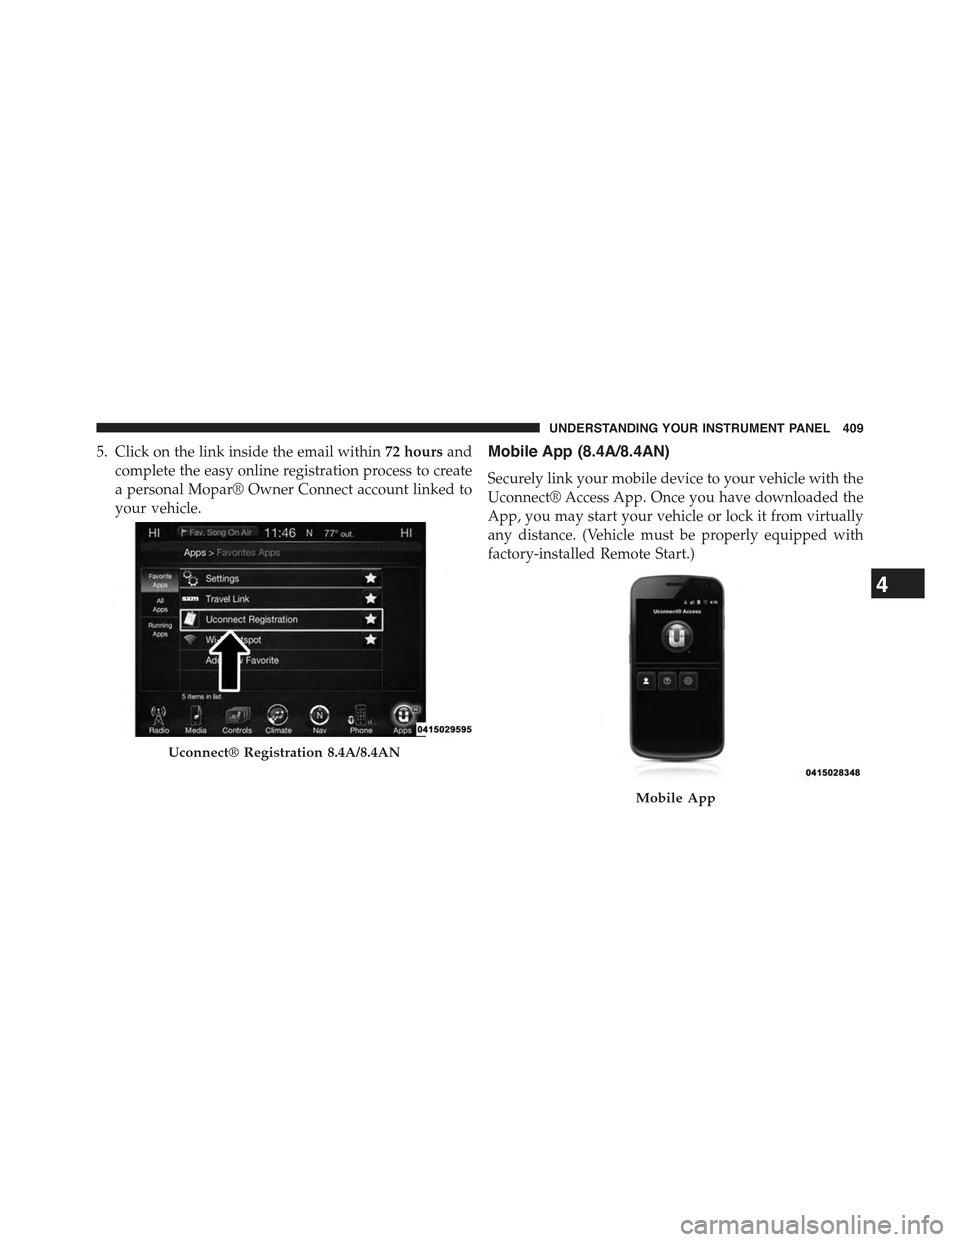
5. Click on the link inside the email within72 hoursand
complete the easy online registration process to create
a personal Mopar® Owner Connect account linked to
your vehicle.
Mobile App (8.4A/8.4AN)
Securely link your mobile device to your vehicle with the
Uconnect® Access App. Once you have downloaded the
App, you may start your vehicle or lock it from virtually
any distance. (Vehicle must be properly equipped with
factory-installed Remote Start.)
Uconnect® Registration 8.4A/8.4AN
Mobile App
4
UNDERSTANDING YOUR INSTRUMENT PANEL 409
Page 424 of 717
CAUTION!
Damage to the transmission may occur if the follow-
ing precautions are not observed:
•Do not shift from REVERSE, PARK, or NEUTRAL
into any forward gear when the engine is above
idle speed.
•Shift into PARK only after the vehicle has come to
a complete stop.
•Shift into or out of REVERSE only after the vehicle
has come to a complete stop and the engine is at
idle speed.
•Before shifting into any gear, make sure your foot
is firmly on the brake pedal.
Keyless Enter-N-Go™
This feature allows the driver to oper-
ate the ignition switch with the push
of a button, as long as the Remote
Start/Keyless Enter-N-Go™ Key Fob
is in the passenger compartment.
Normal Starting
Using The ENGINE START/STOP Button
1. The transmission must be in PARK or NEUTRAL.
2. Press and hold the brake pedal while pushing the
ENGINE START/STOP button once.
3. The system takes over and attempts to start the
vehicle. If the vehicle fails to start, the starter will
disengage automatically after 10 seconds.
422 STARTING AND OPERATING
Page 585 of 717
NOTE:When using a portable battery booster pack
follow the manufacturer’s operating instructions and
precautions.
Preparations For Jump-Start
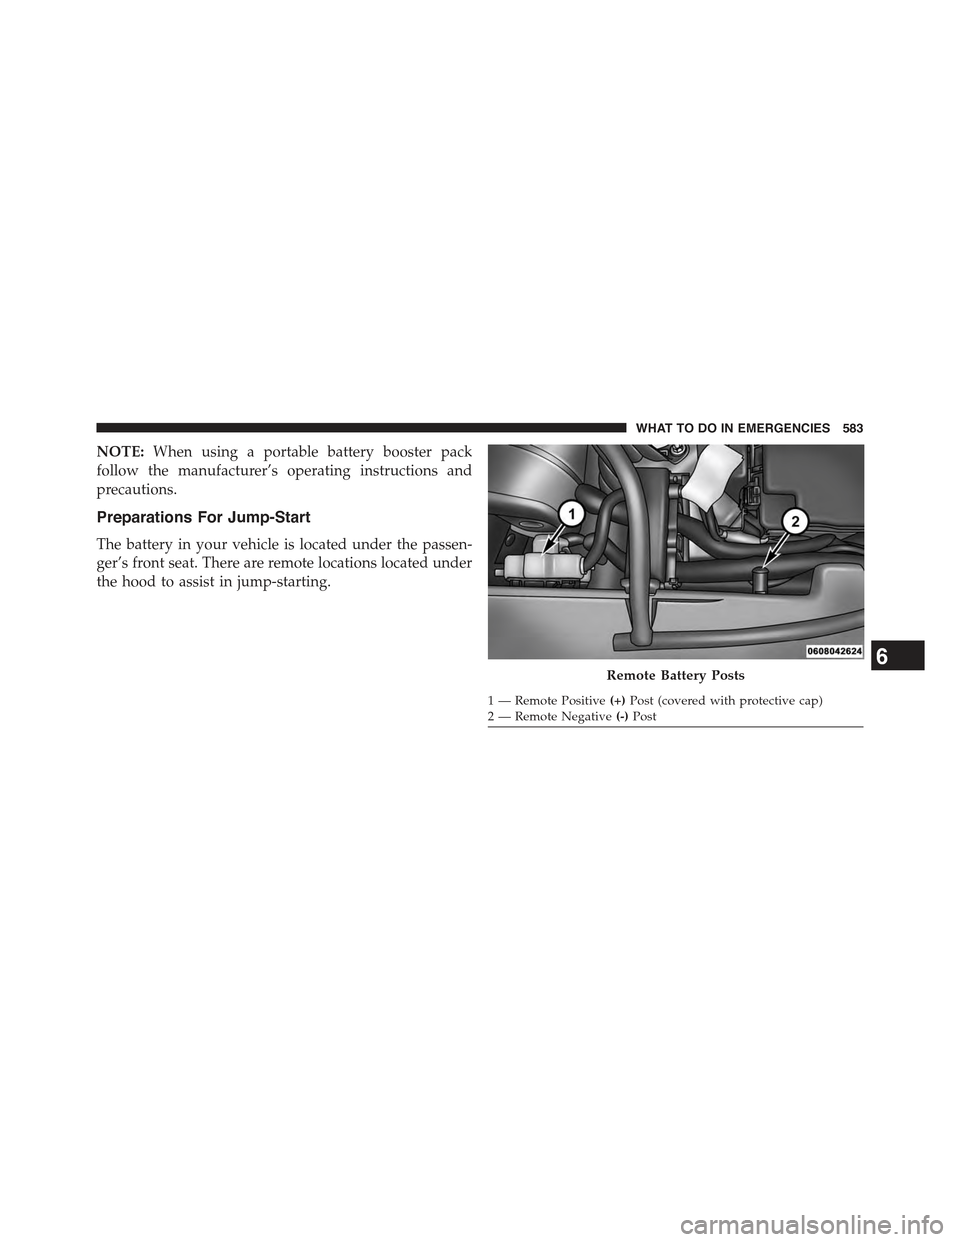
The battery in your vehicle is located under the passen-
ger’s front seat. There are remote locations located under
the hood to assist in jump-starting.
Remote Battery Posts
1—RemotePositive(+)Post (covered with protective cap)2 — Remote Negative(-)Post
6
WHAT TO DO IN EMERGENCIES 583
Page 586 of 717
WARNING!
•Take care to avoid the radiator cooling fan when-
ever the hood is raised. It can start anytime the
ignition switch is ON. You can be injured by
moving fan blades.
•Remove any metal jewelry such as rings, watch
bands and bracelets that could make an inadvertent
electrical contact. You could be seriously injured.
•Batteries contain sulfuric acid that can burn your
skin or eyes and generate hydrogen gas which is
flammable and explosive. Keep open flames or
sparks away from the battery.
NOTE:Be sure that the disconnected ends of the cables
do not touch while still connected to the other vehicle.
1. Set the parking brake, shift the automatic transmission
into PARK and turn the ignition to LOCK.
2. Turn off the heater, radio, and all unnecessary electri-
cal accessories.
3.Remove the protective cover over the remote positive
(+)battery post. Pull upward on the cover to remove it.
4. If using another vehicle to jump-start the battery, park
the vehicle within the jumper cables reach, set the
parking brake and make sure the ignition is OFF.
WARNING!
Do not allow vehicles to touch each other as this
could establish a ground connection and personal
injury could result.
584 WHAT TO DO IN EMERGENCIES
Page 587 of 717
Jump-Starting Procedure
WARNING!
Failure to follow this jump-starting procedure could
result in personal injury or property damage due to
battery explosion.
CAUTION!
Failure to follow these procedures could result in
damage to the charging system of the booster vehicle
or the discharged vehicle.
NOTE:Make sure at all times that unused ends of
jumper cables are not contacting each other or either
vehicle while making connections.
Connecting The Jumper Cables
1. Connect the positive(+)end of the jumper cable to the
remote positive(+)post of the discharged vehicle.
2. Connect the opposite end of the positive(+)jumper
cable to the positive(+)post of the booster battery.
3. Connect the negative end(-)of the jumper cable to the
negative(-)post of the booster battery.
4. Connect the opposite end of the negative(-)jumper
cable to the remote negative(-)post of the vehicle with
the discharged battery.
WARNING!
Do not connect the jumper cable to the negative (-) post
of the discharged battery. The resulting electrical spark
could cause the battery to explode and could result in
personal injury. Only use the specific ground point, do
not use any other exposed metal parts.
6
WHAT TO DO IN EMERGENCIES 585