AUX JEEP GRAND CHEROKEE 2016 WK2 / 4.G SRT Owners Manual
[x] Cancel search | Manufacturer: JEEP, Model Year: 2016, Model line: GRAND CHEROKEE, Model: JEEP GRAND CHEROKEE 2016 WK2 / 4.GPages: 723, PDF Size: 5.54 MB
Page 291 of 723
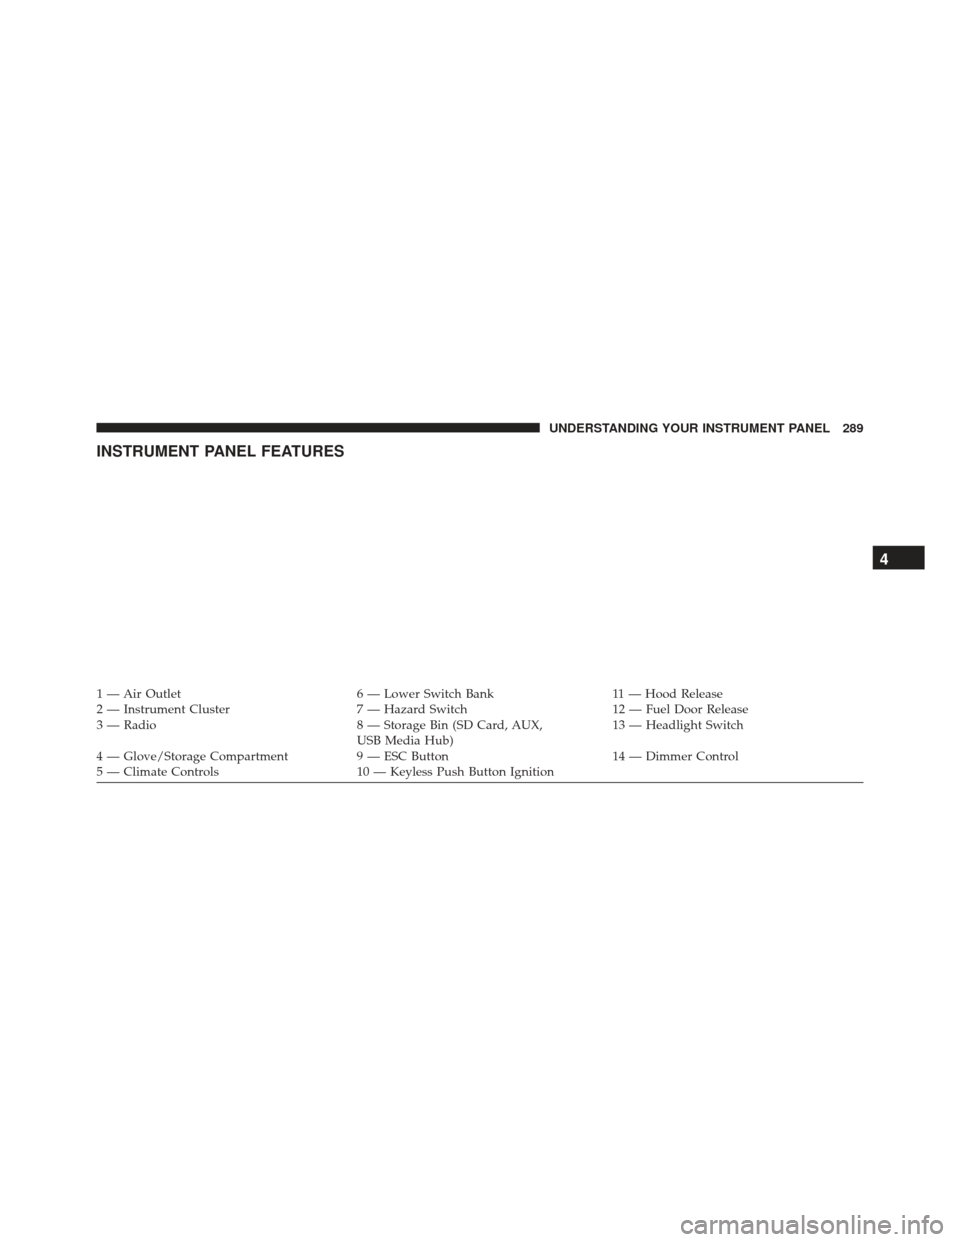
INSTRUMENT PANEL FEATURES
1 — Air Outlet6 — Lower Switch Bank11 — Hood Release
2 — Instrument Cluster 7 — Hazard Switch12 — Fuel Door Release
3 — Radio 8 — Storage Bin (SD Card, AUX,
USB Media Hub) 13 — Headlight Switch
4 — Glove/Storage Compartment 9 — ESC Button14 — Dimmer Control
5 — Climate Controls 10 — Keyless Push Button Ignition
4
UNDERSTANDING YOUR INSTRUMENT PANEL 289
Page 367 of 723
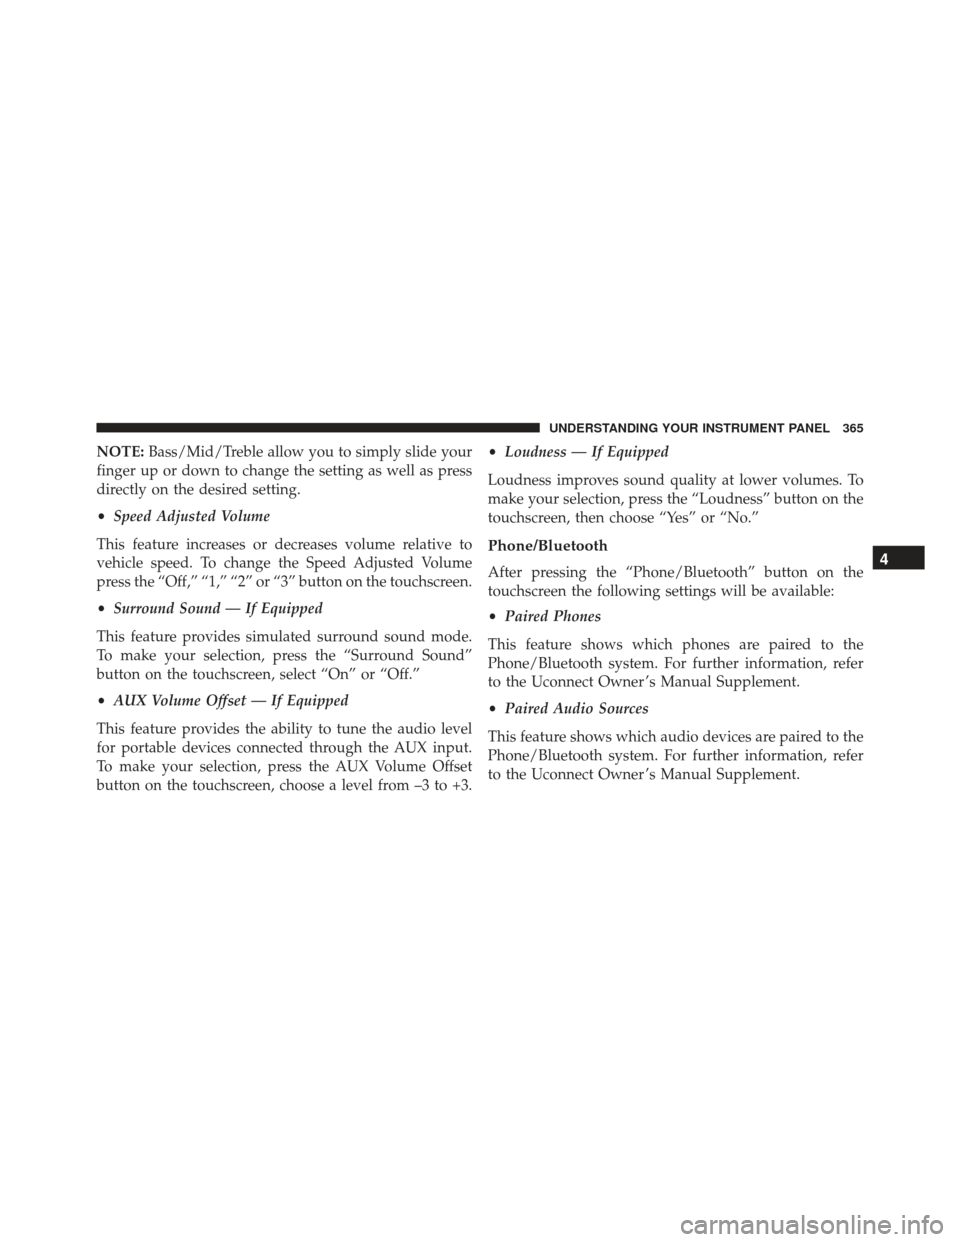
NOTE:Bass/Mid/Treble allow you to simply slide your
finger up or down to change the setting as well as press
directly on the desired setting.
• Speed Adjusted Volume
This feature increases or decreases volume relative to
vehicle speed. To change the Speed Adjusted Volume
press the “Off,” “1,” “2” or “3” button on the touchscreen.
• Surround Sound — If Equipped
This feature provides simulated surround sound mode.
To make your selection, press the “Surround Sound”
button on the touchscreen, select “On” or “Off.”
• AUX Volume Offset — If Equipped
This feature provides the ability to tune the audio level
for portable devices connected through the AUX input.
To make your selection, press the AUX Volume Offset
button on the touchscreen, choose a level from –3 to +3. •
Loudness — If Equipped
Loudness improves sound quality at lower volumes. To
make your selection, press the “Loudness” button on the
touchscreen, then choose “Yes” or “No.”
Phone/Bluetooth
After pressing the “Phone/Bluetooth” button on the
touchscreen the following settings will be available:
• Paired Phones
This feature shows which phones are paired to the
Phone/Bluetooth system. For further information, refer
to the Uconnect Owner ’s Manual Supplement.
• Paired Audio Sources
This feature shows which audio devices are paired to the
Phone/Bluetooth system. For further information, refer
to the Uconnect Owner ’s Manual Supplement.4
UNDERSTANDING YOUR INSTRUMENT PANEL 365
Page 409 of 723
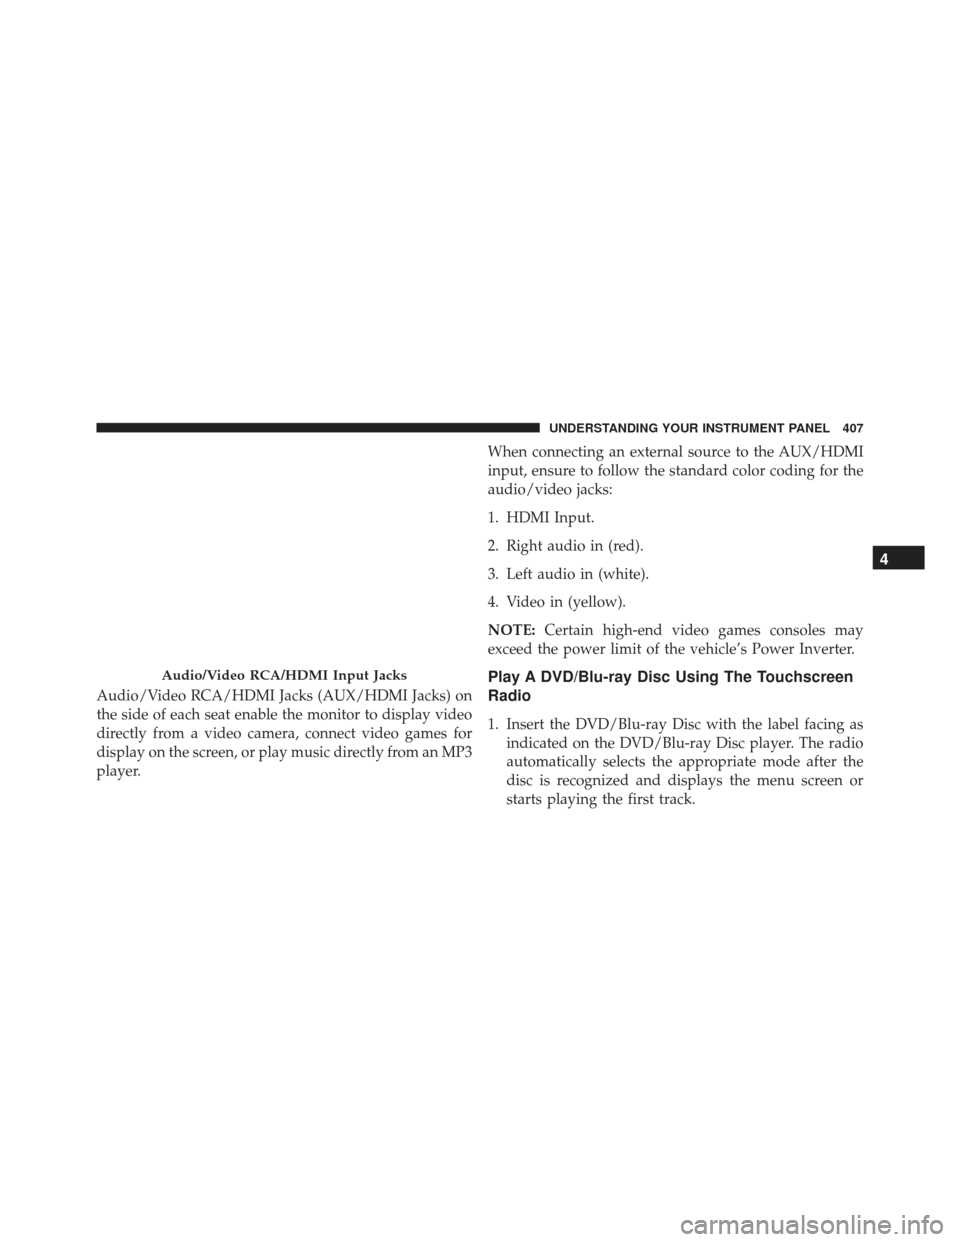
Audio/Video RCA/HDMI Jacks (AUX/HDMI Jacks) on
the side of each seat enable the monitor to display video
directly from a video camera, connect video games for
display on the screen, or play music directly from an MP3
player.When connecting an external source to the AUX/HDMI
input, ensure to follow the standard color coding for the
audio/video jacks:
1. HDMI Input.
2. Right audio in (red).
3. Left audio in (white).
4. Video in (yellow).
NOTE:
Certain high-end video games consoles may
exceed the power limit of the vehicle’s Power Inverter.
Play A DVD/Blu-ray Disc Using The Touchscreen
Radio
1. Insert the DVD/Blu-ray Disc with the label facing as indicated on the DVD/Blu-ray Disc player. The radio
automatically selects the appropriate mode after the
disc is recognized and displays the menu screen or
starts playing the first track.
Audio/Video RCA/HDMI Input Jacks
4
UNDERSTANDING YOUR INSTRUMENT PANEL 407
Page 418 of 723
PRODUCTS, AND IS IN LIEU OF ALL OTHER WAR-
RANTIES (EXPRESS OR IMPLIED), INCLUDING ANY
WARRANTY OR MERCHANTABILITY OR FITNESS
FOR A PARTICULAR PURPOSE.
If you have any questions or comments regarding your
Unwired wireless headphones, please phone 1-888-293-
3332 or email [email protected].
You may register your Unwired wireless headphones by
phone at 1-888-293-3332.
System Information
Disc Menu
When listening to a CD Audio or CD Data disc, pushing
the remote control’s POP UP/MENU button displays a
list of all commands which control playback of the disc.
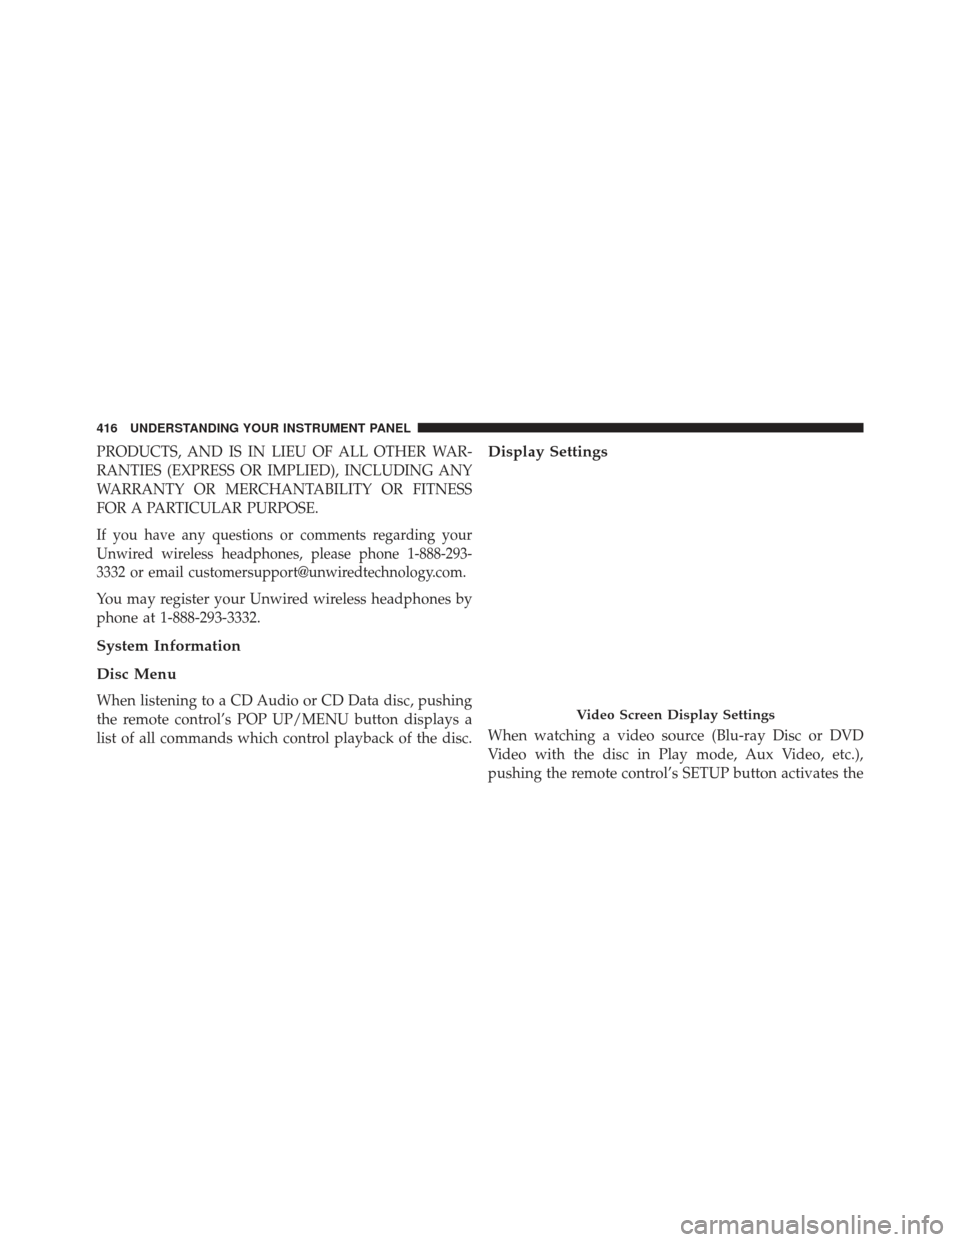
Display Settings
When watching a video source (Blu-ray Disc or DVD
Video with the disc in Play mode, Aux Video, etc.),
pushing the remote control’s SETUP button activates the
Video Screen Display Settings
416 UNDERSTANDING YOUR INSTRUMENT PANEL
Page 424 of 723
The right-hand control is a rocker-type switch with a
push-button in the center and controls the volume and
mode of the sound system. Pushing the top of the rocker
switch will increase the volume, and pushing the bottom
of the rocker switch will decrease the volume.Pushing the center button will make the radio switch
between the various modes available (AM/FM/SXM/
CD/AUX/VES, etc.).
The left-hand control is a rocker-type switch with a
push-button in the center. The function of the left-hand
control is different depending on which mode you are in.
The following describes the left-hand control operation in
each mode.
Radio Operation
Pushing the top of the switch will “Seek” up for the next
listenable station and pushing the bottom of the switch
will “Seek” down for the next listenable station.
The button located in the center of the left-hand control
will tune to the next preset station that you have pro-
grammed in the radio preset button.
Remote Sound System Controls (Back View Of Steering
Wheel)
422 UNDERSTANDING YOUR INSTRUMENT PANEL
Page 444 of 723
Radio
Use your voice to quickly get to the AM, FM or SiriusXM
Satellite Radio stations you would like to hear. (Subscrip-
tion or included SiriusXM Satellite Radio trial required.)
Push the VR button
. After the beep, say:
•Tune to ninety-five-point-five FM
• Tune to Satellite Channel Hits 1
TIP: At any time, if you are not sure of what to say or
want to learn a Voice Command, push the VR button
and say “Help.” The system will provide you with
a list of commands. Media
Uconnect offers connections via USB, SD, Bluetooth and
auxiliary ports (If Equipped). Voice operation is only
available for connected USB and iPod devices. (Remote
CD player optional and not available on all vehicles.)
Uconnect 8.4A/8.4AN Radio
442 UNDERSTANDING YOUR INSTRUMENT PANEL
Page 589 of 723
NOTE:The funnel for the Cap-Less Fuel System is
located on top of the spare tire. If your vehicle is out of
fuel and an auxiliary fuel can is needed, insert the funnel
into the filler neck and proceed to fill the vehicle. For
vehicles not equipped with a spare tire, the fuel filler
funnel is stored in the left storage bin under the load
floor. For more information on the Cap-Less Fuel System
refer to “Adding Fuel” in “Starting And Operating” in
this manual.
Spare Tire Stowage
The spare tire is stowed under the load floor in the rear
cargo area and is secured to the body with a special wing
nut.
Preparations For Jacking
CAUTION!
Always lift or jack the vehicle from the correct
jacking points. Failure to follow this information
could cause damage to the vehicle or underbody
components.
1. Park the vehicle on a firm, level surface. Avoid ice or slippery surfaces.
WARNING!
Do not attempt to change a tire on the side of the
vehicle closest to moving traffic, pull far enough off
the road to avoid being hit when operating the jack
or changing the wheel.
2. Turn on the Hazard Warning flasher.
6
WHAT TO DO IN EMERGENCIES 587
Page 670 of 723
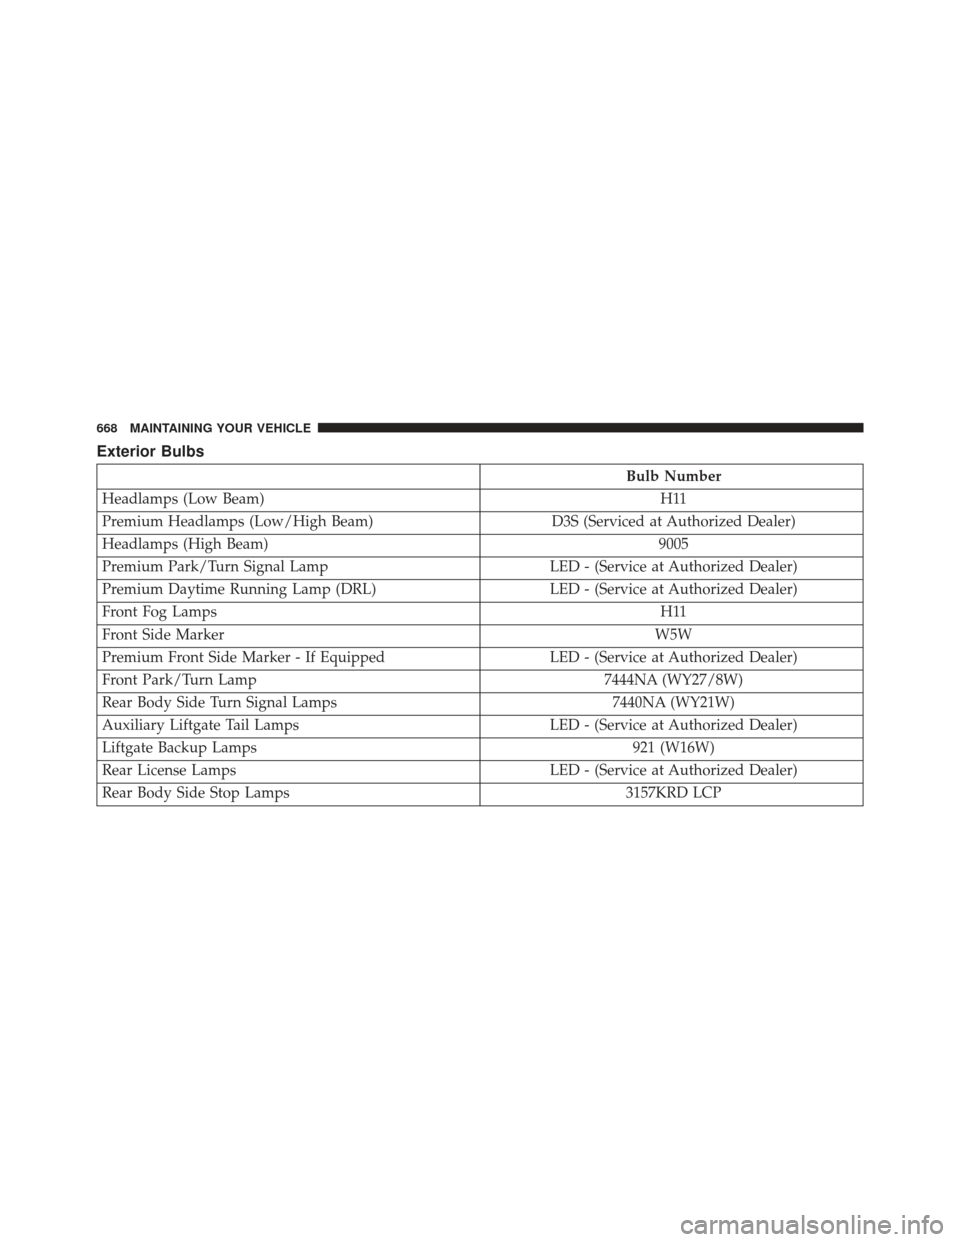
Exterior Bulbs
Bulb Number
Headlamps (Low Beam) H11
Premium Headlamps (Low/High Beam) D3S (Serviced at Authorized Dealer)
Headlamps (High Beam) 9005
Premium Park/Turn Signal Lamp LED - (Service at Authorized Dealer)
Premium Daytime Running Lamp (DRL) LED - (Service at Authorized Dealer)
Front Fog Lamps H11
Front Side Marker W5W
Premium Front Side Marker - If Equipped LED - (Service at Authorized Dealer)
Front Park/Turn Lamp 7444NA (WY27/8W)
Rear Body Side Turn Signal Lamps 7440NA (WY21W)
Auxiliary Liftgate Tail Lamps LED - (Service at Authorized Dealer)
Liftgate Backup Lamps 921 (W16W)
Rear License Lamps LED - (Service at Authorized Dealer)
Rear Body Side Stop Lamps 3157KRD LCP
668 MAINTAINING YOUR VEHICLE
Page 675 of 723
5. Tail lamps are now visible. Rotate socket(s) counterclockwise.
Rear Liftgate Tail LampsRear Of Liftgate Tail Lamp
1 — Auxiliary LED Tail Connector – Do Not Remove
2 — Backup Bulb Socket
7
MAINTAINING YOUR VEHICLE 673
Page 703 of 723
Alarm (Security Alarm)............20, 297, 302, 322
Alarm System (Security Alarm) ................20
Alterations/Modifications, Vehicle ...............9
Antifreeze (Engine Coolant) ...............641, 675
Disposal ............................. .643
Anti-Lock Brake System (ABS) ................502
Anti-Lock Warning Light ....................311
Appearance Care ........................ .651
Arming System (Security Alarm) ...............20
Assist, Hill Start ......................... .504
Auto Down Power Windows ..................44
Automatic Door Locks ......................35
Automatic Headlights ..................... .170
Automatic High Beams .....................170
Automatic Temperature Control (ATC) .......425, 433
Automatic Transmission .................471, 651
Adding Fluid ......................... .651
Autostick ............................ .479
Fluid And Filter Changes ..................651 Fluid Change
......................... .651
Fluid Level Check ...................649, 650
Fluid Type ........................ .649, 677
Gear Ranges .......................... .473
Special Additives ...................... .650
Autostick .............................. .479
Auxiliary Electrical Outlet (Power Outlet) ........263
Auxiliary Power Outlet .....................263
Axle Fluid ............................. .677
Battery ............................ .299, 623
Charging System Light ...................299
Keyless Transmitter Replacement (RKE) ........26
Belts, Seat ...............................111
Blind Spot Monitoring ..................... .134
Body Mechanism Lubrication .................629
B-Pillar Location ......................... .528
Brake Assist System ...................... .504
Brake Control System, Electronic ..............501
10
INDEX 701