ESP JEEP GRAND CHEROKEE 2016 WK2 / 4.G Owner's Manual
[x] Cancel search | Manufacturer: JEEP, Model Year: 2016, Model line: GRAND CHEROKEE, Model: JEEP GRAND CHEROKEE 2016 WK2 / 4.GPages: 276, PDF Size: 10.84 MB
Page 121 of 276
Siri Eyes Free — If Equipped
Siri lets you use your voice to send text messages, select media, place phone calls
and much more. Siri uses your natural language to understand what you mean and
will respond back to confirm your requests. The system is designed to keep your eyes
on the road and your hands on the wheel by letting Siri help you perform useful tasks.
To enable Siri push and hold, then release the Uconnect Voice Recognition (VR)
button on the steering wheel. After you hear a double beep you can ask Siri to play
podcasts and music, get directions, read text messages and many other useful
requests.
Siri Eyes Free Available
ELECTRONICS
119
Page 126 of 276
Voice Text Reply
Uconnect will announceincomingtext messages. Push the Phone buttonand
say Listen. (Must have compatible device paired to Uconnect system.)
1. Once an incoming text message is read to you, push the Phone button
. After
the beep, say: Reply.
2. Listen to the Uconnect prompts. After the beep, repeat one of the pre-defined messages and follow the system prompts.
PRE-DEFINED VOICE TEXT REPLY RESPONSES
Yes. Stuck in Traffic. See you later.
No. Start without me. I’ll be Late.
Okay. Where are you?
I will be
minutes late.
Call me. Are you there yet?
I’ll call you later. I need directions.
See you in
minutes.
I’m on my way.
Can’t talk right now.
I’m lost. Thanks.
TIP:Your device must have the full implementation of the Message Access Profile
(MAP) to take advantage of this feature. For details about MAP, visit
UconnectPhone.com for U.S. residents. Apple iPhone iOS6 or later supports reading
incoming text messages only. To enable this feature on your Apple iPhone, follow
these 4 simple steps:
1. Select “Settings.”
2. Select “Bluetooth.”
3. Select the (i) for the paired vehicle.
4. Turn on “Show Notifications.”
TIP: Voice Text Reply is not compatible
with iPhone, but if your vehicle is
equipped with Siri Eyes Free, you can use
your voice to send a text message.
iPhone Notification Setting
ELECTRONICS
124
Page 144 of 276
Here’s How:
1. Push the Uconnect Phone button
and wait for the beep, then say “reply.”
Uconnect will give the following prompt: “Please say the message you would like
to send.”
2. Wait for the beep and say one of the pre-defined messages. (If you are not sure, you can say “help”). Uconnect will then read the pre-defined messages allowed.
3. As soon as you hear the message you would like to send, you can interrupt the list of prompts by pushing the Uconnect phone button and saying the phrase.
Uconnect will confirm the message by reading it back to you.
4. Push the Phone button and say “Send.”
PRE-DEFINED VOICE TEXT REPLY RESPONSES
Yes. Stuck in Traffic. See you later.
No. Start without me. I’ll be Late.
Okay. Where are you?
I will be <5, 10,
15,...etc.> minutes late.
Call me. Are you there yet?
I’ll call you later. I need directions.
See you in <5, 10,
15,...etc.> of minutes.
I’m on my way.
Can’t talk right now.
I’m lost. Thanks.
NOTE:
To make the SMS voice reading function available, the SMS notification option on
phone must be enabled; this option is usually available on the phone, in the
Bluetooth connections menu for a device registered as Uconnect. After enabling this
function on the mobile phone, it must be disconnected and reconnected with the
Uconnect system in order to make it effective.
Helpful Tips And Common Questions To Improve Bluetooth Performance With
Your Uconnect System
Mobile Phone won’t reconnect to system after pairing:
• Set mobile phone to auto-connect or trusted device in mobile phone Bluetooth
settings (Blackberry devices).
• Perform a factory reset on your mobile phone. Refer to your mobile phone manufacturer or cellular provider for instructions.
• Many mobile phones do not automatically reconnect after being restarted (hard reboot). Your mobile phone can still be connected manually. Close all applications
that may be operating (refer to mobile phone manufacturer’s instructions), and
follow “Pairing (Wirelessly Connecting) Your Mobile Phone To The Uconnect
System”.
ELECTRONICS
142
Page 146 of 276
VIDEO ENTERTAINMENT SYSTEM (VES)
System Operation
• Cycle the ignition to the ON or ACCposition.
• The LCD screens are located in the rear of the front seats. To open the LCD
screen, lift the cover.
• The system may be controlled by the front seat occupants using the touch-
screen radio, or by the rear seat occu-
pants using the remote control.
• Your vehicle may be equipped with a Blu-ray Disc Player. If equipped with a
Blu-ray Disc Player, the icon will be
present on the Player.
• Turn on the Rear Seat Entertainment system by pushing the Power button on
the remote control.
• To use the headphones, push the power button located on the right ear cup. Select the channel on the headphones (1 or 2) that corresponds to the channel selected
on the VES screen.
• When the Video Screen(s) are open and a DVD/Blu-ray Disc is inserted into the Disc player, the screen(s) turn(s) ON automatically, the headphone transmitters
turn ON and playback begins.
• With the Dual Video Screen System, Channel 1 (Rear 1) on the Remote Control and Headphones refers to Screen 1 (driver's side) and Channel 2 (Rear 2) on the
Remote Control and Headphones refers to Screen 2 (passenger's side).
Dual Video Screen
Typically, there are two different ways to operate the features of the Rear Seat
Entertainment System:
• The Remote Control
• The Touchscreen Radio (If Equipped)
Rear LCD Screen
ELECTRONICS
144
Page 193 of 276
– Electronic Throttle Control (ETC) Light
This light informs you of a problem with the Electronic Throttle Control (ETC) system.
If a problem is detected, the light will come on while the engine is running. Cycle the
ignition when the vehicle has completely stopped and the gear selector is placed in
the PARK position; the light should turn off.
If the light remains lit with the engine running, your vehicle will usually be drivable;
however, see an authorized service center immediately. If the light is flashing when
the engine is running, immediate service is required and you may experience reduced
performance, an elevated/rough idle or engine stall and your vehicle may require
towing.
– Tire Pressure Monitoring System (TPMS) Light
Each tire, including the spare (if provided), should be checked monthly, when cold
and inflated to the inflation pressure recommended by the vehicle manufacturer on
the vehicle placard or tire inflation pressure label. (If your vehicle has tires of a
different size than the size indicated on the vehicle placard or tire inflation pressure
label, you should determine the proper tire inflation pressure for those tires.)
As an added safety feature, your vehicle has been equipped with a Tire Pressure
Monitoring System (TPMS) which display in the Electronic Vehicle Information
Center (EVIC) or Driver Information Display (DID) when one or more of your tires is
significantly under-inflated. Accordingly, when the low tire pressure EVIC or DID
display illuminates, you should stop and check your tires as soon as possible, and
inflate them to the proper pressure. Driving on a significantly under-inflated tire
causes the tire to overheat and can lead to tire failure. Under-inflation also reduces
fuel efficiency and tire tread life, and may affect the vehicle’s handling and stopping
ability.
IF THE LIGHT STARTS FLASHING INDICATING A LOW TIRE PRESSURE, ADJUST THE AIR
PRESSURE IN THE LOW TIRE TO THE AIR PRESSURE SHOWN ON THE VEHICLE PLACARD OR
TIRE INFLATION PRESSURE LABEL LOCATED ON THE DRIVER'S DOOR.
NOTE:
After inflation, the vehicle may need to be driven for 20 minutes before the flashing light
will turn off.
Please note that the TPMS is not a substitute for proper tire maintenance, and it is
the driver’s responsibility to maintain correct tire pressure, even if under-inflation
has not reached the level to trigger illumination of the TPMS low EVIC or DID display.
WHAT TO DO IN EMERGENCIES
191
Page 194 of 276
Your vehicle has also been equipped with a TPMS malfunction indicator to indicate
when the system is not operating properly. The TPMS malfunction indicator is
combined with the low tire pressure telltale. When the system detects a malfunction,
the telltale will flash for approximately one minute and then remain continuously
illuminated. This sequence will continue each time the vehicle is restarted as long as
the malfunction exists.
When the malfunction indicator is illuminated, the system may not be able to detect
or signal low tire pressure as intended. TPMS malfunctions may occur for a variety of
reasons, including the installation of replacement or alternate tires or wheels on the
vehicle that prevent the TPMS from functioning properly. Always check the TPMS
malfunction telltale after replacing one or more tires or wheels on your vehicle, to
ensure that the replacement or alternate tires and wheels allow the TPMS to continue
to function properly.
NOTE:
Tire pressures change by approximately 1 psi (7 kPa) per 12° F (7° C) of air
temperature change. Keep this in mind when checking tire pressure inside a garage,
especially in the Winter. Example: If garage temperature is 68°F (20°C) and the
outside temperature is 32°F (0°C), then the cold tire inflation pressure should be
increased by 3 psi (21 kPa), which equals 1 psi (7 kPa) for every 12°F (7°C) for this
outside temperature condition.
CAUTION!
The TPMS has been optimized for the original equipment tires and wheels. TPMS
pressures and warning have been established for the tire size equipped on your
vehicle. Undesirable system operation or sensor damage may result when using
replacement equipment that is not of the same size, type, and/or style. Aftermar-
ket wheels can cause sensor damage. Do not use tire sealant from a can, or
balance beads if your vehicle is equipped with a TPMS, as damage to the sensors
may result.
– Seat Belt Reminder Light
When the ignition switch is first turned to the ON/RUN position, this light will turn on
for four to eight seconds as a bulb check. During the bulb check, if the driver's seat
belt is unbuckled, a chime will sound. After the bulb check or when driving, if the
driver or front passenger seat belt remains unbuckled, the Seat Belt Indicator Light
will flash or remain on continuously. Refer to “Seat Belt Systems” in “Things To
Know Before Starting” in your Owner’s Manual on the DVD for further information.
WHAT TO DO IN EMERGENCIES
192
Page 218 of 276
CAP-LESS FUEL FILL FUNNEL
The funnel for the Cap-Less Fuel System is located on top of the spare tire or in the
storage tub if not equipped with a spare tire. If your vehicle is out of fuel and an
auxiliary fuel can is needed, insert the funnel into the filler neck and proceed to fill
the vehicle.
ENHANCED ACCIDENT RESPONSE SYSTEM (EARS)
This vehicle is equipped with an Enhanced Accident Response System.
Please refer to “Supplemental Restraint System (SRS) — Air Bags” in “Getting
Started” in this guide for further information on the Enhanced Accident Response
System (EARS) function.
EVENT DATA RECORDER (EDR)
This vehicle is equipped with an event data recorder (EDR). The main purpose of an
EDR is to record, in certain crash or near crash-like situations, such as an air bag
deployment or hitting a road obstacle, data that will assist in understanding how a
vehicle’s systems performed.
Please refer to “Supplemental Restraint System (SRS) — Air Bags” in “Getting
Started” in this guide for further information on the Event Data Recorder (EDR).
WHAT TO DO IN EMERGENCIES
216
Page 251 of 276
FUSES
Power Distribution Center
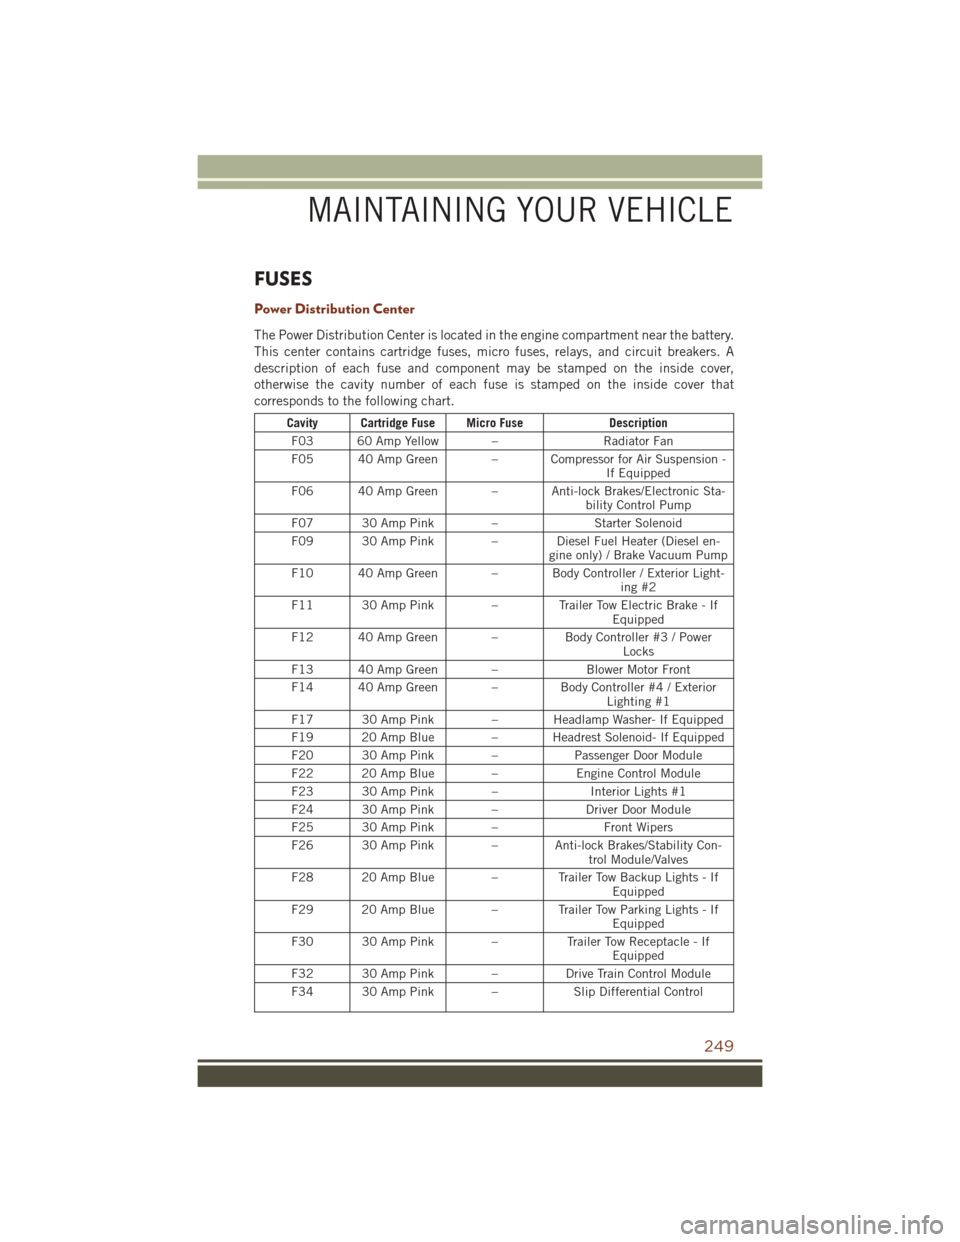
The Power Distribution Center is located in the engine compartment near the battery.
This center contains cartridge fuses, micro fuses, relays, and circuit breakers. A
description of each fuse and component may be stamped on the inside cover,
otherwise the cavity number of each fuse is stamped on the inside cover that
corresponds to the following chart.
Cavity Cartridge Fuse Micro FuseDescription
F03 60 Amp Yellow – Radiator Fan
F05 40 Amp Green – Compressor for Air Suspension - If Equipped
F06 40 Amp Green – Anti-lock Brakes/Electronic Sta- bility Control Pump
F07 30 Amp Pink – Starter Solenoid
F09 30 Amp Pink – Diesel Fuel Heater (Diesel en- gine only) / Brake Vacuum Pump
F10 40 Amp Green – Body Controller / Exterior Light- ing #2
F11 30 Amp Pink – Trailer Tow Electric Brake - If Equipped
F12 40 Amp Green – Body Controller #3 / Power
Locks
F13 40 Amp Green – Blower Motor Front
F14 40 Amp Green – Body Controller #4 / Exterior
Lighting #1
F17 30 Amp Pink – Headlamp Washer- If Equipped
F19 20 Amp Blue – Headrest Solenoid- If Equipped
F20 30 Amp Pink – Passenger Door Module
F22 20 Amp Blue – Engine Control Module
F23 30 Amp Pink – Interior Lights #1
F24 30 Amp Pink – Driver Door Module
F25 30 Amp Pink – Front Wipers
F26 30 Amp Pink – Anti-lock Brakes/Stability Con- trol Module/Valves
F28 20 Amp Blue – Trailer Tow Backup Lights - If Equipped
F29 20 Amp Blue – Trailer Tow Parking Lights - If Equipped
F30 30 Amp Pink – Trailer Tow Receptacle - If
Equipped
F32 30 Amp Pink – Drive Train Control Module
F34 30 Amp Pink – Slip Differential Control
MAINTAINING YOUR VEHICLE
249
Page 258 of 276
Full Size Spare — If Equipped
The full size spare is for temporary emergency use only. This tire may look like the
originally equipped tire on the front or rear axle of your vehicle, but it is not. This
spare tire may have limited tread life. When the tread is worn to the tread wear
indicators, the temporary use full size spare tire needs to be replaced. Since it is not
the same as your original equipment tire, replace (or repair) the original equipment
tire and reinstall on the vehicle at the first opportunity.
Limited Use Spare — If Equipped
The limited-use spare tire is for temporary emergency use only. This tire is identified
by a label located on the limited-use spare wheel. This label contains the driving
limitations for this spare. This tire may look like the original equipped tire on the front
or rear axle of your vehicle, but it is not. Installation of this limited-use spare tire
affects vehicle handling. Since it is not the same as your original equipment tire,
replace (or repair) the original equipment tire and reinstall on the vehicle at the first
opportunity.
WARNING!
Limited-use spares are for emergency use only. Installation of this limited-use
spare tire affects vehicle handling. With this tire, do not drive more than the speed
listed on the limit-use spare wheel. Keep inflated to the cold tire inflation
pressures listed on your Tire and Loading Information Placard located on the
driver’s side B-Pillar or the rear edge of the driver’s side door. Replace (or repair)
the original equipment tire at the first opportunity and reinstall it on your vehicle.
Failure to do so could result in loss of vehicle control.
Wheel And Wheel Trim Care
All wheels and wheel trim, especially aluminum and chrome plated wheels, should
be cleaned regularly with a mild soap and water to prevent corrosion.
To remove heavy soil and/or excessive brake dust, use MOPAR Wheel Cleaner or
equivalent or select a non-abrasive, non-acidic cleaner.
CAUTION!
Do not use scouring pads, steel wool, a bristle brush, or metal polishes. Do not use
oven cleaner. These products may damage the wheel's protective finish. Avoid
automatic car washes that use acidic solutions or harsh brushes that may damage
the wheel's protective finish. Only MOPAR Wheel Cleaner or equivalent is
recommended.
MAINTAINING YOUR VEHICLE
256
Page 265 of 276
AccessUconnect .........78,80,84
Accessories ..............260 Mopar ...............260
Adaptive Cruise Control (ACC) Off ..................53
On ..................53
Adaptive Cruise Control (ACC) (Cruise Control) ...........53
Adding Engine Coolant (Antifreeze) .............232
Adding Fuel ..............253
Adding Washer Fluid .........232
Air Bag AdvancedFrontAirBag ......19
AdvanceFrontAirBag ......19
AirBags ...............19
Air Bag Warning Light .19, 22, 190
Driver Knee Air Bag ........20
Enhanced Accident
Response ...........21,216
Event Data Recorder
(EDR) .............22,216
FrontAirBag ............19
PassengerKneeAirBag ......20
Rollover ...............19
SideAirBags ............20
SideImpacts ............19
AirBagLight..............22
Air Cleaner, Engine (Engine Air Cleaner Filter) ...........232
Air Conditioner Maintenance ....232
Air Conditioning ..........66,68
Air Conditioning Refrigerant .....232
Air Conditioning System .......232
Air Suspension ............158
Alarm Arm The System ..........17
Disarm The System ........17
Vehicle Security Alarm ......17
Alarm (Security Alarm) .....17,195
Antifreeze (Engine Coolant) ........ 226, 228, 232
Capacities ............230
Disposal ..............232
Anti-Lock Brake System (ABS) . . .190
APP UconnectAccess..........81 Appearance Care
...........232
Arming System (Security Alarm) . . .17
Assistance Towing ..........189
Audio Jack ...............107
Automatic Headlights .........45
Automatic High Beams ........45
Automatic Temperature Control (ATC).................66
Automatic Transmission Adding Fluid ...........229
FluidType ...... 228, 229, 231
Shifting ...............59
AxleFluid......... 228, 229, 231
Axle Lubrication ............229
Background Themes Uconnect8.4A ..........100
Uconnect8.4N....... 100, 117
Back-Up Camera ............70
Battery .................232
Charging System Light .....189
Blind Spot Monitoring .........71
Body Mechanism Lubrication ....232
Brake Fluid ........ 228, 229, 231
Brakes .................232
Brake System .............232
FluidCheck ............229
Master Cylinder .........
2
32
WarningLight ..........193
Break-In Recommendations, Diesel................180
Break-In Recommendations, New Vehicle .............42
Bulb Replacement ..........257
Calibration, Compass .........147
Canada...............4,259
Capacities, Antifreeze (Engine Coolant) ..............230
Capacities, Fluid .....226, 228, 230
Caps, Filler Fuel ................216
Oil(Engine) ............232
CarWashes ..............232
CD (Compact Disc) Player ......107
Charging System Light ........189
Check Engine Light (Malfunction Indicator Light) ..........194
INDEX
263