steering wheel JEEP GRAND CHEROKEE 2016 WK2 / 4.G Owner's Guide
[x] Cancel search | Manufacturer: JEEP, Model Year: 2016, Model line: GRAND CHEROKEE, Model: JEEP GRAND CHEROKEE 2016 WK2 / 4.GPages: 276, PDF Size: 10.84 MB
Page 159 of 276
5. Using a ballpoint pen or similar object, press and hold the recessed transfer caseNEUTRAL (N) button (located by the selector switch) for four seconds. The light
behind the N symbol will blink, indicating shift in progress. The light will stop
blinking (stay on solid) when the shift to NEUTRAL (N) is complete. A “FOUR
WHEEL DRIVE SYSTEM IN NEUTRAL” message will display on the Driver
Information Display (DID).
6. After the shift is completed and the NEUTRAL (N) light stays on, release the NEUTRAL (N) button.
7. Shift the transmission into REVERSE.
8. Release the brake pedal for five seconds and ensure that there is no vehicle movement.
9. Press and hold the brake pedal. Shift the transmission back into NEUTRAL
10. Firmly apply the parking brake.
11. With the transmission and transfer case in NEUTRAL, press and hold the ENGINE START/STOP button until the engine turns off.
12. Move the transmission gear selector to PARK. Release the brake pedal.
13. Push the ENGINE STOP/START button twice (without pressing the brake pedal), to turn the ignition switch to the OFF position
Repeat these Steps 1 through 5 to shift out of NEUTRAL.
SELEC-TERRAIN
Selec-Terrain combines the capabilities of the vehicle control systems, along with
driver input, to provide the best performance for all terrains.
Rotate the mode control knob to select the following Selec-Terrain positions:
Snow – Tuning set for additional stability in inclement weather. Use on and off road
on loose traction surfaces such as snow. When in Snow mode (depending on certain
operating conditions), the transmission may use second gear (rather than first gear)
during launches, to minimize wheel slippage. If equipped with air suspension, the
level will change to Normal Ride Height (NRH).
Auto – Fully automatic full time four-wheel drive operation can be used on and off
road. Balances traction with seamless steering feel to provide improved handling and
acceleration over two-wheel drive vehicles. If equipped with air suspension, the level
will change to NRH.
Sand – Off road calibration for use on low traction surfaces such as sand or wet grass.
Driveline is maximized for traction. Some binding may be felt on less forgiving
surfaces. The electronic brake controls are set to limit traction control management
of throttle and wheel spin. If equipped with air suspension, the level will change to
NRH.
OFF-ROAD CAPABILITIES (4WD OPERATION)
157
Page 175 of 276
SELEC-TRACK
Selec-Track combines the capabilities of
the vehicle control systems, along with
driver input, to provide the best perfor-
mance for all terrains.
Rotate the mode control knob to select
the following Selec-Track positions:
•Sport - Dry weather, on-road calibra-
tion. Performance based tuning that
provides a rear wheel drive feel but with improved handling and acceleration over
a two-wheel drive vehicle. The active suspension system will be in a semi firm
mode, and a green flag will light up in the instrument cluster.
• Snow - Tuning set for additional stability in inclement weather. Use on and off road
on loose traction surfaces such as snow.
• Auto - Fully automatic full time four-wheel drive operation can be used on and off
road. This position balances traction with seamless steering feel to provide
improved handling and acceleration over two-wheel drive vehicles.
• Track - This position offers track road calibration for use on high traction surfaces.
Driveline is maximized for traction. Some binding may be felt on less forgiving
surfaces.
• To w - Use this mode for towing. Vehicle suspension will go to Firm mode.
Active Damping System
This vehicle is equipped with an electronic controlled damping system. This system
reduces body roll and pitch in many driving situations including cornering, accelera-
tion and braking. There are 3 modes:
•Street Mode (Available in terrain positions AUTO, SNOW and CUSTOM.) — Used
during highway speeds where a touring suspension feel is desired.
• Sport Mode (Available in terrain positions AUTO, SPORT, CUSTOM and TOW.) —
Provides a firm suspension for better handling.
• Track Firm (Available in terrain positions AUTO, TRACK and CUSTOM.) —
Provides a full firm suspension for an aggressive track experience.
Selec-Track switch
SRT
173
Page 176 of 276
Launch Mode — If Equipped
This system maximizes acceleration traction for straight line racing. To use Launch
Mode please follow the steps below:
1. Bring vehicle to complete stop on a level track surface with the engine running.
2. Set the steering wheel for straight ahead driving.
3. Fully press the brake pedal.
4. Press and release the “LAUNCH” Button.
5. Press the accelerator pedal to the floor.
NOTE:
If the cluster launch DID message indicates all conditions are correct for launch and
the throttle is pressed to the floor quickly (within approximately 1/2 second) the
system will hold the engine speed to a preset speed (below the engine rev limiter
speed).
6. Release the brake pedal.
Pressing the launch control button when launch control is active will deactivate
launch control.
NOTE:
• Launch Mode brings the engine to optimum RPM and waits for the driver torelease the brake. Launch Mode then uses engine throttle only to achieve
controlled wheelslip for maximum acceleration through 62 mph (100 km/h).
• Launch Mode can be initiated in any of the Select Trac Modes.
• Launch Mode is not available until the 500 mile (805 km) break-in has been achieved.
SRT
174
Page 180 of 276
Gauges 2
When selected, this screen displays the following values:
Intake Air Temperature
• Shows the actual intake air temperature.
Battery Voltage
• Shows the actual battery voltage.
Transmission Temperature
• Shows the actual transmission temperature.
G-Force
When selected, this screen displays all four G-Force values (two lateral and two
longitudinal) as well as steering angle.
The following features are available:
Lateral G-Force Left and Right
• The lateral g-force measures the (sideways) left and right force of the vehicle.
Longitudinal G-Force Acceleration and Braking
• The longitudinal g-force measures the acceleration and braking force of thevehicle.
Peak G-Forces Acceleration and Braking, Left and Right
• This shows the maximum g-forces that have been achieved since the last reset from the DID. Peak values are maintained through ignition cycles by the DID until
they are cleared by the driver.
Vehicle Speed
• Vehicle Speed measures the current speed of the vehicle in either mph or km/h, starting at 0 with no maximum value.
Steering Wheel Angle
• Steering Wheel Angle utilizes the steering angle sensor to measure the degree of the steering wheel relative to zero. The zero degree measurement indicates a
steering wheel straight ahead position. When the steering angle value is negative,
this indicates a turn to the left, and when the steering angle value is positive, a turn
to the right.
SRT
178
Page 215 of 276
If you must use the accessories (wipers, defrosters, etc.) while being towed, the
ignition must be in the ON/RUN position, not the ACC position.
If the key fob is unavailable, or the vehicle's battery is discharged, refer to “Manual
Park Release” in this section for instructions on shifting the transmission out of
PARK for towing.
CAUTION!
• Do not use sling type equipment when towing. Vehicle damage may occur.
• When securing the vehicle to a flat bed truck, do not attach to front or rearsuspension components. Damage to your vehicle may result from improper
towing.
Two-Wheel Drive Models
The manufacturer recommends towing your vehicle with all four wheels OFFthe
ground using a flatbed.
If flatbed equipment is not available, and the transmission is operable, the vehicle
may be towed (with rear wheels on the ground) under the following conditions:
• The transmission must be in NEUTRAL. Refer to "Manual Park Release" in this section for instructions on shifting the transmission to NEUTRAL when the engine
is off.
• The towing speed must not exceed 30 mph (48 km/h).
• The towing distance must not exceed 30 miles (48 km).
If the transmission is not operable, or the vehicle must be towed faster than 30 mph
(48 km/h) or farther than 30 miles (48 km), tow with the rear wheels OFFthe ground.
Acceptable methods are to tow the vehicle on a flatbed, or with the front wheels
raised and the rear wheels on a towing dolly, or (when using a suitable steering wheel
stabilizer to hold the front wheels in the straight position) with the rear wheels raised
and the front wheels on the ground.
CAUTION!
Towing faster than 30 mph (48 km/h) or farther than 30 miles (48 km) with rear
wheels on the ground can cause severe transmission damage. Damage from
improper towing is not covered under the New Vehicle Limited Warranty.
WHAT TO DO IN EMERGENCIES
213
Page 216 of 276
Four-Wheel Drive Models
The manufacturer recommends towing with all wheelsOFFthe ground. Acceptable
methods are to tow the vehicle on a flatbed or with one end of vehicle raised and the
opposite end on a towing dolly.
If flatbed equipment is not available, and the transfer case is operable, vehicles with
a two-speed transfer case may be towed (in the forward direction, with ALLwheels on
the ground), IFthe transfer case is in NEUTRAL (N) and the transmission is in PARK.
Refer to “Recreational Towing” in “Starting And Operating” in the Owner’s Manual
on the DVD for detailed instructions.
Vehicles equipped with a single-speed transfer case have no NEUTRAL position, and
therefore mustbe towed with all four wheels OFFthe ground.
CAUTION!
• Front or rear wheel lifts must not be used. Internal damage to the transmission
or transfer case will occur if a front or rear wheel lift is used when towing.
• Towing this vehicle in violation of the above requirements can cause severe
transmission and/or transfer case damage. Damage from improper towing is
not covered under the New Vehicle Limited Warranty.
FREEING A STUCK VEHICLE
If your vehicle becomes stuck in mud, sand or snow, it can often be moved using a
rocking motion. Turn the steering wheel right and left to clear the area around the
front wheels. Push and hold the lock button on the gear selector. Then shift back and
forth between DRIVE and REVERSE while gently pressing the accelerator.
NOTE:
Shifts between DRIVE and REVERSE can only be achieved at wheel speeds of 5 mph
(8 km/h) or less. Whenever the transmission remains in NEUTRAL for more than two
seconds, you must push the brake pedal to engage DRIVE or REVERSE.
Use the least amount of accelerator pedal pressure that will maintain the rocking
motion without spinning the wheels or racing the engine.
WHAT TO DO IN EMERGENCIES
214
Page 219 of 276
OPENING THE HOOD
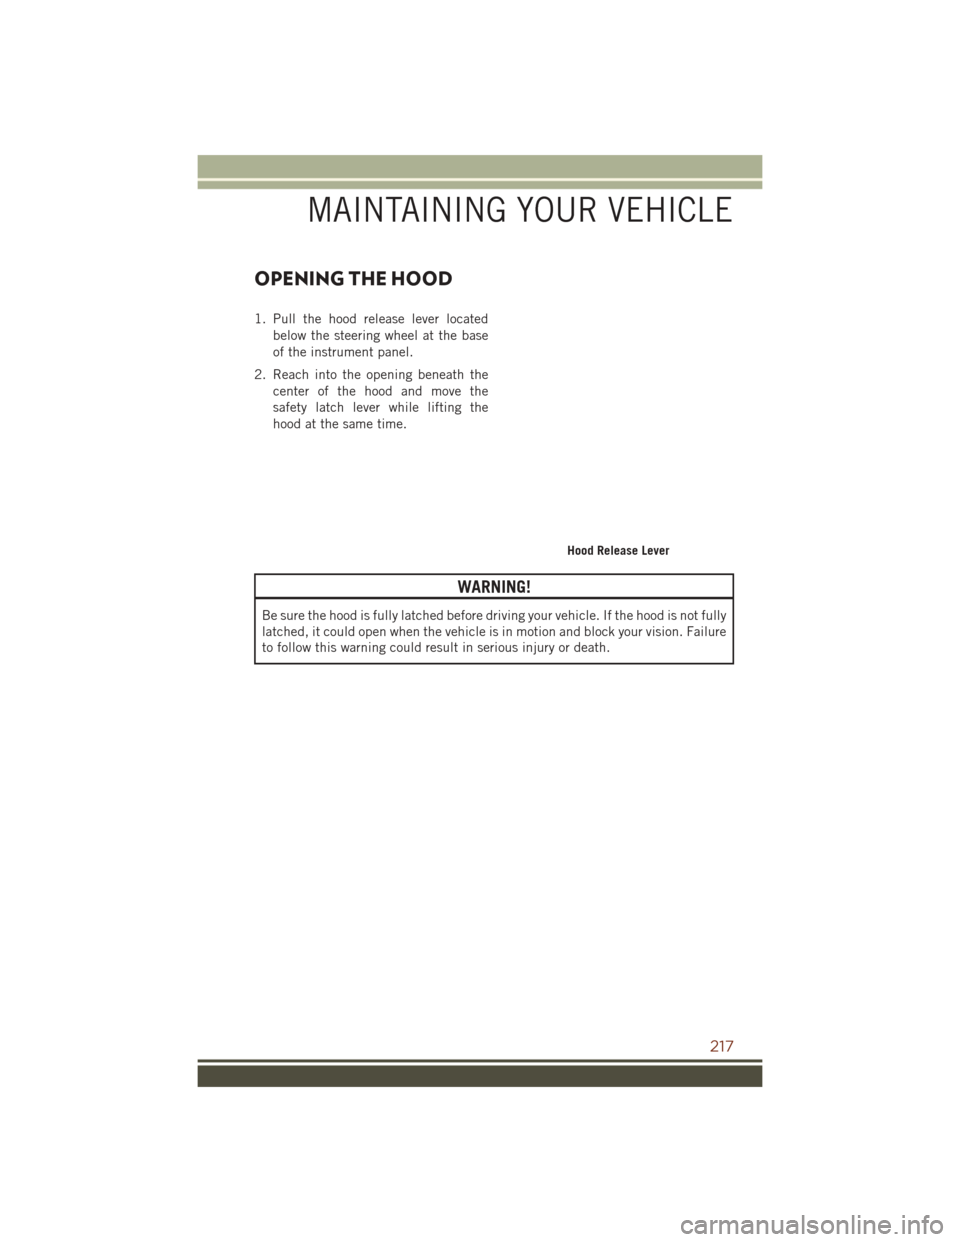
1. Pull the hood release lever locatedbelow the steering wheel at the base
of the instrument panel.
2. Reach into the opening beneath the center of the hood and move the
safety latch lever while lifting the
hood at the same time.
WARNING!
Be sure the hood is fully latched before driving your vehicle. If the hood is not fully
latched, it could open when the vehicle is in motion and block your vision. Failure
to follow this warning could result in serious injury or death.
Hood Release Lever
MAINTAINING YOUR VEHICLE
217
Page 253 of 276
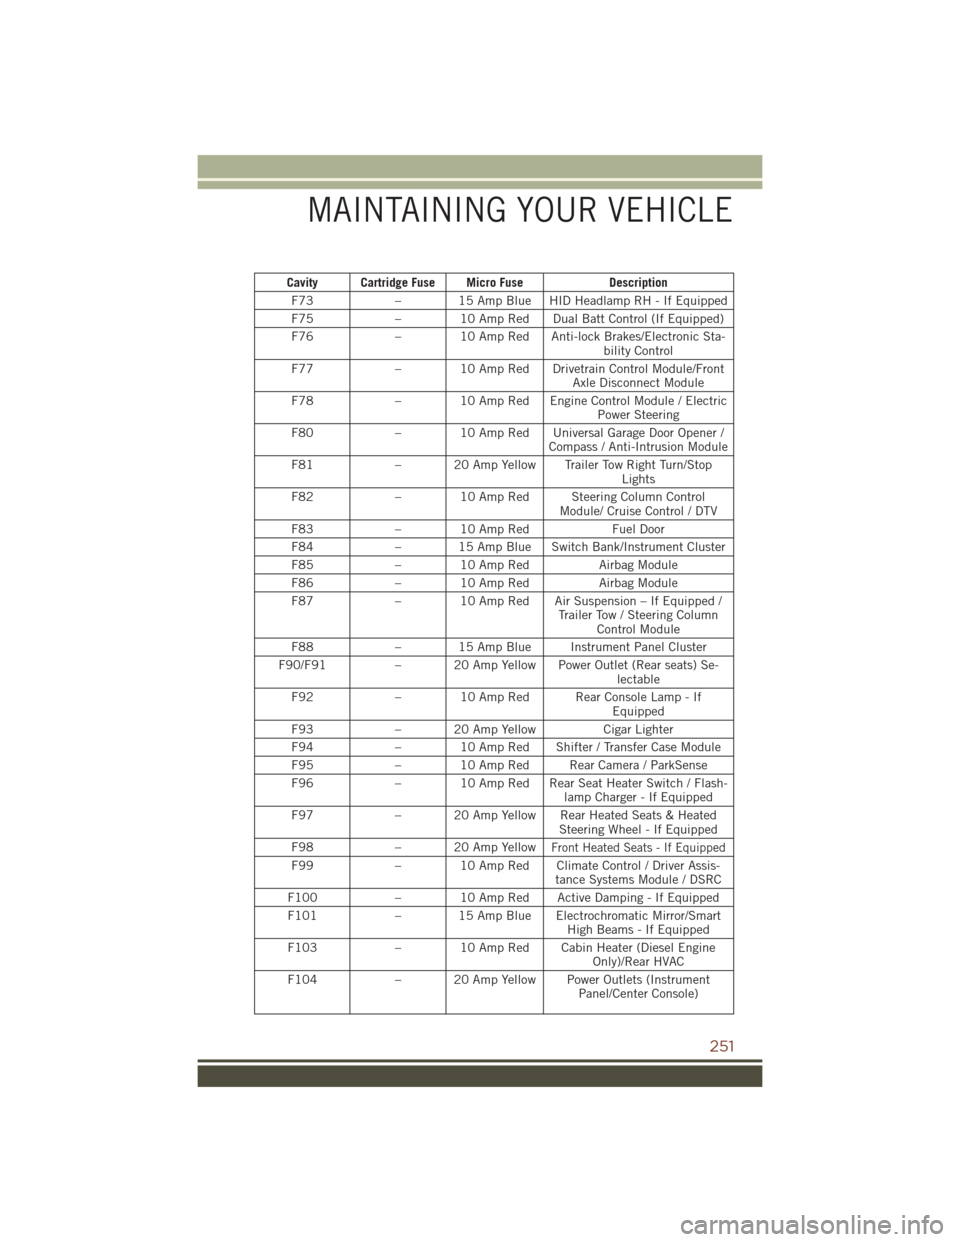
Cavity Cartridge Fuse Micro FuseDescription
F73 – 15 Amp Blue HID Headlamp RH - If Equipped
F75 – 10 Amp Red Dual Batt Control (If Equipped)
F76 – 10 Amp Red Anti-lock Brakes/Electronic Sta-
bility Control
F77 – 10 Amp Red Drivetrain Control Module/Front
Axle Disconnect Module
F78 – 10 Amp Red Engine Control Module / Electric
Power Steering
F80 – 10 Amp Red Universal Garage Door Opener /
Compass / Anti-Intrusion Module
F81 – 20 Amp Yellow Trailer Tow Right Turn/Stop
Lights
F82 – 10 Amp Red Steering Column Control
Module/ Cruise Control / DTV
F83 – 10 Amp Red Fuel Door
F84 – 15 Amp Blue Switch Bank/Instrument Cluster
F85 – 10 Amp Red Airbag Module
F86 – 10 Amp Red Airbag Module
F87 – 10 Amp Red Air Suspension – If Equipped /
Trailer Tow / Steering ColumnControl Module
F88 – 15 Amp Blue Instrument Panel Cluster
F90/F91 – 20 Amp Yellow Power Outlet (Rear seats) Se-
lectable
F92 – 10 Amp Red Rear Console Lamp - If
Equipped
F93 – 20 Amp Yellow Cigar Lighter
F94 – 10 Amp Red Shifter / Transfer Case Module
F95 – 10 Amp Red Rear Camera / ParkSense
F96 – 10 Amp Red Rear Seat Heater Switch / Flash-
lamp Charger - If Equipped
F97 – 20 Amp Yellow Rear Heated Seats & Heated
Steering Wheel - If Equipped
F98 – 20 Amp Yellow
Front Heated Seats - If Equipped
F99– 10 Amp Red Climate Control / Driver Assis-
tance Systems Module / DSRC
F100 – 10 Amp Red Active Damping - If Equipped
F101 – 15 Amp Blue Electrochromatic Mirror/Smart
High Beams - If Equipped
F103 – 10 Amp Red Cabin Heater (Diesel Engine
Only)/Rear HVAC
F104 – 20 Amp Yellow Power Outlets (Instrument
Panel/Center Console)
MAINTAINING YOUR VEHICLE
251
Page 270 of 276
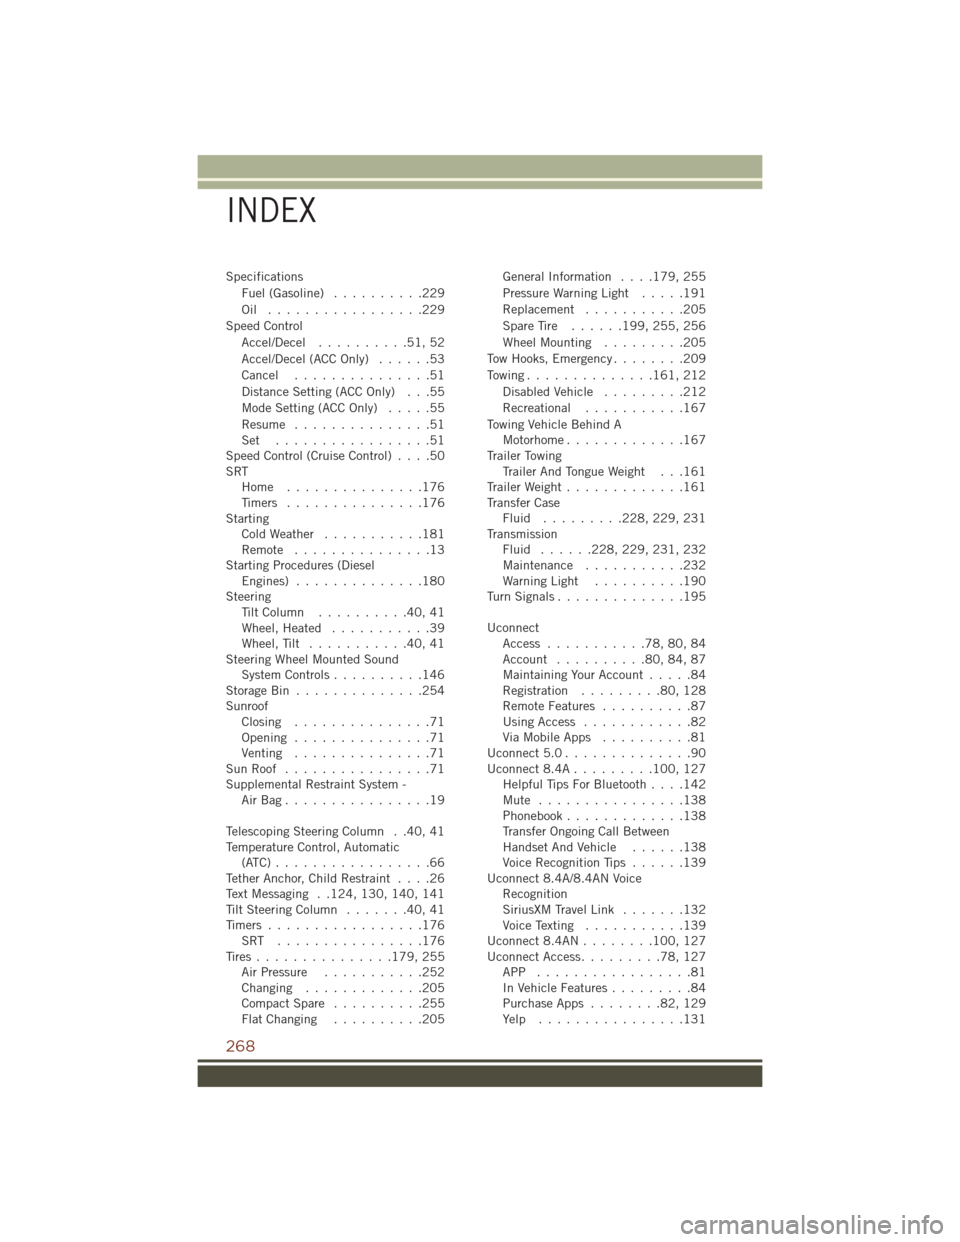
SpecificationsFuel (Gasoline) ..........229
Oil .................229
Speed Control Accel/Decel ..........51,52
Accel/Decel (ACC Only) ......53
Cancel ...............51
Distance Setting (ACC Only) . . .55
Mode Setting (ACC Only) .....55
Resume ...............51
Set .................51
Speed Control (Cruise Control) ....50
SRT Home ...............176
Timers ...............176
Starting ColdWeather ...........181
Remote ...............13
Starting Procedures (Diesel Engines) ..............180
Steering TiltColumn ..........40,41
Wheel, Heated ...........39
Wheel, Tilt ...........40,41
Steering Wheel Mounted Sound System Controls ..........146
Storage Bin ..............254
Sunroof Closing ...............71
Opening ...............71
Venting ...............71
SunRoof ................71
Supplemental Restraint System - AirBag................19
Telescoping Steering Column . .40, 41
Temperature Control, Automatic (ATC).................66
Tether Anchor, Child Restraint ....26
Text Messaging . .124, 130, 140, 141
Tilt Steering Column .......40,41
Timers.................176 SRT ................176
Tires ............... 179, 255
Air Pressure ...........252
Changing .............205
CompactSpare ..........255
FlatChanging ..........205 General Information
....179, 255
Pressure Warning Light .....191
Replacement ...........205
SpareTire ...... 199, 255, 256
WheelMounting .........205
Tow Hooks, Emergency ........209
Towing.............. 161, 212
Disabled Vehicle .........212
Recreational ...........167
Towing Vehicle Behind A Motorhome .............167
Trailer Towing Trailer And Tongue Weight . . .161
Trailer Weight .............161
Transfer Case Fluid ......... 228, 229, 231
Transmission Fluid ...... 228, 229, 231, 232
Maintenance ...........232
Warning Light ..........190
TurnSignals..............195
Uconnect Access ...........78,80,84
Account ..........80,84,87
Maintaining Your Account .....84
Registration .........80,128
RemoteFeatures ..........87
Using Access ............82
Via Mobile Apps ..........81
Uconnect5.0..............90
Uconnect8.4A......... 100, 127
Helpful Tips For Bluetooth ....142
Mute ................138
P h
onebook.............138
Transfer Ongoing Call Between
HandsetAndVehicle ......138
Voice Recognition Tips ......139
Uconnect 8.4A/8.4AN Voice Recognition
SiriusXM Travel Link .......132
Voice Texting ...........139
Uconnect8.4AN........ 100, 127
Uconnect Access .........78,127
APP .................81
In Vehicle Features .........84
Purchase Apps ........82,129
Yelp ................131
INDEX
268