radiator JEEP GRAND CHEROKEE 2017 WK2 / 4.G Owners Manual
[x] Cancel search | Manufacturer: JEEP, Model Year: 2017, Model line: GRAND CHEROKEE, Model: JEEP GRAND CHEROKEE 2017 WK2 / 4.GPages: 633, PDF Size: 6.6 MB
Page 88 of 633
CAUTION!
Failure to follow these cautions can cause damage to
the heating elements:
•Use care when washing the inside of the rear win-
dow. Do not use abrasive window cleaners on the
interior surface of the window. Use a soft cloth and a
mild washing solution, wiping parallel to the heat-
ing elements. Labels can be peeled off after soaking
with warm water.
• Do not use scrapers, sharp instruments, or abrasive
window cleaners on the interior surface of the win-
dow.
• Keep all objects a safe distance from the window.
Climate Control Functions
A/C (Air Conditioning)
The Air Conditioning (A/C) button allows the operator to
manually activate or deactivate the air conditioning sys-
tem. When the air conditioning system is turned on, cool
dehumidified air will flow through the outlets into the
cabin. For improved fuel economy, press the A/C button to
turn off the air conditioning and manually adjust the
blower and airflow mode settings. Also, make sure to select
only Panel, Bi-Level or Floor modes. NOTE:
•
If fog or mist appears on the windshield or side glass,
select Defrost mode and increase blower speed if needed.
• If your air conditioning performance seems lower than
expected, check the front of the A/C condenser (located
in front of the radiator), for an accumulation of dirt or
insects. Clean with a gentle water spray from the front of
the radiator and through the condenser.
MAX A/C
MAX A/C sets the control for maximum cooling perfor-
mance.
Press and release to toggle between MAX A/C and the prior
settings. The button illuminates when MAX A/C is on.
In MAX A/C, the blower level and mode position can be
adjusted to desired user settings. Pressing other settings
will cause the MAX A/C operation to switch to the selected
setting and MAX A/C to exit.
Recirculation
When outside air contains smoke, odors, or high humidity,
or if rapid cooling is desired, you may wish to recirculate
interior air by pressing the Recirculation control button.
The recirculation indicator will illuminate when this button
86 GETTING TO KNOW YOUR VEHICLE
Page 396 of 633
speed, apply them lightly and avoid locking or skidding
the tires.
WARNING!
If the engine stalls, you lose forward motion, or cannot
make it to the top of a steep hill or grade, never attempt
to turn around. To do so may result in tipping and
rolling the vehicle. Always back carefully straight
down a hill in REVERSE gear. Never back down a hill
in NEUTRAL using only the brake.
Remember, never drive diagonally across a hill always
drive straight up or down.
If the wheels start to slip as you approach the crest of a hill,
ease off the accelerator and maintain forward motion by
turning the front wheels slowly. This may provide a fresh
“bite” into the surface and will usually provide traction to
complete the climb.
Traction Downhill
When descending mountains or hills, use Hill Descent or
Selec-Speed Control to avoid repeated heavy braking. If not equipped with Hill Descent or Selec-Speed Control
use the following procedure:
Shift the transmission into a low gear, and the transfer case
into 4WD LOW range. Let the vehicle go slowly down the
hill with all four wheels turning against engine compres-
sion drag. This will permit you to control the vehicle speed
and direction.
When descending mountains or hills, repeated braking can
cause brake fade with loss of braking control. Avoid
repeated heavy braking by downshifting the transmission
whenever possible.
After Driving Off-Road
Off-road operation puts more stress on your vehicle than
does most on-road driving. After going off-road, it is
always a good idea to check for damage. That way you can
get any problems taken care of right away and have your
vehicle ready when you need it.
•
Completely inspect the underbody of your vehicle.
Check tires, body structure, steering, suspension, and
exhaust system for damage.
• Inspect the radiator for mud and debris and clean as
required.
394 STARTING AND OPERATING
Page 397 of 633
•Check threaded fasteners for looseness, particularly on
the chassis, drivetrain components, steering, and sus-
pension. Retighten them, if required, and torque to the
values specified in the Service Manual.
• Check for accumulations of plants or brush. These things
could be a fire hazard. They might hide damage to fuel
lines, brake hoses, axle pinion seals, and propeller shafts.
• After extended operation in mud, sand, water, or similar
dirty conditions, have the radiator, fan, brake rotors,
wheels, brake linings, and axle yokes inspected and
cleaned as soon as possible.WARNING!
Abrasive material in any part of the brakes may cause
excessive wear or unpredictable braking. You might
not have full braking power when you need it to
prevent a collision. If you have been operating your
vehicle in dirty conditions, get your brakes checked
and cleaned as necessary.
• If you experience unusual vibration after driving in
mud, slush or similar conditions, check the wheels for
impacted material. Impacted material can cause a wheel
imbalance and freeing the wheels of it will correct the
situation.
6
STARTING AND OPERATING 395
Page 413 of 633
Underhood Fuses
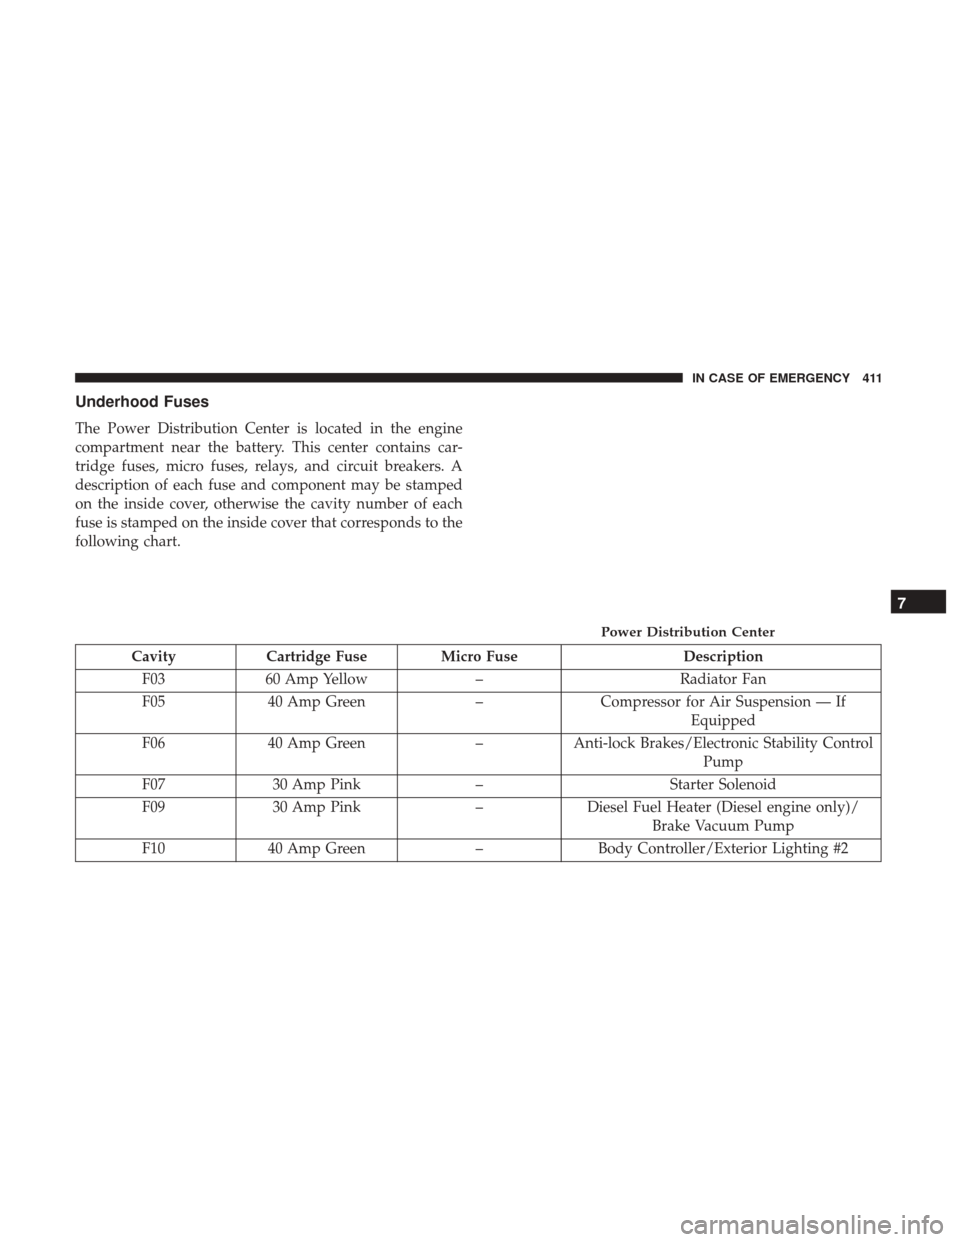
The Power Distribution Center is located in the engine
compartment near the battery. This center contains car-
tridge fuses, micro fuses, relays, and circuit breakers. A
description of each fuse and component may be stamped
on the inside cover, otherwise the cavity number of each
fuse is stamped on the inside cover that corresponds to the
following chart.
CavityCartridge Fuse Micro Fuse Description
F03 60 Amp Yellow –Radiator Fan
F05 40 Amp Green –Compressor for Air Suspension — If
Equipped
F06 40 Amp Green –Anti-lock Brakes/Electronic Stability Control
Pump
F07 30 Amp Pink –Starter Solenoid
F09 30 Amp Pink –Diesel Fuel Heater (Diesel engine only)/
Brake Vacuum Pump
F10 40 Amp Green –Body Controller/Exterior Lighting #2
Power Distribution Center
7
IN CASE OF EMERGENCY 411
Page 428 of 633
WARNING!
•Take care to avoid the radiator cooling fan whenever
the hood is raised. It can start anytime the ignition
switch is ON. You can be injured by moving fan
blades.
• Remove any metal jewelry such as rings, watch
bands and bracelets that could make an inadvertent
electrical contact. You could be seriously injured.
• Batteries contain sulfuric acid that can burn your
skin or eyes and generate hydrogen gas which is
flammable and explosive. Keep open flames or
sparks away from the battery.
NOTE: Be sure that the disconnected ends of the cables do
not touch while still connected to the either vehicle.
1. Set the parking brake, shift the automatic transmission into PARK and turn the ignition to OFF/LOCK.
2. Turn off the heater, radio, and all unnecessary electrical accessories.
3. Remove the protective cover over the remote positive (+) battery post. Pull upward on the cover to remove it. 4. If using another vehicle to jump-start the battery, park
the vehicle within the jumper cables reach, set the
parking brake and make sure the ignition is OFF.
WARNING!
Do not allow vehicles to touch each other as this could
establish a ground connection and personal injury
could result.
Jump-Starting Procedure
WARNING!
Failure to follow this jump-starting procedure could
result in personal injury or property damage due to
battery explosion.
CAUTION!
Failure to follow these procedures could result in
damage to the charging system of the booster vehicle
or the discharged vehicle.
NOTE: Make sure at all times that unused ends of jumper
cables are not contacting each other or either vehicle while
making connections.
426 IN CASE OF EMERGENCY
Page 430 of 633
If frequent jump-starting is required to start your vehicle
you should have the battery and charging system tested at
your authorized dealer.
CAUTION!
Accessories plugged into the vehicle power outlets
draw power from the vehicle’s battery, even when not
in use (i.e., cellular devices, etc.). Eventually, if plugged
in long enough without engine operation, the vehicle’s
battery will discharge sufficiently to degrade battery
life and/or prevent the engine from starting.
REFUELING IN EMERGENCY
The funnel for the Cap-Less Fuel System is located in the
spare tire storage area. If your vehicle is out of fuel and an
auxiliary fuel can is needed, insert the funnel into the filler
neck and proceed to fill the vehicle.
For more information on the Cap-Less Fuel System refer to
“Refueling The Vehicle” in “Starting And Operating ” in
this manual.
IF YOUR ENGINE OVERHEATS
In any of the following situations, you can reduce the
potential for overheating by taking the appropriate action.
•On the highways — slow down.
• In city traffic — while stopped, place the transmission in
NEUTRAL, but do not increase the engine idle speed
while preventing vehicle motion with the brakes.
NOTE: There are steps that you can take to slow down an
impending overheat condition:
• If your air conditioner (A/C) is on, turn it off. The A/C
system adds heat to the engine cooling system and
turning the A/C off can help remove this heat.
• You can also turn the temperature control to maximum
heat, the mode control to floor and the blower control to
high. This allows the heater core to act as a supplement
to the radiator and aids in removing heat from the
engine cooling system.
428 IN CASE OF EMERGENCY
Page 431 of 633
WARNING!
You or others can be badly burned by hot engine
coolant (antifreeze) or steam from your radiator. If you
see or hear steam coming from under the hood, do not
open the hood until the radiator has had time to cool.
Never try to open a cooling system pressure cap when
the radiator or coolant bottle is hot.
CAUTION!
Driving with a hot cooling system could damage your
vehicle. If the temperature gauge reads HOT (H), pull
over and stop the vehicle. Idle the vehicle with the air
conditioner turned off until the pointer drops back
into the normal range. If the pointer remains on HOT
(H), and you hear continuous chimes, turn the engine
off immediately and call for service.
MANUAL PARK RELEASE
WARNING!
Always secure your vehicle by fully applying the
parking brake, before activating the Manual Park
Release. Activating the Manual Park Release will al-
low your vehicle to roll away if it is not secured by the
parking brake or by proper connection to a tow vehicle.
Activating the Manual Park Release on an unsecured
vehicle could lead to serious injury or death for those
in or around the vehicle.
In order to move the vehicle in cases where the transmis-
sion will not shift out of PARK (such as a dead battery), a
Manual Park Release is available.
Follow these steps to use the Manual Park Release:
1. Firmly apply the parking brake.
2. Open the center console and locate the Manual Park Release cover, remove it by snapping the cover away
from the console hinges.
7
IN CASE OF EMERGENCY 429
Page 448 of 633
5.7L Engine
1 — Remote Jump Start Positive Terminal6 — Air Cleaner Filter
2 — Power Distribution Center (Fuses) 7 — Washer Fluid Reservoir
3 — Engine Oil Dipstick 8 — Coolant Pressure Cap (Radiator)
4 — Engine Oil Fill 9 — Engine Coolant Reservoir
5 — Brake Fluid Reservoir 10 — Remote Jump Start Negative Terminal
446 SERVICING AND MAINTENANCE
Page 450 of 633
Checking Oil Level — Gasoline Engine
To assure proper lubrication of your vehicle’s engine, the
engine oil must be maintained at the correct level. Check
the oil level at regular intervals, such as every fuel stop.
The best time to check the engine oil level is about five
minutes after a fully warmed up engine is shut off.
Checking the oil while the vehicle is on level ground will
improve the accuracy of the oil level readings. Always
maintain the oil level within the SAFE zone on the dipstick.
Adding one quart of oil when the reading is at the bottom
of the SAFE zone will result in a reading at the top of the
safe zone on these engines.
CAUTION!
Overfilling or underfilling the crankcase will cause
aeration or loss of oil pressure. This could damage your
engine.
Adding Washer Fluid
The instrument cluster display will indicate when the
washer fluid level is low. When the sensor detects a low
fluid level, the windshield will light on the vehicle graphic
outline and the “WASHER FLUID LOW” message will be
displayed.The fluid reservoir for the windshield washers and the rear
window washer is shared. The fluid reservoir is located in
the engine compartment, be sure to check the fluid level at
regular intervals. Fill the reservoir with windshield washer
solvent only (not radiator antifreeze). When refilling the
washer fluid reservoir, take some washer fluid and apply it
to a cloth or towel and wipe clean the wiper blades, this
will help blade performance. To prevent freeze-up of your
windshield washer system in cold weather, select a solu-
tion or mixture that meets or exceeds the temperature
range of your climate. This rating information can be found
on most washer fluid containers.
WARNING!
Commercially available windshield washer solvents
are flammable. They could ignite and burn you. Care
must be exercised when filling or working around the
washer solution.
Maintenance-Free Battery
Your vehicle is equipped with a maintenance-free battery.
You will never have to add water, nor is periodic mainte-
nance required.
448 SERVICING AND MAINTENANCE
Page 460 of 633
CAUTION!
The cabin air filter is identified with an arrow to
indicate airflow direction through the filter. Failure to
properly install the filter will result in the need to
replace it more often.
8. Reinstall the glove compartment door on the glove compartment door hinge and reattach the glove com-
partment tension tether by inserting the tether clip in the
glove compartment and sliding the clip away from the
face of the glove compartment door.
9. Push the door to the near closed position to reengage the glove compartment travel stops.
NOTE: Ensure the glove compartment door hinges and
glove compartment travel stops are fully engaged.
Accessory Drive Belt Inspection
WARNING!
• Do not attempt to inspect an accessory drive belt
with vehicle running.
(Continued)
WARNING! (Continued)
•When working near the radiator cooling fan, discon-
nect the fan motor lead. The fan is temperature
controlled and can start at any time regardless of
ignition mode. You could be injured by the moving
fan blades.
• You can be badly injured working on or around a
motor vehicle. Only do service work for which you
have the knowledge and the proper equipment. If
you have any doubt about your ability to perform a
service job, take your vehicle to a competent me-
chanic.
When inspecting accessory drive belts, small cracks that
run across ribbed surface of belt from rib to rib, are
considered normal. These are not a reason to replace belt.
However, cracks running along a rib (not across) are not
normal. Any belt with cracks running along a rib must be
replaced. Also have the belt replaced if it has excessive
wear, frayed cords or severe glazing.
458 SERVICING AND MAINTENANCE