tire pressure JEEP GRAND CHEROKEE 2017 WK2 / 4.G Owner's Manual
[x] Cancel search | Manufacturer: JEEP, Model Year: 2017, Model line: GRAND CHEROKEE, Model: JEEP GRAND CHEROKEE 2017 WK2 / 4.GPages: 372
Page 217 of 372

WARNING!
Do not exceed 50 mph (80 km/h) if the
“Tire Pressure Monitoring Telltale Light” is
illuminated. Vehicle handling and braking
may be reduced. You could have a collision
and be severely or fatally injured.
Jack/Spare Tire Stowage
Jack Location
The scissor-type jack and tire changing tools
are located in rear cargo area, below the load
floor.Spare Tire Stowage
The spare tire is stowed under the load floor
in the rear cargo area and is secured to the
body with a special wing nut.
Preparations For Jacking
CAUTION!
Always lift or jack the vehicle from the
correct jacking points. Failure to follow
this information could cause damage to
the vehicle or underbody components.
NOTE:
To assist with changing a spare tire, the air
suspension system (if equipped) has a fea-
ture which allows the automatic leveling to be
disabled.
1. Park the vehicle on a firm, level surface. Avoid ice or slippery surfaces.
Spare Tire/Jack And Tools
1 — Cap-Less Fuel Fill Funnel
2 — Spare Tire
3 — Tire Changing Tools And Jack
215
Page 226 of 372
REFUELING IN EMERGENCY
The funnel for the Cap-Less Fuel System is
located in the spare tire storage area. If your
vehicle is out of fuel and an auxiliary fuel can
is needed, insert the funnel into the filler
neck and proceed to fill the vehicle.
For more information on the Cap-Less Fuel
System refer to “Refueling The Vehicle” in
“Starting And Operating ” in this manual.
IF YOUR ENGINE
OVERHEATS
In any of the following situations, you can
reduce the potential for overheating by taking
the appropriate action.
• On the highways — slow down.
• In city traffic — while stopped, place thetransmission in NEUTRAL, but do not in-
crease the engine idle speed while prevent-
ing vehicle motion with the brakes. NOTE:
There are steps that you can take to slow
down an impending overheat condition:
• If your air conditioner (A/C) is on, turn it
off. The A/C system adds heat to the en-
gine cooling system and turning the A/C
off can help remove this heat.
• You can also turn the temperature control to maximum heat, the mode control to
floor and the blower control to high. This
allows the heater core to act as a supple-
ment to the radiator and aids in removing
heat from the engine cooling system.WARNING!
You or others can be badly burned by hot
engine coolant (antifreeze) or steam from
your radiator. If you see or hear steam
coming from under the hood, do not open
the hood until the radiator has had time to
cool. Never try to open a cooling system
pressure cap when the radiator or coolant
bottle is hot.
CAUTION!
Driving with a hot cooling system could
damage your vehicle. If the temperature
gauge reads HOT (H), pull over and stop
the vehicle. Idle the vehicle with the air
conditioner turned off until the pointer
drops back into the normal range. If the
pointer remains on HOT (H), and you hear
continuous chimes, turn the engine off
immediately and call for service.
MANUAL PARK RELEASE
WARNING!
Always secure your vehicle by fully apply-
ing the parking brake, before activating
the Manual Park Release. Activating the
Manual Park Release will allow your ve-
hicle to roll away if it is not secured by the
parking brake or by proper connection to a
tow vehicle. Activating the Manual Park
Release on an unsecured vehicle could
lead to serious injury or death for those in
or around the vehicle.
IN CASE OF EMERGENCY
224
Page 228 of 372
FREEING A STUCK VEHICLE
If your vehicle becomes stuck in mud, sand
or snow, it can often be moved using a rock-
ing motion. Turn the steering wheel right and
left to clear the area around the front wheels.
Push and hold the lock button on the gear
selector. Then shift back and forth between
DRIVE and REVERSE while gently pressing
the accelerator.
NOTE:
Shifts between DRIVE and REVERSE can
only be achieved at wheel speeds of 5 mph
(8 km/h) or less. Whenever the transmission
remains in NEUTRAL for more than two sec-
onds, you must press the brake pedal to
engage DRIVE or REVERSE.
Use the least amount of accelerator pedal
pressure that will maintain the rocking mo-
tion without spinning the wheels or racing the
engine.NOTE:
Push the "ESC Off" switch (if necessary), to
place the Electronic Stability Control (ESC)
system in "Partial Off" mode, before rocking
the vehicle. Refer to “Electronic Brake Con-
trol” in “Safety” in the Owners Manual at
www.jeep.com/en/owners/manuals/ for fur-
ther information. Once the vehicle has been
freed, push the "ESC Off" switch again to
restore "ESC On" mode.
WARNING!
Fast spinning tires can be dangerous.
Forces generated by excessive wheel
speeds may cause damage, or even failure,
of the axle and tires. A tire could explode
and injure someone. Do not spin your
vehicle's wheels faster than 30 mph
(48 km/h) or for longer than 30 seconds
continuously without stopping when you
are stuck and do not let anyone near a
spinning wheel, no matter what the speed.
CAUTION!
• Racing the engine or spinning the
wheels may lead to transmission over-
heating and failure. Allow the engine to
idle with the transmission in NEUTRAL
for at least one minute after every five
rocking-motion cycles. This will mini-
mize overheating and reduce the risk of
transmission failure during prolonged
efforts to free a stuck vehicle.
• When “rocking” a stuck vehicle by shift-
ing between DRIVE and REVERSE, do
not spin the wheels faster than 15 mph
(24 km/h), or drivetrain damage may
result.
• Revving the engine or spinning the
wheels too fast may lead to transmission
overheating and failure. It can also dam-
age the tires. Do not spin the wheels
above 30 mph (48 km/h) while in gear
(no transmission shifting occurring).
IN CASE OF EMERGENCY
226
Page 234 of 372
SCHEDULED SERVICING
NON-SRT
Your vehicle is equipped with an automatic
oil change indicator system. The oil change
indicator system will remind you that it is
time to take your vehicle in for scheduled
maintenance.
Based on engine operation conditions, the oil
change indicator message will illuminate.
This means that service is required for your
vehicle. Operating conditions such as fre-
quent short-trips, trailer tow, extremely hot or
cold ambient temperatures, and E85 fuel
usage will influence when the “Oil Change
Required” message is displayed. Severe op-erating conditions can cause the change oil
message to illuminate as early as
3,500 miles (5,600 km) since last reset.
Have your vehicle serviced as soon as pos-
sible, within the next 500 miles (805 km).
Your authorized dealer will reset the oil
change indicator message after completing
the scheduled oil change.
NOTE:
Under no circumstances should oil change
intervals exceed 10,000 miles (16,000 km),
twelve months or 350 hours of engine run
time, whichever comes first. The 350 hours
of engine run or idle time is generally only a
concern for fleet customers. Once A Month Or Before A Long Trip:
• Check engine oil level.
• Check windshield washer fluid level.
• Check the tire inflation pressures and look
for unusual wear or damage.
• Check the fluid levels of the coolant reser- voir, brake master cylinder and fill as
needed.
• Check function of all interior and exterior lights
Required Maintenance
Refer to the Maintenance Schedules on the
following pages for required maintenance.
At Every Oil Change Interval As Indicated By Oil Change Indicator System:
• Change oil and filter.
• Rotate the tires. Rotate at the first sign of irregular wear, even if it occurs before the oil indicator system turns on.
• Inspect battery and clean and tighten terminals as required.
• Inspect brake pads, shoes, rotors, drums, hoses and park brake.
• Inspect engine cooling system protection and hoses.
• Inspect exhaust system.
• Inspect engine air cleaner if using in dusty or off-road conditions.SERVICING AND MAINTENANCE
232
Page 237 of 372
SCHEDULED SERVICING –
SRT
The Scheduled Maintenance services listed in
this manual must be done at the times or mile-
ages specified to protect your vehicle warranty
and ensure the best vehicle performance and
reliability. More frequent maintenance may be
needed for vehicles in severe operating condi-
tions, such as dusty areas and very short trip
driving. Inspection and service should also be
done anytime a malfunction is suspected.
The oil change indicator system will remind
you that it is time to take your vehicle in for
scheduled maintenance.
The Instrument Cluster Display will display
an “Oil Change Required” message and a
single chime will sound, indicating that an oil
change is necessary.
Based on engine operation conditions, the oil
change indicator message will illuminate. This
means that service is required for your vehicle.
Have your vehicle serviced as soon as possible,
within the next 500 miles (805 km).
NOTE:
• The oil change indicator message will notmonitor the time since the last oil change.
Change your vehicle's oil if it has been six
months since your last oil change, even if
the oil change indicator message is NOT
illuminated.
• Change your engine oil more often if you drive your vehicle off-road for an extended
period of time.
•
Under no circumstances should oil change
intervals exceed 6,000 miles (10,000 km) or
six months, whichever comes first.
Your authorized dealer will reset the oil change
indicator message after completing the sched-
uled oil change. If a scheduled oil change is
performed by someone other than your autho-
rized dealer, the message can be reset by
referring to the steps described under “Instru-
ment Cluster Display” in “Getting To Know
Your Instrument Panel” in this guide.
At Each Stop For Fuel
• Check the engine oil level. Refer to “En- gine Compartment” in this section for fur-
ther information. • Check the windshield washer solvent and
add if required.
Once A Month
• Check tire pressure and look for unusual wear or damage.
• Inspect the battery, and clean and tighten the terminals as required.
• Check the fluid levels of the coolant reser- voir, engine oil, brake master cylinder, and
add as needed.
• Check all lights and other electrical items for correct operation.
At Each Oil Change
• Change the engine oil filter.
• Inspect the brake hoses and lines.
CAUTION!
Failure to perform the required mainte-
nance items may result in damage to the
vehicle.
235
Page 241 of 372
SCHEDULED SERVICING —
DIESEL ENGINE
Your vehicle is equipped with an automatic
oil change indicator system. The oil change
indicator system will remind you that it is
time to take your vehicle in for scheduled
maintenance.
Based on engine operation conditions, the oil
change indicator message will illuminate.
This means that service is required for your
vehicle. Operating conditions such as fre-
quent short-trips, trailer tow, extremely hot or
cold ambient temperatures will influence
when the “Oil Change Required” message is
displayed. Severe Operating Conditions can
cause the change oil message to illuminate
as early as 3,500 miles (5,600 km) since last
reset. Have your vehicle serviced as soon as
possible, within the next 500 miles
(805 km).Your authorized dealer will reset the oil
change indicator message after completing
the scheduled oil change. If a scheduled oil
change is performed by someone other than
your authorized dealer, the message can be
reset by referring to the steps described un-
der “Instrument Cluster Display” in “Getting
To Know Your Instrument Panel” in this
guide.
NOTE:
Under no circumstances should oil change
intervals exceed 10,000 miles (16,000 km)
or twelve months, whichever comes first.
Engine Oil Filter Replacement
Residual oil in the housing may spill from the
housing when the new filter is installed if the
residual oil is not either removed from the
housing or enough time has not elapsed to
allow the oil to drain back into the engine.
When servicing the oil filter on this engine,carefully remove the filter and use a suction
gun to remove any residual oil left in the
housing or wait about 30 minutes for the oil
to drain back into the engine.
Once A Month Or Before A Long Trip:
• Check engine oil level
• Check windshield washer fluid level
• Check the tire inflation pressures and look
for unusual wear or damage
• Check the fluid levels of the coolant reser- voir, brake master cylinder, and fill as
needed
• Check function of all interior and exterior lights
239
Page 259 of 372
Installing The Rear Wiper
1. Lift the rear wiper arm pivot cap awayfrom the glass to allow the rear wiper
blade to be raised off of the glass.
NOTE:
The rear wiper arm cannot be fully raised
off the glass unless the wiper arm pivot
cap is unsnapped first. Attempting to fully
raise the rear wiper arm without unsnap-
ping the wiper arm pivot cap may damage
the vehicle.
2. Lift the rear wiper arm fully off the glass.
3. Insert the wiper blade pivot pin into the opening on the end of the wiper arm. Grab
the bottom end of the wiper arm with one
hand, and press the wiper blade flush with
the wiper arm until it snaps into place.
4. Lower the wiper blade onto the glass and snap the wiper arm pivot cap back into
place.Cooling System
WARNING!
You or others can be badly burned by hot
engine coolant (antifreeze) or steam from
your radiator. If you see or hear steam
coming from under the hood, do not open
the hood until the radiator has had time to
cool. Never try to open a cooling system
pressure cap when the radiator or coolant
bottle is hot.
Engine Coolant Checks
Check the engine coolant (antifreeze) protec-
tion every 12 months (before the onset of
freezing weather, where applicable). If the
engine coolant (antifreeze) is dirty, the sys-
tem should be drained, flushed, and refilled
with fresh OAT coolant (conforming to
MS.90032) by an authorized dealer. Check the front of the A/C condenser for any accu-
mulation of bugs, leaves, etc. If dirty, clean
by gently spraying water from a garden hose
vertically down the face of the condenser.
Check the engine cooling system hoses for
brittle rubber, cracking, tears, cuts, and
tightness of the connection at the coolant
recovery bottle and radiator. Inspect the en-
tire system for leaks.
With the engine at normal operating tempera-
ture (but not running), check the cooling
system pressure cap for proper vacuum seal-
ing by draining a small amount of engine
coolant (antifreeze) from the radiator drain
cock. If the cap is sealing properly, the engine
coolant (antifreeze) will begin to drain from
the coolant recovery bottle. DO NOT RE-
MOVE THE COOLANT PRESSURE CAP
WHEN THE COOLING SYSTEM IS HOT.
257
Page 260 of 372
RAISING THE VEHICLE
In the case where it is necessary to raise the
vehicle, go to an authorized dealer or service
station.
TIRES
Tire Safety Information
Tire safety information will cover aspects of
the following information: Tire Markings, Tire
Identification Numbers, Tire Terminology and
Definitions, Tire Pressures and Tire Loading.
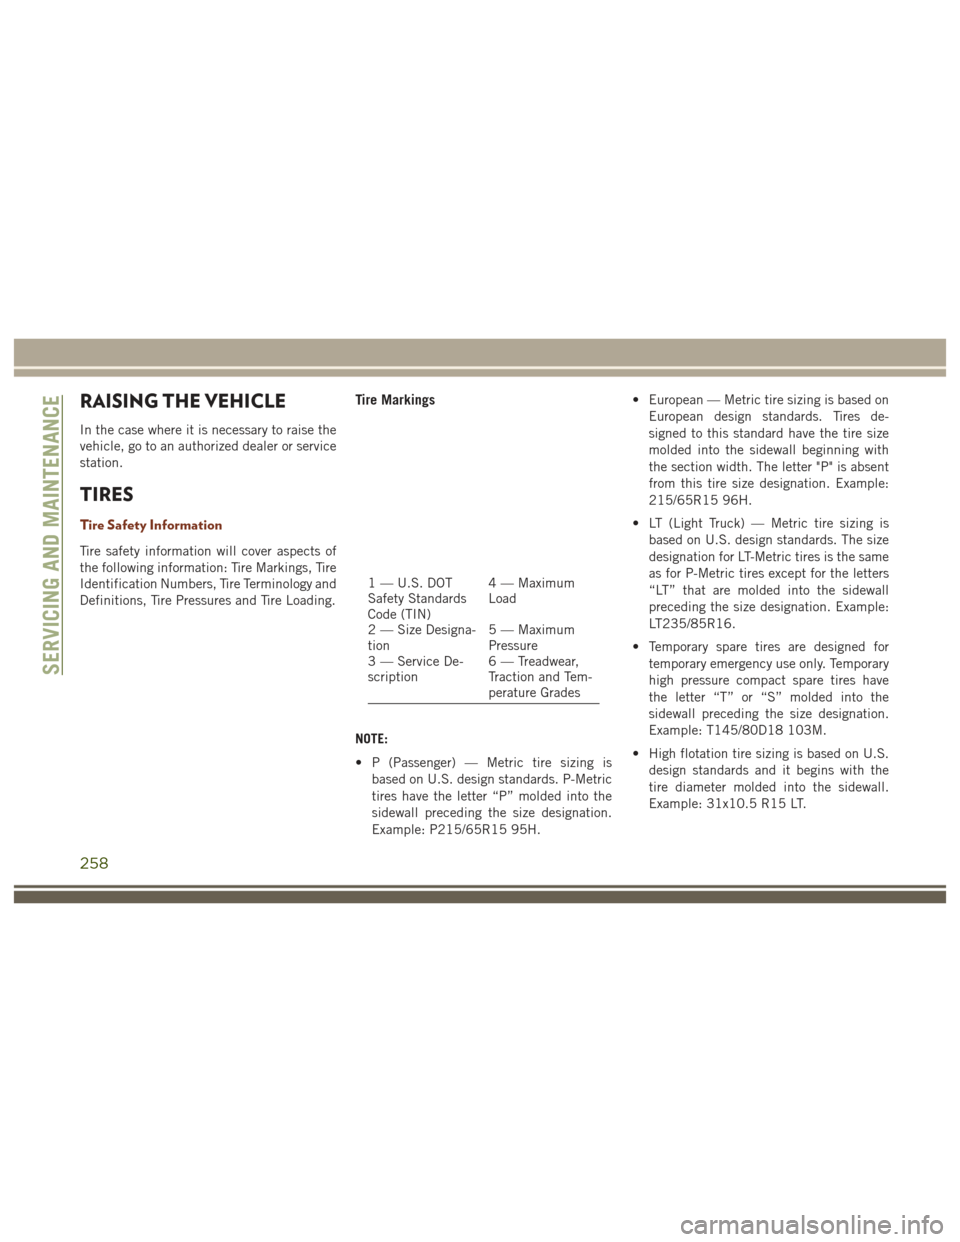
Tire Markings
NOTE:
• P (Passenger) — Metric tire sizing isbased on U.S. design standards. P-Metric
tires have the letter “P” molded into the
sidewall preceding the size designation.
Example: P215/65R15 95H. • European — Metric tire sizing is based on
European design standards. Tires de-
signed to this standard have the tire size
molded into the sidewall beginning with
the section width. The letter "P" is absent
from this tire size designation. Example:
215/65R15 96H.
• LT (Light Truck) — Metric tire sizing is based on U.S. design standards. The size
designation for LT-Metric tires is the same
as for P-Metric tires except for the letters
“LT” that are molded into the sidewall
preceding the size designation. Example:
LT235/85R16.
• Temporary spare tires are designed for temporary emergency use only. Temporary
high pressure compact spare tires have
the letter “T” or “S” molded into the
sidewall preceding the size designation.
Example: T145/80D18 103M.
• High flotation tire sizing is based on U.S. design standards and it begins with the
tire diameter molded into the sidewall.
Example: 31x10.5 R15 LT.
1 — U.S. DOT
Safety Standards
Code (TIN) 4 — Maximum
Load
2 — Size Designa-
tion 5 — Maximum
Pressure
3 — Service De-
scription 6 — Treadwear,
Traction and Tem-
perature Grades
SERVICING AND MAINTENANCE
258
Page 262 of 372
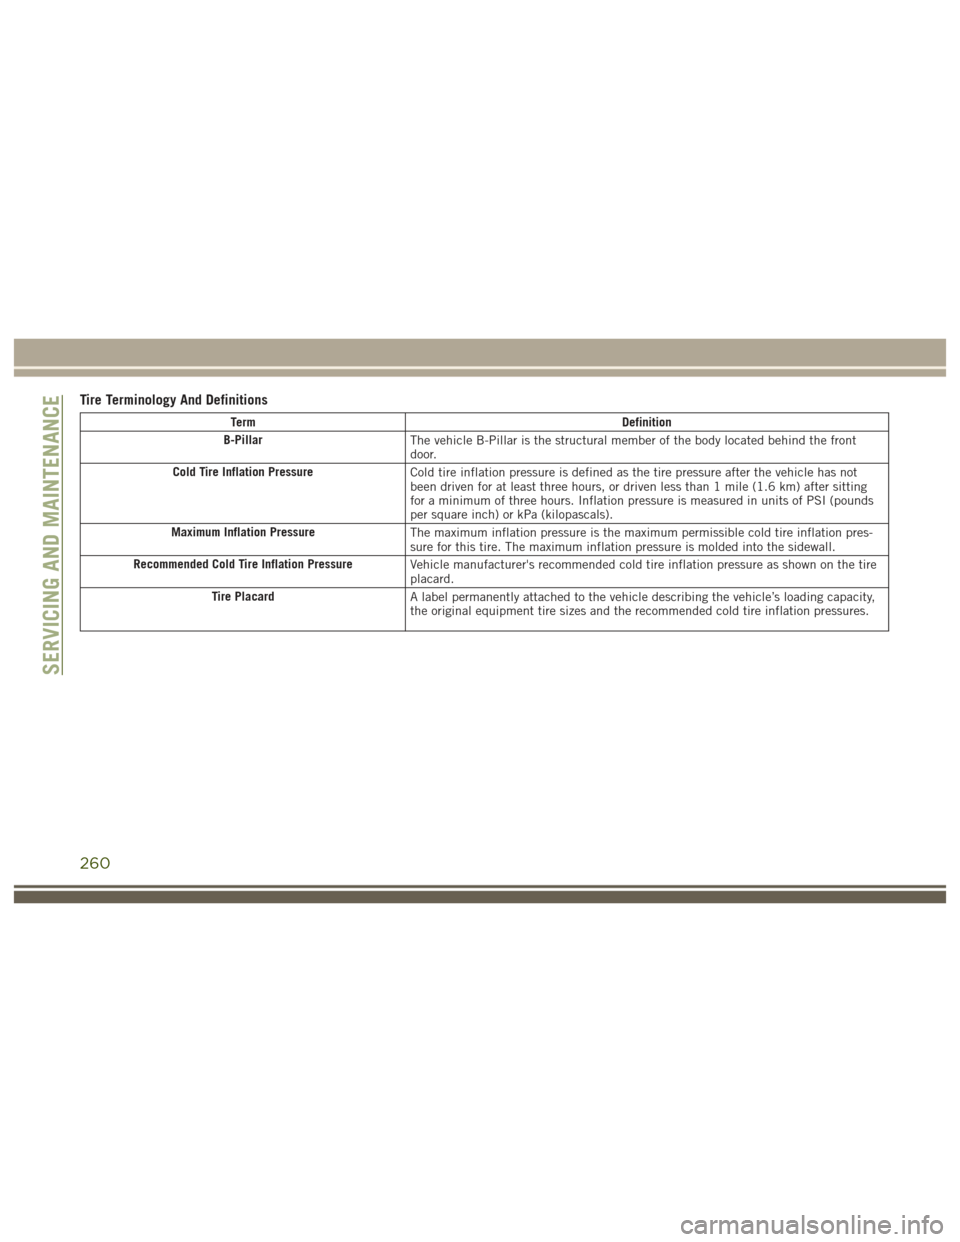
Tire Terminology And Definitions
TermDefinition
B-Pillar The vehicle B-Pillar is the structural member of the body located behind the front
door.
Cold Tire Inflation Pressure Cold tire inflation pressure is defined as the tire pressure after the vehicle has not
been driven for at least three hours, or driven less than 1 mile (1.6 km) after sitting
for a minimum of three hours. Inflation pressure is measured in units of PSI (pounds
per square inch) or kPa (kilopascals).
Maximum Inflation Pressure The maximum inflation pressure is the maximum permissible cold tire inflation pres-
sure for this tire. The maximum inflation pressure is molded into the sidewall.
Recommended Cold Tire Inflation Pressure Vehicle manufacturer's recommended cold tire inflation pressure as shown on the tire
placard.
Tire Placard A label permanently attached to the vehicle describing the vehicle’s loading capacity,
the original equipment tire sizes and the recommended cold tire inflation pressures.
SERVICING AND MAINTENANCE
260
Page 263 of 372
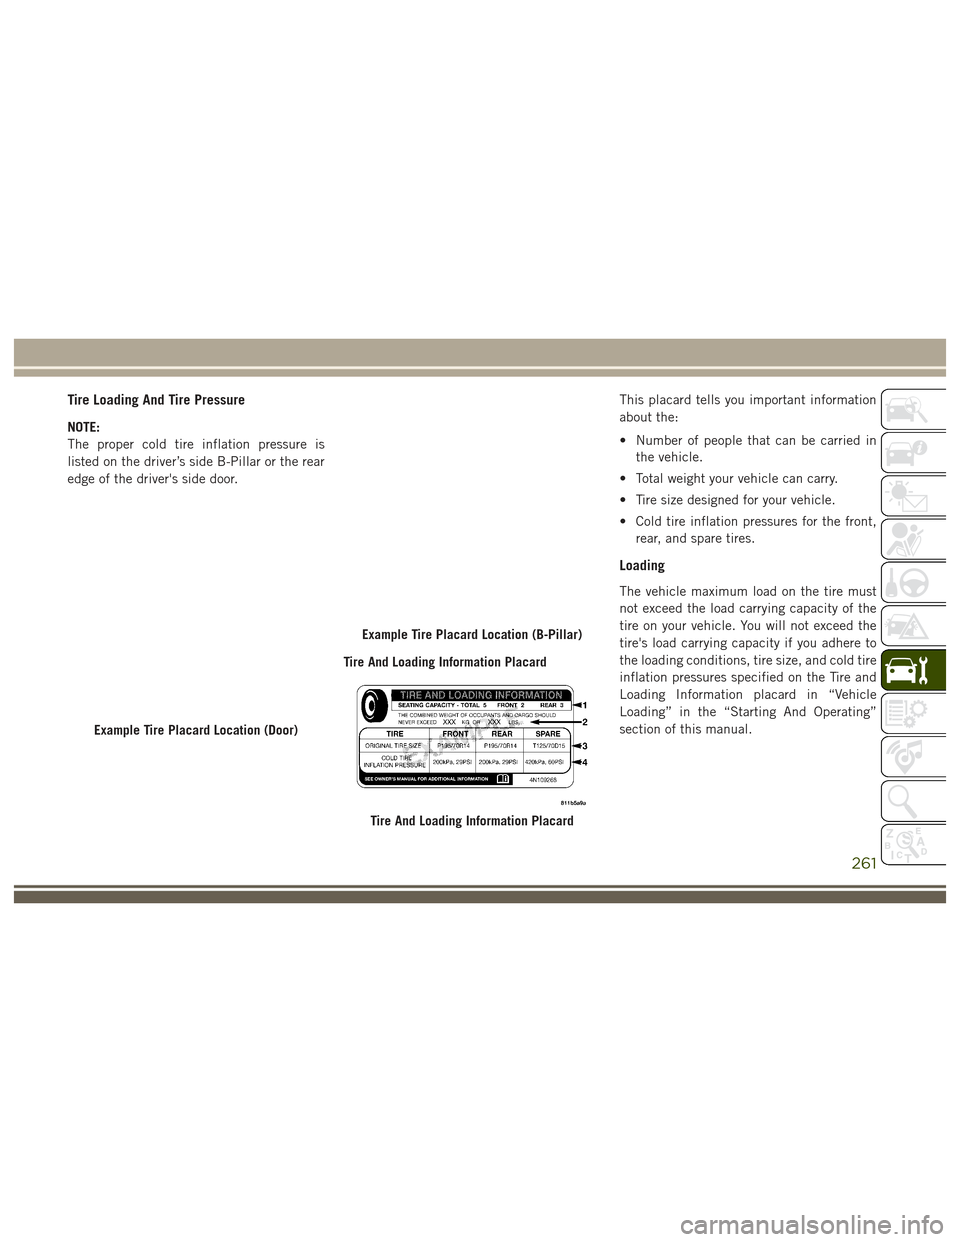
Tire Loading And Tire Pressure
NOTE:
The proper cold tire inflation pressure is
listed on the driver’s side B-Pillar or the rear
edge of the driver's side door.Tire And Loading Information PlacardThis placard tells you important information
about the:
• Number of people that can be carried in
the vehicle.
• Total weight your vehicle can carry.
• Tire size designed for your vehicle.
• Cold tire inflation pressures for the front, rear, and spare tires.
Loading
The vehicle maximum load on the tire must
not exceed the load carrying capacity of the
tire on your vehicle. You will not exceed the
tire's load carrying capacity if you adhere to
the loading conditions, tire size, and cold tire
inflation pressures specified on the Tire and
Loading Information placard in “Vehicle
Loading” in the “Starting And Operating”
section of this manual.
Example Tire Placard Location (Door)
Example Tire Placard Location (B-Pillar)
Tire And Loading Information Placard
261