air condition JEEP GRAND CHEROKEE 2017 WK2 / 4.G Owner's Manual
[x] Cancel search | Manufacturer: JEEP, Model Year: 2017, Model line: GRAND CHEROKEE, Model: JEEP GRAND CHEROKEE 2017 WK2 / 4.GPages: 372
Page 226 of 372
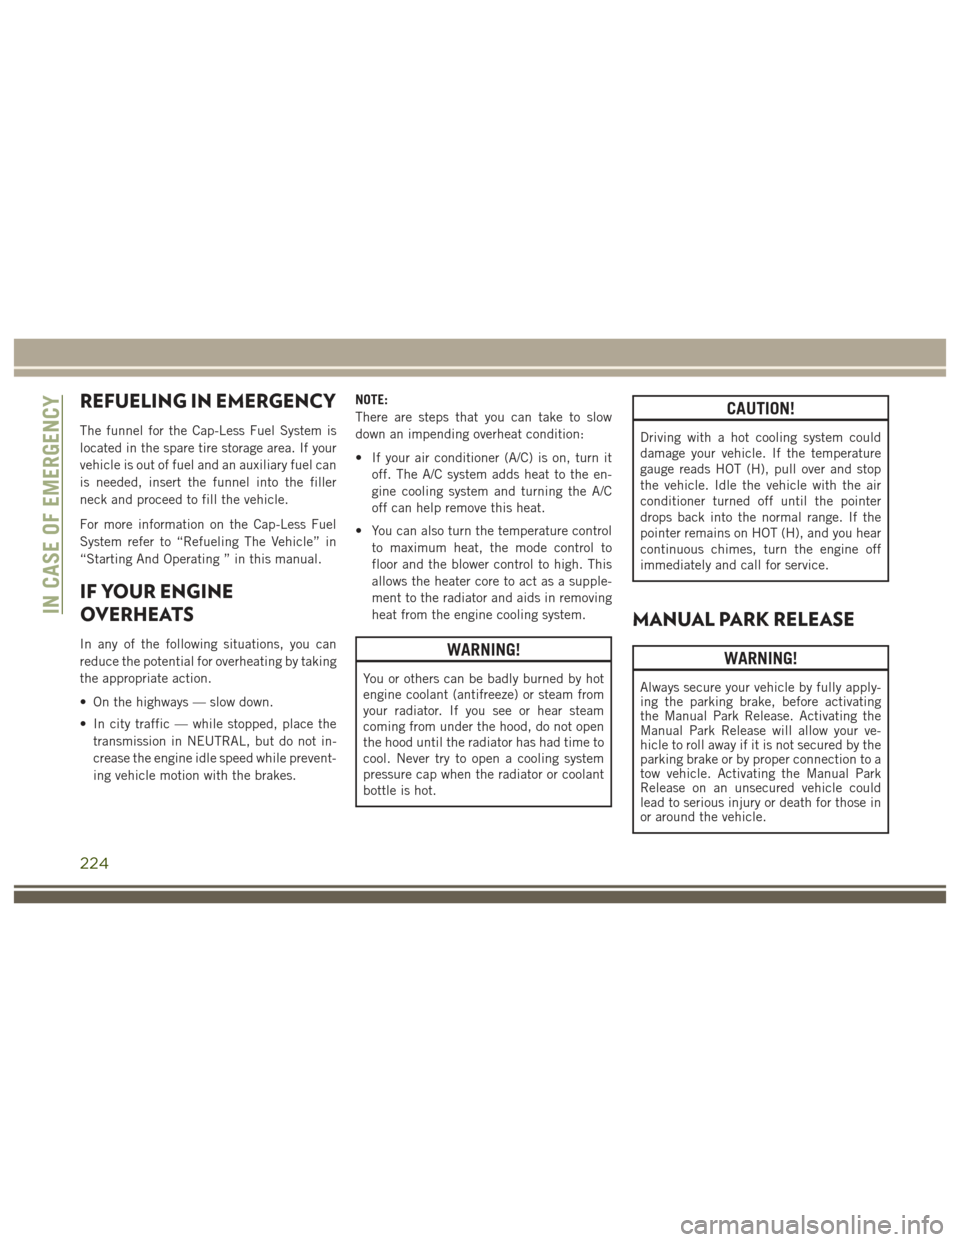
REFUELING IN EMERGENCY
The funnel for the Cap-Less Fuel System is
located in the spare tire storage area. If your
vehicle is out of fuel and an auxiliary fuel can
is needed, insert the funnel into the filler
neck and proceed to fill the vehicle.
For more information on the Cap-Less Fuel
System refer to “Refueling The Vehicle” in
“Starting And Operating ” in this manual.
IF YOUR ENGINE
OVERHEATS
In any of the following situations, you can
reduce the potential for overheating by taking
the appropriate action.
• On the highways — slow down.
• In city traffic — while stopped, place thetransmission in NEUTRAL, but do not in-
crease the engine idle speed while prevent-
ing vehicle motion with the brakes. NOTE:
There are steps that you can take to slow
down an impending overheat condition:
• If your air conditioner (A/C) is on, turn it
off. The A/C system adds heat to the en-
gine cooling system and turning the A/C
off can help remove this heat.
• You can also turn the temperature control to maximum heat, the mode control to
floor and the blower control to high. This
allows the heater core to act as a supple-
ment to the radiator and aids in removing
heat from the engine cooling system.WARNING!
You or others can be badly burned by hot
engine coolant (antifreeze) or steam from
your radiator. If you see or hear steam
coming from under the hood, do not open
the hood until the radiator has had time to
cool. Never try to open a cooling system
pressure cap when the radiator or coolant
bottle is hot.
CAUTION!
Driving with a hot cooling system could
damage your vehicle. If the temperature
gauge reads HOT (H), pull over and stop
the vehicle. Idle the vehicle with the air
conditioner turned off until the pointer
drops back into the normal range. If the
pointer remains on HOT (H), and you hear
continuous chimes, turn the engine off
immediately and call for service.
MANUAL PARK RELEASE
WARNING!
Always secure your vehicle by fully apply-
ing the parking brake, before activating
the Manual Park Release. Activating the
Manual Park Release will allow your ve-
hicle to roll away if it is not secured by the
parking brake or by proper connection to a
tow vehicle. Activating the Manual Park
Release on an unsecured vehicle could
lead to serious injury or death for those in
or around the vehicle.
IN CASE OF EMERGENCY
224
Page 233 of 372
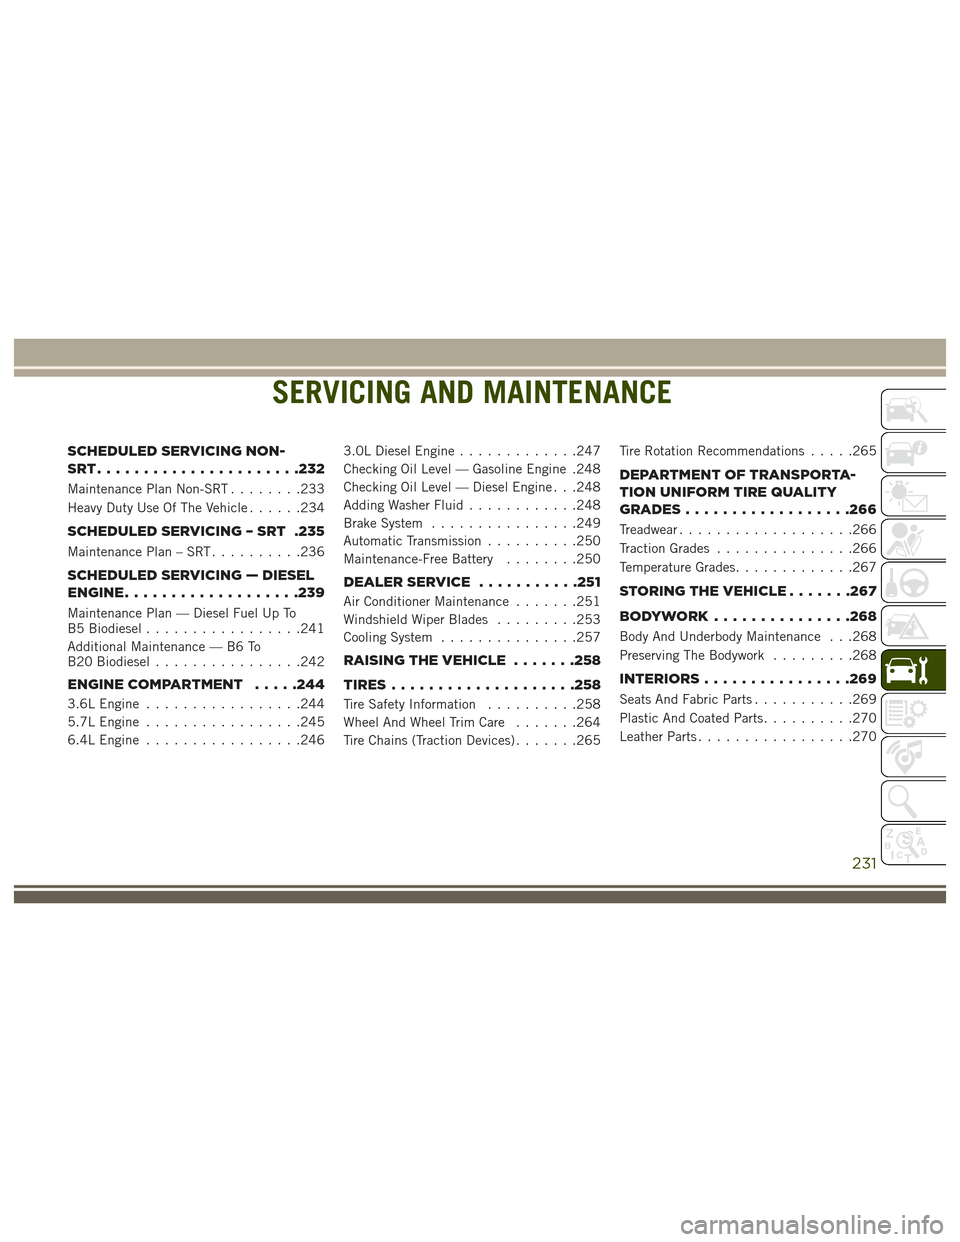
SERVICING AND MAINTENANCE
SCHEDULED SERVICING NON-
SRT......................232
Maintenance Plan Non-SRT........233
Heavy Duty Use Of The Vehicle ......234
SCHEDULED SERVICING – SRT .235
Maintenance Plan – SRT..........236
SCHEDULED SERVICING — DIESEL
ENGINE.................. .239
Maintenance Plan — Diesel Fuel Up To
B5 Biodiesel.................241
Additional Maintenance — B6 To
B20 Biodiesel ................242
ENGINE COMPARTMENT .....244
3.6L Engine.................244
5.7L Engine .................245
6.4L Engine .................246 3.0L Diesel Engine
.............247
Checking Oil Level — Gasoline Engine .248
Checking Oil Level — Diesel Engine . . .248
Adding Washer Fluid ............248
Brake System ................249
Automatic Transmission ..........250
Maintenance-Free Battery ........250
DEALERSERVICE .......... .251
Air Conditioner Maintenance.......251
Windshield Wiper Blades .........253
Cooling System ...............257
RAISINGTHEVEHICLE .......258
TIRES................... .258
Tire Safety Information..........258
Wheel And Wheel Trim Care .......264
Tire Chains (Traction Devices) .......265Tire Rotation Recommendations
.....265
DEPARTMENT OF TRANSPORTA-
TION UNIFORM TIRE QUALITY
GRADES................. .266
Treadwear...................266
Traction Grades ...............266
Temperature Grades .............267
STORINGTHEVEHICLE.......267
BODYWORK...............268
Body And Underbody Maintenance . . .268
Preserving The Bodywork .........268
INTERIORS............... .269
Seats And Fabric Parts...........269
Plastic And Coated Parts ..........270
Leather Parts .................270
SERVICING AND MAINTENANCE
231
Page 234 of 372
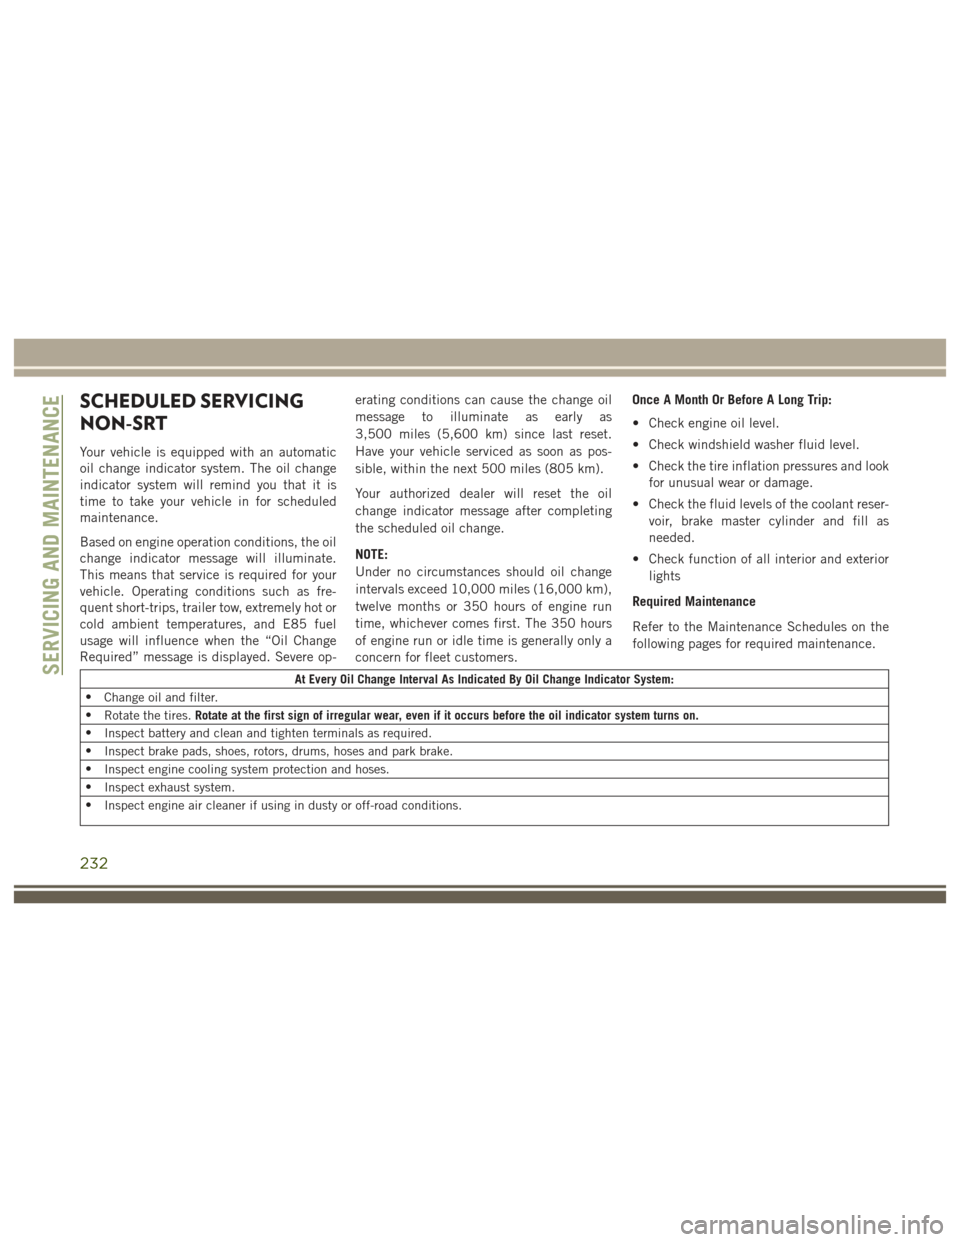
SCHEDULED SERVICING
NON-SRT
Your vehicle is equipped with an automatic
oil change indicator system. The oil change
indicator system will remind you that it is
time to take your vehicle in for scheduled
maintenance.
Based on engine operation conditions, the oil
change indicator message will illuminate.
This means that service is required for your
vehicle. Operating conditions such as fre-
quent short-trips, trailer tow, extremely hot or
cold ambient temperatures, and E85 fuel
usage will influence when the “Oil Change
Required” message is displayed. Severe op-erating conditions can cause the change oil
message to illuminate as early as
3,500 miles (5,600 km) since last reset.
Have your vehicle serviced as soon as pos-
sible, within the next 500 miles (805 km).
Your authorized dealer will reset the oil
change indicator message after completing
the scheduled oil change.
NOTE:
Under no circumstances should oil change
intervals exceed 10,000 miles (16,000 km),
twelve months or 350 hours of engine run
time, whichever comes first. The 350 hours
of engine run or idle time is generally only a
concern for fleet customers. Once A Month Or Before A Long Trip:
• Check engine oil level.
• Check windshield washer fluid level.
• Check the tire inflation pressures and look
for unusual wear or damage.
• Check the fluid levels of the coolant reser- voir, brake master cylinder and fill as
needed.
• Check function of all interior and exterior lights
Required Maintenance
Refer to the Maintenance Schedules on the
following pages for required maintenance.
At Every Oil Change Interval As Indicated By Oil Change Indicator System:
• Change oil and filter.
• Rotate the tires. Rotate at the first sign of irregular wear, even if it occurs before the oil indicator system turns on.
• Inspect battery and clean and tighten terminals as required.
• Inspect brake pads, shoes, rotors, drums, hoses and park brake.
• Inspect engine cooling system protection and hoses.
• Inspect exhaust system.
• Inspect engine air cleaner if using in dusty or off-road conditions.SERVICING AND MAINTENANCE
232
Page 235 of 372
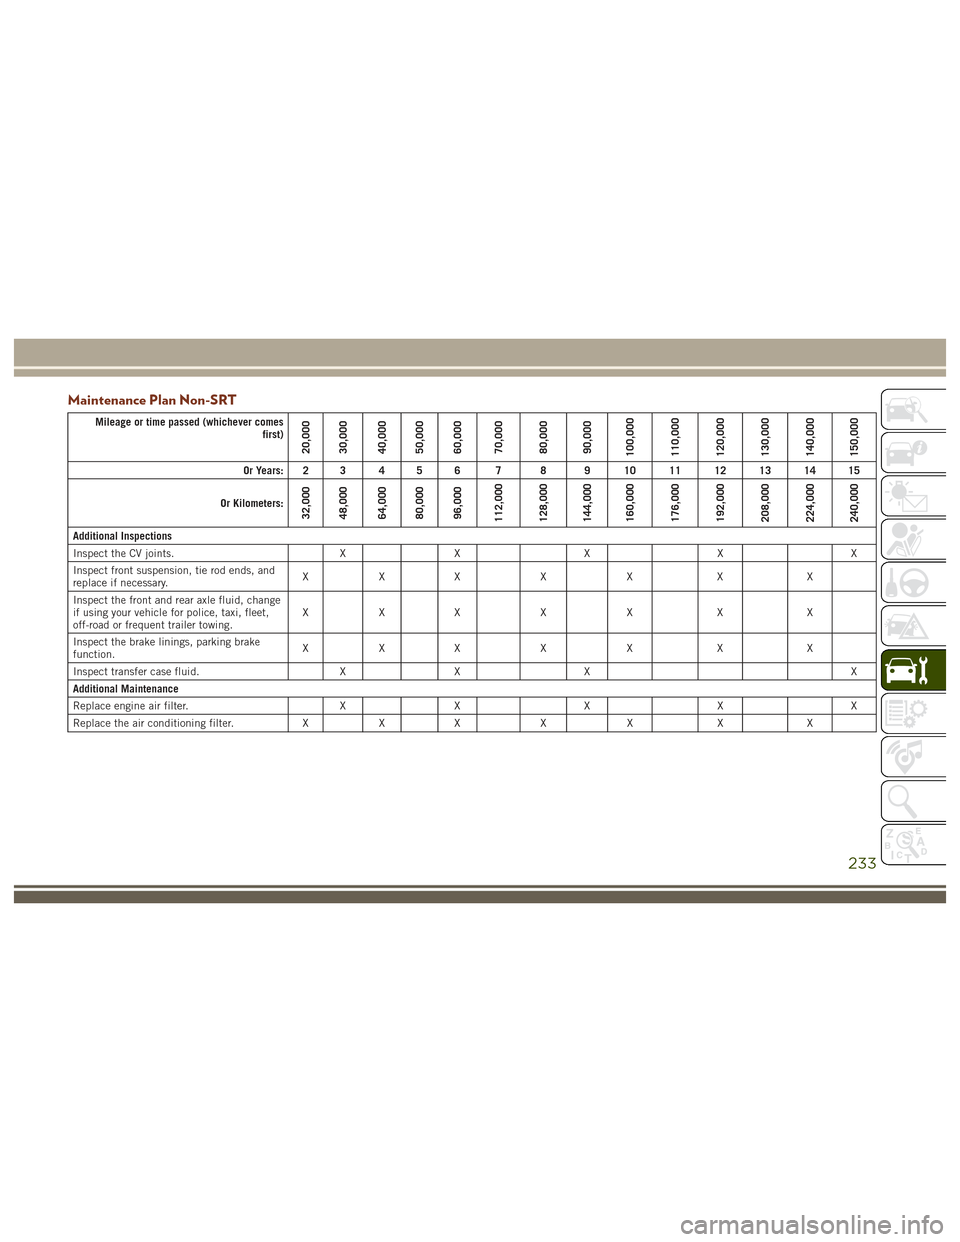
Maintenance Plan Non-SRT
Mileage or time passed (whichever comesfirst)
20,000
30,000
40,000
50,000
60,000
70,000
80,000
90,000
100,000
110,000
120,000
130,000
140,000
150,000
Or Years: 2 3 4 5 6 7 8 9 10 11 12 13 14 15
Or Kilometers:
32,000
48,000
64,000
80,000
96,000
112,000
128,000
144,000
160,000
176,000
192,000
208,000
224,000
240,000
Additional Inspections
Inspect the CV joints. X X X X X
Inspect front suspension, tie rod ends, and
replace if necessary. XXX X X X X
Inspect the front and rear axle fluid, change
if using your vehicle for police, taxi, fleet,
off-road or frequent trailer towing. XXX X X X X
Inspect the brake linings, parking brake
function. XXX X X X X
Inspect transfer case fluid. X X X X
Additional Maintenance
Replace engine air filter. X X X X X
Replace the air conditioning filter. X X X X X X X
233
Page 239 of 372
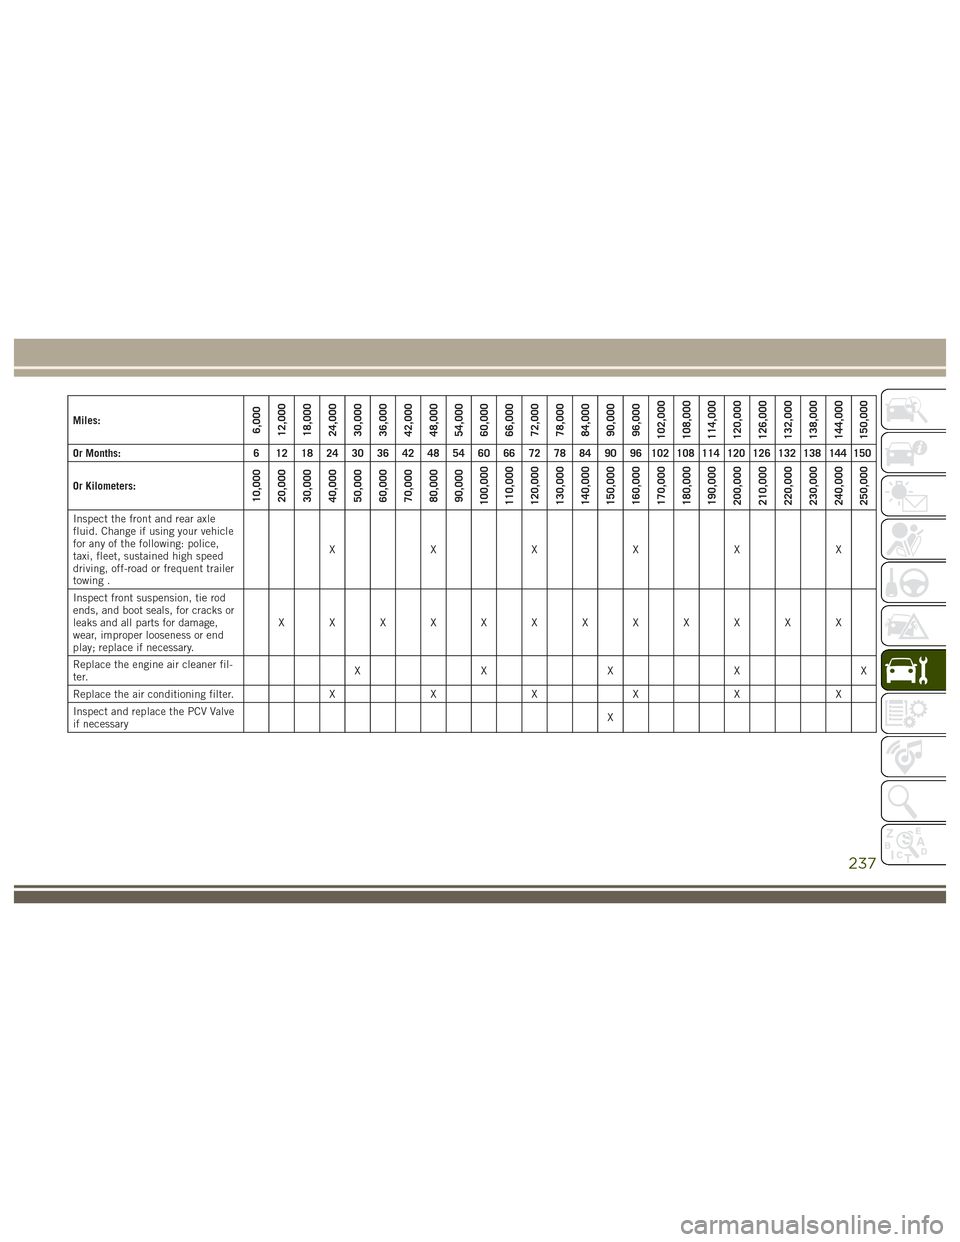
Miles:6,000
12,000
18,000
24,000
30,000
36,000
42,000
48,000
54,000
60,000
66,000
72,000
78,000
84,000
90,000
96,000
102,000
108,000
114,000
120,000
126,000
132,000
138,000
144,000
150,000
Or Months: 6 12 18 24 30 36 42 48 54 60 66 72 78 84 90 96 102 108 114 120 126 132 138 144 150
Or Kilometers:
10,000
20,000
30,000
40,000
50,000
60,000
70,000
80,000
90,000
100,000
110,000
120,000
130,000
140,000
150,000
160,000
170,000
180,000
190,000
200,000
210,000
220,000
230,000
240,000
250,000
Inspect the front and rear axle
fluid. Change if using your vehicle
for any of the following: police,
taxi, fleet, sustained high speed
driving, off-road or frequent trailer
towing . XXXXXX
Inspect front suspension, tie rod
ends, and boot seals, for cracks or
leaks and all parts for damage,
wear, improper looseness or end
play; replace if necessary. XXXXXXXXXXXX
Replace the engine air cleaner fil-
ter. XXXXX
Replace the air conditioning filter. X X X X X X
Inspect and replace the PCV Valve
if necessary X
237
Page 242 of 372
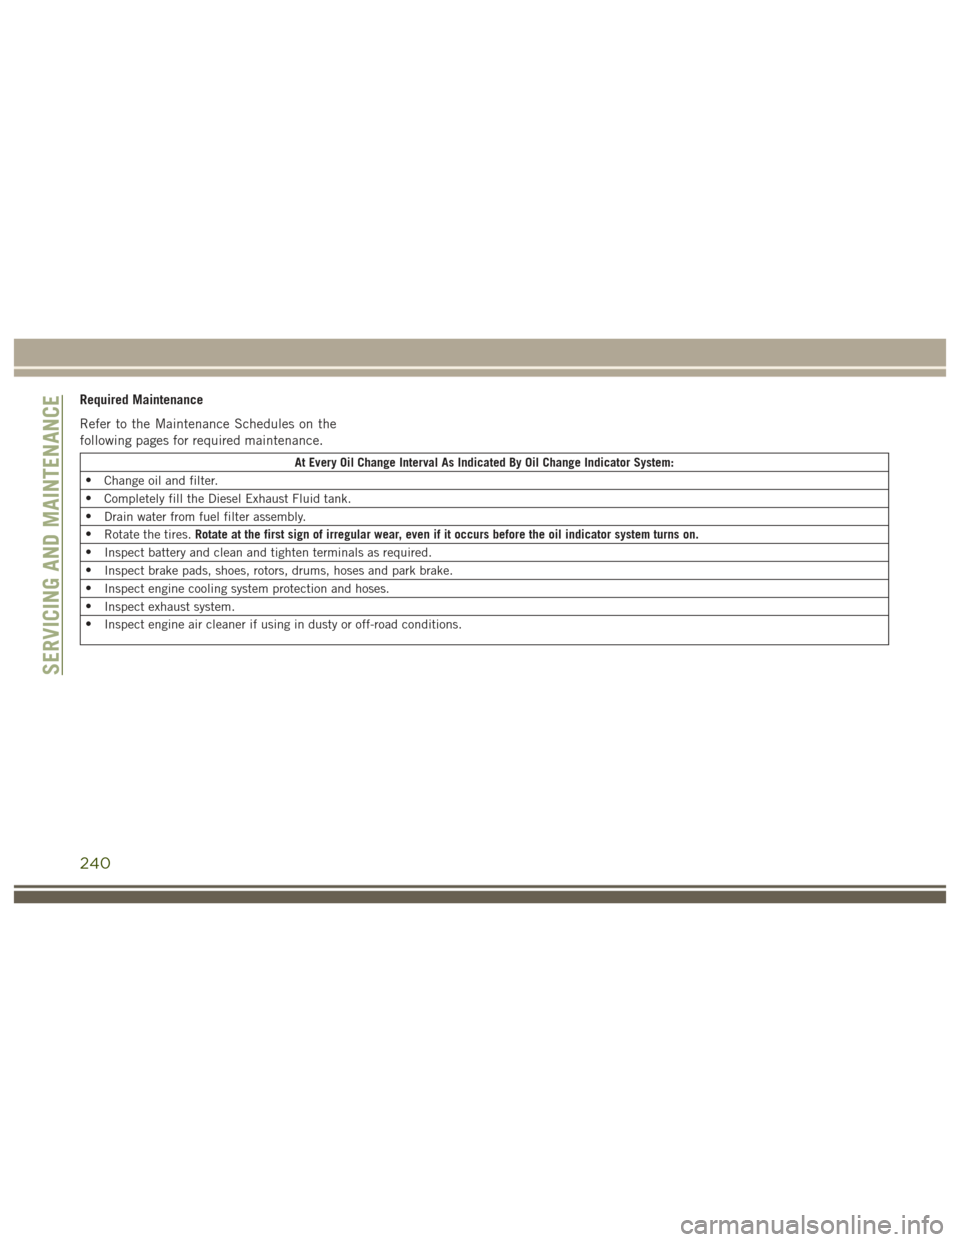
Required Maintenance
Refer to the Maintenance Schedules on the
following pages for required maintenance.
At Every Oil Change Interval As Indicated By Oil Change Indicator System:
• Change oil and filter.
• Completely fill the Diesel Exhaust Fluid tank.
• Drain water from fuel filter assembly.
• Rotate the tires. Rotate at the first sign of irregular wear, even if it occurs before the oil indicator system turns on.
• Inspect battery and clean and tighten terminals as required.
• Inspect brake pads, shoes, rotors, drums, hoses and park brake.
• Inspect engine cooling system protection and hoses.
• Inspect exhaust system.
• Inspect engine air cleaner if using in dusty or off-road conditions.
SERVICING AND MAINTENANCE
240
Page 244 of 372
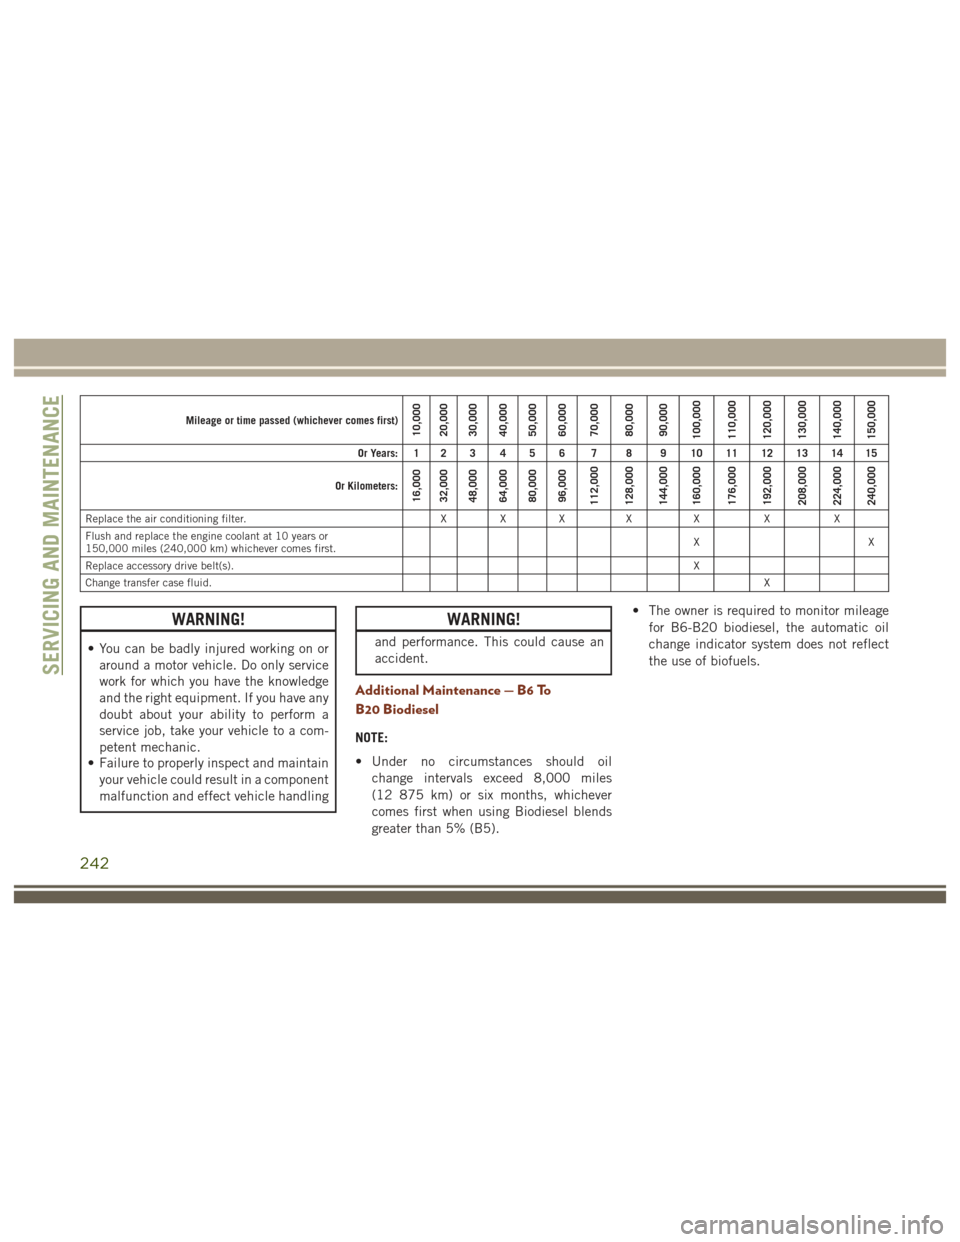
Mileage or time passed (whichever comes first)10,000
20,000
30,000
40,000
50,000
60,000
70,000
80,000
90,000
100,000
110,000
120,000
130,000
140,000
150,000
Or Years: 1 2 3 4 5 6 7 8 9 10 11 12 13 14 15
Or Kilometers:
16,000
32,000
48,000
64,000
80,000
96,000
112,000
128,000
144,000
160,000
176,000
192,000
208,000
224,000
240,000
Replace the air conditioning filter. X X XXX XX
Flush and replace the engine coolant at 10 years or
150,000 miles (240,000 km) whichever comes first. XX
Replace accessory drive belt(s). X
Change transfer case fluid. X
WARNING!
• You can be badly injured working on or
around a motor vehicle. Do only service
work for which you have the knowledge
and the right equipment. If you have any
doubt about your ability to perform a
service job, take your vehicle to a com-
petent mechanic.
• Failure to properly inspect and maintain
your vehicle could result in a component
malfunction and effect vehicle handling
WARNING!
and performance. This could cause an
accident.
Additional Maintenance — B6 To
B20 Biodiesel
NOTE:
• Under no circumstances should oil
change intervals exceed 8,000 miles
(12 875 km) or six months, whichever
comes first when using Biodiesel blends
greater than 5% (B5). • The owner is required to monitor mileage
for B6-B20 biodiesel, the automatic oil
change indicator system does not reflect
the use of biofuels.
SERVICING AND MAINTENANCE
242
Page 253 of 372
CAUTION!
“fast charger” to provide starting volt-
age.
DEALER SERVICE
Your authorized dealer has the qualified ser-
vice personnel, special tools, and equipment
to perform all service operations in an expert
manner. Service Manuals are available which
include detailed service information for your
vehicle. Refer to these Service Manuals be-
fore attempting any procedure yourself.
NOTE:
Intentional tampering with emissions control
systems may void your warranty and could
result in civil penalties being assessed
against you.
WARNING!
You can be badly injured working on or
around a motor vehicle. Only do service
work for which you have the knowledge
and the proper equipment. If you have any
WARNING!
doubt about your ability to perform a ser-
vice job, take your vehicle to a competent
mechanic.
Air Conditioner Maintenance
For best possible performance, your air con-
ditioner should be checked and serviced by
an authorized dealer at the start of each warm
season. This service should include cleaning
of the condenser fins and a performance test.
Drive belt tension should also be checked at
this time.
WARNING!
• Use only refrigerants and compressorlubricants approved by the manufac-
turer for your air conditioning system.
Some unapproved refrigerants are flam-
mable and can explode, injuring you.
Other unapproved refrigerants or lubri-
cants can cause the system to fail, re-
quiring costly repairs. Refer to Warranty
WARNING!
Information Book, for further warranty
information.
• The air conditioning system contains re-
frigerant under high pressure. To avoid
risk of personal injury or damage to the
system, adding refrigerant or any repair
requiring lines to be disconnected
should be done by an experienced tech-
nician.
CAUTION!
Do not use chemical flushes in your air
conditioning system as the chemicals can
damage your air conditioning components.
Such damage is not covered by the New
Vehicle Limited Warranty.
251
Page 254 of 372
Air Conditioning Filter Replacement (A/C Air
Filter)
Refer to “Scheduled Servicing” in this sec-
tion for the proper maintenance intervals.
WARNING!
Do not remove the cabin air filter while the
vehicle is running, or while the ignition is
in the ACC or ON/RUN mode. With the
cabin air filter removed and the blower
operating, the blower can contact hands
and may propel dirt and debris into your
eyes, resulting in personal injury.
The A/C air filter is located in the fresh air
inlet behind the glove compartment. Perform
the following procedure to replace the filter:
1. Open the glove compartment and remove all contents. 2. There are glove compartment travel stops
on both sides of the glove compartment
door, partially close the glove compart-
ment door and push inward to release the
glove compartment travel stop on one side
and repeat this procedure for the opposite
side. 3. Pull the right hand side of the glove com-
partment door toward the rear of the ve-
hicle to disengage the glove compartment
door from its hinges.
NOTE:
When disengaging the glove compartment
door from its hinges, there will be some
resistance.
4. With the glove compartment door loose, remove the glove compartment tension
tether and tether clip by sliding the clip
toward the face of the glove compartment
door and lifting the clip out of glove com-
partment door.
5. Remove the filter cover by disengaging the retaining tab and mid way snap that
secures the filter cover to the HVAC hous-
ing. Disengage the mid way snap by pull-
ing the door outward. Unhinge the filter
cover on the right side to fully remove the
cover.
Glove Compartment
1 — Glove Compartment Travel Stops
2 — Glove Compartment Tension Tether
3 — Glove Compartment DoorSERVICING AND MAINTENANCE
252
Page 255 of 372
6. Remove the A/C air filter by pulling itstraight out of the housing.
7. Install the A/C air filter with the arrow on the filter pointing toward the floor. When
installing the filter cover, make sure the
retaining tabs fully engage the cover.
CAUTION!
The cabin air filter is identified with an
arrow to indicate airflow direction through
the filter. Failure to properly install the
filter will result in the need to replace it
more often.
8. Reinstall the glove compartment door on the glove compartment door hinge and
reattach the glove compartment tension
tether by inserting the tether clip in the
glove compartment and sliding the clip
away from the face of the glove compart-
ment door.
9. Push the door to the near closed position to reengage the glove compartment travel
stops.
NOTE:
Ensure the glove compartment door
hinges and glove compartment travel
stops are fully engaged.
Windshield Wiper Blades
Clean the rubber edges of the wiper blades
and the windshield periodically with a sponge
or soft cloth and a mild nonabrasive cleaner.
This will remove accumulations of salt or road
film.
Operation of the wipers on dry glass for long
periods may cause deterioration of the wiper
blades. Always use washer fluid when using
the wipers to remove salt or dirt from a dry
windshield.
Avoid using the wiper blades to remove frost
or ice from the windshield. Keep the blade
rubber out of contact with petroleum prod-
ucts such as engine oil, gasoline, etc.
NOTE:
Life expectancy of wiper blades varies de-
pending on geographical area and frequency
of use. Poor performance of blades may be
present with chattering, marks, water lines or
wet spots. If any of these conditions are
present, clean the wiper blades or replace as
necessary.
A/C Air Filter Cover
1 — Retaining Tab
2 — Mid Way Snap
3 — Filter Cover Hinge
253