phone JEEP GRAND CHEROKEE 2017 WK2 / 4.G Owner's Manual
[x] Cancel search | Manufacturer: JEEP, Model Year: 2017, Model line: GRAND CHEROKEE, Model: JEEP GRAND CHEROKEE 2017 WK2 / 4.GPages: 372
Page 326 of 372
Media ControlsThe controls are accessed by pressing the
desired button on the touchscreen and
choosing between Disc, AUX, USB,
Bluetooth or SD Card.
NOTE:
Uconnect will automatically switch to the
appropriate mode when something is first
connected or inserted into the system.
UCONNECT REAR SEAT
ENTERTAINMENT (RSE)
SYSTEM — IF EQUIPPED
Your Rear Seat Entertainment System is de-
signed to give your family years of enjoyment.
You can play your favorite CDs, DVDs or
Blu-ray Discs, listen to audio over the wire-
less headphones, or plug and play a variety of
standard video games or audio devices.
Please review this Owner's Manual to become
familiar with its features and operation.
Getting Started
•Screen(s) located in the rear of front seats:
Open the LCD screen cover by lifting up on
cover. • Place the ignition in the ON or ACC posi-
tion.
• Your vehicle may be equipped with a Blu- ray Disc Player. If equipped with a Blu-ray
disc player, the icon will be present on the
Player.
• Turn on the Rear Seat Entertainment sys- tem by pushing the power button on the
remote control.
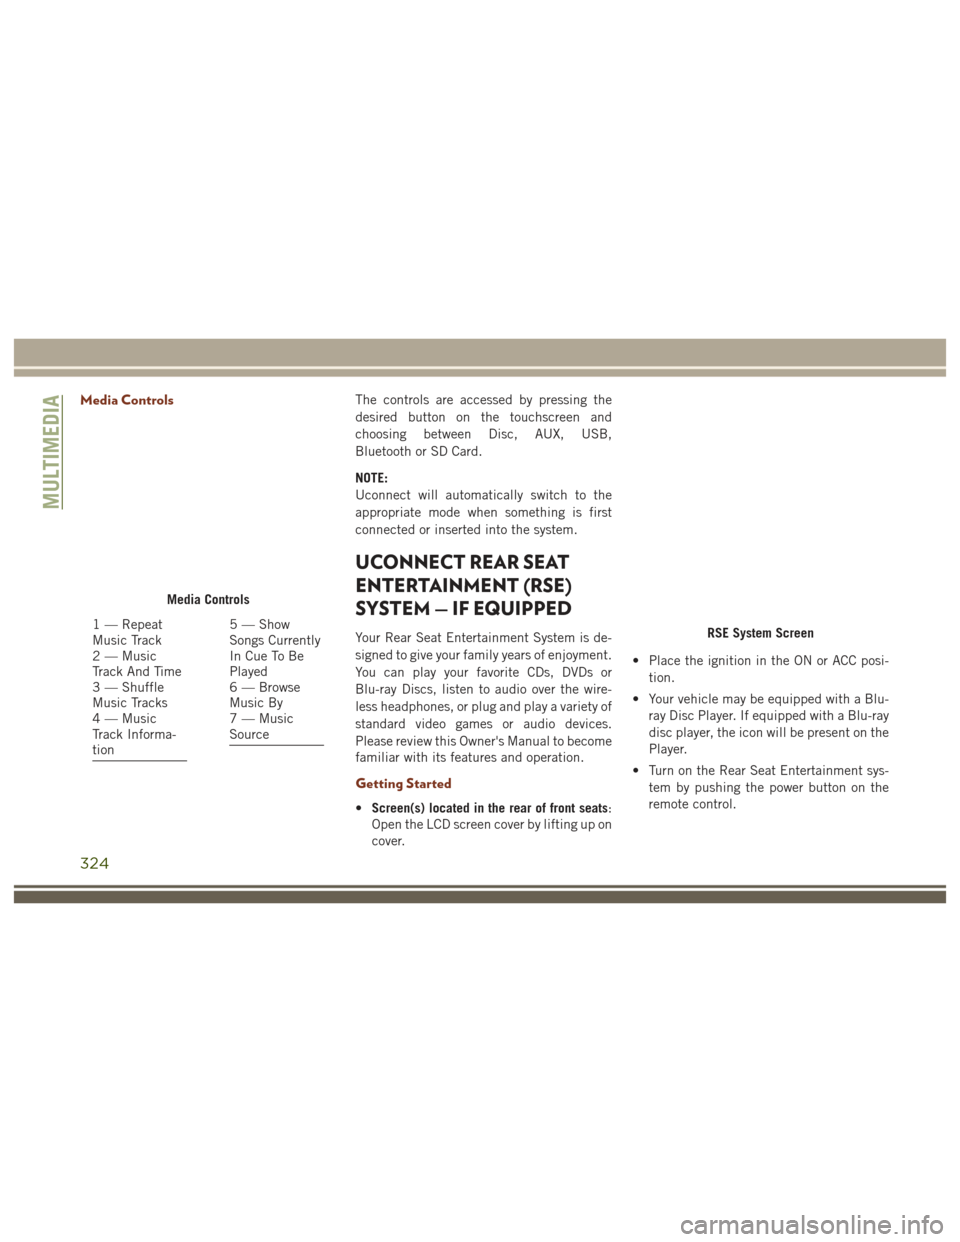
Media Controls
1 — Repeat
Music Track
2 — Music
Track And Time
3 — Shuffle
Music Tracks
4 — Music
Track Informa-
tion5 — Show
Songs Currently
In Cue To Be
Played
6 — Browse
Music By
7 — Music
SourceRSE System Screen
MULTIMEDIA
324
Page 327 of 372
• When the Video Screen(s) are open and aDVD/Blu-ray disc is inserted into the disc
player, the screen(s) turn(s) on automati-
cally, the headphone transmitters turn on
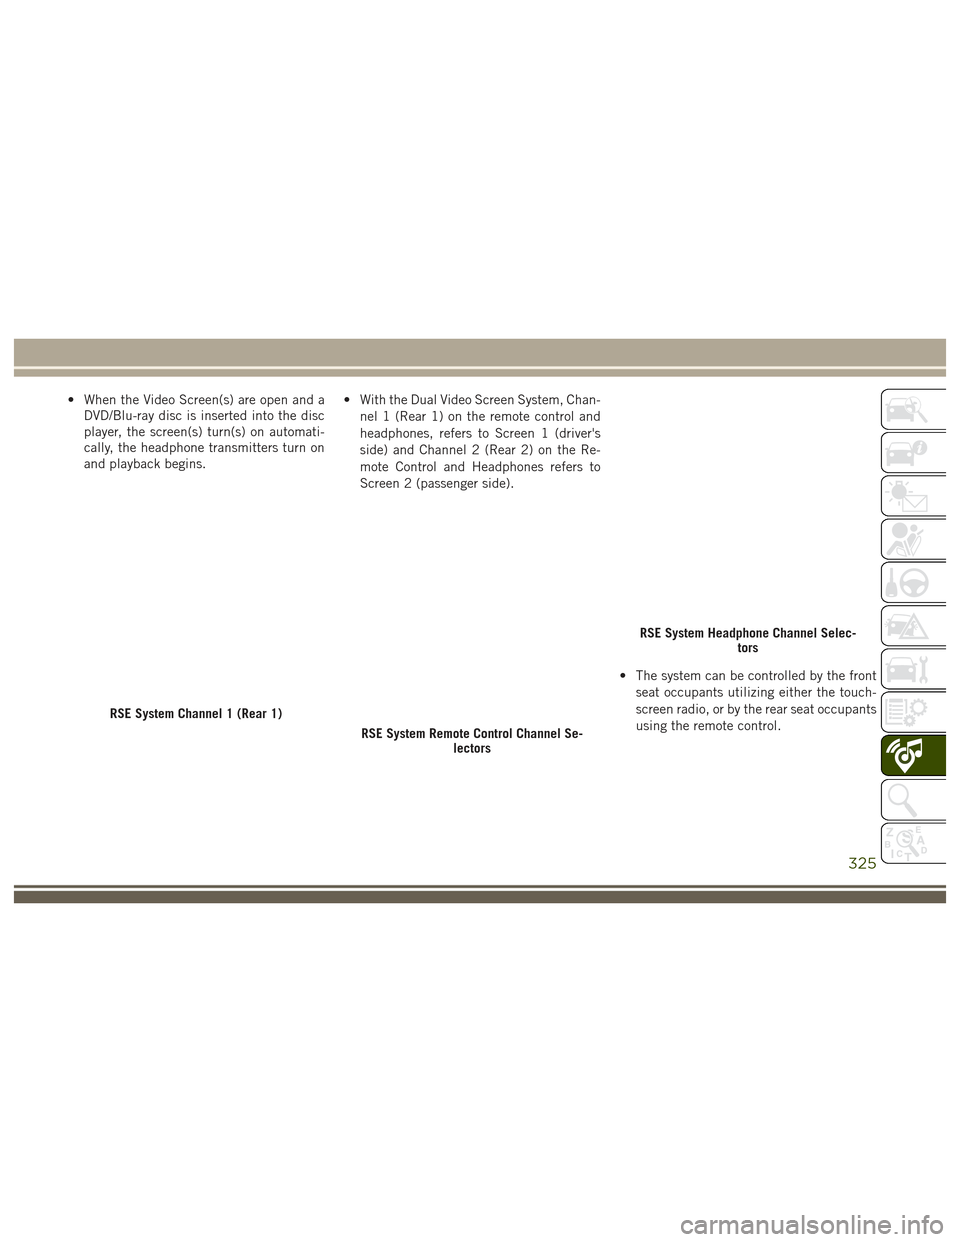
and playback begins. • With the Dual Video Screen System, Chan-
nel 1 (Rear 1) on the remote control and
headphones, refers to Screen 1 (driver's
side) and Channel 2 (Rear 2) on the Re-
mote Control and Headphones refers to
Screen 2 (passenger side).
• The system can be controlled by the frontseat occupants utilizing either the touch-
screen radio, or by the rear seat occupants
using the remote control.
RSE System Channel 1 (Rear 1)
RSE System Remote Control Channel Se- lectors
RSE System Headphone Channel Selec- tors
325
Page 328 of 372
Dual Video Screen
NOTE:
Typically there are two different ways to op-
erate the features of the Rear Seat Entertain-
ment System.
• The Remote Control
• The Touchscreen Radio (If Equipped)
Blu-ray Disc Player
Play A Blu-ray Disc
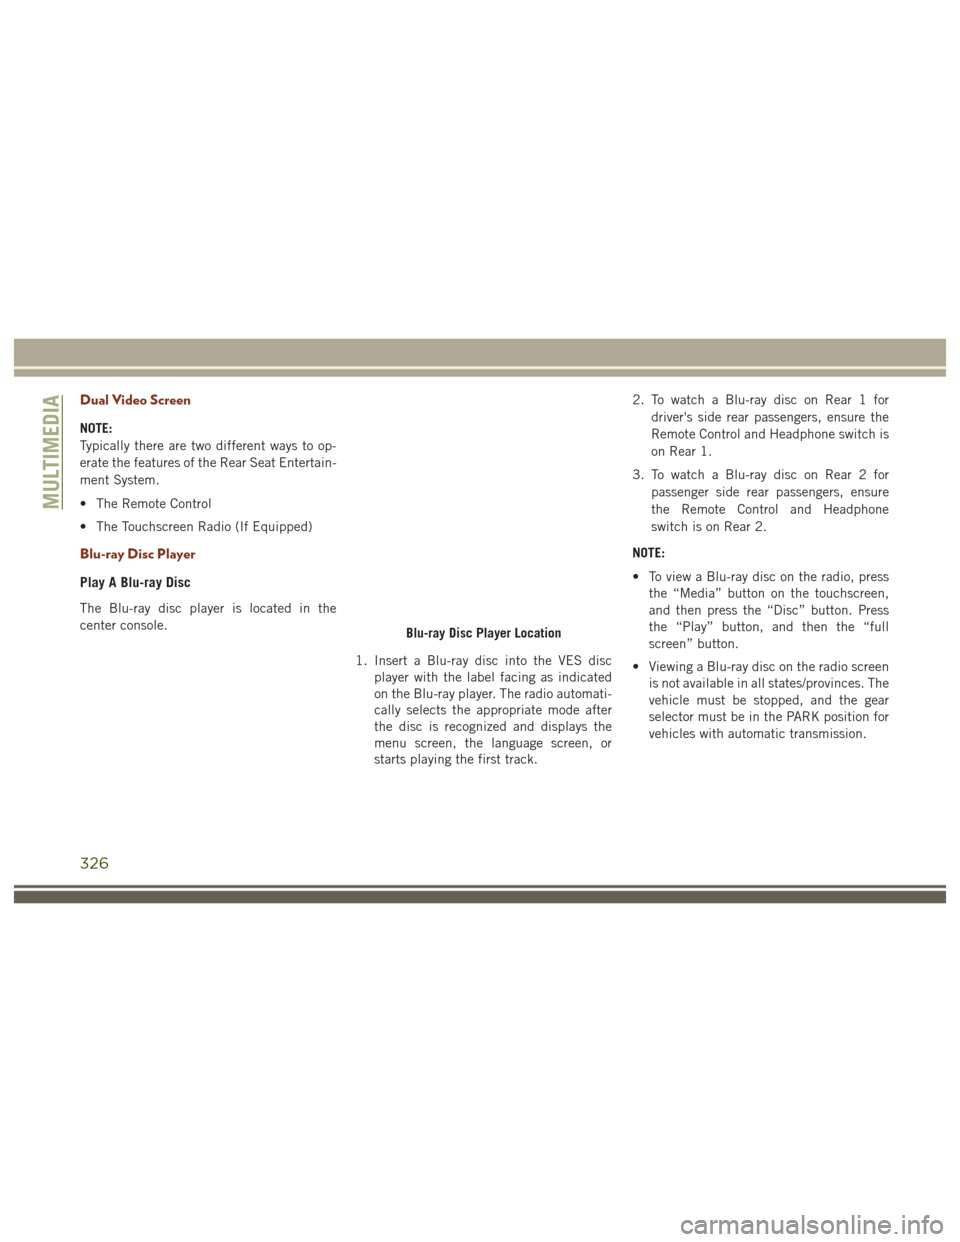
The Blu-ray disc player is located in the
center console.1. Insert a Blu-ray disc into the VES discplayer with the label facing as indicated
on the Blu-ray player. The radio automati-
cally selects the appropriate mode after
the disc is recognized and displays the
menu screen, the language screen, or
starts playing the first track. 2. To watch a Blu-ray disc on Rear 1 for
driver's side rear passengers, ensure the
Remote Control and Headphone switch is
on Rear 1.
3. To watch a Blu-ray disc on Rear 2 for passenger side rear passengers, ensure
the Remote Control and Headphone
switch is on Rear 2.
NOTE:
• To view a Blu-ray disc on the radio, press the “Media” button on the touchscreen,
and then press the “Disc” button. Press
the “Play” button, and then the “full
screen” button.
• Viewing a Blu-ray disc on the radio screen is not available in all states/provinces. The
vehicle must be stopped, and the gear
selector must be in the PARK position for
vehicles with automatic transmission.
Blu-ray Disc Player Location
MULTIMEDIA
326
Page 329 of 372
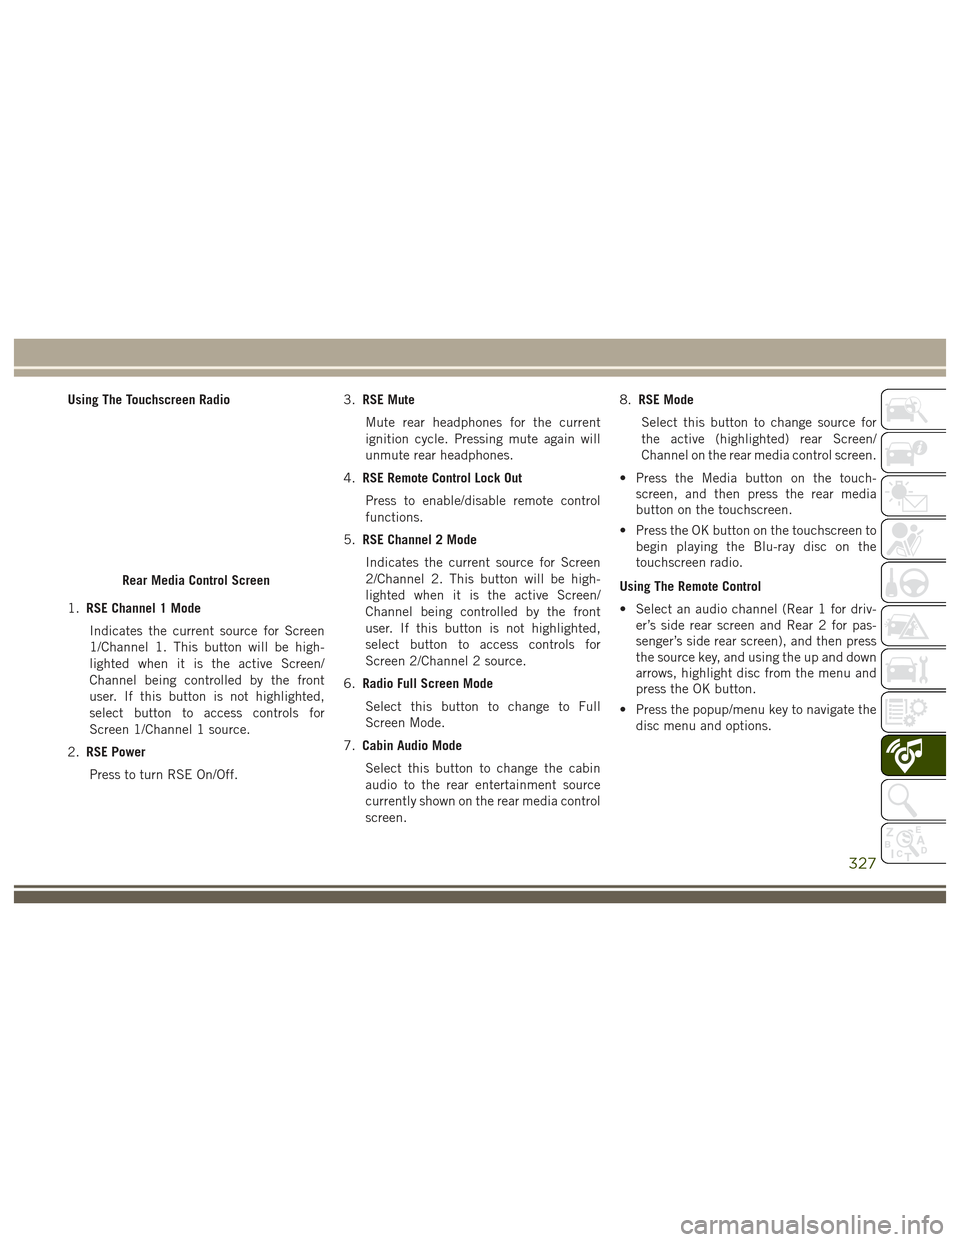
Using The Touchscreen Radio
1.RSE Channel 1 Mode
Indicates the current source for Screen
1/Channel 1. This button will be high-
lighted when it is the active Screen/
Channel being controlled by the front
user. If this button is not highlighted,
select button to access controls for
Screen 1/Channel 1 source.
2. RSE Power
Press to turn RSE On/Off. 3.
RSE Mute
Mute rear headphones for the current
ignition cycle. Pressing mute again will
unmute rear headphones.
4. RSE Remote Control Lock Out
Press to enable/disable remote control
functions.
5. RSE Channel 2 Mode
Indicates the current source for Screen
2/Channel 2. This button will be high-
lighted when it is the active Screen/
Channel being controlled by the front
user. If this button is not highlighted,
select button to access controls for
Screen 2/Channel 2 source.
6. Radio Full Screen Mode
Select this button to change to Full
Screen Mode.
7. Cabin Audio Mode
Select this button to change the cabin
audio to the rear entertainment source
currently shown on the rear media control
screen. 8.
RSE Mode
Select this button to change source for
the active (highlighted) rear Screen/
Channel on the rear media control screen.
• Press the Media button on the touch- screen, and then press the rear media
button on the touchscreen.
• Press the OK button on the touchscreen to begin playing the Blu-ray disc on the
touchscreen radio.
Using The Remote Control
• Select an audio channel (Rear 1 for driv- er’s side rear screen and Rear 2 for pas-
senger’s side rear screen), and then press
the source key, and using the up and down
arrows, highlight disc from the menu and
press the OK button.
• Press the popup/menu key to navigate the disc menu and options.
Rear Media Control Screen
327
Page 333 of 372
UCONNECT PHONE
Operation
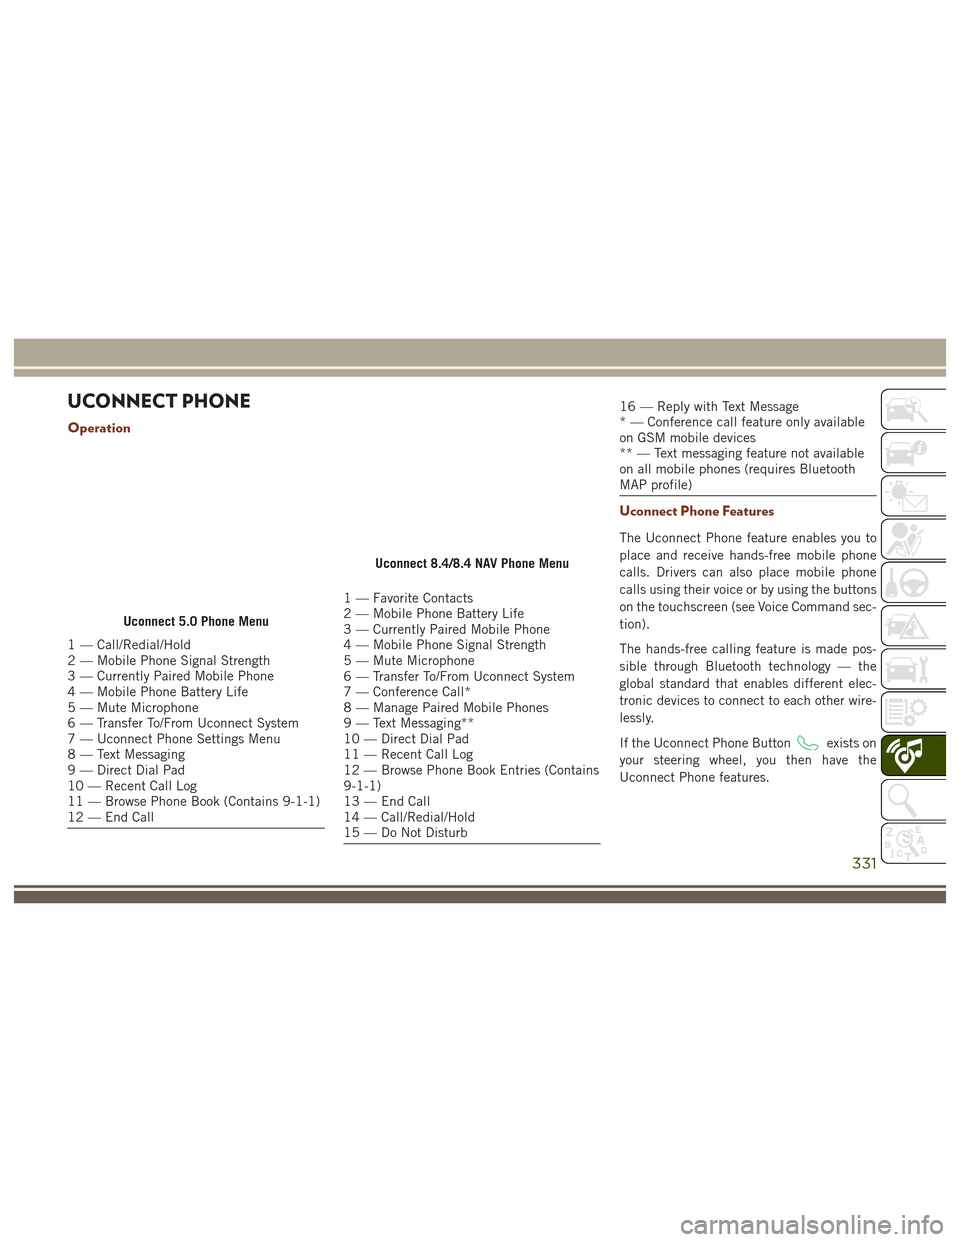
1 — Call/Redial/Hold
2 — Mobile Phone Signal Strength
3 — Currently Paired Mobile Phone
4 — Mobile Phone Battery Life
5 — Mute Microphone
6 — Transfer To/From Uconnect System
7 — Uconnect Phone Settings Menu
8 — Text Messaging
9 — Direct Dial Pad
10 — Recent Call Log
11 — Browse Phone Book (Contains 9-1-1)
12 — End Call
1 — Favorite Contacts
2 — Mobile Phone Battery Life
3 — Currently Paired Mobile Phone
4 — Mobile Phone Signal Strength
5 — Mute Microphone
6 — Transfer To/From Uconnect System
7 — Conference Call*
8 — Manage Paired Mobile Phones
9 — Text Messaging**
10 — Direct Dial Pad
11 — Recent Call Log
12 — Browse Phone Book Entries (Contains
9-1-1)
13 — End Call
14 — Call/Redial/Hold
15 — Do Not Disturb
16 — Reply with Text Message
* — Conference call feature only available
on GSM mobile devices
** — Text messaging feature not available
on all mobile phones (requires Bluetooth
MAP profile)
Uconnect Phone Features
The Uconnect Phone feature enables you to
place and receive hands-free mobile phone
calls. Drivers can also place mobile phone
calls using their voice or by using the buttons
on the touchscreen (see Voice Command sec-
tion).
The hands-free calling feature is made pos-
sible through Bluetooth technology — the
global standard that enables different elec-
tronic devices to connect to each other wire-
lessly.
If the Uconnect Phone Button
exists on
your steering wheel, you then have the
Uconnect Phone features.
Uconnect 5.0 Phone Menu
Uconnect 8.4/8.4 NAV Phone Menu
331
Page 334 of 372
NOTE:
• The Uconnect Phone requires a mobilephone equipped with the Bluetooth
Hands-Free Profile, Version 1.0 or higher.
• Most mobile phones/devices are compat- ible with the Uconnect system, however
some mobile phones/devices may not be
equipped with all of the required features
to utilize all of the Uconnect system fea-
tures.
• For Uconnect Customer Care: •
U.S. residents visitUconnectPhone.com
or call 1-877-855-8400.
General Information
This device complies with Part 15 of the FCC
rules and RSS 210 of Industry Canada. Op-
eration is subject to the following conditions:
• Changes or modifications not expressly approved by the party responsible for com-
pliance could void the user’s authority to
operate the equipment.
• This device may not cause harmful inter- ference. • This device must accept any interference
received, including interference that may
cause undesired operation.
Uconnect Phone (Bluetooth Hands Free
Calling)
The Uconnect Phone feature enables you to
place and receive hands-free mobile phone
calls. Drivers can also place mobile phone
calls using their voice or by using the buttons
on the touchscreen (see Voice Command sec-
tion).
The hands-free calling feature is made pos-
sible through Bluetooth technology — the
global standard that enables different elec-
tronic devices to connect to each other wire-
lessly.
If the Uconnect Phone Button
exists on
your steering wheel, you then have the
Uconnect Phone features.
NOTE:
• The Uconnect Phone requires a mobile phone equipped with the Bluetooth
Hands-Free Profile, Version 1.0 or higher. • Most mobile phones/devices are compat-
ible with the Uconnect system, however
some mobile phones/devices may not be
equipped with all of the required features
to utilize all of the Uconnect system fea-
tures.
• For Uconnect Customer Care: •
U.S. residents visitUconnectPhone.com
or call 1-877-855-8400.
Pairing (Wirelessly Connecting) Your
Mobile Phone To The Uconnect System
Mobile phone pairing is the process of estab-
lishing a wireless connection between a cel-
lular phone and the Uconnect system.
NOTE:
• To use the Uconnect Phone feature, you first must determine if your mobile phone
and software are compatible with the
Uconnect system. Please visit
UconnectPhone.com for complete mobile
phone compatibility information.
• Mobile phone pairing is not available while the vehicle is in motion.
MULTIMEDIA
332
Page 335 of 372
• A maximum of 10 mobile phones can bepaired to the Uconnect system.
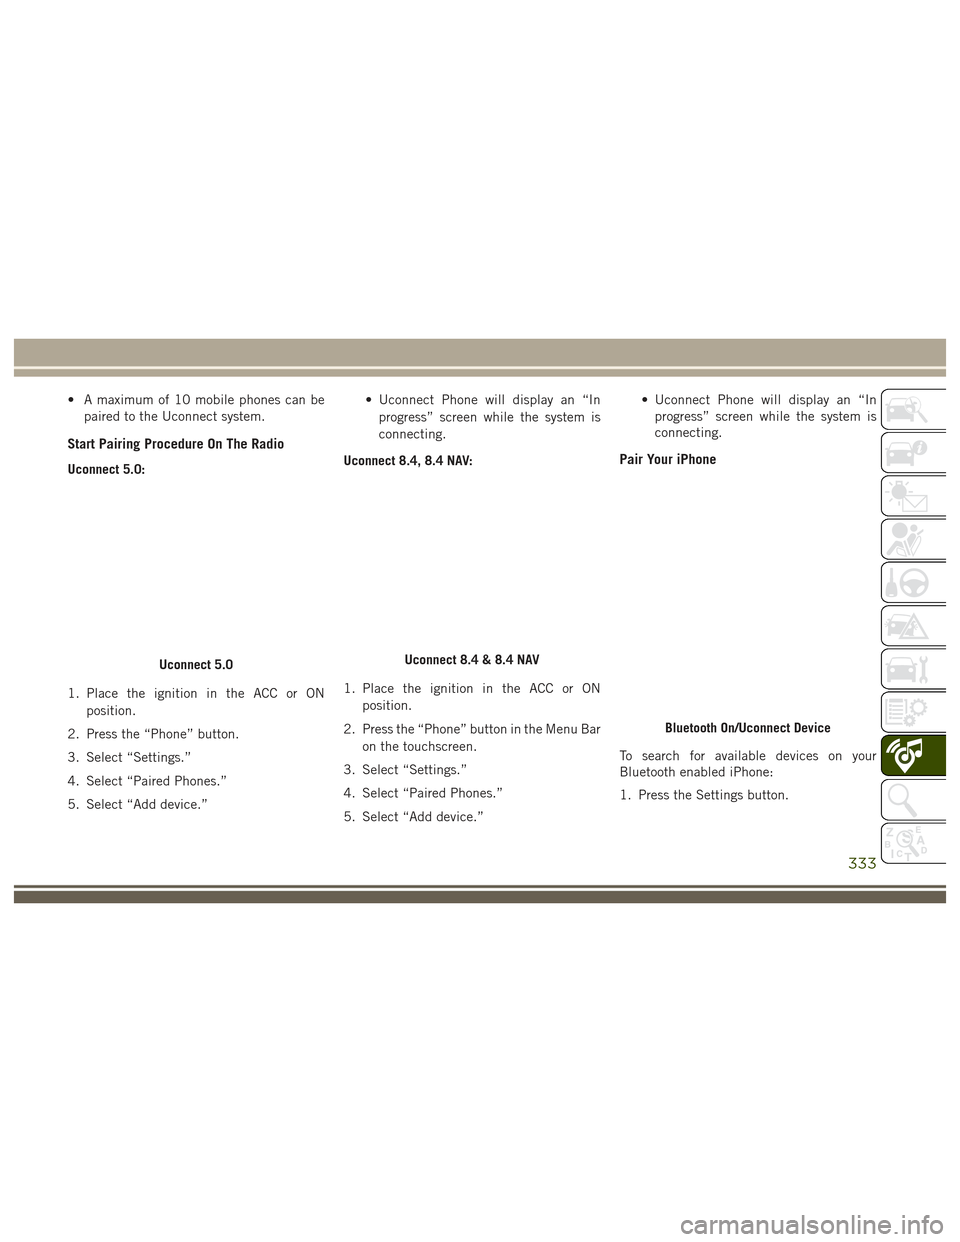
Start Pairing Procedure On The Radio
Uconnect 5.0:
1. Place the ignition in the ACC or ON
position.
2. Press the “Phone” button.
3. Select “Settings.”
4. Select “Paired Phones.”
5. Select “Add device.” • Uconnect Phone will display an “In
progress” screen while the system is
connecting.
Uconnect 8.4, 8.4 NAV:
1. Place the ignition in the ACC or ON position.
2. Press the “Phone” button in the Menu Bar on the touchscreen.
3. Select “Settings.”
4. Select “Paired Phones.”
5. Select “Add device.” • Uconnect Phone will display an “In
progress” screen while the system is
connecting.Pair Your iPhone
To search for available devices on your
Bluetooth enabled iPhone:
1. Press the Settings button.
Uconnect 5.0Uconnect 8.4 & 8.4 NAV
Bluetooth On/Uconnect Device
333
Page 336 of 372
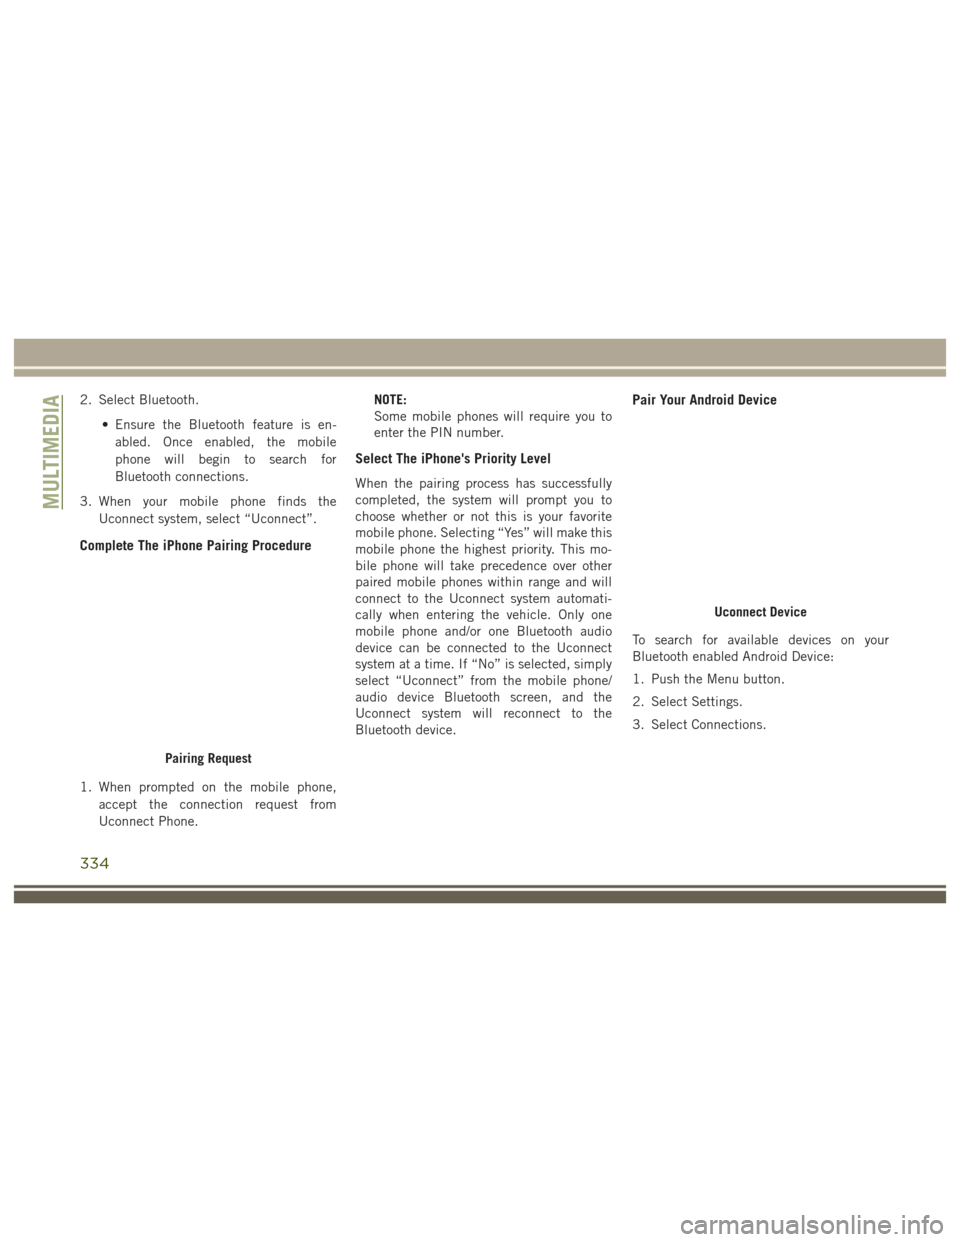
2. Select Bluetooth.• Ensure the Bluetooth feature is en-abled. Once enabled, the mobile
phone will begin to search for
Bluetooth connections.
3. When your mobile phone finds the Uconnect system, select “Uconnect”.
Complete The iPhone Pairing Procedure
1. When prompted on the mobile phone,accept the connection request from
Uconnect Phone. NOTE:
Some mobile phones will require you to
enter the PIN number.
Select The iPhone's Priority Level
When the pairing process has successfully
completed, the system will prompt you to
choose whether or not this is your favorite
mobile phone. Selecting “Yes” will make this
mobile phone the highest priority. This mo-
bile phone will take precedence over other
paired mobile phones within range and will
connect to the Uconnect system automati-
cally when entering the vehicle. Only one
mobile phone and/or one Bluetooth audio
device can be connected to the Uconnect
system at a time. If “No” is selected, simply
select “Uconnect” from the mobile phone/
audio device Bluetooth screen, and the
Uconnect system will reconnect to the
Bluetooth device.
Pair Your Android Device
To search for available devices on your
Bluetooth enabled Android Device:
1. Push the Menu button.
2. Select Settings.
3. Select Connections.
Pairing Request
Uconnect Device
MULTIMEDIA
334
Page 337 of 372
4. Turn Bluetooth setting to “On.”• Ensure the Bluetooth feature is en-abled. Once enabled, the mobile phone
will begin to search for Bluetooth
connections.
5. Once your mobile phone finds the Uconnect system, select “Uconnect”.
• You may be prompted by your mobile phone to download the phonebook,
check “Do Not Ask Again” to automati-
cally download the phonebook. This is
so you can make calls by saying the
name of your contact.Complete The Android Pairing Procedure
1. Confirm the passkey shown on the mobile
phone matches the passkey shown on the
Uconnect system then accept the
Bluetooth pairing request.
NOTE:
Some mobile phones require the PIN to be
entered manually, enter the PIN number
shown on the Uconnect screen.
Select The Android Mobile Phone's Priority
Level
When the pairing process has successfully
completed, the system will prompt you to
choose whether or not this is your favorite
mobile phone. Selecting “Yes” will make this
mobile phone the highest priority. This mo-
bile phone will take precedence over other
paired mobile phones within range and will
connect to the Uconnect system automati-
cally when entering the vehicle. Only one
mobile phone and/or one Bluetooth audio
device can be connected to the Uconnect
system at a time. If “No” is selected, simply
select “Uconnect” from the mobile phone/
audio device Bluetooth screen, and the
Uconnect system will reconnect to the
Bluetooth device.
You are now ready to make hands-free calls.
Press the Uconnect “Phone” button
on
your steering wheel to begin.
NOTE:
Refer to UconnectPhone.com website for ad-
ditional information on mobile phone pairing
and for a list of compatible phones.
Pairing Request
335
Page 338 of 372
Common Phone Commands (Examples)
• “Call John Smith”
• “Call John Smith mobile”
• “Dial 1 248 555 1212”
• “Redial”
Mute (Or Unmute) Microphone During
Call
• During a call, press the “Mute” button onthe Phone main screen to mute and un-
mute the call.
Transfer Ongoing Call Between Handset
And Vehicle
• During an on-going call, press the “Trans-fer” button on the Phone main screen to
transfer an on-going call between handset
and vehicle.
Phonebook
The Uconnect system will automatically sync
your phonebook from your paired phone, if
this feature is supported by your phone.
Phonebook contacts are updated each time
that the phone is connected. If your phone book entries do not appear, check the set-
tings on your phone. Some phones require
you to enable this feature manually.
• Your phonebook can be browsed on the
Uconnect system touchscreen, but editing
can only be done on your phone. To
browse, press the “Phone” button on the
touchscreen, then the “Phonebook” but-
ton on the touchscreen.
Favorite phonebook entries can be saved as
Favorites for quicker access. Favorites are
shown at the top of the main phone screen.
Voice Command Tips
• Speaking complete names (i.e; Call John Doe vs. Call John) will result in greater
system accuracy.
• You can “link” commands together for faster results. Say “Call John Doe, mo-
bile,” for example.
• If you are listening to available voice com- mand options, you do not have to listen to
the entire list. When you hear the com-
mand that you need, push the
button on the steering wheel, wait for the
beep and say your command.
Changing The Volume
• Start a dialogue by pushing the Phone
button
, then say a command for
example - "Help".
• Use the radio VOLUME/MUTE rotary knob to adjust the volume to a comfortable level
while the Uconnect system is speaking.
NOTE:
The volume setting for Uconnect is different
than the audio system.
NOTE:
To access help, push the Uconnect Phone
button
on the steering wheel and say
"help." Push the Uconnect Phone Pickup
button
or the VR buttonand say
"cancel" to cancel the help session.
Using Do Not Disturb
With Do Not Disturb, you can disable notifi-
cations from incoming calls and texts, allow-
ing you to keep your eyes on the road and
hands on the wheel. For your convenience
there is a counter display to keep track of
your missed calls and text messages while
you were using Do Not Disturb.
MULTIMEDIA
336