key JEEP GRAND CHEROKEE 2017 WK2 / 4.G Owner's Guide
[x] Cancel search | Manufacturer: JEEP, Model Year: 2017, Model line: GRAND CHEROKEE, Model: JEEP GRAND CHEROKEE 2017 WK2 / 4.GPages: 372
Page 155 of 372
WARNING!
• Do not leave the key fob in or near thevehicle, or in a location accessible to
children, and do not leave the ignition of
a vehicle equipped with Keyless Enter-
N-Go in the ACC or ON/RUN mode. A
child could operate power windows,
other controls, or move the vehicle.
STOP/START SYSTEM — IF
EQUIPPED
The Stop/Start function is developed to re-
duce fuel consumption. The system will stop
the engine automatically during a vehicle
stop if the required conditions are met. Re-
leasing the brake pedal or pressing the accel-
erator pedal will automatically re-start the
engine.
Automatic Mode
The Stop/Start feature is
enabled after every nor-
mal customer engine
start. At that time, the
system will go into STOP/
START READY and if all
other conditions are met,
can go into a STOP/START AUTOSTOP AC-
TIVE “Autostop” mode.
To Activate The Autostop Mode, The Following
Must Occur:
• The system must be in STOP/START READY state. A STOP/START READY mes-
sage will be displayed in the instrument
cluster display within the Stop/Start sec-
tion. Refer to “Instrument Cluster Dis-
play” in “Getting To Know Your Instrument
Panel” in your Owners Manual at
www.jeep.com/en/owners/manuals/ .
• The vehicle must be completely stopped.
• The shifter must be in a forward gear and the brake pedal depressed. The engine will shut down, the tachometer
will move to the zero position and the Stop/
Start telltale will illuminate indicating you
are in Autostop. Customer settings will be
maintained upon return to an engine running
condition.
Refer to the “Stop/Start System” in the
“Starting And Operating” section located in
your Owners Manual at
www.jeep.com/en/owners/manuals/ .
Possible Reasons The Engine Does Not
Autostop
Prior to engine shut down, the system will
check many safety and comfort conditions to
see if they are fulfilled. Detailed information
about the operation of the Stop/Start system
may be viewed in the instrument cluster dis-
play Stop/Start Screen. In the following situ-
ations, the engine will not stop:
• Driver’s seat belt is not buckled.
• Driver’s door is not closed.
• Battery temperature is too warm or cold.
• Battery charge is low.
• The vehicle is on a steep grade.
153
Page 159 of 372
300 to 500 miles (483 to 805 km):
• Exercise the full engine rpm range, shift-ing manually (paddles or gear shift) at
higher rpms when possible.
• Do not perform sustained operation with the accelerator pedal at wide open
throttle.
• Maintain vehicle speed below 85 mph (136 km/h) and observe local speed
limits.
For the first 1500 miles (2414 km):
• Do not participate in track events, sport driving schools, or similar activities during
the first 1500 mi (2414 km).
NOTE:
Check engine oil with every refueling and add
if necessary. Oil and fuel consumption may
be higher through the first oil change interval.
Running the engine with an oil level below
the add mark can cause severe engine dam-
age.AUTOMATIC
TRANSMISSION
WARNING!
• It is dangerous to shift out of PARK or NEUTRAL if the engine speed is higher
than idle speed. If your foot is not firmly
pressing the brake pedal, the vehicle
could accelerate quickly forward or in
reverse. You could lose control of the
vehicle and hit someone or something.
Only shift into gear when the engine is
idling normally and your foot is firmly
pressing the brake pedal.
• Unintended movement of a vehicle
could injure those in or near the vehicle.
As with all vehicles, you should never
exit a vehicle while the engine is run-
ning. Before exiting a vehicle, always
apply the parking brake, shift the trans-
mission into PARK, and turn the ignition
OFF. When the ignition is in the OFF
mode, the transmission is locked in
PARK, securing the vehicle against un-
wanted movement.
WARNING!
• When leaving the vehicle, always makesure the ignition is in the OFF mode,
remove the key fob from the vehicle, and
lock the vehicle.
• Never leave children alone in a vehicle,
or with access to an unlocked vehicle.
Allowing children to be in a vehicle un-
attended is dangerous for a number of
reasons. A child or others could be seri-
ously or fatally injured. Children should
be warned not to touch the parking
brake, brake pedal or the transmission
gear selector.
• Do not leave the key fob in or near the
vehicle (or in a location accessible to
children), and do not leave the ignition
in the ACC or ON/RUN mode. A child
could operate power windows, other con-
trols, or move the vehicle.
157
Page 208 of 372
Bulb Replacement
High Intensity Discharge Headlamps (HID)
—
If Equipped
The headlamps are a type of high voltage
discharge tube. High voltage can remain in
the circuit even with the headlamp switch off
and the key removed. Because of this, you
should not attempt to service a headlamp bulb
yourself. If a headlamp bulb fails, take your
vehicle to an authorized dealer for service.
WARNING!
A transient high voltage occurs at the bulb
sockets of High Intensity Discharge (HID)
headlamps when the headlamp switch is
turned ON. It may cause serious electrical
shock or electrocution if not serviced prop-
erly. See your authorized dealer for ser-
vice. NOTE:
On vehicles equipped with High Intensity
Discharge (HID) headlamps, when the head-
lamps are turned on, there is a blue hue to
the lamps. This diminishes and becomes
more white after approximately 10 seconds,
as the system charges.
Halogen Headlamps — If Equipped
1. Open the hood.
2. Turn the low or high beam bulb one–
quarter turn counterclockwise to remove
from housing.
3. Disconnect the electrical connector and replace the bulb.
CAUTION!
Do not touch the new bulb with your fin-
gers. Oil contamination will severely
shorten bulb life. If the bulb comes in
contact with any oily surface, clean the
bulb with rubbing alcohol.
Front Turn Signal Lamp
1. Open the hood.
2. Turn the turn signal bulb one–quarter turncounterclockwise to remove from
housing.
3. Disconnect the electrical connector and replace the bulb.
CAUTION!
Do not touch the new bulb with your fin-
gers. Oil contamination will severely
shorten bulb life. If the bulb comes in
contact with any oily surface, clean the
bulb with rubbing alcohol.
Front Fog Lamps
1. Reach through the cutout in the splashshield and disconnect the wiring harness
from the fog lamp connector.
2. Firmly grasp the bulb by the two latches and squeeze them together to unlock the
bulb from the back of the front fog lamp
housing.
IN CASE OF EMERGENCY
206
Page 209 of 372
3. Pull the bulb straight out from the keyedopening in the housing.
CAUTION!
•Do not touch the new bulb with your
fingers. Oil contamination will severely
shorten bulb life. If the bulb comes in
contact with any oily surface, clean the
bulb with rubbing alcohol.
• Always use the correct bulb size and type for replacement. An incorrect bulb size
or type may overheat and cause damage
to the lamp, the socket or the lamp
wiring.
4. Align the index tabs of the front fog lamp bulb with the slots in the collar of the bulb
opening on the back of the front fog lamp
housing.
5. Insert the bulb into the housing until the index tabs are engaged in the slots of the
collar.
6. Firmly and evenly push the bulb straight into the lamp housing until both tabs snap
firmly into place and are fully engaged. 7. Connect the wiring harness to the front fog
lamp connector.
Rear Tail, Stop, and Turn Signal Lamps
1. Raise the liftgate.
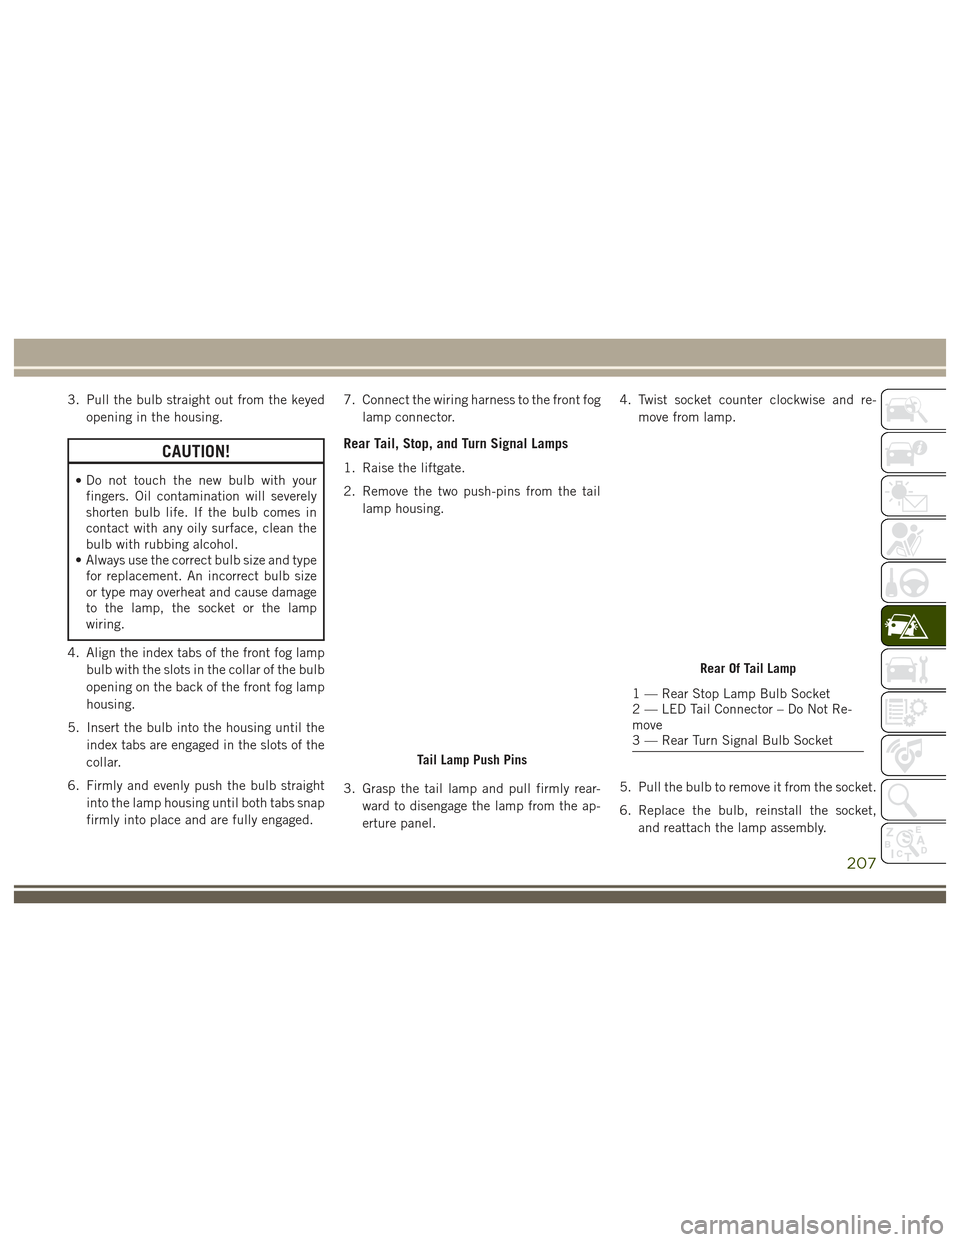
2. Remove the two push-pins from the taillamp housing.
3. Grasp the tail lamp and pull firmly rear- ward to disengage the lamp from the ap-
erture panel. 4. Twist socket counter clockwise and re-
move from lamp.
5. Pull the bulb to remove it from the socket.
6. Replace the bulb, reinstall the socket, and reattach the lamp assembly.
Tail Lamp Push Pins
Rear Of Tail Lamp
1 — Rear Stop Lamp Bulb Socket
2 — LED Tail Connector – Do Not Re-
move
3 — Rear Turn Signal Bulb Socket
207
Page 214 of 372
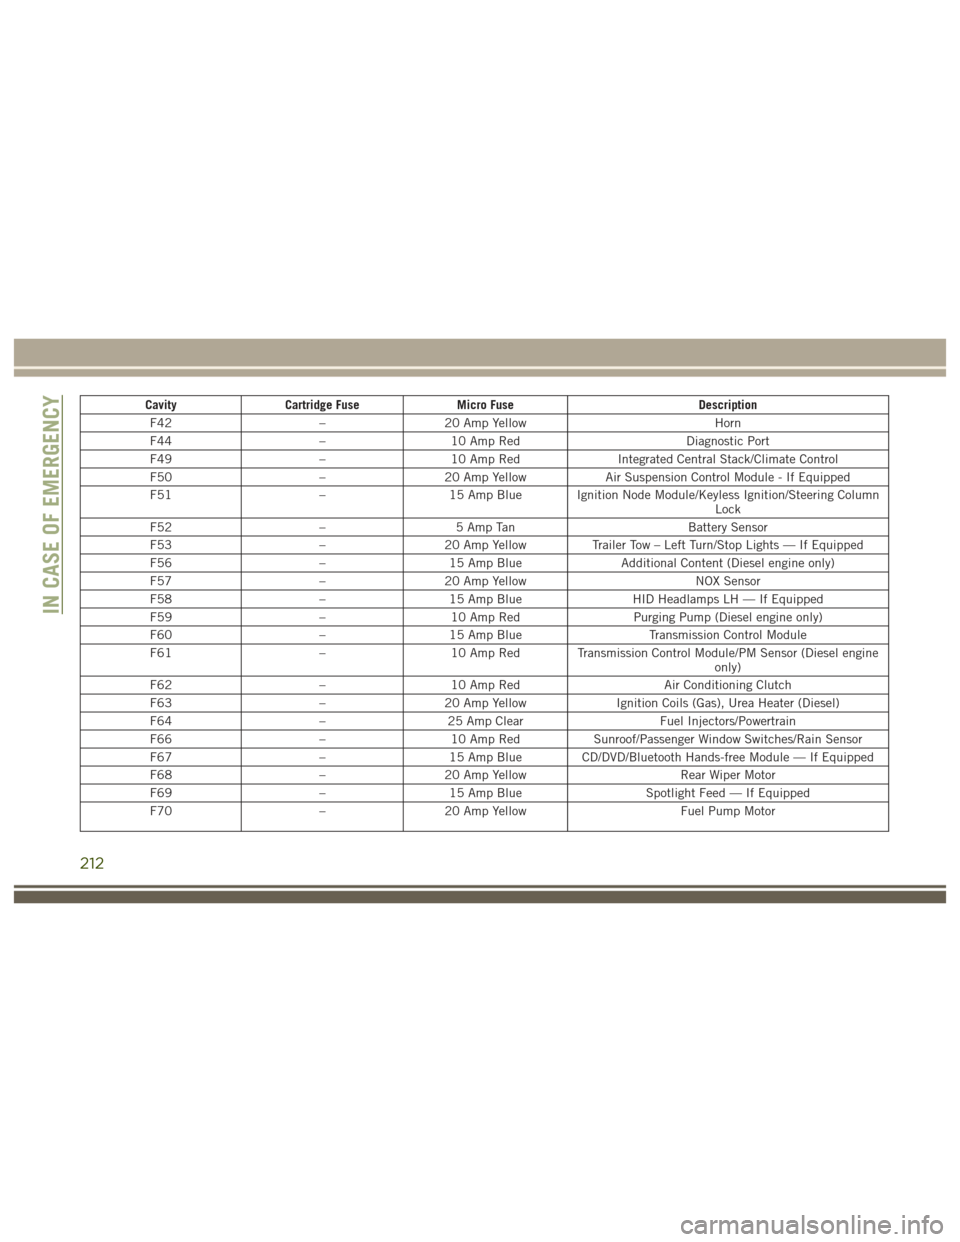
CavityCartridge Fuse Micro Fuse Description
F42 –20 Amp Yellow Horn
F44 –10 Amp Red Diagnostic Port
F49 –10 Amp Red Integrated Central Stack/Climate Control
F50 –20 Amp Yellow Air Suspension Control Module - If Equipped
F51 –15 Amp Blue Ignition Node Module/Keyless Ignition/Steering Column
Lock
F52 –5 Amp Tan Battery Sensor
F53 –20 Amp Yellow Trailer Tow – Left Turn/Stop Lights — If Equipped
F56 –15 Amp Blue Additional Content (Diesel engine only)
F57 –20 Amp Yellow NOX Sensor
F58 –15 Amp Blue HID Headlamps LH — If Equipped
F59 –10 Amp Red Purging Pump (Diesel engine only)
F60 –15 Amp Blue Transmission Control Module
F61 –10 Amp Red Transmission Control Module/PM Sensor (Diesel engine
only)
F62 –10 Amp Red Air Conditioning Clutch
F63 –20 Amp Yellow Ignition Coils (Gas), Urea Heater (Diesel)
F64 –25 Amp Clear Fuel Injectors/Powertrain
F66 –10 Amp Red Sunroof/Passenger Window Switches/Rain Sensor
F67 –15 Amp Blue CD/DVD/Bluetooth Hands-free Module — If Equipped
F68 –20 Amp Yellow Rear Wiper Motor
F69 –15 Amp Blue Spotlight Feed — If Equipped
F70 –20 Amp Yellow Fuel Pump Motor
IN CASE OF EMERGENCY
212
Page 230 of 372
NOTE:
SRT vehicles and 4WD models without 4WD
LOW range should only be towed with all four
wheelsOFFthe ground.
Proper towing or lifting equipment is required
to prevent damage to your vehicle. Use only
tow bars and other equipment designed for
this purpose, following equipment manufac-
turer’s instructions. Use of safety chains is
mandatory. Attach a tow bar or other towing
device to main structural members of the
vehicle, not to bumpers or associated brack-
ets. State and local laws regarding vehicles
under tow must be observed.
If you must use the accessories (wipers, de-
frosters, etc.) while being towed, the ignition
must be in the ON/RUN mode, not the ACC
mode.
If the key fob is unavailable, or the vehicle's
battery is discharged, refer to “Manual Park
Release” in this section for instructions on
shifting the transmission out of PARK for
towing.CAUTION!
• Do not use sling type equipment when towing. Vehicle damage may occur.
• When securing the vehicle to a flat bed
truck, do not attach to front or rear
suspension components. Damage to
your vehicle may result from improper
towing.
Two-Wheel Drive Models
The manufacturer recommends towing your
vehicle with all four wheels OFFthe ground
using a flatbed.
If flatbed equipment is not available, and the
transmission is operable, the vehicle may be
towed (with rear wheels on the ground) under
the following conditions:
• The transmission must be in NEUTRAL. Refer to "Manual Park Release" in this
section for instructions on shifting the
transmission to NEUTRAL when the en-
gine is off.
• The towing speed must not exceed 30 mph (48 km/h). • The towing distance must not exceed
30 miles (48 km).
If the transmission is not operable, or the
vehicle must be towed faster than 30 mph
(48 km/h) or farther than 30 miles (48 km),
tow with the rear wheels OFFthe ground.
Acceptable methods are to tow the vehicle on
a flatbed, or with the front wheels raised and
the rear wheels on a towing dolly, or (when
using a suitable steering wheel stabilizer to
hold the front wheels in the straight position)
with the rear wheels raised and the front
wheels on the ground.
CAUTION!
Towing faster than 30 mph (48 km/h) or
farther than 30 miles (48 km) with rear
wheels on the ground can cause severe
transmission damage. Damage from im-
proper towing is not covered under the
New Vehicle Limited Warranty.
IN CASE OF EMERGENCY
228
Page 293 of 372
• Prevent any liquid from entering the sys-tem: this could damage it beyond repair.
Anti-theft Protection
The system is equipped with an anti-theft
protection system based on the exchange of
information with the electronic control unit
(Body Computer) on the vehicle.
This guarantees maximum safety and pre-
vents the secret code from being entered
after the power supply has been discon-
nected.
If the check has a positive outcome, the
system will start to operate, whereas if the
comparison codes are not the same or if the
electronic control unit (Body Computer) is
replaced, the system will ask the user to enter
the secret code according to the procedure
described in the paragraph below.
Entering The Secret Code
When the system is switched on, if the code is
requested, the display will show "Please enter
Anti-Theft Code" followed by the screen
showing a keypad to enter the secret code. The secret code has four numbers from 0 to
9: to insert the code numbers, rotate the
BROWSE/ENTER dial and press to confirm.
After entering the fourth number the system
will start functioning.
If an incorrect code is entered, the system
displays "Incorrect Code" to notify the user of
the need to enter the correct code.
After the 3 available attempts to enter the
code, the system displays "Incorrect Code.
Radio locked. Wait for 30 minutes". After the
text has disappeared it is possible to start the
code entering procedure again.
Vehicle Radio Passport
This document certifies ownership of the sys-
tem. The vehicle radio passport shows the
system model, serial number and secret
code.
In case you lose the radio passport, please go
to Jeep Assistance Network with an ID and
the car papers.
Keep the vehicle radio passport in a safe place
so that you can give the information to the
relevant authorities if the system is stolen.
UCONNECT ACCESS
Uconnect Access — If Equipped (Available
On Uconnect 8.4/8.4 NAV — U.S.
Residents Only)
WARNING!
ALWAYS drive safely with your hands on
the wheel. You have full responsibility and
assume all risks related to the use of the
Uconnect features and applications in this
vehicle. Only use Uconnect when it is safe
to do so. Failure to do so may result in an
accident involving serious injury or death.
WARNING!
ALWAYS obey traffic laws and pay atten-
tion to the road. Some Uconnect Access
services, including 9-1-1 and Assist, will
NOT work without an operable 1X (voice/
data) or 3G (data) network connection.
NOTE:
Your vehicle may be transmitting data as
authorized by the subscriber.
291
Page 302 of 372
understand and agree that 9-1-1 operators may,
like any other 9-1-1 call, record conversations
and sounds in and near your vehicle upon con-
nection.
Roadside Assistance (If Equipped)
If your vehicle is equipped with this feature
and has an operable 1X (voice/data) or 3G
(data) network connection, you may be able
to connect with Roadside Assistance by
pushing the "ASSIST" button on the rearview
mirror. You will be presented with Assist Care
options. Make a selection by pressing the
prompts displayed on the radio. If Roadside
Assistance is provided to your vehicle, you
agree to be responsible for any additional
roadside assistance service costs that you
may incur. In order to provide Uconnect Ser-
vices to you, we may record and monitor your
conversations with Roadside Assistance,
Uconnect Care or Vehicle Care, whether such
conversations are initiated through the
Uconnect Services in your vehicle, your de-
vice or via a landline device, and may share
information obtained through such recording
and monitoring in accordance with regulatoryrequirements. You acknowledge, agree and
consent to any recording, monitoring or shar-
ing of information obtained through any such
call recordings.
Yelp
Customers have the ability to search for
nearby destinations or a Point Of Interest
(POI) either by category or custom search by
using keywords (for example, “Italian restau-
rant”). Searching can be done by either voice
or by using the touchscreen keypad. Using
the touchscreen, launch Yelp by selecting the
“Apps
” icon, then press “Yelp.” To use
voice recognition, push the VR button on the
steering wheel and say “launch Yelp,” then
follow the instructions on the Teleprompter.
Security Alarm Notification
The Theft Alarm Notification feature notifies
you via email or text (SMS) message when the
vehicle’s factory-installed security alarm sys-
tem has been set-off. There are a number of
reasons why your alarm may have been trig-
gered, one of which could be that your ve-
hicle was stolen. If so, please see the details
of the Stolen Vehicle Assistance service be- low. When you register, Theft Alarm Notifica-
tion is automatically set to send you an email
at the email address you provide should the
alarm go off. You may also opt to have a text
message sent to your device.
Stolen Vehicle Assistance
If your vehicle is stolen, contact local law
enforcement immediately to file a stolen ve-
hicle report. Once this report has been filed,
Uconnect care can help locate your vehicle.
The Uconnect Care agent will ask for the
stolen vehicle report number issued by local
law enforcement. As long as your vehicle has
an operable 1X (voice/data) or 3G (data)
network connection, the Uconnect Care
Agent may be able to locate the stolen vehicle
and work with law enforcement to help re-
cover it. Your vehicle must have an operable
1X (voice/data) or 3G (data) network connec-
tion and must be registered with Uconnect
Access with an active subscription that in-
cludes the applicable feature.
MULTIMEDIA
300
Page 303 of 372
3G Wi-Fi Hotspot
3G Wi-Fi Hotspot is an in-vehicle feature that
connects your device to an operable 1X
(voice/data) or 3G (data) network using
Uconnect Access and is ready to go where
ever you are. Once your vehicle is registered
for Uconnect Access, you can purchase a 3G
Wi-Fi Hotspot subscription at the Uconnect
Store. After you've made your purchase, turn
on your signal and connect your passengers’
devices. It's never been easier to bring your
home or office with you.
WARNING!
NEVER use the 3G Wi-Fi Hotspot when
you are driving the vehicle. As the driver,
you should only use the 3G Wi-Fi Hotspot
when the vehicle is parked in a safe loca-
tion. Failure to do so may result in an
accident involving serious injury or death.
Vehicle Health Report/Alert
Your vehicle will send you a monthly email
report, which summarizes the performance of
your vehicle’s key systems so you can stay ontop of your vehicle’s maintenance needs.
Your vehicle will also send you Vehicle Health
Alerts when it detects issues with its key
systems that need your attention. For further
information, go to the Mopar Owner Connect
website moparownerconnect.com.
Uconnect Access Remote Features
If you own a compatible iPhone or Android
powered device, the Uconnect Access App
allows you to remotely lock or unlock your
doors, start your engine or activate your horn
and lights from virtually anywhere. Your ve-
hicle must be equipped with remote start and
your vehicle must have an operable 1X (voice/
data) or 3G (data) network connection). Ser-
vices can only be used where coverage is
available; see coverage map for details. You
can download the App from Mopar Owner
Connect or from the App Store (iPhone) or
Google Play Store (Android). Visit
UconnectPhone.com to determine if your de-
vice is compatible. For Uconnect Phone cus-
tomer support and to determine if your device
is compatible.
U.S. residents - visit UconnectPhone.com or
call 1-877-855-8400.
Remote Start (If Equipped)
This feature provides the ability to start the
engine on your vehicle, without the keys and
from virtually any distance. You can send a
request to your vehicle in one of two ways:
1. Using the Uconnect Access App from a
compatible device.
2. From the Mopar Owner Connect website.
• After 15 minutes if you have not en-tered your vehicle with the key, the
engine will shut off automatically.
• You can also send a command to turn- off an engine that has been remote
started.
• This remote function requires your ve- hicle to be equipped with a factory-
installed Remote Start system. To uti-
lize this feature after the Uconnect
Access App is downloaded, login with
your user name and password.
To use this feature after the Uconnect Access
App is downloaded, login using your user
name and password. You will need your four
301
Page 304 of 372
digit Uconnect Security PIN to confirm the
request. Press the “remote start” icon on
your Uconnect Access App to remotely start
the vehicle.
You can set-up notifications for your account
to receive an email or text (SMS) message
every time a command is sent. Login to
Mopar Owner Connect
moparownerconnect.com and click on Edit
Profile to manage Uconnect Notifications.
Remote Door Lock/Unlock
This feature provides the ability to lock or
unlock the door on your vehicle, without the
keys and from virtually any distance. You can
send a request to your vehicle in one of three
ways:
1. Using the Uconnect Access App from acompatible device.
2. From the Mopar Owner Connect website.
3. By contacting the Uconnect Care on the phone.
To use this feature after the Uconnect Access
App is downloaded, login using your user
name and password. You will need your four digit Uconnect Security PIN to confirm the
request. Press the “closed lock” icon on your
Uconnect Access App to lock the doors, and
press the “open lock” icon to unlock the
driver’s door.
You can set-up notifications for your account
to receive an email or text (SMS) message
every time a command is sent. Login to
Mopar
Owner Connect
moparownerconnect.com and click on Edit
Profile to manage Uconnect Notifications.Remote Horn And Lights
It’s easy to locate a vehicle in a dark, crowded
or noisy parking area by activating the horn
and lights. It may also help if you need to
draw attention to your vehicle for any reason.
You can send a request to your vehicle in one
of three ways:
1. Using the Uconnect Access App from a compatible device.
2. From the Mopar Owner Connect website.
3. By contacting the Uconnect Care on the phone. To use this feature after the Uconnect Access
App is downloaded, login using your user
name and password. You will need your four
digit Uconnect Security PIN to confirm the
request. You can set-up notifications for your
account to receive an email or text (SMS)
message every time a command is sent.
Login to Mopar Owner Connect
moparownerconnect.com and click on Edit
Profile to manage Uconnect Notifications.
Voice Texting
Want to dictate a personal message? Register
with Uconnect Access to take advantage of a
new, cloudbased Voice Texting service, an
enhancement to Voice Text Reply.
Voice Texting allows you to compose a new
text or reply to an incoming text message.
Before you attempt to use the Voice Texting
feature, check to ensure you have the follow-
ing:
1. A paired, Bluetooth enabled device with
the Message Access Profile (MAP). Not all
Bluetooth enabled devices support MAP,
MULTIMEDIA
302