air conditioning JEEP GRAND CHEROKEE 2017 WK2 / 4.G User Guide
[x] Cancel search | Manufacturer: JEEP, Model Year: 2017, Model line: GRAND CHEROKEE, Model: JEEP GRAND CHEROKEE 2017 WK2 / 4.GPages: 372
Page 51 of 372
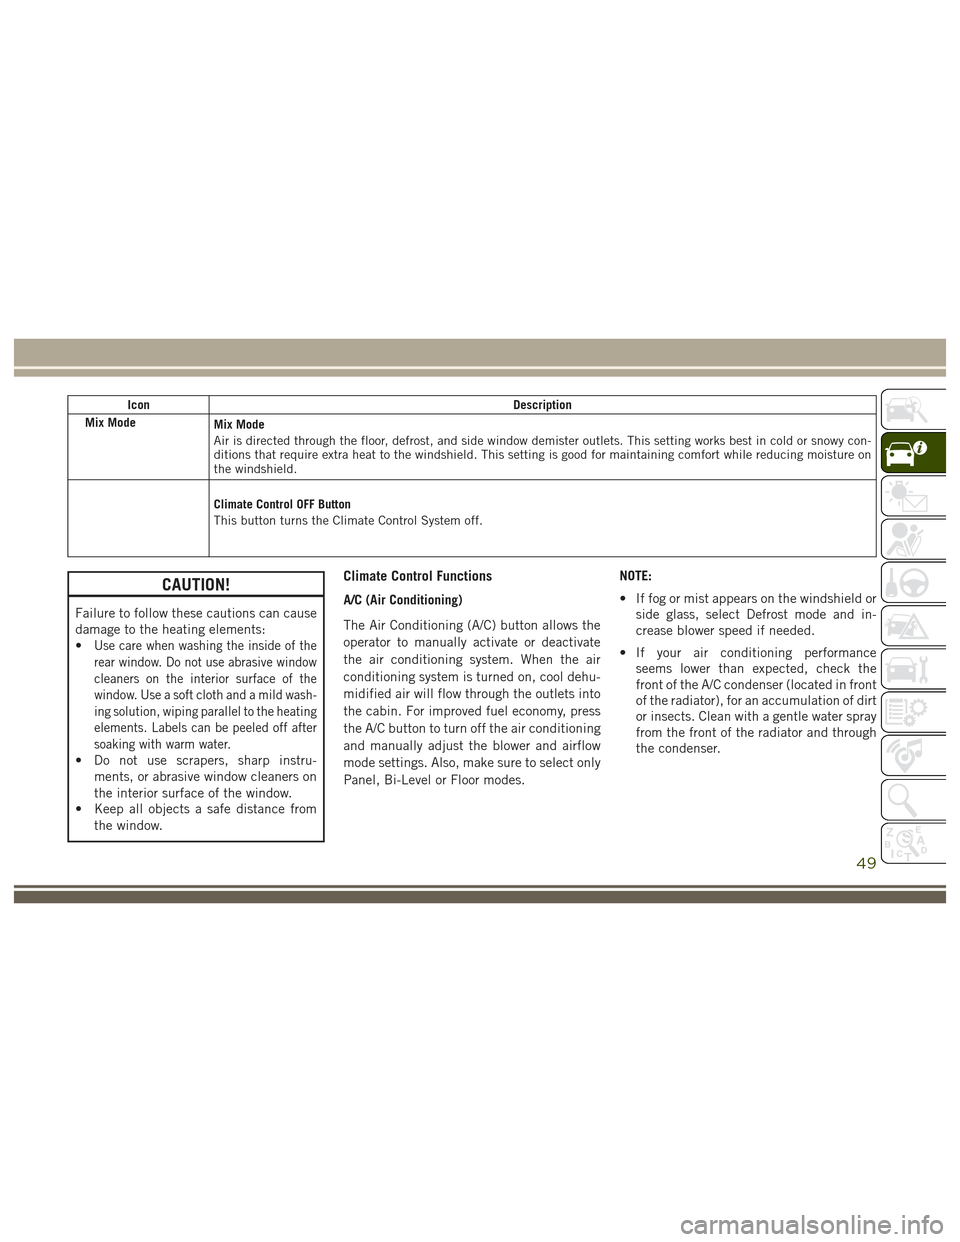
IconDescription
Mix Mode
Mix Mode
Air is directed through the floor, defrost, and side window demister outlets. This setting works best in cold or snowy con-
ditions that require extra heat to the windshield. This setting is good for maintaining comfort while reducing moisture on
the windshield.
Climate Control OFF Button
This button turns the Climate Control System off.
CAUTION!
Failure to follow these cautions can cause
damage to the heating elements:
•
Usecarewhenwashingtheinsideofthe
rear window. Do not use abrasive window
cleaners on the interior surface of the
window. Use a soft cloth and a mild wash-
ing solution, wiping parallel to the heating
elements. Labels can be peeled off after
soaking with warm water.
• Do not use scrapers, sharp instru- ments, or abrasive window cleaners on
the interior surface of the window.
• Keep all objects a safe distance from
the window.
Climate Control Functions
A/C (Air Conditioning)
The Air Conditioning (A/C) button allows the
operator to manually activate or deactivate
the air conditioning system. When the air
conditioning system is turned on, cool dehu-
midified air will flow through the outlets into
the cabin. For improved fuel economy, press
the A/C button to turn off the air conditioning
and manually adjust the blower and airflow
mode settings. Also, make sure to select only
Panel, Bi-Level or Floor modes. NOTE:
• If fog or mist appears on the windshield or
side glass, select Defrost mode and in-
crease blower speed if needed.
• If your air conditioning performance seems lower than expected, check the
front of the A/C condenser (located in front
of the radiator), for an accumulation of dirt
or insects. Clean with a gentle water spray
from the front of the radiator and through
the condenser.
49
Page 53 of 372
warms up. The blower will increase in speed
and transition into Auto mode.
Manual Operation Override
This system offers a full complement of
manual override features. The AUTO symbol
in the front ATC display will be turned off
when the system is being used in the manual
mode.
NOTE:
The system will not automatically sense the
presence of fog, mist or ice on the wind-
shield. DEFROST mode must be manually
selected to clear the windshield and side
glass.
Operating Tips
NOTE:
Refer to the chart at the end of this section
for suggested control settings for various
weather conditions.
Summer Operation
The engine cooling system must be protected
with a high-quality antifreeze coolant to pro-
vide proper corrosion protection and to pro-
tect against engine overheating. OAT coolant
(conforming to MS.90032) is recommended.
Winter Operation
To ensure the best possible heater and de-
froster performance, make sure the engine
cooling system is functioning properly and
the proper amount, type, and concentration
of coolant is used. Use of the air Recircula-
tion mode during Winter months is not rec-
ommended, because it may cause window
fogging.
Vacation/Storage
Before you store your vehicle, or keep it out of
service (i.e., vacation) for two weeks or more,
run the air conditioning system at idle for
about five minutes, in fresh air with the
blower setting on high. This will ensure ad-
equate system lubrication to minimize the
possibility of compressor damage when the
system is started again.
Window Fogging
Vehicle windows tend to fog on the inside in
mild, rainy and/or humid weather. To clear
the windows, select Defrost or Mix mode and
increase the front blower speed. Do not use
the Recirculation mode without A/C for long
periods, as fogging may occur.
Outside Air Intake
Make sure the air intake, located directly in
front of the windshield, is free of obstructions
such as leaves. Leaves collected in the air
intake may reduce airflow, and if they enter
the plenum, they could plug the water drains.
In winter months, make sure the air intake is
clear of ice, slush, and snow.
Cabin Air Filter
The climate control system filters out dust
and pollen from the air. Contact your autho-
rized dealer to service your cabin air filter,
and to have it replaced when needed.
51
Page 214 of 372
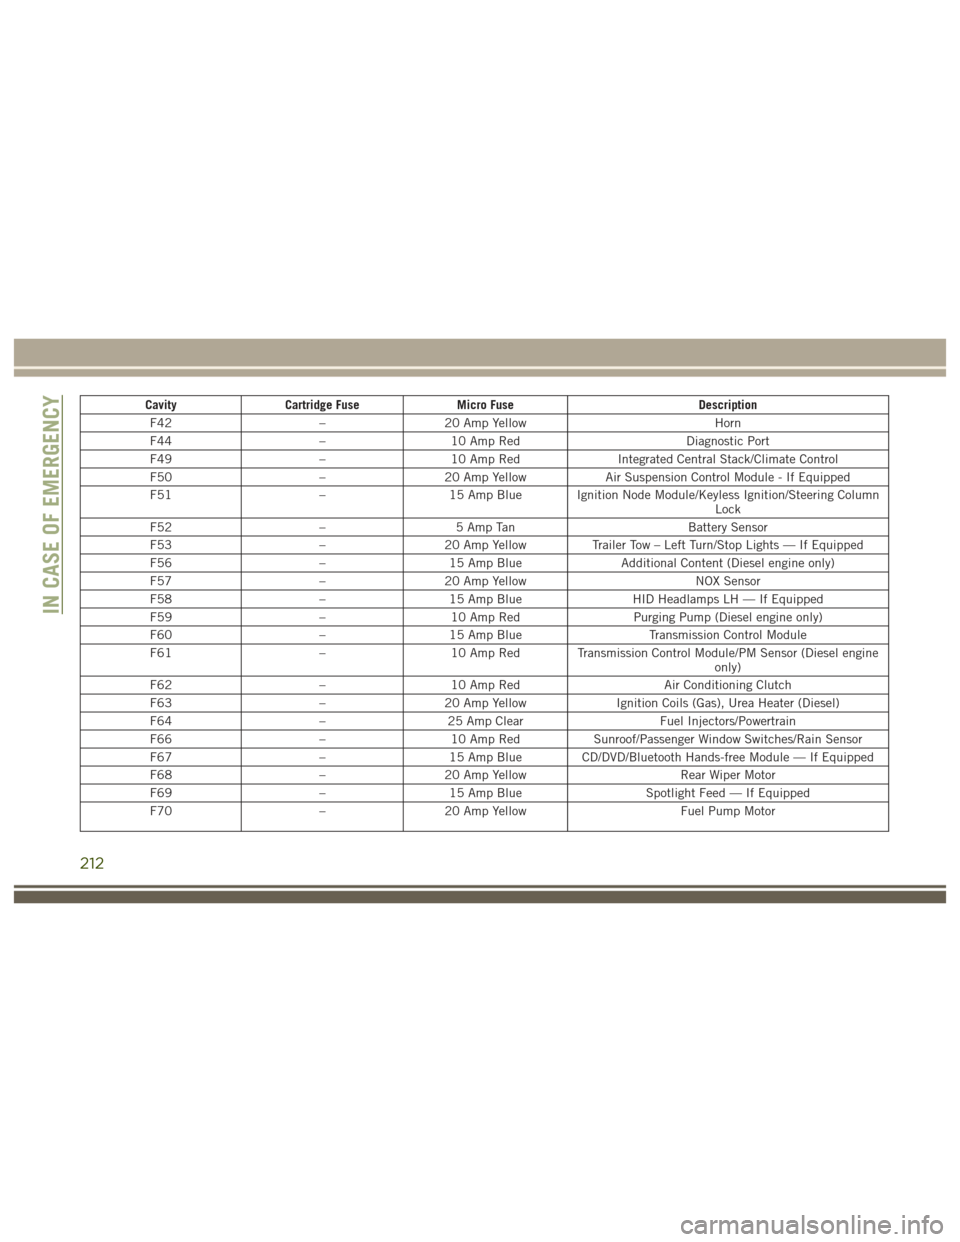
CavityCartridge Fuse Micro Fuse Description
F42 –20 Amp Yellow Horn
F44 –10 Amp Red Diagnostic Port
F49 –10 Amp Red Integrated Central Stack/Climate Control
F50 –20 Amp Yellow Air Suspension Control Module - If Equipped
F51 –15 Amp Blue Ignition Node Module/Keyless Ignition/Steering Column
Lock
F52 –5 Amp Tan Battery Sensor
F53 –20 Amp Yellow Trailer Tow – Left Turn/Stop Lights — If Equipped
F56 –15 Amp Blue Additional Content (Diesel engine only)
F57 –20 Amp Yellow NOX Sensor
F58 –15 Amp Blue HID Headlamps LH — If Equipped
F59 –10 Amp Red Purging Pump (Diesel engine only)
F60 –15 Amp Blue Transmission Control Module
F61 –10 Amp Red Transmission Control Module/PM Sensor (Diesel engine
only)
F62 –10 Amp Red Air Conditioning Clutch
F63 –20 Amp Yellow Ignition Coils (Gas), Urea Heater (Diesel)
F64 –25 Amp Clear Fuel Injectors/Powertrain
F66 –10 Amp Red Sunroof/Passenger Window Switches/Rain Sensor
F67 –15 Amp Blue CD/DVD/Bluetooth Hands-free Module — If Equipped
F68 –20 Amp Yellow Rear Wiper Motor
F69 –15 Amp Blue Spotlight Feed — If Equipped
F70 –20 Amp Yellow Fuel Pump Motor
IN CASE OF EMERGENCY
212
Page 235 of 372
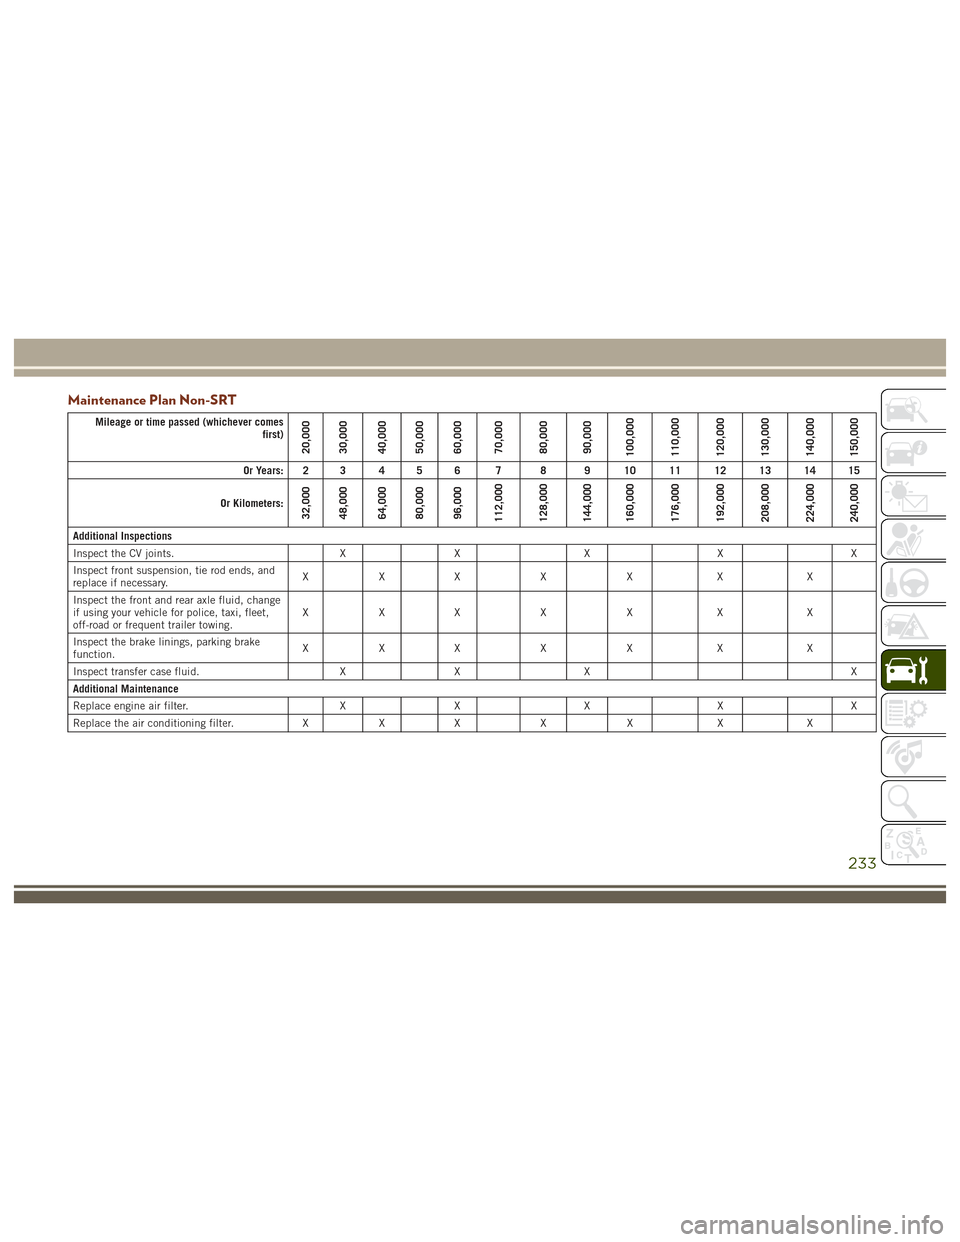
Maintenance Plan Non-SRT
Mileage or time passed (whichever comesfirst)
20,000
30,000
40,000
50,000
60,000
70,000
80,000
90,000
100,000
110,000
120,000
130,000
140,000
150,000
Or Years: 2 3 4 5 6 7 8 9 10 11 12 13 14 15
Or Kilometers:
32,000
48,000
64,000
80,000
96,000
112,000
128,000
144,000
160,000
176,000
192,000
208,000
224,000
240,000
Additional Inspections
Inspect the CV joints. X X X X X
Inspect front suspension, tie rod ends, and
replace if necessary. XXX X X X X
Inspect the front and rear axle fluid, change
if using your vehicle for police, taxi, fleet,
off-road or frequent trailer towing. XXX X X X X
Inspect the brake linings, parking brake
function. XXX X X X X
Inspect transfer case fluid. X X X X
Additional Maintenance
Replace engine air filter. X X X X X
Replace the air conditioning filter. X X X X X X X
233
Page 239 of 372
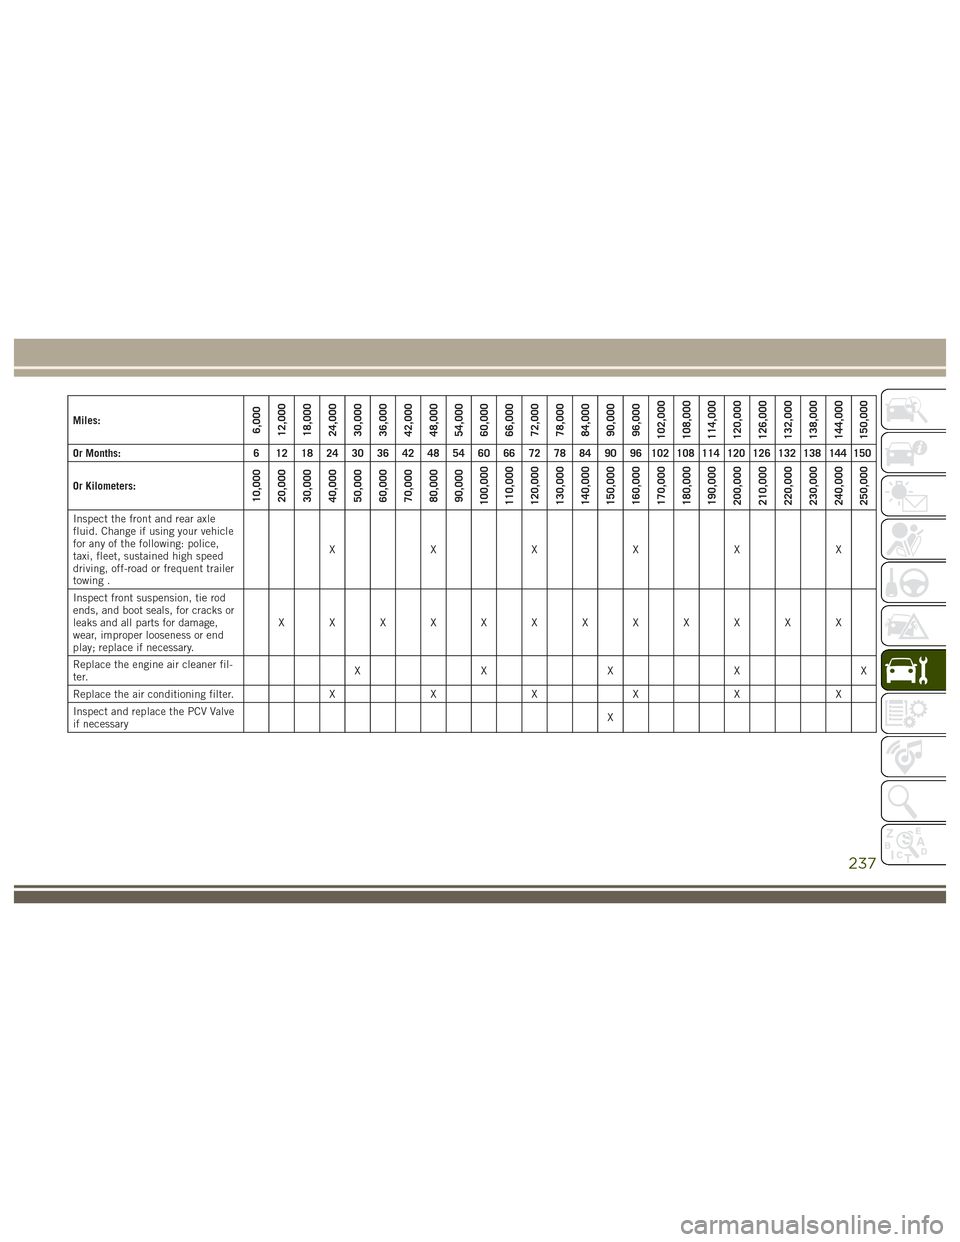
Miles:6,000
12,000
18,000
24,000
30,000
36,000
42,000
48,000
54,000
60,000
66,000
72,000
78,000
84,000
90,000
96,000
102,000
108,000
114,000
120,000
126,000
132,000
138,000
144,000
150,000
Or Months: 6 12 18 24 30 36 42 48 54 60 66 72 78 84 90 96 102 108 114 120 126 132 138 144 150
Or Kilometers:
10,000
20,000
30,000
40,000
50,000
60,000
70,000
80,000
90,000
100,000
110,000
120,000
130,000
140,000
150,000
160,000
170,000
180,000
190,000
200,000
210,000
220,000
230,000
240,000
250,000
Inspect the front and rear axle
fluid. Change if using your vehicle
for any of the following: police,
taxi, fleet, sustained high speed
driving, off-road or frequent trailer
towing . XXXXXX
Inspect front suspension, tie rod
ends, and boot seals, for cracks or
leaks and all parts for damage,
wear, improper looseness or end
play; replace if necessary. XXXXXXXXXXXX
Replace the engine air cleaner fil-
ter. XXXXX
Replace the air conditioning filter. X X X X X X
Inspect and replace the PCV Valve
if necessary X
237
Page 244 of 372
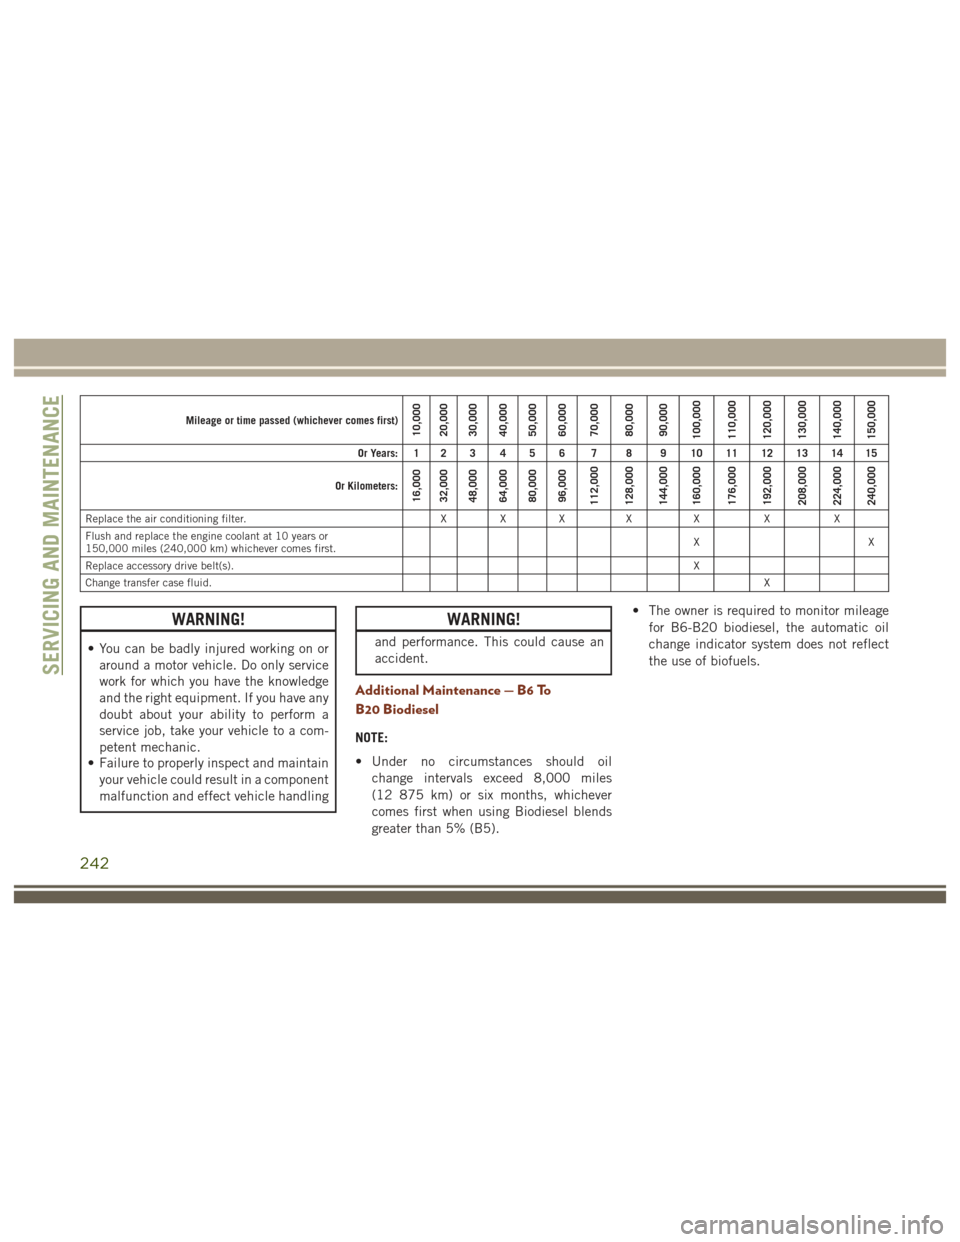
Mileage or time passed (whichever comes first)10,000
20,000
30,000
40,000
50,000
60,000
70,000
80,000
90,000
100,000
110,000
120,000
130,000
140,000
150,000
Or Years: 1 2 3 4 5 6 7 8 9 10 11 12 13 14 15
Or Kilometers:
16,000
32,000
48,000
64,000
80,000
96,000
112,000
128,000
144,000
160,000
176,000
192,000
208,000
224,000
240,000
Replace the air conditioning filter. X X XXX XX
Flush and replace the engine coolant at 10 years or
150,000 miles (240,000 km) whichever comes first. XX
Replace accessory drive belt(s). X
Change transfer case fluid. X
WARNING!
• You can be badly injured working on or
around a motor vehicle. Do only service
work for which you have the knowledge
and the right equipment. If you have any
doubt about your ability to perform a
service job, take your vehicle to a com-
petent mechanic.
• Failure to properly inspect and maintain
your vehicle could result in a component
malfunction and effect vehicle handling
WARNING!
and performance. This could cause an
accident.
Additional Maintenance — B6 To
B20 Biodiesel
NOTE:
• Under no circumstances should oil
change intervals exceed 8,000 miles
(12 875 km) or six months, whichever
comes first when using Biodiesel blends
greater than 5% (B5). • The owner is required to monitor mileage
for B6-B20 biodiesel, the automatic oil
change indicator system does not reflect
the use of biofuels.
SERVICING AND MAINTENANCE
242
Page 253 of 372
CAUTION!
“fast charger” to provide starting volt-
age.
DEALER SERVICE
Your authorized dealer has the qualified ser-
vice personnel, special tools, and equipment
to perform all service operations in an expert
manner. Service Manuals are available which
include detailed service information for your
vehicle. Refer to these Service Manuals be-
fore attempting any procedure yourself.
NOTE:
Intentional tampering with emissions control
systems may void your warranty and could
result in civil penalties being assessed
against you.
WARNING!
You can be badly injured working on or
around a motor vehicle. Only do service
work for which you have the knowledge
and the proper equipment. If you have any
WARNING!
doubt about your ability to perform a ser-
vice job, take your vehicle to a competent
mechanic.
Air Conditioner Maintenance
For best possible performance, your air con-
ditioner should be checked and serviced by
an authorized dealer at the start of each warm
season. This service should include cleaning
of the condenser fins and a performance test.
Drive belt tension should also be checked at
this time.
WARNING!
• Use only refrigerants and compressorlubricants approved by the manufac-
turer for your air conditioning system.
Some unapproved refrigerants are flam-
mable and can explode, injuring you.
Other unapproved refrigerants or lubri-
cants can cause the system to fail, re-
quiring costly repairs. Refer to Warranty
WARNING!
Information Book, for further warranty
information.
• The air conditioning system contains re-
frigerant under high pressure. To avoid
risk of personal injury or damage to the
system, adding refrigerant or any repair
requiring lines to be disconnected
should be done by an experienced tech-
nician.
CAUTION!
Do not use chemical flushes in your air
conditioning system as the chemicals can
damage your air conditioning components.
Such damage is not covered by the New
Vehicle Limited Warranty.
251
Page 254 of 372
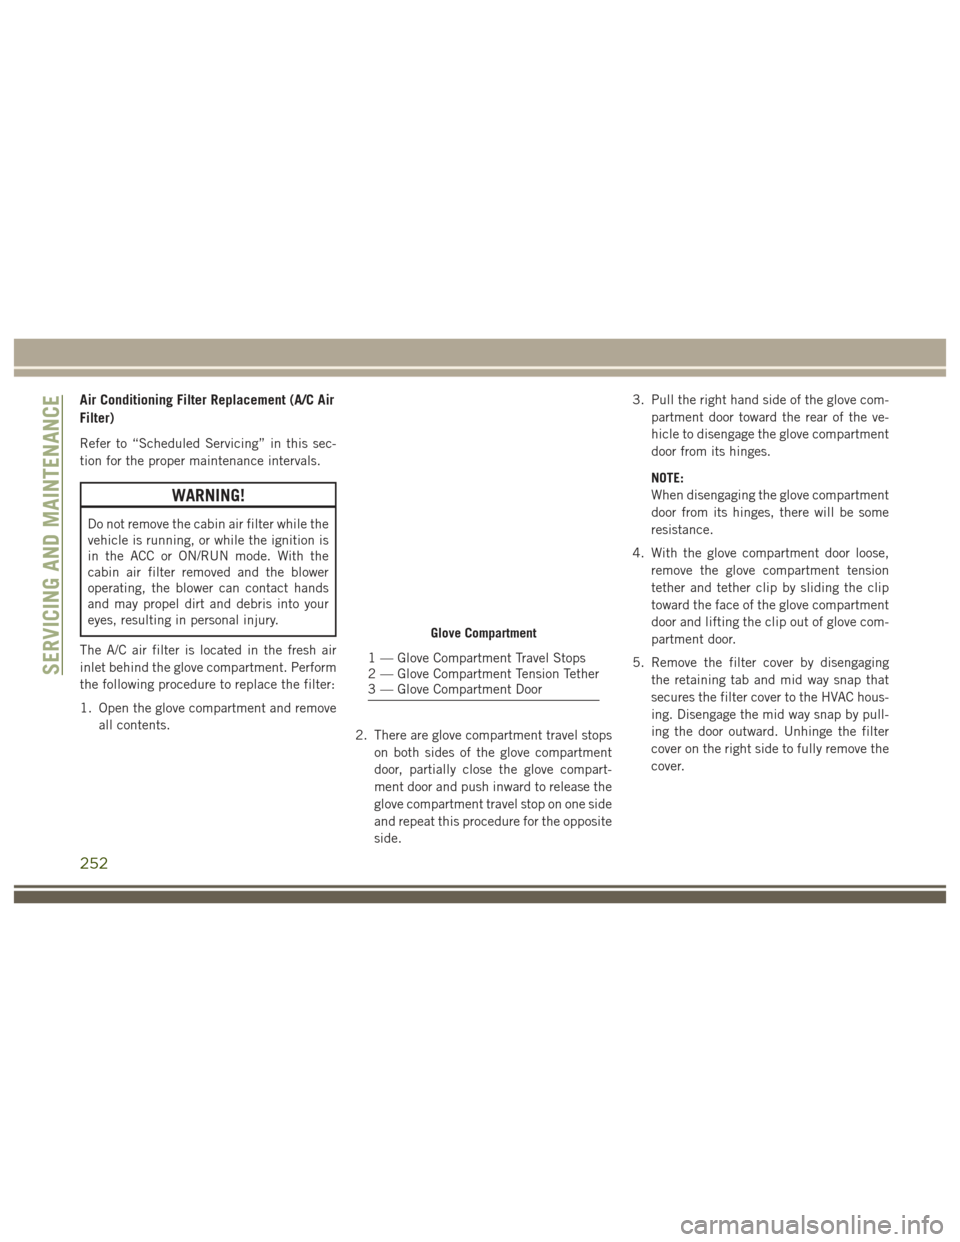
Air Conditioning Filter Replacement (A/C Air
Filter)
Refer to “Scheduled Servicing” in this sec-
tion for the proper maintenance intervals.
WARNING!
Do not remove the cabin air filter while the
vehicle is running, or while the ignition is
in the ACC or ON/RUN mode. With the
cabin air filter removed and the blower
operating, the blower can contact hands
and may propel dirt and debris into your
eyes, resulting in personal injury.
The A/C air filter is located in the fresh air
inlet behind the glove compartment. Perform
the following procedure to replace the filter:
1. Open the glove compartment and remove all contents. 2. There are glove compartment travel stops
on both sides of the glove compartment
door, partially close the glove compart-
ment door and push inward to release the
glove compartment travel stop on one side
and repeat this procedure for the opposite
side. 3. Pull the right hand side of the glove com-
partment door toward the rear of the ve-
hicle to disengage the glove compartment
door from its hinges.
NOTE:
When disengaging the glove compartment
door from its hinges, there will be some
resistance.
4. With the glove compartment door loose, remove the glove compartment tension
tether and tether clip by sliding the clip
toward the face of the glove compartment
door and lifting the clip out of glove com-
partment door.
5. Remove the filter cover by disengaging the retaining tab and mid way snap that
secures the filter cover to the HVAC hous-
ing. Disengage the mid way snap by pull-
ing the door outward. Unhinge the filter
cover on the right side to fully remove the
cover.
Glove Compartment
1 — Glove Compartment Travel Stops
2 — Glove Compartment Tension Tether
3 — Glove Compartment DoorSERVICING AND MAINTENANCE
252
Page 269 of 372
WARNING!
The traction grade assigned to this tire is
based on straight-ahead braking traction
tests, and does not include acceleration,
cornering, hydroplaning, or peak traction
characteristics.
Temperature Grades
The temperature grades are A (the highest),
B, and C, representing the tire's resistance to
the generation of heat and its ability to dissi-
pate heat, when tested under controlled con-
ditions on a specified indoor laboratory test
wheel.
Sustained high temperature can cause the
material of the tire to degenerate and reduce
tire life, and excessive temperature can lead
to sudden tire failure. The grade C corre-
sponds to a level of performance, which all
passenger vehicle tires must meet under the
Federal Motor Vehicle Safety Standard No.
109. Grades B and A represent higher levels
of performance on the laboratory test wheel,
than the minimum required by law.
WARNING!
The temperature grade for this tire is es-
tablished for a tire that is properly inflated
and not overloaded. Excessive speed,
under-inflation, or excessive loading, ei-
ther separately or in combination, can
cause heat buildup and possible tire fail-
ure.
STORING THE VEHICLE
If the vehicle should remain stationary for
more than a month, observe the following
precautions:
• Park your vehicle in a covered, dry andpossibly airy location the windows open
slightly.
• Check that the Electric Park Brake is not engaged.
• Disconnect the negative (-) terminal from the battery post and be sure that the
battery is fully charged. During storage
check battery charge quarterly. • If you do not disconnect the battery from
the electrical system, check the battery
charge every thirty days.
• Clean and protect the painted parts by applying protective waxes.
• Clean and protect polished metal parts by applying protective waxes.
• Apply talcum powder to the front and rear wiper blades and leave raised from the
glass.
• Cover the vehicle with an appropriate cover taking care not to damage the
painted surface by dragging across dirty
surfaces. Do not use plastic sheeting
which will not allow the evaporation of
moisture present on the surface of the
vehicle.
• Inflate the tires at a pressure of +7.25 psi (+0.5 bar) higher than recommended on
the tire placard and check it periodically.
• Do not drain the engine cooling system.
• Whenever you leave the vehicle is station- ary for two weeks or more, run idle the
engine for approximately five minutes,
with the air conditioning system on and
high fan speed. This will ensure a proper
267
Page 361 of 372
AccessUconnect ..........291, 293, 298
Accessories ..................283
Mopar ...................283
Adaptive Cruise Control (ACC) Off .................175, 177
On..................175, 177
Adaptive Cruise Control (ACC) (Cruise Control) ..................174
Adding Fuel ..............186, 188
Additives, Fuel ................274
AirBag ....................122 Air Bag Operation ............124
Air Bag Warning Light .........121
Driver Knee Air Bag ...........124
Enhanced Accident Response .128, 229
Event Data Recorder (EDR) ......229
Front Air Bag ..............122
If A Deployment Occurs ........128
Knee Impact Bolsters .........124
Maintaining Your Air Bag System . .129
Redundant Air Bag Warning Light . .122
Side Air Bags ..............125
Transporting Pets ............142
Air Bag Light ...........80, 121, 144 Air Bag Maintenance
............129
Air Conditioner Maintenance .......251
Air Conditioning Filter .........51, 252
Air Conditioning, Operating Tips ......51
Air Conditioning Refrigerant ........251
Air Conditioning System .......50, 251
Alarm Arm The System .............18
Disarm The System ............18
Alarm (Security Alarm) .........17, 81
Alarm System (Security Alarm) .......17
Antifreeze (Engine Coolant) ........276
Capacities ................277
Anti-Lock Brake System (ABS) .......92
Anti-Lock Warning Light ...........86
APP Uconnect Access ............293
Arming System (Security Alarm) ......17
Assist, Hill Start ................94
Audio
Jack ..................322
Auto Down Power Windows .........53
Automatic Door Locks ............23
Automatic High Beams ...........38
Automatic Temperature Control (ATC) . . .50
Automatic Transmission ..........159 Adding Fluid
...........279, 281
Fluid Level Check ...........250
Fluid Type .........279, 281, 283
Auto Up Power Windows ...........53
Axle Fluid ...................283
Axle Lubrication ...........279, 281
Background Themes Uconnect 8.4N .............341
Back-Up Camera ..............185
Battery ..................82, 250
Charging System Light .........82
Belts, Seat ..................143
Blind Spot Monitoring ...........103
B-Pillar Location ..............261
Brake Assist System .............93
Brake Control System, Electronic .....93
Brake Fluid .......249, 279, 281, 283
Brake System ................249
Fluid Check ........249, 279, 281
Master Cylinder .............249
Warning Light ...............80
Brake/Transmission Interlock .......158
Break-In Recommendations, New Vehicle ...................155
INDEX
359