heating JEEP GRAND CHEROKEE 2018 Owner handbook (in English)
[x] Cancel search | Manufacturer: JEEP, Model Year: 2018, Model line: GRAND CHEROKEE, Model: JEEP GRAND CHEROKEE 2018Pages: 368, PDF Size: 5.72 MB
Page 27 of 368
Your remote keyless entry key fob can also be
programmed to recall the same positions
when the unlock button is pushed.
NOTE:
Your vehicle is equipped with two key fobs,
one key fob can be linked to memory position
1 and the other key fob can be linked to
memory position 2.
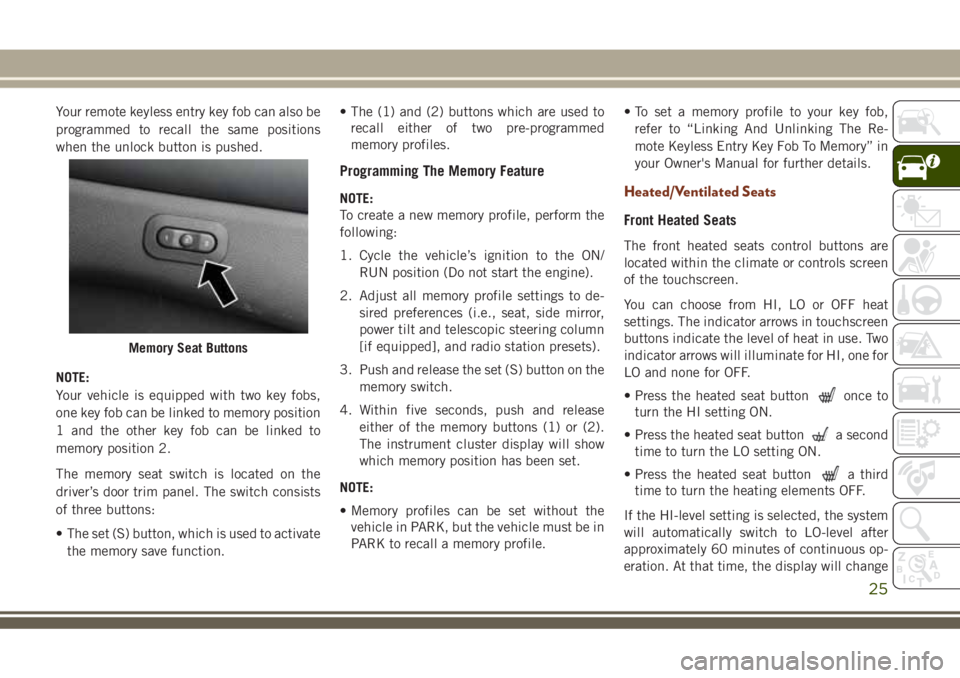
The memory seat switch is located on the
driver’s door trim panel. The switch consists
of three buttons:
• The set (S) button, which is used to activate
the memory save function.• The (1) and (2) buttons which are used to
recall either of two pre-programmed
memory profiles.
Programming The Memory Feature
NOTE:
To create a new memory profile, perform the
following:
1. Cycle the vehicle’s ignition to the ON/
RUN position (Do not start the engine).
2. Adjust all memory profile settings to de-
sired preferences (i.e., seat, side mirror,
power tilt and telescopic steering column
[if equipped], and radio station presets).
3. Push and release the set (S) button on the
memory switch.
4. Within five seconds, push and release
either of the memory buttons (1) or (2).
The instrument cluster display will show
which memory position has been set.
NOTE:
• Memory profiles can be set without the
vehicle in PARK, but the vehicle must be in
PARK to recall a memory profile.• To set a memory profile to your key fob,
refer to “Linking And Unlinking The Re-
mote Keyless Entry Key Fob To Memory” in
your Owner's Manual for further details.Heated/Ventilated Seats
Front Heated Seats
The front heated seats control buttons are
located within the climate or controls screen
of the touchscreen.
You can choose from HI, LO or OFF heat
settings. The indicator arrows in touchscreen
buttons indicate the level of heat in use. Two
indicator arrows will illuminate for HI, one for
LO and none for OFF.
• Press the heated seat button
once to
turn the HI setting ON.
• Press the heated seat button
a second
time to turn the LO setting ON.
• Press the heated seat button
a third
time to turn the heating elements OFF.
If the HI-level setting is selected, the system
will automatically switch to LO-level after
approximately 60 minutes of continuous op-
eration. At that time, the display will change
Memory Seat Buttons
25
Page 28 of 368
from HI to LO, indicating the change. The
LO-level setting will turn OFF automatically
after approximately 45 minutes.
NOTE:
• Once a heat setting is selected, heat will be
felt within two to five minutes.
• The engine must be running for the heated
seats to operate.
Vehicles Equipped With Remote Start
On models that are equipped with remote
start, the heated seats can be programmed to
come on during a remote start.
This feature can be programmed through the
Uconnect system. Refer to your Owner's
Manual for further details.
WARNING!
• Persons who are unable to feel pain to
the skin because of advanced age,
chronic illness, diabetes, spinal cord in-
jury, medication, alcohol use, exhaus-
tion or other physical condition must
exercise care when using the seat
WARNING!
heater. It may cause burns even at low
temperatures, especially if used for long
periods of time.
• Do not place anything on the seat or
seatback that insulates against heat,
such as a blanket or cushion. This may
cause the seat heater to overheat. Sit-
ting in a seat that has been overheated
could cause serious burns due to the
increased surface temperature of the
seat.
Rear Heated Seats
On some models, the two outboard seats are
equipped with heated seats. The heated seat
switches for these seats are located on the
rear of the center console. There are two
heated seat switches
that allow the rear
passengers to operate the seats indepen-
dently.
You can choose from HI, LO or OFF heat
settings. The indicator lights in each switch
indicate the level of heat in use. Two indica-
tor lights will illuminate for HI, one for LO
and none for OFF.• Push the heated seat button
once to
select HI-level heating.
• Push the heated seat button
a second
time to select LO-level heating.
• Push the heated seat button
a third
time to turn the heating elements OFF.
NOTE:
• Once a heat setting is selected, heat will be
felt within two to five minutes.
• The engine must be running for the heated
seats to operate.
If the HI-level setting is selected, the system
will automatically switch to LO-level after
approximately 60 minutes of continuous op-
eration. At that time, the number of illumi-
nated LEDs changes from two to one, indicat-
ing the change. The LO-level setting will turn
OFF automatically after approximately
45 minutes.
Front Ventilated Seats
If your vehicle is equipped with ventilated
seats, the seat cushion and seat back will
have fans that draw the air from the passen-
ger compartment and move air through fine
GETTING TO KNOW YOUR VEHICLE
26
Page 34 of 368
WARNING!
Do not adjust the steering column while
driving. Adjusting the steering column
while driving or driving with the steering
column unlocked, could cause the driver
to lose control of the vehicle. Failure to
follow this warning may result in serious
injury or death.
Heated Steering Wheel
The steering wheel contains a heating ele-
ment that helps warm your hands in cold
weather. The heated steering wheel has only
one temperature setting. Once the heated
steering wheel has been turned on, it will stay
on for an average of 80 minutes or more
before automatically shutting off. This time
will vary based on environmental tempera-
tures. The heated steering wheel can shut off
early or may not turn on when the steering
wheel is already warm.The heated steering wheel control button is
located within the Uconnect system. You can
gain access to the control button through the
climate screen or the controls screen.
• Press the heated steering wheel button
once to turn the heating element ON.
• Press the heated steering wheel button
a second time to turn the heating element
OFF.
NOTE:
The engine must be running for the heated
steering wheel to operate.
Vehicles Equipped With Remote Start
On models that are equipped with remote
start, the heated steering wheel can be pro-
grammed to come on during a remote start
through the Uconnect system. Refer to
“Uconnect Settings” in “Multimedia” in the
Owner’s Manual for further information.
WARNING!
• Persons who are unable to feel pain to
the skin because of advanced age,
chronic illness, diabetes, spinal cord in-
WARNING!
jury, medication, alcohol use, exhaus-
tion, or other physical conditions must
exercise care when using the steering
wheel heater. It may cause burns even at
low temperatures, especially if used for
long periods.
• Do not place anything on the steering
wheel that insulates against heat, such
as a blanket or steering wheel covers of
any type and material. This may cause
the steering wheel heater to overheat.
MIRRORS
Folding Mirrors
All outside mirrors are hinged and may be
moved either forward or rearward to resist
damage. The hinges have three detent posi-
tions:
• Full forward position
• Full rearward position
• Normal positionGETTING TO KNOW YOUR VEHICLE
32
Page 50 of 368
Manual Operation Override
This system offers a full complement of
manual override features. The AUTO symbol
in the front ATC display will be turned off
when the system is being used in the manual
mode.
Operating Tips
Summer Operation
The engine cooling system must be protected
with a high-quality antifreeze coolant to pro-
vide proper corrosion protection and to pro-
tect against engine overheating. OAT coolant
(conforming to MS.90032) is recommended.
Winter Operation
To ensure the best possible heater and de-
froster performance, make sure the engine
cooling system is functioning properly and
the proper amount, type, and concentration
of coolant is used. Use of the Air Recircula-
tion mode during Winter months is not rec-
ommended, because it may cause window
fogging.
Vacation/Storage
Before you store your vehicle, or keep it out of
service (i.e., vacation) for two weeks or more,
run the air conditioning system at idle for
about five minutes, in fresh air with the
blower setting on high. This will ensure ad-
equate system lubrication to minimize the
possibility of compressor damage when the
system is started again.
Window Fogging
Vehicle windows tend to fog on the inside in
mild, rainy, and/or humid weather. To clear
the windows, select Defrost or Mix mode and
increase the front blower speed. Do not use
the Recirculation mode without A/C for long
periods, as fogging may occur.
CAUTION!
Failure to follow these cautions can cause
damage to the heating elements:
• Use care when washing the inside of
the rear window. Do not use abrasive
window cleaners on the interior surface
of the window. Use a soft cloth and a
CAUTION!
mild washing solution, wiping parallel
to the heating elements. Labels can be
peeled off after soaking with warm
water.
• Do not use scrapers, sharp instru-
ments, or abrasive window cleaners on
the interior surface of the window.
• Keep all objects a safe distance from
the window.
Outside Air Intake
Make sure the air intake, located directly in
front of the windshield, is free of obstruc-
tions, such as leaves. Leaves collected in the
air intake may reduce airflow, and if they
enter the plenum, they could plug the water
drains. In Winter months, make sure the air
intake is clear of ice, slush, and snow.
Cabin Air Filter
The climate control system filters out dust
and pollen from the air. Contact an autho-
rized dealer to service your cabin air filter,
and to have it replaced when needed.
GETTING TO KNOW YOUR VEHICLE
48
Page 133 of 368
SAFETY TIPS
Transporting Passengers
NEVER TRANSPORT PASSENGERS IN THE
CARGO AREA.
WARNING!
• Do not leave children or animals inside
parked vehicles in hot weather. Interior
heat build-up may cause serious injury
or death.
• It is extremely dangerous to ride in a
cargo area, inside or outside of a vehicle.
In a collision, people riding in these
areas are more likely to be seriously
injured or killed.
• Do not allow people to ride in any area of
your vehicle that is not equipped with
seats and seat belts.
• Be sure everyone in your vehicle is in a
seat and using a seat belt properly.
Exhaust Gas
WARNING!
Exhaust gases can injure or kill. They con-
tain carbon monoxide (CO), which is col-
orless and odorless. Breathing it can make
you unconscious and can eventually poi-
son you. To avoid breathing (CO), follow
these safety tips:
• Do not run the engine in a closed garage
or in confined areas any longer than
needed to move your vehicle in or out of
the area.
• If you are required to drive with the
trunk/liftgate/rear doors open, make sure
that all windows are closed and the cli-
mate control BLOWER switch is set at
high speed. DO NOT use the recircula-
tion mode.
• If it is necessary to sit in a parked vehicle
with the engine running, adjust your
heating or cooling controls to force out-
side air into the vehicle. Set the blower
at high speed.The best protection against carbon monoxide
entry into the vehicle body is a properly main-
tained engine exhaust system.
Whenever a change is noticed in the sound of
the exhaust system, when exhaust fumes can
be detected inside the vehicle, or when the
underside or rear of the vehicle is damaged,
have a competent mechanic inspect the com-
plete exhaust system and adjacent body ar-
eas for broken, damaged, deteriorated, or
mispositioned parts. Open seams or loose
connections could permit exhaust fumes to
seep into the passenger compartment. In
addition, inspect the exhaust system each
time the vehicle is raised for lubrication or oil
change. Replace as required.
Safety Checks You Should Make Inside
The Vehicle
Seat Belts
Inspect the seat belt system periodically,
checking for cuts, frays, and loose parts.
Damaged parts must be replaced immedi-
ately. Do not disassemble or modify the sys-
tem.
131
Page 141 of 368
STARTING THE ENGINE —
3.0L DIESEL ENGINE
Before starting your vehicle, adjust your seat,
both inside and outside mirrors, and fasten
your seat belts.
The starter is allowed to crank for up to
30-second intervals. Waiting a few minutes
between such intervals will protect the starter
from overheating.
WARNING!
• Before exiting a vehicle, always come to
a complete stop, then shift the auto-
matic transmission into PARK and apply
the parking brake.
• Always make sure the keyless ignition
node is in the OFF mode, key fob is
removed from the vehicle and vehicle is
locked.
• Never leave children alone in a vehicle,
or with access to an unlocked vehicle.
WARNING!
Leaving children in a vehicle unattended
is dangerous for a number of reasons. A
child or others could be seriously or
fatally injured. Children should be
warned not to touch the parking brake,
brake pedal or the gear selector.
• Do not leave the key fob in or near the
vehicle, or in a location accessible to
children, and do not leave the ignition of
a vehicle equipped with Keyless Enter-
N-Go in the ACC or ON/RUN mode. A
child could operate power windows,
other controls, or move the vehicle.
• Do not leave children or animals inside
parked vehicles in hot weather. Interior
heat build-up may cause serious injury
or death.
NOTE:
Engine start up in very low ambient tempera-
ture could result in evident white smoke. This
condition will disappear as the engine warms
up.
CAUTION!
• The engine is allowed to crank as long as
30 seconds. If the engine fails to start
during this period, please wait at least
two minutes for the starter to cool before
repeating start procedure.
• If the “Water in Fuel Indicator Light”
remains on, DO NOT START engine be-
fore you drain the water from the fuel
filters to avoid engine damage. Refer to
“Draining Fuel/Water Separator Filter”
in “Servicing And Maintenance” in your
Diesel Supplement for further informa-
tion, which can be found with your on-
line Owner’s Information.
139
Page 143 of 368
To Activate The Autostop Mode, The Following
Must Occur:
• The system must be in STOP/START
READY state. A STOP/START READY mes-
sage will be displayed in the instrument
cluster display within the Stop/Start sec-
tion. Refer to “Instrument Cluster” in “Get-
ting To Know Your Instrument Panel” in
your Owner’s Manual for further informa-
tion.
• The vehicle must be completely stopped.
• The shifter must be in a forward gear and
the brake pedal depressed.
The engine will shut down, the tachometer
will move to the zero position and the Stop/
Start telltale will illuminate indicating you
are in Autostop. Customer settings will be
maintained upon return to an engine running
condition.
Refer to the “Stop/Start System” in the
“Starting And Operating” section located in
your Owner’s Manual for further information.Possible Reasons The Engine Does Not
Autostop
Prior to engine shut down, the system will
check many safety and comfort conditions to
see if they are fulfilled. Detailed information
about the operation of the Stop/Start system
may be viewed in the instrument cluster dis-
play Stop/Start Screen. In the following situ-
ations, the engine will not stop:
• Driver’s seat belt is not buckled.
• Driver’s door is not closed.
• Battery temperature is too warm or cold.
• Battery charge is low.
• The vehicle is on a steep grade.
• Cabin heating or cooling is in process and
an acceptable cabin temperature has not
been achieved.
• HVAC is set to full defrost mode at a high
blower speed.
• HVAC set to MAX A/C.• Engine has not reached normal operating
temperature.
• The transmission is not in a forward gear.
• Hood is open.
• Vehicle is in 4LO transfer case mode.
• Brake pedal is not pressed with sufficient
pressure.
Other Factors Which Can Inhibit Autostop In-
clude:
• Accelerator pedal input.
• Engine temp too high.
• 5 MPH threshold not achieved from previ-
ous AUTOSTOP.
• Steering angle beyond threshold.
• ACC is on and speed is set.
It may be possible for the vehicle to be driven
several times without the STOP/START sys-
tem going into a STOP/START READY state
under more extreme conditions of the items
listed above.
141
Page 222 of 368
CAUTION!
Do not run the booster vehicle engine
above 2000 rpm since it provides no
charging benefit, wastes fuel and can
damage booster vehicle engine.
6. Once the engine is started, remove the
jumper cables in the reverse sequence:
Cable Disconnection
1. Disconnect the negative(-)end of the
jumper cable from the remote negative(-)
post of the discharged vehicle.
2. Disconnect the opposite end of the nega-
tive(-)jumper cable from the negative(-)
post of the booster battery.
3. Disconnect the positive(+)end of the
jumper cable from the positive(+)post of
the booster battery.
4. Disconnect the opposite end of the posi-
tive(+)jumper cable from the remote
positive(+)post of the discharged
vehicle.5. Reinstall the protective cover over the
remote positive(+)post of the discharged
vehicle.
REFUELING IN EMERGENCY
The funnel for the Cap-Less Fuel System is
located in the spare tire storage area. If your
vehicle is out of fuel and an auxiliary fuel can
is needed, insert the funnel into the filler
neck and proceed to fill the vehicle.
For more information on the Cap-Less Fuel
System refer to “Refueling The Vehicle” in
“Starting And Operating”.
IF YOUR ENGINE
OVERHEATS
In any of the following situations, you can
reduce the potential for overheating by taking
the appropriate action.
• On the highways — slow down.
• In city traffic — while stopped, place the
transmission in NEUTRAL, but do not in-
crease the engine idle speed while prevent-
ing vehicle motion with the brakes.NOTE:
There are steps that you can take to slow
down an impending overheat condition:
• If your air conditioner (A/C) is on, turn it off.
The A/C system adds heat to the engine
cooling system and turning the A/C off can
help remove this heat.
• You can also turn the temperature control
to maximum heat, the mode control to floor
and the blower control to high. This allows
the heater core to act as a supplement to
the radiator and aids in removing heat from
the engine cooling system.
WARNING!
You or others can be badly burned by hot
engine coolant (antifreeze) or steam from
your radiator. If you see or hear steam
coming from under the hood, do not open
the hood until the radiator has had time to
cool. Never try to open a cooling system
pressure cap when the radiator or coolant
bottle is hot.
IN CASE OF EMERGENCY
220
Page 225 of 368
WARNING!
of the axle and tires. A tire could explode
and injure someone. Do not spin your
vehicle's wheels faster than 30 mph
(48 km/h) or for longer than 30 seconds
continuously without stopping when you
are stuck and do not let anyone near a
spinning wheel, no matter what the speed.
CAUTION!
• Racing the engine or spinning the
wheels may lead to transmission over-
heating and failure. Allow the engine to
idle with the transmission in NEUTRAL
for at least one minute after every five
rocking-motion cycles. This will mini-
mize overheating and reduce the risk of
transmission failure during prolonged
efforts to free a stuck vehicle.
CAUTION!
• When “rocking” a stuck vehicle by shift-
ing between DRIVE and REVERSE, do
not spin the wheels faster than 15 mph
(24 km/h), or drivetrain damage may
result.
• Revving the engine or spinning the
wheels too fast may lead to transmission
overheating and failure. It can also dam-
age the tires. Do not spin the wheels
above 30 mph (48 km/h) while in gear
(no transmission shifting occurring).
TOWING A DISABLED
VEHICLE
This section describes procedures for towing
a disabled vehicle using a commercial towing
service. If the transmission and drivetrain areoperable, disabled vehicles may also be
towed as described under “Recreational Tow-
ing” in the “Starting And Operating” section.
NOTE:
Vehicles equipped with Quadra-Lift must be
placed in Transport mode, before tying them
down (from the body) on a trailer or flatbed
truck. Refer to the section on Quadra-Lift for
more information. If the vehicle cannot be
placed in Transport mode (for example, en-
gine will not run), tie-downs must be fastened
to the axles (not to the body). Failure to follow
these instructions may cause fault codes to
be set and/or cause loss of proper tie-down
tension.
223
Page 257 of 368
WARNING!
had time to cool. Never open a cooling
system pressure cap when the radiator
or coolant bottle is hot.
• Keep hands, tools, clothing, and jewelry
away from the radiator cooling fan when
the hood is raised. The fan starts auto-
matically and may start at any time,
whether the engine is running or not.
• When working near the radiator cooling
fan, disconnect the fan motor lead or
turn the ignition to the OFF mode. The
fan is temperature controlled and can
start at any time the ignition is in the ON
mode.
Engine Coolant Checks
Check the engine coolant (antifreeze) protec-
tion every 12 months (before the onset of
freezing weather, where applicable). If the
engine coolant (antifreeze) is dirty, the sys-
tem should be drained, flushed, and refilled
with fresh OAT coolant (conforming to
MS.90032) by an authorized dealer. Check
the front of the A/C condenser for any accu-mulation of bugs, leaves, etc. If dirty, clean
by gently spraying water from a garden hose
vertically down the face of the condenser.
Check the engine cooling system hoses for
brittle rubber, cracking, tears, cuts, and
tightness of the connection at the coolant
recovery bottle and radiator. Inspect the en-
tire system for leaks. DO NOT REMOVE THE
COOLANT PRESSURE CAP WHEN THE
COOLING SYSTEM IS HOT.
RAISING THE VEHICLE
In the case where it is necessary to raise the
vehicle, go to an authorized dealer or service
station.
TIRES
Tires — General Information
Tire Pressure
Proper tire inflation pressure is essential to
the safe and satisfactory operation of your
vehicle. Four primary areas are affected by
improper tire pressure:
• Safety and Vehicle Stability• Economy
• Tread Wear
• Ride Comfort
Safety
WARNING!
• Improperly inflated tires are dangerous
and can cause collisions.
• Underinflation increases tire flexing and
can result in overheating and tire failure.
• Overinflation reduces a tire's ability to
cushion shock. Objects on the road and
chuckholes can cause damage that re-
sult in tire failure.
• Overinflated or underinflated tires can
affect vehicle handling and can fail sud-
denly, resulting in loss of vehicle control.
• Unequal tire pressures can cause steer-
ing problems. You could lose control of
your vehicle.
• Unequal tire pressures from one side of
the vehicle to the other can cause the
vehicle to drift to the right or left.
255