start stop button JEEP GRAND CHEROKEE 2018 Owner handbook (in English)
[x] Cancel search | Manufacturer: JEEP, Model Year: 2018, Model line: GRAND CHEROKEE, Model: JEEP GRAND CHEROKEE 2018Pages: 368, PDF Size: 5.72 MB
Page 15 of 368
KEYS
Key Fob
Your vehicle uses a keyless ignition system.
The ignition system consists of a key fob with
Remote Keyless Entry (RKE) and a START/
STOP push button ignition system. The Re-
mote Keyless Entry system consists of a key
fob and Keyless Enter-N-Go feature if
equipped.
NOTE:
The key fob may not be found if it is located
next to a mobile phone, laptop or other elec-
tronic device; these devices may block the
key fob’s wireless signal.
The key fob allows you to lock or unlock the
doors and liftgate from distances up to ap-
proximately 66 ft (20 m) using a handheld
key fob. The key fob does not need to be
pointed at the vehicle to activate the system.
NOTE:
• In the ON/RUN position, the lock button is
disabled. Only the unlock button is en-
abled.• With ignition on/start and the vehicle mov-
ing at 5 mph, all RKE commands are
disabled.NOTE:
In case the ignition switch does not change
with the push of a button, the key fob may
have a low or dead battery. In this situation, a
back up method can be used to operate the
ignition switch. Put the nose side of the key
fob (side opposite of the Emergency Key)
against the ENGINE START/STOP button and
push to operate the ignition switch.
To Unlock The Doors And Liftgate
Push and release the unlock button on the
key fob once to unlock the driver's door or
twice within five seconds to unlock all doors
and the liftgate.
All doors can be programmed to unlock on the
first push of the unlock button. Refer to
“Uconnect Settings” in “Multimedia” in the
Owner’s Manual for further information.
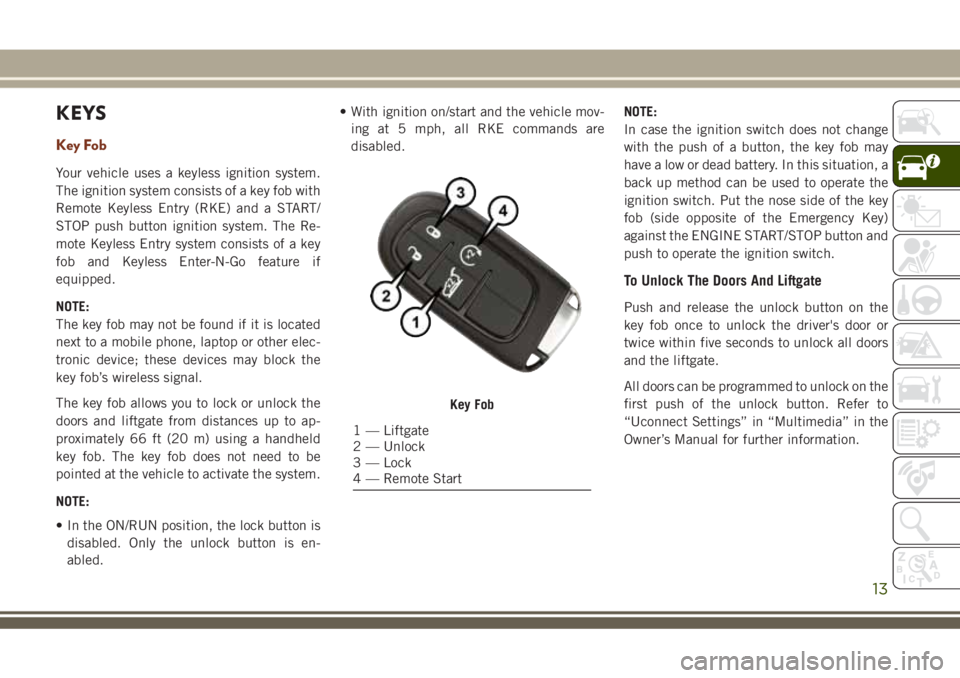
Key Fob
1 — Liftgate
2 — Unlock
3 — Lock
4 — Remote Start
13
Page 17 of 368
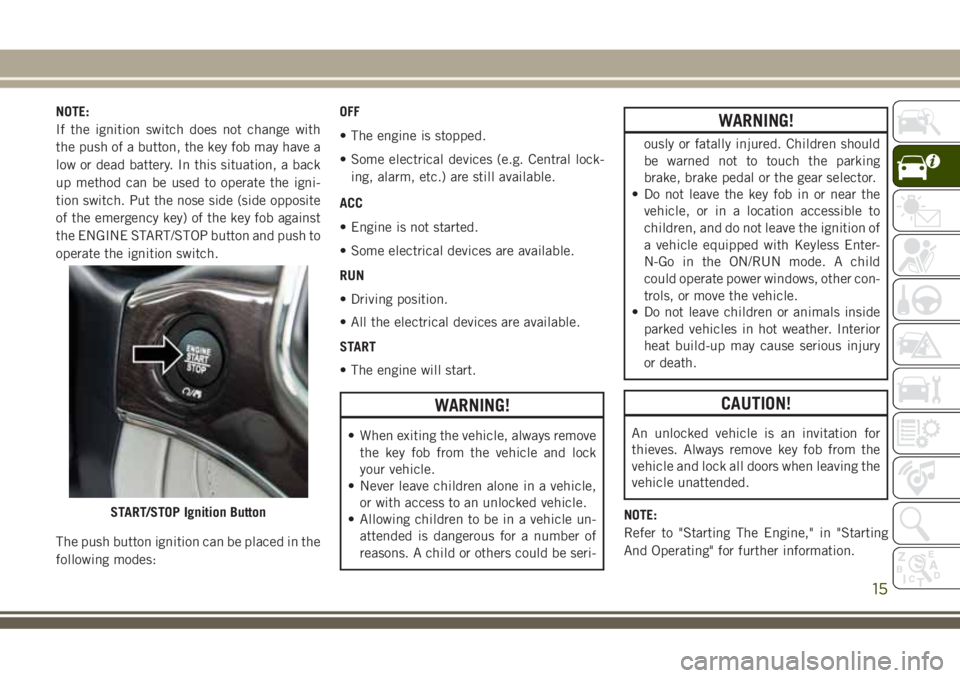
NOTE:
If the ignition switch does not change with
the push of a button, the key fob may have a
low or dead battery. In this situation, a back
up method can be used to operate the igni-
tion switch. Put the nose side (side opposite
of the emergency key) of the key fob against
the ENGINE START/STOP button and push to
operate the ignition switch.
The push button ignition can be placed in the
following modes:OFF
• The engine is stopped.
• Some electrical devices (e.g. Central lock-
ing, alarm, etc.) are still available.
ACC
• Engine is not started.
• Some electrical devices are available.
RUN
• Driving position.
• All the electrical devices are available.
START
• The engine will start.
WARNING!
• When exiting the vehicle, always remove
the key fob from the vehicle and lock
your vehicle.
• Never leave children alone in a vehicle,
or with access to an unlocked vehicle.
• Allowing children to be in a vehicle un-
attended is dangerous for a number of
reasons. A child or others could be seri-
WARNING!
ously or fatally injured. Children should
be warned not to touch the parking
brake, brake pedal or the gear selector.
• Do not leave the key fob in or near the
vehicle, or in a location accessible to
children, and do not leave the ignition of
a vehicle equipped with Keyless Enter-
N-Go in the ON/RUN mode. A child
could operate power windows, other con-
trols, or move the vehicle.
• Do not leave children or animals inside
parked vehicles in hot weather. Interior
heat build-up may cause serious injury
or death.
CAUTION!
An unlocked vehicle is an invitation for
thieves. Always remove key fob from the
vehicle and lock all doors when leaving the
vehicle unattended.
NOTE:
Refer to "Starting The Engine," in "Starting
And Operating" for further information.
START/STOP Ignition Button
15
Page 18 of 368
Vehicle On Message
When opening the driver's door when the
ignition is in RUN (engine not running), a
chime will sound to remind you to place the
ignition in the OFF position. In addition to
the chime, the message will display “Ignition
Or Accessory On” in the cluster.
NOTE:
The power window switches and power sun-
roof (if equipped) will remain active up to ten
minutes after the ignition is cycled to the OFF
position. Opening either front door will can-
cel this feature. The time for this feature is
programmable.
WARNING!
• Before exiting a vehicle, always come to
a complete stop, then shift the auto-
matic transmission into PARK, apply the
parking brake, place the engine in the
OFF position, remove the key fob from
the vehicle and lock your vehicle. If
equipped with Keyless Enter-N-Go, al-
ways make sure the keyless ignition is in
WARNING!
“OFF” position, remove the key fob from
the vehicle and lock the vehicle.
• Never leave children alone in a vehicle,
or with access to an unlocked vehicle.
• Allowing children to be in a vehicle un-
attended is dangerous for a number of
reasons. A child or others could be seri-
ously or fatally injured. Children should
be warned not to touch the parking
brake, brake pedal or the gear selector.
• Do not leave the key fob in or near the
vehicle, or in a location accessible to
children, and do not leave the ignition of
a vehicle equipped with Keyless Enter-
N-Go in the ON/RUN mode. A child
could operate power windows, other
controls, or move the vehicle.
• Do not leave children or animals inside
parked vehicles in hot weather. Interior
heat build-up may cause serious injury
or death.
CAUTION!
An unlocked vehicle is an invitation for
thieves. Always remove key fob from the
vehicle and lock all doors when leaving the
vehicle unattended.
REMOTE STARTING
SYSTEM — IF EQUIPPED
• Push the remote start button on the key fob
twice within five seconds. Pushing the re-
mote start button a third time shuts the
engine off.
• With remote start, the engine will only run
for 15 minutes (time out) unless the igni-
tion is placed in the ON/RUN position.
• The vehicle must be manually started with
a push of the ignition START/STOP button
after two consecutive time outs.
GETTING TO KNOW YOUR VEHICLE
16
Page 22 of 368
To Disarm The System
The vehicle security alarm can be disarmed
using any of the following methods:
• Push the unlock button on the key fob.
• Grasp the Passive Entry Unlock Door
Handle (refer to "Keyless Enter-N-Go" in
“Doors” in Getting To Know Your Vehicle" in
your Owner’s Manual for further informa-
tion).
• Cycle the vehicle ignition system out of the
OFF position.
– For vehicles equipped with Keyless
Enter-N-Go, push the Keyless Enter-
N-Go Start/Stop button (requires at
least one valid key fob in the vehicle).
– For vehicles not equipped with Keyless
Enter-N-Go, insert a valid key into the
ignition switch and turn the key to the
ON position.
NOTE:
• The driver's door key cylinder and the lift-
gate button on the key fob cannot arm or
disarm the vehicle security alarm.• The vehicle security alarm remains armed
during power liftgate entry. Pushing the
liftgate button will not disarm the vehicle
security alarm. If someone enters the ve-
hicle through the liftgate and opens any
door the alarm will sound.
• When the vehicle security alarm is armed,
the interior power door lock switches will
not unlock the doors.
• The ultrasonic intrusion sensor (motion de-
tector) actively monitors your vehicle every
time you arm the security system. If you
prefer, you can turn off the ultrasonic intru-
sion sensor when arming the security sys-
tem. To do so, push the lock button on the
key fob three times within 15 seconds of
arming the system (while the vehicle secu-
rity light is flashing rapidly).
The vehicle security alarm is designed to
protect your vehicle; however, you can create
conditions where the system will give you a
false alarm. If one of the previously described
arming sequences has occurred, the vehicle
security alarm will arm regardless of whetheryou are in the vehicle or not. If you remain in
the vehicle and open a door, the alarm will
sound. If this occurs, disarm the vehicle
security alarm.
If the vehicle security alarm is armed and the
battery becomes disconnected, the vehicle
security alarm will remain armed when the
battery is reconnected; the exterior lights will
flash, the horn will sound. If this occurs,
disarm the vehicle security alarm.
Security System Manual Override
The system will not arm if you lock the doors
using the manual door lock plunger.
DOORS
Keyless Enter-N-Go — Passive Entry
The Passive Entry system is an enhancement
to the vehicle’s key fob and a feature of
Keyless Enter-N-Go — Passive Entry. This
feature allows you to lock and unlock the
vehicle’s door(s) and fuel door without having
to push the key fob lock or unlock buttons.
GETTING TO KNOW YOUR VEHICLE
20
Page 64 of 368
INSTRUMENT CLUSTER
DISPLAY
Your vehicle will be equipped with an instru-
ment cluster display, which offers useful in-
formation to the driver. With the ignition in
the STOP/OFF mode, opening/closing of a
door will activate the display for viewing, and
display the total miles, or kilometers, in the
odometer. Your instrument cluster display is
designed to display important information
about your vehicle’s systems and features.
Using a driver interactive display located on
the instrument panel, your instrument clus-
ter display can show you how systems are
working and give you warnings when they are
not. The steering wheel mounted controls
allow you to scroll through the main menus
and submenus. You can access the specific
information you want and make selections
and adjustments.
Instrument Cluster Display Location And
Controls
The instrument cluster display is located in
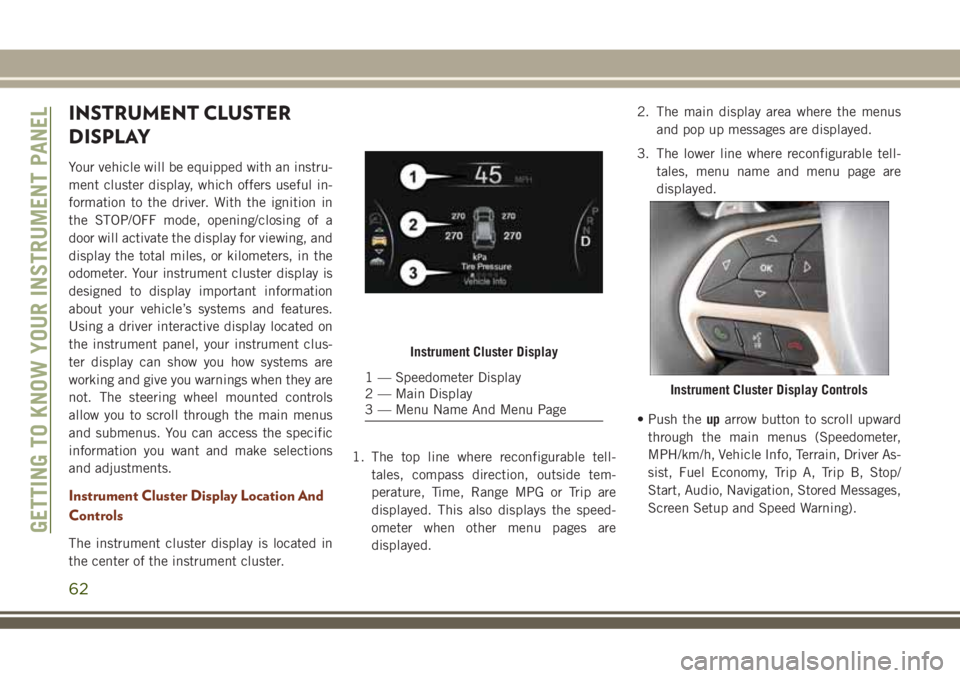
the center of the instrument cluster.1. The top line where reconfigurable tell-
tales, compass direction, outside tem-
perature, Time, Range MPG or Trip are
displayed. This also displays the speed-
ometer when other menu pages are
displayed.2. The main display area where the menus
and pop up messages are displayed.
3. The lower line where reconfigurable tell-
tales, menu name and menu page are
displayed.
• Push theuparrow button to scroll upward
through the main menus (Speedometer,
MPH/km/h, Vehicle Info, Terrain, Driver As-
sist, Fuel Economy, Trip A, Trip B, Stop/
Start, Audio, Navigation, Stored Messages,
Screen Setup and Speed Warning).
Instrument Cluster Display
1 — Speedometer Display
2 — Main Display
3 — Menu Name And Menu PageInstrument Cluster Display Controls
GETTING TO KNOW YOUR INSTRUMENT PANEL
62
Page 65 of 368
•Push thedownarrow button to scroll down-
ward through the main menu and sub-
menus (Speedometer, MPH/km/h, Vehicle
Info, Terrain, Driver Assist, Fuel Economy,
Trip A, Trip B, Stop/Start, Audio, Naviga-
tion, Stored Messages, Screen Setup and
Speed Warning).
•Push therightarrow button to access the
information screens or submenu screens of
a main menu item.
•Push theleftarrow button to access the
information screens or submenu screens of
a main menu item.
•Push theOKbutton to access/select the
information screens or submenu screens of
a main menu item. Push and hold theOK
button for two seconds to reset displayed/
selected features that can be reset.
Instrument Cluster Display Selectable
Items
The instrument cluster display can be used to
view the following main menu items:
NOTE:
Depending on the vehicles options, feature
settings may vary.
• Speedometer • Trip
• MPH to km/h • Audio
• Vehicle Info • Stored Messages
• Driver Assist • Screen Setup
• Fuel Economy • Speed Warning
Display Menu items
SRT Instrument Cluster Display Performance
Features
The instrument cluster display can be used to
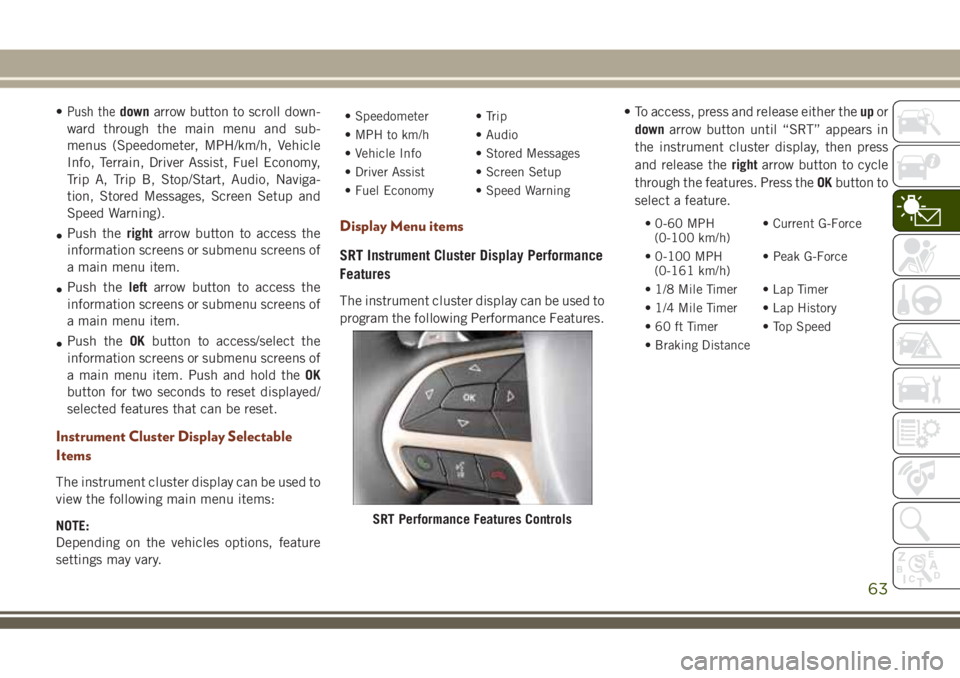
program the following Performance Features.• To access, press and release either theupor
downarrow button until “SRT” appears in
the instrument cluster display, then press
and release therightarrow button to cycle
through the features. Press theOKbutton to
select a feature.
• 0-60 MPH
(0-100 km/h)• Current G-Force
• 0-100 MPH
(0-161 km/h)• Peak G-Force
• 1/8 Mile Timer • Lap Timer
• 1/4 Mile Timer • Lap History
• 60 ft Timer • Top Speed
• Braking Distance
SRT Performance Features Controls
63
Page 139 of 368
STARTING THE ENGINE —
GAS
Before starting your vehicle, adjust your seat,
adjust the inside and outside mirrors, fasten
your seat belt, and if present, instruct all
other occupants to buckle their seat belts.
WARNING!
• Before exiting a vehicle, always come to
a complete stop, then shift the auto-
matic transmission into PARK and apply
the parking brake.
• Always make sure the keyless ignition
node is in the OFF mode, key fob is
removed from the vehicle and vehicle is
locked.
• Never leave children alone in a vehicle,
or with access to an unlocked vehicle.
Leaving children in a vehicle unattended
is dangerous for a number of reasons. A
child or others could be seriously or
fatally injured. Children should be
warned not to touch the parking brake,
brake pedal or the gear selector.
WARNING!
• Do not leave the key fob in or near the
vehicle, or in a location accessible to
children, and do not leave the ignition of
a vehicle equipped with Keyless Enter-
N-Go in the ACC or ON/RUN mode. A
child could operate power windows,
other controls, or move the vehicle.
• Do not leave children or animals inside
parked vehicles in hot weather. Interior
heat build-up may cause serious injury
or death.
Automatic Transmission
The gear selector must be in the NEUTRAL or
PARK position before you can start the en-
gine. Apply the brakes before shifting into
any driving gear.
CAUTION!
Damage to the transmission may occur if
the following precautions are not ob-
served:
• Do not shift from REVERSE, PARK, or
NEUTRAL into any forward gear when
the engine is above idle speed.
• Shift into PARK only after the vehicle
has come to a complete stop.
• Shift into or out of REVERSE only after
the vehicle has come to a complete stop
and the engine is at idle speed.
• Before shifting into any gear, make sure
your foot is firmly on the brake pedal.
Normal Starting
To Turn On The Engine Using The ENGINE START/
STOP Button
1. The transmission must be in PARK or
NEUTRAL.
2. Press and hold the brake pedal while
pushing the ENGINE START/STOP button
once.
137
Page 140 of 368
3. The system takes over and attempts to
start the vehicle. If the vehicle fails to
start, the starter will disengage automati-
cally after 10 seconds.
4. If you wish to stop the cranking of the
engine prior to the engine starting, push
the button again.
NOTE:
Normal starting of either a cold or a warm
engine is obtained without pumping or press-
ing the accelerator pedal.
To Turn Off The Engine Using ENGINE START/
STOP Button
1. Place the gear selector in PARK, then
push and release the ENGINE START/
STOP button.
2. The ignition will return to the OFF mode.
3. If the gear selector is not in PARK (with
vehicle stopped) and the ENGINE START/
STOP button is pushed once, the trans-
mission will automatically select PARK
and the engine will turn off, however theignition will remain in the ACC mode
(NOT the OFF mode). Never leave a ve-
hicle out of the PARK position, or it could
roll.
4. If the gear selector is in NEUTRAL, and
the vehicle speed is below 5 mph
(8 km/h), pushing the START/STOP but-
ton once will turn the engine off. The
ignition will remain in the ACC mode.
5. If the vehicle speed is above 5 mph
(8 km/h), the ENGINE START/STOP but-
ton must be held for two seconds (or three
short pushes in a row) to turn the engine
off. The ignition will remain in the ACC
mode (NOT the OFF mode) if the engine is
turned off when the transmission is not in
PARK.
NOTE:
The system will automatically time out and
the ignition will cycle to the OFF mode after
30 minutes of inactivity if the ignition is left
in the ACC or RUN (engine not running) mode
and the transmission is in PARK.ENGINE START/STOP Button Functions — With
Driver’s Foot OFF The Brake Pedal (In PARK Or
NEUTRAL Position)
The ENGINE START/STOP button operates
similar to an ignition switch. It has three
modes: OFF, ACC, and RUN. To change the
ignition modes without starting the vehicle
and use the accessories, follow these steps:
1. Starting with the ignition in the OFF
mode,
2. Push the ENGINE START/STOP button
once to place the ignition to the ACC
mode (instrument cluster will display
“ACC”),
3. Push the ENGINE START/STOP button a
second time to place the ignition to the
RUN mode (instrument cluster will dis-
play “ON/RUN”),
4. Push the ENGINE START/STOP button a
third time to return the ignition to the OFF
mode (instrument cluster will display
“OFF”).
STARTING AND OPERATING
138
Page 142 of 368
Automatic Transmission
Start the engine with the transmission gear
selector in the PARK position. Apply the
brake before shifting to any driving range.
Normal Starting
Observe the instrument panel cluster lights
when starting the engine.
NOTE:
Normal starting of either a cold or a warm
engine is obtained without pumping or press-
ing the accelerator pedal
1. Always apply the parking brake.
2. Press and hold the brake pedal while
pushing the ENGINE START/STOP button
once.
NOTE:
A delay of the start of up to five seconds is
possible under very cold conditions. The
"Wait to Start" telltale will be illuminated
during the pre-heat process, When the
engine Wait To Start light goes off the
engine will automatically crank.
CAUTION!
If the “Water in Fuel Indicator Light” re-
mains on, DO NOT START engine before
you drain the water from the fuel filters to
avoid engine damage. Refer to “Draining
Fuel/Water Separator Filter” in “Servicing
And Maintenance” in your Diesel Supple-
ment for further information, which can be
found with your online Owner’s Informa-
tion.
3. The system will automatically engage the
starter to crank the engine. If the vehicle
fails to start, the starter will disengage
automatically after 25 seconds.
4. If you wish to stop the cranking of the
engine prior to the engine starting, push
the button again.
5. Check that the oil pressure warning light
has turned off.
6. Release the parking brake.
STOP/START SYSTEM — IF
EQUIPPED
The Stop/Start function is developed to re-
duce fuel consumption. The system will stop
the engine automatically during a vehicle
stop if the required conditions are met. Re-
leasing the brake pedal or pressing the accel-
erator pedal will automatically re-start the
engine.
This vehicle has been upgraded with a heavy
duty starter, enhanced battery, and other up-
graded engine parts, to handle the additional
engine starts.
Automatic Mode
The Stop/Start feature is enabled
after every normal customer en-
gine start. At that time, the sys-
tem will go into STOP/START
READY and if all other conditions are met,
can go into a STOP/START AUTOSTOP AC-
TIVE “Autostop” mode.
STARTING AND OPERATING
140
Page 154 of 368
NOTE:
• If shift conditions/interlocks are not met, or
a transfer case motor temperature protec-
tion condition exists, a “For 4x4 High Slow
Below 3 mph (5 km/h) Put Trans in N push
4 Low” message will flash from the instru-
ment cluster display. Refer to “Instrument
Cluster Display” in “Getting To Know Your
Instrument Panel” for further information.
• Shifting into or out of 4WD LOW is possible
with the vehicle completely stopped; how-
ever, difficulty may occur due to the mating
clutch teeth not being properly aligned.
Several attempts may be required for
clutch teeth alignment and shift comple-
tion to occur. The preferred method is with
the vehicle rolling 0 to 3 mph (0 to 5 km/h).
If the vehicle is moving faster than 3 mph
(5 km/h), the transfer case will not allow
the shift.
Shifting Into NEUTRAL (N)
WARNING!
You or others could be injured or killed if
you leave the vehicle unattended with the
WARNING!
transfer case in the NEUTRAL (N) position
without first fully engaging the parking
brake. The NEUTRAL (N) position disen-
gages both the front and rear drive shafts
from the powertrain and will allow the
vehicle to roll, even if the transmission is
in PARK. The parking brake should always
be applied when the driver is not in the
vehicle.
1. Bring the vehicle to a complete stop, with
the engine running.
2. Press and hold the brake pedal.
3. Shift the transmission into NEUTRAL.
4. If vehicle is equipped with Quadra-Lift air
suspension, ensure the vehicle is set to
Normal Ride Height.
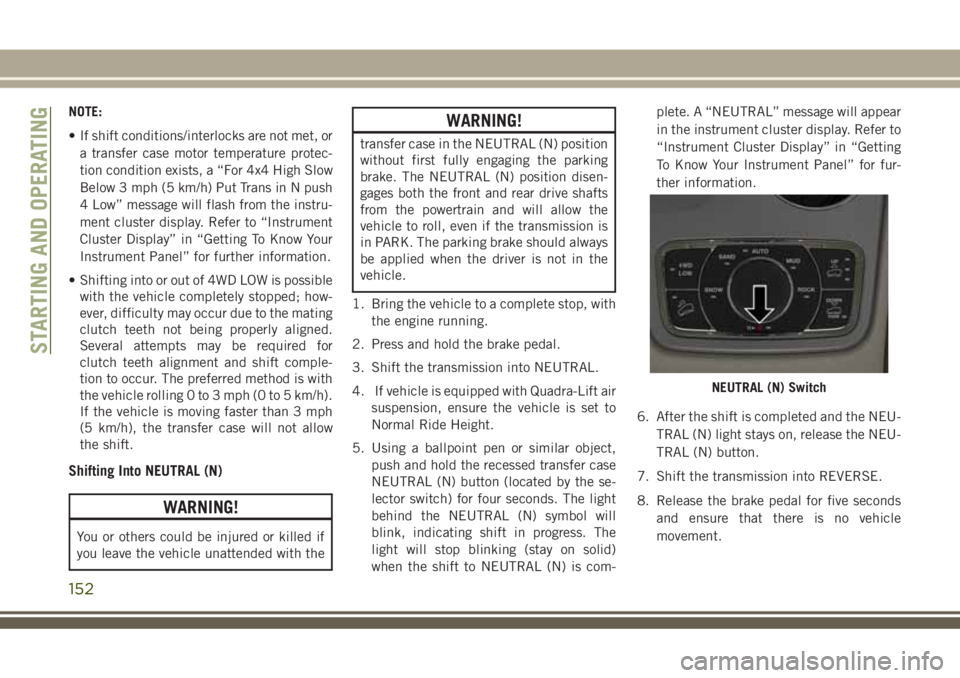
5. Using a ballpoint pen or similar object,
push and hold the recessed transfer case
NEUTRAL (N) button (located by the se-
lector switch) for four seconds. The light
behind the NEUTRAL (N) symbol will
blink, indicating shift in progress. The
light will stop blinking (stay on solid)
when the shift to NEUTRAL (N) is com-plete. A “NEUTRAL” message will appear
in the instrument cluster display. Refer to
“Instrument Cluster Display” in “Getting
To Know Your Instrument Panel” for fur-
ther information.
6. After the shift is completed and the NEU-
TRAL (N) light stays on, release the NEU-
TRAL (N) button.
7. Shift the transmission into REVERSE.
8. Release the brake pedal for five seconds
and ensure that there is no vehicle
movement.
NEUTRAL (N) Switch
STARTING AND OPERATING
152