mirror JEEP GRAND CHEROKEE 2020 Owner handbook (in English)
[x] Cancel search | Manufacturer: JEEP, Model Year: 2020, Model line: GRAND CHEROKEE, Model: JEEP GRAND CHEROKEE 2020Pages: 378, PDF Size: 6.88 MB
Page 102 of 378
(8 km/h), to objects moving a maximum of
approximately 20 mph (32 km/h), such as in
parking lot situations.
NOTE:
In a parking lot situation, oncoming vehicles
can be obscured by vehicles parked on either
side. If the sensors are blocked by other
structures or vehicles, the system will not be
able to alert the driver.
When RCP is on and the vehicle is in RE-
VERSE, the driver is alerted using both the
visual and audible alarms, including reduc-
ing the radio volume.
WARNING!
Rear Cross Path Detection (RCP) is not a
back up aid system. It is intended to be
used to help a driver detect an oncoming
vehicle in a parking lot situation. Drivers
must be careful when backing up, even
when using RCP. Always check carefully
behind your vehicle, look behind you, and
be sure to check for pedestrians, animals,
other vehicles, obstructions, and blind
spots before backing up. Failure to do so
can result in serious injury or death.
Modes Of Operation
Three selectable modes of operation are
available in the Uconnect System. Refer to
“Uconnect Settings” in “Multimedia” in the
Owner’s Manual for further information.
Blind Spot Alert Lights Only
When operating in Blind Spot Alert mode, the
BSM system will provide a visual alert in the
appropriate side view mirror based on a de-
tected object. However, when the system is
operating in Rear Cross Path (RCP) mode, the
system will respond with both visual and
audible alerts when a detected object is pres-
ent. Whenever an audible alert is requested,
the radio is muted.
Blind Spot Alert Lights/Chime
When operating in Blind Spot Alert Lights/
Chime mode, the BSM system will provide a
visual alert in the appropriate side view mirror
based on a detected object. If the turn signal
is then activated, and it corresponds to an
alert present on that side of the vehicle, an
audible chime will also be sounded. When-
ever a turn signal and detected object are
present on the same side at the same time,both the visual and audible alerts will be
issued. In addition to the audible alert the
radio (if on) will also be muted.
NOTE:
Whenever an audible alert is requested by the
BSM system, the radio is also muted.
When the system is in RCP, the system shall
respond with both visual and audible alerts
when a detected object is present. Whenever
an audible alert is requested, the radio is also
muted. Turn/hazard signal status is ignored;
the RCP state always requests the chime.
Blind Spot Alert Off
When the BSM system is turned off there will
be no visual or audible alerts from either the
BSM or RCP systems.
NOTE:
The BSM system will store the current oper-
ating mode when the vehicle is shut off. Each
time the vehicle is started the previously
stored mode will be recalled and used.
SAFETY
100
Page 147 of 378
STARTING THE ENGINE —
GAS
Before starting your vehicle, adjust your seat,
adjust the inside and outside mirrors, fasten
your seat belt, and if present, instruct all
other occupants to buckle their seat belts.
WARNING!
• Before exiting a vehicle, always come to
a complete stop, then shift the auto-
matic transmission into PARK and apply
the parking brake.
• Always make sure the keyless ignition
node is in the OFF mode, key fob is
removed from the vehicle and vehicle is
locked.
• Never leave children alone in a vehicle,
or with access to an unlocked vehicle.
Leaving children in a vehicle unattended
is dangerous for a number of reasons. A
child or others could be seriously or
fatally injured. Children should be
warned not to touch the parking brake,
brake pedal or the gear selector.
WARNING!
• Do not leave the key fob in or near the
vehicle, or in a location accessible to
children, and do not leave the ignition of
a vehicle equipped with Keyless Enter-
N-Go in the ACC or ON/RUN mode. A
child could operate power windows,
other controls, or move the vehicle.
• Do not leave children or animals inside
parked vehicles in hot weather. Interior
heat build-up may cause serious injury
or death.
Automatic Transmission
The gear selector must be in the NEUTRAL or
PARK position before you can start the en-
gine. Apply the brakes before shifting into
any driving gear.
CAUTION!
Damage to the transmission may occur if
the following precautions are not ob-
served:
• Do not shift from REVERSE, PARK, or
NEUTRAL into any forward gear when
the engine is above idle speed.
• Shift into PARK only after the vehicle
has come to a complete stop.
• Shift into or out of REVERSE only after
the vehicle has come to a complete stop
and the engine is at idle speed.
• Before shifting into any gear, make sure
your foot is firmly on the brake pedal.
Normal Starting
To Turn On The Engine Using The ENGINE START/
STOP Button
1. The transmission must be in PARK or
NEUTRAL.
2. Press and hold the brake pedal while
pushing the ENGINE START/STOP button
once.
145
Page 150 of 378
NOTE:
In some cases the ParkSense graphic will be
displayed in the instrument cluster. In these
cases, the shifter must be returned to “P” to
select desired gear.
If the driver shifts into PARK while moving, the
vehicle may AutoPark.
AutoPark will engageONLYwhen vehicle
speed is 1.2 MPH (1.9 km/h) or less.
The MESSAGE “Vehicle Speed is Too High to
Shift to P”will be displayed in the instrument
cluster if vehicle speed is above 1.2 MPH
(1.9 km/h).
WARNING!
If vehicle speed is above 1.2 MPH
(1.9 km/h), the transmission will default
to NEUTRAL until the vehicle speed drops
below 1.2 MPH (1.9 km). A vehicle left in
the NEUTRAL position can roll. As an
added precaution, always apply the park-
ing brake when exiting the vehicle.4WD LOW — If Equipped
AutoPark will be disabled when operating the
vehicle in 4WD LOW.
The MESSAGE “AutoPark Disabled” will be
displayed in the instrument cluster.
Additional customer warnings will be given
when both of these conditions are met:
• Vehicle is not in PARK
• Driver’s Door is ajar
The MESSAGE “AutoPark Not Engaged” will
be displayed in the instrument cluster. A
warning chime will continue until you shift
the vehicle into PARK or the Driver’s Door is
closed.
ALWAYS DO A VISUAL CHECKthat your vehicle
is in PARK by looking for the "P" in the
instrument cluster display and on the shifter.
As an added precaution, always apply the
parking brake when exiting the vehicle.
STARTING THE ENGINE —
3.0L DIESEL ENGINE
Before starting your vehicle, adjust your seat,
both inside and outside mirrors, and fasten
your seat belts.
The starter is allowed to crank for up to
30-second intervals. Waiting a few minutes
between such intervals will protect the starter
from overheating.
WARNING!
• Before exiting a vehicle, always come to
a complete stop, then shift the auto-
matic transmission into PARK and apply
the parking brake.
• Always make sure the keyless ignition
node is in the OFF mode, key fob is
removed from the vehicle and vehicle is
locked.
• Never leave children alone in a vehicle,
or with access to an unlocked vehicle.
Leaving children in a vehicle unattended
is dangerous for a number of reasons. A
child or others could be seriously orSTARTING AND OPERATING
148
Page 216 of 378
Cavity Cartridge Fuse Micro Fuse Description
F63 – 20 Amp Yellow Ignition Coils / Ignition Coil Capacitors / Short Runner Valve Actuator — If
Equipped (Gas) Urea Heater (Diesel)
(*)
F64 – 25 Amp Clear Fuel Injectors/Powertrain
(*)
F66 – 10 Amp Red Sunroof/Rain Sensor/Inside Rear View Mirror / USB Port / DSCR / DTV —
If Equipped
F67 – 15 Amp Blue CD/DVD/UCI Port/USB Charging Port
F68 – 20 Amp Yellow Rear Wiper Motor
F69 – 15 Amp Blue Spotlight Feed — If Equipped
F70 – 20 Amp Yellow Fuel Pump Motor
(*)
F71 – 30 Amp Green Amplifier/ANCM — If Equipped
F72 – 10 Amp Red ECM
(*)
F73 – 15 Amp Blue HID Headlamp RH — If Equipped
(*)
F75 – 10 Amp Red Dual Batt Control — If Equipped
F76 – 10 Amp Red Anti-lock Brakes/Electronic Stability Control
(*)
F77 – 10 Amp Red Drivetrain Control Module/Front Axle Disconnect Module — If Equipped
(*)
F78 – 10 Amp Red Engine Control Module/Electric Power Steering
(*)
IN CASE OF EMERGENCY
214
Page 278 of 378
Plastic And Coated Parts
Use a specific product to clean vinyl
upholstery.
CAUTION!
• Direct contact of air fresheners, insect
repellents, suntan lotions, or hand sani-
tizers to the plastic, painted, or deco-
rated surfaces of the interior may cause
permanent damage. Wipe away
immediately.
• Damage caused by these type of prod-
ucts may not be covered by your New
Vehicle Limited Warranty.
Cleaning Plastic Instrument Cluster Lenses
The lenses in front of the instruments in this
vehicle are molded in clear plastic. When
cleaning the lenses, care must be taken to
avoid scratching the plastic.1. Clean with a wet soft cloth. A mild soap
solution may be used, but do not use high
alcohol content or abrasive cleaners. If
soap is used, wipe clean with a clean
damp cloth.
2. Dry with a soft cloth.
Leather Parts
Your leather upholstery can be best preserved
by regular cleaning with a damp soft cloth.
Small particles of dirt can act as an abrasive
and damage the leather upholstery and
should be removed promptly with a damp
cloth. Care should be taken to avoid soaking
your leather upholstery with any liquid.
Please do not use polishes, oils, cleaning
fluids, solvents, detergents, or ammonia-
based cleaners to clean your leather uphol-
stery. Application of a leather conditioner is
not required to maintain the original condi-
tion.
NOTE:
If equipped with light colored leather, it
tends to show any foreign material, dirt, and
fabric dye transfer more so than darker col-
ors. The leather is designed for easy cleaning.
CAUTION!
Do not use Alcohol and Alcohol-based
and/or Ketone based cleaning products to
clean leather upholstery, as damage to the
upholstery may result.
Glass Surfaces
All glass surfaces should be cleaned on a
regular basis with any commercial
household-type glass cleaner. Never use an
abrasive type cleaner. Use caution when
cleaning the inside rear window equipped
with electric defrosters or windows equipped
with radio antennas. Do not use scrapers or
other sharp instruments that may scratch the
elements.
When cleaning the rear view mirror, spray
cleaner on the towel or cloth that you are
using. Do not spray cleaner directly on the
mirror.
SERVICING AND MAINTENANCE
276
Page 319 of 378
• Safety & Driving
Assistance• Phone/Bluetooth
• Mirrors & Wipers • Accessibility
• Lights • Radio Setup
• Doors & Locks • Restore Settings
• Auto-On Comfort &
Remote Start• Clear Personal Data
• Compass –
If Equipped• System Information
NOTE:
Depending on the vehicles options, feature
settings may vary.
Refer to “Uconnect Settings” in “Multime-
dia” in the Owner’s Manual for further infor-
mation.
OFF ROAD PAGES — IF
EQUIPPED
Your vehicle is equipped with Off Road
Pages, which provides the vehicle status
while operating on off road conditions. It
supplies information relating to the vehicle
ride height, the status of the transfer case,
the pitch and roll of the vehicle (if equipped),
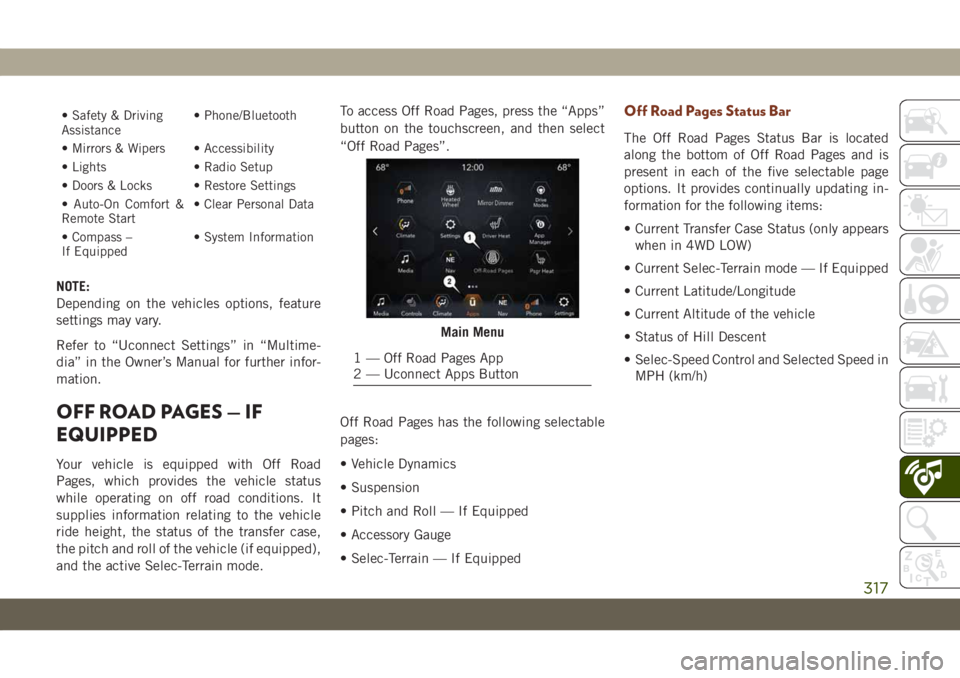
and the active Selec-Terrain mode.To access Off Road Pages, press the “Apps”
button on the touchscreen, and then select
“Off Road Pages”.
Off Road Pages has the following selectable
pages:
• Vehicle Dynamics
• Suspension
• Pitch and Roll — If Equipped
• Accessory Gauge
• Selec-Terrain — If Equipped
Off Road Pages Status Bar
The Off Road Pages Status Bar is located
along the bottom of Off Road Pages and is
present in each of the five selectable page
options. It provides continually updating in-
formation for the following items:
• Current Transfer Case Status (only appears
when in 4WD LOW)
• Current Selec-Terrain mode — If Equipped
• Current Latitude/Longitude
• Current Altitude of the vehicle
• Status of Hill Descent
• Selec-Speed Control and Selected Speed in
MPH (km/h)
Main Menu
1 — Off Road Pages App
2 — Uconnect Apps Button
317
Page 344 of 378
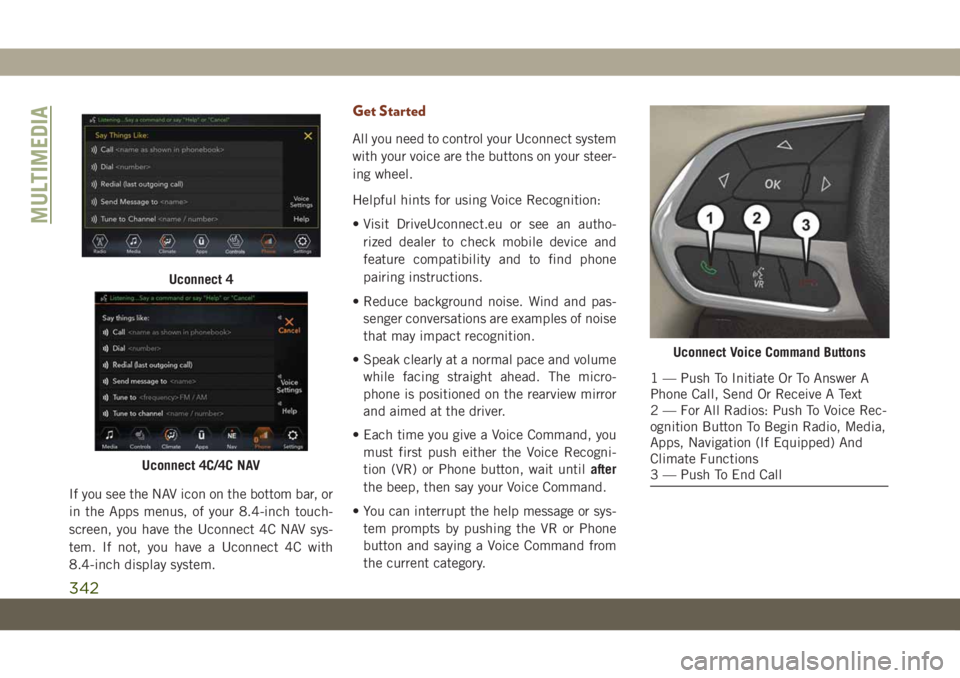
If you see the NAV icon on the bottom bar, or
in the Apps menus, of your 8.4-inch touch-
screen, you have the Uconnect 4C NAV sys-
tem. If not, you have a Uconnect 4C with
8.4-inch display system.
Get Started
All you need to control your Uconnect system
with your voice are the buttons on your steer-
ing wheel.
Helpful hints for using Voice Recognition:
• Visit DriveUconnect.eu or see an autho-
rized dealer to check mobile device and
feature compatibility and to find phone
pairing instructions.
• Reduce background noise. Wind and pas-
senger conversations are examples of noise
that may impact recognition.
• Speak clearly at a normal pace and volume
while facing straight ahead. The micro-
phone is positioned on the rearview mirror
and aimed at the driver.
• Each time you give a Voice Command, you
must first push either the Voice Recogni-
tion (VR) or Phone button, wait untilafter
the beep, then say your Voice Command.
• You can interrupt the help message or sys-
tem prompts by pushing the VR or Phone
button and saying a Voice Command from
the current category.
Uconnect 4
Uconnect 4C/4C NAV
Uconnect Voice Command Buttons
1 — Push To Initiate Or To Answer A
Phone Call, Send Or Receive A Text
2 — For All Radios: Push To Voice Rec-
ognition Button To Begin Radio, Media,
Apps, Navigation (If Equipped) And
Climate Functions
3 — Push To End Call
MULTIMEDIA
342
Page 372 of 378
Ignition.....................15
Switch...................15
Instrument Cluster..............67
Descriptions................83
Display...................66
Instrument Panel Lens Cleaning.....276
Interior Appearance Care.........275
Intermittent Wipers (Delay Wipers)....41
Introduction...................1
Jacking Instructions............218
Jack Location................217
Jack Operation.........217, 218, 262
Jump Starting................225
Key Fob
Arm The System.............18
Disarm The System............18
Keyless Enter-N-Go..............21
Passive Entry...............21
Keys.......................14
Replacement...............15
LaneSense..................181
Lap/Shoulder Belts.............110
Latches....................143
Hood....................59Lead Free Gasoline.............282
Leaks, Fluid.................143
Life Of Tires.................266
Liftgate.....................59
Closing...................60
Opening..................59
Power....................61
Liftgate Window Wiper/Washer.......43
Light Bulbs..................143
Lights.....................143
AirBag ............73, 117, 141
Automatic Headlights..........38
Brake Assist Warning...........92
Brake Warning...............73
Bulb Replacement...........204
Cruise.................82, 84
Daytime Running.............37
Electronic Stability Program(ESP)
Indicator..................75
Exterior..............
.36, 143
F
og ...................40, 81
Hazard Warning Flasher........203
Headlights On With Wipers.......39
High Beam/Low Beam Select . . .37, 38
Hill Descent Control Indicator.....94
Lights On Reminder...........40
Low Fuel..................77Malfunction Indicator
(Check Engine)..............78
Park..................39, 82
Passing...................38
Seat Belt Reminder...........75
Security Alarm..............76
Service..................204
Side Marker...............207
Traction Control..............92
Turn Signals......40, 83, 143, 207
Warning Instrument Cluster
Descriptions.............75, 83
Locks
Child Protection..............24
Luggage Carrier................64
Lug Nuts/Bolts................278
Maintenance...............55, 58
Maintenance Free Battery.........256
Maintenance Schedule. . . .236, 240, 244
Malfunction Indicator Light
(Check Engine)...............78
Memory Feature (Memory Seats)......25
Memory Seat..................25
Methanol...................283
Methanol Fuel................283
Mirrors.....................35
INDEX
370