display JEEP GRAND CHEROKEE 2020 Owner handbook (in English)
[x] Cancel search | Manufacturer: JEEP, Model Year: 2020, Model line: GRAND CHEROKEE, Model: JEEP GRAND CHEROKEE 2020Pages: 378, PDF Size: 6.88 MB
Page 107 of 378
NOTE:
It is particularly important, for you to regu-
larly check the tire pressure in all of your tires
and to maintain the proper pressure.
The Tire Pressure Monitor System (TPMS)
consists of the following components:
• Receiver Module
• Four Tire Pressure Monitoring Sensors• Various Tire Pressure Monitoring System
Messages, which display in the instrument
cluster, and a graphic displaying tire pres-
sures
• TPMS Warning Light
Tire Pressure Monitoring Low Pressure
Warnings
The TPMS Warning Light will il-
luminate in the instrument clus-
ter, and an audible chime will be
activated, when one or more of
the four active road tire pres-
sures are low. In addition, the instrument
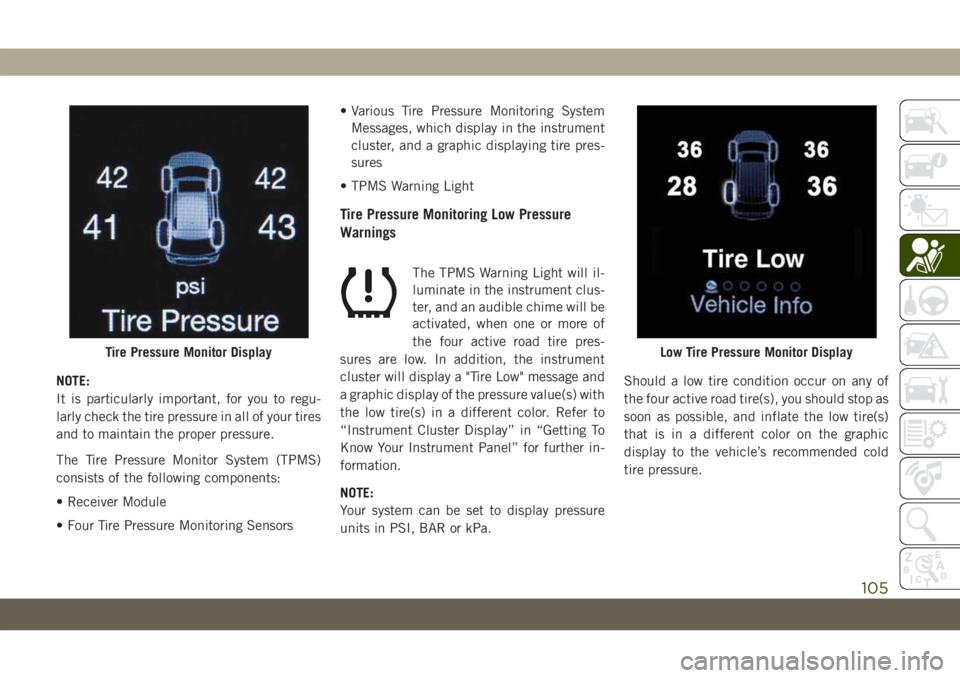
cluster will display a "Tire Low" message and
a graphic display of the pressure value(s) with
the low tire(s) in a different color. Refer to
“Instrument Cluster Display” in “Getting To
Know Your Instrument Panel” for further in-
formation.
NOTE:
Your system can be set to display pressure
units in PSI, BAR or kPa.Should a low tire condition occur on any of
the four active road tire(s), you should stop as
soon as possible, and inflate the low tire(s)
that is in a different color on the graphic
display to the vehicle’s recommended cold
tire pressure.
Tire Pressure Monitor DisplayLow Tire Pressure Monitor Display
105
Page 108 of 378
NOTE:
When filling warm tires, the tire pressure may
need to be increased up to an additional 4 psi
(28 kPa) above the recommended cold plac-
ard pressure in order to turn the TPMS Warn-
ing Light off.
The system will automatically update, the
graphic display of the pressure value(s) will
return to its original color and the TPMS
Warning Light will extinguish once the up-
dated tire pressure(s) have been received.
The vehicle may need to be driven for up to
10 minutes above 15 mph (24 km/h) to
receive this information.
Service TPM System Warning
The Tire Pressure Monitoring System Warning
Light will flash on and off for 75 seconds, and
remain on solid when a system fault is de-
tected. The system fault will also sound a
chime. The instrument cluster display will
display a “SERVICE TPM SYSTEM” message
for a minimum of five seconds. This message
is then followed by a graphic display, with “-
-“ in place of the pressure value(s), indicat-
ing which Tire Pressure Monitoring Sensor(s)
is not being received.If the ignition switch is cycled, this sequence
will repeat, providing the system fault still
exists. If the system fault no longer exists, the
Tire Pressure Monitoring System Warning
Light will no longer flash, the "SERVICE TPM
SYSTEM" message will not be present, and a
pressure value will be displayed instead of
dashes. A system fault can occur by any of
the following:
• Jamming due to electronic devices or driv-
ing next to facilities emitting the same
Radio Frequencies as the TPM sensors.
• Lots of snow or ice around the wheels or
wheel housings.
• Using tire chains on the vehicle.
• Using wheels/tires not equipped with TPM
sensors.
NOTE:
There is no tire pressure monitoring sensor in
the spare tire. The TPMS will not be able to
monitor the tire pressure. If you install the
spare tire in place of a road tire that has a
pressure below the low-pressure warning
limit, upon the next ignition switch cycle, the
Tire Pressure Monitoring System Warning
Light will remain on, a chime will sound, andthe instrument cluster display will still dis-
play a pressure value in the different color
graphic display. After driving the vehicle for
up to 10 minutes above 15 mph (24 km/h),
the Tire Pressure Monitoring System Warning
Light will flash on and off for 75 seconds and
then remain on solid. In addition, the instru-
ment cluster display will display a “SERVICE
TPM SYSTEM" message for five seconds and
then display dashes (- -) in place of the
pressure value. For each subsequent ignition
switch cycle, a chime will sound, the Tire
Pressure Monitoring System Warning Light
will flash on and off for 75 seconds and then
remain on solid, and the instrument cluster
display will display a "SERVICE TPM SYS-
TEM" message for five seconds and then
display dashes (- -) in place of the pressure
value. Once you repair or replace the original
road tire, and reinstall it on the vehicle in
place of the spare tire, the TPMS will update
automatically.
In addition, the Tire Pressure Monitoring Sys-
tem Warning Light will turn off and the
graphic in the instrument cluster display will
display a new pressure value instead of
dashes (- -), as long as no tire pressure is
SAFETY
106
Page 109 of 378
below the low-pressure warning limit in any of
the four active road tires. The vehicle may
need to be driven for up to 10 minutes above
15 mph (24 km/h) in order for the TPMS to
receive this information.
TPMS Deactivation — If Equipped
The Tire Pressure Monitoring System (TPMS)
can be deactivated if replacing all four wheel
and tire assemblies (road tires) with wheel
and tire assemblies that do not have TPMS
Sensors, such as when installing winter
wheel and tire assemblies on your vehicle.
To deactivate the TPMS, first, replace all four
wheel and tire assemblies (road tires) with
tires not equipped with Tire Pressure Moni-
toring (TPM) Sensors. Then, drive the vehicle
for 10 minutes above 15 mph (24 km/h). The
TPMS will chime, the TPMS Warning Light
will flash on and off for 75 seconds and then
remain on. The instrument cluster will dis-
play the “SERVICE TPM SYSTEM” message
and then display dashes (--) in place of the
pressure values.Beginning with the next ignition cycle, the
TPMS will no longer chime or display the
“SERVICE TPM SYSTEM” message in the
instrument cluster but dashes (--) will remain
in place of the pressure values.
To reactivate the TPMS, replace all four
wheel and tire assemblies (road tires) with
tires equipped with TPM sensors. Then, drive
the vehicle for up to 10 minutes above
15 mph (24 km/h). The TPMS will chime, the
TPMS Warning Light will flash on and off for
75 seconds and then turn off. The instrument
cluster will display the “SERVICE TPM SYS-
TEM” message and then display pressure
values in place of the dashes. On the next
ignition cycle the "SERVICE TPM SYSTEM"
message will no longer be displayed as long
as no system fault exists.
OCCUPANT RESTRAINT
SYSTEMS
Some of the most important safety features in
your vehicle are the restraint systems:
Occupant Restraint Systems Features
• Seat Belt Systems
• Supplemental Restraint Systems (SRS) Air
Bags
• Supplemental Active Head Restraints
• Child Restraints
Some of the safety features described in this
section may be standard equipment on some
models, or may be optional equipment on
others. If you are not sure, ask an authorized
dealer.
Important Safety Precautions
Please pay close attention to the information
in this section. It tells you how to use your
restraint system properly, to keep you and
your passengers as safe as possible.
Here are some simple steps you can take to
minimize the risk of harm from a deploying
air bag:
1. Children 12 years old and under should
always ride buckled up in the rear seat of
a vehicle with a rear seat.
107
Page 148 of 378
3. The system takes over and attempts to
start the vehicle. If the vehicle fails to
start, the starter will disengage automati-
cally after 10 seconds.
4. If you wish to stop the cranking of the
engine prior to the engine starting, push
the button again.
NOTE:
Normal starting of either a cold or a warm
engine is obtained without pumping or press-
ing the accelerator pedal.
To Turn Off The Engine Using ENGINE START/
STOP Button
1. Place the gear selector in PARK, then
push and release the ENGINE START/
STOP button.
2. The ignition will return to the OFF mode.
3. If the gear selector is not in PARK (with
vehicle stopped) and the ENGINE START/
STOP button is pushed once, the trans-
mission will automatically select PARK
and the engine will turn off, however theignition will remain in the ACC mode
(NOT the OFF mode). Never leave a ve-
hicle out of the PARK position, or it could
roll.
4. If the gear selector is in NEUTRAL, and
the vehicle speed is below 5 mph
(8 km/h), pushing the START/STOP but-
ton once will turn the engine off. The
ignition will remain in the ACC mode.
5. If the vehicle speed is above 5 mph
(8 km/h), the ENGINE START/STOP but-
ton must be held for two seconds (or three
short pushes in a row) to turn the engine
off. The ignition will remain in the ACC
mode (NOT the OFF mode) if the engine is
turned off when the transmission is not in
PARK.
NOTE:
The system will automatically time out and
the ignition will cycle to the OFF mode after
30 minutes of inactivity if the ignition is left
in the ACC or RUN (engine not running) mode
and the transmission is in PARK.ENGINE START/STOP Button Functions — With
Driver’s Foot OFF The Brake Pedal (In PARK Or
NEUTRAL Position)
The ENGINE START/STOP button operates
similar to an ignition switch. It has three
modes: OFF, ACC, and RUN. To change the
ignition modes without starting the vehicle
and use the accessories, follow these steps:
1. Starting with the ignition in the OFF
mode,
2. Push the ENGINE START/STOP button
once to place the ignition to the ACC
mode (instrument cluster will display
“ACC”),
3. Push the ENGINE START/STOP button a
second time to place the ignition to the
RUN mode (instrument cluster will dis-
play “ON/RUN”),
4. Push the ENGINE START/STOP button a
third time to return the ignition to the OFF
mode (instrument cluster will display
“OFF”).
STARTING AND OPERATING
146
Page 149 of 378
NOTE:
Only press one pedal at a time while driving
the vehicle. Torque performance of the ve-
hicle could be reduced if both pedals are
pressed at the same time. If pressure is
detected on both pedals simultaneously, a
warning message will display in the instru-
ment cluster. For further information, refer to
“Instrument Cluster Display” in “Getting To
Know Your Instrument Panel”.
AutoPark
AutoPark is a supplemental feature to assist
in placing the vehicle in PARK should the
situations on the following pages occur. It is a
back up system and should not be relied upon
as the primary method by which the driver
shifts the vehicle into PARK.
The conditions under which AutoPark will
engage are outlined on the following pages.
WARNING!
• Driver inattention could lead to failure to
place the vehicle in PARK. ALWAYS DO
A VISUAL CHECK that your vehicle is in
WARNING!
PARK by verifying that a solid (not blink-
ing) “P” is indicated in the instrument
cluster display and on the gear selector.
If the "P" indicator is blinking, your ve-
hicle is not in PARK. As an added pre-
caution, always apply the parking brake
when exiting the vehicle.
• AutoPark is a supplemental feature. It is
not designed to replace the need to shift
your vehicle into PARK. It is a back up
system and should not be relied upon as
the primary method by which the driver
shifts the vehicle into PARK.
If the vehicle is not in PARK and the driver turns
off the engine, the vehicle may AutoPark.
AutoPark will engage when all of these con-
ditions are met:
• Vehicle is equipped with an 8-speed trans-
mission
• Vehicle is not in PARK
• Vehicle Speed is 1.2 MPH (1.9 km/h) or
less
• Ignition switched from RUN to ACCNOTE:
For Keyless Go equipped vehicles, The en-
gine will turn off and the ignition switch will
change to ACC mode. After 30 minutes the
ignition switches to OFF automatically, un-
less the driver turns the ignition switch OFF.
If the vehicle is not in PARK and the driver exits
the vehicle with the engine running, the vehicle
may AutoPark.
AutoPark will engage when all of these con-
ditions are met:
• Vehicle is equipped with an 8-speed trans-
mission
• Vehicle is not in PARK
• Vehicle Speed is 1.2 MPH (1.9 km/h) or
less
• Driver’s seat belt is unbuckled
• Driver’s door is ajar
• Brake Pedal is not depressed
The MESSAGE “AutoPark Engaged Shift to P
then Shift to Gear”will display in the instru-
ment cluster.
147
Page 150 of 378
NOTE:
In some cases the ParkSense graphic will be
displayed in the instrument cluster. In these
cases, the shifter must be returned to “P” to
select desired gear.
If the driver shifts into PARK while moving, the
vehicle may AutoPark.
AutoPark will engageONLYwhen vehicle
speed is 1.2 MPH (1.9 km/h) or less.
The MESSAGE “Vehicle Speed is Too High to
Shift to P”will be displayed in the instrument
cluster if vehicle speed is above 1.2 MPH
(1.9 km/h).
WARNING!
If vehicle speed is above 1.2 MPH
(1.9 km/h), the transmission will default
to NEUTRAL until the vehicle speed drops
below 1.2 MPH (1.9 km). A vehicle left in
the NEUTRAL position can roll. As an
added precaution, always apply the park-
ing brake when exiting the vehicle.4WD LOW — If Equipped
AutoPark will be disabled when operating the
vehicle in 4WD LOW.
The MESSAGE “AutoPark Disabled” will be
displayed in the instrument cluster.
Additional customer warnings will be given
when both of these conditions are met:
• Vehicle is not in PARK
• Driver’s Door is ajar
The MESSAGE “AutoPark Not Engaged” will
be displayed in the instrument cluster. A
warning chime will continue until you shift
the vehicle into PARK or the Driver’s Door is
closed.
ALWAYS DO A VISUAL CHECKthat your vehicle
is in PARK by looking for the "P" in the
instrument cluster display and on the shifter.
As an added precaution, always apply the
parking brake when exiting the vehicle.
STARTING THE ENGINE —
3.0L DIESEL ENGINE
Before starting your vehicle, adjust your seat,
both inside and outside mirrors, and fasten
your seat belts.
The starter is allowed to crank for up to
30-second intervals. Waiting a few minutes
between such intervals will protect the starter
from overheating.
WARNING!
• Before exiting a vehicle, always come to
a complete stop, then shift the auto-
matic transmission into PARK and apply
the parking brake.
• Always make sure the keyless ignition
node is in the OFF mode, key fob is
removed from the vehicle and vehicle is
locked.
• Never leave children alone in a vehicle,
or with access to an unlocked vehicle.
Leaving children in a vehicle unattended
is dangerous for a number of reasons. A
child or others could be seriously orSTARTING AND OPERATING
148
Page 152 of 378
CAUTION!
avoid engine damage. Refer to “Draining
Fuel/Water Separator Filter” in “Servicing
And Maintenance” in your Diesel Supple-
ment for further information, which can be
found with your online Owner’s Informa-
tion.
3. The system will automatically engage the
starter to crank the engine. If the vehicle
fails to start, the starter will disengage
automatically after 25 seconds.
4. If you wish to stop the cranking of the
engine prior to the engine starting, push
the button again.
5. Check that the oil pressure warning light
has turned off.
6. Release the parking brake.NOTE:
Only press one pedal at a time while driving
the vehicle. Torque performance of the ve-
hicle could be reduced if both pedals are
pressed at the same time. If pressure is
detected on both pedals simultaneously, a
warning message will display in the instru-
ment cluster. For further information, refer to
“Instrument Cluster Display” in “Getting To
Know Your Instrument Panel”.
STOP/START SYSTEM — IF
EQUIPPED
The Stop/Start function is developed to re-
duce fuel consumption. The system will stop
the engine automatically during a vehicle
stop if the required conditions are met. Re-
leasing the brake pedal or pressing the accel-
erator pedal will automatically re-start the
engine.
This vehicle has been upgraded with a heavy
duty starter, enhanced battery, and other up-
graded engine parts, to handle the additional
engine starts.
Automatic Mode
The Stop/Start feature is enabled
after every normal customer en-
gine start. At that time, the sys-
tem will go into STOP/START
READY and if all other conditions are met,
can go into a STOP/START AUTOSTOP AC-
TIVE “Autostop” mode.
To Activate The Autostop Mode, The Following
Must Occur:
• The system must be in STOP/START
READY state. A STOP/START READY mes-
sage will be displayed in the instrument
cluster display within the Stop/Start sec-
tion. Refer to “Instrument Cluster” in “Get-
ting To Know Your Instrument Panel” in
your Owner’s Manual for further informa-
tion.
• The vehicle must be completely stopped.
• The shifter must be in a forward gear and
the brake pedal depressed.
STARTING AND OPERATING
150
Page 154 of 378
• STOP/START OFF switch is pushed.
• A STOP/START system error occurs.
• 4WD system is put into 4LO mode.
To Manually Turn Off The Stop/Start
System
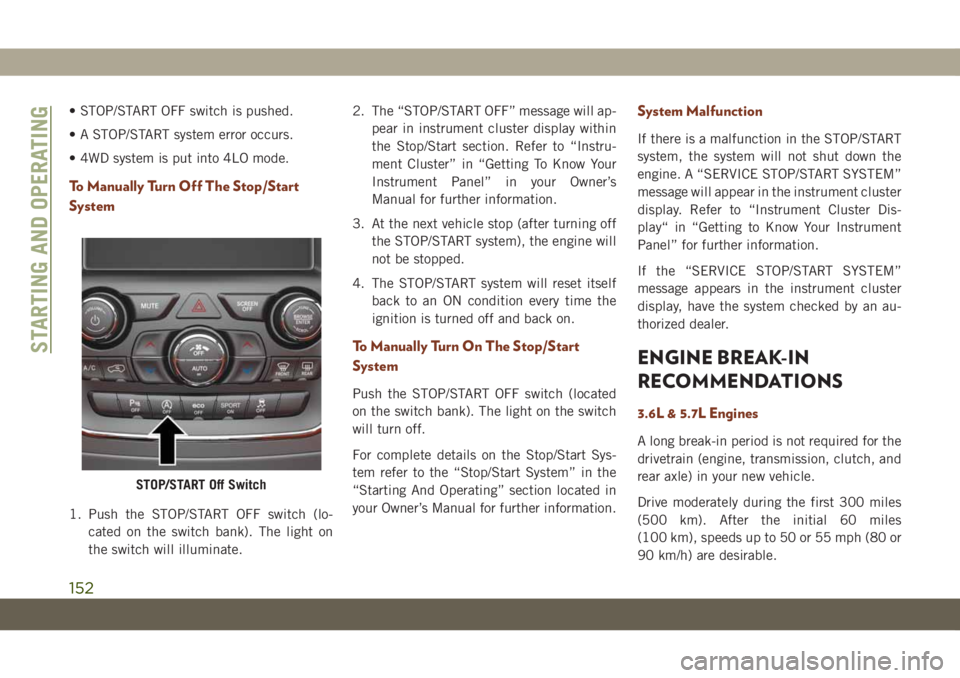
1. Push the STOP/START OFF switch (lo-
cated on the switch bank). The light on
the switch will illuminate.2. The “STOP/START OFF” message will ap-
pear in instrument cluster display within
the Stop/Start section. Refer to “Instru-
ment Cluster” in “Getting To Know Your
Instrument Panel” in your Owner’s
Manual for further information.
3. At the next vehicle stop (after turning off
the STOP/START system), the engine will
not be stopped.
4. The STOP/START system will reset itself
back to an ON condition every time the
ignition is turned off and back on.
To Manually Turn On The Stop/Start
System
Push the STOP/START OFF switch (located
on the switch bank). The light on the switch
will turn off.
For complete details on the Stop/Start Sys-
tem refer to the “Stop/Start System” in the
“Starting And Operating” section located in
your Owner’s Manual for further information.
System Malfunction
If there is a malfunction in the STOP/START
system, the system will not shut down the
engine. A “SERVICE STOP/START SYSTEM”
message will appear in the instrument cluster
display. Refer to “Instrument Cluster Dis-
play“ in “Getting to Know Your Instrument
Panel” for further information.
If the “SERVICE STOP/START SYSTEM”
message appears in the instrument cluster
display, have the system checked by an au-
thorized dealer.
ENGINE BREAK-IN
RECOMMENDATIONS
3.6L & 5.7L Engines
A long break-in period is not required for the
drivetrain (engine, transmission, clutch, and
rear axle) in your new vehicle.
Drive moderately during the first 300 miles
(500 km). After the initial 60 miles
(100 km), speeds up to 50 or 55 mph (80 or
90 km/h) are desirable.
STOP/START Off Switch
STARTING AND OPERATING
152
Page 159 of 378
mode. An onboard frequency generator cre-
ates counteracting sound waves through the
audio system to help keep the vehicle quiet.
Eight–Speed Automatic Transmission
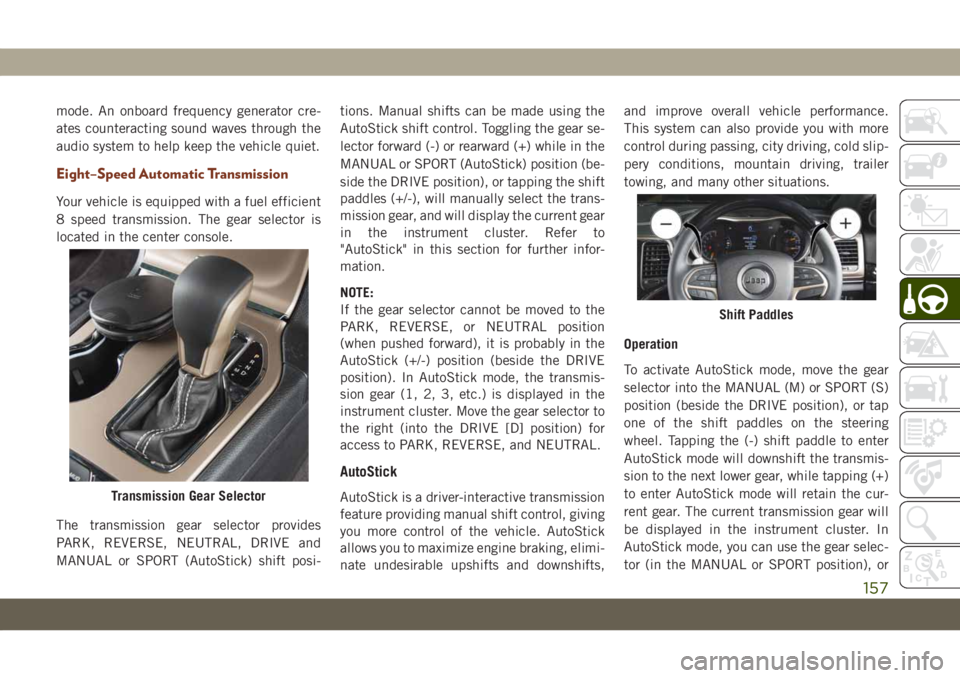
Your vehicle is equipped with a fuel efficient
8 speed transmission. The gear selector is
located in the center console.
The transmission gear selector provides
PARK, REVERSE, NEUTRAL, DRIVE and
MANUAL or SPORT (AutoStick) shift posi-tions. Manual shifts can be made using the
AutoStick shift control. Toggling the gear se-
lector forward (-) or rearward (+) while in the
MANUAL or SPORT (AutoStick) position (be-
side the DRIVE position), or tapping the shift
paddles (+/-), will manually select the trans-
mission gear, and will display the current gear
in the instrument cluster. Refer to
"AutoStick" in this section for further infor-
mation.
NOTE:
If the gear selector cannot be moved to the
PARK, REVERSE, or NEUTRAL position
(when pushed forward), it is probably in the
AutoStick (+/-) position (beside the DRIVE
position). In AutoStick mode, the transmis-
sion gear (1, 2, 3, etc.) is displayed in the
instrument cluster. Move the gear selector to
the right (into the DRIVE [D] position) for
access to PARK, REVERSE, and NEUTRAL.
AutoStick
AutoStick is a driver-interactive transmission
feature providing manual shift control, giving
you more control of the vehicle. AutoStick
allows you to maximize engine braking, elimi-
nate undesirable upshifts and downshifts,and improve overall vehicle performance.
This system can also provide you with more
control during passing, city driving, cold slip-
pery conditions, mountain driving, trailer
towing, and many other situations.
Operation
To activate AutoStick mode, move the gear
selector into the MANUAL (M) or SPORT (S)
position (beside the DRIVE position), or tap
one of the shift paddles on the steering
wheel. Tapping the (-) shift paddle to enter
AutoStick mode will downshift the transmis-
sion to the next lower gear, while tapping (+)
to enter AutoStick mode will retain the cur-
rent gear. The current transmission gear will
be displayed in the instrument cluster. In
AutoStick mode, you can use the gear selec-
tor (in the MANUAL or SPORT position), orTransmission Gear Selector
Shift Paddles
157
Page 160 of 378
the shift paddles, to manually shift the trans-
mission. Tapping the gear selector forward (-)
while in the MANUAL (M) or SPORT (S)
position, or tapping the (-) shift paddle, will
downshift the transmission to the next lower
gear. Tapping the selector rearward (+) (or
tapping the (+) shift paddle) will command
an upshift.
NOTE:
The shift paddles may be disabled (or re-
enabled, as desired) using the Uconnect Per-
sonal Settings or, in SRT models, using Drive
Modes.
In AutoStick mode, the transmission will
shift up or down when (+/-) is manually se-
lected by the driver (using the gear selector,
or the shift paddles), unless an engine lug-
ging or overspeed condition would result. It
will remain in the selected gear until another
upshift or downshift is chosen, except as
described below.
• The transmission will automatically down-
shift as the vehicle slows (to prevent engine
lugging) and will display the current gear.• The transmission will automatically down-
shift to first gear when coming to a stop.
After a stop, the driver should manually
upshift (+) the transmission as the vehicle
is accelerated.
• You can start out, from a stop, in first or
second gear (or third gear, in 4LO range,
Snow mode, or Sand mode). Tapping (+) (at
a stop) will allow starting in second gear.
Starting out in second or third gear can be
helpful in snowy or icy conditions.
• If a requested downshift would cause the
engine to over-speed, that shift will not
occur.
• The system will ignore attempts to upshift
at too low of a vehicle speed.
• Holding the (-) paddle depressed, or hold-
ing the gear selector in the (-) position, will
downshift the transmission to the lowest
gear possible at the current speed.
• Transmission shifting will be more notice-
able when AutoStick is enabled.
• The system may revert to automatic shift
mode if a fault or overheat condition is
detected.NOTE:
When Selec-Speed or Hill Descent Control is
enabled, AutoStick is not active.
To disengage AutoStick, return the gear se-
lector to the DRIVE position, or press and
hold the (+) shift paddle (if the gear selector
is already in DRIVE) until "D" is once again
indicated in the instrument cluster. You can
shift in or out of AutoStick at any time with-
out taking your foot off the accelerator pedal.
WARNING!
Do not downshift for additional engine
braking on a slippery surface. The drive
wheels could lose their grip and the ve-
hicle could skid, causing a collision or
personal injury.STARTING AND OPERATING
158