display JEEP GRAND CHEROKEE 2020 Owner handbook (in English)
[x] Cancel search | Manufacturer: JEEP, Model Year: 2020, Model line: GRAND CHEROKEE, Model: JEEP GRAND CHEROKEE 2020Pages: 378, PDF Size: 6.88 MB
Page 193 of 378
NOTE:
When working with AdBlue®, it is important
to know that:
• Any containers or parts that come into con-
tact with AdBlue
®must be AdBlue®com-
patible (plastic or stainless steel). Copper,
brass, aluminum, iron or non-stainless
steel should be avoided as they are subject
to corrosion by AdBlue
®.
• If AdBlue
®is spilled, it should be wiped up
completely.
Adding AdBlue®
Preliminary Conditions
AdBlue
®freezes at temperatures lower than
12° F (-11° C). If the car stands for a long
time at this temperature refilling could be
difficult. For this reason, it is advised to park
the vehicle in a garage and/or heated environ-
ment and wait for the urea to return to liquid
state before topping up.Proceed as follows:
• Park the car on flat ground and stop the
engine by cycling the ignition to the OFF
position.
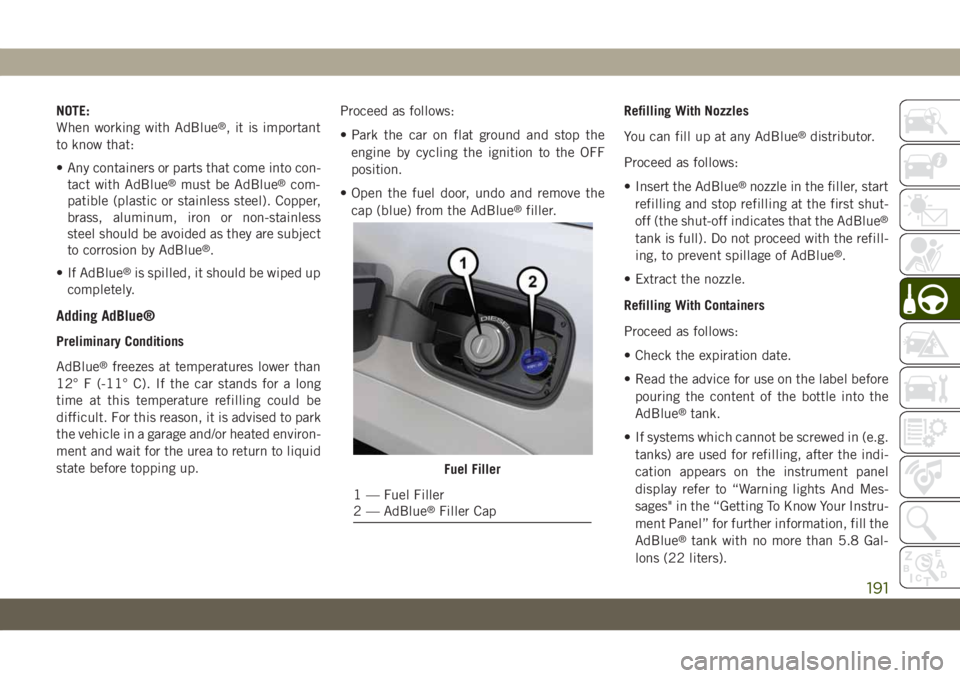
• Open the fuel door, undo and remove the
cap (blue) from the AdBlue
®filler.Refilling With Nozzles
You can fill up at any AdBlue
®distributor.
Proceed as follows:
• Insert the AdBlue
®nozzle in the filler, start
refilling and stop refilling at the first shut-
off (the shut-off indicates that the AdBlue
®
tank is full). Do not proceed with the refill-
ing, to prevent spillage of AdBlue®.
• Extract the nozzle.
Refilling With Containers
Proceed as follows:
• Check the expiration date.
• Read the advice for use on the label before
pouring the content of the bottle into the
AdBlue
®tank.
• If systems which cannot be screwed in (e.g.
tanks) are used for refilling, after the indi-
cation appears on the instrument panel
display refer to “Warning lights And Mes-
sages" in the “Getting To Know Your Instru-
ment Panel” for further information, fill the
AdBlue
®tank with no more than 5.8 Gal-
lons (22 liters).
Fuel Filler
1 — Fuel Filler
2 — AdBlue®Filler Cap
191
Page 194 of 378
• If containers which can be screwed to the
filler are used, the reservoir is full when the
AdBlue
®level in the container stops pour-
ing out. Do not proceed further.
CAUTION!
To avoid fuel spillage and overfilling, do
not “top off” the fuel tank after filling.
Operations After Refilling
Proceed as follows:
• Fit the cap back on the AdBlue
®filler by
turning it clockwise and screwing it com-
pletely.
• Cycle the ignition to RUN (it is not neces-
sary to start the engine).
• Wait for the indication on the instrument
panel to switch off before moving the car.
The indication may stay on for a few sec-
onds to approximately half a minute. If the
engine is started and the car is moved, the
indication will remain on for longer. This
will not compromise engine operation.• If the AdBlue
®was topped up when the
tank was empty, wait for 2 minutes before
starting the engine.
NOTE:
• If AdBlue
®is spilled out of the filler neck,
clean up well the area and proceed to filling
up again. If the liquid crystallizes, elimi-
nate it with a sponge and warm water.
• DO NOT EXCEED THE MAXIMUM LEVEL:
this could cause damage to the reservoir.
AdBlue
®freezes at under 12° F (-11° C).
Although the system is designed to operate
below the freezing point of the AdBlue
®,it
is advisable not to fill the tank beyond the
maximum level because if the AdBlue
®
freezes the system can be damaged. Follow
the instructions in this section.
• If the AdBlue
®is spilled on painted sur-
faces or aluminium, immediately clean the
area with water and use absorbent material
to collect the fluid that has been spilled on
the ground.
• Do not try to start the engine if AdBlue
®
was accidentally added to the diesel fuel
tank, this can result in serious engine dam-
age, contact an authorized dealer.• Do not add additives or other fluids to
AdBlue
®, doing so could damage the
system.
• The use of non-conforming or degraded
AdBlue
®may lead to indications appearing
on the instrument panel display refer to
“Warning Lights And Messages" in the
“Getting To Know Your Instrument Panel”
for further information.
• Never pour AdBlue
®into another con-
tainer: it could be contaminated.
• If the AdBlue
®runs out, see refer to “Warn-
ing Lights And Messages" in the “Getting To
Know Your Instrument Panel” for further
information to continue using the car
normally.
TRAILER TOWING
Trailer Towing Weights (Maximum Trailer
Weight Ratings) — Non SRT
The following chart provides the maximum
trailer weight ratings towable for your given
drivetrain.
STARTING AND OPERATING
192
Page 238 of 378
SCHEDULED SERVICING
Scheduled Servicing — Non SRT
Correct servicing is crucial for guaranteeing a
long life for the car under the best conditions.
For this reason, Jeep has planned a series of
checks and services at fixed distance inter-
vals and, where provided, at fixed time inter-
vals, as described in the Scheduled Servicing
plan. To keep the car’s efficiency in tip-top
condition, in the following Scheduled Service
plan pages a few additional checks are listed
that should be carried out more frequently
with respect to the normal coupon redemp-
tion schedule. Scheduled Servicing is offered
by all authorized dealerships according to
fixed time or mileage intervals. If, during
each operation, in addition to the ones
scheduled, the need arises for further re-
placements or repairs, these may be carried
out with the owner's explicit agreement only.
The technicians at your dealership know your
vehicle best, and have access to factory
trained information, genuine Mopar parts,
and specially designed electronic and me-
chanical tools that can help prevent futurecostly repairs. If your car is used frequently
for towing, the interval between one sched-
uled servicing operation and the next should
be reduced. More frequent maintenance may
be needed for vehicles in severe operating
conditions, such as dusty areas and very
short trip driving.
NOTE:
Scheduled Servicing interventions are set out
by the Manufacturer. Failure to have them
carried out may invalidate the warranty. It is
advised to inform an authorized dealership of
any small operating irregularities without
waiting for the next service.
The oil change indicator system will remind
you that it is time to take your vehicle in for
scheduled maintenance.
In the instrument cluster an “Oil Change
Required” message will be displayed and a
single chime will sound, indicating that an oil
change is necessary.The oil change indicator message will illumi-
nate approximately 7,000 miles
(11,200 km) after the most recent oil change
was performed. Have your vehicle serviced as
soon as possible, within 500 miles (800 km).
NOTE:
• The oil change indicator message will not
monitor the time since the last oil change.
Change your vehicles oil if it has been
12 months since your last oil change even
if the oil change indicator message is NOT
illuminated.
• Change your engine oil more often if you
drive your vehicle off-road for an extended
period of time.
• Under no circumstances should oil change
intervals exceed 7,500 miles (12,000 km)
or 12 months, whichever comes first.
Your authorized dealer will reset the oil
change indicator message after completing
the scheduled oil change. If this scheduled
oil change is performed by someone other
than your authorized dealer the message can
SERVICING AND MAINTENANCE
236
Page 239 of 378
be reset by referring to the steps described
under ”Instrument Cluster Display” in “Get-
ting To Know Your Instrument Panel” for
further information.
At Each Stop for Fuel
• Check the engine oil level about 5 minutes
after a fully warmed engine is shut off.
Checking the oil level while the vehicle is
on level ground will improve the accuracy of
the oil level reading. Add oil only when the
level is at or below the ADD or MIN mark.
• Check the windshield washer solvent and
add if required.
Once a Month
• Check tire pressure and look for unusual
wear or damage. Rotate tires at the first
sign of irregular wear.
• Inspect the battery and clean and tighten
the terminals as required.
• Check the fluid levels of the coolant reser-
voir, and brake master cylinder; add fluid as
needed.
• Check all lights and other electrical items
for correct operation.At Each Oil Change
• Check tire pressure and look for unusual
wear or damage. Rotate tires at the first
sign of irregular wear, even if it occurs
before the oil indicator system turns on.
• Change the engine oil filter.
• Inspect the brake hoses and lines.
CAUTION!
Failure to perform the required mainte-
nance items may result in damage to the
vehicle.
Maintenance Plan — Gasoline Engine
NOTE:
Once you have carried out the last interven-
tion in the table, continue with the scheduled
servicing, maintaining the frequency indi-
cated in the plan by marking each operation
with a dot or dedicated note. Simply restart-
ing the maintenance from the start of the
plan may cause the allowed interval to be
exceeded for some operations.
237
Page 242 of 378
WARNING!
doubt about your ability to perform a
service job, take your vehicle to a com-
petent mechanic.
• Failure to properly inspect and maintain
your vehicle could result in a component
malfunction and effect vehicle handling
and performance. This could cause an
accident.
Severe Duty Conditions
**** Change the engine oil and engine oil
filter at every 4500 miles (7,500 km) or
12 months if using your vehicle under any of
the following severe duty conditions:
• Stop and go driving.
• Driving in dusty conditions.
• Short trips of less than 10 miles (16 km).
• Trailer towing.
• Taxi, police, or delivery service (commercial
service).
• Off-road or desert operation.
Scheduled Servicing — SRT
Correct servicing is crucial for guaranteeing a
long life for the car under the best conditions.
For this reason, Jeep has planned a series of
checks and services at fixed distance inter-
vals and, where provided, at fixed time inter-
vals, as described in the Scheduled Servicing
plan. To keep the car’s efficiency in tip-top
condition, in the following Scheduled Service
plan pages a few additional checks are listed
that should be carried out more frequently
with respect to the normal coupon redemp-
tion schedule. Scheduled Servicing is offered
by all authorized dealerships according to
fixed time or mileage intervals. If, during
each operation, in addition to the ones
scheduled, the need arises for further re-
placements or repairs, these may be carried
out with the owner's explicit agreement only.
The technicians at your dealership know your
vehicle best, and have access to factory
trained information, genuine Mopar parts,
and specially designed electronic and me-
chanical tools that can help prevent future
costly repairs. If your car is used frequently
for towing, the interval between one sched-uled servicing operation and the next should
be reduced. More frequent maintenance may
be needed for vehicles in severe operating
conditions, such as dusty areas and very
short trip driving.
NOTE:
Scheduled Servicing interventions are set out
by the Manufacturer. Failure to have them
carried out may invalidate the warranty. It is
advised to inform an authorized dealership of
any small operating irregularities without
waiting for the next service.
The oil change indicator system will remind
you that it is time to take your vehicle in for
scheduled maintenance.
The Instrument Cluster Display will display
an “Oil Change Required” message and a
single chime will sound, indicating that an oil
change is necessary.
Based on engine operation conditions, the oil
change indicator message will illuminate.
This means that service is required for your
vehicle. Have your vehicle serviced as soon as
possible, within the next 500 miles
(805 km).
SERVICING AND MAINTENANCE
240
Page 243 of 378
NOTE:
• The oil change indicator message will not
monitor the time since the last oil change.
Change your vehicle's oil if it has been six
months since your last oil change, even if
the oil change indicator message is NOT
illuminated.
• Change your engine oil more often if you
drive your vehicle off-road for an extended
period of time.
• Under no circumstances should oil change
intervals exceed 6,000 miles (10,000 km)
or six months, whichever comes first.
Your authorized dealer will reset the oil
change indicator message after completing
the scheduled oil change. If a scheduled oil
change is performed by someone other than
your authorized dealer, the message can be
reset by referring to the steps described un-
der “Instrument Cluster Display” in “Getting
To Know Your Instrument Panel” in this
guide.At Each Stop For Fuel
• Check the engine oil level. Refer to “Engine
Compartment” in this section for further
information.
• Check the windshield washer solvent and
add if required.
Once A Month
• Check tire pressure and look for unusual
wear or damage. Rotate tires at the first
sign of irregular wear
• Inspect the battery, and clean and tighten
the terminals as required.
• Check the fluid levels of the coolant reser-
voir, engine oil, brake master cylinder, and
add as needed.
• Check all lights and other electrical items
for correct operation.At Each Oil Change
• Check tire pressure and look for unusual
wear or damage. Rotate tires at the first
sign of irregular wear, even if it occurs
before the oil indicator system turns on.
• Change the engine oil filter.
• Inspect the brake hoses and lines.
CAUTION!
Failure to perform the required mainte-
nance items may result in damage to the
vehicle.
Maintenance Plan — SRT
NOTE:
Once you have carried out the last interven-
tion in the table, continue with the scheduled
servicing, maintaining the frequency indi-
cated in the plan by marking each operation
with a dot or dedicated note. Simply restart-
ing the maintenance from the start of the
plan may cause the allowed interval to be
exceeded for some operations.
241
Page 246 of 378
WARNING!
• You can be badly injured working on or
around a motor vehicle. Do only service
work for which you have the knowledge
and the right equipment. If you have any
doubt about your ability to perform a
service job, take your vehicle to a com-
petent mechanic.
• Failure to properly inspect and maintain
your vehicle could result in a component
malfunction and effect vehicle handling
and performance. This could cause an
accident.
Severe Duty Conditions
(****) Change the engine oil and engine oil
filter at every 3,000 miles (5 000 km) or
3 months if using your vehicle under any of
the following severe duty conditions:
• Stop and go driving.
• Driving in dusty conditions.
• Short trips of less than 10 miles (16 km).
• Trailer towing.• Taxi, police, or delivery service (commercial
service).
• Off-road or desert operation.
Scheduled Servicing — Diesel Engine
Your vehicle is equipped with an automatic
oil change indicator system. The oil change
indicator system will remind you that it is
time to take your vehicle in for scheduled
servicing.
Based on engine operation conditions, the oil
change indicator message will illuminate.
This means that service is required for your
vehicle. Operating conditions such as fre-
quent short-trips, trailer tow, extremely hot or
cold ambient temperatures will influence
when the “Oil Change Required” message is
displayed.
Your authorized dealer will reset the oil
change indicator message after completing
the scheduled oil change. If a scheduled oil
change is performed by someone other than
your authorized dealer, the message can bereset by referring to the steps described un-
der “Instrument Cluster Display” in “Getting
To Know Your Instrument Panel” for further
information.
Engine Oil Filter Replacement
Residual oil in the housing may spill from the
housing when the new filter is installed if the
residual oil is not either removed from the
housing or enough time has not elapsed to
allow the oil to drain back into the engine.
When servicing the oil filter on this engine,
carefully remove the filter and use a suction
gun to remove any residual oil left in the
housing or wait about 30 minutes for the oil
to drain back into the engine.
To help you have the best driving experience
possible, the manufacturer has identified the
specific vehicle maintenance service inter-
vals that are required to keep your vehicle
operating properly and safely.
The manufacturer recommends that these
maintenance intervals be performed at your
selling dealer. The technicians at your deal-
ership know your vehicle best, and have ac-
cess to factory trained information, genuine
Mopar parts, and specially designed elec-
SERVICING AND MAINTENANCE
244
Page 256 of 378
Checking the oil while the vehicle is on level
ground will improve the accuracy of the oil
level readings. Add oil only when the level on
the dipstick is below the “MIN” mark. The
total capacity from the MIN mark to the MAX
mark is 1 qt (1 L).
CAUTION!
Overfilling or underfilling the crankcase
will cause oil aeration or loss of oil pres-
sure. This could damage your engine.
NOTE:
It is possible for your oil level to be slightly
higher than a previous check. This would be
due to diesel fuel that may temporarily be in
the crankcase due to operation of the diesel
particulate filter regeneration strategy. This
fuel will evaporate out under normal opera-
tion.
Never operate the engine with oil level below
the “MIN” mark or above the upper “MAX”
mark.
WARNING!
• Never smoke while working in the engine
compartment: gas and inflammable va-
pors may be present, with the risk of fire.
• Be very careful when working in the
engine compartment when the engine is
hot: you may get burned. Do not get too
close to the radiator cooling fan: the
electric fan may start; danger of injury.
Scarves, ties and other loose clothing
might be pulled by moving parts.
CAUTION!
• Be careful not to confuse the various
types of fluids while topping up: they are
not compatible with each other! Topping
up with an unsuitable fluid could se-
verely damage your car.
• The oil level must never exceed the MAX
mark.
• Always top up using engine oil of the
same specifications as that already in
the engine.
CAUTION!
• If the engine oil is being topped up, wait
for the engine to cool down before loos-
ening the filler cap, particularly for ve-
hicles with aluminium cap (if
equipped). WARNING: risk of burns!
• Overfilling or underfilling the crankcase
will cause aeration or loss of oil pres-
sure. This could damage your engine.
Adding Washer Fluid
The instrument cluster display will indicate
when the washer fluid level is low. When the
sensor detects a low fluid level, the wind-
shield will light on the vehicle graphic outline
and the “WASHER FLUID LOW” message
will be displayed.
The fluid reservoir for the windshield washers
and the rear window washer is shared. The
fluid reservoir is located in the engine com-
partment, be sure to check the fluid level at
regular intervals. Fill the reservoir with wind-
shield washer solvent only (not radiator anti-
freeze). When refilling the washer fluid reser-
voir, take some washer fluid and apply it to a
cloth or towel and wipe clean the wiper
SERVICING AND MAINTENANCE
254
Page 275 of 378
These effects can be reduced by timely rota-
tion of tires. The benefits of rotation are
especially worthwhile with aggressive tread
designs such as those on On/Off-Road type
tires. Rotation will increase tread life, help to
maintain mud, snow, and wet traction levels,
and contribute to a smooth, quiet ride.
Refer to the “Maintenance Plan” for the
proper maintenance intervals. More frequent
rotation is permissible if desired. The reasons
for any rapid or unusual wear should be
corrected prior to rotation being performed.
NOTE:
The premium Tire Pressure Monitor System
will automatically locate the pressure values
displayed in the correct vehicle position fol-
lowing a tire rotation.
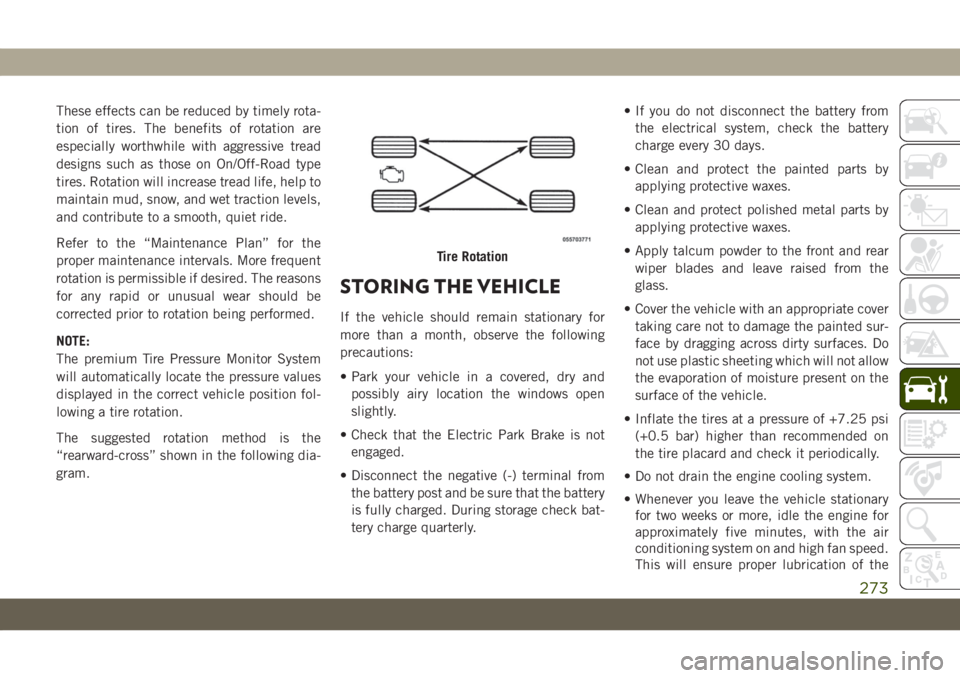
The suggested rotation method is the
“rearward-cross” shown in the following dia-
gram.
STORING THE VEHICLE
If the vehicle should remain stationary for
more than a month, observe the following
precautions:
• Park your vehicle in a covered, dry and
possibly airy location the windows open
slightly.
• Check that the Electric Park Brake is not
engaged.
• Disconnect the negative (-) terminal from
the battery post and be sure that the battery
is fully charged. During storage check bat-
tery charge quarterly.• If you do not disconnect the battery from
the electrical system, check the battery
charge every 30 days.
• Clean and protect the painted parts by
applying protective waxes.
• Clean and protect polished metal parts by
applying protective waxes.
• Apply talcum powder to the front and rear
wiper blades and leave raised from the
glass.
• Cover the vehicle with an appropriate cover
taking care not to damage the painted sur-
face by dragging across dirty surfaces. Do
not use plastic sheeting which will not allow
the evaporation of moisture present on the
surface of the vehicle.
• Inflate the tires at a pressure of +7.25 psi
(+0.5 bar) higher than recommended on
the tire placard and check it periodically.
• Do not drain the engine cooling system.
• Whenever you leave the vehicle stationary
for two weeks or more, idle the engine for
approximately five minutes, with the air
conditioning system on and high fan speed.
This will ensure proper lubrication of the
Tire Rotation
273
Page 303 of 378
UCONNECT 4 WITH 7-INCH
DISPLAY
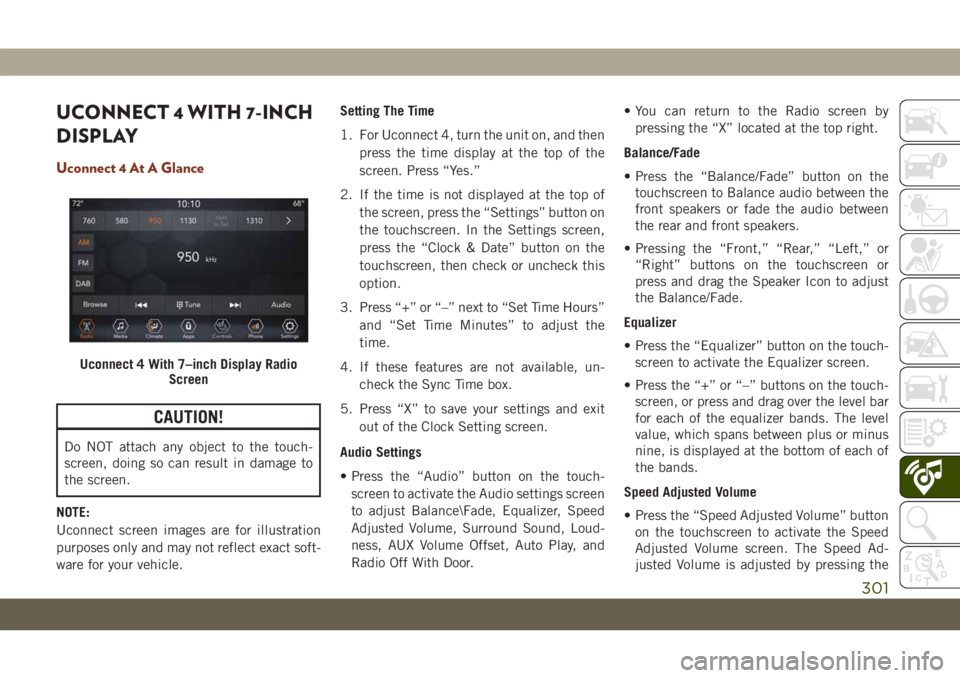
Uconnect 4 At A Glance
CAUTION!
Do NOT attach any object to the touch-
screen, doing so can result in damage to
the screen.
NOTE:
Uconnect screen images are for illustration
purposes only and may not reflect exact soft-
ware for your vehicle.Setting The Time
1. For Uconnect 4, turn the unit on, and then
press the time display at the top of the
screen. Press “Yes.”
2. If the time is not displayed at the top of
the screen, press the “Settings” button on
the touchscreen. In the Settings screen,
press the “Clock & Date” button on the
touchscreen, then check or uncheck this
option.
3. Press “+” or “–” next to “Set Time Hours”
and “Set Time Minutes” to adjust the
time.
4. If these features are not available, un-
check the Sync Time box.
5. Press “X” to save your settings and exit
out of the Clock Setting screen.
Audio Settings
• Press the “Audio” button on the touch-
screen to activate the Audio settings screen
to adjust Balance\Fade, Equalizer, Speed
Adjusted Volume, Surround Sound, Loud-
ness, AUX Volume Offset, Auto Play, and
Radio Off With Door.• You can return to the Radio screen by
pressing the “X” located at the top right.
Balance/Fade
• Press the “Balance/Fade” button on the
touchscreen to Balance audio between the
front speakers or fade the audio between
the rear and front speakers.
• Pressing the “Front,” “Rear,” “Left,” or
“Right” buttons on the touchscreen or
press and drag the Speaker Icon to adjust
the Balance/Fade.
Equalizer
• Press the “Equalizer” button on the touch-
screen to activate the Equalizer screen.
• Press the “+” or “–” buttons on the touch-
screen, or press and drag over the level bar
for each of the equalizer bands. The level
value, which spans between plus or minus
nine, is displayed at the bottom of each of
the bands.
Speed Adjusted Volume
• Press the “Speed Adjusted Volume” button
on the touchscreen to activate the Speed
Adjusted Volume screen. The Speed Ad-
justed Volume is adjusted by pressing the
Uconnect 4 With 7–inch Display Radio
Screen
301