warning light JEEP GRAND CHEROKEE 2020 Owner handbook (in English)
[x] Cancel search | Manufacturer: JEEP, Model Year: 2020, Model line: GRAND CHEROKEE, Model: JEEP GRAND CHEROKEE 2020Pages: 378, PDF Size: 6.88 MB
Page 191 of 378
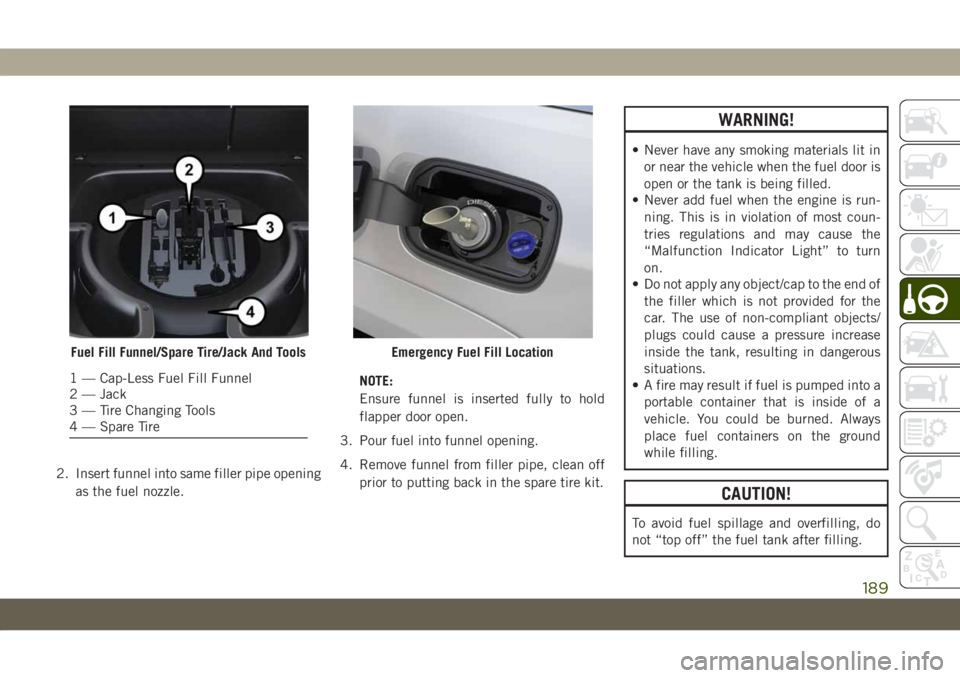
2. Insert funnel into same filler pipe opening
as the fuel nozzle.NOTE:
Ensure funnel is inserted fully to hold
flapper door open.
3. Pour fuel into funnel opening.
4. Remove funnel from filler pipe, clean off
prior to putting back in the spare tire kit.
WARNING!
• Never have any smoking materials lit in
or near the vehicle when the fuel door is
open or the tank is being filled.
• Never add fuel when the engine is run-
ning. This is in violation of most coun-
tries regulations and may cause the
“Malfunction Indicator Light” to turn
on.
• Do not apply any object/cap to the end of
the filler which is not provided for the
car. The use of non-compliant objects/
plugs could cause a pressure increase
inside the tank, resulting in dangerous
situations.
• A fire may result if fuel is pumped into a
portable container that is inside of a
vehicle. You could be burned. Always
place fuel containers on the ground
while filling.
CAUTION!
To avoid fuel spillage and overfilling, do
not “top off” the fuel tank after filling.
Fuel Fill Funnel/Spare Tire/Jack And Tools
1 — Cap-Less Fuel Fill Funnel
2 — Jack
3 — Tire Changing Tools
4 — Spare Tire
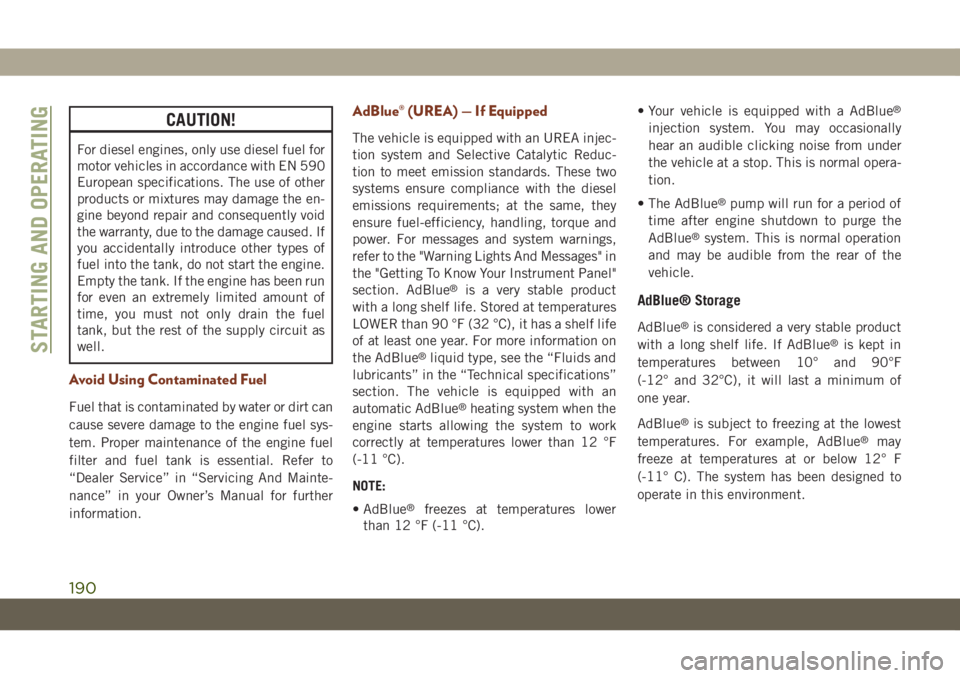
Emergency Fuel Fill Location
189
Page 192 of 378
CAUTION!
For diesel engines, only use diesel fuel for
motor vehicles in accordance with EN 590
European specifications. The use of other
products or mixtures may damage the en-
gine beyond repair and consequently void
the warranty, due to the damage caused. If
you accidentally introduce other types of
fuel into the tank, do not start the engine.
Empty the tank. If the engine has been run
for even an extremely limited amount of
time, you must not only drain the fuel
tank, but the rest of the supply circuit as
well.
Avoid Using Contaminated Fuel
Fuel that is contaminated by water or dirt can
cause severe damage to the engine fuel sys-
tem. Proper maintenance of the engine fuel
filter and fuel tank is essential. Refer to
“Dealer Service” in “Servicing And Mainte-
nance” in your Owner’s Manual for further
information.
AdBlue® (UREA) — If Equipped
The vehicle is equipped with an UREA injec-
tion system and Selective Catalytic Reduc-
tion to meet emission standards. These two
systems ensure compliance with the diesel
emissions requirements; at the same, they
ensure fuel-efficiency, handling, torque and
power. For messages and system warnings,
refer to the "Warning Lights And Messages" in
the "Getting To Know Your Instrument Panel"
section. AdBlue
®is a very stable product
with a long shelf life. Stored at temperatures
LOWER than 90 °F (32 °C), it has a shelf life
of at least one year. For more information on
the AdBlue
®liquid type, see the “Fluids and
lubricants” in the “Technical specifications”
section. The vehicle is equipped with an
automatic AdBlue
®heating system when the
engine starts allowing the system to work
correctly at temperatures lower than 12 °F
(-11 °C).
NOTE:
• AdBlue
®freezes at temperatures lower
than 12 °F (-11 °C).• Your vehicle is equipped with a AdBlue
®
injection system. You may occasionally
hear an audible clicking noise from under
the vehicle at a stop. This is normal opera-
tion.
• The AdBlue
®pump will run for a period of
time after engine shutdown to purge the
AdBlue
®system. This is normal operation
and may be audible from the rear of the
vehicle.
AdBlue® Storage
AdBlue®is considered a very stable product
with a long shelf life. If AdBlue®is kept in
temperatures between 10° and 90°F
(-12° and 32°C), it will last a minimum of
one year.
AdBlue
®is subject to freezing at the lowest
temperatures. For example, AdBlue®may
freeze at temperatures at or below 12° F
(-11° C). The system has been designed to
operate in this environment.
STARTING AND OPERATING
190
Page 193 of 378
NOTE:
When working with AdBlue®, it is important
to know that:
• Any containers or parts that come into con-
tact with AdBlue
®must be AdBlue®com-
patible (plastic or stainless steel). Copper,
brass, aluminum, iron or non-stainless
steel should be avoided as they are subject
to corrosion by AdBlue
®.
• If AdBlue
®is spilled, it should be wiped up
completely.
Adding AdBlue®
Preliminary Conditions
AdBlue
®freezes at temperatures lower than
12° F (-11° C). If the car stands for a long
time at this temperature refilling could be
difficult. For this reason, it is advised to park
the vehicle in a garage and/or heated environ-
ment and wait for the urea to return to liquid
state before topping up.Proceed as follows:
• Park the car on flat ground and stop the
engine by cycling the ignition to the OFF
position.
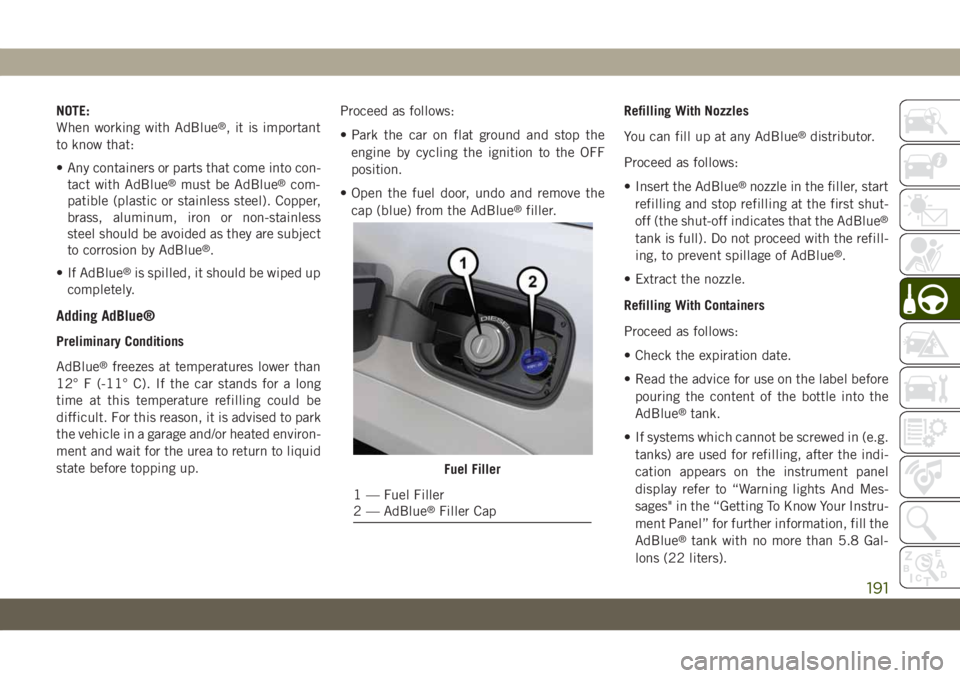
• Open the fuel door, undo and remove the
cap (blue) from the AdBlue
®filler.Refilling With Nozzles
You can fill up at any AdBlue
®distributor.
Proceed as follows:
• Insert the AdBlue
®nozzle in the filler, start
refilling and stop refilling at the first shut-
off (the shut-off indicates that the AdBlue
®
tank is full). Do not proceed with the refill-
ing, to prevent spillage of AdBlue®.
• Extract the nozzle.
Refilling With Containers
Proceed as follows:
• Check the expiration date.
• Read the advice for use on the label before
pouring the content of the bottle into the
AdBlue
®tank.
• If systems which cannot be screwed in (e.g.
tanks) are used for refilling, after the indi-
cation appears on the instrument panel
display refer to “Warning lights And Mes-
sages" in the “Getting To Know Your Instru-
ment Panel” for further information, fill the
AdBlue
®tank with no more than 5.8 Gal-
lons (22 liters).
Fuel Filler
1 — Fuel Filler
2 — AdBlue®Filler Cap
191
Page 194 of 378
• If containers which can be screwed to the
filler are used, the reservoir is full when the
AdBlue
®level in the container stops pour-
ing out. Do not proceed further.
CAUTION!
To avoid fuel spillage and overfilling, do
not “top off” the fuel tank after filling.
Operations After Refilling
Proceed as follows:
• Fit the cap back on the AdBlue
®filler by
turning it clockwise and screwing it com-
pletely.
• Cycle the ignition to RUN (it is not neces-
sary to start the engine).
• Wait for the indication on the instrument
panel to switch off before moving the car.
The indication may stay on for a few sec-
onds to approximately half a minute. If the
engine is started and the car is moved, the
indication will remain on for longer. This
will not compromise engine operation.• If the AdBlue
®was topped up when the
tank was empty, wait for 2 minutes before
starting the engine.
NOTE:
• If AdBlue
®is spilled out of the filler neck,
clean up well the area and proceed to filling
up again. If the liquid crystallizes, elimi-
nate it with a sponge and warm water.
• DO NOT EXCEED THE MAXIMUM LEVEL:
this could cause damage to the reservoir.
AdBlue
®freezes at under 12° F (-11° C).
Although the system is designed to operate
below the freezing point of the AdBlue
®,it
is advisable not to fill the tank beyond the
maximum level because if the AdBlue
®
freezes the system can be damaged. Follow
the instructions in this section.
• If the AdBlue
®is spilled on painted sur-
faces or aluminium, immediately clean the
area with water and use absorbent material
to collect the fluid that has been spilled on
the ground.
• Do not try to start the engine if AdBlue
®
was accidentally added to the diesel fuel
tank, this can result in serious engine dam-
age, contact an authorized dealer.• Do not add additives or other fluids to
AdBlue
®, doing so could damage the
system.
• The use of non-conforming or degraded
AdBlue
®may lead to indications appearing
on the instrument panel display refer to
“Warning Lights And Messages" in the
“Getting To Know Your Instrument Panel”
for further information.
• Never pour AdBlue
®into another con-
tainer: it could be contaminated.
• If the AdBlue
®runs out, see refer to “Warn-
ing Lights And Messages" in the “Getting To
Know Your Instrument Panel” for further
information to continue using the car
normally.
TRAILER TOWING
Trailer Towing Weights (Maximum Trailer
Weight Ratings) — Non SRT
The following chart provides the maximum
trailer weight ratings towable for your given
drivetrain.
STARTING AND OPERATING
192
Page 219 of 378
JACKING AND TIRE
CHANGING
WARNING!
• Do not attempt to change a tire on the
side of the vehicle close to moving traf-
fic. Pull far enough off the road to avoid
the danger of being hit when operating
the jack or changing the wheel.
• Being under a jacked-up vehicle is dan-
gerous. The vehicle could slip off the
jack and fall on you. You could be
crushed. Never put any part of your body
under a vehicle that is on a jack. If you
need to get under a raised vehicle, take
it to a service center where it can be
raised on a lift.
• Never start or run the engine while the
vehicle is on a jack.
• The jack is designed to be used as a tool
for changing tires only. The jack should
not be used to lift the vehicle for service
purposes. The vehicle should be jacked
on a firm level surface only. Avoid ice or
slippery areas.
Run Flat Tires — SRT Models
SRT models are equipped with “run flat”
tires. Run flat tires allow the vehicle to be
driven approximately 50 miles (80 km) at
55 mph (88 km/h). Tire service should be
obtained to avoid prolonged run flat feature
usage.
WARNING!
Do not exceed 50 mph (80 km/h) if the
“Tire Pressure Monitoring Telltale Light” is
illuminated. Vehicle handling and braking
may be reduced. You could have a collision
and be severely or fatally injured.
Jack Location
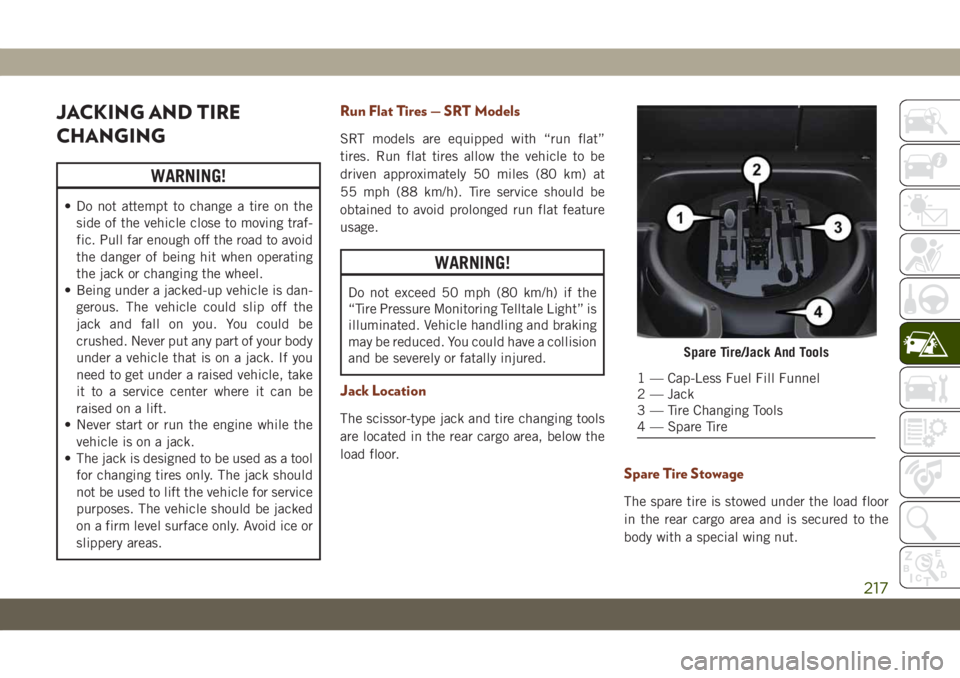
The scissor-type jack and tire changing tools
are located in the rear cargo area, below the
load floor.
Spare Tire Stowage
The spare tire is stowed under the load floor
in the rear cargo area and is secured to the
body with a special wing nut.
Spare Tire/Jack And Tools
1 — Cap-Less Fuel Fill Funnel
2 — Jack
3 — Tire Changing Tools
4 — Spare Tire
217
Page 223 of 378
WARNING!
Raising the vehicle higher than necessary
can make the vehicle less stable. It could
slip off the jack and hurt someone near it.
Raise the vehicle only enough to remove
the tire.
7. Remove the lug nuts and wheel.
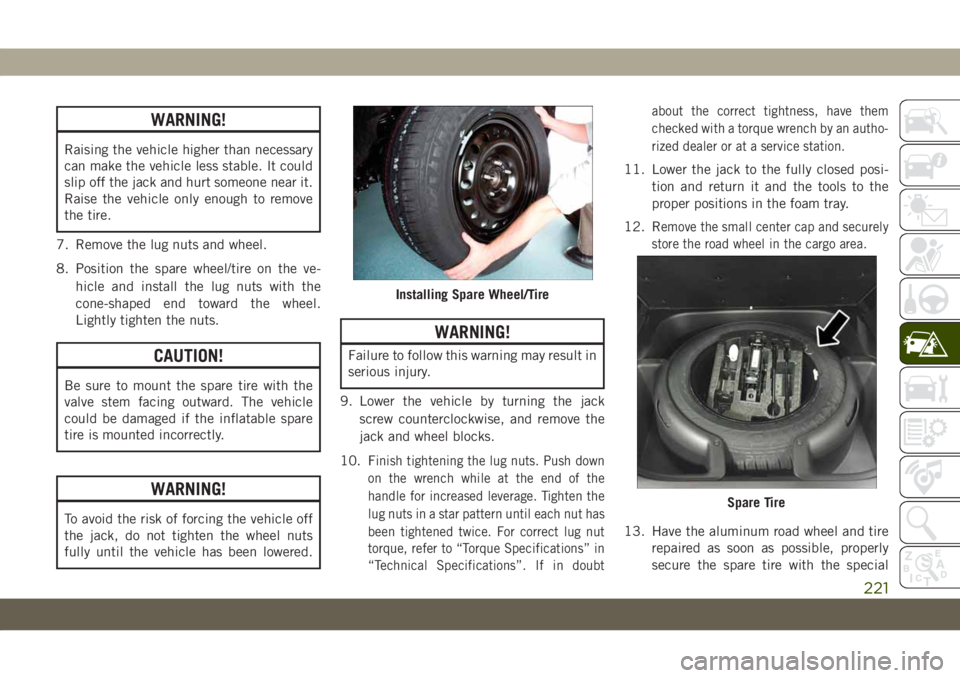
8. Position the spare wheel/tire on the ve-
hicle and install the lug nuts with the
cone-shaped end toward the wheel.
Lightly tighten the nuts.
CAUTION!
Be sure to mount the spare tire with the
valve stem facing outward. The vehicle
could be damaged if the inflatable spare
tire is mounted incorrectly.
WARNING!
To avoid the risk of forcing the vehicle off
the jack, do not tighten the wheel nuts
fully until the vehicle has been lowered.
WARNING!
Failure to follow this warning may result in
serious injury.
9. Lower the vehicle by turning the jack
screw counterclockwise, and remove the
jack and wheel blocks.
10. F
inish tightening the lug nuts. Push down
on the wrench while at the end of the
handle for increased leverage. Tighten the
lug nuts in a star pattern until each nut has
been tightened twice. For correct lug nut
torque, refer to “Torque Specifications” in
“Technical Specifications”. If in doubtabout the correct tightness, have them
checked with a torque wrench by an autho-
rized dealer or at a service station.
11. Lower the jack to the fully closed posi-
tion and return it and the tools to the
proper positions in the foam tray.
12. R
emove the small center cap and securely
store the road wheel in the cargo area.
13. Have the aluminum road wheel and tire
repaired as soon as possible, properly
secure the spare tire with the special
Installing Spare Wheel/Tire
Spare Tire
221
Page 224 of 378
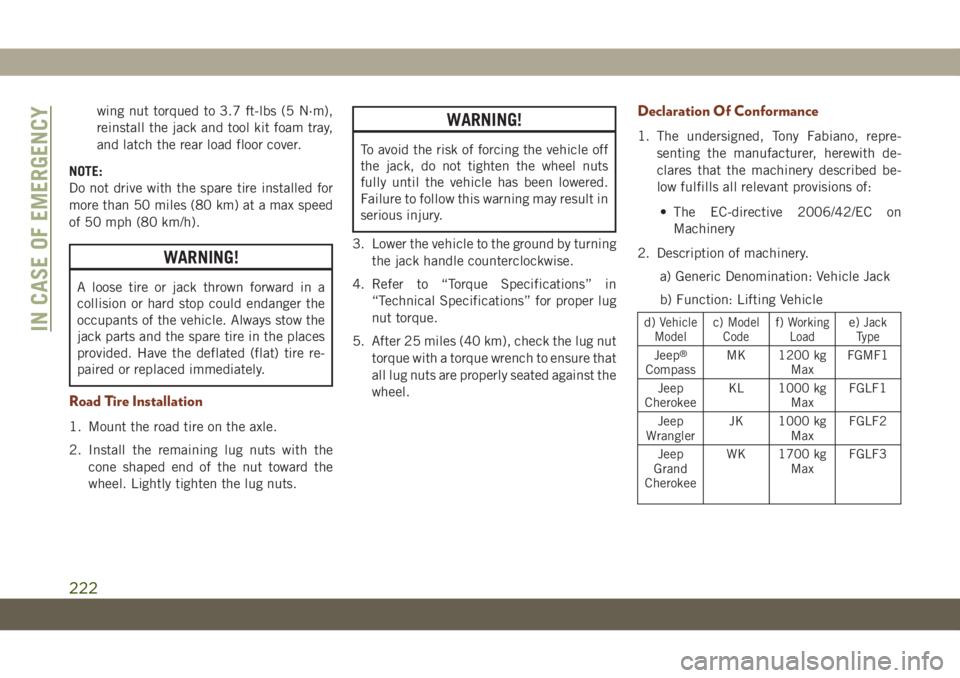
wing nut torqued to 3.7 ft-lbs (5 N·m),
reinstall the jack and tool kit foam tray,
and latch the rear load floor cover.
NOTE:
Do not drive with the spare tire installed for
more than 50 miles (80 km) at a max speed
of 50 mph (80 km/h).
WARNING!
A loose tire or jack thrown forward in a
collision or hard stop could endanger the
occupants of the vehicle. Always stow the
jack parts and the spare tire in the places
provided. Have the deflated (flat) tire re-
paired or replaced immediately.
Road Tire Installation
1. Mount the road tire on the axle.
2. Install the remaining lug nuts with the
cone shaped end of the nut toward the
wheel. Lightly tighten the lug nuts.
WARNING!
To avoid the risk of forcing the vehicle off
the jack, do not tighten the wheel nuts
fully until the vehicle has been lowered.
Failure to follow this warning may result in
serious injury.
3. Lower the vehicle to the ground by turning
the jack handle counterclockwise.
4. Refer to “Torque Specifications” in
“Technical Specifications” for proper lug
nut torque.
5. After 25 miles (40 km), check the lug nut
torque with a torque wrench to ensure that
all lug nuts are properly seated against the
wheel.
Declaration Of Conformance
1. The undersigned, Tony Fabiano, repre-
senting the manufacturer, herewith de-
clares that the machinery described be-
low fulfills all relevant provisions of:
• The EC-directive 2006/42/EC on
Machinery
2. Description of machinery.
a) Generic Denomination: Vehicle Jack
b) Function: Lifting Vehicle
d)Vehicle
Modelc)Model
Codef)Working
Loade)Jack
Type
Jeep®
CompassMK 1200 kg
MaxFGMF1
Jeep
CherokeeKL 1000 kg
MaxFGLF1
Jeep
WranglerJK 1000 kg
MaxFGLF2
Jeep
Grand
CherokeeWK 1700 kg
MaxFGLF3
IN CASE OF EMERGENCY
222
Page 249 of 378
Miles or time passed (whichever comes first):12,500
25,000
37,500
50,000
62,500
75,000
87,500
100,000
112,500
125,000
137,500
150,000
Or Months: 12 24 36 48 60 72 84 96 108 120 132 144
Kilometers:
20,000
40,000
60,000
80,000
100,000
120,000
140,000
160,000
180,000
200,000
220,000
240,000
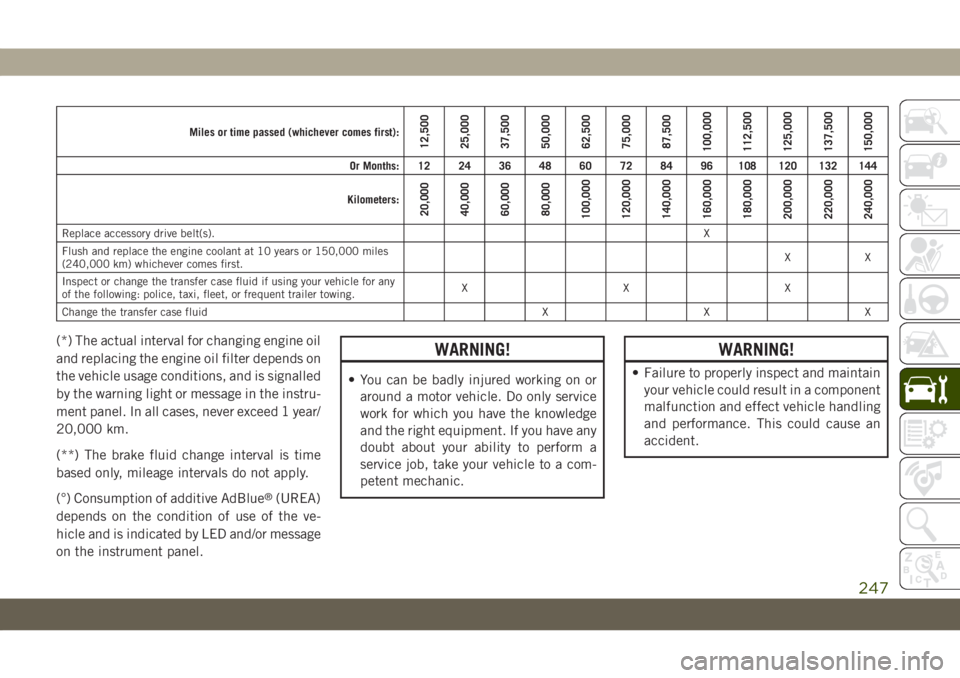
Replace accessory drive belt(s).X
Flush and replace the engine coolant at 10 years or 150,000 miles
(240,000 km) whichever comes first.XX
Inspect or change the transfer case fluid if using your vehicle for any
of the following: police, taxi, fleet, or frequent trailer towing.XXX
Change the transfer case fluid X X X
(*) The actual interval for changing engine oil
and replacing the engine oil filter depends on
the vehicle usage conditions, and is signalled
by the warning light or message in the instru-
ment panel. In all cases, never exceed 1 year/
20,000 km.
(**) The brake fluid change interval is time
based only, mileage intervals do not apply.
(°) Consumption of additive AdBlue
®(UREA)
depends on the condition of use of the ve-
hicle and is indicated by LED and/or message
on the instrument panel.
WARNING!
• You can be badly injured working on or
around a motor vehicle. Do only service
work for which you have the knowledge
and the right equipment. If you have any
doubt about your ability to perform a
service job, take your vehicle to a com-
petent mechanic.
WARNING!
• Failure to properly inspect and maintain
your vehicle could result in a component
malfunction and effect vehicle handling
and performance. This could cause an
accident.
247
Page 256 of 378
Checking the oil while the vehicle is on level
ground will improve the accuracy of the oil
level readings. Add oil only when the level on
the dipstick is below the “MIN” mark. The
total capacity from the MIN mark to the MAX
mark is 1 qt (1 L).
CAUTION!
Overfilling or underfilling the crankcase
will cause oil aeration or loss of oil pres-
sure. This could damage your engine.
NOTE:
It is possible for your oil level to be slightly
higher than a previous check. This would be
due to diesel fuel that may temporarily be in
the crankcase due to operation of the diesel
particulate filter regeneration strategy. This
fuel will evaporate out under normal opera-
tion.
Never operate the engine with oil level below
the “MIN” mark or above the upper “MAX”
mark.
WARNING!
• Never smoke while working in the engine
compartment: gas and inflammable va-
pors may be present, with the risk of fire.
• Be very careful when working in the
engine compartment when the engine is
hot: you may get burned. Do not get too
close to the radiator cooling fan: the
electric fan may start; danger of injury.
Scarves, ties and other loose clothing
might be pulled by moving parts.
CAUTION!
• Be careful not to confuse the various
types of fluids while topping up: they are
not compatible with each other! Topping
up with an unsuitable fluid could se-
verely damage your car.
• The oil level must never exceed the MAX
mark.
• Always top up using engine oil of the
same specifications as that already in
the engine.
CAUTION!
• If the engine oil is being topped up, wait
for the engine to cool down before loos-
ening the filler cap, particularly for ve-
hicles with aluminium cap (if
equipped). WARNING: risk of burns!
• Overfilling or underfilling the crankcase
will cause aeration or loss of oil pres-
sure. This could damage your engine.
Adding Washer Fluid
The instrument cluster display will indicate
when the washer fluid level is low. When the
sensor detects a low fluid level, the wind-
shield will light on the vehicle graphic outline
and the “WASHER FLUID LOW” message
will be displayed.
The fluid reservoir for the windshield washers
and the rear window washer is shared. The
fluid reservoir is located in the engine com-
partment, be sure to check the fluid level at
regular intervals. Fill the reservoir with wind-
shield washer solvent only (not radiator anti-
freeze). When refilling the washer fluid reser-
voir, take some washer fluid and apply it to a
cloth or towel and wipe clean the wiper
SERVICING AND MAINTENANCE
254
Page 257 of 378
blades, this will help blade performance. To
prevent freeze-up of your windshield washer
system in cold weather, select a solution or
mixture that meets or exceeds the tempera-
ture range of your climate. This rating infor-
mation can be found on most washer fluid
containers.
WARNING!
Commercially available windshield washer
solvents are flammable. They could ignite
and burn you. Care must be exercised
when filling or working around the washer
solution.
CAUTION!
Do not travel with the windshield washer
fluid reservoir empty: the windshield
washer is essential for improving visibility.
Brake System
In order to assure brake system performance,
all brake system components should be in-
spected periodically. Refer to the “Mainte-
nance Plan” in this section for the proper
maintenance intervals.
WARNING!
Riding the brakes can lead to brake failure
and possibly a collision. Driving with your
foot resting or riding on the brake pedal
can result in abnormally high brake tem-
peratures, excessive lining wear, and pos-
sible brake damage. You would not have
your full braking capacity in an emergency.
Fluid Level Check — Brake Master Cylinder
The fluid level of the master cylinder should
be checked whenever the vehicle is serviced,
or immediately if the brake system warning
light is on. If necessary, add fluid to bring
level within the designated marks on the side
of the reservoir of the brake master cylinder.
Be sure to clean the top of the master cylin-
der area before removing cap. With disc
brakes, fluid level can be expected to fall asthe brake pads wear. Brake fluid level should
be checked when pads are replaced. If the
brake fluid is abnormally low, check the sys-
tem for leaks.
Refer to “Fluids And Lubricants” in “Techni-
cal Specifications” for further information.
WARNING!
• Use only manufacturer's recommended
brake fluid. Refer to “Fluids And Lubri-
cants” in “Technical Specifications” for
further information. Using the wrong
type of brake fluid can severely damage
your brake system and/or impair its per-
formance. The proper type of brake fluid
for your vehicle is also identified on the
original factory installed hydraulic mas-
ter cylinder reservoir.
• To avoid contamination from foreign
matter or moisture, use only new brake
fluid or fluid that has been in a tightly
closed container. Keep the master cylin-
der reservoir cap secured at all times.
Brake fluid in a open container absorbs
moisture from the air resulting in a lower
255