audio JEEP GRAND CHEROKEE 2021 Owner handbook (in English)
[x] Cancel search | Manufacturer: JEEP, Model Year: 2021, Model line: GRAND CHEROKEE, Model: JEEP GRAND CHEROKEE 2021Pages: 378, PDF Size: 6.88 MB
Page 12 of 378
TIPS CONTROLS AND GENERAL INFORMATION . . . 320Steering Wheel Audio Controls......... 320
Reception Conditions.............. 321
Care And Maintenance............. 321
Anti-Theft Protection.............. 321
IPOD/USB/MEDIA PLAYER CONTROL......... 321Audio Jack (AUX)................ 322
USB Port..................... 322
Bluetooth Streaming Audio........... 322
UCONNECT REAR SEAT ENTERTAINMENT (RSE) SYSTEM
— IF EQUIPPED.................... 322
Getting Started................. 322
Dual Video Screen................ 324
Blu-ray Disc Player................ 324
Play Video Games................ 327
NAVIGATION — IF EQUIPPED............. 328Changing The Navigation Voice Prompt
Volume....................... 328
Finding Points Of Interest........... 330
Finding A Place By Spelling The Name . . . 330
One-Step Voice Destination Entry....... 330
Setting Your Home Location.......... 330
Home........................ 330
Adding A Stop.................. 332
Taking A Detour................. 332
Map Update.................... 332
UCONNECT PHONE................... 333Uconnect Phone (Bluetooth Hands Free
Calling)...................... 333
Pairing (Wirelessly Connecting) Your Mobile
Phone To The Uconnect System........ 335
Common Phone Commands (Examples) . . . 338
Mute (Or Unmute) Microphone During Call . 338
Transfer Ongoing Call Between Handset And
Vehicle...................... 338Phonebook.................... 338
Voice Command Tips.............. 339
Changing The Volume.............. 339
Using Do Not Disturb.............. 339
Incoming Text Messages............ 339
Helpful Tips And Common Questions To
Improve Bluetooth Performance With Your
Uconnect System................ 341
UCONNECT VOICE RECOGNITION QUICK TIPS.... 341Introducing Uconnect.............. 341
Get Started.................... 342
Basic Voice Commands............. 343
Radio........................ 343
Media....................... 343
Phone....................... 344
Voice Text Reply — If Equipped........ 345
Climate...................... 346
Navigation (4C NAV) — If Equipped..... 346
Siri Eyes Free — If Equipped......... 347
Do Not Disturb.................. 347
Android Auto — If Equipped.......... 348
Apple CarPlay — If Equipped......... 348
Additional Information............. 349
CUSTOMER ASSISTANCE
IF YOU NEED ASSISTANCE.............. 350ARGENTINA................... 351
AUSTRALIA.................... 351
AUSTRIA..................... 351
BALANCE OF THE CARIBBEAN........ 351
BELGIUM..................... 352
BOLIVIA...................... 352
BRAZIL...................... 352
BULGARIA.................... 352
CHILE....................... 352
CHINA....................... 353COLOMBIA.................... 353
COSTA RICA................... 353
CROATIA...................... 353
CZECH REPUBLIC................ 353
DENMARK.................... 354
DOMINICAN REPUBLIC............ 354
ECUADOR..................... 354
EL SALVADOR.................. 354
ESTONIA..................... 354
FINLAND..................... 355
FRANCE...................... 355
GERMANY..................... 355
GREECE...................... 356
GUATEMALA................... 356
HONDURAS.................... 356
HUNGARY..................... 356
INDIA....................... 356
IRELAND..................... 357
ITALY ........................ 357
LATVIA....................... 357
LITHUANIA.................... 358
LUXEMBURG................... 358
NETHERLANDS................. 358
NEW ZEALAND.................. 359
NORWAY ...................... 359
PANAMA...................... 359
PARAGUAY.................... 359
PERU....................... 359
POLAND...................... 360
PORTUGAL.................... 360
P
UERTO RICO AND U.S. VIRGIN ISLANDS . . 360REUNION..................... 360
ROMANIA..................... 360
RUSSIA...................... 361
SERBIA...................... 361
SLOVAKIA..................... 361
TABLE OF CONTENTS
10
Page 68 of 378
INSTRUMENT CLUSTER
DISPLAY
Your vehicle will be equipped with an instru-
ment cluster display, which offers useful in-
formation to the driver. With the ignition in
the STOP/OFF mode, opening/closing of a
door will activate the display for viewing, and
display the total miles, or kilometers, in the
odometer. Your instrument cluster display is
designed to display important information
about your vehicle’s systems and features.
Using a driver interactive display located on
the instrument panel, your instrument clus-
ter display can show you how systems are
working and give you warnings when they are
not. The steering wheel mounted controls
allow you to scroll through the main menus
and submenus. You can access the specific
information you want and make selections
and adjustments.
Instrument Cluster Display Location And
Controls
The instrument cluster display is located in
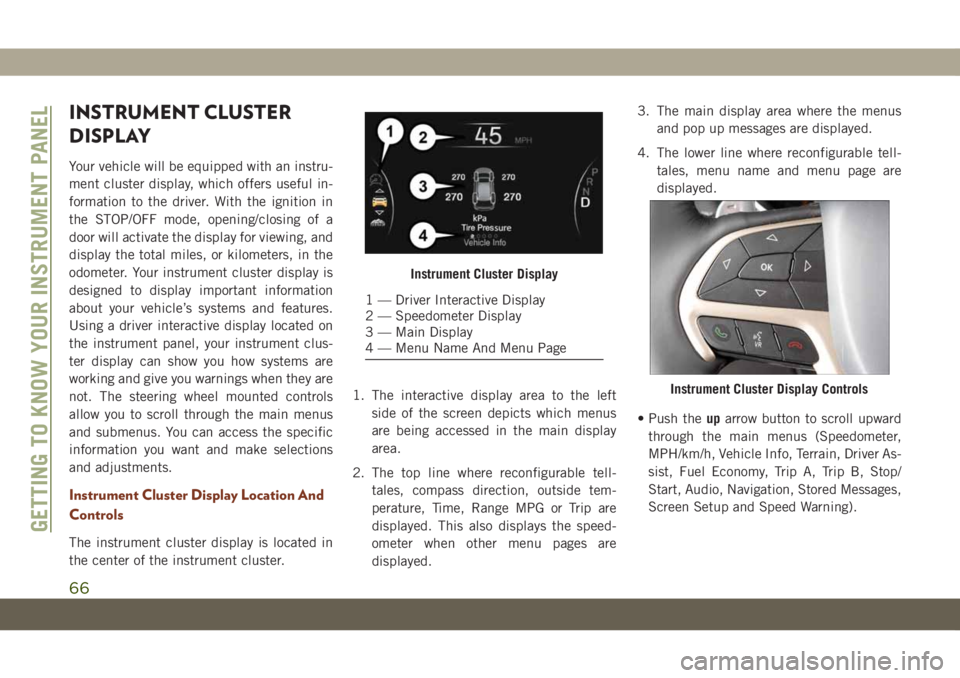
the center of the instrument cluster.1. The interactive display area to the left
side of the screen depicts which menus
are being accessed in the main display
area.
2. The top line where reconfigurable tell-
tales, compass direction, outside tem-
perature, Time, Range MPG or Trip are
displayed. This also displays the speed-
ometer when other menu pages are
displayed.3. The main display area where the menus
and pop up messages are displayed.
4. The lower line where reconfigurable tell-
tales, menu name and menu page are
displayed.
• Push theuparrow button to scroll upward
through the main menus (Speedometer,
MPH/km/h, Vehicle Info, Terrain, Driver As-
sist, Fuel Economy, Trip A, Trip B, Stop/
Start, Audio, Navigation, Stored Messages,
Screen Setup and Speed Warning).
Instrument Cluster Display
1 — Driver Interactive Display
2 — Speedometer Display
3 — Main Display
4 — Menu Name And Menu Page
Instrument Cluster Display Controls
GETTING TO KNOW YOUR INSTRUMENT PANEL
66
Page 69 of 378
• Push thedownarrow button to scroll down-
ward through the main menu and sub-
menus (Speedometer, MPH/km/h, Vehicle
Info, Terrain, Driver Assist, Fuel Economy,
Trip A, Trip B, Stop/Start, Audio, Naviga-
tion, Stored Messages, Screen Setup and
Speed Warning).
• Push therightarrow button to access the
information screens or submenu screens of
a main menu item.
• Push theleftarrow button to access the
information screens or submenu screens of
a main menu item.
• Push theOKbutton to access/select the
information screens or submenu screens of
a main menu item. Push and hold theOK
button for two seconds to reset displayed/
selected features that can be reset.
Oil Change Indicator System — If
Equipped
Your vehicle is equipped with an engine oil
change indicator system. The “Oil Change
Due” message will display in the instrument
cluster display for five seconds after a single
chime has sounded, to indicate the nextscheduled oil change interval. The engine oil
change indicator system is duty cycle based,
which means the engine oil change interval
may fluctuate, dependent upon your personal
driving style.
To have the oil changed, please refer to an
authorized dealer.
Instrument Cluster Display Selectable
Items
The instrument cluster display can be used to
view the main menu items for several fea-
tures. Use theupanddownarrow buttons to
scroll through the driver interactive display
menu options until the desired menu is
reached.
NOTE:
Depending on the vehicle’s options, feature
settings may vary.
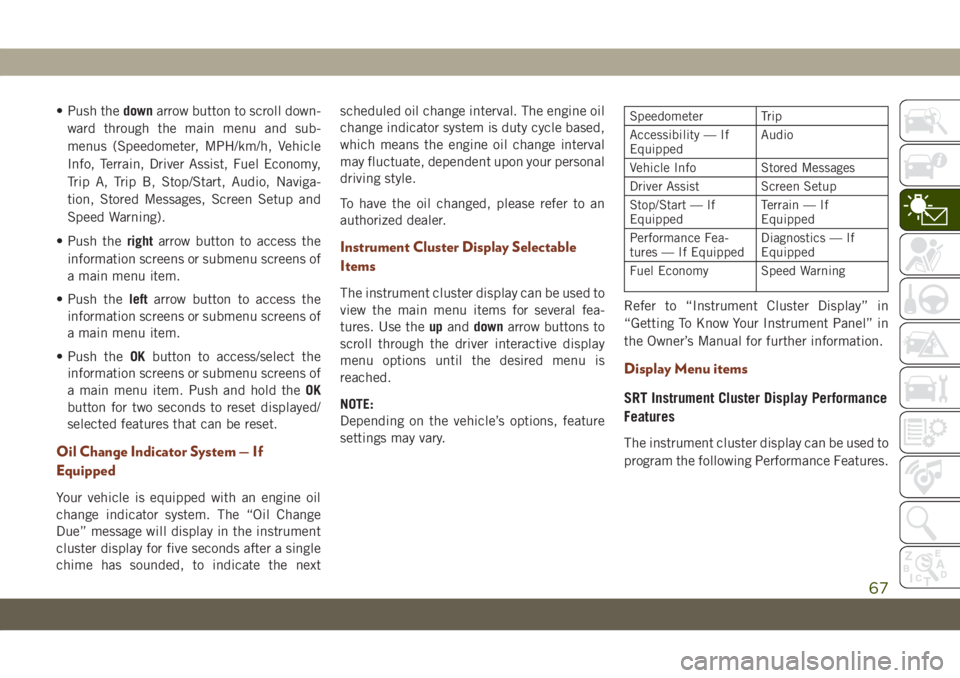
Speedometer Trip
Accessibility — If
EquippedAudio
Vehicle Info Stored Messages
Driver Assist Screen Setup
Stop/Start — If
EquippedTerrain — If
Equipped
Performance Fea-
tures — If EquippedDiagnostics — If
Equipped
Fuel Economy Speed Warning
Refer to “Instrument Cluster Display” in
“Getting To Know Your Instrument Panel” in
the Owner’s Manual for further information.
Display Menu items
SRT Instrument Cluster Display Performance
Features
The instrument cluster display can be used to
program the following Performance Features.
67
Page 159 of 378
mode. An onboard frequency generator cre-
ates counteracting sound waves through the
audio system to help keep the vehicle quiet.
Eight–Speed Automatic Transmission
Your vehicle is equipped with a fuel efficient
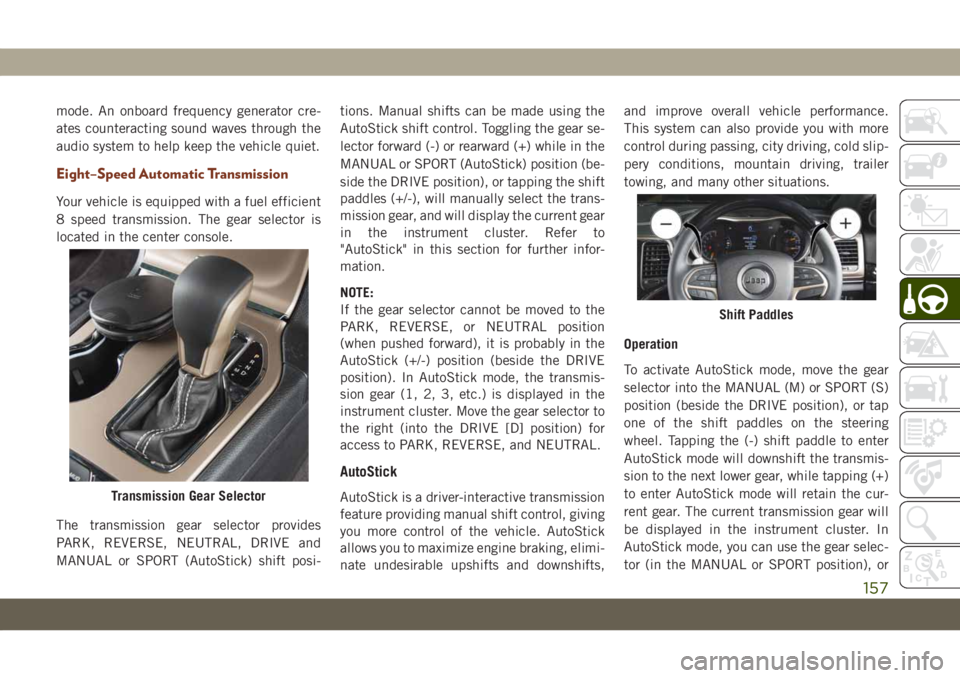
8 speed transmission. The gear selector is
located in the center console.
The transmission gear selector provides
PARK, REVERSE, NEUTRAL, DRIVE and
MANUAL or SPORT (AutoStick) shift posi-tions. Manual shifts can be made using the
AutoStick shift control. Toggling the gear se-
lector forward (-) or rearward (+) while in the
MANUAL or SPORT (AutoStick) position (be-
side the DRIVE position), or tapping the shift
paddles (+/-), will manually select the trans-
mission gear, and will display the current gear
in the instrument cluster. Refer to
"AutoStick" in this section for further infor-
mation.
NOTE:
If the gear selector cannot be moved to the
PARK, REVERSE, or NEUTRAL position
(when pushed forward), it is probably in the
AutoStick (+/-) position (beside the DRIVE
position). In AutoStick mode, the transmis-
sion gear (1, 2, 3, etc.) is displayed in the
instrument cluster. Move the gear selector to
the right (into the DRIVE [D] position) for
access to PARK, REVERSE, and NEUTRAL.
AutoStick
AutoStick is a driver-interactive transmission
feature providing manual shift control, giving
you more control of the vehicle. AutoStick
allows you to maximize engine braking, elimi-
nate undesirable upshifts and downshifts,and improve overall vehicle performance.
This system can also provide you with more
control during passing, city driving, cold slip-
pery conditions, mountain driving, trailer
towing, and many other situations.
Operation
To activate AutoStick mode, move the gear
selector into the MANUAL (M) or SPORT (S)
position (beside the DRIVE position), or tap
one of the shift paddles on the steering
wheel. Tapping the (-) shift paddle to enter
AutoStick mode will downshift the transmis-
sion to the next lower gear, while tapping (+)
to enter AutoStick mode will retain the cur-
rent gear. The current transmission gear will
be displayed in the instrument cluster. In
AutoStick mode, you can use the gear selec-
tor (in the MANUAL or SPORT position), orTransmission Gear Selector
Shift Paddles
157
Page 186 of 378
PARKVIEW REAR BACK UP
CAMERA — IF EQUIPPED
The ParkView Rear Back Up Camera allows
you to see an on-screen image of the rear
surroundings of your vehicle whenever the
gear selector is put into REVERSE. The im-
age will be displayed on the Navigation/
Multimedia radio display screen along with a
caution note to “check entire surroundings”
across the top of the screen. After five sec-
onds this note will disappear. The ParkView
camera is located on the rear of the vehicle
above the rear license plate.
When the vehicle is shifted out of REVERSE
(with camera delay turned off), the rear cam-
era mode is exited and the navigation or
audio screen appears again.Manual Activation Of The Rear View Camera
1. Press the “Controls” button located on
the bottom of the Uconnect display.
2. Press the “Backup Camera” button to
turn the Rear View Camera system on.
NOTE:
The ParkView Rear Back Up Camera has
programmable modes of operation that may
be selected through the Uconnect System.
Refer to “Uconnect Settings” in “Multime-
dia” in your Owner’s Manual for further infor-
mation.
When the vehicle is shifted out of REVERSE
(with camera delay turned off), the rear cam-
era mode is exited and the previous screen
appears again. When the vehicle is shifted
out of REVERSE (with camera delay turnedon), the camera image will continue to be
displayed for up to ten seconds after shifting
out of REVERSE unless the vehicle speed
exceeds 8 mph (13 km/h), the vehicle is
shifted into PARK, the vehicle’s ignition is
cycled to the OFF position, or the user
presses image defeat [X] to exit out of the
camera video display.
When enabled, active guide lines are overlaid
on the image to illustrate the width of the
vehicle and its projected backup path based
on the steering wheel position. A dashed
center line overlay indicates the center of the
vehicle to assist with parking or aligning to a
hitch/receiver. Different colored zones indi-
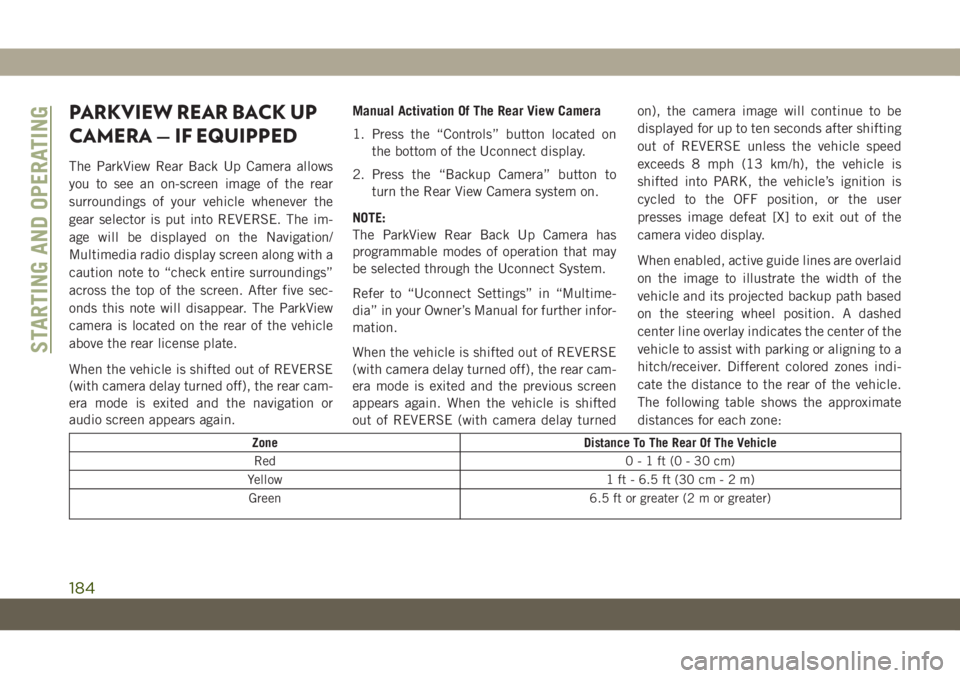
cate the distance to the rear of the vehicle.
The following table shows the approximate
distances for each zone:
Zone Distance To The Rear Of The Vehicle
Red 0-1ft(0-30cm)
Yellow 1 ft - 6.5 ft (30 cm-2m)
Green 6.5 ft or greater (2 m or greater)
STARTING AND OPERATING
184
Page 303 of 378
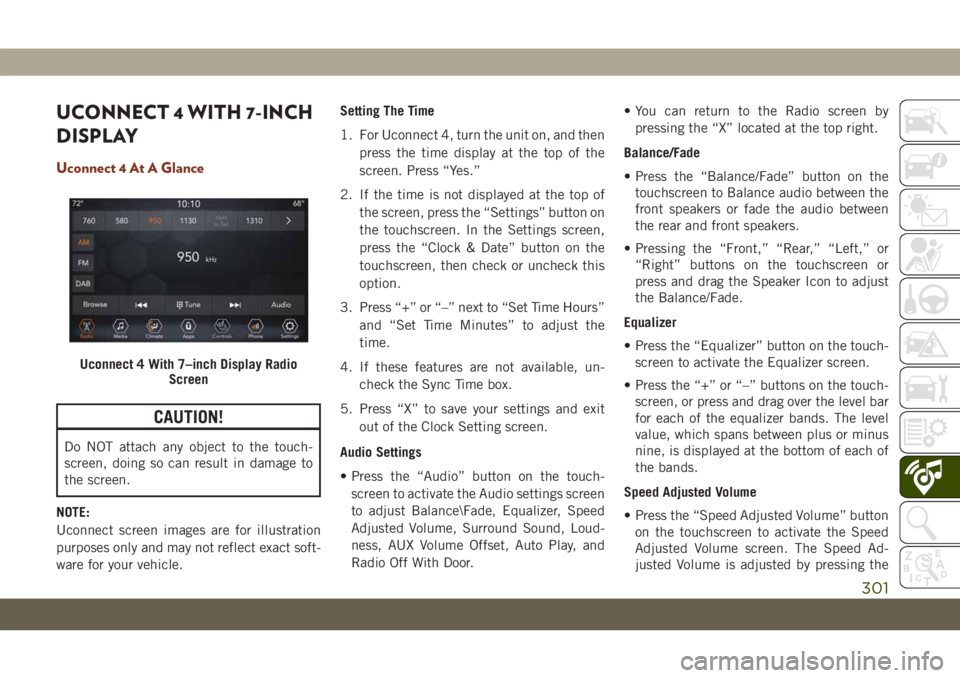
UCONNECT 4 WITH 7-INCH
DISPLAY
Uconnect 4 At A Glance
CAUTION!
Do NOT attach any object to the touch-
screen, doing so can result in damage to
the screen.
NOTE:
Uconnect screen images are for illustration
purposes only and may not reflect exact soft-
ware for your vehicle.Setting The Time
1. For Uconnect 4, turn the unit on, and then
press the time display at the top of the
screen. Press “Yes.”
2. If the time is not displayed at the top of
the screen, press the “Settings” button on
the touchscreen. In the Settings screen,
press the “Clock & Date” button on the
touchscreen, then check or uncheck this
option.
3. Press “+” or “–” next to “Set Time Hours”
and “Set Time Minutes” to adjust the
time.
4. If these features are not available, un-
check the Sync Time box.
5. Press “X” to save your settings and exit
out of the Clock Setting screen.
Audio Settings
• Press the “Audio” button on the touch-
screen to activate the Audio settings screen
to adjust Balance\Fade, Equalizer, Speed
Adjusted Volume, Surround Sound, Loud-
ness, AUX Volume Offset, Auto Play, and
Radio Off With Door.• You can return to the Radio screen by
pressing the “X” located at the top right.
Balance/Fade
• Press the “Balance/Fade” button on the
touchscreen to Balance audio between the
front speakers or fade the audio between
the rear and front speakers.
• Pressing the “Front,” “Rear,” “Left,” or
“Right” buttons on the touchscreen or
press and drag the Speaker Icon to adjust
the Balance/Fade.
Equalizer
• Press the “Equalizer” button on the touch-
screen to activate the Equalizer screen.
• Press the “+” or “–” buttons on the touch-
screen, or press and drag over the level bar
for each of the equalizer bands. The level
value, which spans between plus or minus
nine, is displayed at the bottom of each of
the bands.
Speed Adjusted Volume
• Press the “Speed Adjusted Volume” button
on the touchscreen to activate the Speed
Adjusted Volume screen. The Speed Ad-
justed Volume is adjusted by pressing the
Uconnect 4 With 7–inch Display Radio
Screen
301
Page 304 of 378
volume level indicator. This alters the auto-
matic adjustment of the audio volume with
variation to vehicle speed.
Loudness — If Equipped
• Press the “On” button on the touchscreen
to activate Loudness. Press “Off” to deac-
tivate this feature. When Loudness is On,
the sound quality at lower volumes
improves.
AUX Volume Offset
• Press the “AUX Volume Offset” button on
the touchscreen to activate the AUX Vol-
ume Offset screen. The AUX Volume Offset
is adjusted by pressing of the “+” and “–”
buttons. This alters the AUX input audio
volume. The level value, which spans be-
tween plus or minus three, is displayed
above the adjustment bar.
Auto Play — If Equipped
• Press the “Auto Play” button on the touch-
screen to activate the Auto Play screen. The
Auto Play feature has two settings “On”
and “Off.” With Auto Play on, music begins
playing from a connected device, immedi-
ately after it is connected to the radio.Auto On Radio — If Equipped
• The Radio automatically turns on when
vehicle is in run or will recall whether it was
on or off at last ignition off.
Radio Off With Door — If Equipped
• Press the “Radio Off With Door” button on
the touchscreen to activate the Radio Off
With Door screen. The Radio Off With Door
feature, when activated, keeps the radio on
until the driver or passenger door is opened,
or when the Radio Off Delay selected time
has expired.
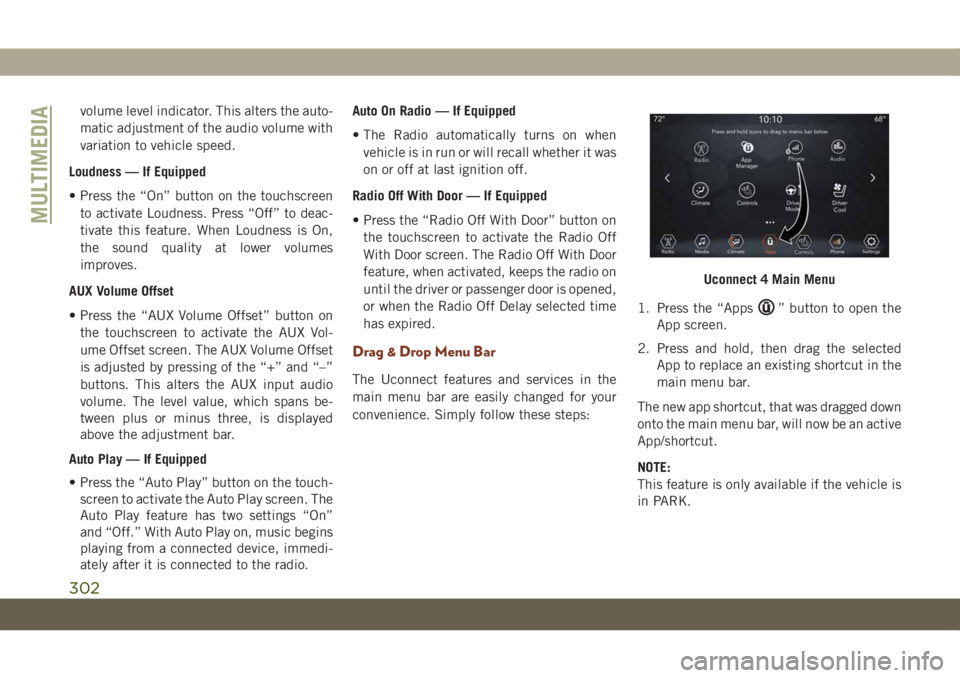
Drag & Drop Menu Bar
The Uconnect features and services in the
main menu bar are easily changed for your
convenience. Simply follow these steps:1. Press the “Apps
” button to open the
App screen.
2. Press and hold, then drag the selected
App to replace an existing shortcut in the
main menu bar.
The new app shortcut, that was dragged down
onto the main menu bar, will now be an active
App/shortcut.
NOTE:
This feature is only available if the vehicle is
in PARK.
Uconnect 4 Main Menu
MULTIMEDIA
302
Page 305 of 378
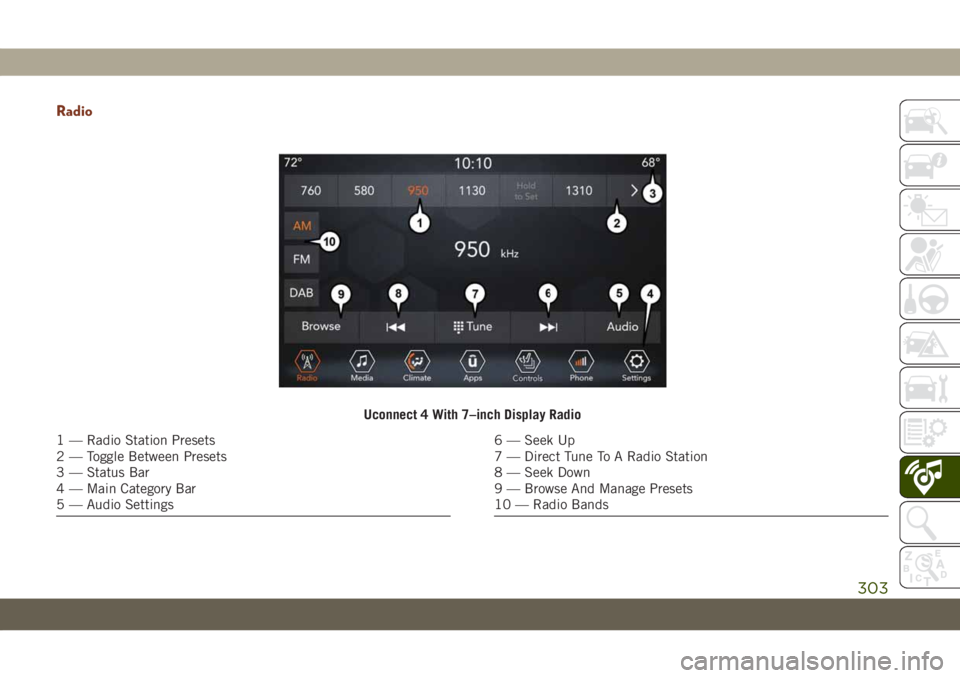
Radio
Uconnect 4 With 7–inch Display Radio
1 — Radio Station Presets
2 — Toggle Between Presets
3 — Status Bar
4 — Main Category Bar
5 — Audio Settings6 — Seek Up
7 — Direct Tune To A Radio Station
8 — Seek Down
9 — Browse And Manage Presets
10 — Radio Bands
303
Page 310 of 378
Background Themes
• Screen background themes are selectable
from a pre-loaded list of themes. If you’d
like to set a theme, follow the instructions
below.
• Press the “Settings” button on the touch-
screen and select the display menu.
• Then press the “Set Theme” button on the
touchscreen and select a theme.
Audio Settings
• Press the “Audio” button on the touch-
screen to activate the Audio settings screen
to adjust Balance\Fade, Equalizer, and
Speed Adjusted Volume.
• You can return to the Radio screen by
pressing the “X” located at the top right.
Balance/Fade
• Press the “Balance/Fade” button on the
touchscreen to Balance audio between the
front speakers or fade the audio between
the rear and front speakers.• Pressing the “Front,” “Rear,” “Left,” or
“Right” buttons on the touchscreen or
press and drag the Speaker Icon to adjust
the Balance/Fade.
Equalizer
• Press the “Equalizer” button on the touch-
screen to activate the Equalizer screen.
• Press the “+” or “–” buttons on the touch-
screen, or press and drag over the level bar
for each of the equalizer bands. The level
value, which spans between plus or minus
nine, is displayed at the bottom of each of
the Bands.
Speed Adjusted Volume
• Press the “Speed Adjusted Volume” button
on the touchscreen to activate the Speed
Adjusted Volume screen. The Speed Ad-
justed Volume is adjusted by pressing the
volume level indicator. This alters the auto-
matic adjustment of the audio volume with
variation to vehicle speed.
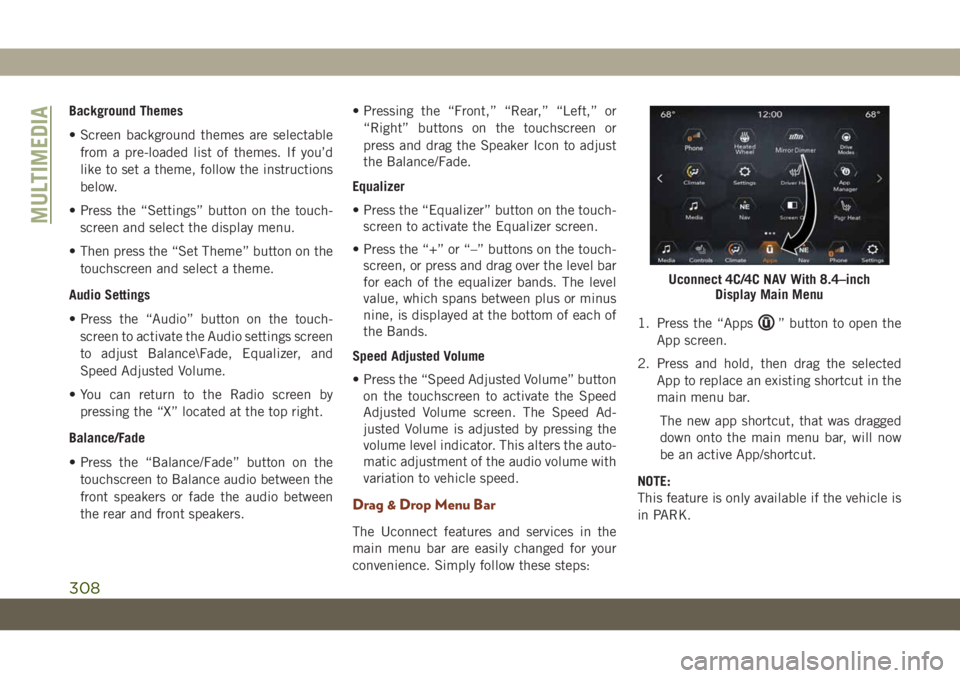
Drag & Drop Menu Bar
The Uconnect features and services in the
main menu bar are easily changed for your
convenience. Simply follow these steps:1. Press the “Apps
” button to open the
App screen.
2. Press and hold, then drag the selected
App to replace an existing shortcut in the
main menu bar.
The new app shortcut, that was dragged
down onto the main menu bar, will now
be an active App/shortcut.
NOTE:
This feature is only available if the vehicle is
in PARK.
Uconnect 4C/4C NAV With 8.4–inch
Display Main Menu
MULTIMEDIA
308
Page 311 of 378
Radio
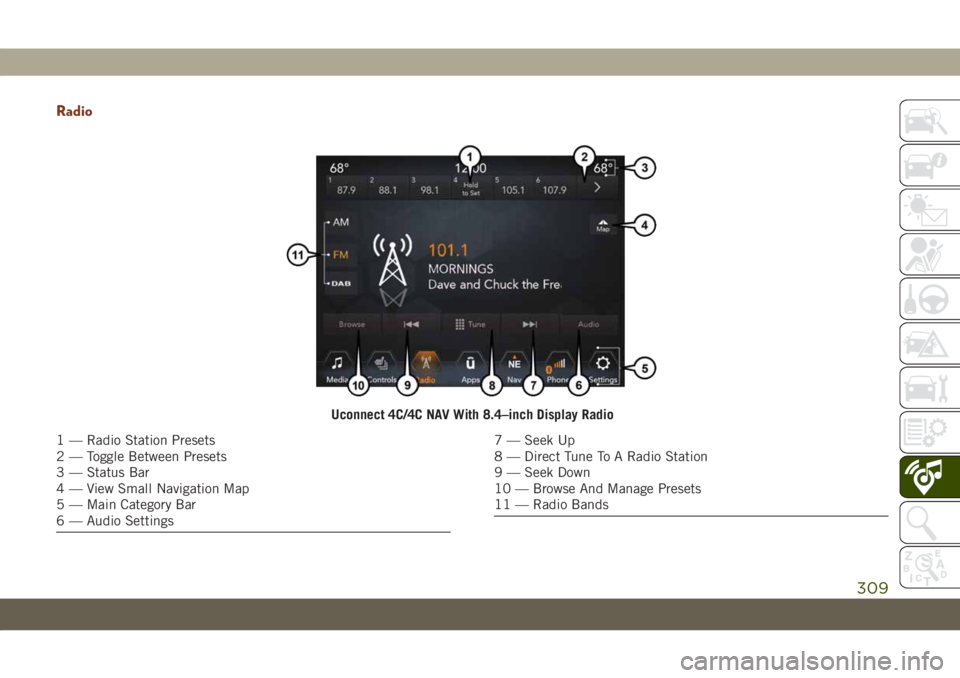
Uconnect 4C/4C NAV With 8.4–inch Display Radio
1 — Radio Station Presets
2 — Toggle Between Presets
3 — Status Bar
4 — View Small Navigation Map
5 — Main Category Bar
6 — Audio Settings7 — Seek Up
8 — Direct Tune To A Radio Station
9 — Seek Down
10 — Browse And Manage Presets
11 — Radio Bands
309