fuel filter JEEP GRAND CHEROKEE 2021 Owner handbook (in English)
[x] Cancel search | Manufacturer: JEEP, Model Year: 2021, Model line: GRAND CHEROKEE, Model: JEEP GRAND CHEROKEE 2021Pages: 378, PDF Size: 6.88 MB
Page 9 of 378
COMMANDVIEW SUNROOF WITH POWER SHADE — IF
EQUIPPED........................ 56
Opening Sunroof.................. 57
Closing Sunroof.................. 57
Opening Power Shade............... 57
Closing Power Shade............... 58
Pinch Protect Feature............... 58
Venting Sunroof — Express........... 58
Sunroof Maintenance............... 58
HOOD.......................... 59To Open The Hood................. 59
To Close The Hood................. 59
LIFTGATE......................... 59Opening....................... 59
Closing........................ 60
Power Liftgate — If Equipped......... 61
INTERNAL EQUIPMENT................. 62Power Outlets.................... 62
ROOF LUGGAGE RACK — IF EQUIPPED......... 64
GETTING TO KNOW YOUR
INSTRUMENT PANEL
INSTRUMENT CLUSTER DISPLAY............ 66Instrument Cluster Display Location And
Controls....................... 66
Oil Change Indicator System — If Equipped . 67
Instrument Cluster Display Selectable Items . 67
Display Menu items................ 67
Diesel Displays — If Equipped......... 68
Diesel Particulate Filter (DPF) Messages — If
Equipped...................... 69
Fuel System Messages — If Equipped..... 70
TRIP COMPUTER..................... 73WARNING LIGHTS AND MESSAGES.......... 73
Red Warning Lights................ 73
Yellow Warning Lights............... 76
Yellow Indicator Lights.............. 80
Green Indicator Lights.............. 82
White Indicator Lights.............. 83
Blue Indicator Lights............... 84
ONBOARD DIAGNOSTIC SYSTEM — OBD II...... 85Onboard Diagnostic System (OBD II)
Cybersecurity.................... 85
SAFETY
SAFETY FEATURES................... 86Anti-Lock Brake System (ABS)......... 86
Electronic Brake Control System........ 87
AUXILIARY DRIVING SYSTEMS............. 97Blind Spot Monitoring (BSM) — If Equipped . 97
Forward Collision Warning (FCW) With
Mitigation..................... 101
Tire Pressure Monitor System (TPMS).... 103
OCCUPANT RESTRAINT SYSTEMS.......... 107Occupant Restraint Systems Features.... 107
Important Safety Precautions......... 107
Seat Belt Systems................ 108
Supplemental Restraint Systems (SRS) . . . 117
Child Restraints — Carrying Children
Safely....................... 127
Transporting Pets................ 140
SAFETY TIPS..................... 140Transporting Passengers............ 140
Exhaust Gas................... 141
Safety Checks You Should Make Inside The
Vehicle...................... 141
Periodic Safety Checks You Should Make
Outside The Vehicle............... 143
STARTING AND OPERATING
STARTING THE ENGINE — GAS............ 145Automatic Transmission............. 145
Normal Starting................. 145
STARTING THE ENGINE — 3.0L DIESEL ENGINE . . 148Automatic Transmission............. 149
Normal Starting................. 149
STOP/START SYSTEM — IF EQUIPPED........ 150Automatic Mode................. 150
Possible Reasons The Engine Does Not
Autostop..................... 151
To Start The Engine While In Autostop Mode . . 151To Manually Turn Off The Stop/Start
System...................... 152
T
o Manually Turn On The Stop/Start System . . 152System Malfunction............... 152
ENGINE BREAK-IN RECOMMENDATIONS....... 1523.6L & 5.7L Engines.............. 152
Diesel Engine................... 153
SRT Engines................... 153
AUTOMATIC TRANSMISSION............. 154Ignition Park Interlock.............. 155
Brake/Transmission Shift Interlock System . 156
Fuel Economy (ECO) Mode........... 156
Eight–Speed Automatic Transmission..... 157
SPORT MODE — IF EQUIPPED............ 159
FOUR WHEEL DRIVE OPERATION........... 159
Quadra-Trac I Operating Instructions/Precautions
— If Equipped.................. 159
Quadra-Trac II Operating Instructions/Precautions
— If Equipped.................. 159
Shift Positions.................. 160
Shifting Procedures............... 161
Quadra-Drive II System — If Equipped.... 163
7
Page 72 of 378
CAUTION!
See an authorized dealer, as damage to the
exhaust system could occur soon with con-
tinued operation.
•Exhaust Filter Full — Power Reduced See
Dealer— This message indicates the PCM
has derated the engine to limit the likeli-
hood of permanent damage to the after-
treatment system. If this condition is not
corrected and a dealer service is not per-
formed, extensive exhaust after-treatment
damage can occur. To correct this condition
it will be necessary to have your vehicle
serviced by an authorized dealer.
NOTE:
Failing to follow the oil change indicator,
changing your oil and resetting the oil change
indicator by 0 miles remaining will prevent
the diesel exhaust filter from performing it's
cleaning routine. This will shortly result in a
Malfunction Indicator Light (MIL) and re-
duced engine power. Only an authorized
dealer will be able to correct this condition.
CAUTION!
See an authorized dealer, as damage to the
exhaust system could occur soon with con-
tinued operation.
Fuel System Messages — If Equipped
The following chart contains a list of different
messages that may appear in the instrument
cluster, depending on different system or fuel
conditions. Use the descriptions to interpret
what the message means and determine the
best action to take.
GETTING TO KNOW YOUR INSTRUMENT PANEL
70
Page 83 of 378
rotate at the same speed. Low range provides
a greater gear reduction ratio to provide in-
creased torque at the wheels.
Refer to “Four-Wheel Drive Operation — If
Equipped” in “Starting And Operating” for
further information on four-wheel drive op-
eration and proper use.
— NEUTRAL Indicator Light — If
Equipped
This light alerts the driver that the 4WD
power transfer case is in the NEUTRAL mode
and the front and rear driveshafts are disen-
gaged from the powertrain.
— Rear Fog Indicator — If Equipped
This indicator light will illuminate when the
rear fog lights are on.
— Wait To Start Light — If Equipped
This indicator light will illuminate for ap-
proximately two seconds when the ignition is
turned to the RUN position. Its duration may
be longer based on colder operating condi-
tions. Vehicle will not initiate start until tell-
tale is no longer displayed.Refer to “Starting The Engine” in “Starting
And Operating” for further information.
NOTE:
The “Wait To Start” telltale may not illumi-
nate if the intake manifold temperature is
warm enough.
— Low Diesel Exhaust Emissions Addi-
tive AdBlue® (UREA) Indicator Light — If
Equipped
The Low Diesel Exhaust Emissions Additive
AdBlue®(UREA) indicator light illuminates
when the AdBlue®level is low.
Fill the AdBlue
®tank as soon as possible with
at least 1.3 gallons (5 liters) of AdBlue®.
If filling the tank is done with a remaining
range of AdBlue
®in the tank equal to zero,
you may need to wait 2 minutes before start-
ing the vehicle.
Refer to “Starting And Operating” for further
information.
— Water In Fuel Indicator Light — If
Equipped
The “Water In Fuel Indicator Light” will illu-
minate when there is water detected in the
fuel filter. If this light remains on, DO NOT
start the vehicle before you drain the water
from the fuel filter to prevent engine damage,
and please see an authorized dealer.
CAUTION!
The presence of water in the fuel system
circuit may cause severe damage to the
injection system and irregular engine op-
eration. If the indicator light is illumi-
nated, contact an authorized dealer as
soon as possible to bleed the system. If the
above indications come on immediately
after refuelling, water has probably been
poured into the tank: switch the engine off
immediately and contact an authorized
dealer.
81
Page 127 of 378
Enhanced Accident Response System
In the event of an impact, if the communica-
tion network remains intact, and the power
remains intact, depending on the nature of
the event, the ORC will determine whether to
have the Enhanced Accident Response Sys-
tem perform the following functions:
• Cut off fuel to the engine (If Equipped)
• Cut off battery power to the electric motor
(If Equipped)
• Flash hazard lights as long as the battery
has power
• Turn on the interior lights, which remain on
as long as the battery has power or for 15
minutes from the intervention of the En-
hanced Accident Response System.
• Unlock the power door locks.
Your vehicle may also be designed to perform
any of these other functions in response to
the Enhanced Accident Response System:
• Turn off the Fuel Filter Heater, Turn off the
HVAC Blower Motor, Close the HVAC Circu-
lation Door• Cut off battery power to the:
– Engine
– Electric Motor (if equipped)
– Electric power steering
– Brake booster
– Electric park brake
– Automatic transmission gear selector
– Horn
– Front wiper
– Headlamp washer pump
NOTE:
After an accident, remember to cycle the
ignition to the STOP (OFF/LOCK) position
and remove the key from the ignition switch
to avoid draining the battery. Carefully check
the vehicle for fuel leaks in the engine com-
partment and on the ground near the engine
compartment and fuel tank before resetting
the system and starting the engine. If there
are no fuel leaks or damage to the vehicle
electrical devices (e.g. headlights) after an
accident, reset the system by following the
procedure described below. If you have any
doubt, contact an authorized dealer.
Enhanced Accident Response System Reset
Procedure
In order to reset the Enhanced Accident Re-
sponse System functions after an event, the
ignition switch must be changed from igni-
tion START or ON/RUN to ignition OFF. Care-
fully check the vehicle for fuel leaks in the
engine compartment and on the ground near
the engine compartment and fuel tank before
resetting the system and starting the engine.
Maintaining Your Air Bag System
WARNING!
• Modifications to any part of the air bag
system could cause it to fail when you
need it. You could be injured if the air
bag system is not there to protect you.
Do not modify the components or wiring,
including adding any kind of badges or
stickers to the steering wheel hub trim
cover or the upper passenger side of the
instrument panel. Do not modify the
front bumper, vehicle body structure, or
add aftermarket side steps or running
boards.
125
Page 151 of 378
WARNING!
fatally injured. Children should be
warned not to touch the parking brake,
brake pedal or the gear selector.
• Do not leave the key fob in or near the
vehicle, or in a location accessible to
children, and do not leave the ignition of
a vehicle equipped with Keyless Enter-
N-Go in the ACC or ON/RUN mode. A
child could operate power windows,
other controls, or move the vehicle.
• Do not leave children or animals inside
parked vehicles in hot weather. Interior
heat build-up may cause serious injury
or death.
NOTE:
Engine start up in very low ambient tempera-
ture could result in evident white smoke. This
condition will disappear as the engine warms
up.
CAUTION!
• The engine is allowed to crank as long as
30 seconds. If the engine fails to start
during this period, please wait at least
two minutes for the starter to cool before
repeating start procedure.
• If the “Water in Fuel Indicator Light”
remains on, DO NOT START engine be-
fore you drain the water from the fuel
filters to avoid engine damage. Refer to
“Draining Fuel/Water Separator Filter”
in “Servicing And Maintenance” in your
Diesel Supplement for further informa-
tion, which can be found with your on-
line Owner’s Information.
Automatic Transmission
Start the engine with the transmission gear
selector in the PARK position. Apply the
brake before shifting to any driving range.
Normal Starting
Observe the instrument panel cluster lights
when starting the engine.
NOTE:
Normal starting of either a cold or a warm
engine is obtained without pumping or press-
ing the accelerator pedal
1. Always apply the parking brake.
2. Press and hold the brake pedal while
pushing the ENGINE START/STOP button
once.
NOTE:
A delay of the start of up to five seconds is
possible under very cold conditions. The
"Wait to Start" telltale will be illuminated
during the pre-heat process, When the
engine Wait To Start light goes off the
engine will automatically crank.
CAUTION!
If the “Water in Fuel Indicator Light” re-
mains on, DO NOT START engine before
you drain the water from the fuel filters to
149
Page 152 of 378
CAUTION!
avoid engine damage. Refer to “Draining
Fuel/Water Separator Filter” in “Servicing
And Maintenance” in your Diesel Supple-
ment for further information, which can be
found with your online Owner’s Informa-
tion.
3. The system will automatically engage the
starter to crank the engine. If the vehicle
fails to start, the starter will disengage
automatically after 25 seconds.
4. If you wish to stop the cranking of the
engine prior to the engine starting, push
the button again.
5. Check that the oil pressure warning light
has turned off.
6. Release the parking brake.NOTE:
Only press one pedal at a time while driving
the vehicle. Torque performance of the ve-
hicle could be reduced if both pedals are
pressed at the same time. If pressure is
detected on both pedals simultaneously, a
warning message will display in the instru-
ment cluster. For further information, refer to
“Instrument Cluster Display” in “Getting To
Know Your Instrument Panel”.
STOP/START SYSTEM — IF
EQUIPPED
The Stop/Start function is developed to re-
duce fuel consumption. The system will stop
the engine automatically during a vehicle
stop if the required conditions are met. Re-
leasing the brake pedal or pressing the accel-
erator pedal will automatically re-start the
engine.
This vehicle has been upgraded with a heavy
duty starter, enhanced battery, and other up-
graded engine parts, to handle the additional
engine starts.
Automatic Mode
The Stop/Start feature is enabled
after every normal customer en-
gine start. At that time, the sys-
tem will go into STOP/START
READY and if all other conditions are met,
can go into a STOP/START AUTOSTOP AC-
TIVE “Autostop” mode.
To Activate The Autostop Mode, The Following
Must Occur:
• The system must be in STOP/START
READY state. A STOP/START READY mes-
sage will be displayed in the instrument
cluster display within the Stop/Start sec-
tion. Refer to “Instrument Cluster” in “Get-
ting To Know Your Instrument Panel” in
your Owner’s Manual for further informa-
tion.
• The vehicle must be completely stopped.
• The shifter must be in a forward gear and
the brake pedal depressed.
STARTING AND OPERATING
150
Page 192 of 378
CAUTION!
For diesel engines, only use diesel fuel for
motor vehicles in accordance with EN 590
European specifications. The use of other
products or mixtures may damage the en-
gine beyond repair and consequently void
the warranty, due to the damage caused. If
you accidentally introduce other types of
fuel into the tank, do not start the engine.
Empty the tank. If the engine has been run
for even an extremely limited amount of
time, you must not only drain the fuel
tank, but the rest of the supply circuit as
well.
Avoid Using Contaminated Fuel
Fuel that is contaminated by water or dirt can
cause severe damage to the engine fuel sys-
tem. Proper maintenance of the engine fuel
filter and fuel tank is essential. Refer to
“Dealer Service” in “Servicing And Mainte-
nance” in your Owner’s Manual for further
information.
AdBlue® (UREA) — If Equipped
The vehicle is equipped with an UREA injec-
tion system and Selective Catalytic Reduc-
tion to meet emission standards. These two
systems ensure compliance with the diesel
emissions requirements; at the same, they
ensure fuel-efficiency, handling, torque and
power. For messages and system warnings,
refer to the "Warning Lights And Messages" in
the "Getting To Know Your Instrument Panel"
section. AdBlue
®is a very stable product
with a long shelf life. Stored at temperatures
LOWER than 90 °F (32 °C), it has a shelf life
of at least one year. For more information on
the AdBlue
®liquid type, see the “Fluids and
lubricants” in the “Technical specifications”
section. The vehicle is equipped with an
automatic AdBlue
®heating system when the
engine starts allowing the system to work
correctly at temperatures lower than 12 °F
(-11 °C).
NOTE:
• AdBlue
®freezes at temperatures lower
than 12 °F (-11 °C).• Your vehicle is equipped with a AdBlue
®
injection system. You may occasionally
hear an audible clicking noise from under
the vehicle at a stop. This is normal opera-
tion.
• The AdBlue
®pump will run for a period of
time after engine shutdown to purge the
AdBlue
®system. This is normal operation
and may be audible from the rear of the
vehicle.
AdBlue® Storage
AdBlue®is considered a very stable product
with a long shelf life. If AdBlue®is kept in
temperatures between 10° and 90°F
(-12° and 32°C), it will last a minimum of
one year.
AdBlue
®is subject to freezing at the lowest
temperatures. For example, AdBlue®may
freeze at temperatures at or below 12° F
(-11° C). The system has been designed to
operate in this environment.
STARTING AND OPERATING
190
Page 239 of 378
be reset by referring to the steps described
under ”Instrument Cluster Display” in “Get-
ting To Know Your Instrument Panel” for
further information.
At Each Stop for Fuel
• Check the engine oil level about 5 minutes
after a fully warmed engine is shut off.
Checking the oil level while the vehicle is
on level ground will improve the accuracy of
the oil level reading. Add oil only when the
level is at or below the ADD or MIN mark.
• Check the windshield washer solvent and
add if required.
Once a Month
• Check tire pressure and look for unusual
wear or damage. Rotate tires at the first
sign of irregular wear.
• Inspect the battery and clean and tighten
the terminals as required.
• Check the fluid levels of the coolant reser-
voir, and brake master cylinder; add fluid as
needed.
• Check all lights and other electrical items
for correct operation.At Each Oil Change
• Check tire pressure and look for unusual
wear or damage. Rotate tires at the first
sign of irregular wear, even if it occurs
before the oil indicator system turns on.
• Change the engine oil filter.
• Inspect the brake hoses and lines.
CAUTION!
Failure to perform the required mainte-
nance items may result in damage to the
vehicle.
Maintenance Plan — Gasoline Engine
NOTE:
Once you have carried out the last interven-
tion in the table, continue with the scheduled
servicing, maintaining the frequency indi-
cated in the plan by marking each operation
with a dot or dedicated note. Simply restart-
ing the maintenance from the start of the
plan may cause the allowed interval to be
exceeded for some operations.
237
Page 240 of 378
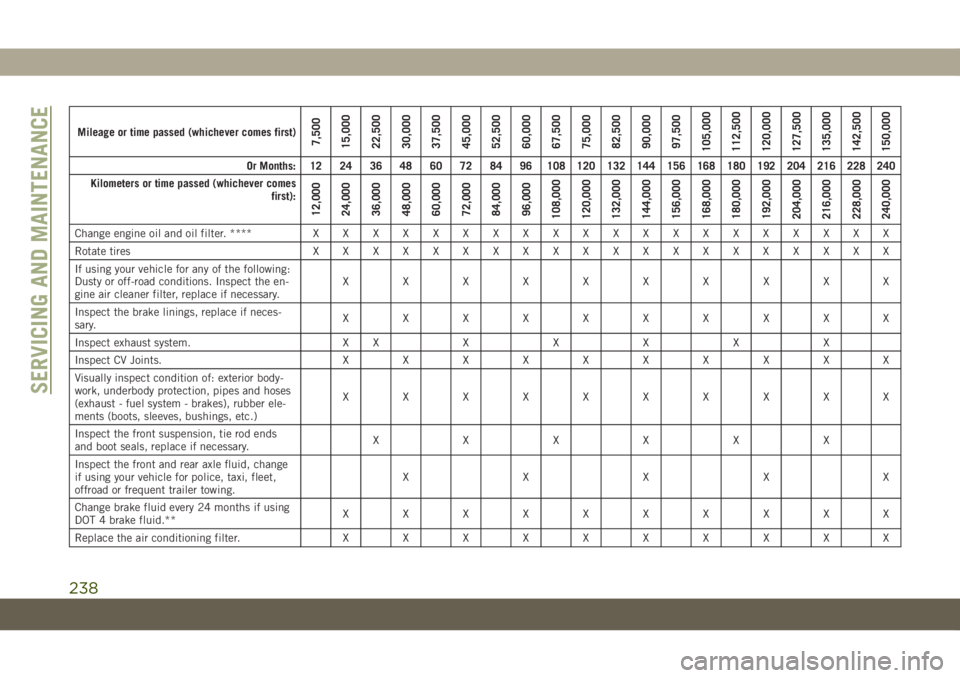
Mileage or time passed (whichever comes first)7,500
15,000
22,500
30,000
37,500
45,000
52,500
60,000
67,500
75,000
82,500
90,000
97,500
105,000
112,500
120,000
127,500
135,000
142,500
150,000
Or Months: 12 24 36 48 60 72 84 96 108 120 132 144 156 168 180 192 204 216 228 240
Kilometers or time passed (whichever comes
first):
12,000
24,000
36,000
48,000
60,000
72,000
84,000
96,000
108,000
120,000
132,000
144,000
156,000
168,000
180,000
192,000
204,000
216,000
228,000
240,000
Change engine oil and oil filter. ****XXXXXXXXXXXXXXXXXXXX
Rotate tiresXXXXXXXXXXXXXXXXXXXX
If using your vehicle for any of the following:
Dusty or off-road conditions. Inspect the en-
gine air cleaner filter, replace if necessary.XXXXXXXXXX
Inspect the brake linings, replace if neces-
sary.XXXXXXXXXX
Inspect exhaust system. XXXXXXX
Inspect CV Joints.XXXXXXXXXX
Visually inspect condition of: exterior body-
work, underbody protection, pipes and hoses
(exhaust - fuel system - brakes), rubber ele-
ments (boots, sleeves, bushings, etc.)XXXXXXXXXX
Inspect the front suspension, tie rod ends
and boot seals, replace if necessary.XXXXXX
Inspect the front and rear axle fluid, change
if using your vehicle for police, taxi, fleet,
offroad or frequent trailer towing.XXXXX
Change brake fluid every 24 months if using
DOT 4 brake fluid.**XXXXXXXXXX
Replace the air conditioning filter.XXXXXXXXXX
SERVICING AND MAINTENANCE
238
Page 243 of 378
NOTE:
• The oil change indicator message will not
monitor the time since the last oil change.
Change your vehicle's oil if it has been six
months since your last oil change, even if
the oil change indicator message is NOT
illuminated.
• Change your engine oil more often if you
drive your vehicle off-road for an extended
period of time.
• Under no circumstances should oil change
intervals exceed 6,000 miles (10,000 km)
or six months, whichever comes first.
Your authorized dealer will reset the oil
change indicator message after completing
the scheduled oil change. If a scheduled oil
change is performed by someone other than
your authorized dealer, the message can be
reset by referring to the steps described un-
der “Instrument Cluster Display” in “Getting
To Know Your Instrument Panel” in this
guide.At Each Stop For Fuel
• Check the engine oil level. Refer to “Engine
Compartment” in this section for further
information.
• Check the windshield washer solvent and
add if required.
Once A Month
• Check tire pressure and look for unusual
wear or damage. Rotate tires at the first
sign of irregular wear
• Inspect the battery, and clean and tighten
the terminals as required.
• Check the fluid levels of the coolant reser-
voir, engine oil, brake master cylinder, and
add as needed.
• Check all lights and other electrical items
for correct operation.At Each Oil Change
• Check tire pressure and look for unusual
wear or damage. Rotate tires at the first
sign of irregular wear, even if it occurs
before the oil indicator system turns on.
• Change the engine oil filter.
• Inspect the brake hoses and lines.
CAUTION!
Failure to perform the required mainte-
nance items may result in damage to the
vehicle.
Maintenance Plan — SRT
NOTE:
Once you have carried out the last interven-
tion in the table, continue with the scheduled
servicing, maintaining the frequency indi-
cated in the plan by marking each operation
with a dot or dedicated note. Simply restart-
ing the maintenance from the start of the
plan may cause the allowed interval to be
exceeded for some operations.
241