setting time JEEP GRAND CHEROKEE 2023 User Guide
[x] Cancel search | Manufacturer: JEEP, Model Year: 2023, Model line: GRAND CHEROKEE, Model: JEEP GRAND CHEROKEE 2023Pages: 424, PDF Size: 15.48 MB
Page 47 of 424

GETTING TO KNOW YOUR VEHICLE45
(Continued)
Door Panel Massage Button
Once activated by either method, the massage
controls will display on the radio screen, and
“Massage Type” and “Intensity Level” can be
selected for the activated seat.
There are four intensity levels and five massage
types that can be selected.
Intensity Levels:
High
Med
Low
Off
Massage Types:
Waterfall
Lower Back
Extend
Low Extend
Rock Climb
The selected settings will save in the system’s
memory when turned off, and will resume the next
time the system is turned on.
NOTE:
The engine must be running for the power seat -
back massage to operate.
The massage feature will turn off after
20 minutes of use. However, if the massage
type or intensity level is changed, the timer then
resets.
HEATED SEATS — IF EQUIPPED
Front Heated Seats
The front heated seats control buttons
are located on the center stack below the
radio screen or within the Uconnect
system. You can gain access to the
control buttons through the Comfort screen.
Press the heated seat switch once to turn the HI
setting on.
Press the heated seat switch a second time to
turn the MED setting on.
Press the heated seat switch a third time to turn
the LO setting on.
Press the heated seat switch a fourth time to
turn the heating elements off.
WARNING!
Persons who are unable to feel pain to the
skin because of advanced age, chronic illness,
diabetes, spinal cord injury, medication,
alcohol use, exhaustion or other physical
condition must exercise care when using the
seat heater. It may cause burns even at low
temperatures, especially if used for long
periods of time.
Do not place anything on the seat or seatback
that insulates against heat, such as a blanket
or cushion. This may cause the seat heater to
overheat. Sitting in a seat that has been over -
heated could cause serious burns due to the
increased surface temperature of the seat.
WARNING!
2
23_WL_OM_EN_USC_t.book Page 45
Page 48 of 424

46GETTING TO KNOW YOUR VEHICLE
NOTE:
Once a heat setting is selected, heat will be felt
within two to five minutes.
The engine must be running for the heated
seats to operate.
The level of heat selected will stay on until the
operator changes it.
For information on use with the Remote Start
system, see Ú page 25.
Rear Heated Seats — If Equipped
The two second row outboard seats may
be equipped with heated seats. There
are two heated seat switches that allow
the rear passengers to operate the seats
independently. The heated seat switches for each
heater are located on the rear of the center
console.
You can choose from HI, MED, LO, or OFF heat
settings. Indicator lights in each switch illuminate
indicating the level of heat in use.
Push the heated seat switch once to turn the HI
setting on.
Push the heated seat switch a second time to
turn the MED setting on.
Push the heated seat switch a third time to turn
the LO setting on.
Push the heated seat switch a fourth time to
turn the heating elements off. The level of heat selected will stay on until the
operator changes it.
NOTE:The engine must be running for the heated seats to
operate.
VENTILATED SEATS — IF EQUIPPED
Located in the seat cushion and seatback are fans
that draw the air from the passenger compartment
and move air through fine perforations in the seat
cover to help keep the occupant cooler in higher
ambient temperatures.
Front Ventilated Seats
The ventilated seats control buttons are
located on the center stack below the
radio screen or within the Uconnect
system. The fans operate at three
speeds: HI, MED and LO.
Press the ventilated seat switch once to choose
HI.
Press the ventilated seat switch a second time
to choose MED.
Press the ventilated seat switch a third time to
choose LO.
Press the ventilated seat switch a fourth time to
turn the ventilation off.
NOTE:The engine must be running for the ventilated
seats to operate.
For information on use with the Remote Start
system, see Ú page 25.
Rear Ventilated Seats — If Equipped
The two second row outboard seats may
be equipped with ventilated seats. The
rear ventilated seat control switches are
located on the rear of the center console
and allow the rear passengers to operate the seats
independently. The fans operate at three speeds:
HI, MED, and LO. Push the ventilated seat switches
to toggle through the speeds, or to turn the feature
off.
There are two ventilated seat switches
Push the ventilated seat switch once to choose
HI.
Push the ventilated seat switch a second time to
choose MED.
Push the ventilated seat switch a third time to
choose LO.
Push the ventilated seat switch a fourth time to
turn the ventilation off.
NOTE:The engine must be running for the ventilated
seats to operate.
23_WL_OM_EN_USC_t.book Page 46
Page 61 of 424
GETTING TO KNOW YOUR VEHICLE59
On some vehicles, the Daytime Running Lights
may deactivate, or reduce intensity, on one side
of the vehicle (when a turn signal is activated on
that side), or on both sides of the vehicle (when
the hazard warning lights are activated).
HIGH/LOW BEAM SWITCH
Push the multifunction lever toward the instrument
panel to switch the headlights to high beams.
Pulling the multifunction back toward the steering
wheel will turn the low beams back on, or shut the
high beams off.
AUTOMATIC HIGH BEAMS —
I
F EQUIPPED
The Automatic High Beam Headlight system
provides increased forward lighting at night by
automating high beam control through the use of a
digital camera mounted on the inside rearview
mirror. This camera detects vehicle specific light
and automatically switches from high beams to low
beams until the approaching vehicle is out of view.
NOTE:
The Automatic High Beam Headlight system can
be turned on or off by selecting or deselecting
“Auto Dim High Beams” within Uconnect
Settings Ú page 204.
The headlight switch must also be turned to the
AUTO position after Automatic High Beams is
enabled within Uconnect Settings for the
feature to activate.
Automatic High Beams will only activate when
the vehicle speed is above 22 mph (35 km/h).
Broken, muddy, or obstructed headlights and
taillights of vehicles in the field of view will
cause headlights to remain on longer (closer to
the vehicle). Also, dirt, film, and other obstruc -
tions on the windshield or camera lens will
cause the system to function improperly.
If the windshield or Automatic High Beam
Headlight Control mirror is replaced, the mirror
must be re-aimed to ensure proper performance.
See a local authorized dealer.
FLASH-TO-PASS
You can signal another vehicle with your headlights
by lightly pulling the multifunction lever toward you.
This will cause the high beam headlights to turn on,
and remain on, until the lever is released.
AUTOMATIC HEADLIGHTS
This system automatically turns the headlights on
or off according to ambient light levels. To turn the
system on, rotate the headlight switch
counterclockwise to the AUTO position. When the
system is on, the headlight time delay feature is
also on. This means the headlights will stay on for up to 90 seconds after you place the ignition into
the OFF position. The headlight time delay can be
programmed to 0/30/60/90 seconds within the
Uconnect system Ú
page 204.
To turn the automatic system off, move the
headlight switch out of the AUTO position.
NOTE:The engine must be running before the headlights
will come on in the automatic mode.
PARKING LIGHTS AND PANEL LIGHTS
To turn on the parking lights and instrument panel
lights, rotate the headlight switch clockwise. To
turn off the parking lights, rotate the headlight
switch back to the O (off) position.
NOTE:Vehicles sold in Canada are equipped with a head -
light switch with an AUTO and ON detent but
without an OFF detent. Headlights will be deacti -
vated when the headlight switch is placed in the
parking lights position. However, the Daytime
Running Lights (DRLs) will be activated along with
the front and rear marker lights. The DRLs may be
deactivated when the parking brake is engaged.
2
23_WL_OM_EN_USC_t.book Page 59
Page 62 of 424
60GETTING TO KNOW YOUR VEHICLE
HEADLIGHTS ON AUTOMATICALLY WITH
W
IPERS
If your vehicle is equipped with Automatic
Headlights, it also has this
customer-programmable feature. When your
headlights are in the automatic mode and the
engine is running, they will automatically turn on
when the wiper system is on. This feature is
programmable through the Uconnect system
Ú page 204.
NOTE:When your headlights come on during the daytime,
the vehicle will monitor outside brightness and
decide if the instrument panel needs to be dimmed
Úpage 62.
HEADLIGHT ILLUMINATION ON
A
PPROACH
When enabled, the headlights, exterior door
handle pocket lights (if equipped), and interior
lights will illuminate when the unlock button on the
key fob is pushed as the operator is approaching
the vehicle. This feature can be turned on/off, and
the length of time the headlights stay on can be
programmed for up to 90 seconds within Uconnect
Settings Ú page 204. Proximity Wake-Up — If Equipped
This feature is enabled/disabled within the
Uconnect system, and is activated when the
operator approaches the driver’s door,
passenger’s door, or liftgate with a valid key fob on
their person. Some exterior and interior lights will
illuminate in order to provide an increased sense
of welcome and security as the operator
approaches the vehicle in the dark. “Headlight
Illumination On Approach” must be selected and
set to a time value other than zero within Uconnect
Settings for Proximity Wake-Up to activate.
The doors may be locked or unlocked for this
feature to activate, as long as the ignition is in the
OFF position, or during a Remote Start event. It will
not activate if the doors are locked and the ignition
was placed in the ON/RUN position.
NOTE:Proximity Wake-Up may not activate under the
following conditions:
After numerous consecutive activations, in
order to conserve the vehicle’s battery
After the vehicle’s engine has been off for
several days
Headlight Animation — If Equipped
When “Headlight Illumination On Approach” is
turned on, and set to a time value above zero, the
exterior lights illuminate in a theatrical manner
during approach to the vehicle. This feature is
activated in the following situations:
Proximity Wake-Up (if equipped) is activated
Remote Start is activated
The unlock button on the key fob is pushed
NOTE:For Headlight Animation to activate with Remote
Start or with the push of the unlock button,
“Greeting Lights” must also be selected within the
Uconnect system.
HEADLIGHT DELAY
To aid in your exit, your vehicle is equipped with a
headlight delay that will leave the headlights on for
approximately 90 seconds. This delay is initiated
when the ignition is placed in the OFF position
while the headlight switch is on, and then the
headlight switch is cycled off. Headlight delay can
be canceled by either turning the headlight switch
on then off, or by placing the ignition in the ON/
RUN position.
NOTE:The headlight delay time is programmable through
Uconnect Settings Ú
page 204.
23_WL_OM_EN_USC_t.book Page 60
Page 65 of 424
GETTING TO KNOW YOUR VEHICLE63
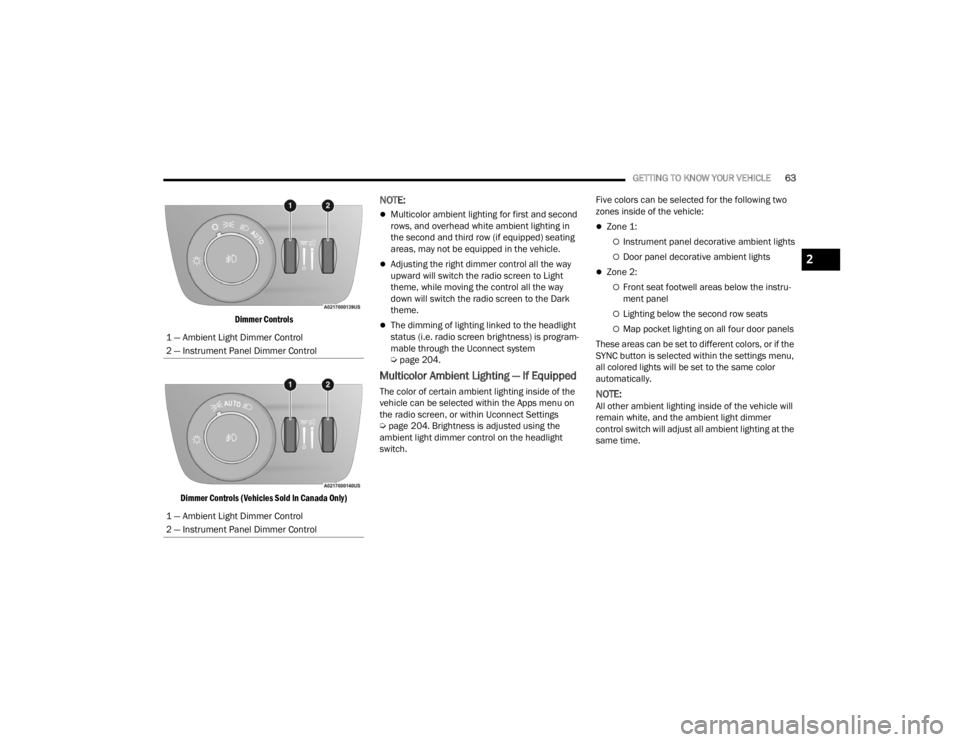
Dimmer Controls
Dimmer Controls (Vehicles Sold In Canada Only)
NOTE:
Multicolor ambient lighting for first and second
rows, and overhead white ambient lighting in
the second and third row (if equipped) seating
areas, may not be equipped in the vehicle.
Adjusting the right dimmer control all the way
upward will switch the radio screen to Light
theme, while moving the control all the way
down will switch the radio screen to the Dark
theme.
The dimming of lighting linked to the headlight
status (i.e. radio screen brightness) is program-
mable through the Uconnect system
Ú page 204.
Multicolor Ambient Lighting — If Equipped
The color of certain ambient lighting inside of the
vehicle can be selected within the Apps menu on
the radio screen, or within Uconnect Settings
Úpage 204. Brightness is adjusted using the
ambient light dimmer control on the headlight
switch. Five colors can be selected for the following two
zones inside of the vehicle:
Zone 1:
Instrument panel decorative ambient lights
Door panel decorative ambient lights
Zone 2:
Front seat footwell areas below the instru
-
ment panel
Lighting below the second row seats
Map pocket lighting on all four door panels
These areas can be set to different colors, or if the
SYNC button is selected within the settings menu,
all colored lights will be set to the same color
automatically.
NOTE:All other ambient lighting inside of the vehicle will
remain white, and the ambient light dimmer
control switch will adjust all ambient lighting at the
same time.
1 — Ambient Light Dimmer Control
2 — Instrument Panel Dimmer Control
1 — Ambient Light Dimmer Control
2 — Instrument Panel Dimmer Control
2
23_WL_OM_EN_USC_t.book Page 63
Page 66 of 424
64GETTING TO KNOW YOUR VEHICLE
WINDSHIELD WIPERS AND WASHERS
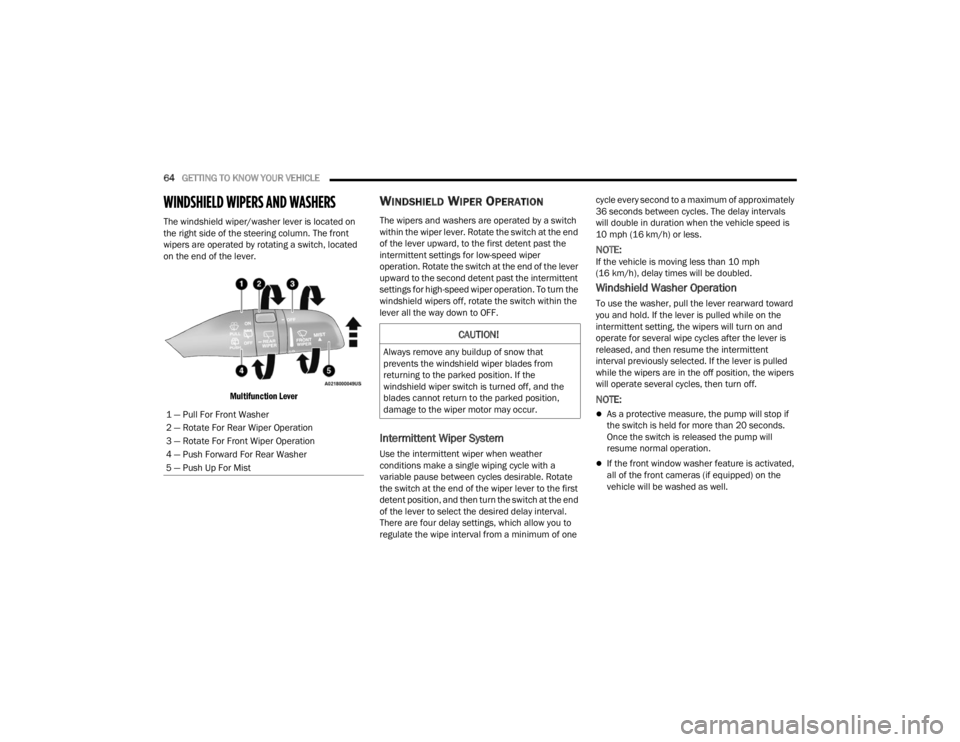
The windshield wiper/washer lever is located on
the right side of the steering column. The front
wipers are operated by rotating a switch, located
on the end of the lever.
Multifunction Lever
WINDSHIELD WIPER OPERATION
The wipers and washers are operated by a switch
within the wiper lever. Rotate the switch at the end
of the lever upward, to the first detent past the
intermittent settings for low-speed wiper
operation. Rotate the switch at the end of the lever
upward to the second detent past the intermittent
settings for high-speed wiper operation. To turn the
windshield wipers off, rotate the switch within the
lever all the way down to OFF.
Intermittent Wiper System
Use the intermittent wiper when weather
conditions make a single wiping cycle with a
variable pause between cycles desirable. Rotate
the switch at the end of the wiper lever to the first
detent position, and then turn the switch at the end
of the lever to select the desired delay interval.
There are four delay settings, which allow you to
regulate the wipe interval from a minimum of one cycle every second to a maximum of approximately
36 seconds between cycles. The delay intervals
will double in duration when the vehicle speed is
10 mph (16 km/h) or less.
NOTE:If the vehicle is moving less than 10 mph
(16 km/h), delay times will be doubled.
Windshield Washer Operation
To use the washer, pull the lever rearward toward
you and hold. If the lever is pulled while on the
intermittent setting, the wipers will turn on and
operate for several wipe cycles after the lever is
released, and then resume the intermittent
interval previously selected. If the lever is pulled
while the wipers are in the off position, the wipers
will operate several cycles, then turn off.
NOTE:
As a protective measure, the pump will stop if
the switch is held for more than 20 seconds.
Once the switch is released the pump will
resume normal operation.
If the front window washer feature is activated,
all of the front cameras (if equipped) on the
vehicle will be washed as well.
1 — Pull For Front Washer
2 — Rotate For Rear Wiper Operation
3 — Rotate For Front Wiper Operation
4 — Push Forward For Rear Washer
5 — Push Up For Mist
CAUTION!
Always remove any buildup of snow that
prevents the windshield wiper blades from
returning to the parked position. If the
windshield wiper switch is turned off, and the
blades cannot return to the parked position,
damage to the wiper motor may occur.
23_WL_OM_EN_USC_t.book Page 64
Page 68 of 424

66GETTING TO KNOW YOUR VEHICLE
REAR WIPER AND WASHER
The rear wiper/washer is operated by rotating a
switch, located at the middle of the lever.
Rotate the center portion of the lever
upward to the first detent for intermittent
operation and to the second detent for
continuous rear wiper operation.
Rear Window Washer Operation Pushing the windshield wiper lever
forward activates the rear window
washer. If the lever is pushed while on
the intermittent setting, the wipers will
turn on and operate for several wipe cycles after
the lever is released, and then resume the
intermittent interval previously selected. If the
lever is pushed while the wipers are in the off
position, the wipers will operate several wipe
cycles, then turn off.
NOTE:If equipped with a Back Up camera washer, when
the rear window washer is activated, the Rear Back
Up camera and Digital Rearview Mirror (if
equipped) cameras are also washed.
WINDSHIELD WIPER DE-ICER —
I
F EQUIPPED
Your vehicle may be equipped with a Windshield
Wiper De-Icer feature that may be activated under
the following conditions:
Activation By Front Defrost — The Windshield
Wiper De-Icer shall be activated automatically in
the case of a cold weather manual start with full
front defrost, and when the ambient tempera -
ture is below 33°F (0.6°C).
Activation By Rear Defrost — The Windshield
Wiper De-Icer shall be activated automatically
when the rear defrost is turned on and when the
ambient temperature is below 33°F (0.6°C).
Activation By Remote Start Operation — When
Remote Start is active and the outside ambient
temperature is less than 33°F (0.6°C), the
Windshield Wiper De-Icer will activate. Exiting
Remote Start will resume its previous operation.
If the Windshield Wiper De-Icer was active, the
timer and operation will continue.
CLIMATE CONTROLS
The Climate Control system allows you to regulate
the temperature, air flow, and direction of air
circulating throughout the vehicle. The controls are
located on the touchscreen and on the instrument
panel below the radio.
AUTOMATIC CLIMATE CONTROL
D
ESCRIPTIONS AND FUNCTIONS
Uconnect 5 NAV With 10.1–inch Display Temperature
Controls
Uconnect 5/5 NAV With 8.4–inch Display Temperature Controls
23_WL_OM_EN_USC_t.book Page 66
Page 74 of 424
72GETTING TO KNOW YOUR VEHICLE
REAR TEMPERATURE LOCK
The Rear Temperature Lock symbol on
the rear display is illuminated when the
rear controls are locked by the front
system.
Rear Lock
Pressing the Rear Temperature Lock button on the
Uconnect touchscreen will illuminate a lock symbol
in the rear display. The rear temperature and air
source are then controlled from the front Uconnect
system.
Rear seat occupants can only adjust the rear ATC
control when the Rear Temperature Lock button is
turned off.
The rear ATC is located on the rear of the front
center console.
Press the Rear Temperature Lock button on the
front Uconnect touchscreen a second time to
turn the Rear Temperature Lock icon off in the
rear display.
Push a rear blower button, adjust the tempera -
ture using the rear up and down arrows, and
select a control mode to suit the rear occupant’s
needs.
ATC is selected by pushing the AUTO button on
the rear climate control faceplate. Once the desired temperature is shown on the rear
display, the ATC System will automatically achieve
and maintain that comfort level. When the system
is set up for your comfort level, it is not necessary
to change the settings. You will experience the
greatest efficiency by simply allowing the system to
function automatically.
AUTOMATIC TEMPERATURE CONTROL
(ATC)
Automatic Operation
1. Push the AUTO button on the front Automatic
Temperature Control (ATC) Panel and the
word “AUTO” will illuminate in the front ATC
display, along with two temperatures for the
driver and front passenger. The system will
then automatically regulate the amount of
airflow.
2. Adjust the temperature you would like the system to maintain, by adjusting the driver,
passenger, and rear temperatures. Once the
desired temperature is displayed, the system
will achieve and automatically maintain that
comfort level.
3. When the system is set up for your comfort level, it is not necessary to change the
settings. You will experience the greatest
efficiency by simply allowing the system to
function automatically.
NOTE:It is not necessary to move the temperature
settings. The system automatically adjusts the
temperature, mode and fan speed to provide
comfort as quickly as possible.
To provide you with maximum comfort in the
automatic mode, during cold start-ups, the blower
fan will remain on low until the engine warms up.
The fan will engage immediately if the Defrost
mode is selected, or by changing the front blower
knob setting.
Manual Operation Override
This system offers a full complement of manual
override features. The AUTO symbol in the front
ATC display will be turned off when the system is
being used in the manual mode.
NOTE:The system will not automatically sense the
presence of fog, mist or ice on the windshield.
Defrost mode must be manually selected to clear
the windshield and side glass.
CLIMATE VOICE RECOGNITION
Adjust vehicle temperatures hands-free and keep
everyone comfortable while you keep moving
ahead (if vehicle is equipped with climate
controls).
23_WL_OM_EN_USC_t.book Page 72
Page 75 of 424
GETTING TO KNOW YOUR VEHICLE73
Push the VR button. After the beep, say one of the
following commands:
“ Set the driver temperature to 70 degrees ”
“Set the passenger temperature to 70 degrees ”
Did You Know: Voice Command for Climate may
only be used to adjust the interior temperature of
your vehicle. Voice Command will not work to
adjust the heated seats or steering wheel if
equipped.
OPERATING TIPS
NOTE:Refer to the chart at the end of this section for
suggested control settings for various weather
conditions.
Summer Operation
The engine cooling system must be protected with
a high-quality antifreeze coolant to provide proper
corrosion protection and to protect against engine
overheating. OAT coolant (conforming to
MS.90032) is recommended. For more
information, see Ú page 401.
Winter Operation
To ensure the best possible heater and defroster
performance, make sure the engine cooling
system is functioning properly and the proper
amount, type, and concentration of coolant is
used. Use of the Air Recirculation mode during
Winter months is not recommended, because it
may cause window fogging.
Vacation/Storage
For information on maintaining the Climate Control
system when the vehicle is being stored for an
extended period of time, see Ú page 392.
Window Fogging
Vehicle windows tend to fog on the inside in mild,
rainy, and/or humid weather. To clear the
windows, select Defrost or Mix mode and increase
the front blower speed. Do not use the
Recirculation mode without A/C for long periods,
as fogging may occur.
Outside Air Intake
Make sure the air intake, located directly in front of
the windshield, is free of obstructions, such as
leaves. Leaves collected in the air intake may
reduce airflow, and if they enter the air distribution
box, they could plug the water drains. In Winter
months, make sure the air intake is clear of ice,
slush, and snow.
Cabin Air Filter
The Climate Control system filters out dust and
pollen from the air. Contact an authorized dealer to
service your cabin air filter, and to have it replaced
when needed.
Stop/Start System — If Equipped
While in an Autostop, the Climate Control system
may automatically adjust airflow to maintain cabin
comfort. Customer settings will be maintained
upon return to an engine running condition.
Windshield Wiper De-Icer — If Equipped
The Windshield Wiper De-Icer is a heating element
located at the base of the windshield.
It operates automatically once the following
conditions are met:
Activation By Front Defrost
The Windshield Wiper De-Icer activates auto -
matically during a cold weather manual start
with full defrost, and when the ambient
temperature is below 33°F (0.6°C) .
CAUTION!
Interior air enters the Rear Automatic
Temperature Control system through an intake
grille, located in the right side trim panel behind
the third row seats. The heater outlets are
located in the right side trim panel, just behind
the rear doors. Do not block or place objects
directly in front of the inlet grille or heater
outlets. The electrical system could overload
causing damage to the blower motor.
2
23_WL_OM_EN_USC_t.book Page 73
Page 76 of 424

74GETTING TO KNOW YOUR VEHICLE
Activation By Rear Defrost
The Windshield Wiper De-Icer activates auto -
matically when the Rear Defrost is operating
and the ambient temperature is below 33°F
(0.6°C) .
Activation By Remote Start Operation
When the Remote Start is activated and the
outside ambient temperature is less than 33°F
(0.6°C) the Windshield Wiper De-Icer will acti -
vate. Exiting Remote Start will resume its
previous operation. If the Windshield Wiper
De-Icer was active, the timer and operation will
continue.
Operating Tips Chart
INTERIOR STORAGE AND EQUIPMENT
STORAGE
Glove Compartment
The glove compartment is located on the
passenger side of the instrument panel.
Glove Compartment Release Handle
To open the glove compartment, pull the release
handle.
WEATHER CONTROL SETTINGS
Hot Weather And
Vehicle Interior Is Very Hot Set the mode control to
(Panel Mode),
(MAX A/C) on, and
blower on high. Roll
down the windows for a minute to flush out the hot air. Adjust the
controls as needed to achieve comfort.
Warm Weather Turn (A/C) on and
set the mode control to
(Panel Mode).
Cool Sunny Operate in (Bi-Level
Mode).
Cool & Humid Conditions Set the mode control to
(Floor Mode) and
turn (A/C) on to
keep windows clear.
Cold Weather Set the mode control to
(Floor Mode). If
windshield fogging
starts to occur, move
the control to (Mix Mode).
WEATHER CONTROL SETTINGS
23_WL_OM_EN_USC_t.book Page 74