ABS JEEP GRAND CHEROKEE 2023 Owners Manual
[x] Cancel search | Manufacturer: JEEP, Model Year: 2023, Model line: GRAND CHEROKEE, Model: JEEP GRAND CHEROKEE 2023Pages: 424, PDF Size: 15.48 MB
Page 9 of 424

7
REAR SEAT ENTERTAINMENT (RSE) WITH
AMAZON FIRE TV BUILT-IN — IF EQUIPPED ..... 234 Overview......................................................... 234
Getting Started .............................................. 235Accessing Rear Seat Entertainment with Fire
TV built-in from the Front Radio Screen....... 235Accessing Rear Seat Entertainment with Fire
TV built-in from the Rear Screens ................ 236
Accessing Rear Seat Entertainment with Fire TV
built-in from the Passenger Screen —
If Equipped..................................................... 236
First Time Starting Up
(Using the Rear Screens) .............................. 236Alexa Voice Control........................................ 237
Listen Via Vehicle Speakers ......................... 237Quick Menu.................................................... 237
Parental Controls (Using the Rear Screens) .. 238
Voice Remote with Alexa Pairing (Using the
Rear Screens) ................................................ 238
Media Sources Input (Using the Front Radio and
Rear Screens) ................................................ 238
Voice Remote with Alexa............................... 239 Replacing the Voice Remote with
Alexa Batteries .............................................. 239
Rear Seat Entertainment with Fire TV Built-In
streaming (Using the Front Radio and Rear
Screens) ......................................................... 240
Fire TV Apps/Games
(Using the Rear Screens) .............................. 241
Are We There Yet? ......................................... 241
Using The Video USB Port ............................. 242
Play Video Games ......................................... 242
Headphones Operation................................. 242
Rear Climate Controls ................................... 243Legal & Compliance ...................................... 245
OFF-ROAD PAGES — IF EQUIPPED.................... 245
Off-Road Pages Status Bar .......................... 245
Vehicle Dynamics ......................................... 246
Accessory Gauges ........................................ 246Pitch & Roll ................................................... 246
Selec-Terrain — If Equipped ......................... 246
Suspension — If Equipped ............................ 247
RADIO OPERATION AND MOBILE PHONES ..... 247
Regulatory And Safety Information .............. 247
SAFETY
SAFETY FEATURES .............................................. 248 Anti-Lock Brake System (ABS) ..................... 248
Drowsy Driver Detection (DDD) — If Equipped .... 249
Rear Seat Reminder Alert (RSRA) ................ 249Electronic Brake Control (EBC) System ...... 250
AUXILIARY DRIVING SYSTEMS .......................... 258
Blind Spot Monitoring (BSM) ........................ 258Forward Collision Warning (FCW)
With Mitigation .............................................. 261
Tire Pressure Monitoring System (TPMS) .... 264
OCCUPANT RESTRAINT SYSTEMS ................... 269
Occupant Restraint Systems Features ....... 269
Important Safety Precautions ...................... 269
Seat Belt Systems ........................................ 270
Supplemental Restraint Systems (SRS) ...... 277Child Restraints ............................................. 289
SAFETY TIPS ........................................................ 303
Transporting Passengers.............................. 303
Transporting Pets ......................................... 303
Connected Vehicles ...................................... 303
Safety Checks You Should Make Inside The
Vehicle .......................................................... 303Periodic Safety Checks You Should Make
Outside The Vehicle ...................................... 305
Exhaust Gas................................................... 305
Carbon Monoxide Warnings ......................... 306
23_WL_OM_EN_USC_t.book Page 7
Page 15 of 424
13
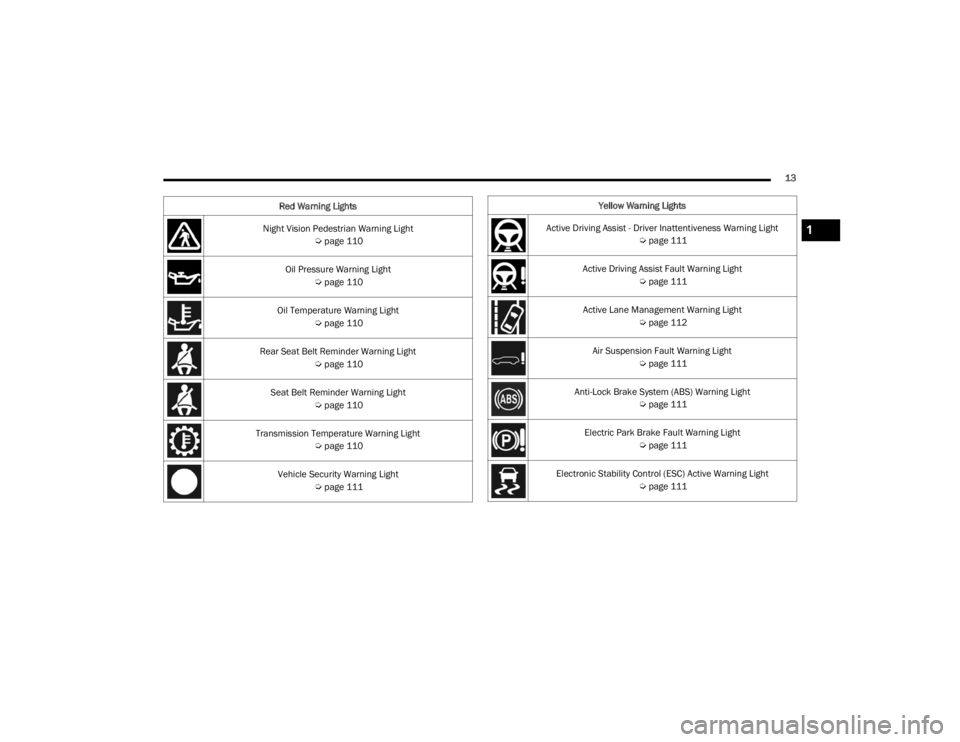
Night Vision Pedestrian Warning Light Úpage 110
Oil Pressure Warning Light Úpage 110
Oil Temperature Warning Light Úpage 110
Rear Seat Belt Reminder Warning Light Úpage 110
Seat Belt Reminder Warning Light Úpage 110
Transmission Temperature Warning Light Úpage 110
Vehicle Security Warning Light Úpage 111
Red Warning Lights
Yellow Warning Lights
Active Driving Assist - Driver Inattentiveness Warning Light Úpage 111
Active Driving Assist Fault Warning Light Úpage 111
Active Lane Management Warning Light Úpage 112
Air Suspension Fault Warning Light Úpage 111
Anti-Lock Brake System (ABS) Warning Light Úpage 111
Electric Park Brake Fault Warning Light Úpage 111
Electronic Stability Control (ESC) Active Warning Light Úpage 111
1
23_WL_OM_EN_USC_t.book Page 13
Page 29 of 424
GETTING TO KNOW YOUR VEHICLE27
When the Vehicle Security system is armed, the
Vehicle Security Light (located in the lower right
portion of the instrument cluster display) will begin
to flash every two seconds until it is disarmed.
NOTE:If the system is armed by pushing the lock button
on the interior door panel, the Vehicle Security
Light will flash rapidly for about 15 seconds once
the door is closed, then slow down to every two
seconds.
TO DISARM THE SYSTEM
The Vehicle Security system can be disarmed using
any of the following methods:
Push the unlock button on the key fob.
Grab the Passive Entry door handle to unlock
the door Ú page 29.
Cycle the ignition out of the OFF position to
disarm the system.
NOTE:
The driver's door key cylinder cannot arm or
disarm the Vehicle Security system. Use of the
door key cylinder when the alarm is armed will
sound the alarm when the door is opened.
The Vehicle Security system remains armed
when the power liftgate is opened using the lift -
gate button on the key fob. If someone enters the vehicle through the opened liftgate, then
opens any door from the inside, the alarm will
sound.
If Passive Entry (if equipped) is used to unlock
the liftgate, the Vehicle Security system is
disarmed and the rest of the vehicle doors will
remain locked unless all doors are set to unlock
on first press within Uconnect Settings.
When the Vehicle Security system is armed, the
interior power door lock switches will not unlock
the doors.
The Vehicle Security system is designed to protect
your vehicle. However, you can create conditions
where the system will give you a false alarm. If one
of the previously described arming sequences has
occurred, the Vehicle Security system will arm
regardless of whether you are in the vehicle or not.
If you remain in the vehicle and open a door, the
alarm will sound. If this occurs, disarm the Vehicle
Security system.
If the Vehicle Security system is armed and the
battery becomes disconnected, the Vehicle
Security system will remain armed when the
battery is reconnected; the exterior lights will flash,
and the horn will sound. If this occurs, disarm the
Vehicle Security system.
REARMING OF THE SYSTEM
If something triggers the alarm and no action is
taken to disarm it, the Vehicle Security system will
turn the horn off after a 29 second cycle (with five
seconds between cycles and up to eight cycles if
the trigger remains active) and then rearm itself.
SECURITY SYSTEM MANUAL OVERRIDE
The Vehicle Security system will not arm if you lock
the doors using the emergency lock lever
Ú page 27.
TAMPER ALERT
If something has triggered the Vehicle Security
system in your absence, the horn will sound three
times and the exterior lights will blink three times
when you disarm the Vehicle Security system.
DOORS
MANUAL DOOR LOCKS
The front doors can be manually unlocked with a
single pull of the inside door handle. The driver’s
door can also be manually unlocked by inserting
the emergency key into the lock cylinder on the
outside door handle.
2
23_WL_OM_EN_USC_t.book Page 27
Page 110 of 424
108GETTING TO KNOW YOUR INSTRUMENT PANEL
WARNING LIGHTS AND MESSAGES
The warning/indicator lights will illuminate in the
instrument panel together with a dedicated
message and/or acoustic signal when applicable.
These indications are indicative and precautionary
and as such must not be considered as exhaustive
and/or alternative to the information contained in
the Owner’s Manual, which you are advised to read
carefully in all cases. Always refer to the
information in this chapter in the event of a failure
indication. All active telltales will display first if
applicable. The system check menu may appear
different based upon equipment options and
current vehicle status. Some telltales are optional
and may not appear.
RED WARNING LIGHTS
Active Driving Assist - Driver
Inattentiveness Warning Light
This light illuminates when driver
inattentiveness has been continually
detected, warning the driver to place
their hands on the steering wheel.
Air Bag Warning Light
This warning light will illuminate to
indicate a fault with the air bag, and will
turn on for four to eight seconds as a bulb
check when the ignition is placed in the
ON/RUN position. This light will illuminate with a single chime when a fault with the air bag has been
detected, it will stay on until the fault is cleared. If
the light is either not on during startup, stays on, or
turns on while driving, have the system inspected
at an authorized dealer as soon as possible.
Brake Warning Light
This warning light monitors various brake
functions, including brake fluid level and
parking brake application. If the brake
light turns on it may indicate that the
parking brake is applied, that the brake fluid level
is low, or that there is a problem with the Anti-Lock
Brake System reservoir.
If the light remains on when the parking brake has
been disengaged, and the fluid level is at the full
mark on the master cylinder reservoir, it indicates
a possible brake hydraulic system malfunction or
that a problem with the Brake Booster has been
detected by the Anti-Lock Brake System (ABS) /
Electronic Stability Control (ESC) system. In this
case, the light will remain on until the condition has
been corrected. If the problem is related to the
brake booster, the ABS pump will run when
applying the brake, and a brake pedal pulsation
may be felt during each stop.
The dual brake system provides a reserve braking
capacity in the event of a failure to a portion of the
hydraulic system. A leak in either half of the dual
brake system is indicated by the Brake Warning
Light, which will turn on when the brake fluid level in the master cylinder has dropped below a
specified level.
The light will remain on until the cause is corrected.
NOTE:The light may flash momentarily during sharp
cornering maneuvers, which change fluid level
conditions. The vehicle should have service
performed, and the brake fluid level checked.
If brake failure is indicated, immediate repair is
necessary.
Vehicles equipped with the Anti-Lock Brake System
(ABS) are also equipped with Electronic Brake
Force Distribution (EBD). In the event of an EBD
failure, the Brake Warning Light will turn on along
with the ABS Light. Immediate repair to the ABS
system is required.
Operation of the Brake Warning Light can be
checked by turning the ignition switch from the OFF
position to the ON/RUN position. The light should
illuminate for approximately two seconds. The light
should then turn off unless the parking brake is
WARNING!
Driving a vehicle with the red brake light on is
dangerous. Part of the brake system may have
failed. It will take longer to stop the vehicle. You
could have a collision. Have the vehicle checked
immediately.
23_WL_OM_EN_USC_t.book Page 108
Page 113 of 424
GETTING TO KNOW YOUR INSTRUMENT PANEL111
Vehicle Security Warning Light —
If Equipped
This light will flash at a fast rate for
approximately 15 seconds when the vehicle
security system is arming, and then will flash
slowly until the vehicle is disarmed.
YELLOW WARNING LIGHTS
Active Driving Assist - Driver
Inattentiveness Warning Light
This light illuminates when driver
inattentiveness has been detected,
warning the driver to place their hands on
the steering wheel.
Active Driving Assist Fault Warning Light
This light will turn on when the Active
Driving Assist system has detected a
fault.
Air Suspension Fault Warning Light
This light will illuminate when there is a
fault detected in the air suspension
system.
Anti-Lock Brake System (ABS) Warning Light
This warning light monitors the ABS. The
light will turn on when the ignition is
placed in the ON/RUN or position and
may stay on for as long as four seconds.
If the ABS light remains on or turns on while
driving, then the Anti-Lock portion of the brake
system is not functioning and service is required as
soon as possible. However, the conventional brake
system will continue to operate normally,
assuming the Brake Warning Light is not also on.
If the ABS light does not turn on when the ignition
is placed in the ON/RUN position, have the brake
system inspected by an authorized dealer.
Electric Park Brake Fault Warning Light
This warning light will illuminate to
indicate the Electric Park Brake is not
functioning properly and service is
required. Contact an authorized dealer.
Electronic Stability Control (ESC) Active
Warning Light — If Equipped
This warning light will indicate when the
ESC system is Active. The ESC Indicator
Light in the instrument cluster will come
on when the ignition is placed in the ON/
RUN position, and when ESC is activated. It should
go out with the engine running. If the ESC Indicator
Light comes on continuously with the engine
running, a malfunction has been detected in the
ESC system. If this warning light remains on after
several ignition cycles, and the vehicle has been
driven several miles (kilometers) at speeds greater
than 30 mph (48 km/h), see an authorized dealer
as soon as possible to have the problem
diagnosed and corrected.
The ESC OFF Indicator Light and the ESC Indi -
cator Light come on momentarily each time the
ignition is placed in the ON/RUN position.
The ESC system will make buzzing or clicking
sounds when it is active. This is normal; the
sounds will stop when ESC becomes inactive.
This light will come on when the vehicle is in an
ESC event.
WARNING!
If you continue operating the vehicle when the
Transmission Temperature Warning Light is
illuminated you could cause the fluid to boil over,
come in contact with hot engine or exhaust
components and cause a fire.
CAUTION!
Continuous driving with the Transmission
Temperature Warning Light illuminated will
eventually cause severe transmission damage
or transmission failure.
3
23_WL_OM_EN_USC_t.book Page 111
Page 133 of 424
STARTING AND OPERATING131
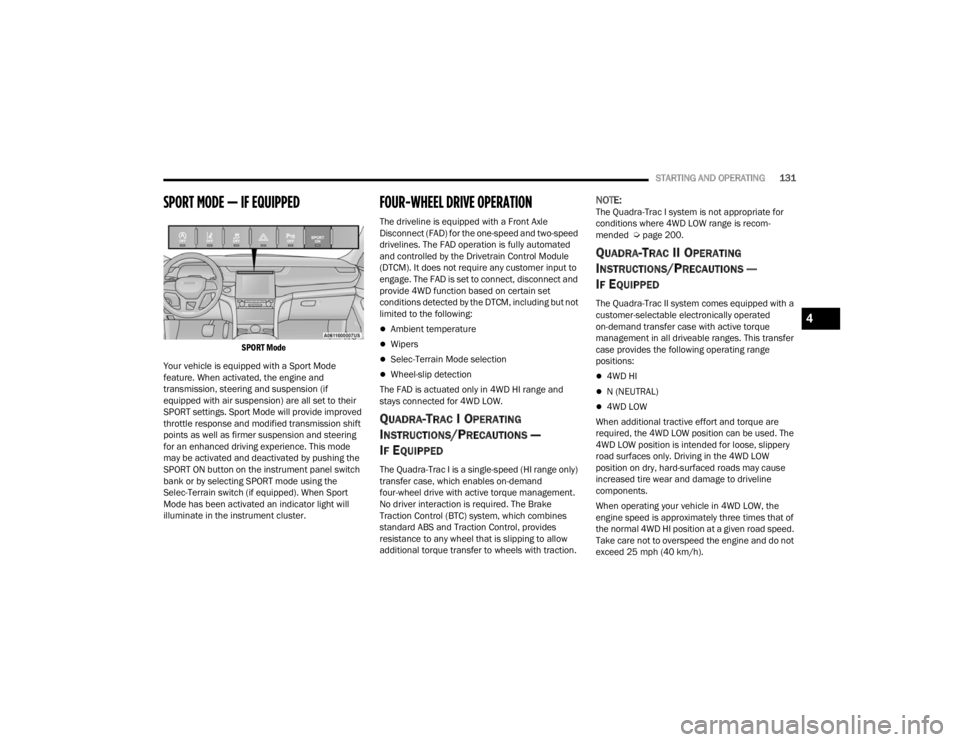
SPORT MODE — IF EQUIPPED
SPORT Mode
Your vehicle is equipped with a Sport Mode
feature. When activated, the engine and
transmission, steering and suspension (if
equipped with air suspension) are all set to their
SPORT settings. Sport Mode will provide improved
throttle response and modified transmission shift
points as well as firmer suspension and steering
for an enhanced driving experience. This mode
may be activated and deactivated by pushing the
SPORT ON button on the instrument panel switch
bank or by selecting SPORT mode using the
Selec-Terrain switch (if equipped). When Sport
Mode has been activated an indicator light will
illuminate in the instrument cluster.
FOUR-WHEEL DRIVE OPERATION
The driveline is equipped with a Front Axle
Disconnect (FAD) for the one-speed and two-speed
drivelines. The FAD operation is fully automated
and controlled by the Drivetrain Control Module
(DTCM). It does not require any customer input to
engage. The FAD is set to connect, disconnect and
provide 4WD function based on certain set
conditions detected by the DTCM, including but not
limited to the following:
Ambient temperature
Wipers
Selec-Terrain Mode selection
Wheel-slip detection
The FAD is actuated only in 4WD HI range and
stays connected for 4WD LOW.
QUADRA-TRAC I OPERATING
I
NSTRUCTIONS/PRECAUTIONS —
I
F EQUIPPED
The Quadra-Trac I is a single-speed (HI range only)
transfer case, which enables on-demand
four-wheel drive with active torque management.
No driver interaction is required. The Brake
Traction Control (BTC) system, which combines
standard ABS and Traction Control, provides
resistance to any wheel that is slipping to allow
additional torque transfer to wheels with traction.
NOTE:The Quadra-Trac I system is not appropriate for
conditions where 4WD LOW range is recom -
mended Ú page 200.
QUADRA-TRAC II OPERATING
I
NSTRUCTIONS/PRECAUTIONS —
I
F EQUIPPED
The Quadra-Trac II system comes equipped with a
customer-selectable electronically operated
on-demand transfer case with active torque
management in all driveable ranges. This transfer
case provides the following operating range
positions:
4WD HI
N (NEUTRAL)
4WD LOW
When additional tractive effort and torque are
required, the 4WD LOW position can be used. The
4WD LOW position is intended for loose, slippery
road surfaces only. Driving in the 4WD LOW
position on dry, hard-surfaced roads may cause
increased tire wear and damage to driveline
components.
When operating your vehicle in 4WD LOW, the
engine speed is approximately three times that of
the normal 4WD HI position at a given road speed.
Take care not to overspeed the engine and do not
exceed 25 mph (40 km/h).
4
23_WL_OM_EN_USC_t.book Page 131
Page 169 of 424
STARTING AND OPERATING167
NOTE:
The driver is always responsible for controlling
the vehicle, responsible for any surrounding
objects, and must intervene as required.
The system is designed to assist the driver and
not to substitute the driver.
During a semi-automatic maneuver, if the driver
touches the steering wheel after being
instructed to remove their hands from the
steering wheel, the system will cancel, and the
driver will be required to manually complete the
parking maneuver.
The system may not work in all conditions (e.g.
environmental conditions such as heavy rain,
snow, etc., or if searching for a parking space
that has surfaces that will absorb the ultrasonic
sensor waves).
New vehicles from the dealership must have at
least 30 miles (48 km) accumulated before the
ParkSense Active Park Assist system is fully cali -
brated and performs accurately. This is due to
the system’s dynamic vehicle calibration to
improve the performance of the feature. The
system will also continuously perform the
dynamic vehicle calibration to account for differ -
ences such as over or under inflated tires and
new tires.
ENABLING AND DISABLING THE
P
ARKSENSE ACTIVE PARK ASSIST
S
YSTEM
The ParkSense Active Park Assist system
can be enabled and disabled with the
ParkSense Active Park Assist switch,
located on the switch panel above the
Uconnect display.
To enable or disable the ParkSense Active Park
Assist system, push the ParkSense Active Park
Assist switch once (LED turns on). Pushing the
switch a second time will disable the system (LED
turns off).
The ParkSense Active Park Assist system will turn
off automatically for any of the following
conditions:
Parking maneuver is completed
Vehicle speed is greater than 18 mph
(30 km/h) when searching for a parking space
Vehicle speed is greater than 5 mph (7 km/h) during active steering guidance into the parking
space
Steering wheel is touched during active steering
guidance into the parking space
ParkSense Front and Rear Park Assist switch is
pushed
Driver's door is opened
Rear liftgate is opened
Electronic Stability Control/Anti-Lock Braking
System intervention
The ParkSense Active Park Assist system allows a
maximum number of shifts between DRIVE and
REVERSE. If the maneuver cannot be completed
within the maximum amount of shifts, the system
will cancel and the instrument cluster display will
instruct the driver to complete the maneuver
manually.
The ParkSense Active Park Assist system will only
operate and search for a parking space when the
following conditions are present:
Gear selector is in DRIVE
Ignition is in the RUN position
ParkSense Active Park Assist switch is activated
Driver's door is closed
Rear liftgate is closed
Vehicle speed is less than 15 mph (25 km/h)
The outer surface and the underside of the front
and rear fascias/bumpers are clean and clear
of snow, ice, mud, dirt or other obstruction
4
23_WL_OM_EN_USC_t.book Page 167
Page 193 of 424

STARTING AND OPERATING191
TRAILER HITCH RECEIVER COVER
R
EMOVAL — IF EQUIPPED
Your vehicle may be equipped with a trailer hitch
receiver cover, this must be removed to access the
trailer hitch receiver. This cover is located at the
bottom center of the rear fascia/bumper.
1. Turn the two locking retainers located at the
bottom of the hitch receiver cover a quarter
turn counterclockwise and pull bottom of the
hitch receiver cover outward (towards you).
2. Pull the bottom of the cover outward (towards you) then downwards to disengage the tabs
located at the top of the hitch receiver cover to
remove.
Hitch Receiver Cover
To reinstall the cover after towing repeat the
procedure in reverse order.NOTE:Be sure to engage all tabs of the hitch receiver
cover in the fascia/bumper prior to installation.
TRAILER AND TONGUE WEIGHT
Never exceed the maximum tongue weight
stamped on your fascia/bumper or trailer hitch.
Weight Distribution
Consider the following items when computing the
weight on the rear axle of the vehicle:
The tongue weight of the trailer.
The weight of any other type of cargo or equip
-
ment put in or on your vehicle.
The weight of the driver and all passengers.
NOTE:Remember that everything put into or on the trailer
adds to the load on your vehicle. Also, additional
factory-installed options or dealer-installed options
must be considered as part of the total load on
your vehicle. Refer to the Tire And Loading Infor -
mation Placard for the maximum combined weight
of occupants and cargo for your vehicle.
1 — Hitch Receiver Cover
2 — Locking Retainers
WARNING!
Always load a trailer with 60% of the weight in
the front of the trailer. This places 10% of the
GTW on the tow hitch of your vehicle. Loads
balanced over the wheels or heavier in the rear
can cause the trailer to sway severely side to
side which will cause loss of control of the
vehicle and trailer. Failure to load trailers heavier
in front is the cause of many trailer collisions.
4
23_WL_OM_EN_USC_t.book Page 191
Page 236 of 424
234MULTIMEDIA
NOTE:To change the source within the app, press the
source name. Pressing this will open a menu with
all available sources. To change the audio source
outside of the app, press the Media button, and
then press the Sources button.
To exit the app, press any of the buttons on the
Bottom Menu Bar. Day/Night Mode
Press the Menu button in the upper left-hand
corner to access McIntosh settings. Tap on a Mode
to set it as the default, or tap “Auto Mode” to
enable your screen to automatically switch
between Day and Night Modes.
Theater Mode
Press the Menu button in the upper left-hand
corner to access McIntosh settings. Under the
Theater Mode section, select “On” to bring forward
the McIntosh meters. This will enlarge the meters
for a more prominent view.
NOTE:Theater Mode will engage after 10 seconds
without input from the user.
For more information on McIntosh, the McIntosh
app and its functionality, please visit
https://
www.mcintoshlabs.com.
REAR SEAT ENTERTAINMENT (RSE) WITH
AMAZON FIRE TV BUILT-IN — IF EQUIPPED
OVERVIEW
Rear Seat Entertainment with Fire TV built-in is
designed to give your family years of enjoyment.
Fire TV lets passengers enjoy a wide variety of
content from popular apps (subscriptions may be
required). Stream videos, play games, listen to
Skip Backward
Press to skip
backward. Press and
hold to fast rewind.
Play/Pause Press to play/pause
the track.
Skip Forward Press to skip forward.
Press and hold to fast
forward.
Repeat Press to repeat track.
Press again to repeat
playlist. Press again to
turn off (works only
with a USB device).
Change Channel Down Press to change
channel down. Press
and hold to seek
channel down. While
using AM/FM, pressing
the channel down will
change the frequency
by 0.1. Pressing and
holding in AM/FM will
seek channels.
Change Channel UpPress to change
channel up. Press and
hold to seek channel
up. While using AM/
FM, pressing the
channel up will change
the frequency by 0.1.
Pressing and holding in
AM/FM will seek
channels.
Menu Press to access
McIntosh settings.
About Press to learn more
about McIntosh.
Audio Press to open the
audio settings page of
the Uconnect media
player.
23_WL_OM_EN_USC_t.book Page 234
Page 250 of 424

248 (Continued)
SAFETY
SAFETY FEATURES
ANTI-LOCK BRAKE SYSTEM (ABS)
The ABS provides increased vehicle stability and
brake performance under most braking conditions.
The system automatically prevents wheel lock and
enhances vehicle control during braking.
The ABS performs a self-check cycle to ensure that
the ABS is working properly each time the vehicle
is started and driven. During this self-check, you
may hear a slight clicking sound as well as some
related motor noises.
The ABS is activated during braking when the
system detects one or more wheels are beginning
to lock. Road conditions such as ice, snow, gravel,
bumps, railroad tracks, loose debris, or panic stops
may increase the likelihood of ABS activation(s).
You also may experience the following normal
characteristics when the ABS activates:
ABS motor noise or clicking sounds (you may
continue to hear for a short time after the stop)
Brake pedal pulsations
A slight drop of the brake pedal at the end of the
stopThe ABS is designed to function with the Original
Equipment Manufacturer (OEM) tires. Modification
may result in degraded ABS performance.
Anti-Lock Brake System (ABS) Warning
Light
The yellow ABS Warning Light will turn on when the
ignition is placed in the ON/RUN mode and may
stay on for as long as four seconds.
If the ABS Warning Light remains on or comes on
while driving, it indicates that the anti-lock portion
of the brake system is not functioning and that
service is required. However, the conventional
brake system will continue to operate normally if
the ABS Warning Light is on.
WARNING!
The ABS contains sophisticated electronic
equipment that may be susceptible to interfer
-
ence caused by improperly installed or high
output radio transmitting equipment. This
interference can cause possible loss of
anti-lock braking capability. Installation of
such equipment should be performed by qual -
ified professionals.
Pumping of the Anti-Lock Brakes will diminish
their effectiveness and may lead to a collision.
Pumping makes the stopping distance longer.
Just press firmly on your brake pedal when you
need to slow down or stop.
The ABS cannot prevent the natural laws of
physics from acting on the vehicle, nor can it
increase braking or steering efficiency beyond
that afforded by the condition of the vehicle
brakes and tires or the traction afforded.
The ABS cannot prevent collisions, including
those resulting from excessive speed in turns,
following another vehicle too closely, or hydro -
planing.
The capabilities of an ABS equipped vehicle
must never be exploited in a reckless or
dangerous manner that could jeopardize the
user’s safety or the safety of others.
WARNING!
23_WL_OM_EN_USC_t.book Page 248