change wheel JEEP GRAND CHEROKEE 2023 Owners Manual
[x] Cancel search | Manufacturer: JEEP, Model Year: 2023, Model line: GRAND CHEROKEE, Model: JEEP GRAND CHEROKEE 2023Pages: 424, PDF Size: 15.48 MB
Page 11 of 424

9
STORING THE VEHICLE ...................................... 392
BODYWORK .......................................................... 392 Protection From Atmospheric Agents .......... 392
Body And Underbody Maintenance.............. 393
Preserving The Bodywork ............................. 393
INTERIORS ........................................................... 394
Seats And Fabric Parts.................................. 394
Plastic And Coated Parts .............................. 394Leather Surfaces ........................................... 395Glass Surfaces .............................................. 395
TECHNICAL SPECIFICATIONS
VEHICLE IDENTIFICATION NUMBER (VIN)......... 396
BRAKE SYSTEM ................................................... 396
WHEEL AND TIRE TORQUE SPECIFICATIONS .. 396
Torque Specifications ................................... 396
FUEL REQUIREMENTS ......................................... 397
2.0L Engine.................................................... 397
3.6L Engine.................................................... 397
5.7L Engine.................................................... 397
Reformulated Gasoline ................................ 398 Materials Added To Fuel .............................. 398
Gasoline/Oxygenate Blends ......................... 398
Do Not Use E-85 In Non-Flex Fuel Vehicles ....398
CNG And LP Fuel System Modifications ...... 398Methylcyclopentadienyl Manganese
Tricarbonyl (MMT) In Gasoline...................... 399Fuel System Cautions ................................... 399
FLUID CAPACITIES ............................................. 400
ENGINE FLUIDS AND LUBRICANTS................... 401
CHASSIS FLUIDS AND LUBRICANTS ................ 402
CUSTOMER ASSISTANCE
SUGGESTIONS FOR OBTAINING SERVICE FOR
YOUR VEHICLE .................................................... 403
Prepare For The Appointment ...................... 403Prepare A List ................................................ 403Be Reasonable With Requests..................... 403 IF YOU NEED ASSISTANCE ................................ 403
Roadside Assistance..................................... 404FCA US LLC Customer Center....................... 405
FCA Canada Inc. Customer Center .............. 405
Mexico............................................................ 405
Puerto Rico And US Virgin Islands ............... 405
Customer Assistance For The Hearing Or
Speech Impaired (TDD/TTY) ......................... 405
Service Contract ........................................... 405
WARRANTY INFORMATION ................................ 406
MOPAR® PARTS ................................................. 406
REPORTING SAFETY DEFECTS .......................... 406
In The 50 United States And
Washington, D.C............................................ 406
In Canada ...................................................... 407
PUBLICATION ORDER FORMS .......................... 407
CHANGE OF OWNERSHIP OR ADDRESS .......... 408
GENERAL INFORMATION.................................... 408
23_WL_OM_EN_USC_t.book Page 9
Page 12 of 424
10
INTRODUCTION
Dear Customer,
Congratulations on the purchase of your new Jeep® vehicle. Be assured that it represents precision workmanship, distinctive styling, and high quality. The all-new
Jeep® Grand Cherokee/Grand Cherokee L continues to build on its proud legacy as the most celebrated SUV ever, while raising the bar in luxury and
performance. With legendary 4x4 capability, this vehicle breaks new ground in exceptional performance, comfort, and functionality. We have improved on-road
refinement and premium styling and craftsmanship inside and out. With an unsurpassed blend of refined sophistication, dynamic performance, cutting edge
technologies, and levels of elegance, the new Jeep® Grand Cherokee/Grand Cherokee L carries an attractive presence and capability that is uncommon in its
class, unquestionably Jeep® brand, and unmistakably world class.
The all-new Jeep® Grand Cherokee/Grand Cherokee L is a specialized utility vehicle and can go places and perform tasks that are not intended for conventional
passenger vehicles. It handles and maneuvers differently from many passenger vehicles both on-road and off-road, so take time to become familiar with your
vehicle. If equipped, the two-wheel drive version of this vehicle was designed for on-road use only. It is not intended for off-road driving or use in other severe
conditions suited for a four-wheel drive vehicle. Be sure you are familiar with all vehicle controls, particularly those used for braking, steering, transmission, and
transfer case shifting. Always observe federal, state, provincial and local laws wherever you drive. As with other vehicles of this type, failure to operate this vehicle
correctly may result in loss of control or a collision Úpage 199.
Please take the time to read all of these publications carefully before driving your vehicle for the first time. Following the instructions, recommendations, tips,
and important warnings in this manual will help ensure safe and enjoyable operation of your vehicle.
This Owner's Manual describes all versions of this vehicle. Options and equipment dedicated to specific markets or versions are not expressly indicated in the
text. Therefore, you should only consider the information that is related to the trim level, engine, and version that you have purchased. Any content introduced
throughout the Owner's Information, which may or may not be applicable to your vehicle, will be identified with the wording “If Equipped”. All data contained in
this publication are intended to help you use your vehicle in the best possible way. FCA US LLC aims at a constant improvement of the vehicles produced. For
this reason, it reserves the right to make changes to the model described for technical and/or commercial reasons. For further information, contact an authorized
dealer.
When it comes to service, remember that authorized dealers know your Jeep® best, have factory-trained technicians, genuine Mopar® parts, and care about
your satisfaction.
23_WL_OM_EN_USC_t.book Page 10
Page 63 of 424
GETTING TO KNOW YOUR VEHICLE61
LIGHTS-ON REMINDER
If the headlights or parking lights are left on after
the ignition is placed in the OFF position, a chime
will sound when the driver’s door is opened.
FOG LIGHTS — IF EQUIPPED
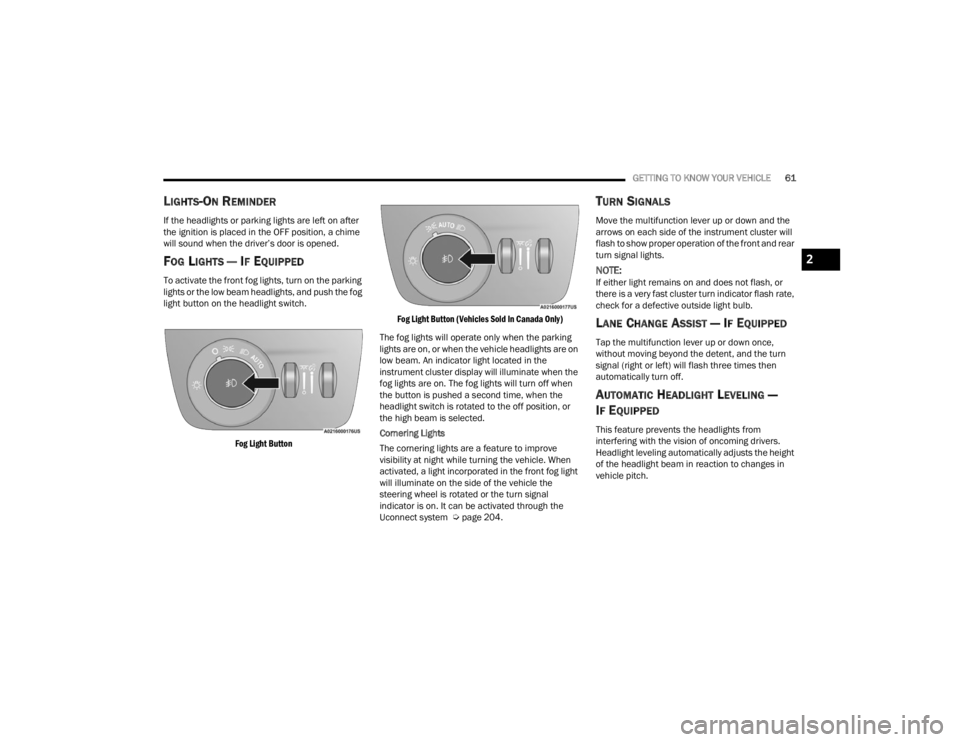
To activate the front fog lights, turn on the parking
lights or the low beam headlights, and push the fog
light button on the headlight switch.
Fog Light Button Fog Light Button (Vehicles Sold In Canada Only)
The fog lights will operate only when the parking
lights are on, or when the vehicle headlights are on
low beam. An indicator light located in the
instrument cluster display will illuminate when the
fog lights are on. The fog lights will turn off when
the button is pushed a second time, when the
headlight switch is rotated to the off position, or
the high beam is selected.
Cornering Lights
The cornering lights are a feature to improve
visibility at night while turning the vehicle. When
activated, a light incorporated in the front fog light
will illuminate on the side of the vehicle the
steering wheel is rotated or the turn signal
indicator is on. It can be activated through the
Uconnect system Ú page 204.
TURN SIGNALS
Move the multifunction lever up or down and the
arrows on each side of the instrument cluster will
flash to show proper operation of the front and rear
turn signal lights.
NOTE:If either light remains on and does not flash, or
there is a very fast cluster turn indicator flash rate,
check for a defective outside light bulb.
LANE CHANGE ASSIST — IF EQUIPPED
Tap the multifunction lever up or down once,
without moving beyond the detent, and the turn
signal (right or left) will flash three times then
automatically turn off.
AUTOMATIC HEADLIGHT LEVELING —
I
F EQUIPPED
This feature prevents the headlights from
interfering with the vision of oncoming drivers.
Headlight leveling automatically adjusts the height
of the headlight beam in reaction to changes in
vehicle pitch.
2
23_WL_OM_EN_USC_t.book Page 61
Page 97 of 424
95
GETTING TO KNOW YOUR INSTRUMENT PANEL
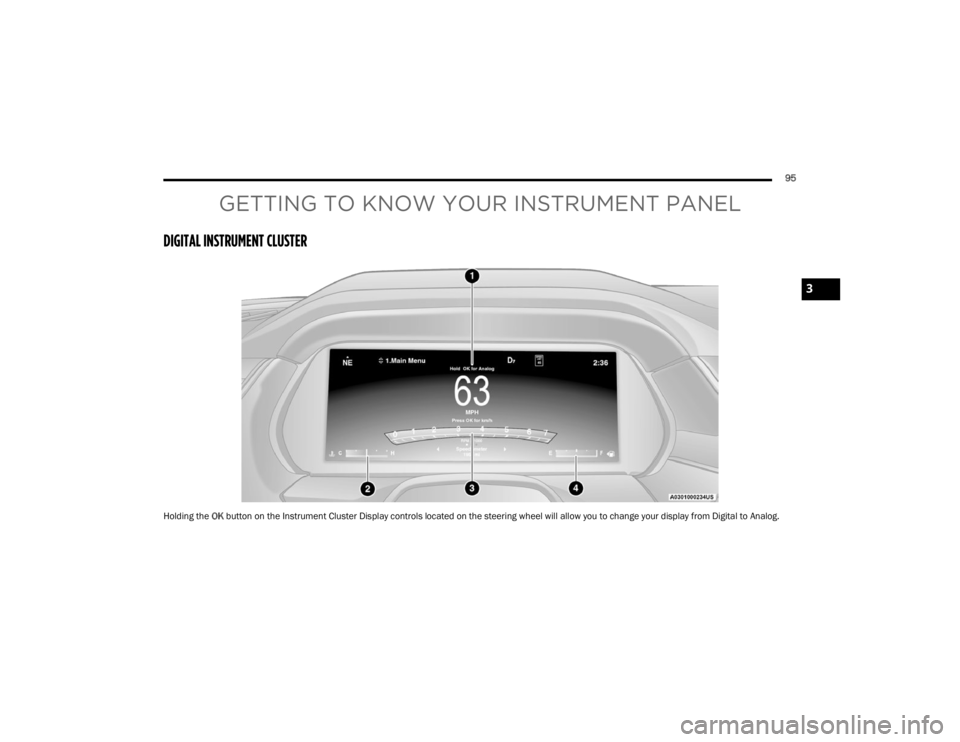
DIGITAL INSTRUMENT CLUSTER
Holding the OK button on the Instrument Cluster Display controls located on the steering wheel will allow you to change your display from Digital to Analog.
3
23_WL_OM_EN_USC_t.book Page 95
Page 99 of 424
GETTING TO KNOW YOUR INSTRUMENT PANEL97
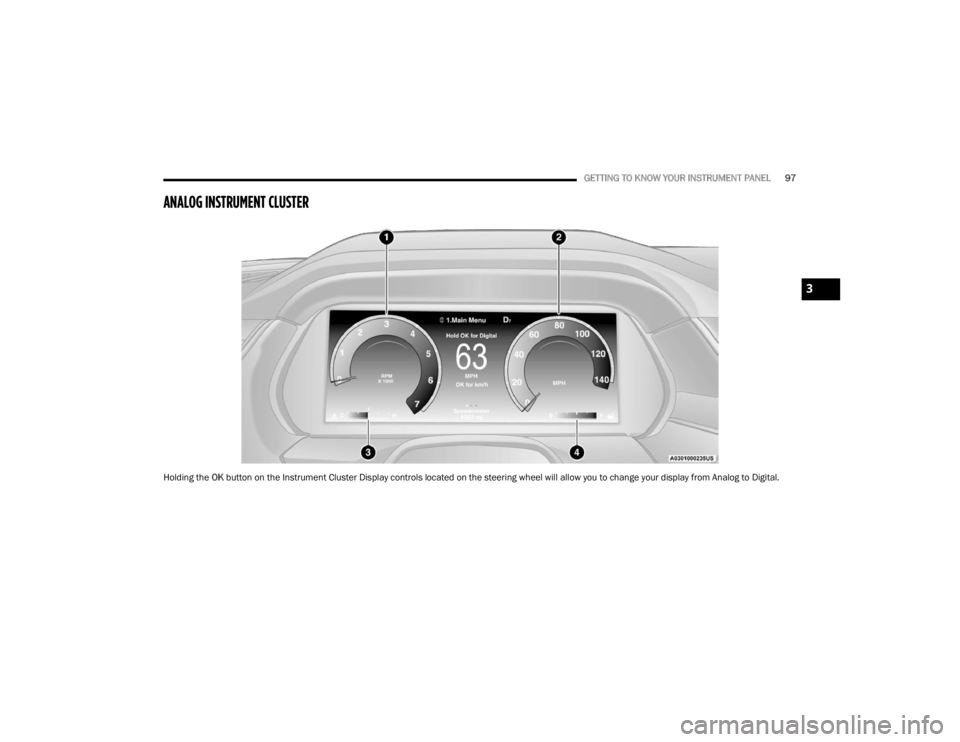
ANALOG INSTRUMENT CLUSTER
Holding the OK button on the Instrument Cluster Display controls located on the steering wheel will allow you to change your display from Analog to Digital.
3
23_WL_OM_EN_USC_t.book Page 97
Page 101 of 424
GETTING TO KNOW YOUR INSTRUMENT PANEL99
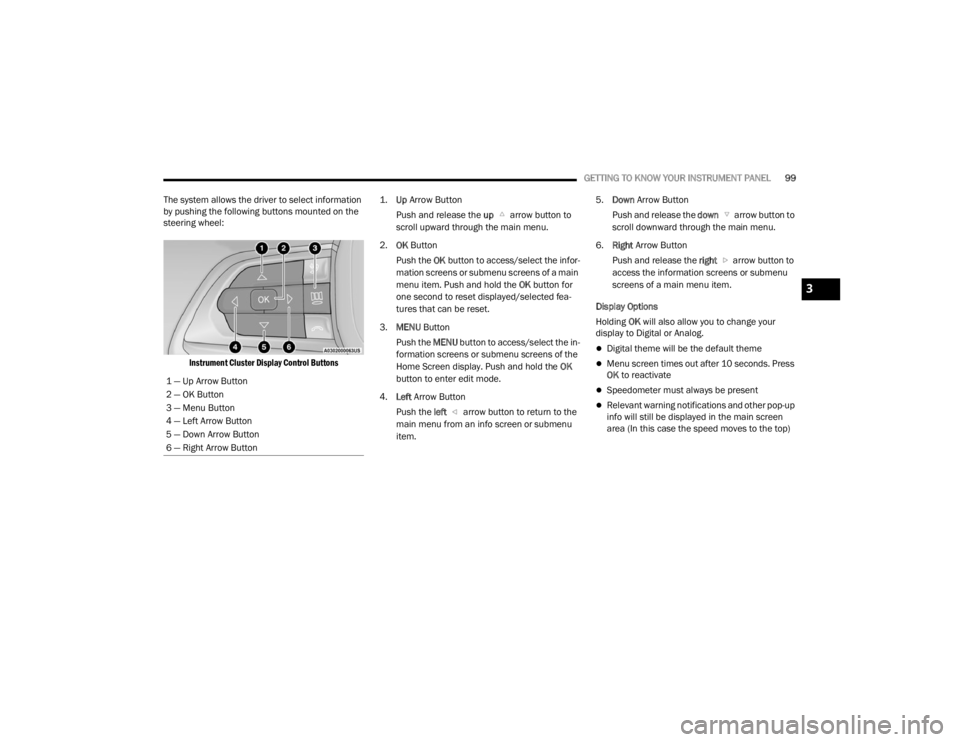
The system allows the driver to select information
by pushing the following buttons mounted on the
steering wheel:
Instrument Cluster Display Control Buttons
1.
Up
Arrow Button
Push and release the up arrow button to
scroll upward through the main menu.
2. OK Button
Push the OK button to access/select the infor -
mation screens or submenu screens of a main
menu item. Push and hold the OK button for
one second to reset displayed/selected fea -
tures that can be reset.
3. MENU Button
Push the MENU button to access/select the in -
formation screens or submenu screens of the
Home Screen display. Push and hold the OK
button to enter edit mode.
4. Left Arrow Button
Push the left arrow button to return to the
main menu from an info screen or submenu
item. 5.
Down Arrow Button
Push and release the down arrow button to
scroll downward through the main menu.
6. Right Arrow Button
Push and release the right arrow button to
access the information screens or submenu
screens of a main menu item.
Display Options
Holding OK will also allow you to change your
display to Digital or Analog.
Digital theme will be the default theme
Menu screen times out after 10 seconds. Press
OK to reactivate
Speedometer must always be present
Relevant warning notifications and other pop-up
info will still be displayed in the main screen
area (In this case the speed moves to the top)
1 — Up Arrow Button
2 — OK Button
3 — Menu Button
4 — Left Arrow Button
5 — Down Arrow Button
6 — Right Arrow Button
3
23_WL_OM_EN_USC_t.book Page 99
Page 103 of 424
GETTING TO KNOW YOUR INSTRUMENT PANEL101
Vehicles Equipped With Keyless Enter ‘n Go™
Ignition
Use the steering wheel instrument cluster display
controls for the following procedure(s):
1. Without pressing the brake pedal, push the ENGINE START/STOP button and place the
ignition in the ON/RUN position (do not start
the engine).
2. Push and release the down arrow button to
scroll downward through the main menu to
“Vehicle Info”.
3. Push and release the right arrow button to access the “Oil Life” screen.
4. Push and hold the OK button to reset oil life. If
conditions are met, the gauge and numeric
display will update to show 100%. If conditions
are not met a pop-up message of “To reset oil
life engine must be off with ignition in run” will
be displayed (for five seconds), and the user
will remain at the Oil Life screen.
5. Push and release the up or down arrow
button to exit the submenu screen.
NOTE:If the indicator message illuminates when you start
the vehicle, the oil change indicator system did not
reset. If necessary, repeat this procedure. Secondary Method Of Resetting Engine Oil Life
1. Without pressing the brake pedal, push the
ENGINE START/STOP button and place the
ignition to the ON/RUN position (do not start
the engine).
2. Fully press the accelerator pedal, slowly, three times within 10 seconds.
3. Without pushing the brake pedal, push the ENGINE START/STOP button once to return the
ignition to the OFF position.
NOTE:If the indicator message illuminates when you start
the vehicle, the oil change indicator system did not
reset. If necessary, repeat this procedure.
DISPLAY AND MESSAGES
The instrument cluster display is located in the
center portion of the cluster and consist of multiple
sections:
Main Screen — The inner ring of the display will
illuminate in black under normal conditions,
yellow for non critical warnings and red for crit -
ical warnings
Submenu Dots — Whenever there are
submenus available, the position within the
submenus is shown here
Reconfigurable Telltales/Information
Gear Selector Status (PRND)
Driver Interactive Display (Compass, Temp,
Range to Empty, Trip A, Trip B, Average Fuel
Economy, Current Fuel Economy and Time)
Air Suspension Status — If Equipped
Four-Wheel Drive (4WD) Status — If Equipped
The instrument cluster display will normally display
the main menu or the screens of a selected feature
of the main menu. The main display area also
displays pop-up messages and warning or
information messages. These pop-up messages
fall into several categories:
Five Second Stored Messages
When the appropriate conditions occur, this
type of message takes control of the main
display area for five seconds and then returns to
the previous screen. Most of the messages of
this type are then stored (as long as the condi-
tion that activated it remains active) and can be
reviewed from the “Messages” main menu item.
Examples of this message type are “Right Front
Turn Signal Lamp Out” and “Low Tire Pressure”.
Unstored Messages
This message type is displayed indefinitely or
until the condition that activated the message is
cleared. Examples of this message type are
“Turn Signal On” (if a turn signal is left on) and
“Lights On” (if driver leaves the vehicle with the
lights on).
3
23_WL_OM_EN_USC_t.book Page 101
Page 110 of 424
108GETTING TO KNOW YOUR INSTRUMENT PANEL
WARNING LIGHTS AND MESSAGES
The warning/indicator lights will illuminate in the
instrument panel together with a dedicated
message and/or acoustic signal when applicable.
These indications are indicative and precautionary
and as such must not be considered as exhaustive
and/or alternative to the information contained in
the Owner’s Manual, which you are advised to read
carefully in all cases. Always refer to the
information in this chapter in the event of a failure
indication. All active telltales will display first if
applicable. The system check menu may appear
different based upon equipment options and
current vehicle status. Some telltales are optional
and may not appear.
RED WARNING LIGHTS
Active Driving Assist - Driver
Inattentiveness Warning Light
This light illuminates when driver
inattentiveness has been continually
detected, warning the driver to place
their hands on the steering wheel.
Air Bag Warning Light
This warning light will illuminate to
indicate a fault with the air bag, and will
turn on for four to eight seconds as a bulb
check when the ignition is placed in the
ON/RUN position. This light will illuminate with a single chime when a fault with the air bag has been
detected, it will stay on until the fault is cleared. If
the light is either not on during startup, stays on, or
turns on while driving, have the system inspected
at an authorized dealer as soon as possible.
Brake Warning Light
This warning light monitors various brake
functions, including brake fluid level and
parking brake application. If the brake
light turns on it may indicate that the
parking brake is applied, that the brake fluid level
is low, or that there is a problem with the Anti-Lock
Brake System reservoir.
If the light remains on when the parking brake has
been disengaged, and the fluid level is at the full
mark on the master cylinder reservoir, it indicates
a possible brake hydraulic system malfunction or
that a problem with the Brake Booster has been
detected by the Anti-Lock Brake System (ABS) /
Electronic Stability Control (ESC) system. In this
case, the light will remain on until the condition has
been corrected. If the problem is related to the
brake booster, the ABS pump will run when
applying the brake, and a brake pedal pulsation
may be felt during each stop.
The dual brake system provides a reserve braking
capacity in the event of a failure to a portion of the
hydraulic system. A leak in either half of the dual
brake system is indicated by the Brake Warning
Light, which will turn on when the brake fluid level in the master cylinder has dropped below a
specified level.
The light will remain on until the cause is corrected.
NOTE:The light may flash momentarily during sharp
cornering maneuvers, which change fluid level
conditions. The vehicle should have service
performed, and the brake fluid level checked.
If brake failure is indicated, immediate repair is
necessary.
Vehicles equipped with the Anti-Lock Brake System
(ABS) are also equipped with Electronic Brake
Force Distribution (EBD). In the event of an EBD
failure, the Brake Warning Light will turn on along
with the ABS Light. Immediate repair to the ABS
system is required.
Operation of the Brake Warning Light can be
checked by turning the ignition switch from the OFF
position to the ON/RUN position. The light should
illuminate for approximately two seconds. The light
should then turn off unless the parking brake is
WARNING!
Driving a vehicle with the red brake light on is
dangerous. Part of the brake system may have
failed. It will take longer to stop the vehicle. You
could have a collision. Have the vehicle checked
immediately.
23_WL_OM_EN_USC_t.book Page 108
Page 137 of 424
STARTING AND OPERATING135
Selec-Terrain
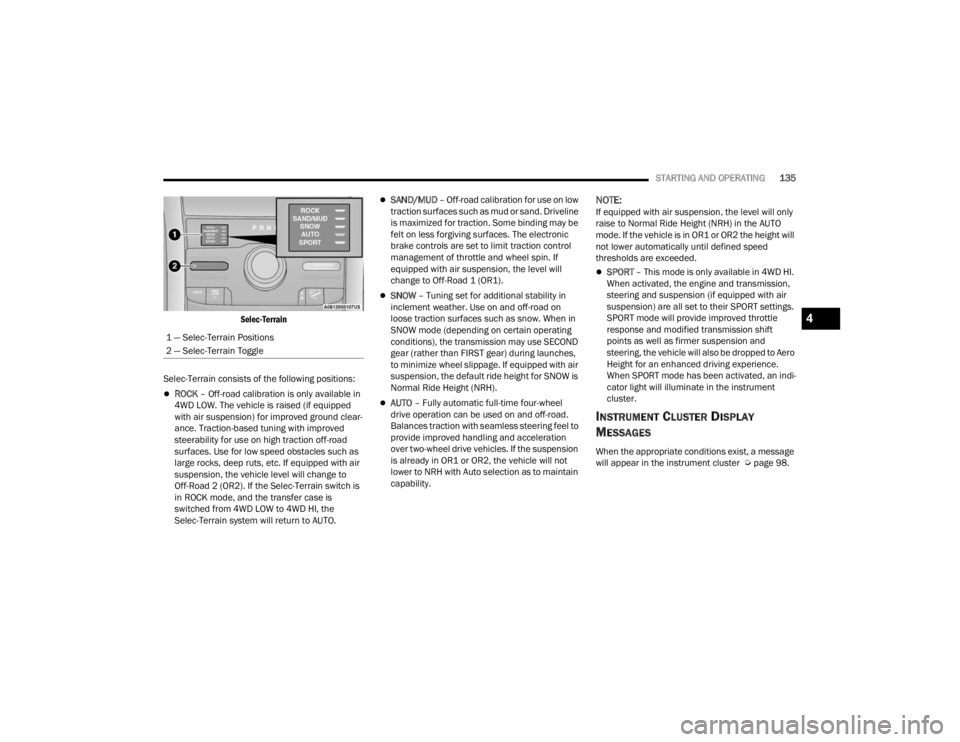
Selec-Terrain consists of the following positions:
ROCK – Off-road calibration is only available in
4WD LOW. The vehicle is raised (if equipped
with air suspension) for improved ground clear -
ance. Traction-based tuning with improved
steerability for use on high traction off-road
surfaces. Use for low speed obstacles such as
large rocks, deep ruts, etc. If equipped with air
suspension, the vehicle level will change to
Off-Road 2 (OR2). If the Selec-Terrain switch is
in ROCK mode, and the transfer case is
switched from 4WD LOW to 4WD HI, the
Selec-Terrain system will return to AUTO.
SAND/MUD – Off-road calibration for use on low
traction surfaces such as mud or sand. Driveline
is maximized for traction. Some binding may be
felt on less forgiving surfaces. The electronic
brake controls are set to limit traction control
management of throttle and wheel spin. If
equipped with air suspension, the level will
change to Off-Road 1 (OR1).
SNOW – Tuning set for additional stability in
inclement weather. Use on and off-road on
loose traction surfaces such as snow. When in
SNOW mode (depending on certain operating
conditions), the transmission may use SECOND
gear (rather than FIRST gear) during launches,
to minimize wheel slippage. If equipped with air
suspension, the default ride height for SNOW is
Normal Ride Height (NRH).
AUTO – Fully automatic full-time four-wheel
drive operation can be used on and off-road.
Balances traction with seamless steering feel to
provide improved handling and acceleration
over two-wheel drive vehicles. If the suspension
is already in OR1 or OR2, the vehicle will not
lower to NRH with Auto selection as to maintain
capability.
NOTE:If equipped with air suspension, the level will only
raise to Normal Ride Height (NRH) in the AUTO
mode. If the vehicle is in OR1 or OR2 the height will
not lower automatically until defined speed
thresholds are exceeded.
SPORT – This mode is only available in 4WD HI.
When activated, the engine and transmission,
steering and suspension (if equipped with air
suspension) are all set to their SPORT settings.
SPORT mode will provide improved throttle
response and modified transmission shift
points as well as firmer suspension and
steering, the vehicle will also be dropped to Aero
Height for an enhanced driving experience.
When SPORT mode has been activated, an indi -
cator light will illuminate in the instrument
cluster.
INSTRUMENT CLUSTER DISPLAY
M
ESSAGES
When the appropriate conditions exist, a message
will appear in the instrument cluster Ú page 98.
1 — Selec-Terrain Positions
2 — Selec-Terrain Toggle
4
23_WL_OM_EN_USC_t.book Page 135
Page 141 of 424
STARTING AND OPERATING139
pushed multiple times. Each toggle down will lower
the requested level by one position down to a
minimum of Entry/Exit Height or the lowest
position allowed based on current conditions (i.e.
vehicle speed, etc.)
Automatic height changes will occur based on
vehicle speed and the current vehicle height. The
indicator lamps and instrument cluster display
messages will operate the same for automatic
changes and user requested changes.
Off-Road 2 (OR2) Ride Height – Indicator lamps
1 through 5 will be illuminated.
Off-Road 1 (OR1) Ride Height – Indicator lamps
2 through 5 will be illuminated.
Normal Ride Height (NRH) – Indicator lamps 3
through 5 will be illuminated.
Aero Ride Height– Indicator lamps 4 and 5 will
be illuminated.
Entry/Exit Ride Height– Indicator lamp 5 will be
illuminated.
Transport Mode – Indicator lamp 5 will be illumi -
nated. Driving above 3 mph (5 km/h) or dese -
lecting setting in the radio will disable Transport
Mode.
Tire/Jack Mode – Indicator lamps 3 through
5 will be illuminated. Driving above 5 mph
(8 km/h) or deselecting setting in the radio will
disable Tire/Jack Mode.
Wheel Alignment Mode – Indicator lamps 3
through 5 will be illuminated. Driving above
5 mph (8 km/h) or deselecting setting in the
radio will disable Wheel Alignment Mode.
FUEL SAVER TECHNOLOGY 5.7L ONLY —
IF EQUIPPED
This feature offers improved fuel economy by
shutting off four of the engine's eight cylinders
during light load and cruise conditions. The system
is automatic with no driver inputs or additional
driving skills required.
NOTE:This system may take some time to return to full
functionality after a battery disconnect.
POWER STEERING
The electric power steering system provides
enhanced vehicle response and increased ease of
maneuverability in tight spaces. The power
steering system adapts to different driving
conditions. If the electric power steering system
experiences a fault that prevents it from providing
assistance, you will still have the ability to steer the
vehicle manually.
NOTE:Alternate electric power steering efforts (Normal,
Comfort and Sport) can be selected through the
Uconnect System Ú page 204. If SPORT mode is
selected, steering efforts are optimized for sporty
driving.
If the Electric Power Steering warning
icon is displayed and the “Service Power
Steering” or the “Power Steering Assist
Off – Service System” message is
displayed within the instrument cluster display,
this indicates the vehicle needs to be taken to the
dealer for service Ú page 108.
NOTE:
Even if the power steering assistance is no
longer operational, it is still possible to steer the
vehicle. Under these conditions there will be a
substantial increase in steering effort, espe -
cially at low speeds and during parking maneu -
vers.
If the condition persists, see an authorized
dealer for service.
WARNING!
Continued operation with reduced assist could
pose a safety risk to yourself and others. Service
should be obtained as soon as possible.
4
23_WL_OM_EN_USC_t.book Page 139