fuel type JEEP GRAND CHEROKEE LIMITED 2019 Owners Manual
[x] Cancel search | Manufacturer: JEEP, Model Year: 2019, Model line: GRAND CHEROKEE LIMITED, Model: JEEP GRAND CHEROKEE LIMITED 2019Pages: 626, PDF Size: 3.77 MB
Page 260 of 626

WARNING!
•Never pour fuel or other flammable liquid into the
throttle body air inlet opening in an attempt to start
the vehicle. This could result in flash fire causing
serious personal injury.
• Do not attempt to push or tow your vehicle to get it
started. Vehicles equipped with an automatic trans-
mission cannot be started this way. Unburned fuel
could enter the catalytic converter and once the
engine has started, ignite and damage the converter
and vehicle.
• If the vehicle has a discharged battery, booster cables
may be used to obtain a start from a booster battery
or the battery in another vehicle. This type of start
can be dangerous if done improperly. Refer to “Jump
Starting Procedure” in “In Case Of Emergency” for
further information.
CAUTION!
To prevent damage to the starter, do not continuously
crank the engine for more than 25 seconds at a time.
Wait 60 seconds before trying again.
Cold Weather Operation (Below –22°F Or 30°C)
To ensure reliable starting at these temperatures, use of an
externally powered electric engine block heater (available
from your authorized dealer) is recommended.
After Starting
The idle speed is controlled automatically, and it will
decrease as the engine warms up.
ENGINE BLOCK HEATER — IF EQUIPPED
The engine block heater warms the engine, and permits
quicker starts in cold weather. Connect the cord to a
standard 110-115 Volt AC electrical outlet with a grounded,
three-wire extension cord.
The engine block heater must be plugged in at least one
hour to have an adequate warming effect on the engine.
The engine block heater cord is located:
• 3.6L Engine — Coiled and strapped to the engine oil
dipstick tube.
• 5.7L Engine — Bundled and fastened to the injector
harness.
258 STARTING AND OPERATING
Page 416 of 626
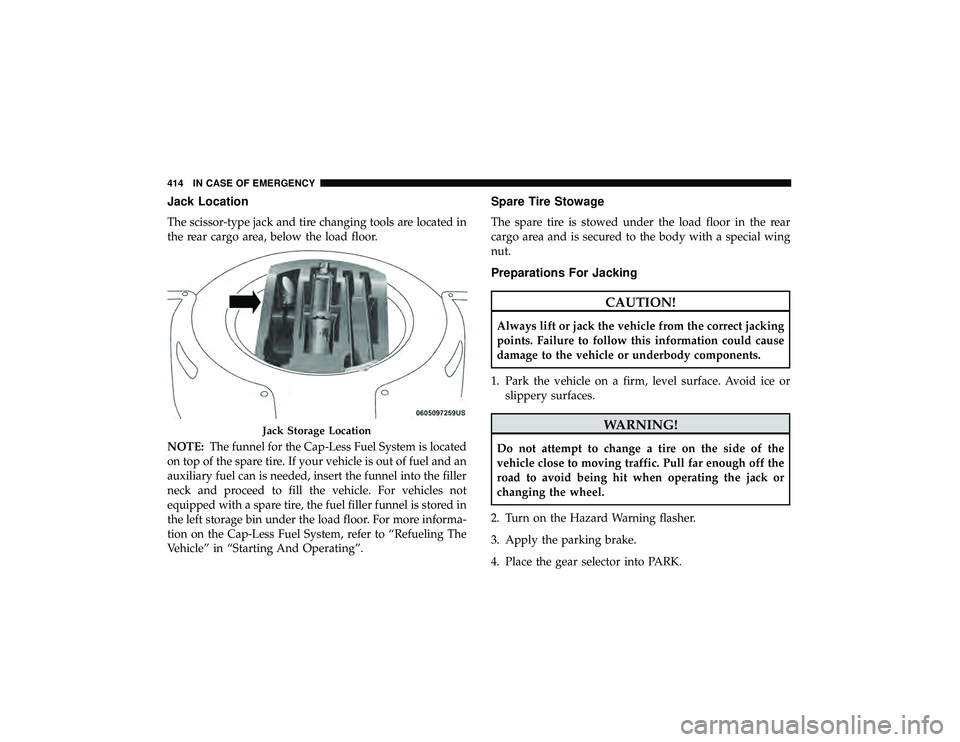
Jack Location
The scissor-type jack and tire changing tools are located in
the rear cargo area, below the load floor.
NOTE:The funnel for the Cap-Less Fuel System is located
on top of the spare tire. If your vehicle is out of fuel and an
auxiliary fuel can is needed, insert the funnel into the filler
neck and proceed to fill the vehicle. For vehicles not
equipped with a spare tire, the fuel filler funnel is stored in
the left storage bin under the load floor. For more informa-
tion on the Cap-Less Fuel System, refer to “Refueling The
Vehicle” in “Starting And Operating”.
Spare Tire Stowage
The spare tire is stowed under the load floor in the rear
cargo area and is secured to the body with a special wing
nut.
Preparations For Jacking
Page 439 of 626
SCHEDULED SERVICING
Scheduled Servicing — Gasoline Engine
Your vehicle is equipped with an automatic oil change
indicator system. The oil change indicator system will
remind you that it is time to take your vehicle in for
scheduled maintenance.
Based on engine operation conditions, the oil change
indicator message will illuminate. This means that service
is required for your vehicle. Operating conditions such as
frequent short-trips, trailer tow, extremely hot or cold
ambient temperatures, and E85 fuel usage will influence
when the “Oil Change Required” message is displayed.
Severe operating conditions can cause the change oil
message to illuminate as early as 3,500 miles (5,600 km)
since last reset. Have your vehicle serviced as soon as
possible, within the next 500 miles (805 km).
Your authorized dealer will reset the oil change indicator
message after completing the scheduled oil change.
NOTE:Under no circumstances should oil change inter-
vals exceed 10,000 miles (16,000 km), twelve months or 350
hours of engine run time, whichever comes first. The 350
hours of engine run or idle time is generally only a concern
for fleet customers. Severe Duty All Models
Change Engine Oil at 4,000 miles (6,500 km) or 350 hours of
engine run time if the vehicle is operated in a dusty and
off-road environment, or is operated predominantly at idle
or only very low engine RPM’s. This type of vehicle use is
considered Severe Duty.
Once A Month Or Before A Long Trip:
•
Check engine oil level.
• Check windshield washer fluid level.
• Check the tire inflation pressures and look for unusual
wear or damage.
• Check the fluid levels of the coolant reservoir, brake
master cylinder and fill as needed.
• Check function of all interior and exterior lights
Maintenance Plan
Required Maintenance
Refer to the Maintenance Plans on the following pages for
required maintenance.
8
SERVICING AND MAINTENANCE 437
Page 480 of 626
WARNING!(Continued)
•Overinflated or underinflated tires can affect vehicle
handling and can fail suddenly, resulting in loss of
vehicle control.
• Unequal tire pressures can cause steering problems.
You could lose control of your vehicle.
• Unequal tire pressures from one side of the vehicle
to the other can cause the vehicle to drift to the right
or left.
• Always drive with each tire inflated to the recom-
mended cold tire inflation pressure.
Both under-inflation and over-inflation affect the stability
of the vehicle and can produce a feeling of sluggish
response or over responsiveness in the steering.
NOTE:
• Unequal tire pressures from side to side may cause
erratic and unpredictable steering response.
• Unequal tire pressure from side to side may cause the
vehicle to drift left or right.
Fuel Economy
Underinflated tires will increase tire rolling resistance
resulting in higher fuel consumption. Tread Wear
Improper cold tire inflation pressures can cause abnormal
wear patterns and reduced tread life, resulting in the need
for earlier tire replacement.
Ride Comfort And Vehicle Stability
Proper tire inflation contributes to a comfortable ride.
Over-inflation produces a jarring and uncomfortable ride.
Tire Inflation Pressures
The proper cold tire inflation pressure is listed on the
driver’s side B-Pillar or rear edge of the driver’s side door.
At least once a month:
•
Check and adjust tire pressure with a good quality
pocket-type pressure gauge. Do not make a visual
judgement when determining proper inflation. Tires
may look properly inflated even when they are under-
inflated.
• Inspect tires for signs of tire wear or visible damage.
478 SERVICING AND MAINTENANCE
Page 611 of 626
Automatic Dimming Mirror....................66
Automatic Door Locks .....................41, 42
Automatic Headlights ........................74
Automatic High Beams .......................73
Automatic Temperature Control (ATC) ............93
Automatic Transmission ..................253, 264
Adding Fluid .......................... .469
Fluid And Filter Change ...................469
Fluid Change .......................... .469
Fluid Level Check .....................468, 469
Fluid Type ......................... .468, 508
Gear Ranges ........................... .266
Special Additives ........................ .468
Automatic Transmission Limp Home Mode ........270
Auto Up Power Windows .....................97
Auxiliary Driving Systems ....................181
Auxiliary Electrical Outlet (Power Outlet) .........125
Auxiliary Power Outlet ..................... .125
Axle Fluid .............................. .508
Battery .............................. .150, 445
Charging System Light ................... .150
Keyless Key Fob Replacement ................22
Battery Saver Feature .........................76
Belts, Seat ............................... .246Blind Spot Monitoring
.......................181
Body Mechanism Lubrication ..................455
B-Pillar Location .......................... .476
Brake Assist System ........................ .168
Brake Control System, Electronic ................167
Brake Fluid .......................... .467, 508
Brake System ......................... .467, 499
Anti-Lock (ABS) ........................ .499
Fluid Check ........................... .467
Master Cylinder ........................ .467
Parking .............................. .260
Warning Light .......................... .149
Brake/Transmission Interlock ..................263
Br eak-In
Recommendations, New Vehicle ..........259
Bulb Replacement ......................... .398
Bulbs, Light ............................. .248
Camera, Rear ............................ .357
Capacities, Fluid .......................... .505
Caps, Filler Fuel ................................. .424
Oil (Engine) ........................ .442, 447
Radiator (Coolant Pressure) .................465
Carbon Monoxide Warning ................245, 504
Cargo Area Cover .......................111,112
12
INDEX 609